Bolens 11A-108N565 Manuale del proprietario
- Categoria
- Tosa erba
- Tipo
- Manuale del proprietario

Owner’s Man ual
¨SET-UP ¨OP ER A TION ¨MAIN TE NANCE
PRINTED IN U.S.A. 772C0757
IM POR TANT: Read
Safety Rules and
In struc tions Care fully.

2
CALLING CUS TOMER SUP PORT
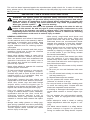
• LO CATE YOUR MODEL NUMBER AND SE RIAL NUMBER which ap pears on your unit and
re cord the in for ma tion in the space pro vided be low.
IM POR TANT: You must have these num bers, along with the date and proof of
pur chase to re ceive war ranty or ser vice.
• If you are hav ing dif fi culty as sem bling this prod uct or if you have any ques tions re gard ing the
con trols, op er a tion or main te nance of this unit, please call the Cus tomer Sup port De part ment.
• Cus tomer Sup port can be reached by di al ing: 1-800-668-1238
• Please have your model num ber and se rial num ber ready when you call.
NOTE: Al though both num bers are im por tant, you will be asked to en ter only your
se rial num ber be fore your call can be pro cessed.
TA BLE OF CON TENTS
CALLING CUS TOMER SUP PORT .............................................2
TA BLE OF CON TENTS .....................................................2
IM POR TANT SAFE OP ER A TION PRAC TICES ....................................3
SLOPE GAUGE...........................................................6
SET-UP IN STRUC TIONS ....................................................7
OP ER A TION .............................................................8
AD JUST MENTS ..........................................................9
LU BRI CA TION...........................................................10
MAIN TE NANCE..........................................................10
OFF SEA SON STOR AGE IN STRUC TIONS......................................11
WAR RANTY: ............................................................14
For more de tails about your unit, visit our website at www.mtdcanada.com
This is where your model num ber will be,
re cord model num ber here:
This is where your se rial num ber will be,
re cord serial num ber here:
MTD PRODUCTS LIMITED
KITCHENER, ON N2G 4J1
1-800-668-1238
XXXXXXXXXX
XXXXXXXXXXX
Model Number
Numéro de modèle
Serial Number
Numéro de série
www.mtdcanada.com

GEN ERAL OP ER A TION
• Read, un der stand, and fol low all in struc tions
on the ma chine and in the man ual(s) be fore
at tempt ing to as sem ble and op er ate. Keep
this man ual in a safe place for fu ture and
reg u lar ref er ence and for or der ing re place -
ment parts.
• Be fa mil iar with all con trols and their proper
op er a tion. Know how to stop the ma chine
and dis en gage them quickly.
• Never al low chil dren un der 14 years old to
op er ate this ma chine. Children 14 years old
and over should read and un der stand the
op er a tion in struc tions and safety rules in
this man ual and should be trained and su -
per vised by a par ent.
• Never al low adults to op er ate this ma chine
with out proper in struc tion.
• To help avoid blade con tact or a thrown ob -
ject in jury, keep by stand ers, help ers,
chil dren and pets at least 75 feet from the
ma chine while it is in op er a tion. Stop ma -
chine if any one en ters the area.
• Thor oughly in spect the area where the
equip ment is to be used. Re move all stones,
sticks, wire, bones, toys and other for eign
ob jects which could be trip ped over or
picked up and thrown by the blade. Thrown
ob jects can cause se ri ous per sonal in jury.
• Plan your mow ing pat tern to avoid dis -
charge of ma te rial to ward roads, side walks,
by stand ers and the like. Also, avoid dis -
charg ing ma te rial against a wall or
ob struc tion which may cause dis charged
ma te rial to ric o chet back to ward the op er a -
tor.
• Al ways wear safety glasses or safety gog -
gles dur ing op er a tion and while per form ing
an ad just ment or re pair to pro tect your eyes.
Thrown ob jects which ric o chet can cause
se ri ous in jury to the eyes.
• Wear sturdy, rough-soled work shoes and
close-fit ting slacks and shirts. Shirts and
pants that cover the arms and legs and
steel-toed shoes are rec om mended. Never
op er ate this ma chine in bare feet, san dals,
slip pery or light weight (e.g. can vas) shoes.
• Many in ju ries oc cur as a re sult of the mower
be ing pulled over the foot dur ing a fall
caused by slip ping or trip ping. Do not hold
on to the mower if you are fall ing; re lease
the han dle im me di ately.
• Never pull the mower back to ward you while
you are walk ing. If you must back the
mower away from a wall or ob struc tion first
look down and be hind to avoid trip ping and
then fol low these steps:
a) Step back from the mower to fully ex tend
your arms.
b) Be sure you are well bal anced with sure
foot ing.
c) Pull the mower back slowly, no more than
half way to ward you.
d) Re peat these steps as needed.
• Do not op er ate the mower while un der the
in flu ence of al co hol or drugs.
• Do not put hands or feet near ro tat ing parts
or un der the cut ting deck. Con tact with the
blade can am pu tate hands and feet.
• A miss ing or dam aged dis charge cover can
cause blade con tact or thrown ob ject in ju -
ries.
• Do not en gage the self-pro pelled mech a -
nism on units so equipped while start ing
en gine.
• Never at tempt to make a wheel or cut ting
height ad just ment while the en gine is run -
ning.
• The blade con trol han dle is a safety de vice.
Never at tempt to by pass its op er a tion.
Doing so makes the safety de vice in op er a -
3
This unit has been in spected against the man u fac tur ers qual ity check list. In case of a dis crep -
ancy, please call us. We will make ev ery ef fort to ship the part(s) by cou rier within one work ing
day of your call.
IM POR TANT SAFE OP ER A TION PRAC TICES
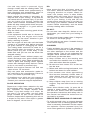
WARNING: This sym bol points out im por tant safety in struc tions which, if not fol -
lowed, could en dan ger the per sonal safety and/or prop erty of your self and oth ers.
Read and fol low all in struc tions in this man ual be fore at tempt ing to op er ate this
ma chine. Fail ure to com ply with these in struc tions may re sult in per sonal in jury.
When you see this sym bol— heed its warn ing.
DANGER: This ma chine was built to be op er ated ac cord ing to the rules for safe op -
er a tion in this man ual. As with any type of power equip ment, care less ness or er ror
on the part of the op er a tor can re sult in se ri ous in jury. This ma chine is ca pa ble of
am pu tat ing hands and feet and throw ing ob jects. Fail ure to ob serve the fol low ing
safety in struc tions could re sult in se ri ous in jury or death.

tive and may re sult in per sonal in jury
through con tact with the ro tat ing blade. The
blade con trol han dle must op er ate eas ily in
both di rec tions and au to mat i cally re turn to
the dis en gaged po si tion when re leased.
• Never op er ate the mower in wet grass. Al -
ways be sure of your foot ing. A slip and fall
can cause se ri ous per sonal in jury. If you feel
you are los ing your foot ing, re lease the
blade con trol han dle im me di ately and the
blade will stop ro tat ing within three sec onds.
• Mow only in day light or in good ar ti fi cial
light. Walk, never run.
• Stop the blade when cross ing gravel drives,
walks or roads.
• If the equip ment should start to vi brate ab -
nor mally, stop the en gine and check
im me di ately for the cause. Vi bra tion is gen -
er ally a warn ing of trou ble.
• Shut the en gine off and wait un til the blade
co mes to a com plete stop be fore re mov ing
the grass catcher or un clog ging the chute.
The cut ting blade con tin ues to ro tate for a
few sec onds af ter the en gine is shut off.
Never place any part of the body in the
blade area un til you are sure the blade has
stopped ro tat ing.
• Never op er ate mower with out proper trail
shield, dis charge cover, grass catcher, blade
con trol han dle or other safety pro tec tive de -
vices in place and work ing. Never op er ate
mower with dam aged safety de vices. Fail ure
to do so, can re sult in per sonal in jury.
• Muf fler and en gine be come hot and can
cause a burn. Do not touch.
• Only use parts and ac ces so ries made for
this ma chine by the man u fac turer. Fail ure to
do so, can re sult in per sonal in jury.
• If sit u a tions oc cur which are not cov ered in
this man ual, use care and good judg ment.
Con tact your cus tomer sup port de part ment.
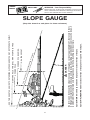
SLOPE OP ER A TION
Slopes are a ma jor fac tor re lated to slip and
fall ac ci dents which can re sult in se vere in -
jury. Op er a tion on slopes re quires ex tra
cau tion. If you feel un easy on a slope, do
not mow it. For your safety, use the slope
gauge in cluded as part of this man ual to
mea sure slopes be fore op er at ing this unit on
a sloped or hilly area. If the slope is greater
than 15 de grees, do not mow it.
DO:
• Mow across the face of slopes; never up
and down. Ex er cise ex treme cau tion when
chang ing di rec tion on slopes. Watch for
holes, ruts, bumps, rocks, or other hid den
ob jects which can cause you to slip or trip.
Tall grass can hide ob sta cles. Al ways be
sure of your foot ing. A slip and fall can
cause se ri ous per sonal in jury. If you feel you
are los ing your bal ance, re lease the blade
con trol han dle im me di ately, and the blade
will stop ro tat ing within 3 sec onds.
DO NOT:
• Do not mow near drop-offs, ditches or em -
bank ments, you could lose your foot ing or
bal ance.
• Do not mow slopes greater than 15 de grees
as shown on the slope gauge.
• Do not mow on wet grass. Un sta ble foot ing
could cause slip ping.
CHILDREN
• Tragic ac ci dents can oc cur if the op er a tor is
not alert to the pres ence of chil dren. Children
are of ten at tracted to the mower and the
mow ing ac tiv ity. They do not un der stand the
dan gers. Never as sume that chil dren will re -
main where you last saw them.
a) Keep chil dren out of the mow ing area
and un der the watch ful care of a re spon -
si ble adult other than the op er a tor.
b) Be alert and turn mower off if a child en -
ters the area.
c) Be fore and while mov ing back wards, look
be hind and down for small chil dren.
d) Use ex treme care when ap proach ing
blind cor ners, door ways, shrubs, trees, or
other ob jects that may ob scure your vi -
sion of a child who may run into the
mower.
e) Keep chil dren away from hot or run ning
en gines. They can suf fer burns from a hot
muf fler.
• Never al low chil dren un der 14 years old to
op er ate a power mower. Children 14 years
old and over should read and un der stand
the op er a tion in struc tions and safety rules in
this man ual and should be trained and su -
per vised by a par ent.
SER VICE SAFE HAN DLING OF GAS O LINE:
• To avoid per sonal in jury or prop erty dam age
use ex treme care in han dling gas o line. Gas -
o line is ex tremely flam ma ble and the va pors
are ex plo sive. Se ri ous per sonal in jury can
oc cur when gas o line is spilled on your self or
4

your clothes which can ig nite. Wash your
skin and change clothes im me di ately.
a) Use only an ap proved gas o line con tainer.
b) Never fill con tain ers in side a ve hi cle or on
a truck or trailer bed with a plas tic liner.
Al ways place con tain ers on the ground
away from your ve hi cle be fore fill ing.
c) When prac ti cal, re move gas-pow ered
equip ment from the truck or trailer and
re fuel it on the ground. If this is not pos si -
ble, then re fuel such equip ment on a
trailer with a por ta ble con tainer, rather
than from a gas o line dis penser noz zle.
d) Keep the noz zle in con tact with the rim of
the fuel tank or con tainer open ing at all
times un til fuel ing is com plete. Do not
use a noz zle lock-open de vice.
e) Ex tin guish all cig a rettes, ci gars, pipes
and other sources of ig ni tion.
f) Never fuel ma chine in doors.
g) Never re move gas cap or add fuel while
the en gine is hot or run ning. Al low en -
gine to cool at least two min utes be fore
re fu el ing.
h) Never over fill fuel tank. Fill tank to no
more than ½ inch be low bot tom of filler
neck to pro vide space for fuel ex pan sion.
i) Re place gas o line cap and tighten se -
curely.
j) If gas o line is spilled, wipe it off the en gine
and equip ment. Move unit to an other
area. Wait 5 min utes be fore start ing the
en gine.
k) Never store the ma chine or fuel con tainer
in side where there is an open flame,
spark or pi lot light as on a wa ter heater,
space heater, fur nace, clothes dryer or
other gas ap pli ances.
l) To re duce fire haz ard, keep ma chine free
of grass, leaves, or other de bris build-up.
Clean up oil or fuel spill age and re move
any fuel soaked de bris.
m) Al low ma chine to cool at least 5 min utes
be fore stor ing.
GEN ERAL SER VICE:
• Never run an en gine in doors or in a poorly
ven ti lated area. En gine ex haust con tains car -
bon mon ox ide, an odor less and deadly gas.
• Be fore clean ing, re pair ing, or in spect ing,
make cer tain the blade and all mov ing parts
have stopped. Dis con nect the spark plug
wire and ground against the en gine to pre -
vent un in tended start ing.
• Check the blade and en gine mount ing bolts
at fre quent in ter vals for proper tight ness.
Also, vi su ally in spect blade for dam age
(e.g., bent, cracked, worn) Re place blade
with the orig i nal equip ment man u fac turer’s
(O.E.M.) blade only, listed in this man ual.
“Use of parts which do not meet the orig i nal
equip ment spec i fi ca tions may lead to im -
proper per for mance and com pro mise
safety!”
• Mower blades are sharp and can cut. Wrap
the blade(s) or wear gloves, and use ex tra
cau tion when ser vic ing them.
• Keep all nuts, bolts, and screws tight to be
sure the equip ment is in safe work ing con di -
tion.
• Never tam per with safety de vices. Check
their proper op er a tion reg u larly.
• Af ter strik ing a for eign ob ject, stop the en -
gine, dis con nect the spark plug wire and
ground against the en gine. Thor oughly in -
spect the mower for any dam age. Re pair the
dam age be fore start ing and op er at ing the
mower.
• Grass catcher com po nents, dis charge cover,
and trail shield are sub ject to wear and
dam age which could ex pose mov ing parts
or al low ob jects to be thrown. For safety
pro tec tion, fre quently check com po nents
and re place im me di ately with orig i nal equip -
ment man u fac turer’s (O.E.M.) parts only,
listed in this man ual. “Use of parts which do
not meet the orig i nal equip ment spec i fi ca -
tions may lead to im proper per for mance
and com pro mise safety!”
• Do not change the en gine gov er nor set ting
or overspeed the en gine. The gov er nor con -
trols the max i mum safe op er at ing speed of
the en gine.
• Main tain or re place safety and in struc tion la -
bels, as nec es sary.
• Ob serve proper dis posal laws and reg u la -
tions. Im proper dis posal of flu ids and
ma te ri als can harm the en vi ron ment.
SI-102
7.23.03
5

6
51 º
.YLEFAS ET AR EPO TON YAM UOY EREHW SEPOLS ENI MRE TED OT EDIUG A SA TEEHS SIHT ESU
GNIDLIUB A FO RENROC A
51
A
GN
I
TN
E
S
E
R
PER
,E
N
IL
DE
TTO
D
NO
D
LOF
o
EP
OLS
TSOP ECNEF A RO
LOH DNA THGIS EERT LA CI TREV A HTIW LEVEL SIHT D
ELOP REWOP A
REGNAD
.)teef 01 yr eve teef ½2 yleta m ixor ppa fo esir a ( seer ged 51 fo sse cxe ni epols a htiw senil cni no wom ton oD
ti ,epols a hcus no rewom dni heb-klaw a gn it ar epo fI .yru jni su oi res esuac dna nru trevo dluoc rewom gn idir A
.yru jni su oi res ni gn itlu ser ,pils dluoc uoy dna gn itoof ruoy nia tniam ot tlu ci ffid ylemer txe si
.sepols fo ecaf eht ssorca reven ,sepols nwod dna pu sr ewom GNIDIR et ar epO
.sepols nwod dna pu reven ,sepols fo ecaf eht ssorca sr ewom DNI HEB-KLAW et ar epO
SLOPE GAUGE
(Keep this sheet in a safe place for fu ture ref er ence.)
OWNER'S
MAN UAL
SAFETY LA BEL
WARNING - Your Re spon si bil ity:
Re strict the use of this power ma chine to per sons who
read, un der stand and fol low the warn ings and in struc -
tions in this man ual and on the ma chine.

This unit is shipped WITH OUT GAS O LINE
or OIL. Af ter as sem bly, ser vice en gine with
gas o line and oil as in structed in the sep a rate
en gine man ual packed with your unit.
NOTE: Ref er ence to right or left
hand side of the mower is ob served
from the op er at ing po si tion.
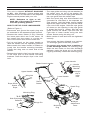
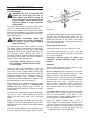
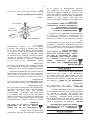
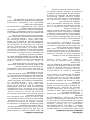
HOW TO SET-UP YOUR LAWN MOWER
(Re fer to Fig ure 1)
• Dis con nect and ground the spark plug wire
as in structed in the sep a rate en gine man ual.
• Re move the car ton in serts (if any). Re move
the loose parts which are in the car ton, lift
the mower from the car ton, or cut the cor -
ners of the car ton and roll the mower out.
• Pull up and back on the up per han dle to
raise the han dle into the op er at ing po si tion.
Make cer tain the lower han dle is seated se -
curely into the han dle mount ing brack ets.
Tighten the wing nuts on each side of the
han dle.
• Re move the hair pin clips from the outer hole
in the weld pins on the han dle mount ing
brack ets. Place the hair pin clips in the in ner
hole.
• The rope guide and wing nut are at tached to
the starter rope, on top of the en gine. Re -
move the wing nut from rope guide. Re move
the rope guide from the starter rope.
• With the spark plug wire dis con nected and
grounded as in structed in the sep a rate en -
gine man ual, hold the blade con trol han dle
against the up per han dle, and pull the starter
rope out of the en gine. Hold the rope guide
as shown so the open ing in the rope guide
is to ward the front of mower. Slip the rope
guide around the starter rope and into the
right side of lower han dle us ing the hole
shown. Se cure us ing the wing nut.
• Make cer tain all nuts and bolts are tight ened
se curely.
Your mower has been shipped as a mulcher.
To dis charge grass to the side, pro ceed.
• To con vert your mower from a mulcher to
a side dis charge mower, lift mulch ing plug.
Slide the two hooks on the side dis charge
de flec tor un der the hinge pin on the mulch -
ing plug as sem bly. Lower the mulch ing plug.
7
SET-UP INSTRUCTIONS
Fig ure 1
Blade Control Handle
Height
Adjustment
Lever
Spark Plug
Mulching
Plug
Lower Handle
Handle
Mounting
Bracket
Hairpin
clip in
inner
hole.
Lower Handle
Upper Handle
Recoil
Starter
Wing
Nuts
Mulching Plug
Side Discharge
Deflector
Rope Guide
Starter
Rope
Wing Nut
Hinge Pin

OPERATION
BEFORE STARTING
Ser vice the en gine with gas o line and oil as
in structed in the sep a rate en gine man ual
packed in your mower. Read in struc tions
care fully.
WARNING: Never fill fuel tank in -
doors, with en gine run ning or un til
the en gine has been al lowed to
cool for at least two min utes af ter
run ning.
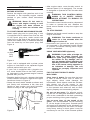
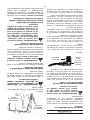
TO START ENGINE AND ENGAGE BLADE
• At tach spark plug wire to spark plug. If unit
is equipped with a rub ber boot over the end
of the spark plug wire, make cer tain the
metal loop on the end of the spark plug wire
(in side the rub ber boot) is fas tened se curely
over the metal tip on the spark plug. See
Figure 2.
• If your unit is equipped with a primer, prime
en gine as in structed in the sep a rate en gine
man ual packed with your unit.
• If your unit is equipped with a throt tle con -
trol, move throt tle le ver to the FAST po si tion
as in structed in the sep a rate en gine man ual
packed with your unit.
• Stand ing be hind the unit, de press the blade
con trol han dle and hold it against the up per
han dle as shown in Fig ure 3.
• Grasp the re coil starter han dle as shown and
pull slowly un til re sis tance is felt, then pull
rap idly to start en gine and avoid kick back.
Re turn it slowly to the rope guide bolt.
• Af ter en gine starts, move throt tle con trol to
de sired speed (if so equipped). The mower
is de signed to op er ate at FULL throt tle while
mow ing.
WARNING: THIS CON TROL MECH -
A NISM IS A SAFETY DE VICE.
NEVER AT TEMPT TO BY PASS ITS
OP ER A TIONS.
The blade con trol han dle must be de pressed
in or der to op er ate the unit. Re lease the
blade con trol han dle to stop the en gine and
blade.
TO STOP ENGINE:
• Re lease the blade con trol han dle to stop the
en gine and blade.
WARNING: The blade con tin ues to
ro tate for a few sec onds af ter the
en gine is shut off.
• Dis con nect and ground the spark plug wire
as in structed in the sep a rate en gine man ual
to pre vent ac ci den tal start ing while equip -
ment is un at tended.
USING YOUR MULCHER (Optional)
WARNING: If you strike a for eign ob -
ject, stop the en gine. Re move wire
from spark plug, thor oughly in spect
the mower for any dam age, and re -
pair the dam age be fore re start ing and
op er at ing the mower. Ex ten sive vi bra -
tion of the mower dur ing op er a tion is
an in di ca tion of dam age. The unit
should be promptly in spected and
re paired.
FOR THE BEST RESULTS WHEN
MULCHING:
Clear lawn of de bris. Be sure that the lawn
is clear of stones, sticks, wire or other for -
eign ob jects which could dam age the
lawnmower. Such ob jects could be ac ci den -
tally thrown out by the mower in any
di rec tion and cause se ri ous per sonal in jury
to the op er a tor and oth ers as well as dam -
age to prop erty and sur round ing ob jects.
Do not cut wet grass. For ef fec tive mulch -
ing do not cut wet grass be cause it tends to
stick to the un der side of the deck pre vent ing
proper mulch ing of the grass clip pings.
Cut no more than 1/3 the length of the
grass. The rec om mended cut for mulch ing
is 1/3 the length of the grass. Ground speed
will need to be ad justed so the clip pings can
be dis persed evenly into the lawn. For es pe -
cially heavy cut ting in thick grass it may be
nec es sary to use one of the slow est speeds
8
Fig ure 2
Metal
Loop
on Spark
Plug
Wire
Rubber Boot
Fig ure 3
Starter
Handle
Blade Control
Handle

(if so equipped) in or der to get a clean well
mulched cut. When mulch ing long grass you
may have to cut the lawn in two passes, low -
er ing the blade an other 1/3 of the length for
the sec ond cut and per haps cut ting in a dif -
fer ent pat tern than was used the first time.
Over lapping the cut a lit tle on each pass will
also help to clean up any stray clip pings left
on the lawn. The mower should al ways be
op er ated at full throt tle to get the best cut
and al low it to do the most ef fec tive job of
mulch ing.
Clean un der side of deck. Be cer tain to
clean the un der side of the cut ting deck af ter
each use to avoid a build-up of grass, which
would pre vent proper mulch ing.
Mulching Leaves. The mulch ing of leaves
can also be ben e fi cial to your lawn. When
mulch ing leaves make sure they are dry and
are not lay ing too thick on the lawn. Do not
wait for all the leaves to be off the trees be -
fore you mulch.
It is rec om mended keep ing drive ways and
side walks on the op er a tors right while mov -
ing. Con tinue mow ing us ing this pat tern,
hav ing the left side of your lawnmower next
to the un cut grass. Mulching with the cut ting
area of the mower on the lawn avoids grass
clip pings in un de sir able ar eas.
DECK
The un der side of the mower deck should be
cleaned af ter each use to pre vent a buildup
of grass clip pings, leaves, dirt or other mat -
ter. If this de bris is al lowed to ac cu mu late, it
will in vite rust and cor ro sion, and may pre -
vent proper mulch ing.
The deck may be cleaned by tilt ing the
mower and scrap ing clean with a suit able
tool (make cer tain the spark plug wire is dis -
con nected).
AD JUST MENTS
CAU TION : DO NOT AT ANY TIME MAKE
ANY AD JUST MENT TO LAWNMOWER
WITH OUT FIRST STOPPING THE ENGINE
AND DIS CON NECTING THE SPARK PLUG
WIRE
CAU TION: Be fore chang ing mow ing
height, stop mower and dis con nect
spark plug ca ble.
MODELS WITH NINE POSITION HEIGHT
ADJUSTERS: (See Figure 4).
• Stop mower and dis con nect spark plug ca -
ble be fore chang ing mower cut ting height.
• The wheel ad just ers give you nine (9) dif fer -
ent cut ting po si tions. Me dium is the best for
most mow ers.
• To change the height of cut, squeeze ad -
juster le ver to ward the wheel, mov ing up or
down to se lected height.
NOTE: All wheels must be in the same
height of cut.
• When cut ting in heavy or moist grass, the
rear of lawnmower may be raised higher to
al low better dis charge of the grass.
CARBURETOR ADJUSTMENT
Mi nor car bu re tor ad just ment may be re -
quired to com pen sate for dif fer ences in fuel,
tem per a ture, al ti tude and load. Re fer to the
sep a rate en gine man ual packed with your
mower for car bu re tor ad just ment in for ma tion.
LUBRICATION
CAU TION: DIS CON NECT SPARK
PLUG WIRE BE FORE SER VICING
WHEELS - If your mower is equipped with
ball bear ing wheels, lu bri cate at least once a
sea son with a light oil, all other types re quire
no lu bri ca tion. How ever, if the wheels are re -
moved for any rea son, lu bri cate the sur face
of the axle bolt and the in ner sur face of the
wheel with light au to mo tive oil.
ENGINE - Fol low en gine man ual for lu bri ca -
tion in struc tions.
BLADE CON TROL - Lu bri cate the pivot
points on the blade con trol han dle and the
brake ca ble at least once a sea son with light
oil. The blade con trol must op er ate freely in
both di rec tions.
9
Fig ure 4

MAINTENANCE
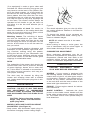
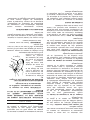
CUTTING BLADE
WARNING: Be sure to dis con nect and
ground the spark plug wire and re -
move ig ni tion key be fore work ing on
the cut ting blade to pre vent ac ci den tal
en gine start ing. Pro tect hands by us -
ing heavy gloves or a rag to grasp the
cut ting blade.
• Tip mower as spec i fied in sep a rate en gine man -
ual. If it is not spec i fied tip with car bu re tor up.
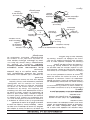
• Re move the bolt and blade sup port which holds
the blade and adapter to the en gine crank shaft.
Re move the blade and adapter from the crank -
shaft. See Fig ure 6.
WARNING: Pe ri odically in spect the
blade adapter for cracks, es pe cially if
you strike a for eign ob ject. Re place
when nec es sary.
For best re sults your blade should be sharp.
The blade may be resharpened by re mov ing it
and ei ther grind ing or fil ing the cut ting edge
keep ing as close to the orig i nal bevel as pos si -
ble. Im proper blade bal ance will re sult in
ex ces sive vi bra tion caus ing even tual dam age to
the en gine and mower. Be sure to care fully
bal ance blade af ter sharp en ing.
CAU TION: Cut ting grass in sandy
soil con di tion causes abra sive wear
to the blades.
Af ter pro longed use, es pe cially in sandy soil
con di tions, the blade will be come worn and
lose some of the orig i nal shape. Cut ting ef fi -
ciently will be re duced and the blade should be
re placed. Re place with an ap proved fac tory re -
place ment blade only. Pos si ble dam age
re sult ing from blade un bal ance con di tion is not
the re spon si bil ity of the man u fac turer.
When sharp en ing the blades, fol low the orig i nal
an gle of grind as a guide. It is ex tremely im -
por tant that each cut ting edge re ceives an
equal amount of grind ing to pre vent an un bal -
anced blade.
The blade can be tested for bal ance by bal anc -
ing it on a round shaft screw driver. Re move
metal from the heavy side un til it bal ances
evenly.
Be fore re as sem bling the blade and the blade
adapter to the unit, lu bri cate the en gine crank -
shaft and the in ner sur face of the blade adapter
with light oil.
In stall the blade adapter on the crank shaft with
the “star” away from the en gine. Re fer to Figure
6. Place the blade with the side marked bot tom
(or with part num ber) fac ing away from the
adapter. Align the blade bell sup port over the
blade with the tabs in the holes of the blade
and in sert the hex bolt. Tighten the hex bolt to
the torque listed be low:
Blade Mounting Torque
Cen ter Bolt 450 in. lb. min., 600 in.lb. max.
To in sure safe op er a tion of your unit, ALL
nuts and bolts must be checked pe ri od i cally
for cor rect tight ness.
CAU TION: Cut ting grass in sandy soil
con di tion causes abra sive wear to the
blades.
ENGINE
Re fer to the sep a rate en gine man ual for en -
gine main te nance in struc tions.
Main tain en gine oil as in structed in the sep -
a rate en gine man ual packed with your unit.
Read and fol low in struc tions care fully.
Un der nor mal con di tions ser vice air cleaner
as in structed in the sep a rate en gine man ual
packed with your unit. Clean ev ery few
hours un der ex tremely dusty con di tions.
Poor en gine per for mance and flood ing usu -
ally in di cates that the air cleaner should be
ser viced.
The spark plug should be cleaned and the
gap re set once a sea son. Spark plug re place -
ment is rec om mended at the start of each
mow ing sea son; check en gine man ual for cor -
rect plug type and gap spec i fi ca tions.
Clean the en gine reg u larly with a cloth or
brush. Keep the cool ing sys tem (blower hous -
ing area) clean to per mit proper air cir cu la tion
which is es sen tial to en gine per for mance and
life. Be cer tain to re move all grass, dirt and
com bus ti ble de bris from muf fler area.
10
Figure 6
Blade Adapter
Blade
Hex Bolt
Blade Bell
Sup port

OFF SEASON STORAGE
INSTRUCTIONS
The fol low ing steps should be taken to pre pare
lawn mower for stor age.
• Clean and lu bri cate mower thor oughly as de -
scribed in the lu bri ca tion in struc tions.
• Re fer to en gine man ual for cor rect en gine
stor age in struc tions.
• Coat mower’s cut ting blade with chas sis
grease to pre vent rust ing.
• Store mower in a dry, clean area.
NOTE: When stor ing any type of power
equip ment in an un ven ti lated or metal
stor age shed, care should be taken to
rust-proof the equip ment. Using a light oil
or sil i cone, coat the equip ment, es pe cially
ca bles and all mov ing parts.
NOTE: Be care ful not to bend or kink ca -
bles.
NOTE: If the starter rope be comes dis -
con nected from rope guide on han dle,
dis con nect and ground the spark plug
wire. De press the blade con trol han dle
and pull the starter rope out from en gine
slowly. Slip the starter rope into the rope
guide bolt on han dle.
11

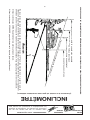
12
40
25
41
42
43
44
18
32
34
33
38
35
38
5
26
26
26
26
28
19
20
20
20
21
21
21
21
6
6
39
39
4
3
38
22
23
23
30
36
37
45
38
12
3
20
22
24
27
14
7
9
10
8
15
16
17
11
46
15
2
13
1
31
29

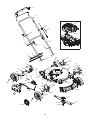
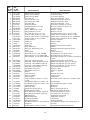
REF PART
NO. NO.
N° DE N° DE
RÉF PIÈCE DE SCRIP TION DE SCRIP TION
1 747-1161A Blade Con trol Han dle Poignée de la commande
2 731-2626 Deluxe Cover (Black) Couvercle (Noir)
731-04204 Deluxe Cover (Red) Couvercle (Rouge)
3 687-02076 Pivot Arm LH Bras de pivotement - droit
4 687-02075 Hgt. Ad just Ass’y LH Réglage de hauteur-gauche
5 687-02074 Hgt. Ad just Ass’y RH Réglage de hauteur-droit
6 687-02077 Pivot Arm RH Bras de pivotement - droit
7 710-1205 Rope Guide Bolt Boulon de guidage de cor don
8 710-1174 Car riage Bolt 5/16-18 x 2.0 Boulon ordi naire 5/16-18 x 2,0
9 749-0928A Lower Han dle Guidon inférieur
10 720-0279 Knob - ERS Guide 1/4-20 Bou ton - 1/4-20
11 720-0284 Wingnut Knob, 5/16-18 Bou ton 5/16-18
12 714-0104 Int. Cot ter Pin .072 x 1.13" Lg. Goupille fendue ,072 x 1,13 po. de lg.
13 746-0946 Con trol Ca ble 48.25" Lg. (Tec) Câble de la commande 48.25 po (Tec)
746-04104 Con trol Ca ble 40.0" Lg. (Kawasaki) Câble de la commande 40,5 po (Kawasaki)
746-1130 Con trol Ca ble 40.0" Lg. (B&S) Câble de la commande 40,0 po (B&S)
14 749-1092A Up per Han dle Guidon supérieur
15 726-0240 Ca ble Tie Attache câble
16 17098 Hinge Clip Attache
17 731-04019 Rear Flap Abattant de pro tec tion arrière
18 682-0139 Deck As sem bly Tablier
19 687-02107 Rear Hgt. Ad just Ass’y LH Réglage de hauteur-gauche arrière
20 720-0426 Knob Bou ton
21 732-0404 Spring Le ver Lev ier de ressort
22 734-2004A Wheel As s'y 8" x 2.125" Idle BB En sem ble de roue 8 x 2,125 po
734-04033 Wheel As s'y 8" x 2.0" S-Wave BB En sem ble de roue 8 x 2,0 po
23 736-0504 Wave Washer .51" ID (w/bb wheels) Rondelle ondulée 0,51 DI (avec roulement à
billes)
24 687-02106 Rear Hgt. Ad just Ass’y RH Réglage de hauteur-droit arrière
25 731-1426A Hub Cap - Yel low Ra dial (op tional) Moyeu de cha peau -jaune (en op tion)
731-0981A Hub Cap - Grey Ra dial (op tional) Moyeu de cha peau -gris (en op tion)
731-0982A Hub Cap - Grey Ra dial (op tional) Moyeu de cha peau -gris (en op tion)
26 738-0507B Shoul der Screw .50 Dia. Vis à épaulement 0,50 Dia.
27 687-02000 Ad just/Brkt. Ass’y RH Sup port - droit
28 687-02001 Ad just/Brkt. Ass’y LH Sup port - gauche
29 7510042823 Screw Vis
30 732-0731 Tor sion Spring Ressort de tor sion
31 731-04525 Shroud - Yellow Capot - jaune
32 782-7006 Plug Adapter Adaptateur
33 736-0270 Cupped Washer .265 ID x .75 OD Rondelle creuse 0,265 DI x 0,75 DE x 0,062
x .062
34 710-0599 Hex Wash S-Tapp Scr 1/4-20 x .50 Vis taraudée
35 710-0654A Hex Wash HD Tap Scr 3/8-16 x .88 Vis autotaraudée 3/8-16 x 0,88
36 731-1409B Chute De flec tor Deflecteur
37 731-1501A Mulching Plug Bouchon
38 712-0431 Flanged Lock Nut 3/8-16 Écrou de blocage 3/8-16
39 15261A Height Ad juster Plate Plaque de réglage de roue
40 731-1933 Front End Cover -Yel low (op tional) Couvercle-jaune (en op tion)
731-1949 Front End Cover-Black (op tional) Couvercle-noir (en op tion)
41 748-0376C Blade Adapter Adaptateur de la lame
753-0588 Blade Adapter Kit Adaptateur de lame
42 742-0740 20" Mulching Blade Lame 20 po
43 736-0524B Blade Bell Sup port Sup port de lame
44 710-1044 Hex Bolt 3/8-24 x 1.5" Lg. (Grade 8) Vis à tête hex. 3/8-24 x ,5 po de lg (Qual. 8)
45 747-0710 Hinge Pin Axe fixe
46 736-0451 Sad dle Wash. .320 ID x .93 OD Rondelle selle 0,320 DI x 0,93 DE
106/700
12.21.04
13

14
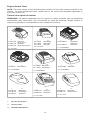
En gine Shroud Chart
NOTE: This chart shows all the op tional en gine shrouds for the lawn mow ers cov ered in this
man ual. To or der re place ment parts, please re fer to the shroud and hard ware ap pli ca ble to
your lawn mower unit.
Tab leau des capots de moteur
RE MARQUE: Ce tab leau représente tous les capots en op tion proposés pour les tondeuses
mentionnées dans cette no tice. Pour com mander un capot de rechange, veuillez indiquer le
capot et la quincaillerie correspondant à votre modèle de tondeuse.
* Part No./N
o
de pièce
** Col our/Couleur
*** Hard ware/Quincaillerie
* **
751B281439 Dark Red/
Rouge foncé
751B281440 Black/Noir
751B281443 Bright Red/Rouge vif
*** 710-1256
* **
751A1433513 YardWorks
Black/Noir
751A1432613 Black/Noir
*** 7510042823
* **
731-04525 Yel low/Jaune
*** 7510042823
* **
7510143208 Black/Noir
*** 7510042823
* **
731-1586B Black/Noir
731-1612A Red/Rouge
*** 7510042823
* **
7511681311 Black/Noir
7511681911 Red/Roug e
7511682011 Grey /Gris
* **
751B281451 Grey/Gris
751B281450 Black/Noir
*** 710-1256
* **
751B281476 Black/Noir
751B281777 Yel low/Jaune
*** 710-1237
* **
731-1395A Red/Rouge
731-1396A Black/Noir
731-1397A Grey/Gris
*** 710-1256

TWO YEAR LIMITED WARRANTY
For TWO YEARS from the date of re tail pur chase within Can ada, MTD PROD UCTS
LIMITED will, at its op tion, re pair or re place, for the orig i nal pur chaser, free of charge, any
part or parts found to be de fec tive in ma te rial or work man ship.
This war ranty does not cover:
1. Any part which has be come in op er a tive due to mis use, com mer cial use, abuse,
ne glect, ac ci dent, im proper main te nance or al ter ation; or
2. The unit if it has not been op er ated and/or main tained in ac cor dance with the
owner’s in struc tions fur nished with the unit; or
3. The en gine or mo tor or com po nent parts thereof which carry sep a rate war ran ties
from their man u fac tur ers. Please re fer to the ap pli ca ble man u fac turer’s war ranty
on these items; or
4. Bat teries and nor mal wear parts ex cept as noted be low. Log split ter pumps,
valves and cyl in ders or com po nent parts thereof are cov ered by a one year war -
ranty; or
5. Rou tine main te nance items such as lu bri cants, fil ters, blade sharp en ing and
tune-ups, or ad just ments such as brake, clutch or deck; or
6. Nor mal de te ri o ra tion of the ex te rior fin ish due to use or ex po sure.
Full Ninety Day War ranty on Bat tery: For ninety (90) days from the date of re tail pur -
chase, if any bat tery in cluded with this unit proves de fec tive in ma te rial or work man ship
and our test ing de ter mines the bat tery will not hold a charge, MTD PROD UCTS LIMITED
will re place the bat tery at no charge to the orig i nal pur chaser.
Ad di tional Limited Thirty Day War ranty on Bat tery: Af ter ninety (90) days but within
one hun dred twenty (120) days from the date of pur chase, MTD PROD UCTS LIMITED will
re place the de fec tive bat tery, for the orig i nal pur chaser, for a cost of one-half (1/2) of the
cur rent re tail price of the bat tery in ef fect at the date of re turn.
Full Sixty Day War ranty on Nor mal Wear Parts: Nor mal wear parts are de fined as belts,
blade adapt ers, blades, grass bags, seats, tires, rider deck wheels and clutch parts (fric -
tion wheels). These parts are war ranted to the orig i nal pur chaser to be free from de fects
in ma te rial and work man ship for a pe riod of sixty (60) days from the date of re tail pur -
chase.
How to Ob tain Ser vice: War ranty ser vice is avail able, with proof of pur chase, through
your lo cal au tho rized ser vice dealer or dis trib u tor. If you do not know the dealer or dis -
trib u tor in your area, please call, toll free 1-800-668-1238. The re turn of a com plete unit
will not be ac cepted by the fac tory un less prior writ ten per mis sion has been ex tended by
MTD PROD UCTS LIMITED.
Trans por ta tion Charges: Trans por ta tion charges for the move ment of any power equip -
ment unit or at tach ment are the re spon si bil ity of the pur chaser. Trans por ta tion charges
for any part sub mit ted for re place ment un der this war ranty must be paid by the pur -
chaser un less such re turn is re quested in writ ing by MTD PROD UCTS LIMITED.
Other War ranties: All other war ran ties, ex press or im plied, in clud ing any im plied war -
ranty of mer chant abil ity is lim ited in its du ra tion to that set forth in this ex press lim ited
war ranty. The pro vi sions as set forth in this war ranty pro vide the sole and ex clu sive rem -
edy of MTD PROD UCTS LIMITED ob li ga tions aris ing from the sale of its prod ucts.
MTD PROD UCTS LIMITED will not be li a ble for in ci den tal or con se quen tial loss or dam -
age.
15

13
notes . . .

GARANTIE LIMITÉE DE DEUX ANS
MTD PROD UCTS LIMITED s’engage à réparer ou à remplacer gratuitement, à son choix, à
l’acheteur ini tial, toute pièce ou partie de pièce qui s’avère défectueuse en rai son d’un vice de
matière ou de fab ri ca tion, dans un délai de DEUX ANS à partir de la date d’achat au détail au
Can ada.
Cette garantie ne couvre pas:
1. Les pièces rendues inutilisables par un emploi in cor rect, une uti li sa tion commerciale,
un emploi abusif, une négligence, un entretien in cor rect ou une mod i fi ca tion;
2. La ma chine si elle n’a pas été utilisée et/ou entretenue conformément aux in struc tions
qui l’accompagnaient;
3. Le moteur, le moteur électrique ou l’un de ses composants car ils sont garantis par
leurs fab ri cants respectifs. Veuillez consulter la garantie qui s’applique à la pièce en
particulier;
4. Les bat ter ies et les pièces présentant une usure normale énumérées plus bas. Les
pompes, soupapes et cylindres des fendeuses à bois sont garantis pen dant un an;
5. Les ar ti cles d’entretien cou rant tels que les lubrifiants, filtres, aiguisage de lames et
révisions, ou les réglages des freins, de l’embrayage ou du pla teau de coupe;
6. La détérioration normale de la finition extérieure du fait de l’utilisation de la ma chine et
de son ex po si tion aux intempéries.
Garantie complète de quatre-vingt-dix jours de la batterie: MTD PROD UCTS LIMITED
s’engage à remplacer gratuitement la batterie à l’acheteur ini tial, si la batterie fournie avec la
ma chine s’avère défectueuse en rai son d’un vice de matière ou de fab ri ca tion et si nos essais
confirment qu’elle ne peut pas maintenir une charge, dans un délai de quatre-vingt-dix (90)
jours à partir de la date d’achat au détail.
Garantie limitée supplémentaire de trente jours de la batterie: À l’expiration du délai de
quatre-vingt-dix (90) jours, mais dans un délai de cent vingt (120) jours de la date d’achat,
MTD PROD UCTS LIMITED s’engage à remplacer la batterie défectueuse à l’acheteur ini tial
pour la moitié du prix de vente au détail de la batterie, en vigueur au mo ment du re tour de la
batterie.
Garantie complète de soixante jours des pièces à usure normale: Les courroies,
adaptateurs de lame, lames, sacs à herbe, sièges, pneus, roues du pla teau de coupe des
tondeuses à siège, et pièces d’embrayage (roues de frottement) sont considérés comme des
pièces à usure normale. Elles sont garanties exemptes de vices de matière et de fab ri ca tion à
l’acheteur ini tial pour une période de soixante (60) jours à partir de la date d’achat au détail.
Pour faire hon orer la garantie: Présentez une preuve d’achat à l’atelier de réparations ou au
distributeur agréé. Si vous ne connaissez pas l’adresse de l’atelier de réparations ou du
distributeur de votre région, appelez le 1-800-668-1238. L’usine ne peut accepter le renvoi
d’une ma chine complète si une autorisation n’a pas été accordée par écrit par MTD PROD -
UCTS LIMITED.
Frais de trans port: Les frais relatifs au trans port de toute ma chine motorisée ou de tout
accessoire sont à la charge de l’acheteur. Les frais de trans port d’une pièce quelconque
envoyée à des fins de remplacement en vertu de cette garantie doivent être pris en charge par
l’acheteur, sauf si le renvoi de la ma chine est demandé par écrit par MTD PROD UCTS
LIMITED.
Autres garanties: Toutes les autres garanties, qu’elles soient ex presses ou tacites, y compris
les garanties tacites de qualité marchande, se limitent à la durée stipulée dans cette garantie
limitée expresse. Les con di tions stipulées dans cette garantie con stit u ent le recours unique et
exclusif quant aux ob li ga tions de MTD PROD UCTS LIMITED découlant de la vente de ses
produits.
MTD PROD UCTS LIMITED ne peut être tenue responsable pour toute perte ou tout dommage
accidentel ou in di rect.
12

Vérifiez périodiquement que TOUS les
écrous et boulons de la ma chine sont bien
serrés.
MOTEUR
Consultez la no tice d’utilisation du moteur
pour tout ce qui concerne l’entretien du
moteur.
Utilisez l’huile à moteur recommandée dans
la no tice d’utilisation du moteur fournie avec
la tondeuse. Lisez attentivement les in struc -
tions et suivez-les.
Nettoyez le filtre à air recommandée dans
la no tice d’utilisation du moteur fournie avec
la tondeuse. Nettoyez-le à intervalles plus
rapprochés dans des con di tions très
poussiéreuses. Une mauvaise per for mance
du moteur et sa «noyade» sont des in di ca -
tions que le filtre à air doit être nettoyé.
Consultez la no tice d’utilisation du moteur
fournie avant de nettoyer le filtre à air.
Nettoyez la bougie et ajustez l’écartement
une fois par saison. Il est recommandé de
remplacer la bougie au début de chaque
saison. Vérifiez le type de bougie à uti liser et
l’écartement cor rect dans la no tice
d’utilisation du moteur.
Nettoyez le moteur régulièrement avec un
linge ou une brosse. Gardez le système de
refroidissement (à proximité du ventilateur)
propre pour as surer la bonne cir cu la tion
d’air essentielle aux bonnes per for mances et
à la longévité du moteur. Enlevez tous les
brins d’herbe, la saleté et autres débris com -
bus ti bles se trouvant à proximité du
silencieux.
ENTREPOSAGE HORS SAISON
Procédez de la manière suivante pour
préparer votre tondeuse pour un
entreposage prolongé.
• Nettoyez et lubrifiez soigneusement la
tondeuse selon les in struc tions de
lubrification.
• Consultez la no tice d’utilisation du moteur
quant aux in struc tions d’entreposage du
moteur.
• Enduisez la lame de la tondeuse d’une
graisse à châssis pour l’empêcher de
rouiller.
• Entreposez la tondeuse dans un endroit sec
et propre.
RE MARQUE: Il est très im por tant de
bien protéger le matériel contre la
rouille s’il doit être entreposé dans un
abri métallique non ventilé. Enduisez
toute la ma chine, en particulier les
câbles et toutes les pièces mo biles,
avec une huile légère ou de la sil i cone.
RE MARQUE: Faites at ten tion de ne pas
plier ni tortiller les câbles.
RE MARQUE: Si la corde du démarreur
se dégage du guide sur le guidon,
débranchez la bougie et mettez-la à la
masse. Appuyez sur la poignée de
commande de la lame et faites
lentement sortir la corde du moteur.
Glissez la corde du démarreur dans le
boulon de guidage sur le guidon.
11

LUBRIFICATION
AT TEN TION: DÉBRANCHEZ
TOUJOURS LE FIL DE LA BOUGIE
AVANT DE FAIRE L’ENTRETIEN.
ROUES - Lubrifiez les roulements à billes
des roues au moins une fois par saison avec
de l’huile fluide, tous les autres gen res n'ont
pas besoin d'être lubrifiées. Toutefois, si
elles doivent être démontées pour une rai -
son quelconque, lubrifiez la sur face du
boulon d’essieu et la sur face intérieure de la
roue avec une huile au to mo bile légère.
MOTEUR - Consultez la no tice d'utilisation
du moteur pour les in struc tions de
lubrification.
COMMANDE DE LA LAME - Lubrifiez les
points de pivot de la poignée de commande
de la lame et le câble de frein au moins une
fois par saison avec une huile légère. La
commande de la lame doit fonctionner
facilement dans les deux sens.
ENTRETIEN
LAME DE COUPE
AVERTISSEMENT: Pour éviter tout
démarrage accidentel, mettez
toujours le fil de la bougie à la
masse, après l’avoir débranché et
avant de manipuler la lame de
coupe. Portez toujours des gants
épais ou utilisez un chif fon pour
manipuler la lame.
• Couchez la tondeuse sur le côté selon les in -
struc tions dans la no tice d’utilisation. Si il y
n’a pas d’instructions spécifique, couchez la
tondeuse sur le côté avec le carburateur en
l’air.
• Enlevez le boulon et le sup port de la lame
qui maintiennent la lame et l’adaptateur sur
le vilebrequin. Dégagez la lame et
l’adaptateur du vilebrequin. Voir la Fig ure 5.
AVERTISSEMENT: Examinez
périodiquement l’adaptateur de
lame pour y détecter tout
fendillement éventuel, surtout après
avoir heurté un objet. Remplacez-le
au besoin.
Pour obtenir les meilleurs résultats, la lame
doit être bien affûtée. Pour la raffûter:
démontez-la puis meulez ou limez les bords
tranchants en maintenant l’angle aussi près
que pos si ble du biseau orig i nal. Une lame
déséquilibrée cause des vi bra tions qui
peuvent endommager le moteur et la
tondeuse. Assurez-vous de bien rééquilibrer
la lame après l’avoir affûtée.
AT TEN TION: Le fait de couper
l’herbe sur un sol sablonneux
provoque l’usure de la lame par
abra sion.
Après un us age prolongé, particulièrement
dans des ter rains sablonneux, la lame sera
émoussée et perdre son tranchant orig i nal.
L’efficacité de la coupe sera réduite et la
lame devra être remplacée. Remplacez-la
toujours par une lame de rechange
approuvée par l’usine. Le fab ri cant n’est pas
responsable des dommages causés par une
lame déséquilibrée.
Il est essentiel que chaque tranchant soit
affûté également pour ne pas avoir une lame
déséquilibrée.
Vous pouvez vérifier l’équilibre de la lame en
la plaçant sur un tournevis à tige ronde.
Limez le métal du côté le plus lourd jusquà
ce que la lame soit parfaitement équilibrée.
Avant de remonter la lame et son adaptateur
sur la tondeuse, lubrifiez le vilebrequin et la
sur face intérieure de l’adaptateur avec une
huile légère.
Placez l’adaptateur de la lame sur le
vilebrequin, «l’étoile» à l’opposé du moteur.
Voir la Fig ure 5. Placez la lame, le côté sur
lequel la men tion «Bot tom» (ou le numéro de
pièce) apparaît, à l’opposé de l’adaptateur.
Alignez le sup port de la lame sur celle-ci en
enfonçant les pattes dans les trous de la
lame, puis insérez le boulon hex. Serrez le
boulon hex. au cou ple recommandé
ci-dessous.
Couple de montage de la lame
Boulon centrale 450 po-lb min., 600 po-lb
max.
10
Figure 5
Adaptateur de
lame
Lame
Boulon hex.
Sup port de
la lame

une di rec tion ou une autre et blesser
grièvement le conducteur du tracteur ou
toute autre personne présente et causer des
dégâts matériels.
Ne coupez pas l’herbe mouillée. Pour un
déchiquetage efficace, ne coupez pas de
l’herbe mouillée car elle a tend ance à coller
au dessous du tablier et à gêner le
déchiquetage.
Coupez 1/3 de la longueur de l’herbe. La
coupe recommandée pour un bon
déchiquetage cor re spond à 1/3 de la
longueur de l’herbe. Ralentissez pour as -
surer une bonne répartition des brins
d’herbe sur la pelouse. En cas d’herbe
particulièrement drue, il faudra peut-être
avancer très lentement (si équipé) pour
bénéficier d’un déchiquetage satisfaisant. Si
l’herbe est trop longue, deux pas sages
seront nécessaires. Abaissez la lame d’un
tiers de la longueur de l’herbe au deuxième
pas sage et coupez dans une autre di rec tion.
Le fait de chevaucher les pas sages permet
de déchiqueter à nou veau les brins d’herbe
qui restent sur la pelouse. La tondeuse doit
toujours fonctionner à plein régime pour
obtenir la meilleure coupe et le meilleur
déchiquetage.
Nettoyez le dessous du pla teau de coupe.
Nettoyez le dessous du pla teau de coupe
après chaque uti li sa tion pour empêcher les
brins d’herbe de s’y accumuler, ce qui
gênerait le déchiquetage.
Déchiquetage de feuilles. Le déchiquetage
des feuilles à l’automne peut aussi être
bénéfique pour votre pelouse. Assurez-vous
toutefois que les feuilles sont sèches et
qu’elles ne forment pas une couche trop
épaisse sur la pelouse. N’attendez pas que
toutes les feuilles soient tombées pour les
déchiqueter.
Méthode de tonte. Il est recommandé de
garder le trottoir ou l’allée sur la droite de la
tondeuse. Continuez de cette façon pour
que l’herbe à tondre se trouve sur la gauche
de la tondeuse. Assurez-vous que les lames
de la tondeuse sont toujours sur l’herbe
pour éviter de faire trop de saletés.
PLA TEAU DE COUPE
Nettoyez le dessous du pla teau de coupe
après chaque uti li sa tion pour empêcher les
brins d’herbe, les feuilles ou la saleté de s’y
accumuler. Toute ac cu mu la tion favorise la
rouille et la cor ro sion et peut empêcher le
déchiquetage efficace.
Inclinez la tondeuse et grattez le dessous du
pla teau de coupe avec un outil approprié
(après avoir vérifié que la bougie est
débranchée) pour nettoyer le pla teau de
coupe.
RÉGLAGES
AT TEN TION: N’EFFECTUEZ JAMAIS DE
RÉGLAGE SUR LA TONDEUSE SANS
AVOIR AUPARAVANT ARRETÉ LE
MOTEUR ET DÉBRANCHÉ LE FIL DE LA
BOUGIE.
AT TEN TION: Avant de changer la
hau teur de la tondeuse, arrêtez-la et
débranchez le fil de la bougie.
MODÈLES AVEC DISPOSITIFS DE
RÉGLAGE DE HAUTEUR: (Voir la Figure
4).
• Arrêtez la tondeuse
et débranchez le fil
de la bougie avant
de changer la hau -
teur de coupe de la
tondeuse.
• Le lev ier de réglage
des roues de votre
tondeuse vous
permet un choix de
neuf (9) hauteurs de
coupe. La coupe
moyenne convient
pour la plupart des tondeuses.
• Pour changer la hau teur de coupe, poussez
le lev ier de réglage des roues vers la roue et
déplacez-le vers le haut ou le bas à la hau -
teur choisie.
RE MARQUE: Toutes les roues doivent
être à la même hau teur.
• Pour couper de l’herbe humide ou épaisse,
réglez l’arrière de la tondeuse plus haut que
l’avant pour permettre une meilleure éjection
de l’herbe.
RÉGLAGES DU CARBURATEUR
Certains ajustements mineurs seront
peut-être nécessaires pour compenser les
différences de car bu rant, de température,
d’altitude et de charge. Consultez la no tice
d’utilisation du moteur fournie avec la
tondeuse quant aux réglages du carburateur.
9
Fig ure 4
La pagina si sta caricando...
La pagina si sta caricando...
La pagina si sta caricando...
La pagina si sta caricando...
La pagina si sta caricando...
La pagina si sta caricando...
La pagina si sta caricando...
La pagina si sta caricando...
-
 1
1
-
 2
2
-
 3
3
-
 4
4
-
 5
5
-
 6
6
-
 7
7
-
 8
8
-
 9
9
-
 10
10
-
 11
11
-
 12
12
-
 13
13
-
 14
14
-
 15
15
-
 16
16
-
 17
17
-
 18
18
-
 19
19
-
 20
20
-
 21
21
-
 22
22
-
 23
23
-
 24
24
-
 25
25
-
 26
26
-
 27
27
-
 28
28


Bolens 11A-108N565 Manuale del proprietario
- Categoria
- Tosa erba
- Tipo
- Manuale del proprietario
in altre lingue
- English: Bolens 11A-108N565 Owner's manual
- français: Bolens 11A-108N565 Le manuel du propriétaire
Documenti correlati
Altri documenti
-
Dolmar PM5120S Manuale del proprietario
-
-
Simplicity 1696109-00 Manuale utente
-
Black & Decker BDMOW1400 Manuale utente
-
-
-
Worx WG708E Original Instructions Manual
-
-
-
McCulloch M53-150AP 4x4 Manuale del proprietario