Philips HB542/01 Manuale utente
- Categoria
- Solarium
- Tipo
- Manuale utente


English Page 4
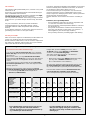
• Keep page 3 open when reading these operating
instructions.
Français Page 10
• Pour le mode d’emploi: dépliez la page 3.
Deutsch Seite 16
• Schlagen Sie beim Lesen der Gebrauchsanweisung
Seite 3 auf.
Nederlands Pagina 22
• Sla bij het lezen van de gebruiksaanwijzing pagina 3 op.
Italiano Pagina 28
• Prima di usare l’apparecchio, aprite la pagina 3 e leggete
attentamente le istruzioni per l’uso.
Español Página 34
• Desplegar la página 3 al leer las instrucciones de manejo.
Dansk Side 40
• Hold side 3 opslået mens De laeser brugsanvisningen.
Norsk Side 46
• Slå opp på side 3 før De leser videre.
Svenska Sid 52
• Ha sidan 3 utvikt när ni läser bruksanvisningen.
2

1
D
B
A
E
F
G
J
N
E
K
I
L
M
H
C
N
P O
HB 544
3

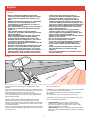
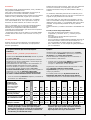
Important
• Before connecting the appliance to the mains
socket, check if the voltage indicated on the rating
plate corresponds with the mains voltage in your
home.
• Water and electricity are a dangerous combination!
Therefore, do not use the appliance in wet
surroundings (e.g. in the bathroom or shower, or
near a swimming pool).
• If you have just been swimming or have just taken a
shower, dry yourself thoroughly before using the
appliance.
• Take care that children cannot play with the
solarium. As a precaution remove the plug from the
wall socket after use.
• Keep the ventilation openings in the upper casing
clear of obstruction when using the solarium.
• Do not exceed the advised session times or the
maximum amount of "tanning hours". (See section
"UV sessions: How often? And how long?")
• Do not select a shorter operational distance than the
advised 20 cm (approx. 8").
• Do not treat each part or side of the body more often
than once a day. Avoid intensive skin exposure to
natural sunlight on the same day as a UV session.
• If you have any symptoms of illness, if you take any
medicines and/or apply cosmetics which increase
skin sensitivity, you should not have a UV-session.
Special care is also necessary in cases of
pronounced individual sensitivity to ultraviolet.
When in doubt, please consult your doctor.
• A solarium is not to be used by people who get
sunburnt without tanning when exposed to the sun,
by persons suffering from sunburn, by children, or by
persons who suffer (or have previously suffered) from
skin cancer or who are predisposed to skin cancer.
• Consult your doctor if ulcers, moles or persistent
lumps develop on the skin.
• Always wear the protective eye goggles while
tanning to protect your eyes against excessive
doses of ultraviolet, visible light and infrared. (Also
refer to section "UV and your health".)
• Remove creams, lipstick and other cosmetics well in
advance of a UV session.
• Do not use sunscreen lotions or creams.
• Do not use suntan lotions or creams.
• If your skin should feel taut after the sun tanning
session, you may apply a moisturizing cream.
• Never use the solarium if the timer has become
faulty.
• Colours may fade under the influence of the sun.
The same effect may occur when using the
appliance.
• Do not expect the appliance to yield better results
than the natural sun.
4
English
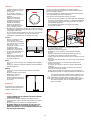
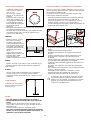
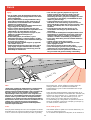
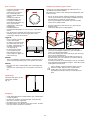
The Sun
UV B
UV C
UV A
VISIBLE LIGHT
INFRARED
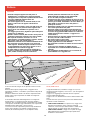
The sun is the source of energy on which all life on earth
depends.
There are various kinds of solar energy: the sunlight enables
us to see, we feel the warmth of the sunshine on our skin, and
under the influence of the sun our skin is tanned.
These three effects are due to three specific components of
the sun radiance spectrum, each of the components having
their own wave lengths.
The sun radiates electro-magnetic vibrations with widely
different wave lengths. The wave lengths of heat rays or
"infrared" (IR) are longer than the wave lengths of visible light.
And the wave lengths of "ultraviolet" (UV), which tans our skin,
are shorter than these.
Science has managed to reproduce these three kinds of solar
radiation: heat (e.g. Infraphil), light (lamps) and UV (solariums,
sun couches etc.)
UV-A, UV-B and UV-C
Ultraviolet (UV) is subdivided into UV-A (longer wave lengths),
UV-B and UV-C (shorter wave lengths).
UV-C seldom reaches the earth as it is filtered out by the
atmosphere.
UV-A and UV-B cause the tanning effect of the skin.
In fact there are two processes which produce tanning, and
they are simultaneously effective:
• "Indirect tanning". Primarily UV-B stimulates the
production of a substance called "melanin", which is
necessary for tanning. The effect does not show until a
couple of days after the sunbath.
• "Direct tanning". The UV-A and also a part of the visible
light cause quicker browning without reddening or "getting
sunburnt".
La pagina sta caricando ...
La pagina sta caricando ...

7
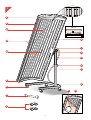
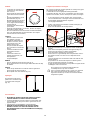
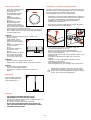
General description (fig. 1, page 3)
A Tube lamps and starters
HB 541 - 8 large tube lamps (type Philips UVA 100W
“Cleo Performance”) with
8 starters (type Philips S12)
HB 542 - 10 large tube lamps (type Philips UVA 100W
“Cleo Performance”) with
10 starters (type Philips S12)
HB 544 - 10 large tube lamps (type Philips UVA 100W
“Cleo Performance”) with
10 starters (type Philips S12) and
4 small tube lamps (type Philips UVA 15W
“Cleo Performance”) for extra face tanning
performance, with
4 starters (type Philips S2)
B Timer
C Stand
D Protective eye goggles (2x)
(Type HB 071 / service n
o
. 4822 690 80123)
E End caps
F Rod
G Bolts and nuts
H Height adjustment knob
I Spanner
J Mains cord
K Castor wheels
L Handle
M Cooling fan
N Vents
O Protective shield
P Protective plastic foil
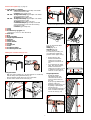
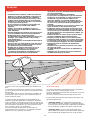
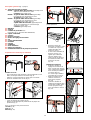
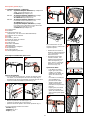
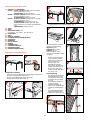
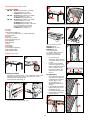
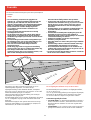
Making the solarium ready for use
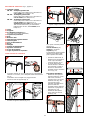
Fixing the stand
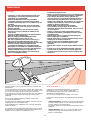
- With one person helping you, lay the solarium on a table top
with the lamps facing downwards (fig. 2).
Ensure that the handle does not rest on the table.
- Fix the castor wheels to the stand (fig. 3).
- Mount the stand to the rod (fig. 4, 5).
- Lift the solarium from the table top (fig. 6).
- Remove the plastic foil from the protective shield (fig. 7).
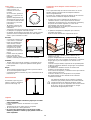
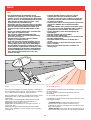
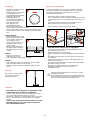
You can be tanned either
lying (fig. 8),
sitting (fig. 9), or
standing (fig. 10)
with this solarium.
To make this possible, you
can adjust the height and
position of the upper casing.
• During tanning, the
distance between the
lamps and your body
should be at least 20 cm
(8").
• If you intend to tan while
lying, this means that the
distance between the
lamps and your bed, couch
or mattress should be at
least 40 cm (16") (fig. 11).
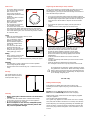
Height adjustment
- Rotate the height
adjustment knob anti-
clockwise two or three
turns to release the rod
(fig. 12).
A gas spring stabilizes the
position of the rod.
- Adjust the height of the rod
by pulling or pushing the
handle (fig. 13).
- Turn the height adjustment
knob clockwise until tight
to lock the rod (fig. 14).
2
3
4
5
6
1
1
2
8
9
10
11
20
40
12
13
7
14
La pagina sta caricando ...
La pagina sta caricando ...
La pagina sta caricando ...
La pagina sta caricando ...
La pagina sta caricando ...
La pagina sta caricando ...
La pagina sta caricando ...
La pagina sta caricando ...
La pagina sta caricando ...
La pagina sta caricando ...
La pagina sta caricando ...

19
Allgemeine Beschreibung (Abb. 1, Seite 3)
A Sonnenlampen und Starter
HB 541 - 8 große UV-Lampen Philips UVA 100 W
"Cleo Performance"
8 Starter Philips S12
HB 542 - 10 große UV-Lampen Philips UVA 100 W
"Cleo Performance"
10 Starter Philips S12
HB 544 - 10 große UV-Lampen Philips UVA 100 W
"Cleo Performance"
10 Starter Philips S12
4 kleine UV-Lampen Philips UVA 15 W
"Cleo Performance"
4 Starter Philips S2
B Zeitschalter
C Stativfuß
D Schutzbrille, 2 Stück
Type HB 071 / Servicenummer 4822 690 80123
E Schutzscheibe
F Stativsäule
G Bolzen und Muttern
H Höhenverstellung
I Schraubenschlüssel
J Netzkabel
K Laufrollen
L Griff
M Lüfter zur Kühlung
N Lüftungsöffnungen
O Schutzabdeckung
P Schutzfolie
Vorbereitung zum Gebrauch
Anbringen des Stativs
- Legen Sie das Solarium, mit Hilfe einer weiteren Person,
flach auf einen Tisch, mit den Lampen nach unten (Abb. 2).
Achten Sie darauf, daß der Griff nicht auf dem Tisch
aufliegt.
- Bringen Sie die Laufrollen am Stativfuß an (Abb. 3).
- Bringen Sie die Stativsäule am Stativfuß an (Abb. 4 und 5).
- Nehmen Sie das Gerät vom Tisch, und befestigen Sie es
am Stativ (Abb. 6).
- Ziehen Sie die Schutzfolie von der Schutzabdeckung ab
(Abb. 7).
Sie können mit diesem Gerät
liegend (Abb. 8)
sitzend (Abb. 9)
stehend (Abb. 10)
sonnenbaden.
Höhe und Neigung des
Lampengehäuses lassen sich
zu diesem Zweck verstellen.
• Der Abstand der Lampen zu
Ihrem Körper sollte
mindestens 20 cm betragen.
• Wenn Sie liegend
sonnenbaden, muß der
Abstand der Lampen zur
Liege also mindestens 40
cm betragen (Abb. 11).
Höhenverstellung
- Drehen Sie den Knopf zur
Höhenverstellung (H) zwei-
oder dreimal gegen den
Uhrzeigersinn zum
Entriegeln der Stativsäule
(Abb. 12).
Eine Gasdruckfeder
stabilisiert die Position der
Stativsäule.
- Verstellen Sie die Höhe
des Geräts, indem Sie am
Griff drücken oder ziehen
(Abb. 13).
- Drehen Sie den Knopf zur
Höhenverstellung in
Uhrzeigerrichtung fest, um
die Stativsäule zu
arretieren (Abb. 14).
2
3
4
5
6
1
1
2
8
9
10
11
20
40
12
13
7
14
La pagina sta caricando ...
La pagina sta caricando ...
La pagina sta caricando ...
La pagina sta caricando ...
La pagina sta caricando ...
La pagina sta caricando ...
La pagina sta caricando ...
La pagina sta caricando ...
La pagina sta caricando ...

29
IL SOLARIUM
Questo tipo di solarium emette prevalentemente raggi UV-A ed
in minima parte anche raggi UV-B.
Possiede alcune caratteristiche che lo rendono ideale per
ottenere una splendida abbronzatura fra le pareti di casa.
La lampada usata in questo solarium emette luce, calore e
raggi ultravioletti, proprio come il sole.
Potrete posizionare il solarium in modo tale che l'intero corpo,
dalla testa ai piedi, risulti abbronzato in modo uniforme, come
stando sotto il sole.
Per una maggior comodità, ma anche per evitare esposizioni
troppo prolungate (es. può accadere se ci si addormenta),
l'interruttore con timer incorporato spegne automaticamente
l'apparecchio 60 minuti dopo l'accensione.
Proprio come nel caso del sole, è sempre meglio non
esagerare! (Vedere sezione "I raggi UV e la vostra salute").
I RAGGI UV E LA VOSTRA SALUTE
Dopo un'esposizione eccessiva ai raggi ultravioletti (siano essi
provenienti dal sole o dal solarium), la pelle può scottarsi.
Insieme a numerosi altri fattori, fra cui un'eccessiva
esposizione ai raggi del sole, l'uso improprio o eccessivo del
solarium può aumentare il rischio di problemi alla pelle o agli
occhi.
Da una parte la natura, l'intensità e la durata delle radiazioni e
dall'altra la sensibilità individuale sono fattori decisivi per
stabilire il grado con cui questi problemi si possono verificare.
Più gli occhi e la pelle sono esposti ai raggi UV, e maggiore
sarà il rischio di disturbi quali infiammazione della cornea e/o
congiuntivite, lesione della retina, cataratta, invecchiamento
precoce e tumori della pelle.
Alcuni farmaci e cosmetici possono aumentare la sensibilità ai
raggi UV.
E' pertanto della massima importanza:
- attenersi alle istruzioni riportate nelle sezioni "Importante" e
"Sedute UV. Quante volte? Per quanto tempo?";
- rispettare la distanza consigliata di almeno 20 cm.;
- non superare il numero annuo consigliato di ore di
abbronzatura (vedere anche la sezione "Sedute UV (...) che
si riferisce al vostro modello di solarium!);
- indossare sempre gli speciali occhiali di protezione durante
le sedute.
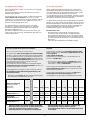
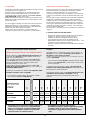
Solo per solarium modello HB 541 (8 lampade)
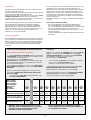
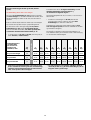
SEDUTE UV: QUANTE VOLTE? PER QUANTO TEMPO?
Potete sottoporvi ad una seduta di raggi UV al giorno per
un periodo di 5-10 giorni (aspettate almeno 48 ore fra la
prima e la seconda seduta).
Trascorso tale periodo, fate riposare la pelle per un po'.
Circa un mese dopo il ciclo di sedute, la pelle avrà perso
gran parte dell'abbronzatura. A questo punto potrete
decidere di iniziare un nuovo ciclo.
D'altra parte, è anche possibile sottoporsi a una o due
sedute di raggi UV alla settimana fra un ciclo e l'altro per
mantenere l'abbronzatura.
Qualunque sia la frequenza stabilita, non superate il limite
massimo di numero di ore consigliate.
• Con il solarium modello HB 541 (8 lampade), il limite è
stato stabilito in 33 ore (= 1980 minuti).
Esempio:
Immaginiamo che vi sottoponiate ad un ciclo di raggi UV di
10 giorni, con una seduta di 12 minuti il primo giorno e di
30 minuti nei nove giorni successivi.
L'intero ciclo sarà così composto da (1 x 12 minuti) + (9 x 30
minuti) = 282 minuti.
• Con il solarium modello HB 541 (8 lampade) potrete quindi
sottoporvi a 7 di questi cicli (7 x 282 minuti = 1974 minuti)
nel corso dell'anno.
Ovviamente il limite massimo si riferisce ad ogni singola
parte del corpo trattata separatamente (ad esempio per la
parte anteriore o quella posteriore).
Dalla tabella allegata risulta che la prima seduta di un ciclo
dovrebbe avere una durata di 12 minuti. E questo
indipendentemente dalla sensibilità della pelle di ogni
persona.
• Se pensate che le sedute siano troppo lunghe per la
vostra pelle (ad. es. nel caso in cui la pelle risulti
tirata o eccessivamente sensibile al termine della
seduta), vi consigliamo di ridurre la durata della
stessa (provate con 5 minuti in meno).
• Per ottenere una splendida abbronzatura,
perfettamente uniforme, giratevi leggermente durante
la seduta in modo da assicurare una migliore
esposizione ai raggi abbronzanti di tutte le parti del
corpo.
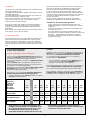
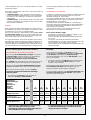
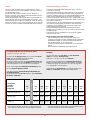
Durata seduta UV
(per ciascuna parte
del corpo)
in minuti 1° 2° 3° 4° 5° 6° 7° 8° 9° 10°
g. g. g. g. g. g. g. g. g. g.
pelle molto
sensibile 12 10-15 10-15 10-15 10-15 10-15 10-15 10-15 10-15 10-15
pelle normale 12 30-35 30-35 30-35 30-35 30-35 30-35 30-35 30-35 30-35
pelle poco
sensibile 12 35-40 35-40 35-40 35-40 35-40 35-40 35-40 35-40 35-40
intervallo min. di 48 ore

30
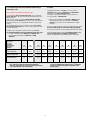
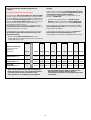
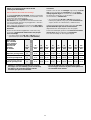
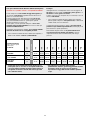
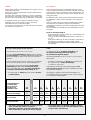
Solo per solarium modello HB 542 e HB 544 (10 lampade)
SEDUTE UV: QUANTE VOLTE? PER QUANTO TEMPO?
Potete sottoporvi ad una seduta di raggi UV al giorno per
un periodo di 5-10 giorni (aspettate almeno 48 ore fra la
prima e la seconda seduta).
Trascorso tale periodo, fate riposare la pelle per un po'.
Circa un mese dopo il ciclo di sedute, la pelle avrà perso
gran parte dell'abbronzatura. A questo punto potrete
decidere di iniziare un nuovo ciclo.
D'altra parte, è anche possibile sottoporsi a una o due
sedute di raggi UV alla settimana fra un ciclo e l'altro per
mantenere l'abbronzatura.
Qualunque sia la frequenza stabilita, non superate il limite
massimo di numero di ore consigliate per anno.
• Con il solarium modello HB 542 e HB544 (10 lampade), il
limite è stato stabilito in 28 ore (= 1680 minuti).
Esempio:
Immaginiamo che vi sottoponiate ad un ciclo di raggi UV di
10 giorni, con una seduta di 10 minuti il primo giorno e di
30 minuti nei nove giorni successivi.
L'intero ciclo sarà così composto da (1 x 10 minuti) + (9 x 30
minuti) = 280 minuti.
• Con il solarium modello HB 542 o HB544 (10 lampade)
potrete quindi sottoporvi a 6 di questi cicli (6 x 280 minuti
= 1680 minuti) nel corso dell'anno.
Ovviamente il limite massimo si riferisce ad ogni singola
parte del corpo trattata separatamente (ad esempio per la
parte anteriore o quella posteriore).
Dalla tabella allegata risulta che la prima seduta di un
ciclo dovrà avere una durata di 10 minuti. E questo
indipendentemente dalla sensibilità della pelle di ogni
persona.
• Se pensate che le sedute siano troppo lunghe per la
vostra pelle (ad. es. nel caso in cui la pelle risulti tirata
o eccessivamente sensibile al termine della seduta), vi
consigliamo di ridurre la durata della stessa (provate
con 5 minuti in meno).
• Per ottenere una splendida abbronzatura,
perfettamente uniforme, giratevi leggermente durante
la seduta in modo da assicurare una migliore
esposizione ai raggi abbronzanti di tutte le parti del
corpo.
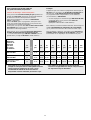
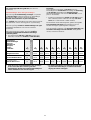
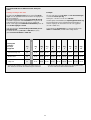
Durata seduta UV
(per ciascuna parte
del corpo)
in minuti 1° 2° 3° 4° 5° 6° 7° 8° 9° 10°
g. g. g. g. g. g. g. g. g. g.
pelle molto
sensibile 10 10-15 10-15 10-15 10-15 10-15 10-15 10-15 10-15 10-15
pelle normale 10 20-25 20-25 20-25 20-25 20-25 20-25 20-25 20-25 20-25
pelle poco
sensibile 10 30-35 30-35 30-35 30-35 30-35 30-35 30-35 30-35 30-35
intervallo min. di 48 ore

31
DESCRIZIONE GENERALE (fig. 1, pagina 3)
A Lampade e starter
HB 541 - 8 lampade grandi a tubi
(mod. Philips UVA 100W "Cleo Performance")
con 8 starter (mod. Philips S 12).
HB 542 - 10 lampade grandi a tubi
(mod. Philips UVA 100W "Cleo Performance")
con 10 starter (mod. Philips S 12)
HB 544 - 10 lampade grandi a tubi
(mod. Philips UVA 100W "Cleo Performance")
con 10 starter (mod. Philips S 12) e
4 lampade piccole a tubi (mod. Philips UVA
15W "Cleo Performance") per intensificare
l'abbronzatura del viso, con 4 starter (mod.
Philips S 2)
B Timer
C Supporto
D Occhialini di protezione (2x)
(mod. HB 071/n∞ 4822 690 80123)
E Coperture di protezione
F Asta
G Bulloni e dadi
H Manopola per regolare l'altezza
I Chiave inglese
J Cavo di alimentazione
K Ruote
L Maniglia
M Ventola di raffreddamento
N Aperture di aerazione
O Scudo di protezione
P Foglio di protezione in plastica
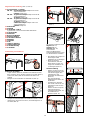
COME FISSARE IL SUPPORTO
- Facendovi aiutare da una seconda persona, appoggiate il
solarium su un tavolo, con le lampade rivolte verso il basso
(fig. 2).
Controllate che la maniglia non poggi sul tavolo.
- Fissate le ruote al supporto (fig. 3).
- Montate il supporto sull'asta (fig. 4-5).
- Sollevate il solarium dal tavolo (fig. 6).
- Togliete il foglio di protezione in plastica (fig. 7).
Con questo solarium potrete
abbronzarvi
stando sdraiati (fig. 8),
seduti (fig. 9) oppure
in piedi (fig. 10).
A tale proposito, potete regolare
l'altezza e la posizione della
parte superiore del solarium.
• Quando vi abbronzate, la
distanza fra le lampade e il
vostro corpo dovrebbe
essere di almeno 20 cm.
• Se volete abbronzarvi
stando sdraiati, la distanza
fra le lampade e il letto, il
divano o il materassino
dovrebbe essere di almeno
40 cm. (fig. 11).
Regolazione dell'altezza
- Ruotate la manopola per
regolare l'altezza in senso
anti-orario, facendole
compiere due o tre giri per
allentare l'asta (fig. 12).
Una speciale molla
permette di stabilizzare la
posizione dell'asta.
- Regolate l'altezza dell'asta
premendo o spingendo la
manopola (fig. 13).
- Ruotate la manopola in
senso orario per fissare
l'asta (fig. 14).
2
3
4
5
6
1
1
2
8
9
10
11
20
40
12
13
7
14

32
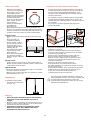
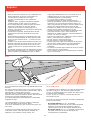
COME USARE IL SOLARIUM
- Controllate la distanza fra il
vostro corpo e il solarium
(min. 20 cm.)
Se necessario, regolate
l'altezza e/o la posizione del
solarium.
- Impostate il timer in base alla
durata della seduta (fig. 15).
(Fate riferimento alla tabella e
ai vostri appunti personali).
- Non dimenticate di indossare
gli speciali occhiali di
protezione.
- Non appena sarà trascorso il tempo impostato, le lampade si
spegneranno automaticamente.
- Se volete abbronzare altre parti del corpo, potete impostare
nuovamente il timer (non è necessario attendere che il
solarium si sia raffreddato).
SDRAIATI
- Mettete il solarium accanto
ad un letto o un divano.
- Il supporto è provvisto di
ruote, quindi potete avvicinare
a voi il solarium anche mentre
siete distesi. Controllate che
le lampade siano posizionate
esattamente sopra di voi
(fig. 8).
- Potete anche sistemare il
supporto sotto il letto (fig. 16)
- Al termine della seduta,
potrete allontanare il
solarium e alzarvi senza problemi.
SEDUTI
- Mettete una sedia o una sdraio accanto al solarium (fig. 9).
- Mettete il solarium nella posizione ottimale, regolando la
parte superiore.
IN PIEDI
- Girate la parte superiore dell'apparecchio e mettetelo in
posizione verticale. Se necessario, regolate l'altezza.
- Sistematevi davanti al solarium (fig. 10) - ad almeno 20 cm.
di distanza.
COME RIPORLO
Il solarium non occupa molto
spazio se riposto in posizione
verticale (fig. 17).
PULIZIA
- Staccate sempre la spina dalla presa di corrente e
lasciate raffreddare il solarium prima di procedere alla
pulizia.
- La parte esterna del solarium può essere pulita con uno
panno umido. Fate in modo che non entri acqua all'interno
dell'apparecchio.
- Non usate sostanze abrasive o spugnette ruvide.
- Non usate assolutamente liquidi quali alcool denaturato,
benzina o acetone per pulire la piastra di protezione, che
potrebbero causare danni irreparabili.
COME SOSTITUIRE LE LAMPADE E/O GLI STARTERS
Dopo un certo periodo di utilizzo dell'apparecchio (con un uso
normale in genere dopo alcuni anni), l'efficienza delle lampade
inizia a diminuire gradualmente.
In questo caso sarà necessario aumentare la durata delle
sedute oppure sostituire le lampade.
• Potete far sostituire le lampade e/o gli starter dal personale
autorizzato dei Centri di Assistenza che possiede la
necessaria esperienza e ha a sua disposizione i pezzi di
ricambio originali e gli attrezzi per eseguire il lavoro.
I Centri di Assistenza sono anche in grado di provvedere allo
smaltimento delle lampade usate.
• Se preferite sostituire le lampade da soli, procedete come
segue:
- Togliete la spina dalla presa di corrente.
- Allentate le viti e togliete le due coperture di protezione
(fig. 18).
- Togliete completamente lo scudo di protezione (fig. 19).
In questo modo le lampade e gli starter risulteranno
accessibili.
- Ruotate leggermente le lampade verso destra o verso sinistra.
Una volta sbloccate, toglietele dal porta-lampade.
- Togliete gli starter ruotandoli leggermente verso sinistra ed
estraendoli.
(Gli starter sono collocati in parti uguali alle estremità del
solarium).
- Per sistemare le nuove lampade e i nuovi starter, procedete
in senso e direzione opposti.
- Reinserite lo scudo di protezione facendolo scivolare
nell'apposito profilo. Non dimenticate di rimettere le
coperture di protezione utilizzando le apposite viti.
Le lampade a tubo dei solarium contengono sostanze
che possono inquinare l'ambiente. Quando dovrete
gettare le vecchie lampade, assicuratevi che vengano
separate dai normali rifiuti e depositate presso un
centro di raccolta differenziato.
15
6
0
5
5
5
0
4
5
4
0
3
5
3
0
2
5
2
0
1
5
1
0
5
0
M
I
N
16
17
19
18
f

33
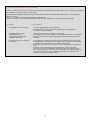
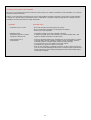
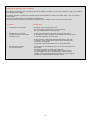
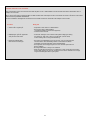
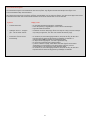
Il solarium non funziona come dovrebbe?
Nel caso in cui il solarium non dovesse funzionare come previsto, non esitate a contattare il vostro rivenditore o un Centro di
Assistenza Philips autorizzato.
Tuttavia, è anche possibile che l'apparecchio non sia stato installato secondo le istruzioni o venga usato in modo improprio.
In questo caso, potrete risolvere il problema da soli e rapidamente. Controllate i seguenti punti prima di contattare il vostro
rivenditore o il Centro di Assistenza Philips autorizzato.
Problema Possibile causa
• Il solarium non si accende - Non avete inserito la spina nella presa di corrente
- Non c'è elettricità (Controllate con altri apparecchi elettrici)
- Il timer non è stato impostato
• Il fusibile spegne - - Controllate il fusibile a cuia vete collegato il solarium.
l'interruttore quando accendete Il modello più adatto per il vostro solarium è un normale fusibile 13A o 16A
il solarium o durante l'uso oppure un fusibile automatico a reazione lenta.
• L'abbronzatura non è - Usate una prolunga troppo lunga, arrotolata e/o che non permette un corretto
vi aspettavate. passaggio della corrente, Chiedete consiglio al vostro rivenditore di fiducia.
In linea di massima, sarebbe meglio evitare l'uso della prolunga.
- Il ciclo prescelto non è il più adatto al vostro tipo di pelle.
- La distanza fra la pelle e il solarium è eccessiva.
- Dopo un uso prolungato, le lampade producono un minor numero di raggi UV
(con un uso normale dell'apparecchio questo si verificherà dopo qualche anno).
Potete compensare questo effetto prolungando la durata delle sedute oppure
sostituendo le lampade.

Importante
• Antes de conectar el aparato a la red, comprueben si la
tensión indicada en la placa de características se
corresponde con la existente en su hogar.
•¡ El agua y la electricidad son una combinación
peligrosa !
No utilicen, pues, el aparato en ambientes húmedos
(cuartos de baño, duchas o junto a una piscina).
• Si han estado nadando o acaban de darse una ducha,
séquense a fondo antes de usar este aparato.
• Cuiden de que los niños no puedan jugar con el
Solarium. Como precaución, desenchufen el aparato de
la red después del uso.
• Cuando usen el Solarium, mantengan libres de toda
obstrucción las aberturas de ventilación de la parte
superior.
• No sobrepasen los tiempos recomendados para cada
sesión ni la cantidad máxima de "horas de bronceado"
(Ver la sección "Sesiones de UV : ¿ Cuantas y de qué
duración ?").
• Cumplan con la mínima distancia operacional de 20 cm.
• No traten cada parte del cuerpo más de una vez al día.
Eviten la exposición intensiva de la piel a la luz solar
natural el mismo día en que hayan tomado una sesión
de UV.
• Si presentan cualquier síntoma de enfermedad, si están
tomando alguna medicación y / o se aplican cosméticos
que incrementen la sensibilidad de la piel, no deben
seguir ningún tratamiento de UV. Es necesario tener un
cuidado especial en los casos de una pronunciada
sensibilidad personal a los ultravioletas.
En caso de duda, consulten a su médico.
• Un Solarium no debe ser usado por personas que
presenten quemaduras solares sin ponerse morenos al
exponerse al sol, que tengan quemaduras solares, por
niños o por personas que sufren (o que han sufrido) cancer
de piel o que estén predispuestas al cancer de piel.
• Consulten a su médico en el caso de que les aparezcan
úlceras, lunares o bultos persistentes en la piel.
• Cuando se bronceen, usen siempre las gafas protectoras
para evitar exponer los ojos a dosis excesivas de
ultravioleta, luz visible o infrarrojos (Consulten también la
sección: "Los UVA y su salud").
• Antes de una sesión de UV, quítense las cremas, barra de
labios y cualesquiera otros cosméticos.
• No usen cremas o lociones protectoras
• No usen lociones o cremas bronceadoras.
• Si notan que tienen la piel reseca después de una sesión
de bronceado, pueden aplicarse una crema hidratante.
• No usen nunca el Solarium si el temporizador está
estropeado.
• Los colores se atenúan bajo la influencia del sol y lo mismo
puede ocurrir al usar este aparato.
• Con el Solarium, no esperen conseguir mejores resultados
que con el sol natural.
34
Español
El sol
UV B
UV C
UV A
LUZ VISIBLE
INFRARROJO
El sol es la fuente de energía de la cual depende toda la vida
terrestre.
Hay varias clases de energía solar: La luz solar nos permite
ver, sentimos el calor de la luz solar en nuestra piel y, bajo la
influencia del sol, nuestra piel se broncea.
Estos tres efectos se deben a otros tantos componentes
específicos del espectro de radiación del sol, cada uno de los
cuales tiene sus propias longitudes de onda.
El sol irradia vibraciones electromagnéticas con diferentes
longitudes de onda.
Las correspondientes a los rayos caloríficos o infrarrojos
(IR) son más largas que las de la luz visible.
Y las de los ultravioleta (UV), que nos broncean la piel, son
más cortas.
La ciencia ha conseguido reproducir estas tres clases de
radiaciones solares : Calor (por ejemplo, Infraphil), luz
(lámparas) y UV (solariums, camas solares, etc.)
UV-A, UV-B y UV-C
Los ultravioleta (UV) se dividen en UV-A (los de mayor longitud
de onda), UV-B y UV-C (los de menor longitud de onda).
Los UV - C raramente llegan a la superficie de la tierra ya que
son filtrados por la atmósfera.
Los UV - A y los UV - B son los causantes del efecto de
bronceado en la piel.
De hecho, son dos los procesos que, actuando conjuntamente,
producen el bronceado :
- Bronceado indirecto. Los UV - B estimulan
primordialmente la producción de una substancia llamada
Melanina, necesaria para el bronceado. El efecto no
aparece hasta un par de días después del baño de sol.
- Bronceado directo. Los UV - A, y también una parte de la
luz visible, ocasionan un moreno más rápido, sin
enrojecimientos ni quemaduras.
La pagina sta caricando ...
La pagina sta caricando ...

37
Descripción general (fig. 1)
A Lámparas tubulares y cebadores
HB 541: 8 grandes lámparas tubulares tipo Philips UVA
100W "Cleo Performance") con
8 cebadores (tipo Philips S12).
HB 542: 10 grandes lámparas tubulares tipo Philips
UVA 100W "Cleo Performance") con
10 cebadores (tipo Philips S12).
HB 544: 10 grandes lámparas tubulares tipo Philips
UVA 100W "Cleo Performance") con
10 cebadores (tipo Philips S12).
4 pequeñas lámparas tubulares tipo Philips
UVA 15W "Cleo Performance") para la función
extra de bronceado de la cara con
4 cebadores (tipo Philips S2).
B Temporizador
C Pedestal
D Gafas protectoras (2x)
(Tipo HB 071 ; Nº. de Servicio 4822 690 80123)
E Cubiertas de los extremos
F Varilla
G Tornillos y tuercas
H Mando de ajuste de la altura
I Llave para tuercas
J Cable de red
K Ruedas orientables
L Empuñadura
M Ventilador para refrigerar
N Respiraderos
O Escudo protector
P Lámina plástica protectora
Para dejar el solarium listo para su uso
Fijación del pedestal
- Con la ayuda de otra persona, pongan el solarium sobre
una mesa, con las lámparas de cara hacia abajo (fig. 2).
Asegúrense de que la empuñadura no quede sobre la mesa.
- Fijen las ruedas orientables al pedestal (fig. 3).
- Monten el pedestal a la varilla (figs. 4, 5).
- Levanten el solarium de la mesa (fig. 6).
- Quiten la lámina de plástico del escudo protector (fig. 7).
Con este solarium pueden broncearse :
- echados (fig. 8),
- sentados (fig. 9) o
- de pie (fig. 10).
Para ello bastará con que
ajusten la altura y posición de
la parte superior.
• Durante el bronceado, la
distancia entre las lámparas
y su cuerpo deberá ser al
menos de 20 cm.
• Si tratan de broncearse
estando echados, esto
significa que la distancia
entre las lámparas y su
cama, lecho o colchoneta
deberá ser al menos de
unos 40 cm (fig. 11).
Ajuste de la altura
- Para liberar la varilla,
hagan girar (dos o tres
vueltas y en sentido
antihorario) el mando de
ajuste de la altura (fig.
12).
Un muelle accionado por
gas estabilizará la
posición de la varilla.
- Ajusten la altura de la
varilla presionando o
tirando de la empuñadura
(fig. 13).
- Hagan girar (en sentido
horario) el mando de
ajuste de la altura hasta
que la varilla quede fijada
(fig. 14).
2
3
4
5
6
1
1
2
8
9
10
11
20
40
12
13
7
14
La pagina sta caricando ...
La pagina sta caricando ...
La pagina sta caricando ...
La pagina sta caricando ...
La pagina sta caricando ...

43
Generel beskrivelse (fig. 1, side 3).
A Solarierør og glimtændere
HB 541 - 8 store solarierør (Philips type UVA 100W
"Cleo Performance") med
8 glimtændere (Philips type S12)
HB 542 - 10 store solarierør (Philips type UVA 100W
"Cleo Performance") med
10 glimtændere (Philips type S12)
HB 544 - 10 store solarierør (Philips type UVA 100W
"Cleo Performance") med
10 glimtændere (Philips type S12) og
4 små solarierør (Philips type UVA 15W
"Cleo Performance") til ekstra ansigtsbruning,
med
4 glimtændere Philips type S2)
B Timer
C Stativ
D Beskyttelsesbriller (2 x)
(Type HB 071, reservedelsnr. 4822 690 80123)
E Endestykker
F Stang
G Bolte og møtrikker
H Fastgørelsesknap til højdejustering
I Skruenøgle
J Netledning
K Hjul på stativet
L Håndtag
M Ventilatorvinge
N Ventilationsåbninger
O Beskyttelsesplade
P Plastik-beskyttelsesfolie
Sådan gøres solariet klar til brug.
Fastgørelse af stativet:
- Få en person til at hjælpe Dem med at lægge solariet på et
bord med solarierørene nedad (fig. 2)..
Sørg for at håndtaget ikke hviler på bordet.
- Skru hjulene fast på stativet (fig. 3)..
- Monter stangen på stativet (fig. 4, 5).
-Løft solariet op fra bordet (fig. 6).
- Tag plastikfolien af beskyttelsespladen (fig. 7).
De kan med dette solarium
enten få UV-behandling
liggende (fig. 8),
siddende (fig. 9) eller
stående (fig. 10).
Dette kan gøres ved at
regulere på overdelens højde
og stilling.
• Under UV-behandlingen
skal afstanden mellem
solarium og Deres krop
være mindst 20 cm.
• Hvis De tager UV-
behandling liggende,
betyder det, at afstanden
mellem solarierørene og
Deres seng, sofa eller
madras mindst skal være
40 cm (fig. 11).
Højderegulering.
- Drej fastgørelsesknappen
til højdejustering to eller
tre omgange venstre om,
til stangen kan bevæges
(fig. 12).
En gasfjeder stabiliserer
stangens stilling.
- Reguler på højden af
solariet ved at trække eller
skubbe på håndtaget (fig.
13).
- Drej fastgørelsesknappen
højre om til stangen igen
sidder fast i stativet (fig. 14).
2
3
4
5
6
1
1
2
8
9
10
11
20
40
12
13
7
14
La pagina sta caricando ...
La pagina sta caricando ...
La pagina sta caricando ...
La pagina sta caricando ...

48
Bare for solarium type HB 542 og HB 544 (med 10
lysrør):
UV-behandling: Hvor ofte? Hvor lenge?
De kan ta en UV behandling pr. dag gjennom en periode
på fem til ti dager. La det være minst 48 timer mellom de to
første behandlingene. Etter en slik serie, bør det være et
opphold.
Etter en måneds tid vil huden ha mistet mye av brunfargen.
Da kan det være på tide med en ny behandlingsrunde.
På den annen side er det også mulig å ta en, eller to
behandlinger pr. uke etterpå for å beholde fargen.
Hva De enn måtte foretrekke, vær sikker på at De ikke
overskrider det maksimale antall soltimer pr. år.
• or solariet type nr. HB 542 og HB 544 (med 10 lysrør) er
dette 28 timer (= 1680 minutter).
F.eks.:
Tenk Dem at De tar en 10 dagers behandling med 10
minutters behandling den første dagen og
30 minutter de 9 følgende dagene.
Hele behandlingstiden blir da (1 x 10 min.) + (9 x 30 min.)=
280 minutter.
• Ved bruk av solariet type nr. HB 542 eller HB 544
(med 10 lysrør), kan De i løpet av et år ta 6 slike
behandlinger (6 x 280 min.= 1680 min.)
Selvfølgelig er maksimum antall soltimer gyldig for hver
side av kroppen separat (med andre ord både for forsiden
og baksiden av kroppen).
Det fremgår av tabellen at den første behandlingen i en
serie alltid skal være på 10 minutter. Dette er ikke avhengig
av den enkeltes hudømfintlighet.
• Hvis De tror at behandlingstiden er for lang for Dem
(f.eks. at huden blir stram og øm etter en behandling)
anbefales det at behandlingstiden blir redusert med
f.eks. 5 min på hver side av kroppen.
• For å få jevn farge over det hele, anbefales det at De
dreier litt på Dem av og til under behandlingen, slik at
kroppens sider også får farge.
Behandlingstid for
UV behandling
(for hver del av
kroppen som 1st 2. 3. 4. 5. 6. 7. 8. 9. 10.
bestråles) i min. dag dag dag dag dag dag dag dag dag dag
for pers.med meget 10 10-15 10-15 10-15 10-15 10-15 10-15 10-15 10-15 10-15
for pers.med 10 20-25 20-25 20-25 20-25 20-25 20-25 20-25 20-25 20-25
for pers.med lite 10 30-35 30-35 30-35 30-35 30-35 30-35 30-35 30-35 30-35
opphold på minst 48 timer

49
Generell beskrivelse (fig. 1 side 3)
A Lysrør og starter
HB 541 - 8 lysrør (type Philips UVA 100W
"Cleo Performance"), med
8 startere (type Philips S 12)
HB 542 - 10 lysrør (type Philips UVA 100W
"Cleo Performance"), med
10 startere (type Philips S 12)
HB 544 - 10 lysrør (type Philips UVA 100W
"Cleo Performance"), med
10 startere (type Philips S 12)
4 små lysrør (type Philips UVA 15W
"Cleo Performanse") for ekstra
bruningseffekt i ansiktet, med
4 startere (type Philips S 2).
B Tidsur
C Stativ
D Beskyttelsesbriller (2)
(type nr. HB 071/service nr. 4822 690 80123)
E Endestykker
F Stang
G Bolter og muttere
H Høydejusterings-hjul
I Skrunøkkel
J Nettledning
K Hjul
L Håndtak
M Kjølevifte
N Ventilasjonsåpninger
O Beskyttelsesfilter
P Beskyttelsesfolie
Klargjøring for bruk
Montering av stativet
-Få hjelp av en annen person. Legg solariet på et bord, med
rørene pekende nedover (fig. 2). Forsikre Dem om at
håndtaket ikke hviler på bordet.
- Fest hjulene til stativet (fig. 3).
- Monter stativet til stangen (fig. 4, 5).
-Løft solariet fra bordet (fig. 6).
- Fjern beskyttelsesfolien fra beskyttelsesfilteret (fig. 7).
De kan sole Dem enten:
liggende (fig. 8),
sittende (fig. 9), eller
stående (fig. 10)
med dette solariet.
For å gjøre dette mulig kan
De justere høyden og
posisjonen til overdelen.
• Under soling må
avstanden mellom rørene
og kroppen være minst 20
cm (8").
• Hvis De har til hensikt å
sole Dem liggende, betyr
dette at avstanden mellom
rørene og Deres seng,
benk eller madrass, må
minst være 40 cm (16")
(fig. 11).
Høydejustering
- Vri høydejusterings-hjulet
mot urviseren to eller tre
omdreiinger for å frigjøre
stangen (fig. 12). En
gass-støtdemper vil
stabilisere posisjonen til
stangen.
- Juster høyden til stangen
ved å trekke eller skyve i
håndtaket (fig. 13).
- Vri høydejusterings-hjulet
med urviseren for å låse
stangen (fig. 14).
2
3
4
5
6
1
1
2
8
9
10
11
20
40
12
13
7
14

50
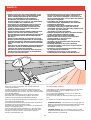
Bruk av solariet
- Undersøk avstanden mellom
kroppen og solariet
(minimum 20 cm eller 8").
Hvis nødvendig juster
høyden og/eller stillingen til
solariet.
- Sett timeren til ønsket
behandlingstid (fig. 15).
(Vennligst se tabellen i
denne bruksanvisningen og
Deres egne notater).
- Glem ikke å ta på Dem de
medfølgende
beskyttelsesbrillene.
- Så snart behandlingstiden er over vil rørene automatisk bli
slått av.
- Hvis De ønsker å behandle den andre siden av kroppen
samtidig, kan De sette på timeren igjen (det er ikke
nødvendig å avkjøle solariet først).
Liggende
- Plasser solariet ved siden av
sengen eller benken.
- Da stativet er på hjul kan De
dra solariet mot Dem mens
De ligger. Forsikre Dem om
at rørene er plassert rett
over Dem (fig. 8).
- De kan bevege stativet
under sengen (fig. 16).
- Etter bruk kan De skyve
solariet vekk for å gjøre det
lettere å stå opp.
Sittende
- Plasser en (flukt)stol og solariet sammen som illustrert i fig. 9.
- Juster solariet i riktig stilling ved å dreie på den øvre delen.
Stående
- Drei den øvre delen i vertikal stilling. Hvis nødvendig juster
høyden.
- Ta plass foran solariet (fig. 10) i en avstand av minst 20 cm
(8").
Oppbevaring
Solariet tar liten plass når det
oppbevares vertikalt
(fig. 17).
Rengjøring
• Trekk alltid støpselet ut av stikkontakten og la solariet kjøles
ned før rengjøring.
• Utsiden kan rengjøres med en fuktig klut. Pass på at det
ikke renner vann inn i apparatet.
• Bruk ikke pusse- eller slipemidler.
• Bruk ikke væsker som alkohol, bensin eller aceton, da dette
kan lage skader som ikke kan repareres.
Skifting av lysstoffrør og/eller startere
I tidens løp (ved vanlig familiebruk først etter flere år), vil
lysstoffrørene bli mindre effektive.
Når dette skjer må man enten forlenge behandlingstiden eller
skifte ut rørene.
• De kan la rørene og/eller starterne bli skiftet av autorisert
service personell: De har nødvendig produktkjennskap og
originale deler og verktøy for å gjøre jobben.
De har også mulighet til å avhende seg med de brukte
rørene på en godkjent måte.
• Hvis De foretrekker å skifte rørene selv, gjøres det på
følgende måte:
- Trekk først støpselet ut av stikkontakten.
-Løsne skruene og fjern de to endedekslene (fig. 18).
- Trekk helt ut beskyttelsesdekslet (fig. 19). Etter dette er
rørene og starterne tilgjengelige.
- Drei rørene forsiktig mot venstre eller høyre. Når de løsner,
fjernes de fra lampeholderne.
- Fjern starterne ved å dreie dem forsiktig mot venstre og
deretter trekke dem ut. (Halvparten av starterne sitter på
hver sin side av solariet).
-Gå frem på motsatt vis ved innsetting av nye rør og startere.
- Skyv beskyttelsesdekslet tilbake på plass. Glem ikke å feste
endestykkene med skruene.
Rørene til dette solariet inneholder stoffer som kan
forurense miljøet. Når De kaster et gammelt rør,
forsikre Dem om at det er separert fra vanlig
husholdningsavfall og kastes på en offentlig anvist
plass.
15
6
0
5
5
5
0
4
5
4
0
3
5
3
0
2
5
2
0
1
5
1
0
5
0
M
I
N
16
17
19
18
f
La pagina sta caricando ...
La pagina sta caricando ...
La pagina sta caricando ...
La pagina sta caricando ...

55
Solariets viktigaste delar, se fig 1 sid 3.
A Solarielysrör och tändare.
HB 541 - 8 stora lysrör (typ Philips UVA 100W "
Cleo performance") med
8 tändare (typ Philips S12)
HB 542 - 10 stora lysrör (typ Philips UVA 100W
"Cleo performance") med
10 tändare (typ Philips S12)
HB 544 - 10 stora lysrör (typ Philips UVA 100W
"Cleo performance") med
10 tändare (typ Philips S12)
4 små lysrör (typ Philips UVA 15W
"Cleo performance") för extra solbränna i
ansiktet, med
4 tändare (typ Philips S2)
B Tidur, med vilken du ställer in önskad solningstid.
C Stativ, bestående av ben och fot.
D Skyddsglasögon, 2st.
(Typ nr HB 071 / service nr 4822 690 80123)
E Skyddskåpor.
F Teleskoprör.
G Fästbultar och muttrar.
H Höjdjusteringsratt.
I Skruvnyckel.
J Nätsladd.
K Länkrullar (svängbara hjul).
L Handtag.
M Kylfläkt.
N Ventilationsöppningar på ovansidan.
O Skyddsskiva.
P Skyddsfolie för skyddsskiva.
Uppställning av solariet för solning
Att sätta ihop stativet
-Lägg solhimmeln, med hjälp av en person, på ett bord med
lysrören vända neråt, fig 2.
Se till att handtaget (L) inte vilar mot bordet.
- Skruva fast länkrullarna (K), fig 3.
- Skruva ihop stativet med fästbultarna, fig 4 - 5.
- Res upp solariet från bordet, fig 6.
- Avlägsna skyddsfolien från skyddsskivan, fig 7.
Du kan sola antingen:
liggande, fig 8,
sittande, fig 9 eller
stående, fig 10
med detta solarium.
För att möjliggöra detta kan
solhimmeln ställas i olika höjd
och vinklar.
• Vid solning skall avståndet
mellan lysrören och
kroppen vara minst 20 cm.
• Om du avser att sola
liggande innebär detta att
avståndet mellan sängen,
soffan, madrassen och
lysrören skall vara minst ca
40 cm, fig 11.
Höjdinställning
- Vrid höjdinställningsratten
(H) moturs två till tre varv så
att teleskoppröret (F) frigörs,
fig 12.
En gasfjäder inuti håller
teleskopröret i läge.
- Justera höjden genom att
dra neråt eller trycka uppåt,
fig 13. OBS! När solariet
levereras står det i översta
läget.
- Vrid höjdinställningsratten
medurs för att låsa
teleskopröret, fig 14.
2
3
4
5
6
1
1
2
8
9
10
11
20
40
12
13
7
14
La pagina sta caricando ...
La pagina sta caricando ...

4222 000 69431
;
-
 1
1
-
 2
2
-
 3
3
-
 4
4
-
 5
5
-
 6
6
-
 7
7
-
 8
8
-
 9
9
-
 10
10
-
 11
11
-
 12
12
-
 13
13
-
 14
14
-
 15
15
-
 16
16
-
 17
17
-
 18
18
-
 19
19
-
 20
20
-
 21
21
-
 22
22
-
 23
23
-
 24
24
-
 25
25
-
 26
26
-
 27
27
-
 28
28
-
 29
29
-
 30
30
-
 31
31
-
 32
32
-
 33
33
-
 34
34
-
 35
35
-
 36
36
-
 37
37
-
 38
38
-
 39
39
-
 40
40
-
 41
41
-
 42
42
-
 43
43
-
 44
44
-
 45
45
-
 46
46
-
 47
47
-
 48
48
-
 49
49
-
 50
50
-
 51
51
-
 52
52
-
 53
53
-
 54
54
-
 55
55
-
 56
56
-
 57
57
-
 58
58


Philips HB542/01 Manuale utente
- Categoria
- Solarium
- Tipo
- Manuale utente
in altre lingue
- English: Philips HB542/01 User manual
- français: Philips HB542/01 Manuel utilisateur
- español: Philips HB542/01 Manual de usuario
- Deutsch: Philips HB542/01 Benutzerhandbuch
- Nederlands: Philips HB542/01 Handleiding
- dansk: Philips HB542/01 Brugermanual
- svenska: Philips HB542/01 Användarmanual
Documenti correlati
-
Philips HB 851 Manuale utente
-
Philips HB546 Manuale utente
-
-
-
-
Philips HB555 Suncare Manuale utente
-
-
-
-