Solac SANDWICH 2 Mod SD5051 Manuale del proprietario
- Categoria
- Produttori di sandwich
- Tipo
- Manuale del proprietario

ESPAÑOL es
1 ATENCION
• Lea completamente estas instrucciones antes de utilizar su aparato.
• Este manual es parte integrante del producto. Consérvelo en
un lugar seguro para futuras consultas.
• Este aparato es sólo para uso doméstico, no industrial. Cualquier
uso diferente al indicado podría ser peligroso.
• Los niños deberían ser supervisados para asegurar que no juegan
con el aparato.
• Este aparato no está destinado para ser utilizado por personas
(incluidos niños) cuyas capacidades físicas, sensoriales o mentales
estén reducidas, o carezcan de experiencia o conocimiento, salvo
si han tenido supervisión o instrucciones relativas al uso del aparato
por una persona responsable de su seguridad.
• No realice ninguna modificación ni reparación en el aparato. Ante
cualquier anomalía en el cable u otra parte del aparato, no lo use y
acuda a un servicio de asistencia autorizado.
• No utilice piezas o accesorios no suministrados o recomendados
por SOLAC.
• Antes de enchufar el aparato a la red eléctrica, compruebe que el
voltaje indicado coincide con el de su hogar.
• Desenchufe el aparato siempre después de su uso y antes de
desmontar o montar piezas y realizar cualquier tarea de
mantenimiento o limpieza. Desenchúfelo también en caso de
apagón. Cuando enchufe o desenchufe el aparato, debe estar
desconectado.
• No tire nunca del cable ni cuelgue el aparato por él. Desenchufe el
aparato tirando siempre de la clavija, nunca del cable.
• Evite que el cable de alimentación entre en contacto con aristas
cortantes o superficies calientes. No deje el cable colgando por el
borde de la mesa o encimera, para evitar que los niños tiren de él y
hagan caer el aparato.
• Si el cable de alimentación está dañado, debe ser sustituido por el
fabricante, por su servicio post-venta o por personal cualificado
similar con el fin de evitar un peligro.
• Retire todas las bolsas de papel o de plástico, láminas plásticas,
cartones y pegatinas eventuales que se encuentran dentro o fuera
del aparato que sirvieron como protección de transporte o
promoción de venta.
• No introduzca nunca el aparato en agua u otro líquido, ni en el
lavavajillas.
• No toque el aparato con las manos húmedas cuando esté en
funcionamiento.
• No use el aparato nunca sobre superficies mojadas ni en el exterior.
• El aparato debe conectarse a una base de toma de corriente que
disponga de un contacto de tierra adecuado.
• No deje el aparato en funcionamiento sin vigilancia.
No utilice el
aparato conectado a un temporizador externo ni a un sistema
separado de control remoto.
• No coloque el aparato debajo de una toma fija de corriente.
• No haga funcionar el aparato con el cable enrollado.
• No calentar con las placas abiertas.
• Coloque el aparato en una superficie nivelada y evite que el cable
cuelgue por el canto de la mesa.
• Antes de utilizar el aparato por primera vez, limpie las placas con un
paño humedecido en aceite. No raspe nunca
las placas con
elementos metálicos.
• Las placas exteriores pueden alcanzar temperaturas elevadas.
Procure no tocarlas con la sandwichera caliente.
• IMPORTANTE: NO CUBRA NUNCA EL APARATO DURANTE EL
FUNCIONAMIENTO, PODRÍA PROVOCAR UN PELIGROSO
SOBRECALENTAMIENTO.
q
¡ATENCION!!: Cuando desee desprenderse del aparato,
NUNCA lo deposite en la basura, sino que acuda al PUNTO
LIMPIO o de recogida de residuos más cercano a su
domicilio, para su posterior tratamiento. De esta manera, está
contribuyendo al cuidado del medio ambiente.
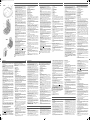
2 COMPONENTES PRINCIPALES
1 Tapa superior
2 Piloto luminoso de encendido (rojo)
3 Piloto luminoso de calentamiento. (verde)
4 Placas superiores
5 Placas inferiores
6 Base de la sandwichera
7 Cable de conexión a la red
8 Pletina de cierre
9 Recogecables (SD5051)
3 INSTRUCCIONES DE USO
1 Conecte la sandwichera a la red. El piloto luminoso de
encendido (2) se encenderá, indicando que la sandwichera
está en funcionamiento. Cierre la sandwichera y accione la
pletina de cierre (8).
2 Disponga de pan de molde y de los ingredientes para el
relleno sobre una mesa seca y limpia.
3 Aplique una fina capa de mantequilla a las caras exteriores
de los panes para evitar que se peguen al contacto con las
placas calientes.
4 Prepare los sandwiches a su gusto.
5 Transcurridos unos minutos, el piloto luminoso de
calentamiento (3) se encenderá, indicando que la
sandwichera ha alcanzado la temperatura adecuada.
6 Introduzca los sándwiches, cierre la sandwichera y accione
la pletina de cierre (8). Espere unos tres minutos
aproximadamente para su perfecta elaboración.
i El piloto de calentamiento (3) se apagará y se encenderá
durante el funcionamiento para mantener constante la
temperatura adecuada en las placas.
Z Recuerde que si algún ingrediente queda pegado a las
placas no ha de utilizar elementos metálicos para
desprenderlo.
4 OTRAS APLICACIONES (SD5051)
Z
Esta sandwichera ha sido diseñada para hacer huevos fritos
de una manera rápida y limpia. Siga las siguientes
instrucciones:
1 Una vez enchufada la sandwichera a la red y encendido el
piloto luminoso de calentamiento verde (3), abra la
sandwichera y ponga un poco de mantequilla o aceite en las
placas inferiores.
2 Vierta los huevos en las placas inferiores y añada sal a su
gusto.
3 Cierre la sandwichera y en dos minutos los huevos estarán
listos
4 Abra la sandwichera y saque los huevos. Le recordamos que
no debe utilizar elementos metálicos para extraerlos ya que
se rayan las placas.
5 MANTENIMIENTO Y LIMPIEZA
‹
Antes de su limpieza, verifique que la sandwichera está
desenchufada, pero no espere a que las placas se enfríen
totalmente para limpiarla.
• Use una esponja o un paño húmedo. Evite detergentes y
elementos abrasivos para no rayar las placas.
• Una vez fría la sandwichera, aplique un paño seco antes de
guardarla.
• Puede guardarla tanto en posición horizontal como vertical.
Z Recuerde que no debe utilizar elementos metálicos en
contacto con las placas.
ENGLISH en
1 IMPORTANT
• Read these instructions carefully before using the appliance.
• This manual is an integral part of the product. Keep it in a safe
place for future reference.
• This appliance is exclusively for household use and not for industrial
use. It is dangerous to use it for any purpose other than the one
indicated.
• Children must be supervised to ensure they do not play with the
appliance.
• This appliance is not to be used by persons (or children) whose
physical, sensorial or mental capacities are impaired, or who have
no experience or knowledge, unless supervised or instructed in the
use of the appliance by a person responsible for their safety.
• Do not make any modifications or repairs to the appliance. In the
event of any anomaly in the cord or any other part of the appliance,
do not use it and take it to an authorised service centre.
• Do not use any parts or accessories not supplied or recommended
by SOLAC.
• Before plugging the appliance into the mains, check that the
indicated voltage is the same as in your home.
• Always unplug the appliance after use and before assembling or
removing parts, and performing any maintenance or cleaning
operations. Also unplug it in the case of a power cut. The appliance
must be switched off before plugging or unplugging it into the mains
• Never pull the cord or use it to hang up the appliance. Always unplug
the appliance by pulling the connection pin, and not the cord.
• Make sure the cord does not come into contact with sharp edges or
hot surfaces. Do not leave the cord hanging over the edge of a table
or worktop, to prevent children from pulling it and causing the
appliance to fall.
• If the power cord is damaged, it should be replaced by the
manufacturer or by your after-sales service shop or similar qualified
personnel to prevent possible hazards.
• Remove all elements from the inside or outside of the appliance
used for protection during transport or for sales promotions, such as
paper or plastic bags, plastic sheets, cardboard and stickers.
• Never immerse the main body in water or any other liquid, or put it
in the dishwasher.
• Do not touch the appliance with wet hands when in operation.
• Do not use the appliance on wet surfaces or outdoors.
• The appliance must be connected to a power socket with a suitable
ground connection.
•
Do not leave the machine running when unattended.
Do not use
the device connected to an external timer or a separate remote
control system.
• Do not install it under a wall plug.
• Do not operate the appliance with the cord wound up.
• Do not heat it with the plates open.
• Place the appliance on a flat surface, ensuring that the cord does
not hang over the edge of the table.
• Before using the appliance for the first time, clean the plates with a
lightly oiled cloth: Never
use metal instruments to scrape the plates.
• The outer plates can get very hot. Try not to touch them while the
sandwich toaster is still hot.
• IMPORTANT: NEVER COVER THE APPLIANCE WHEN IN
OPERATION, AS THIS CAN CAUSE DANGEROUS
OVERHEATING.
q
IMPORTANT!! When you want to dispose of the appliance,
NEVER throw it in the rubbish bin. Take it to the CLEAN
POINT or waste collection centre closest to your home for
processing. You will thus be helping to take care of the
environment.
2 MAIN COMPONENTS
1 Top cover
2 Power pilot light (red)
3 Heating pilot light (green)
4 Top plates
5 Bottom plates
6 Sandwich toaster base
7Power cord
8 Closing tab
9 Cord winder
3 INSTRUCTIONS FOR USE
1 Plug the sandwich toaster into the mains. The pilot light (2)
comes on to show that the sandwich toaster is operational.
Close the sandwich toaster, and lock it with the closing tab
(8).
2 Place the sliced bread and filling ingredients on a clean dry
surface.
3 Spread a thin layer of butter on the outside of the bread to
keep it from sticking to the hot plates.
4 Prepare the sandwiches to your liking.
5 After a few minutes, the heating light (3) comes on to show
that the sandwich toaster has reached the correct
temperature.
6 Insert the sandwiches, close the sandwich toaster, and lock
it with the closing tab (8). Wait around three minutes for them
to be perfectly toasted.
i The heating pilot light (3) will come on and off during the
operation of the appliance to ensure a constant temperature
of the plates.
Z Remember not to use metal instruments to remove any
ingredients that stick to the plates.
4OTHER USES
Z
This sandwich toaster has been designed to fry eggs quickly
and cleanly: Proceed as follows:
1 Plug the sandwich toaster in, and when the heating pilot light
(3) comes on, open the unit and place a little butter or oil on
the bottom plates.
2 Break the eggs onto the bottom plates and add salt to taste.
3 Close the sandwich toaster and the eggs will be cooked in 2
minutes
4 Open the sandwich toaster and remove the eggs. Remember
not to use any metal instruments for this, as they will scratch
the plates.
5 MAINTENANCE AND CLEANING
‹
Before cleaning, make sure the sandwich toaster is
unplugged, but do not wait for the plates to cool down
completely before cleaning them.
• Use a damp sponge or cloth. Avoid using detergents and
abrasive elements which may scratch the plates.
• Once the sandwich toaster is cold, wipe it with a dry cloth before
putting it away.
• The unit can be stored vertically or horizontally.
Z Remember not to use metal instruments in contact with the
plates.
FRANÇAIS fr
1 ATTENTION
• Lisez attentivement ce mode d'emploi avant d'utiliser l'appareil.
• Ce manuel fait partie du produit. Conservez-le dans un lieu sûr
afin de pouvoir le consulter ultérieurement.
• Cet appareil est destiné uniquement à un usage domestique, non
industriel. Tout usage autre que celui indiqué pourrait s’avérer
dangereux.
• Les enfants doivent être surveillés afin de s’assurer qu’ils ne jouent
pas avec l’appareil.
• À moins d’avoir été supervisées ou d’avoir reçu les instructions
d’usage de la personne responsable de leur sécurité, les personnes
(y compris des enfants) aux capacités physiques, sensorielles ou
mentales réduites, ou manquant d’expérience ou de connaissance,
ne doivent pas utiliser cet appareil.
• Ne modifiez ni ne réparez jamais l’appareil. Si vous constatez une
anomalie sur le cordon ou une autre partie de l’appareil, ne l’utilisez
pas et amenez-le à un centre de service technique agréé.
• N’utilisez pas de pièces ni d'accessoires non fournis ou
recommandés par SOLAC.
• Avant de brancher l’appareil au secteur, vérifiez que la tension
indiquée correspond bien à celle de votre logement.
• Débranchez toujours l’appareil après usage et avant de démonter
ou de monter des pièces et d'effectuer toute opération d’entretien ou
de nettoyage. Débranchez-le également en cas de coupure de
courant. Lorsque vous branchez ou débranchez l’appareil, celui-ci
doit être en position « arrêt ».
• Ne tirez jamais sur le câble et ne suspendez pas l’appareil par le
câble. Débranchez l’appareil en tirant toujours sur la prise, jamais
sur le cordon.
• Prenez garde à ce que le cordon d'alimentation n'entre pas en
contact avec des éléments tranchants ou des surfaces chaudes. Ne
laissez pas le cordon pendre au bord de la table ou du plan de
travail afin d’éviter que les enfants ne tirent dessus et ne le fassent
tomber.
• Si le cordon d’alimentation est endommagé, il devra être remplacé
par le fabricant, par un service après-vente ou par tout
professionnel agréé afin d’écarter tout danger.
• Retirez tous les sachets en papier ou en plastique, les films
plastiques, les cartons et autocollants éventuels apposés sur
l'appareil ou à l'extérieur lui servant de protection pendant le
transport ou pour sa promotion.
• Ne plongez pas l'appareil dans l'eau ou dans un liquide et ne le
mettez pas au lave-vaisselle. L'appareil ne doit jamais être en
contact avec l'eau pendant son nettoyage.
• Ne touchez pas l'appareil en marche avec les mains humides.
• Ne l'utilisez jamais sur des surfaces mouillées ni à l'extérieur.
• L’appareil doit être branché à une prise de courant disposant d’une
prise de terre adaptée.
•
Ne laissez pas l'appareil en fonctionnement sans surveillance.
N'utilisez pas l'appareil en le branchant à une minuterie ni à un
système séparé de contrôle à distance.
• N’installez pas l’appareil au-dessous d’une prise électrique.
• Ne faites pas fonctionner l’appareil avec le cordon d’alimentation
enroulé.
• Ne chauffez pas l’appareil avec les plaques ouvertes.
• Placez l’appareil sur une surface plane et ne laissez pas le câble
pendre au-dessus du rebord de la table.
• Avant d’utiliser votre appareil pour la première fois, nettoyez-en les
plaques à l’aide d’un chiffon humidifié d’huile. Ne grattez jamais les
plaques avec des éléments métalliques.
• Les plaques extérieures peuvent atteindre des températures très
élevées. Ne les touchez pas si elles sont chaudes.
• IMPORTANT : NE COUVREZ JAMAIS L’APPAREIL PENDANT
SON FONCTIONNEMENT EN RAISON DU RISQUE DE
SURCHAUFFE.
q
ATTENTION ! Pour mettre l’appareil au rebut, NE LE JETEZ
JAMAIS à la poubelle ; déposez-le dans un POINT DE
RECYCLAGE ou à la déchetterie la plus proche afin qu’il y
soit recyclé. Vous contribuerez ainsi à la préservation de
l’environnement.
2 PRINCIPAUX ÉLÉMENTS
1 Couvercle supérieur
2 Voyant de fonctionnement (rouge)
3 Voyant de chauffe (vert)
4 Plaques supérieures
5 Plaques inférieures
6 Base de l’appareil à sandwich
7 Câble électrique
8 Clip de fermeture
9 Enrouleur du câble
3 MODE D’EMPLOI
1 Branchez l’appareil. Le voyant de fonctionnement (2)
s’allumera pour indiquer que l’appareil a été mis en marche.
Refermez-le et actionnez le clip de fermeture (8).
2 Placez sur une table sèche et propre les tranches de pain de
mie et les ingrédients de garniture entre deux tranches.
3 Appliquez une fine couche de beurre sur les faces
extérieures des tranches de pain afin d’éviter qu’elles ne
collent en entrant en contact avec les plaques chaudes.
4 Préparez la garniture des sandwiches à votre goût.
5 Après quelques minutes, le voyant vert (3) s’allumera pour
indiquer que l’appareil a atteint la bonne température.
6 Introduisez les sandwiches dans l’appareil, refermez-le et
actionnez le clip de fermeture (8). Attendez quelques
minutes jusqu’à ce que les sandwiches soient correctement
cuits.
i Le voyant de chauffe (3) s’éteindra et s’allumera
successivement pendant le fonctionnement de l’appareil afin
de permettre aux plaques de conserver la bonne
température.
Z Souvenez-vous de ne jamais utiliser d’élément métallique
pour décrocher tout ingrédient qui pourrait rester collé aux
plaques.
4 AUTRES APPLICATIONS
Z
Cet appareil à sandwichs a également été conçu pour frire
des œufs d’une manière propre et rapide. Pour ce faire,
suivez les instructions ci-dessous :
1 Après avoir branché l’appareil à sandwiches, et une fois le
voyant (3) éteint, ouvrez l’appareil et mettez un peu de
beurre ou d’huile sur les plaques inférieures de celui-ci.
2 Versez les œufs sur les plaques inférieures et ajoutez-y une
pincée de sel à votre goût.
3 Refermez l’appareil à sandwiches et vos œufs seront prêts
au bout de deux minutes.
4 Ouvrez l’appareil à sandwiches et retirez-en les œufs frits.
Nous vous rappelons que vous ne devez pas utiliser
d’élément métallique au risque de rayer les plaques.
5 ENTRETIEN ET NETTOYAGE
‹ Avant de nettoyer votre appareil à sandwiches, vérifiez que
ce dernier est bien débranché, mais n’attendez pas que les
plaques soient entièrement refroidies pour les nettoyer.
• Utilisez à cet effet une éponge ou un chiffon humide. Evitez
d’utiliser des produits nettoyants ou des objets abrasifs, au
risque de rayer les plaques.
• Une fois l’appareil à sandwiches refroidi, passez-y un chiffon sec
avant de le ranger.
• Vous pouvez le ranger aussi bien en position horizontale et
verticale.
Z Souvenez-vous que vous ne devez jamais toucher les
plaques avec des objets métalliques.
DEUTSCH de
1 ACHTUNG
• Lesen Sie diese Anweisungen vor Inbetriebnahme des Gerätes
aufmerksam durch.
• Diese Bedienungsanleitung ist Bestandteil des Produkts.
Bewahren Sie sie an einem sicheren Ort zum späteren
Nachlesen auf.
• Dieses Gerät ist ausschließlich für den Hausgebrauch und nicht für
gewerbliche Zwecke bestimmt. Jede andere Verwendung als die
vorgesehene kann gefährlich sein.
• Kinder nicht unbeaufsichtigt lassen um sicherzustellen, dass sie das
Gerät nicht als Spielzeug verwenden.
• Dieses Gerät darf nicht von Personen (einschließlich Kindern) mit
eingeschränkten körperlichen, sensorischen oder geistigen
Fähigkeiten bzw. ohne ausreichende Erfahrung und Kenntnisse
benutzt werden, es sei denn unter der Aufsicht oder
entsprechenden Anleitung einer für ihre Sicherheit verantwortlichen
Person.
• Nehmen Sie keine Änderungen oder Reparaturen am Gerät vor.
Benutzen Sie das Gerät nicht im Falle eines Defekts am Netzkabel
oder einem anderen Geräteteil und bringen Sie es zu einem
autorisierten Kundendienst.
• Verwenden Sie ausschließlich von SOLAC gelieferte oder
empfohlene Teile bzw. Zubehör.
• Vergewissern Sie sich vor dem Netzanschluss des Geräts, dass die
angegebene Netzspannung mit derjenigen Ihres Haushalts
übereinstimmt.
• Trennen Sie das Gerät nach dem Gebrauch, vor dem Abnehmen
bzw. Aufsetzen eines Teils sowie vor jeder Reinigung oder Wartung
stets vom Netz. Bei Stromausfall ebenfalls vom Netz trennen. Das
Gerät muss ausgeschaltet sein, wenn Sie es an das Netz
anschließen oder vom Netz trennen.
• Ziehen Sie nicht am Kabel bzw. hängen Sie das Gerät nicht am
Kabel auf. Ziehen Sie stets am Netzstecker, nicht am Kabel, wenn
Sie das Gerät vom Netz trennen.
• Achten Sie darauf, dass das Netzkabel nicht mit scharfen Kanten
oder heißen Flächen in Berührung kommt. Lassen Sie das Kabel
nicht über die Tischkante bzw. Abstellfläche hängen, um zu
verhindern, dass Kinder daran ziehen und das Gerät zu Boden fällt.
• Sollte das Netzkabel beschädigt sein, darf es vorsichtshalber nur
vom Hersteller, seinem autorisierten Kundendienst oder ähnlichem
Fachpersonal ausgetauscht werden.
• Entfernen Sie alle Papier- und Kunststoffbeutel, Kunststofffolien,
Kartons bzw. Aufkleber in oder am Gerät, die als Transportschutz
oder Werbungselemente dienen.
• Das Gerät nicht in Wasser oder andere Flüssigkeiten tauchen und
nicht in der Spülmaschine reinigen.
• Das Gerät während des Betriebs nicht mit feuchten Händen
berühren.
• Stellen Sie das Gerät niemals auf nassen Oberflächen oder im
Freien auf.
• Stellen Sie sicher, dass die Steckdose vorschriftsmäßig geerdet ist.
•
Lassen Sie das Gerät nicht unbeaufsichtigt in Betrieb.
Verwenden Sie das Gerät nicht, wenn es an eine externe
Zeitschaltuhr oder an eine separate Fernbedienung angeschlossen
ist.
• Das Gerät nicht unter einer Steckdose aufstellen.
• Das Gerät nicht mit aufgerolltem Kabel einschalten.
• Nicht mit geöffneten Platten erhitzen.
• Stellen Sie das Gerät auf eine waagerechte Fläche und lassen Sie
das Netzkabel nicht über die Tischkante hängen.
• Vor der ersten Verwendung Platten mit einem ölgetränkten Tuch
abreiben. Niemals
mit Metallgegenständen über die Platten fahren.
• Die Außenflächen der Platten können sehr heiß werden. Achten Sie
darauf, sie während des Gerätebetriebs nicht zu berühren.
• WICHTIG: DECKEN SIE DAS GERÄT WÄHREND DES
BETRIEBS NIEMALS AB, DA DIE GEFAHR EINER
ÜBERHITZUNG BESTEHT.
q
ACHTUNG: Das Gerät KEINESFALLS über den Hausmüll
entsorgen, sondern zum nächstgelegenen
WERTSTOFFHOF oder zu einer Abfallannahmestelle zur
Weiterverwertung bringen. So leisten Sie einen Beitrag zum
Umweltschutz.
2 MATERIALIEN
1Deckel
2 Betriebsanzeige (rot)
3 Aufwärmanzeige (grün)
4 Obere Platten
5 Untere Platten
6 Boden des Sandwichtoasters
7 Netzkabel
8 Schliessvorrichtung
9 Kabelfach
3 GEBRAUCHSANLEITUNG
1 Sandwichtoaster ans Netz anschließen. Die Betriebsanzeige
(2) leuchtet auf und zeigt an, dass der Toaster in Betrieb ist.
Sandwichtoaster mithilfe der Schließvorrichtung (8) schließen.
2 Toastbrotscheiben und Zutaten für den Belag auf einer
sauberen und trockenen Unterlage bereitlegen.
3 Die Außenseiten der Toastscheiben dünn mit Butter oder
Margarine bestreichen, um beim Kontakt mit der heißen
Toastplatte ein Ankleben zu vermeiden.
4 Sandwich nach Belieben zubereiten.
5 Nach einigen Minuten leuchtet die Aufwärmanzeige (3) auf
und weist darauf hin, dass die Betriebstemperatur erreicht ist.
6 Die vorbereiteten Sandwiches zwischen die Toastplatten
legen und den Toaster mithilfe der Schließvorrichtung (8)
schließen. Nach ca. 3 Minuten sind die Sandwiches perfekt
getoastet.
i Während des Betriebs geht die Aufwärmanzeige (3)
abwechselnd aus und an, um die ideale Plattentemperatur
aufrechtzuerhalten.
Z Bitte beachten Sie, dass eventuelle auf den Toastplatten
haftende Reste nicht mit Metallgegenständen entfernt
werden dürfen.
4 WEITERE VERWENDUNGEN
Z Dieses Modell wurde speziell dafür entworfen, Spiegeleier
auf schnelle uns saubere Weise zuzubereiten. Gehen Sie
dazu folgendermaßen vor:
1 Schließen Sie den Sandwichtoaster ans Netz an und warten
Sie, bis die grüne Aufwärmanzeige (3) erloschen ist.
Sandwichtoaster öffnen und etwas Butter oder Öl auf die
unteren Platten geben.
2 Die Eier über der Platte aufschlagen und nach Geschmack
salzen.
3 Sandwichtoaster schließen – nach 2 Minuten sind die Eier
fertig.
4 Sandwichtoaster öffnen und Spiegeleier herausnehmen.
Achten Sie darauf, dabei keine Metallgegenstände zu
verwenden, da diese die Platten zerkratzen können.
5 PFLEGE UND REINIGUNG
‹ Vor dem Reinigen sicherstellen, dass der Sandwichtoaster
vom Netz getrennt ist. Die Platten sollten jedoch noch nicht
ganz abgekühlt sein.
• Verwenden Sie einen Schwamm oder ein feuchtes Tuch.
Verwenden Sie keine Scheuermittel, um Kratzer auf der
Plattenbeschichtung zu vermeiden.
• Sobald der Sandwichtoaster abgekühlt ist, reiben Sie ihn mit
einem trockenen Tuch ab. Danach kann er verstaut werden.
• Das Gerät kann sowohl waagerecht als auch senkrecht
aufbewahrt werden.
Z Achten Sie darauf, dass die Platten nicht mit
Metallgegenständen in Berührung kommen.
PORTUGUÊS pt
1 ATENÇÃO
• Leia completamente estas instruções antes de utilizar o aparelho.
• Este manual é parte integrante do produto. Guarde-o em lugar
seguro para eventual consulta posterior.
• Este aparelho destina-se apenas à utilização doméstica, não industrial.
Qualquer utilização diferente da indicada poderia ser perigosa.
• As crianças devem ser supervisionadas para assegurar que não
brincam com o aparelho.
• Este aparelho não está destinado para as pessoas (incluindo crianças)
que apresentem capacidades físicas, sensoriais ou mentais reduzidas,
ou falta de experiência e conhecimento, excepto se forem
supervisionadas ou receberam instruções sobre a utilização do aparelho
por uma pessoa responsável pela sua segurança.
• Não realize qualquer modificação nem reparação ao aparelho. Perante
qualquer anomalia no cabo ou noutra parte do aparelho, não o utilize e
contacte um serviço de assistência autorizado.
• Não utilize peças ou acessórios que não tenham sido fornecidos ou
recomendados pela SOLAC.
• Antes de ligar o aparelho à rede eléctrica, verifique se a tensão indicada
é igual à da sua residência.
• Desligue sempre o aparelho depois da utilização e antes de desmontar
ou montar peças e realizar qualquer tarefa de manutenção ou limpeza.
Desligue-o também em caso de corte de energia. Quando ligar ou
desligar o aparelho da tomada, este deve estar desligado.
• Nunca puxe nem pendure o aparelho pelo cabo. Desligue o aparelho da
tomada puxando sempre pela ficha, nunca pelo cabo.
• Evite que o cabo de ligação entre em contacto com arestas cortantes ou
superfícies quentes. Não permita que o cabo fique pendurado na borda
da mesa, ou no tampo, de forma a evitar que as crianças puxem pelo
mesmo e façam cair o aparelho.
• Se o cabo de alimentação estiver danificado, deve ser substituído pelo
fabricante, pelo seu serviço de pós-venda ou por pessoal qualificado
semelhante, com o fim de evitar riscos.
• Retire todas as embalagens de papel ou de plástico, lâminas plásticas,
cartões e eventuais autocolantes que se encontrem dentro ou fora do
aparelho e que serviram como protecção de transporte ou promoção de
venda.
• Não coloque nunca o aparelho na água ou em outro líquido, nem no
lava-loiça.
• Não toque no aparelho com as mãos húmidas quando este estiver a
funcionar.
• Não utilize o aparelho sobre superfícies molhadas nem no exterior.
• O aparelho deve ligar-se a uma tomada de corrente que disponha de um
contacto de ligação à terra adequado.
•
Não deixe o aparelho em funcionamento sem vigilância.
Não utilize
o aparelho ligado a um temporizador externo nem a um sistema
separado do controlo remoto.
• Não coloque o aparelho numa tomada fixa de corrente.
• Não coloque o aparelho em funcionamento com o fio enrolado.
• Não aqueça com as placas abertas.
• Coloque o aparelho numa superfície nivelada e evite que o cabo fique
pendurado no canto da mesa.
• Antes de utilizar o aparelho pela primeira vez, limpe as placas com um
pano humedecido em óleo. Nunca raspe as placas com peças metálicas.
• As placas exteriores podem alcançar temperaturas elevadas. Evite
tocar-lhes com a sandwicheira quente.
• IMPORTANTE: NUNCA TAPE O APARELHO DURANTE O
FUNCIONAMENTO. PODERIA PROVOCAR UM
SOBREAQUECIMENTO PERIGOSO.
q
ATENÇÃO! Quando pretender desfazer-se do aparelho, NUNCA
o deite no caixote do lixo, faça-o no seu ECOPONTO ou no ponto
de recolha de resíduos mais perto de sua casa, para o seu
posterior tratamento. Desta forma, está a contribuir para a
protecção do meio ambiente.
2 COMPONENTES PRINCIPAIS
1 Tampa superior
2 Luz piloto de ligação (vermelho)
3 Piloto luminoso de aquecimento. (verde)
4 Placas superiores
5 Placas inferiores
6 Base da sandwicheira
7 Fio de ligação à rede
8 Fecho
9 Recolhe-fios
3 INSTRUÇÕES DE UTILIZAÇÃO
1 Ligue a sandwicheira à rede. A luz piloto de acendimento (2)
acende-se, indicando que a sandwicheira está em
funcionamento. Feche a sandwicheira e aperte o fecho (8).
2 Coloque à sua disposição pão de forma e os ingredientes que vai
utilizar no recheio.
3 Aplique uma camada fina de manteiga na parte exterior das
faixas para evitar que, em contacto com as placas quentes estas
se peguem.
4 Prepare as sandwiches ao seu gosto.
5 Decorridos uns minutos, a luz piloto de aquecimento (3) acende-
se, indicando que a sandwicheira atingiu a temperatura
adequada.
6 Coloque as sandwiches, baixe a tampa superior e feche (8) a
sandwicheira. Espere cerca de três minutos para que a
sandwiche fique perfeita.
i O piloto de aquecimento (3) desliga-se e acende-se durante o
funcionamento para manter constante a temperatura adequada
nas placas.
Z Lembre-se que se algum ingrediente ficar agarrado às placas
não deverão ser utilizadas peças metálicas para o retirar.
4 OUTRAS APLICAÇÕES
Z
Esta sandwicheira foi estudada para estrelar ovos de uma forma
rápida e limpa. Siga as seguintes instruções:
1 Após a ligação da sandwicheira à rede, e a luz piloto (3) tiver
apagado, abra a sandwicheira e ponha um pouco de manteiga
ou óleo nas placas inferiores.
2 Deite os ovos nas placas inferiores e acrescente sal a seu gosto.
3 Feche a sandwicheira e após dois minutos os ovos estarão prontos
4 Abra a sandwicheira e retire os ovos. Recomendamos que não
deve utilizar peças metálicas, pois riscam as placas.
5 LIMPEZA E MANUTENÇÃO
‹
Antes da limpeza, verifique se a sandwicheira está desligada da
rede, mas para limpar as placas não espere que as mesmas
esfriem totalmente.
• Utilize uma esponja ou pano húmido. Evite detergentes e elementos
abrasivos para que as placas não fiquem riscadas.
• Quando a sandwicheira esfriar, coloque-lhe um pano seco antes de
a guardar.
• Pode guardá-la, tanto na posição horizontal como na vertical.
Z Nunca deve utilizar peças metálicas em contacto com as placas.
ITALIANO it
1ATTENZIONE
• Leggere le presenti istruzioni in ogni loro parte prima di utilizzare
l'apparecchio.
• Il presente manuale è parte integrante del prodotto. Conservarlo in
un luogo sicuro per poterlo consultare in futuro.
• Il presente apparecchio è destinato unicamente all'uso domestico e non
industriale. Per evitare pericoli, non utilizzare l'apparecchio per scopi
diversi da quelli a cui è destinato.
• Assicurarsi che i bambini non giochino con l'apparecchio.
• L’apparecchio non è indicato per essere utilizzato da persone (bambini
compresi) con capacità fisiche, sensoriali o mentali ridotte e prive
dell'esperienza e delle conoscenze necessarie, a meno che non abbiano
ricevuto una supervisione o istruzioni relative all’uso dell’apparecchio
stesso da una persona responsabile della loro sicurezza.
• Non apportare modifiche né riparazioni di sorta all’apparecchio. In
presenza di qualunque anomalia del cavo o di qualsiasi altra parte
dell’apparecchio, non utilizzarlo e consultare un servizio di assistenza
autorizzato.
• Non usare pezzi o accessori non forniti o non raccomandati da SOLAC.
• Prima di collegare l’apparecchio alla rete elettrica, verificare che il
voltaggio indicato coincida con quello della sua abitazione.
• Scollegare sempre l’apparecchio dalla rete elettrica dopo l’uso e prima
di smontare o montare dei pezzi o svolgere qualsiasi attività di
manutenzione o pulitura. Scollegare l’apparecchio dalla rete elettrica
anche in caso di black-out. In fase di collegamento o scollegamento alla/
dalla rete elettrica, l’apparecchio deve restare sempre spento.
• Non tirare mai il cavo né appendere l’apparecchio allo stesso.
Scollegare l’apparecchio dalla rete elettrica impugnando sempre la
spina e non il cavo di alimentazione.
• Evitare che il cavo entri in contatto con schegge taglienti o superfici
calde. Non lasciare il cavo sospeso dal bordo di tavoli o ripiani; i bambini
potrebbero tirarlo e far cadere l'apparecchio.
• Se il cavo di alimentazione è danneggiato farlo sostituire dal produttore,
da un servizio di assistenza post-vendita o da personale qualificato per
evitare pericoli.
• Rimuovere tutti i sacchetti di carta o di plastica, i pezzi di plastica, i
cartoncini ed eventuali adesivi che si trovano dentro o fuori l'apparecchio
e che sono stati utilizzati per proteggerlo durante il trasporto o per
promuoverne la vendita.
• Non immergere mai l'apparecchio in acqua, in altri liquidi o in
lavastoviglie.
• Non toccare l'apparecchio con le mani umide quando è in funzione.
• Non utilizzare mai l'apparecchio su superfici umide e all'aperto.
• Collegare l'apparecchio a una presa di corrente dotata di messa a terra
adeguata.
•
Non lasciare in funzione l’apparecchio senza sorvegliarlo.
Non
usare l’apparecchio collegato a un timer esterno né ad un sistema
separato di comando a distanza.
• Non collocare l'apparecchio sotto a una presa di corrente fissa.
• Non accendere l'apparecchio se il cavo è arrotolato.
• Non utilizzare se le piastre sono aperte.
• Posizionare l'apparecchio su una superficie piana evitando che il cavo
penzoli dal bordo del tavolo.
• Prima di usare l'apparecchio per la prima volta, pulire le piastre con un
panno inumidito con olio. Non raschiare mai le piastre con componenti
metallici.
• È possibilce che le piastre esterne raggiungano temperature elevate.
Prestare attenzione a non toccare l'apparecchio quando è caldo.
• IMPORTANTE: NON COPRIRE MAI L'APPARECCHIO DURANTE IL
FUNZIONAMENTO POICHÉ CIÒ POTREBBE CAUSARE UN
PERICOLOSO SURRISCALDAMENTO.
q
ATTENZIONE: Non smaltire MAI l'apparecchio insieme ai rifiuti
domestici. Portarlo presso il CENTRO DI SMALTIMENTO o di
raccolta più vicino perché possa essere smaltito adeguatamente.
In questo modo si contribuirà alla tutela dell'ambiente.
2 COMPONENTI PRINCIPALI
1 Coperchio superiore
2 Spia luminosa di accensione (rossa)
3 Spia luminosa di riscaldamento (verde)
4 Piastre superiori
5 Piastre inferiori
6 Base della piastra
7 Cavo di collegamento alla rete
8 Piastrina di chiusura
9 Avvolgicavo
3 ISTRUZIONI PER L'USO
1 Collegare la piastra alla rete. La spia luminosa (2) si accende, a
indicare che la piastra è in funzione. Chiudere la piastra e
muovere la piastrina di chiusura (8).
2 Disporre il pane e gli ingredienti per la farcitura su un tavolo
asciutto e pulito.
3 Applicare un leggero strato di burro sui due lati del pane in modo
da evitare che rimanga attaccato alle piastre calde.
4 Preparare i panini a piacere.
5 Dopo alcuni minuti, la spia verde (3) si accende, a indicare che il
tostapane ha raggiunto la temperatura adeguata.
6 Introdurre i panini, chiudere la piastra e spostare la piastrina di
chiusura (8). Far trascorrere alcuni minuti per ottenere un
risultato perfetto.
i La spia di riscaldamento (3) si spegne e si accende durante il
funzionamento allo scopo di mantenere costantemente le piastre
a una temperatura adeguata.
Z Ricordare che, se qualche ingrediente rimane attaccato alle
piastre, non devono essere utilizzati elementi metallici per
rimuoverlo.
4 ALTRE APPLICAZIONI
Z
La piastra è stata ideata per cuocere uova fritte in modo rapido e
pulito. Seguire le seguenti istruzioni:
1 Dopo il collegamento della piastra alla rete e l'accensione della
spia (3), aprire la piastra e passarvi sopra del burro o dell'olio.
2 Versare le uova sulle piastre inferiori e aggiungervi sale a
piacere.
3 Chiudere la piastra; le uova saranno pronte dopo due minuti.
4 Aprire la piastra e togliere le uova. Si consiglia di non utilizzare
componenti metallici per raccogliere le uova, poiché questi
graffierebbero le piastre.
5 MANUTENZIONE E PULIZIA
‹
Prima di pulire l'apparecchio controllare che la piastra non sia
collegata alla rete. Attendere che le piastre siano completamente
fredde prima di pulirle.
• Servirsi di una spugna o di un panno umido. Non utilizzare detersivi
e sostanze abrasive per non graffiare le piastre.
• Una volta raffreddata la piastra, passare un panno asciutto per
asciugarla completamente prima di riporla.
• È possibile riporre la piastra sia in posizione orizzontale che
verticale.
Z Fare in modo che elementi non entrino in contatto con le piastre.
NEDERLANDS nl
1 WAARSCHUWINGEN
• Lees deze gebruiksaanwijzingen helemaal door alvorens het apparaat in
gebruik te nemen.
• Deze gebruiksaanwijzing is onderdeel van het product. Bewaar de
gebruiksaanwijzing op een veilige plek om deze in de toekomst na
te kunnen slaan.
• Het apparaat is uitsluitend bedoeld voor huishoudelijk gebruik; niet voor
bedrijfsmatig gebruik. Elk ander gebruik dan hier vermeld kan gevaarlijk
zijn.
• Laat kinderen niet zonder toezicht in de buurt van het apparaat om er
zeker van te zijn dat ze er niet mee spelen.
• Dit apparaat mag niet door mensen (met inbegrip van kinderen) met
lichamelijke, zintuiglijke of geestelijke beperkingen, of met een gebrek
aan ervaring en kennis gebruikt worden, met uitzondering van hen die
door een met hun veiligheid belaste persoon opgeleid of gesuperviseerd
werden voor het gebruik van dit apparaat.
• Voer geen enkele wijziging of reparatie aan het apparaat uit. Bij defecten
aan het netsnoer of een ander deel van het apparaat, het apparaat niet
gebruiken maar naar een erkende technische dienst brengen.
• Gebruik geen onderdelen of hulpstukken die niet door SOLAC geleverd
of aanbevolen zijn.
• Kijk, alvorens het apparaat op het lichtnet aan te sluiten, of het
aangegeven voltage overeenkomt met de netspanning bij u thuis.
• Trek altijd na gebruik de stekker uit het stopcontact en ook vóórdat u
onderdelen verwijdert of aanbrengt of onderhouds- of
reinigingswerkzaamheden aan het apparaat verricht. Trek de stekker er
ook bij stroomuitval uit. Wanneer u de stekker in of uit het stopcontact
doet, dient het apparaat uit te staan.
• Trek nooit aan het snoer of laat het apparaat nooit aan het snoer hangen.
Neem de stekker uit het stopcontact door aan de stekker, nooit aan het
snoer, te trekken.
• Zorg ervoor dat het netsnoer niet in contact komt met scherpe kanten of
hete oppervlakken. Laat het snoer niet over de rand van de tafel of het
aanrecht hangen om te voorkomen dat kinderen eraan trekken en het
apparaat op de grond valt.
• Laat als het netsnoer beschadigd is, dit door de fabrikant, zijn
klantenservice of door vergelijkbaar opgeleid personeel vervangen, om
evt. risico’s te vermijden.
• Verwijder alle papieren of plastic zakken, kunststof plaatjes, kaartjes en
stickers die evt. aan de binnen- of buitenkant van het apparaat
aangebracht werden ter bescherming tijdens het transport of voor
reclamedoeleinden.
• Dompel dit apparaat niet in water of in andere vloeistoffen onder en stop
het evenmin in de vaatwasser.
• Raak het apparaat niet met natte handen aan als het aan staat.
• Gebruik dit apparaat nooit op een natte ondergrond of buitenshuis.
• Het apparaat dient aangesloten te worden op een stopcontact met een
goede aardleiding.
•
Laat het toestel niet werken zonder toezicht.
Sluit het toestel niet aan
op een externe timer noch op een afzonderlijk
afstandsbedieningssysteem.
• Plaats het apparaat niet onder een stopcontact.
• Zet het apparaat niet aan terwijl het snoer nog opgerold is.
• Verhit het niet met de platen open.
• Plaats het apparaat op een waterpasse ondergrond en voorkom dat het
snoer over de rand van de tafel of het aanrecht hangt.
• Wrijf vóór het eerste gebruik de platen in met een in olie gedrenkte doek.
Bewerk de platen nooit met metalen voorwerpen.
• De buitenste platen kunnen erg heet worden. Raak ze niet aan als het
tosti-ijzer heet is.
• BELANGRIJK: BEDEK HET APPARAAT NOOIT ALS HET IN
WERKING IS. DIT ZOU EEN GEVAARLIJKE OVERVERHITTING
KUNNEN VEROORZAKEN.
q
LET OP: Wanneer u het apparaat wilt afdanken, deponeer het dan IN
GEEN GEVAL bij het huisvuil, maar breng het voor verdere verwerking
naar het dichtstbijzijnde recyclingcentrum of vuilophaalpunt. Op deze
wijze draagt u bij aan het behoud van het milieu.
2 VOORNAAMSTE ONDERDELEN
1 Bovenste deksel
2 Aan-lampje (rood)
3 Controlelampje voor opwarmen (groen)
4 Bovenste toastplaten
5 Onderste toastplaten
6 Onderstel van het tosti-ijzer
7 Netsnoer
8 Sluitinrichting
9 Snoerspoel
3 GEBRUIKSAANWIJZINGEN
1 Sluit het tosti-ijzer op het lichtnet aan. Het Aan-lampje (2) gaat
branden ten teken dat het tosti-ijzer in werking is. Sluit het tosti-
ijzer en bedien de sluitinrichting (8).
2 Bereid de sneetjes toastbrood en alle ingrediënten voor het beleg
op een schone en droge onderlegger.
3 Bestrijk de sneetjes toastbrood aan de buitenkant met een fijne
laag boter, om te voorkomen dat het toastbrood bij het contact
met de hete toastplaat blijft kleven.
4 Bereid de tosti naar smaak toe.
5 Na verloop van enkele minuten dooft het indicatielampje
Opwarmen (3) ten teken dat de bedrijfstemperatuur is bereikt.
6 Plaats de sneetjes brood tussen de toastplaten en sluit het
apparaat met de sluitinrichting (8). Wacht circa drie minuten tot
de sneetjes brood goed doorbakken zijn.
i Het controlelampje Opwarmen (3) gaat tijdens gebruik
afwisselend uit en aan om de juiste temperatuur van de
toastplaten te handhaven.
Z Denk eraan dat u op de toastplaten vastgekleefde resten niet
met metalen voorwerpen mag verwijderen.
4 ANDERE TOEPASSINGEN
Z
Dit model is speciaal ontworpen om spiegeleieren op een snelle
en schone manier toe te bereiden. Volg de onderstaande
aanwijzingen:
1 Open nadat het tosti-ijzer is aangesloten en het lampje
Opwarmen (3) is gedoofd, het tosti-ijzer en doe een beetje boter
of olie op de onderste plaat.
2 Breek de eieren boven de plaat en voeg zout naar smaak toe.
3 Sluit het tosti-ijzer en de eieren zijn na 2 minuten klaar.
4 Open het tosti-ijzer en verwijder de eieren. Nogmaals, gebruik
geen metalen voorwerpen om ze eruit te halen omdat dit krassen
op de toastplaten zou veroorzaken.
5 ONDERHOUD EN REINIGING
‹
Ga vóór de reiniging na of de stekker van het tosti-ijzer niet in het
stopcontact zit, maar wacht niet met schoonmaken tot de platen
helemaal zijn afgekoeld.
• Gebruik hiervoor een spons of een vochtige doek. Gebruik geen
schuurmiddelen om krassen op de toastplaten te voorkomen.
• Nadat het tosti-ijzer is afgekoeld, wrijf hem voor het opbergen met
een droge doek af.
• Het apparaat kan zowel liggend als rechtopstaand worden
opgeborgen.
Z Zorg ervoor dat de platen niet in aanraking komen met
voorwerpen van metaal.
DESPLEGABLE_SD5051_1tinta.fm Page 1 Tuesday, April 6, 2010 10:47 AM
La pagina si sta caricando...
-
 1
1
-
 2
2


Solac SANDWICH 2 Mod SD5051 Manuale del proprietario
- Categoria
- Produttori di sandwich
- Tipo
- Manuale del proprietario
in altre lingue
- English: Solac SANDWICH 2 Mod SD5051 Owner's manual
- français: Solac SANDWICH 2 Mod SD5051 Le manuel du propriétaire
- español: Solac SANDWICH 2 Mod SD5051 El manual del propietario
- Deutsch: Solac SANDWICH 2 Mod SD5051 Bedienungsanleitung
- Nederlands: Solac SANDWICH 2 Mod SD5051 de handleiding
- português: Solac SANDWICH 2 Mod SD5051 Manual do proprietário
- slovenčina: Solac SANDWICH 2 Mod SD5051 Návod na obsluhu
- čeština: Solac SANDWICH 2 Mod SD5051 Návod k obsluze
- polski: Solac SANDWICH 2 Mod SD5051 Instrukcja obsługi
- română: Solac SANDWICH 2 Mod SD5051 Manualul proprietarului
Documenti correlati
Altri documenti
-
Tristar SA-2839 Manuale utente
-
Palson Montana Manuale del proprietario
-
Palson Dakota 30500 Manuale del proprietario
-
ECG S 419 decente Manuale utente
-
JATA SW270 Scheda dati
-
Philips HD2384 Manuale utente
-
-
Kenwood SM420 Manuale utente
-
Princess 122333 Scheda dati
-
Cloer 6235 Manuale utente