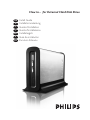
Philips SPD5100CC/00 Manuale utente
- Categoria
- Dischi rigidi interni
- Tipo
- Manuale utente

How to... for External Hard Disk Drive
Install Guide
Installationsanleitung
Guide d'installation
Guida d'installazione
Installatiegids
Guía de instalación
Kurulum Kıla
vuzu
UK
D
F
I
NL
E
TR

Contents
How to connect this external harddisk on your system? (USB installation) 5
How to connect this external harddisk on your system? (Firewire installation) 9
How to install the external harddisk for Windows 98 Second Edition only? 12
How to install the external harddisk for Windows ME? 12
How to safely disconnect the external harddisk without shutting down your system? 13
How to quick format the external harddisk? 15
How to format the external harddisk? 19
How to use the One-Click Backup button ? 25
How to use the Safe Shutdown button? 31
How to create a backup? 33
How to restore a backup? 39
How to defragment 43
How to check the external harddisk disk for errors? 47
Warranty, Environment and Safety 51
Specifications
52
Inhaltsverzeichnis
Anschließen des externe Festplatte an Ihr System (USB-Installation) 5
Anschließen des externe Festplatte an Ihr System (Firewire-Installation) 9
How to install the external harddisk for Windows 98 Second Edition only? 12
How to install the external harddisk for Windows ME? 12
Sicheres Entfernen der externe Festplatte ohne Herunterfahren Ihres Systems 13
Schnellformatieren der externe Festplatte 15
Formatieren der externe Festplatte 19
So wird die Schaltfläche „Sicherungskopie per Mausklick“ verwendet 25
So wird die Schaltfläche „Sicheres Abschalten“ verwendet 31
Erstellen einer Sicherungskopie 33
Wiederherstellen einer Sicherungskopie 39
Defragmentieren 43
Überprüfen der externe Festplatte auf Fehler 47
Garantie, Umwelt und Sicherheit 53
Spezifikationen 54
Table des matières
Comment raccorder disque dur externe sur votre système ? (Installation USB) 5
Comment raccorder disque dur externe sur votre système ? (Installation Firewire) 9
How to install the external harddisk for Windows 98 Second Edition only? 12
How to install the external harddisk for Windows ME? 12
Comment débrancher en toute sécurité le disque dur externe sans éteindre le système ? 13
Comment formater rapidement le disque dur externe? 15
Comment formater le disque dur externe ? 19
Comment utiliser le bouton One-Click Backup ? 25
Comment utiliser le bouton Safe Shutdown ? 31
Comment créer une sauvegarde ? 33
Comment restaurer une sauvegarde ? 39
Comment défragmenter ? 43
Comment vérifier si le disque dur externe comporte des erreurs ? 47
Garantie, Environnement et Consignes de sécurité 55
Caractéristiques techniques 56
Sommario
Come collegare questa disco rigido esterno al proprio sistema (installazione USB) 5
Come collegare questa disco rigido esterno al proprio sistema (installazione firewire) 9
How to install the external harddisk for Windows 98 Second Edition only? 12
How to install the external harddisk for Windows ME? 12
Come scollegare in modo sicuro l'unità disco rigido esterno senza spegnere il sistema 13
Come formattare rapidamente l'unità disco rigido esterno 15
Come formattare l'unità disco rigido esterno 19
UK
D
F
I
2
La pagina sta caricando ...
La pagina sta caricando ...

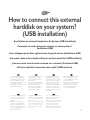
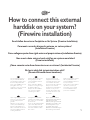
How to connect this external
harddisk on your system?
(USB installation)
Anschließen des externe Festplatte an Ihr System (USB-Installation)
Comment raccorder disque dur externe sur votre système ?
(Installation USB)
Come collegare questa disco rigido esterno al proprio sistema (installazione USB)
Hoe moet u deze externe harde schijf op uw systeem aansluiten? (USB-installatie)
¿Cómo conectar esta disco duro externo en su sistema? (Instalación USB)
Bu harici sabit disk sisteminize takma şekli? (USB kurulumu)
The next pages show how to
use your external HDD with
your (desktop) computer. Since
there are many brands and
types of PC’s available, the next
photographs show only
examples on how your external
HDD could be installed.
Auf den nächsten Seiten wird
Ihnen gezeigt, wie Sie Ihre
externe Festplatte mit Ihrem
PC verwenden.
Da es verschiedene Marken
und Arten von PCs gibt, zeigen
die nächsten Bilder nur
Beispiele, wie die Installation
einer externen Festplatte
vonstatten gehen kann.
Les pages suivantes vous
expliquent comment utiliser
votre disque dur externe avec
votre ordinateur de bureau.
Comme il existe de nombreuses
marques et de nombreux
modèles de PC, les illustrations
suivantes ne sont que des
exemples de la manière dont
votre disque dur externe peut
être installé.
Nelle prossime pagine verranno
date informazioni su come
usare l'unità HDD esterna con
il proprio computer.
Poiché esistono molte marche e
tipi di PC, le prossime foto
mostreranno solo esempi di
come l'unità HDD esterna
possa essere installata.
Op de volgende pagina’s kunt u
lezen hoe u uw externe HDD
met uw desktopcomputer
gebruikt.
Aangezien er vele merken en
soorten pc’s beschikbaar zijn,
laten de onderstaande foto’s
alleen voorbeelden zien van hoe
uw externe HDD zou kunnen
worden geïnstalleerd.
Las páginas a continuación
muestran cómo utilizar su di
sco
duro externo con su ordenador
de sobremesa.
Puesto que hay muchas marcas
y tipos de PC disponibles, las
fotos a continuación muestran
cómo debe instalarse el disco
duro externo.
İzleyen sayfalar, masaüstü
bilgisayarınızla harici HDD’nizi
(sabit disk sürücünüzü)
kullanma şeklini göstermektedir.
Piyasada bir çok marka ve tipte
PC bulunduğundan, izleyen
fotoğraflar; sadece harici
HDD’nizin nasıl kurulabileceğine
dair örnekleri göstermektedir.
UK D F I
NL E TR
5

6
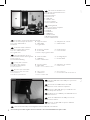
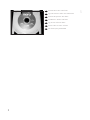
This can be found in the box:
A: Your new external HDD device
B: Vertical Stand
C: Power Adapter
D: Power Cord
E: USB cable
F: Firewire cable
G: How to Manual
H: Nero Software disc
Packungsinhalt:
A: Ihre neue externe Festplatte
B: Vertikaler Ständer
C: Netzteil
D: Netzkabel
E: USB-Kabel
F: Firewire-Kabel
G: Bedienungsanleitung
H: Nero Software-CD
Votre boîte comprend les éléments suivants :
A: votre nouveau disque dur externe B: Support vertical C: Adaptateur de courant
D: Cordon d’alimentation E: Câble USB F: Câble Firewire
G: Manuel H: Logiciel Nero
Contenuto della confezione:
A: La nuova unità HDD esterna B: Il supporto verticale C: Il trasformatore
D: Il cavo di alimentazione E: Il cavo USB F: Il cavo Firewire
G: La guida d'uso H: Il disco del programma Nero
Het volgende zit in de doos:
A: Uw nieuwe externe HDD-apparaat B: Verticaal statief C: Voedingsadapter
D: Stroomsnoer E: USB-kabel F: Firewire-kabel
G: Instructiehandleiding H: Nero software-disc
La caja debe contener:
A: Su disco duro externo B: Soporte vertical C: Adaptador de corriente
D: Cable de alimentación E: Cable USB F: Cable firewire
G: Manual Cómo... H: Disco con el software Nero
Bu, kutu içinde bulunabilir:
A: Yeni harici HDD sürücünüz B: Dikey Sehpa C: Güç Adaptörü
D: Güç Kablosu E: USB kablosu F: Firewire/Güvenlik duvarı kablosu
G: Kullanma Şekli Kılavuzu H: Nero Yazılım diski
TR
E
NL
I
F
D
UK
1
2
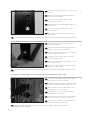
Plug the USB cable in the USB port of your new
external HDD.*
Stecken Sie das USB-Kabel in den USB-
Anschluss Ihrer neuen externen Festplatte.*
Insérez le câble USB dans le port USB de votre
nouveau disque dur externe.*
Collegare il cavo USB alla porta USB della nuova
unità HDD esterna.*
Steek de USB-kabel in de USB-poort van uw
nieuwe externe HDD.*
Conecte el cable USB en el puerto USB del
disco duro externo.*
Harici HDD’nizin USB portuna/bağlantı noktasına USB kablosunu takınız.*
*Connect the power cables together and connect them to the external harddisk and a power outlet.
TR
E
NL
I
F
D
UK
La pagina sta caricando ...

8
Insert the Nero Disc in the Drive.
Legen Sie die Nero-CD in das Laufwerk ein.
Insérez le disque Nero dans Drive.
Inseriti il disco di Nero nell’ Drive.
Leg de Nero-CD in de Drive.
Inserte el disco de Nero en Drive.
CD’ i Drive içine yerlesletiriniz.
TR
E
NL
I
F
D
UK
5

How to connect this external
harddisk on your system?
(Firewire installation)
Anschließen des externe Festplatte an Ihr System (Firewire-Installation)
Comment raccorder disque dur externe sur votre système ?
(Installation Firewire)
Come collegare questa disco rigido esterno al proprio sistema (installazione firewire)
Hoe moet u deze externe harde schijf op uw systeem aansluiten?
(Firewire-installatie)
¿Cómo conectar esta disco duro externo en su sistema? (Instalación Firewire)
Bu harici sabit disk sisteminize takma şekli?
(Firewire/Güvenlik duvarı kurulumu)
The next pages show how to
use your external HDD with
your (desktop) computer. Since
there are many brands and
types of PC’s available, the next
photographs show only
examples on how your external
HDD could be installed.
Auf den nächsten Seiten wird
Ihnen gezeigt, wie Sie Ihre
externe Festplatte mit Ihrem
PC verwenden.
Da es verschiedene Marken
und Arten von PCs gibt, zeigen
die nächsten Bilder nur
Beispiele, wie die Installation
einer externen Festplatte
vonstatten gehen kann.
Les pages suivantes vous
expliquent comment utiliser
votre disque dur externe avec
votre ordinateur de bureau.
Comme il existe de nombreuses
marques et de nombreux
modèles de PC, les illustrations
suivantes ne sont que des
exemples de la manière dont
votre disque dur externe peut
être installé.
Nelle prossime pagine verranno
date informazioni su come
usare l'unità HDD esterna con
il proprio computer.
Poiché esistono molte marche e
tipi di PC, le prossime foto
mostreranno solo esempi di
come l'unità HDD esterna
possa essere installata.
Op de volgende pagina’s kunt u
lezen hoe u uw externe HDD
met uw desktopcomputer
gebruikt.
Aangezien er vele merken en
soorten pc’s beschikbaar zijn,
laten de onderstaande foto’s
alleen voorbeelden zien van hoe
uw externe HDD zou kunnen
worden geïnstalleerd.
Las páginas a continuación
muestran cómo utilizar su disco
duro externo con su ordenador
de sobremesa.
Puesto que hay muchas marcas
y tipos de PC disponibles, las
fotos a continuación muestran
cómo debe instalarse el disco
duro externo.
İzleyen sayfalar, masaüstü
bilgisayarınızla harici HDD’nizi
(sabit disk sürücünüzü)
kullanma şeklini göstermektedir.
Piyasada bir çok marka ve tipte
PC bulunduğundan, izleyen
fotoğraflar; sadece harici
HDD’nizin nasıl kurulabileceğine
dair örnekleri göstermektedir.
UK D F I
NL E TR
9
La pagina sta caricando ...
La pagina sta caricando ...
La pagina sta caricando ...

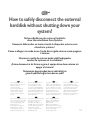
How to safely disconnect the external
harddisk without shutting down your
system?
Sicheres Entfernen der externe Festplatte
ohne Herunterfahren Ihres Systems
Comment débrancher en toute sécurité le disque dur externe sans
éteindre le système ?
Come scollegare in modo sicuro l'unità disco rigido esterno senza spegnere
il sistema
Hoe moet u veilig de externe harde schijf loskoppelen
zonder uw systeem uit te schakelen?
¿Cómo desconectar de forma segura el equipo disco duro externo sin
apagar el sistema?
Sisteminize kapatmadan harici sabit disk’nin
güvenli şekilde bağlantısını kesme şekli?
The next pages show how to
disconnect your new external
HDD to a computer.
The screenshots are
representing the Microsoft
Windows XP™ operating
system. Other operating
systems may show different
popups.
Auf den nächsten Seiten wird
Ihnen gezeigt, wie Sie Ihre
externe Festplatte von Ihrem
PC entfernen. Die abgebildeten
Screenshots zeigen das Betriebs-
system Microsoft Windows XP™.
Bei anderen Betriebssystemen
können andere Popup-Fenster
angezeigt werden.
Les pages suivantes vous
indiquent comment débrancher
votre nouveau disque dur externe
de votre ordinateur. Les écrans
illustrés représentent le système
d’exploitation Microsoft
Windows XP™. Les autres
systèmes d’exploitation peuvent
présenter d’autres illustrations.
Nelle prossime pagine verranno
date informazioni su come
scollegare la nuova unità HDD
esterna dal proprio computer.
Nelle seguenti schermate è
rappresentato il sistema operativo
Microsoft Windows XP™.
Gli altri sistemi operativi possono
mostrare finestre diverse.
Op de volgende pagina’s kunt u
zien u uw nieuwe externe HDD
van een computer loskoppelt.
De schermafbeeldingen zijn
gebaseerd op het
besturingssysteem Microsoft
Windows XP™. Andere
besturingssystemen kunnen
afwijkende popups laten zien.
Las siguientes páginas muestran
cómo desconectar su nuevo
disco duro externo del
ordenador. Las imágenes de
pantalla representan el sistema
operativo Microsoft Windows
XP™. Otros sistemas
operativos podrían mostrar
pantallas distintas.
İzleyen sayfalar, bilgisayara
giden yeni harici HDD’nizin
bağlantısını kesme şeklini
göstermektedir.
Ekran resimleri; Microsoft
Windows XP™ işletim sistemini
temsil etmektedir. Diğer işletim
sistemleri; farklı açılır
menülerini gösterebilir.
UK D F I
NL E TR
13
La pagina sta caricando ...

How to quick format the
external harddisk
?
Schnellformatieren der externe Festplatte
Comment formater rapidement le disque dur externe?
Come formattare rapidamente l'unità disco rigido esterno
Hoe moet u snel de externe harde schijf formatteren?
¿Cómo formatear rápidamente el equipo disco duro externo?
Harici sabit disk’ı hızlı formatlama şekli?
The next pages show how to
quick format your new external
HDD.
The screenshots are representing
the Microsoft Windows XP™
operating system. Other
operating systems may show
different popups.
If you only plan to use Windows
XP or 2000 we advice to
reformat to NTFS.
NTFS is not usable for Windows
98SE, ME, Mac, Linux.
Formatting will erase all the data.
Auf den nächsten Seiten wird
Ihnen gezeigt, wie Sie Ihre neue
externe Festplatte schnell
formatieren.
Die abgebildeten Screenshots
zeigen das Betriebssystem
Microsoft Windows XP™.
Bei anderen Betriebssystemen
können andere Popup-Fenster
angezeigt werden.
Wenn Sie nur Windows XP oder
2000 zu verwenden planen,
empfehlen wir eine
Neuformatierung auf NTFS.
NTFS lässt sich nicht für
Windows 98E, ME, Mac, Linux
einrichten.
Durch Formatierung gehen alle
Daten verloren.
Les pages suivantes montrent
comment formater rapidement
votre nouveau disque dur
externe.
Les écrans illustrés représentent
le système d’exploitation
Microsoft Windows XP™. Les
autres systèmes d’exploitation
peuvent présenter d’autres
illustrations.
Si vous comptez utiliser
exclusivement Windows XP ou
2000, nous recommandons de
reformater le disque en NTFS.
Le format NTFS n’est pas lisible
sous Windows 98SE, ME, Mac
et Linux.
Le formatage entraîne la perte
de toutes les données.
Nelle prossime pagine verranno
date informazioni su come
formattare rapidamente la
nuova unità HDD esterna.
Nelle seguenti schermate è
rappresentato il sistema
operativo Microsoft Windows
XP™.
Gli altri sistemi operativi possono
mostrare finestre diverse.
Se si ha in programma di
utilizzare Windows XP o 2000,
è consigliata la riformattazione
su NTFS.
NTFS non è utilizzabile con
Windows 98SE, ME, Mac, Linux.
La formattazione comporterà la
perdita di tutti i dati.
Op de volgende pagina’s kunt u
zien hoe u uw nieuwe externe
HDD snel moet formatteren.
De schermafbeeldingen zijn
gebaseerd op het besturings-
systeem Microsoft Windows
XP™. Andere besturings-
systemen kunnen afwijkende
popups laten zien.
Als u van plan bent Windows XP
of 2000 te gebruiken, adviseren
wij u te herformatteren naar
NTFS. NTFS is niet geschikt voor
Windows 98SE, ME, Mac, Linux.
Door formatteren zullen alle
gegevens verloren gaan.
Las páginas siguientes muestran
cómo formatear rápidamente su
nuevo disco duro externo.
Las imágenes de pantalla
representan el sistema operativo
Microsoft Windows XP™. Otros
sistemas operativos podrían
mostrar pantallas distintas.
Si sólo piensa utilizar Windows
XP o 2000, le recomendamos
reformatear en NTFS.
NTFS no es recomendable con
Windows 98SE, ME, Mac y
Linux.
El formateo borrará todos los
datos.
İzleyen sayfalar, yeni harici
HDD’nizin hızlı formatlama
şeklini göstermektedir.
Ekran resimleri; Microsoft
Windows XP™ işletim sistemini
temsil etmektedir. Diğer işletim
sistemleri; farklı açılır menülerini
gösterebilir.
Eğer sadece Windows XP yada
2000’i kullanmayı
düşünüyorsanız, NTFS’ye yeniden
formatlamanızı tavsiye ederiz.
NTFS; Windows 98SE, ME, Mac,
Linux için görünür değildir.
Formatlama işlemi ile, tüm veriler
kaybedilecektir.
UK D F I
NL E TR
15
La pagina sta caricando ...

17
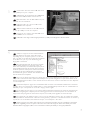
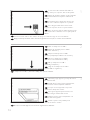
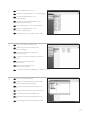
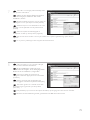
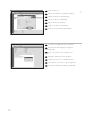
When this popup appears, you have to click
"OK". Please be aware that all the data that is on the
drive will be lost.
Sobald dieses Popup-Fenster angezeigt wird,
müssen Sie auf "OK" klicken. Bitte beachten Sie, dass
alle Daten, die auf dem Laufwerk sind bei diesem
Vorgang verloren gehen.
Lorsque cet écran apparaît, vous devez cliquer
sur "OK". Sachez que toutes les données présentes sur
ce disque seront perdues.
Non appena appare questa finestra, è necessario
cliccare su "OK". Si ricorda che tutti i dati presenti
sull'unità verranno persi.
Wanneer deze popup verschijnt moet u op "OK" klikken. Denk erom dat alle gegevens op het station
verloren zullen gaan.
Cuando aparezca esta pantalla, debe hacer clic en "OK". Por favor tenga en cuenta que se perderán todos
los datos grabados en la unidad.
Bu açılır menü belirdiğinde, "OK" üzerine tıklatmanız gereklidir. Sürücü üzerindeki tüm verilerin
kaybolacağını aklınızda bulundurunuz.
TR
E
NL
I
F
D
UK
4
5
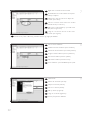
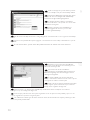
When this popup appears, the format is
completed.
Sobald dieses Popup-Fenster angezeigt wird, ist
die Formatierung abgeschlossen.
Lorsque cet écran apparaît, le formatage est
terminé.
La visualizzazione di questa finestra indica che la
formattazione è terminata.
Wanneer deze popup verschijnt is de
formattering voltooid.
Cuando aparezca esta pantalla, el formateo
habrá terminado.
Bu açılır menü belirdiğinde, formatlama işlemi tamamlanmış olur.
TR
E
NL
I
F
D
UK
La pagina sta caricando ...

How to format the
external harddisk?
Formatieren der externe Festplatte
Comment formater le disque dur externe ?
Come formattare l'unità disco rigido esterno
Hoe moet u de externe harde schijf formatteren?
¿Cómo formatear el equipo disco duro externo?
harici sabit disk’ı formatlama şekli?
The next pages show how to
format your new external HDD.
The screenshots are representing
the Microsoft Windows XP™
operating system.
Other operating systems may
show different popups.
If you only plan to use Windows
XP or 2000 we advice to
reformat to NTFS.
NTFS is not usable for Windows
98SE, ME, Mac, Linux.
Formatting will erase all the data.
Auf den nächsten Seiten wird
Ihnen gezeigt, wie Sie Ihre neue
externe Festplatte formatieren.
Die abgebildeten Screenshots
zeigen das Betriebssystem
Microsoft Windows XP™.
Bei anderen Betriebssystemen
können andere Popup-Fenster
angezeigt werden.
Wenn Sie nur Windows XP oder
2000 zu verwenden planen,
empfehlen wir eine
Neuformatierung auf NTFS.
NTFS lässt sich nicht für
Windows 98E, ME, Mac, Linux
einrichten.
Durch Formatierung gehen alle
Daten verloren.
Les pages suivantes montrent
comment formater votre
nouveau disque dur externe.
Les écrans illustrés représentent
le système d’exploitation
Microsoft Windows XP™.
Les autres systèmes
d’exploitation peuvent
présenter d’autres illustrations.
Si vous comptez utiliser
exclusivement Windows XP ou
2000, nous recommandons de
reformater le disque en NTFS.
Le format NTFS n’est pas lisible
sous Windows 98SE, ME, Mac
et Linux.
Le formatage entraîne la perte
de toutes les données.
Nelle prossime pagine verranno
date informazioni su come
formattare la nuova unità HDD
esterna.
Nelle seguenti schermate è
rappresentato il sistema operativo
Microsoft Windows XP™.
Gli altri sistemi operativi possono
mostrare finestre diverse.
Se si ha in programma di
utilizzare Windows XP o 2000,
è consigliata la riformattazione
su NTFS.
NTFS non è utilizzabile con
Windows 98SE, ME, Mac, Linux.
La formattazione comporterà la
perdita di tutti i dati.
Op de volgende pagina’s kunt u
zien hoe u uw nieuwe externe
HDD moet formatteren.
De schermafbeeldingen zijn
gebaseerd op het besturings-
systeem Microsoft Windows
XP™. Andere besturings-
systemen kunnen afwijkende
popups laten zien.
Als u van plan bent Windows XP
of 2000 te gebruiken, adviseren
wij u te herformatteren naar
NTFS. NTFS is niet geschikt voor
Windows 98SE, ME, Mac, Linux.
Door formatteren zullen alle
gegevens verloren gaan.
Las páginas siguientes muestran
cómo formatear su nuevo disco
duro externo.
Las imágenes de pantalla
representan el sistema operativo
Microsoft Windows XP™. Otros
sistemas operativos podrían
mostrar pantallas distintas.
Si sólo piensa utilizar Windows
XP o 2000, le recomendamos
reformatear en NTFS.
NTFS no es recomendable con
Windows 98SE, ME, Mac y
Linux.
El formateo borrará todos los
datos.
İzleyen sayfalar, yeni harici
HDD’nizin formatlama şeklini
göstermektedir.
Ekran resimleri; Microsoft
Windows XP™ işletim sistemini
temsil etmektedir. Diğer işletim
sistemleri; farklı açılır menülerini
gösterebilir.
Eğer sadece Windows XP yada
2000’i kullanmayı
düşünüyorsanız, NTFS’ye yeniden
formatlamanızı tavsiye ederiz.
NTFS; Windows 98SE, ME, Mac,
Linux için görünür değildir.
Formatlama işlemi ile, tüm veriler
kaybedilecektir.
UK D F I
NL E TR
19

20
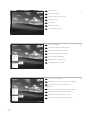
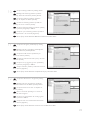
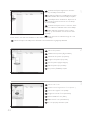
Choose "Start".
Wählen Sie "Start".
Choisissez "Start" (Démarrer).
Scegliere "Start".
Kies "Start".
Elija "Start" (Inicio).
"Start" (Başlat)’ı seçiniz.
TR
E
NL
I
F
D
UK
1
2
3
Choose "Settings".
Wählen Sie "Settings" (Einstellungen).
Choisissez "Settings" (Paramètres).
Scegliere "Settings" (Impostazioni).
Kies "Settings" (Instellingen).
Elija "Settings" (Configuración).
"Settings" (Ayarlar)’ı seçiniz.
TR
E
NL
I
F
D
UK
Choose "Control Panel".
Wählen Sie "Control Panel" (Systemsteuerung).
Choisissez "Control Panel" (Panneau de
configuration).
Scegliere "Control Panel" (Pannello di controllo).
Kies "Control Panel" (Configuratiescherm).
Elija "Control panel" (Panel de control).
"Control Panel" (Kontrol Paneli)’ni seçiniz.
TR
E
NL
I
F
D
UK

21
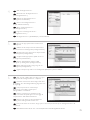
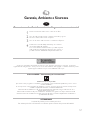
Choose "Administrative Tools".
Wählen Sie "Administrative Tools" (Verwaltung).
Choisissez "Administrative Tools"
(Outils administratifs).
Scegliere la scheda "Administrative Tools"
(Strumenti di amministrazione).
Kies "Administrative Tools" (Systeembeheer).
Elija la ficha "Administrative Tools"
(Herramientas administrativas).
"Administrative Tools" (İdari Araçlar)’ı seçiniz.
TR
E
NL
I
F
D
UK
4
5
6
Choose "Computer Management".
Wählen Sie "Computer Management"
(Computerverwaltung).
Choisissez "Computer Management"
(Gestion informatique).
Scegliere "Computer Management" (Gestione
computer).
Kies "Computer Management"
(Computerbeheer).
Elija "Computer Management"
(Administración de equipos).
"Computer Management" (Bilgisayar Yönetimi)’ni seçiniz.
TR
E
NL
I
F
D
UK
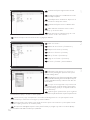
Choose "Disk Management".
Wählen Sie "Datenspeicher" und dann "Disk
Management" (Datenträgerverwaltung).
Choisissez "Disk Management" (Gestion du
disque).
Scegliere "Disk Management" (Gestione disco).
Kies "Disk Management" (Schijfbeheer).
Elija "Disk Management" (Administración de
discos).
"Disk Management" (Disk Yönetimi)’ni seçiniz.
TR
E
NL
I
F
D
UK

22
Right click on "Unallocated" hard disk.
Rechtsklicken Sie auf die "Unallocated" (nicht
zugeordnete) Festplatte.
Cliquez avec le bouton droit sur disque dur
"Unallocated" (Non alloué).
Cliccare con il tasto destro del mouse sul disco
rigido "Unallocated" (non allocato).
Klik met de rechtermuisknop op "Unallocated
hard disk" (Niet toegewezen).
Haga clic con el botón derecho en disco duro
"Unallocated" (No asignado).
"Unallocated" (Tahsis edilmemiş) sabit disk üzerine sağ düğmeyle tıklatınız.
TR
E
NL
I
F
D
UK
7
8
9
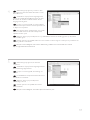
Choose "New Partition".
Wählen Sie "New Partition" (Neue Partition).
Choisissez "New Partition" (Nouvelle partition).
Scegliere "New Partition" (Nuova partizione).
Kies "New Partition" (Nieuwe partitie).
Elija "New Partition" (Partición nueva).
"New Partition" (Yeni Disk Bölümü)’nü seçiniz.
TR
E
NL
I
F
D
UK
Click "Next".
Klicken Sie auf "Next" (Weiter).
Cliquez sur "Next" (Suivant).
Cliccare su "Next" (Avanti).
Klik op "Next" (Volgende).
Haga clic en "Next" (Siguiente).
"Next" (İleri) üzerine tıklatınız.
TR
E
NL
I
F
D
UK
La pagina sta caricando ...
La pagina sta caricando ...

How to use the One-Click
Backup button ?
So wird die Schaltfläche „Sicherungskopie per Mausklick“ verwendet
Comment utiliser le bouton One-Click Backup ?
Come usare il pulsante One-Click Backup
Hoe moet u de One-Click Backup knop gebruiken?
¿Cómo se utiliza el botón de Copia de seguridad con un solo clic?
Tek Tıklatmalı Yedek Kopya düğmesinin kullanım şekli?
The next pages show how to
use the One-Click Backup to
simplify initiating the automatic
back up.
Auf den nächsten Seiten wird
Ihnen gezeigt, wie Sie
„Sicherung per Mausklick“ zum
Starten einer automatischen
Sicherungskopie verwenden.
Les pages qui suivent
expliquent comment utiliser le
bouton One-Click Backup pour
lancer une sauvegarde
automatique en toute
simplicité.
Nelle prossime pagine verranno
date informazioni su come
usare il pulsante One-Click
Backup per semplificare
l'inizializzazione del backup
automatico.
De volgende pagina’s laten u
zien hoe u One-Click Backup
gebruikt om de start van de
automatische backup te
vereenvoudigen.
Las páginas siguientes muestran
cómo utilizar la función de
Copia de Seguridad con un solo
botón para iniciar la copia de
seguridad automática.
İngiltere Bir sonraki sayfa,
otomatik yedek kopyayı
başlatmayı basitleştirmek için
Tek Tıklatmalı Yedek Kopya’nın
kullanım şeklini göstermektedir.
UK D F I
NL E TR
25
La pagina sta caricando ...
La pagina sta caricando ...
La pagina sta caricando ...
La pagina sta caricando ...
La pagina sta caricando ...

How to use the Safe
Shutdown button?
So wird die Schaltfläche „Sicheres Abschalten“ verwendet
Comment utiliser le bouton Safe Shutdown ?
Come usare il pulsante Safe Shutdown
Hoe moet u de Safe Shutdown knop gebruiken?
¿Cómo se utiliza el botón de Apagado Seguro?
Güvenli Kapatma düğmesinin kullanım şekli?
The next pages show how to
use the Safe Shutdown button
of your external HDD.
Auf den nächsten Seiten wird
Ihnen gezeigt, wie Sie die
Schaltfläche „Sicheres
Abschalten“ für Ihre externe
Festplatte verwenden.
Les pages qui suivent
expliquent comment utiliser le
bouton Safe Shutdown (arrêt en
sécurité) de votre disque dur
externe.
Nelle prossime pagine verranno
date informazioni su come
usare il pulsante Safe Shutdown
per l'unità HDD esterna.
De volgende pagina’s laten zien
hoe u de knop Safe Shutdown
moet gebruiken voor uw
externe HDD.
Las páginas siguientes
muestran cómo utilizar el botón
de Apagado Seguro de su disco
duro externo.
İngiltere İzleyen sayfalar, harici
HDD’nizin Güvenli Kapatma
düğmesini kullanma şeklini
göstermektedir.
UK D F I
NL E TR
31

32
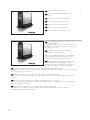
Push the Safe Shutdown button.
Klicken Sie auf die Schaltfläche „Sicheres
Abschalten“.
Appuyez sur le bouton Safe Shutdown.
Premere il pulsante Safe Shutdown.
Druk op de knop Safe Shutdown.
Pulse el botón de Apagado Seguro.
Güvenli Kapatma dü mesine bas›n›z.
TR
E
NL
I
F
D
UK
1
2
Wait until the blue led on front of the HDD is
not functioning anymore.
Disconnect the USB or firewire and Power cable from
the Philips HDD. You have now removed your HDD
safely from your system.
Warten Sie, bis die blaue LED auf der
Vorderseite der Festplatte ausgeht.
Ziehen Sie das USB- bzw. FireWire- und Netzkabel
von Ihrer Philips Festplatte ab. Sie haben nun Ihre
Festplatte sicher aus Ihrem System entfernt.
Attendez que le voyant bleu à l’avant du disque
s’éteigne. Débranchez le câble USB / FireWire et
l’alimentation du disque dur Philips. Le disque dur est
ainsi débranché de l’ordinateur en toute sécurité.
Attendere che il LED blu sulla parte anteriore dell'unità HDD smetta di funzionare.
Scollegare il cavo USB o il cavo Firewire e il cavo di alimentazione dall'unità HDD Philips. A questo punto l'unità
HDD è stata rimossa in modo sicuro.
Wacht tot het blauwe lampje aan de voorzijde van de HDD niet meer werkt.
Maak de USB-, of firewire- en stroomkabel los van de Philips HDD. U hebt de HDD nu veilig uit uw systeem
verwijderd.
Espere hasta que el indicador LED azul del frontal del disco duro se apague.
Desconecte el cable USB o FireWire y el cable de alimentación del disco duro Philips. Ahora ha quitado su disco
duro del sistema de forma segura.
HDD’nin ön taraf›ndaki mavi led çal›flmay› b›rak›ncaya kadar bekleyiniz.
USB yada firewire ve Philips HDD’den gelen güç kablosunun ba lant›s›n› kesiniz. fiu anda, HDD’nizi
sisteminizden güvenli bir flekilde kald›rd›n›z.
TR
E
NL
I
F
D
UK

How to create a backup?
Erstellen einer Sicherungskopie
Comment créer une sauvegarde ?
Come eseguire un backup
Hoe moet u een backup maken?
¿Cómo crear un copia de seguridad?
Bir yedek kopya yaratma şekli?
The next pages show how to
create a backup.
The screenshots are
representing the Microsoft
Windows XP™ operating
system. Other operating
systems may show different
popups.
Auf den nächsten Seiten wird
Ihnen gezeigt, wie Sie eine
Sicherungskopie erstellen.
Die abgebildeten Screenshots
zeigen das Betriebssystem
Microsoft Windows XP™.
Bei anderen Betriebssystemen
können andere Popup-Fenster
angezeigt werden.
Les pages suivantes vous
expliquent comment créer une
sauvegarde. Les écrans illustrés
représentent le système
d’exploitation Microsoft
Windows XP™. Les autres
systèmes d’exploitation peuvent
présenter d’autres illustrations.
Nelle prossime pagine verranno
date informazioni su come
eseguire un backup.
Nelle seguenti schermate è
rappresentato il sistema operativo
Microsoft Windows XP™.
Gli altri sistemi operativi possono
mostrare finestre diverse.
Op de volgende pagina’s kunt u
zien hoe u een backup moet
maken.
De schermafbeeldingen zijn
gebaseerd op het besturings-
systeem Microsoft Windows
XP™. Andere besturings-
systemen kunnen afwijkende
popups laten zien.
Las páginas siguientes muestran
como crear una copia de
seguridad.
Las imágenes de pantalla
representan el sistema
operativo Microsoft Windows
XP™. Otros sistemas
operativos podrían mostrar
pantallas distintas.
İzleyen sayfalar, bir yedek
kopya yaratma şeklini
göstermektedir.
Ekran resimleri; Microsoft
Windows XP™ işletim sistemini
temsil etmektedir. Diğer işletim
sistemleri; farklı açılır
menülerini gösterebilir.
UK D F I
NL E TR
33
La pagina sta caricando ...
La pagina sta caricando ...
La pagina sta caricando ...

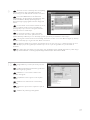
37
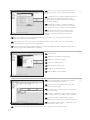
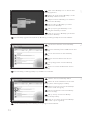
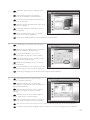
The next screen is a summary. Check everything
is correct and then click on the "Backup" button.
The backup process will start; this can take some time.
Der nächste Bildschirm ist eine Übersicht.
Überprüfen Sie, ob alle richtig ist, und klicken Sie dann
auf die Schaltfläche "Backup" (Sicherungskopie).
Der Sicherungsvorgang beginnt. Das kann einige Zeit
dauern.
L’écran suivant est un résumé. Vérifiez si tout est
correct et cliquez ensuite sur le bouton "Backup"
(Sauvegarde). Le processus de sauvegarde démarre;
cela peut durer un certain temps.
La schermata seguente è di tipo riassuntivo.
Verificare che tutto sia corretto, quindi cliccare sul
pulsante "Backup". Inizierà il processo di backup; questa operazione può richiedere molto tempo.
Het volgende scherm biedt een samenvatting. Controleer of alles correct is en klik vervolgens op de knop
"Backup". Het backup-proces gaat van start; dit kan even duren.
La siguiente pantalla es un resumen. Compruebe que todo está correcto y a continuación haga clic en el
botón "Backup" (Copia de seguridad). Se iniciará el proceso de copia de seguridad, esto puede tardar un
momento.
Bir sonraki ekran, bir özettir. Her şeyin doğru olup olmadığını kontrol edip "Backup button" (Yedek kopya
düğmesi) üzerine tıklatınız. Yedek kopya işlemi başlayacaktır; bu işlem biraz zaman alabilir.
TR
E
NL
I
F
D
UK
9
10
Congratulations: you have just made your first
backup.
Herzlichen Glückwunsch! Sie haben gerade Ihre
erste Sicherungskopie gemacht.
Félicitations : vous venez de réaliser votre
première sauvegarde.
Complimenti: è stato appena creato il primo
backup!
Gefeliciteerd: u hebt net uw eerste backup
gemaakt.
Felicitaciones: ya ha hecho su primera copia de
seguridad.
Tebrikler: İlk yedek kopyanızı yaptınız.
TR
E
NL
I
F
D
UK
La pagina sta caricando ...

How to restore a backup?
Wiederherstellen einer Sicherungskopie
Comment restaurer une sauvegarde ?
Come ripristinare un backup
Hoe moet u een backup terugzetten?
¿Cómo restaurar una copia de seguridad?
Bir yedek kopyayı geri yükleme şekli?
The next pages show how to
restore a backup.
The screenshots are
representing the Microsoft
Windows XP™ operating
system. Other operating
systems may show different
popups.
Auf den nächsten Seiten wird
Ihnen gezeigt, wie Sie eine
Sicherungskopie
wiederherstellen.
Die abgebildeten Screenshots
zeigen das Betriebssystem
Microsoft Windows XP™.
Bei anderen Betriebssystemen
können andere Popup-Fenster
angezeigt werden.
Les pages suivantes vous
expliquent comment restaurer
une sauvegarde.
Les écrans illustrés représentent
le système d’exploitation
Microsoft Windows XP™.
Les autres systèmes
d’exploitation peuvent
présenter d’autres illustrations.
Nelle prossime pagine verranno
date informazioni su come
ripristinare un backup.
Nelle seguenti schermate è
rappresentato il sistema
operativo Microsoft Windows
XP™. Gli altri sistemi operativi
possono mostrare finestre
diverse.
Op de volgende pagina’s kunt u
zien hoe u een backup terug
kunt zetten.
De schermafbeeldingen zijn
gebaseerd op het besturings-
systeem Microsoft Windows
XP™. Andere besturings-
systemen kunnen afwijkende
popups laten zien.
Las páginas siguientes
muestran como restaurar una
copia de seguridad.
Las imágenes de pantalla
representan el sistema
operativo Microsoft Windows
XP™. Otros sistemas
operativos podrían mostrar
pantallas distintas.
İzleyen sayfalar, bir yedek
kopyayı geri yükleme şeklini
göstermektedir.
Ekran resimleri; Microsoft
Windows XP™ işletim sistemini
temsil etmektedir. Diğer işletim
sistemleri; farklı açılır
menülerini gösterebilir.
UK D F I
NL E TR
39
La pagina sta caricando ...
La pagina sta caricando ...

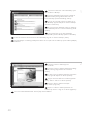
42
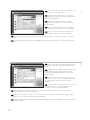
Click on "Restore".
Klicken Sie auf "Restore" (Wiederherstellen).
Cliquez sur "Restore" (Restauration).
Cliccare su "Restore" (Ripristina).
Klik op "Restore" (Herstellen).
Haga clic en "Restore" (Restaurar).
"Restore" (Geri Yükle) üzerine tıklatınız.
TR
E
NL
I
F
D
UK
6
7
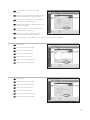
You have successfully restored your backup.
Sie haben Ihre Sicherungskopie erfolgreich
wiederhergestellt.
Vous avez restauré votre sauvegarde avec
succès.
Il ripristino del backup è stato effettuato.
U hebt nu met succes een backup hersteld.
Ha restaurado con éxito su copia de seguridad.
Yedek kopyanızı başarılı şekilde geri yüklediniz.
TR
E
NL
I
F
D
UK
La pagina sta caricando ...
La pagina sta caricando ...
La pagina sta caricando ...
La pagina sta caricando ...
La pagina sta caricando ...
La pagina sta caricando ...
La pagina sta caricando ...
La pagina sta caricando ...
La pagina sta caricando ...
La pagina sta caricando ...
La pagina sta caricando ...
La pagina sta caricando ...
La pagina sta caricando ...
La pagina sta caricando ...
La pagina sta caricando ...
La pagina sta caricando ...
La pagina sta caricando ...
La pagina sta caricando ...
La pagina sta caricando ...
La pagina sta caricando ...
La pagina sta caricando ...
La pagina sta caricando ...
La pagina sta caricando ...
La pagina sta caricando ...
La pagina sta caricando ...
La pagina sta caricando ...
-
 1
1
-
 2
2
-
 3
3
-
 4
4
-
 5
5
-
 6
6
-
 7
7
-
 8
8
-
 9
9
-
 10
10
-
 11
11
-
 12
12
-
 13
13
-
 14
14
-
 15
15
-
 16
16
-
 17
17
-
 18
18
-
 19
19
-
 20
20
-
 21
21
-
 22
22
-
 23
23
-
 24
24
-
 25
25
-
 26
26
-
 27
27
-
 28
28
-
 29
29
-
 30
30
-
 31
31
-
 32
32
-
 33
33
-
 34
34
-
 35
35
-
 36
36
-
 37
37
-
 38
38
-
 39
39
-
 40
40
-
 41
41
-
 42
42
-
 43
43
-
 44
44
-
 45
45
-
 46
46
-
 47
47
-
 48
48
-
 49
49
-
 50
50
-
 51
51
-
 52
52
-
 53
53
-
 54
54
-
 55
55
-
 56
56
-
 57
57
-
 58
58
-
 59
59
-
 60
60
-
 61
61
-
 62
62
-
 63
63
-
 64
64
-
 65
65
-
 66
66
-
 67
67
-
 68
68


Philips SPD5100CC/00 Manuale utente
- Categoria
- Dischi rigidi interni
- Tipo
- Manuale utente
in altre lingue
- English: Philips SPD5100CC/00 User manual
- français: Philips SPD5100CC/00 Manuel utilisateur
- español: Philips SPD5100CC/00 Manual de usuario
- Deutsch: Philips SPD5100CC/00 Benutzerhandbuch
- Nederlands: Philips SPD5100CC/00 Handleiding
- Türkçe: Philips SPD5100CC/00 Kullanım kılavuzu
Documenti correlati
-
Philips SPD5210CC/00 Manuale utente
-
Philips SPD5240CC/00 Manuale utente
-
Philips SPE3050CC Manuale del proprietario
-
-
Philips SPE3031CC/00 Manuale utente
-
Philips SPD5125CC/05 Manuale utente
-
Philips SPE2005 Manuale utente
-
-
Philips SPD3400CC/05 Manuale utente
Altri documenti
-
aqprox! appDSHDD Manuale utente
-
Conceptronic CM3GD1T Manuale utente
-
Conceptronic MediaGiant Plus Manuale utente
-
Iomega eGo Portable Guida Rapida
-
ACT AC1205 Secure USB 3.2 Gen1 2.5 In Manuale utente
-
Packard Bell dot sc Manuale utente
-
Fujitsu Siemens Computers amilo notebook xi 3650 Manuale del proprietario
-
Fujitsu AMILO Xi 3670 First-Time Setup
-
Seagate HM321HI Scheda dati
-
Trekstor DataStation maxi m.ub 500GB (Green) Manuale utente