
instructions

1
1
Usage
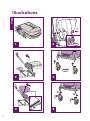
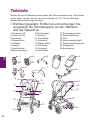
Illustrations
5
2
6
3
1
2
1
2
1
1
1
4

2
7
10
2
1
8
9
11
1
12
2
1
1

3
15 18
16
14
17
13
1

4
23
24
19
21
20
22
1
2

5
28
25
1
2
26
1
1
2
3 0
1
1
2
29
27
1
1
2

6
32
31
1
1
33
1
2
34
35
36

7
37
39
1
2
38
1
2
40
41
42

8
43

9
中 文( 簡 體 )

EN
10
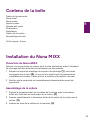
Contents
Illustrations 1–8
English (EN) 9
Safety and Recommendations 10
Warnings 11
Parts List 14
Contents of the Box 15
How to Set Up the Nuna MIXX
™
15
How to Use the Nuna MIXX 17
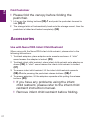
Accessories 20
Cleaning and Maintenance 22
Warranty, Product Registration & Contact 23

EN
11
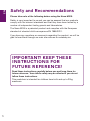
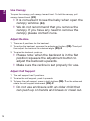
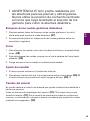
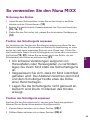
Safety and Recommendations
Please take note of the following before using the Nuna MIXX.
Safety is very important to us and you can be assured that our products
comply with the relevant standards and that they have been tested by a
number of independent testing panels and laboratories.
The Nuna MIXX is a patented product and complies with the European
standard of wheeled child conveyances EN 1888:2012.
If you have any questions or comments regarding the product, we will be
glad to hear them through our web site nuna.eu or nunababy.ca.
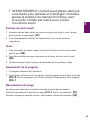
IMPORTANT! KEEP THESE
INSTRUCTIONS FOR
FUTURE REFERENCE!
Read these instructions carefully before use and keep them for
future reference. Your child’s safety may be affected if you do not
follow these instructions.
This pushchair is intended for children from birth and up to 20kg
maximum.

EN
12
WARNINGS
Please read all the instructions in the manual before
using the product. Please save instruction manual
for future use. Failure to follow these warnings and
instructions may result in serious injury or death.
! Never leave your child unattended. Always keep
child in view while in pushchair.
! WARNING Ensure that all the locking devices are
engaged before use.
! To avoid injury ensure that your child is kept away
when unfolding and folding this product.
! WARNING Do not let your child play with this
product.
! WARNING Always use the restraint system.
Safety belts and restraint systems must be used
correctly.
! WARNING Check that the seat unit or PIPA
™
infant child restraint attachment devices are
correctly engaged before use.
! This product is not suitable for running or skating.
! Use the pushchair with a child weighing less than
20kg. It will cause damage to the pushchair with
an untted child.
! Pushchair designed to be used from birth shall
recommend the use of the most reclined position
for new born babies.
! The parking device shall be engaged when
placing and removing children.
! To prevent a hazardous, unstable condition, do
not place more than 4.5kg in the storage basket.

EN
13
! Any load attached to the handle or on the back of
the backrest or on the sides of the vehicle will
affect the stability of the vehicle.
! Use the pushchair with only one child at a time.
Never place purses, shopping bags, parcels or
accessory items on the handle or canopy.
! Accessories which are not approved by the
manufacturer shall not be used.
! For PIPA
™
infant child restraint used in
conjunction with a chassis, this vehicle does not
replace a cot or a bed. Should your child need to
sleep, then it should be placed in a suitable pram
body, cot or bed.
! Only replacement parts supplied or recommended
by the manufacturer shall be used.
! Adult assembly required.
! Overloading, folding incorrectly, or using
component parts from other manufacturers may
cause the pushchair to be damaged, broken
or unsafe. Please read the instruction manual
carefully.
! Make sure your child’s body is clear from the
moving parts when adjusting the pushchair.
! Child may slip into leg openings and be strangled
if the harness is not used.
! Never use pushchair on stairs or escalators. You
may suddenly lose control of the MIXX or your
child may fall out. Also, use extra care when going
up or down a step or curb.
! Keep away from high temperature objects, liquids,
and electronics.
! Never allow your child to stand on the pushchair
or sit in the pushchair with head toward front of
pushchair.

EN
14
! This pushchair does not replace a cot or a bed.
Should your child need to sleep, they should be
placed in cot.
! Never place the pushchair on roads, slopes or
dangerous areas.
! To avoid strangulation, DO NOT place items with
a string around your child’s neck, suspend strings
from this product, or attach strings to toys.
! DO NOT use storage basket as a child carrier.
! To prevent tipping, never let child climb the
pushchair. Always lift the child in and out of the
pushchair.
! To avoid nger entrapment, use care when folding
and unfolding the pushchair.
! To ensure your child’s safety, please make sure all
parts are assembled and fastened properly before
using the pushchair.
! To avoid strangulation, do make sure your child is
clear from the canopy.
! Always engage the brakes when parking the
pushchair.
! Discontinue using pushchair if it is damaged or
broken.
! Pushchair to be used only at walking speed. This
product is not intended for use while jogging.
! Never allow children to stand on the footrest.
! To avoid suffocation, remove plastic bag and
packaging materials before using this product.
The plastic bag and packaging materials should
then be kept away from babies and children.
! Do not place more than 0.5kg (1lb) in canopy
pocket.

EN
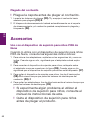
15
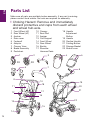
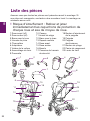
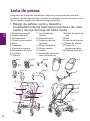
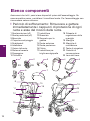
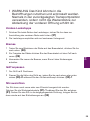
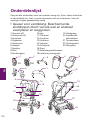
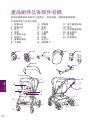
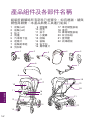
Parts List
Make sure all parts are available before assembly. If any part is missing,
please contact local retailer. No tools are required for assembly.
! Choking Hazard: Remove and immediately
discard protective end caps from each wheel
and wheel hub axle.
x
2
x
2
2 4
6
1
3
9
11
10
12
13
14
15
17
16
18
23
21
20
22
19
8
7
1 Front Wheel (x2)
2 Rear Wheel (x2)
3 Armbar
4 Rain cover
5 Footmuff
6 Adapter
7 Canopy Visor
8 Brake Assembly
9 Pushchair
10 Canopy
11 Seat Pad
12 Armbar
13 Calf Support
14 Front Wheel
15 Rear Wheel
16 Buckle
17 Shoulder
Harness Pads
18 Handle
Adjustment
Button
19 Handle
20 Recline Handle
21 Folding Button
22 Storage Basket
23 Brake Lever
5

EN
16
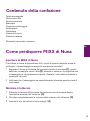
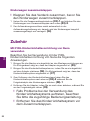
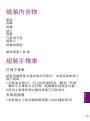
Contents of the Box
Pushchair Frame
Front Wheel
Rear Wheel
Armbar
Rain Cover
Footmuff
Adapter
Canopy Visor
Brake Assembly
Tools Needed: None
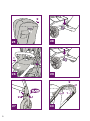
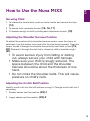
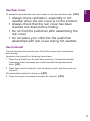
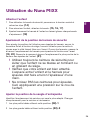
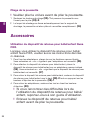
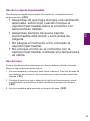
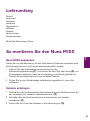
How to Set Up the Nuna MIXX
Opening the Nuna MIXX
Check that you have all the parts for this product before using it. The
assembly should be performed only by adults.
1 Separate storage latch from storage mount
(1), and then lift the handle
upwards (2), a click sound means the pushchair is open completely.
Rotate the backrest to vertical position .
2 Check that the pushchair is completely latched open before continuing.
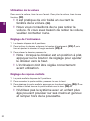
Assemble Canopy
1 Align the canopy visor zipper with the zipper on the inside ofthe front
canopy edge. (3)
2 Completely zip the canopy visor onto the canopy. (3)
3 Insert the clips of canopy to the mount. (4)

EN
17
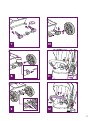
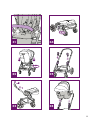
Assemble Front Wheels
1 Assemble front wheels to front legs. (5)
! Check that wheels are securely attached by
pulling down.
2 To disassemble front wheel, detach front wheel from front leg (6)-2 while
pressing the release button. (6)-1
Assemble Rear Wheels
1 Assemble brake assembly to rear legs (7), assemble rear wheels to brake
assembly (8). Wrap the connecting tube of rear legs with the ap of the
storage basket, and then snap the three snap buttons (9).
! Check that wheels are securely attached by
pulling on wheel assemblies.
2 To disassemble rear wheel, detach rear wheel from rear wheel mount
(10)-2 while pressing the release button. (10)-1
Assemble Armbar
1 Align the armbar ends with the armbar mounts, and then insert to lock.
(11)
2 To disassemble armbar, press armbar release button (12)-1, and then
pull out the armbar. (12)-2
3 Attach the buttons on the both sides of the soft goods and the seat.
(13)-1
The completely assembled pushchair is shown as (13).

EN
18
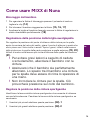
How to Use the Nuna MIXX
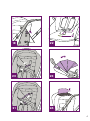
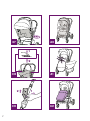
Securing Child
1 To release the buckle latch, push on center button and remove the clips.
(14)
2 To secure child, assemble buckle. (15, 16, 17)
3 Fit harness snugly to child by sliding each adjustment buckle. (18)
Adjusting the Shoulder Harness Position
To adjust the position of the shoulder harness anchor, open the zipper of
seat back, turn the anchor to be level with the side facing forward. Open the
snaps, thread it through the shoulder harness slot from back to front (19,
20).
Rethread it through the slot that is closest to child’s shoulder height
(21).
! To avoid serious injury from falling or sliding
out, always secure your child with harness.
! Make sure your child is snugly secured. The
space between the child and the shoulder
harness should be about the thickness of one
hand.
! Do not cross the shoulder belts. This will cause
pressure on child’s neck.
Adjusting the Crotch Belt Position
Identify crotch belt slot that will achieve a snug t. Change crotch belt slot if
necessary.
1 Smaller babies use this position.
(22)-1
2 Larger babies use this position. (22)-2

EN
19
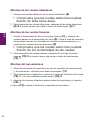
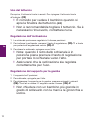
Use Canopy
To open the canopy, pull canopy toward front. To fold the canopy, pull
canopy toward back. (23)
! It is convenient to see the baby when open the
canopy window. (24)
! We do not recommend that you remove the
canopy. If you have any need to remove the
canopy please contact nuna.
Adjust Recline
1 There are 5 positions for the backrest.
2 To recline the backrest, squeeze the adjustment button,
(25)-1 and pull
then adjust the backrest to a desired angle. (25)-2
3 To raise the backrest, push up.
! Please note: when the backrest is in the at
position squeeze the adjustment button to
adjust the backrest upwards.
! Make sure the recline is set properly for use.
Adjust Calf Support
1 The calf support has 2 positions.
2 To raise the calf support, push it upwards.
3 To lower the calf support, press in both buttons
(26)-1 on the sides and
rotate the calf support downward. (26)-2
! Do not use enclosure with an older child that
can push up on hands and knees or crawl out.
La pagina si sta caricando...
La pagina si sta caricando...
La pagina si sta caricando...
La pagina si sta caricando...
La pagina si sta caricando...
La pagina si sta caricando...
La pagina si sta caricando...
La pagina si sta caricando...
La pagina si sta caricando...
La pagina si sta caricando...
La pagina si sta caricando...
La pagina si sta caricando...
La pagina si sta caricando...
La pagina si sta caricando...
La pagina si sta caricando...
La pagina si sta caricando...
La pagina si sta caricando...
La pagina si sta caricando...
La pagina si sta caricando...
La pagina si sta caricando...
La pagina si sta caricando...
La pagina si sta caricando...
La pagina si sta caricando...
La pagina si sta caricando...
La pagina si sta caricando...
La pagina si sta caricando...
La pagina si sta caricando...
La pagina si sta caricando...
La pagina si sta caricando...
La pagina si sta caricando...
La pagina si sta caricando...
La pagina si sta caricando...
La pagina si sta caricando...
La pagina si sta caricando...
La pagina si sta caricando...
La pagina si sta caricando...
La pagina si sta caricando...
La pagina si sta caricando...
La pagina si sta caricando...
La pagina si sta caricando...
La pagina si sta caricando...
La pagina si sta caricando...
La pagina si sta caricando...
La pagina si sta caricando...
La pagina si sta caricando...
La pagina si sta caricando...
La pagina si sta caricando...
La pagina si sta caricando...
La pagina si sta caricando...
La pagina si sta caricando...
La pagina si sta caricando...
La pagina si sta caricando...
La pagina si sta caricando...
La pagina si sta caricando...
La pagina si sta caricando...
La pagina si sta caricando...
La pagina si sta caricando...
La pagina si sta caricando...
La pagina si sta caricando...
La pagina si sta caricando...
La pagina si sta caricando...
La pagina si sta caricando...
La pagina si sta caricando...
La pagina si sta caricando...
La pagina si sta caricando...
La pagina si sta caricando...
La pagina si sta caricando...
La pagina si sta caricando...
La pagina si sta caricando...
La pagina si sta caricando...
La pagina si sta caricando...
La pagina si sta caricando...
La pagina si sta caricando...
La pagina si sta caricando...
La pagina si sta caricando...
La pagina si sta caricando...
La pagina si sta caricando...
La pagina si sta caricando...
La pagina si sta caricando...
La pagina si sta caricando...
La pagina si sta caricando...
La pagina si sta caricando...
La pagina si sta caricando...
La pagina si sta caricando...
La pagina si sta caricando...
La pagina si sta caricando...
La pagina si sta caricando...
La pagina si sta caricando...
La pagina si sta caricando...
La pagina si sta caricando...
La pagina si sta caricando...
La pagina si sta caricando...
La pagina si sta caricando...
La pagina si sta caricando...
La pagina si sta caricando...
La pagina si sta caricando...
La pagina si sta caricando...
La pagina si sta caricando...
La pagina si sta caricando...
La pagina si sta caricando...
La pagina si sta caricando...
La pagina si sta caricando...
La pagina si sta caricando...
La pagina si sta caricando...
La pagina si sta caricando...
La pagina si sta caricando...
La pagina si sta caricando...
La pagina si sta caricando...
La pagina si sta caricando...
La pagina si sta caricando...
La pagina si sta caricando...
La pagina si sta caricando...
La pagina si sta caricando...
La pagina si sta caricando...
La pagina si sta caricando...
La pagina si sta caricando...
La pagina si sta caricando...
La pagina si sta caricando...
La pagina si sta caricando...
La pagina si sta caricando...
La pagina si sta caricando...
La pagina si sta caricando...
La pagina si sta caricando...
La pagina si sta caricando...
La pagina si sta caricando...
La pagina si sta caricando...
La pagina si sta caricando...
La pagina si sta caricando...
La pagina si sta caricando...
La pagina si sta caricando...
La pagina si sta caricando...
La pagina si sta caricando...
La pagina si sta caricando...
La pagina si sta caricando...
La pagina si sta caricando...
La pagina si sta caricando...
La pagina si sta caricando...
La pagina si sta caricando...
-
 1
1
-
 2
2
-
 3
3
-
 4
4
-
 5
5
-
 6
6
-
 7
7
-
 8
8
-
 9
9
-
 10
10
-
 11
11
-
 12
12
-
 13
13
-
 14
14
-
 15
15
-
 16
16
-
 17
17
-
 18
18
-
 19
19
-
 20
20
-
 21
21
-
 22
22
-
 23
23
-
 24
24
-
 25
25
-
 26
26
-
 27
27
-
 28
28
-
 29
29
-
 30
30
-
 31
31
-
 32
32
-
 33
33
-
 34
34
-
 35
35
-
 36
36
-
 37
37
-
 38
38
-
 39
39
-
 40
40
-
 41
41
-
 42
42
-
 43
43
-
 44
44
-
 45
45
-
 46
46
-
 47
47
-
 48
48
-
 49
49
-
 50
50
-
 51
51
-
 52
52
-
 53
53
-
 54
54
-
 55
55
-
 56
56
-
 57
57
-
 58
58
-
 59
59
-
 60
60
-
 61
61
-
 62
62
-
 63
63
-
 64
64
-
 65
65
-
 66
66
-
 67
67
-
 68
68
-
 69
69
-
 70
70
-
 71
71
-
 72
72
-
 73
73
-
 74
74
-
 75
75
-
 76
76
-
 77
77
-
 78
78
-
 79
79
-
 80
80
-
 81
81
-
 82
82
-
 83
83
-
 84
84
-
 85
85
-
 86
86
-
 87
87
-
 88
88
-
 89
89
-
 90
90
-
 91
91
-
 92
92
-
 93
93
-
 94
94
-
 95
95
-
 96
96
-
 97
97
-
 98
98
-
 99
99
-
 100
100
-
 101
101
-
 102
102
-
 103
103
-
 104
104
-
 105
105
-
 106
106
-
 107
107
-
 108
108
-
 109
109
-
 110
110
-
 111
111
-
 112
112
-
 113
113
-
 114
114
-
 115
115
-
 116
116
-
 117
117
-
 118
118
-
 119
119
-
 120
120
-
 121
121
-
 122
122
-
 123
123
-
 124
124
-
 125
125
-
 126
126
-
 127
127
-
 128
128
-
 129
129
-
 130
130
-
 131
131
-
 132
132
-
 133
133
-
 134
134
-
 135
135
-
 136
136
-
 137
137
-
 138
138
-
 139
139
-
 140
140
-
 141
141
-
 142
142
-
 143
143
-
 144
144
-
 145
145
-
 146
146
-
 147
147
-
 148
148
-
 149
149
-
 150
150
-
 151
151
-
 152
152
-
 153
153
-
 154
154
-
 155
155
-
 156
156
-
 157
157
-
 158
158


in altre lingue
Documenti correlati
Altri documenti
-
Baby Jogger City Elite 2 Assembly Instructions Manual
-
Joie Litetrax Manuale utente
-
mothercare Nuna Leaf Grow Bouncer_0716038 Guida utente
-
Joie litetrax™ 4 travel system Manuale del proprietario
-
-
Joie S1201MAPAV000 Manuale utente
-
-
Jane B01MRG81XG Manuale utente
-
Joie S1112DMDPW000 Manuale utente
-
 MIXX StreamQ C2 User Guides
