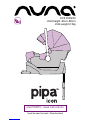
Nuna pipaicon Instructions Manual
- Categoria
- Sedili dell'auto
- Tipo
- Instructions Manual


EN
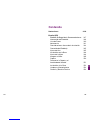
Contents
Illustrations 3–10
English (EN)
Safety and Recommendations 11
Product Information 12–13
Parts List 14
WARNING 15–17
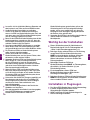
Installation Concerns 18
Aeroplane Installation 18
Contents of the Box 19
Handle Adjustment 19
Installation with Base 20–21
Height Adjustment 22
Securing Child 23
Canopy 24
Detach Canopy and Seat Pad 25
Installation without Base 26
Cleaning and Maintenance 27
Warranty, Product Registration & Contact 28
Vehicle Fitting Information 29–53


EN
EN
11 12
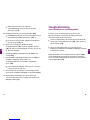
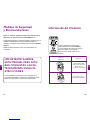
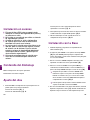
Safety and
Recommendations
Please take note of the following before using the Nuna PIPATM
icon infant child restraint.
If you have any questions or comments regarding the PIPA icon
infant child restraint, we will be glad to hear them through our web
site www.nuna.eu
Please keep the instruction manual at the bottom of the soft goods.
IMPORTANT! RETAIN FOR
FUTURE REFERENCE. READ
CAREFULLY.
Read these instructions carefully before use and keep them for
future reference. Your child’s safety may be affected if you do
not follow these instructions.
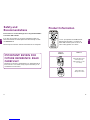
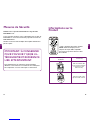
Product Information
figure for
installation
child height 40cm-85cm/
child weight≤13kg
(approximately 1.5 years
old or under)
suitable for
child weight≤13kg
child age≤18 months
" i-Size" (Integral Universal ISOFIX infant
child restraint Systems) is a category of
infant child restraint System for use in all
i-Size seating position of a vehicle.

EN
EN
13 14
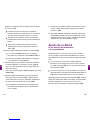
1 According to the ECE R129/00 Regulation, the infant child
restraint with Base is a Universal ISOFIX Class C, D infant child
restraint and should be tted using the ISOFIX connections.
2 This is an “i-Size” child restraint System. It is approved to
Regulation ECE R129/00, for use in, “i-Size compatible” vehicle
seating positions as indicated by vehicle manufacturers in the
vehicle users’ manual.
3 If in doubt, please consult the infant child restraint manufacturer
or the retailer.
This is an i-Size ISOFIX infant child restraint SYSTEM.It is
approved to ECE R129/00 series of amendments for not all vehicle
manufacture's handbooks list i-Size compatibility yet. This seat and
base is also approved for use in ISOFIX compatible vehicles. Please
refer to the vehicle manufacturer's website or consult your dealer.
It will fit vehicles with positions approved as i-Size ISOFIX positions
(as detailed in the vehicle handbook), depending on the category of
the infant child restraint and of the fixture. If in doubt, consult either
the infant child restraint manufacturer or vehicle manufacturer.
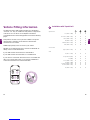
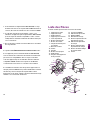
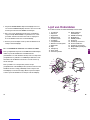
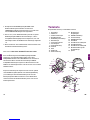
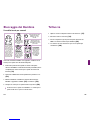
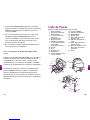
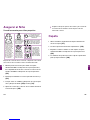
Parts List
Some module may vary depending on model
12
13
14
11
1 Head Support
2 Seat Pad
3 Side Guides
4 Infant Insert
5 Adjustment Webbing
6 Adjustment Button
7 Safety Buckle
8 Shoulder Harness Straps
9 Canopy Mount
10 Canopy
11 Handle
12 Handle Button
13 Rear Guide
14 Stroller Release Handle
15 ISOFIX Connector
16 Shell Indicator
17 ISOFIX Guides
18 Load Leg
19 Load Leg Adjust Button A
20 Load Leg Indicator
21 Load Leg Adjust Button B
22 Infant Child Restraint
Release Button
23 Lock-off
2
3
4
59
678
10
1
23
15
16
18 20
21
22
17
19

EN
EN
15 16
WARNING
NO PIPA icon infant child restraint can guarantee full
protection from injury in an accident. However, proper
use of this PIPA icon infant child restraint will reduce
the risk of serious injury or death to your child.
To use this PIPA icon infant child restraint with the
ISOFIX connections according to the ECE R129/00
Regulation, your child must meet the following
requirements.
Child height 40cm-85cm/Child weight≤13kg
(approximately 1.5 years old or under).
To use this PIPA icon infant child restraint
according to the ECE R129/00 Regulation, your
child must meet the following requirements.
Child weight≤13kg/Child age≤18 months
Any straps of PIPA icon infant child restraint and
vehicle seat should be tightened and not twisted.
DO NOT install this PIPA icon infant child restraint
without following the instructions in this manual or
you may put your child at serious risk of injury or
death.
NEVER leave your child unattended with this PIPA
icon infant child restraint.
DO NOT make any modication to this PIPA icon
infant child restraint or use it along with component
parts from other manufacturers.
DO NOT use this PIPA icon infant child restraint if it
has damaged or missing parts.
DO NOT have your child in large/oversized clothes
because this may prevent your child from being
properly and securely fastened by the shoulder
harness straps and the crotch strap between the
legs.
DO NOT leave this PIPA icon infant child restraint or
other items unbelted or unsecured in your vehicle
because unsecured PIPA icon infant child restraint
can be thrown around and may injure occupants in
a sharp turn, sudden stop, or collision.
DO NOT place rear-facing PIPA icon infant child
restraint on frontal seat with air bag. Death or
serious injury may occur. Please reference vehicle
owner’s manual for more information.
NEVER use a second-hand PIPA icon infant child
restraint or an PIPA icon infant child restraint whose
history you do not know because they may have
structural damage that endangers your child’s
safety.
NEVER use ropes or any other substitutes to secure
PIPA icon infant child restraint in vehicle or to secure
child into PIPA icon infant child restraint.
DO NOT use this PIPA icon infant child restraint
without the soft goods.
The soft goods should not be replaced with
any besides the ones recommended by the
manufacturer. The soft goods constitute an
integral part of the PIPA icon infant child restraint
performance.
DO NOT put anything other than the recommended
inner cushions in this PIPA icon infant child restraint.
Be sure that the PIPA icon infant child restraint is
installed in such a way that no part of it interferes
with movable seats or in the operation of vehicle
doors.
DO NOT continue to use this PIPA icon infant child
restraint after it has suffered any type of crash, even
a minor one. Replace immediately as there may be
invisible, structural damage from the crash.
Remove this PIPA icon infant child restraint and
base from the vehicle seat when it is not in regular
use.
Consult the distributor for issues concerning
maintenance, repair and part replacement.
To avoid the risk of falling out, always secure the
child using the safety harness when the child is
placed in PIPA icon infant child restraint, even when
the PIPA icon infant child restraint is not in the
vehicle.

EN
EN
17 18
Before carrying the PIPA icon infant child restraint
by hand, ensure that the child is fastened with the
safety harness, and that the handle is correctly
locked in a vertical position.
To avoid serious injury or death, NEVER place PIPA
icon infant child restraint on elevated surface seat
with child in it.
The parts of this PIPA icon infant child restraint
should not be lubricated in any way.
Always secure child in PIPA icon infant child
restraint, even on short trips, as this is when most
accidents occur.
DO NOT use this PIPA icon infant child restraint
for more than 5 years after the purchase date as
parts may degrade over time, or from exposure
to sunlight, and may not perform adequately in a
crash.
Please keep this PIPA icon infant child restraint
away from sunlight, otherwise it may be too hot for
child’s skin. Always touch test seat before placing
child in it.
Frequently check the ISOFIX guides for dirt and
clean them if necessary. Reliability can be effected
by ingress of dirt, dust, food particles etc.
DO NOT place any objects in the load leg area in
front of your base.
Correct Installation is only permitted by use of the
ISOFIX connectors.
After your child is placed in this PIPA icon infant
child restraint, the safety belt must be used
correctly, and ensure that any lap strap is worn low
down, so that the pelvis is rmly engaged.
DO NOT use any load bearing contact points
other than those described in the instructions and
marked on the PIPA icon infant child restraint.
Installation Concerns
This PIPA icon infant child restraint with the Base is
suitable for vehicle seats with i-Size ISOFIX anchor
points. (1)
DO NOT place rear-facing PIPA icon infant child
restraint on front seat with air bag. Death or serious
injury may occur. (2) Please reference vehicle
owner’s manual for more information.
DO NOT install this PIPA icon infant child restraint
on vehicle seats that face sideways or rearward with
respect to the moving direction of the vehicle. (3)
It is recommended to install this PIPA icon infant
child restraint on the rear vehicle seat. (4)
DO NOT install this PIPA icon infant child restraint
on vehicle seats unstable during installation.
Aeroplane Installation
The Nuna PIPA icon can only be installed using a
2-point safety belt if being used in an aircraft.
DO NOT install in a vehicle using a 2-point safetybelt.
When being used in an aircraft, the child restraint must
only be installed rear facing on the seat.
Nuna child restraint width is 450mm, but some aircraft
seat widths are 430mm. For narrow seat, please place
padding under the seat to raise the height and allow it
to t between the arm rests.
This child restraint’s base is NOT certied for use in
aircraft.

EN
EN
19 20
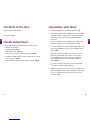
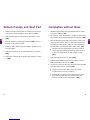
Contents of the Box
PIPA icon infant child restraint
Tools Needed: None
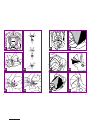
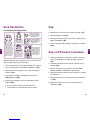
Handle Adjustment
1 The handle of the PIPA icon infant child restraint can be
adjusted to 3 positions.
Rocking position. (5)-1
Baby chair position. (5) -2
Position for car, hand or stroller transportation. (5)-3
2 To adjust the handle positon, squeeze handle buttons on both
sides to release it. (6)-1
3 Rotate handle until it clicks into any of the 3 positions. (6)-2
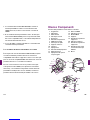
Installation with Base
1 Unfold the load leg from storage compartment. (7)
2 Fit the ISOFIX guides with the ISOFIX anchor points. (8)
The ISOFIX guides can protect the surface of the vehicle
seat from being torn. They can also guide the ISOFIX
connectors.
3 Rotate the ISOFIX connectors 180 degrees until they are
pointing in the direction of the ISOFIX guides. (9)
4 Line up the ISOFIX connectors with the ISOFIX guides, and
then click both ISOFIX connectors into the ISOFIX anchor
points. (10)
Make sure that both ISOFIX connectors are securely
attached to their ISOFIX anchor points. There should
be two audible clicks and the colors of the indicators
on the both ISOFIX connectors should be completely
green. (10)-1
Check to make sure the base is securely installed by
pulling on the both ISOFIX connectors.
5 After placing the base on the vehicle seat, extend the load
leg to floor (11). When the load leg indicator shows green
means it is installed correctly, red means it is installed
incorrectly. (11)

EN
EN
21 22
The load leg has 24 positions. When the load leg
indicator shows red this means the load leg is in the
wrong position.
Make sure the load leg is secure by pressing down on
the front of the base.
To shorten the load leg, squeeze the load leg release
button and pull the load leg upwards. (11)
The completely assembled base is shown as (12)
The ISOFIX connectors must be attached and locked
onto the ISOFIX anchor points. (12)-1
The load leg must be installed correctly with green
indicator. (12)-2
6 To remove the base, press the secondary lock button (13)-1
first and then the button (13)-2 on the latch connectors
before removing the base from the vehicle seat.
7 Press the ISOFIX releasing button to fold the ISOFIX. (14)
8 Push the PIPA icon infant child restraint down into the base
(15), if the PIPA icon infant child restraint is secure, the PIPA
icon infant child restraint indicator shows green. (16)
Pull up on the PIPA icon infant child restraint to be sure it
is securely latched into the base.
9 Level line on carrier must be level to the ground when the
PIPA icon infant child restraint is installed. (41)
10 To release the PIPA icon infant child restraint, pull the infant
child restraint up while squeezing the PIPA icon infant child
restraint release button. (17)
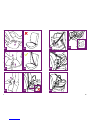
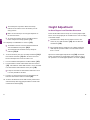
Height Adjustment
for Head Support and Shoulder Harnesses
Check that Shoulder Harness Straps are set at the proper height.
Please choose the proper pair of shoulder harness slots according
to the child’s height.
Shoulder Harness Straps must go into the harness slots
nearest to your childs shoulders (18), but not above the
shoulder line. (19)
If the Shoulder Harness Straps are not at proper height, the
child might be ejected the PIPA icon infant child restraint if
there is a crash.
Squeeze the head support adjustment lever (20), meanwhile
pull up or push down the head support until it snaps into one of
the 7 positions. The head support positions are shown as (21).

EN
EN
23 24
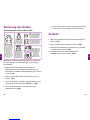
Securing Child
After the child is placed into the seat, check whether the Shoulder
Harness Straps are at proper height.
1 While pressing the adjustment button located at the front of
the PIPA icon infant child restraint, pull completely the two
Shoulder Harness Straps of the PIPA icon infant child restraint.
(22)
2 Unlock the buckle of the harnesses by pressing the red button.
(23)
3 Place the child into the PIPA icon infant child restraint and lock
the buckle. (25)Please refer to. (24)
4 Tighten the shoulder harness straps by pulling the adjustment
webbing. (26)
Make sure the space between the child and the Shoulder
Harness Straps is about the thickness of one hand.
Detach the snaps on
the head support to
remove the head
portion of the insert.
We recommend
using the full infant
insert while the baby
is under 60 cm or
until they outgrow
the insert. The infant
insert increases side
impact protection.
Remove the head
support portion of
the infant insert
when the child’s
head no longer ts
comfortably.
Remove the body
portion of the infant
insert when the
infant’s shoulders no
longer t comfortably.
The cushion can
be used separately
without being
attached to the
insert to bolster
the infant's back
for more comfort.
Remove the infant
insert cushion by
detaching the snaps
to allow more space
when the infant does
not t comfortably.
1
2
Use Infant Insert
Canopy
1 Unzip the zipper behind the front canopy bow. (27)
2 Pull the canopy out of the compartment. (28)
3 Attach the magnets on each corner to the front of the PIPA
icon infant child restraint. (29)
4 The zipper on the back of canopy can be opened for
ventilation. (30)

EN
EN
25 26
Detach Canopy and Seat Pad
1 Detach the snaps to disassemble the canopy, press the button
in the canopy mount and pull the canopy bow out. (31)
2 Pull the fastening pieces underneath the edge of the seat out.
(32)
3 Press the red button to disengage the buckle (23). Remove
the Infant Insert and crotch strap.
4 Detach the elastic band on the head support, and then remove
the head support.
5 Remove the seat pad from the adjustment button as shown in.
(33)
6 Remove the seat pad from the Stroller release button as shown
in. (34)
Installation without Base
1 DO NOT install this PIPA icon infant child restraint on vehicle
seats with Lap Belts. (35)
2 This PIPA icon infant child restraint is suitable for vehicle seats
with a 3-point Retractor Safety Belt (without base) only. (36)
3 Place the PIPA icon infant child restraint onto the vehicle seat
where you wish to put it. Pull the vehicle safety belt out and
lock it into the vehicle buckle, sliding the vehicle lap belt into
the side guides of the PIPA icon infant child restraint. (37)
The PIPA icon infant child restraint can not be used if the
vehicle safety belt buckle (female buckle end) is too long
to anchor the PIPA icon infant child restraint securely.
(37)
4 Slide diagonal belt into the rear guide. (38)
5 Pull the vehicle shoulder belt to fasten the PIPA icon infant
child restraint tightly and securely. (39)
6 Level line on carrier must be level to the ground when the PIPA
icon infant child restraint is installed. (41)
Tension the vehicle safety belt as much as possible,
checking that it is not loose or twisted.
After installing the PIPA icon infant child restraint, always
check that the vehicle belts are routed correctly and
securely fastened into the vehicle buckle. (40)

EN
EN
27 28
Cleaning and Maintenance
After removing the wedge from the insert, please store it
somewhere that the child cannot access it.
Please wash the soft goods with cold water under 30°C.
Do not iron the soft goods.
Do not bleach or dry clean the soft goods.
Do not use undiluted neutral detergent, gasoline or other
organic solvent to wash the PIPA icon infant child restraint and
base. It may cause damage to the product.
Use only mild detergent, water and a soft cloth to clean the
PIPA icon infant child restraint shell, handle and harness straps
and base.
Do not twist the soft goods to dry with great force. It may leave
the soft goods with wrinkles.
Please hang dry the soft goods in the shade.
Please remove the PIPA icon infant child restraint and base
from the vehicle seat if not in use for a long period of time. Put
the PIPA icon infant child restraint and base in a cool, dry place
and somewhere your child can not access it.
Warranty, Product
Registration & Contact
Warranty
We have purposely designed our high-quality products so that it
can grow with both your child and your family. Because we stand
by our product, our gear is covered by a custom warranty per
product, starting from the day it was purchased. Please have the
proof of purchase, model number and serial number available
when you contact us.
For warranty information please visit:
http://www.nuna.eu/warranty
Product Registration
All products include a serial label which lists the product model
number and serial number. This label is located on the footend,
under the mattress on your carry cot. Before contacting customer
service, please have these numbers available for reference.
To register your product please visit:
https://www.nuna.eu/register-gear
Contact
For replacement parts, service, or additional warranty questions,
please contact our customer service departments.
www.nuna.eu
In the United Kingdom:
www.nuna.eu

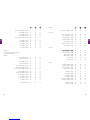
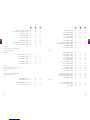
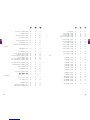
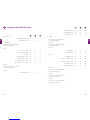
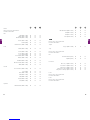
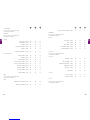
Vehicle Fitting Information
The PIPA icon infant child restraint with base are classified for
“universal” use. They are suitable for fixing into the seat positions
of the most cars. The letters on the diagram to the below
correspond with the vehicle fitting positions listed in the following
pages.
Seat positions in other cars may also be suitable to accept the
child restraint. If in doubt, consult either the child restraint
manufacturer or the retailer.
ALWAYS give priority to the rear seats of your vehicle.
DO NOT fit your child restraint onto a vehicle seat fitted with an
airbag, unless it can be deactivated.
If your child restraint can be fitted, it is marked with V.
If your child restraint cannot be fitted, it is marked with X.
If your vehicle is not listed in this manual or it is not marked with
either a V or X then please refer to your vehicle’s handbook or
contact the manufacturer for further information.
2
2
1
3
3
1
A
I
R
B
A
G
Installation with 3-point-belt
EN
EN
29 30
Alpha Romeo
147 (2001 - 2009)
159 Saloon (2006 - 2011)
Brera (2006 - 2011)
GT (2004 - 2011)
Guilietta (2010 - 2012)
Mito (2009 - 2011)
Aston martin
Cygnet (2010 - 2011)
Audi
A1 (2011 - 2012)
A1 Sportback (2012)
A3 (2002)
A3 S3 (2006 - 2011)
A4 (2005 - 2008)
A4 Allroad (2009 - 2011)
A4 Avant (2008 - 2011)
A5 (2007 - 2011)
V
X
V
V
V
X
V
X
V
X
V
X
V
V
V
V
V
V
V
X
X
V
V
V
V
V
V
V
V
V
V
V
V
V
X
X
V
V
V
V
V
V
V
V
V
21 3

EN
EN
31 32
V
V
V
V
X
V
V
V
V
V
V
V
X
X
X
V
V
X
X
V
V
V
V
V
X
V
V
V
V
V
V
V
V
V
V
V
V
V
V
V
V
V
V
V
V
V
V
V
X
V
V
V
V
V
V
V
V
V
V
V
V
V
V
V
V
V
V
V
V
V
V
V
Cadillac
BLS Saloon (2006 - 2011)
Chevrolet
Aveo 3dr (2008 - 2011)
Aveo 5dr (2008 - 2011)
Captiva (2011 - 2012)
Captiva (2006 - 2011)
Cruze (2008 - 2011)
Orlando (2010 - 20121
Spark (2009 - 2011)
Chrysler
Voyager (2001 - 2008)
300 C (2010 - 2012)
300 C (2004 - 2010)
Delta (2012)
Ypsilon (2012)
Citroen
Berlingo (2009- 2012)
Berlingo (1998 - 2009)
C-Crosser (2007 - 2012)
C-Zero (2011 - 2012)
C1 (2005 - 2011)
C2 (2003 - 2009)
C3 (2009 - 2012)
C3 (2002 - 2009)
C3 Picasso (2009 - 2011)
C3 Pluriel (2003 - 2010)
C4 (2010 - 2012)
C4 (2004 - 2010)
A5 Sportback (2009 - 2011)
A5 S5 (2007 - 2011)
A6 (2004 - 2011)
A6 S6 (2006 - 2011)
A7 Sportback (2011 - 2012)
A8 (2003 - 2011)
A8 S8 (2006 - 2011)
Q5 (2009 - 2012)
Q7 (2006 - 2011)
TT (1999 - 2006)
Bentley
Please refer to the manufacturer
for further information
BMW
1 Series (2004 - 2011)
1 Series F20 (2011)
3 Series (2004 - 2011)
3 Series F30 (2011)
3 Series M3 (2007 - 2011)
5 Series M5 (2005 - 2011)
5 Series Saloon (2003 - 2010)
6 Series (2004 - 2011)
6 Series M6 (2005 - 2010)
7 Series (2008 - 2011)
X3 (2004 - 2011)
X3 F25 (2011 - 2012)
X5 (2007 - 2011)
X6 (2010 - 2011)
X
V
V
V
V
V
V
V
X
V
V
V
V
V
V
V
V
V
V
V
V
V
V
V
V
V
V
V
V
V
V
V
V
V
X
V
V
V
V
V
V
V
V
V
V
V
V
V
V
V
V
V
V
V
V
V
V
V
V
V
X
V
V
V
V
V
V
V
V
V
V
V
V
V
V
V
V
V
21 3 21 3

EN
EN
33 34
V
V
V
V
V
V
V
V
V
V
V
V
V
V
V
X
V
X
V
V
V
V
V
V
V
V
X
V
V
V
V
V
V
V
X
V
V
V
V
V
V
V
V
X
V
V
V
V
V
V
V
Doblo (2001 - 2010)
Linea (2007 - 2012)
Multipla (2000 - 2010)
Panda (2012)
Panda (2004 - 2011)
Punto (2003 - 2006)
Grande Punto (2006 - 2010)
Abarth Grande Punto (2008 - 2011)
Sedici (2006 - 2011)
Ulysse (2003 - 2005)
Ford
CMax (2003 - 2012)
Fiesta (2008 - 2011)
Fiesta (2002 - 2008)
Focus (2010 - 2011)
Focus (2005 - 2011)
Focus CMax (2012)
Focus CMax (2003 - 2010)
Fusion (2002 - 2011)
Galaxy (2006 - 2011)
KA (1996 - 2008)
KA 2010 (2009 - 2011)
Kuga (2008 - 2011)
Mondeo Estate (2007 - 2011)
Mondeo MKIV (2007 - 2011)
Mondeo Saloon (2000 - 2007)
SMax (2006 - 2011)
Honda
Accord (8) (2003 - 2008)
Accord Saloon (2008 - 2011)
Civic (2012)
C4 Picasso (2007 - 2011)
Grand C4 Picasso (2007 - 2011)
C5 (2004 - 2008)
C6 (2006 - 2011)
DS3 (2010 - 2011)
DS4 (2011 - 2012)
Nemo Multispace (2009 - 2011)
Xsara Picasso (2000 - 2009)
Daewoo
Please refer to the manufacturer
for further information
Daihatsu
Charade (2003 - 2007)
Copen (2002 - 2012)
Materia (2007 - 2010)
Sirion (2005 - 2010)
Terios (2006 - 2010)
Dodge
Please refer to the manufacturer
for further information
Ferrari
Please refer to the manufacturer
for further information
Fiat
500 (2008 - 2011)
500 C (2009 - 2011)
Abarth 500 (2009 - 2011)
Bravo (2007 - 2011)
X
V
V
V
X
V
V
V
V
V
X
X
V
V
V
V
X
V
V
V
X
V
V
V
V
X
V
V
X
X
V
V
V
V
V
X
V
V
V
X
V
V
V
V
X
V
V
X
V
X
V
V
V
V
X
V
V
V
X
V
V
V
V
V
X
V
V
V
X
V
V
V
V
X
V
V
X
V
X
V
V
V
V
X
V
V
V
21 3 21 3

EN
EN
35 36
V
V
V
X
V
V
V
V
V
V
V
V
V
V
V
X
V
V
V
V
V
V
V
V
V
V
X
V
V
X
V
V
V
V
V
V
V
V
V
X
V
V
V
V
V
V
V
V
V
X
V
V
X
V
V
V
V
V
V
V
V
V
X
V
V
V
V
V
V
Jaguar
S-Type (1999 - 2007)
X-Type (2001 - 2010)
XF (2008 - 2011)
XF R (2009 - 2011)
XJ (2003 - 2009)
XJ R (2003 - 2008)
XK (2006 - 2011)
XK R (2006 - 2011)
Jeep
Cherokee (2001 - 2007)
Cherokee 2008 (2008 - 2010)
Grand Cherokee (2005 - 2011)
Compass (2006 - 2012)
Patriot (2007 - 2011)
Kia
Carens (2000 - 2006)
Ceed Hatchback (2012)
Cerato (2004 - 2006)
Optima (2012)
Picanto (2004 - 2011)
Rio (2012)
Rio (2005 - 2011)
Rio 2nd Gen (2005 - 2011)
Sedona (2006 - 2011)
Sedona 2nd Gen (1999 - 2006)
Sorento (2003 - 2009)
Sportage (2005 - 2010)
Land rover
Defender (1983 - 2012)
Defender 2007 (1983 - 2011)
Civic (2006 - 2011)
Civic Hybrid Saloon (2006 - 2010)
CRV 3rd Gen (2001 - 2006)
CRV (2007 - 2011)
CRZ (2009 - 2012)
FRV (2006 - 2011)
Insight (2009 - 2011)
Jazz (2008 - 2011)
Jazz (2002 - 2008)
Hyundai
Accent (2006 - 2009)
Amica (2006 - 2009)
Coupe / Tuscani (2001 - 2009)
Getz (2002 - 2009)
I10 Hatchback (2008 - 2012)
I20 Hatchback (2009 - 2012)
I30 (2007 - 2012)
I40 (2011 - 2012)
IX35 (2010 - 2012)
Matrix (2001 - 2010)
SantaFe (2006 - 2011)
SantaFe (2001 - 2005)
Trajet (2000 - 2006)
Tucson (2004 - 2009)
Please refer to the manufacturer
for further information
V
V
V
V
V
V
V
V
V
V
V
V
V
V
X
V
V
V
V
V
V
V
V
V
V
V
V
V
V
V
V
V
V
V
V
V
V
V
V
V
V
V
V
X
V
V
V
V
V
V
V
V
V
V
V
V
V
V
V
V
V
V
V
V
V
V
V
V
V
V
X
V
V
V
V
V
V
V
V
V
V
21 3 21 3

EN
EN
37 38
X
V
V
X
V
V
V
V
V
V
V
X
V
V
V
V
V
V
V
V
V
V
V
V
X
V
V
V
V
V
V
V
V
V
V
V
V
V
V
V
V
V
V
V
V
V
X
V
V
V
V
V
V
V
V
V
V
V
V
V
V
V
V
V
V
V
V
V
X
V
X
X
V
V
V
X
V
X
X
X
X
V
V
V
V
X
V
X
V
V
V
V
V
V
V
X
V
V
V
X
V
V
V
V
V
V
V
V
V
V
X
X
V
V
V
V
V
V
V
V
X
V
V
V
X
V
V
V
V
V
V
V
V
V
V
X
X
V
V
V
V
5 (2005 - 2010)
6 (2002 - 2007)
6 2008 (2007 - 2011)
6 Hatchback (2007 - 2012)
MX-5 (1990 - 2005)
RX-8 (2003 - 2010)
Mercedez Benz
A Class (2005 - 2012)
B Class (2012)
B Class (2005 - 2011)
C Class (2008 - 2012)
C Class (2000 - 2007)
C Class Estate (2008 - 2012)
C Class Sports Coupe (2001 - 2008)
CLK (2002 - 2009)
E Class Estate (2009 - 2012)
E Class Saloon (2002 - 2008)
GL Class (2006 - 2012)
ML Class (2005 - 2012)
R Class (2006 - 2012)
S Class (2006 - 2012)
SL Class (2002 - 2011)
SLK Roadster (2004 - 2011)
MG
Please refer to the manufacturer
for further information
Mini
Mini Hatchback (2006 - 2011)
Mini One Convertible (2006 - 2012)
Mini Cooper (2001 - 2006)
Discovery (2004 - 2009)
Discovery 4 (2009 - 2012)
Freelander (2006 - 2011)
Freelander 2 (2006 - 2011)
Freelander Hardback (2003 - 2006)
Freelander Softback (2003 - 2006)
Range Rover (2002 - 2012)
Range Rover Sport (2005 - 2012)
Range Rover Evoque (2011 - 2012)
Lotus
Please refer to the manufacturer
for further information
Lexus
GS 300 (2005 - 2012)
IS Saloon (2005 - 2011)
IS 250 (2005 - 2011)
RX 350 (2003 - 2009)
Lambourghini
Please refer to the manufacturer
for further information
Maserati
Please refer to the manufacturer
for further information
Mazda
BT-50 (2011 - 2012)
BT-50 (2006 - 2011)
CX-5 (2011 - 2012)
CX-7 (2007 - 2011)
2 (2007 - 2011)
2 (2003 - 2007)
3 (2004 - 2008)
3 Hatchback (2009 - 2011)
3 2007 ( 2004 - 2008)
21 3 21 3
La pagina si sta caricando...
La pagina si sta caricando...
La pagina si sta caricando...
La pagina si sta caricando...
La pagina si sta caricando...
La pagina si sta caricando...
La pagina si sta caricando...
La pagina si sta caricando...
La pagina si sta caricando...
La pagina si sta caricando...
La pagina si sta caricando...
La pagina si sta caricando...
La pagina si sta caricando...
La pagina si sta caricando...
La pagina si sta caricando...
La pagina si sta caricando...
La pagina si sta caricando...
La pagina si sta caricando...
La pagina si sta caricando...
La pagina si sta caricando...
La pagina si sta caricando...
La pagina si sta caricando...
La pagina si sta caricando...
La pagina si sta caricando...
La pagina si sta caricando...
La pagina si sta caricando...
La pagina si sta caricando...
La pagina si sta caricando...
La pagina si sta caricando...
La pagina si sta caricando...
La pagina si sta caricando...
La pagina si sta caricando...
La pagina si sta caricando...
La pagina si sta caricando...
La pagina si sta caricando...
La pagina si sta caricando...
La pagina si sta caricando...
La pagina si sta caricando...
La pagina si sta caricando...
La pagina si sta caricando...
La pagina si sta caricando...
La pagina si sta caricando...
La pagina si sta caricando...
La pagina si sta caricando...
La pagina si sta caricando...
La pagina si sta caricando...
La pagina si sta caricando...
La pagina si sta caricando...
La pagina si sta caricando...
La pagina si sta caricando...
La pagina si sta caricando...
La pagina si sta caricando...
La pagina si sta caricando...
La pagina si sta caricando...
La pagina si sta caricando...
La pagina si sta caricando...
La pagina si sta caricando...
La pagina si sta caricando...
La pagina si sta caricando...
-
 1
1
-
 2
2
-
 3
3
-
 4
4
-
 5
5
-
 6
6
-
 7
7
-
 8
8
-
 9
9
-
 10
10
-
 11
11
-
 12
12
-
 13
13
-
 14
14
-
 15
15
-
 16
16
-
 17
17
-
 18
18
-
 19
19
-
 20
20
-
 21
21
-
 22
22
-
 23
23
-
 24
24
-
 25
25
-
 26
26
-
 27
27
-
 28
28
-
 29
29
-
 30
30
-
 31
31
-
 32
32
-
 33
33
-
 34
34
-
 35
35
-
 36
36
-
 37
37
-
 38
38
-
 39
39
-
 40
40
-
 41
41
-
 42
42
-
 43
43
-
 44
44
-
 45
45
-
 46
46
-
 47
47
-
 48
48
-
 49
49
-
 50
50
-
 51
51
-
 52
52
-
 53
53
-
 54
54
-
 55
55
-
 56
56
-
 57
57
-
 58
58
-
 59
59
-
 60
60
-
 61
61
-
 62
62
-
 63
63
-
 64
64
-
 65
65
-
 66
66
-
 67
67
-
 68
68
-
 69
69
-
 70
70
-
 71
71
-
 72
72
-
 73
73
-
 74
74
-
 75
75
-
 76
76
-
 77
77
-
 78
78
-
 79
79


Nuna pipaicon Instructions Manual
- Categoria
- Sedili dell'auto
- Tipo
- Instructions Manual
in altre lingue
- español: Nuna pipaicon
- Deutsch: Nuna pipaicon
- Nederlands: Nuna pipaicon
Documenti correlati
Altri documenti
-
Graco SNUGESSENTIALS Manuale del proprietario
-
 ickle bubba Mercury i-Size Car Seat Guida utente
-
Graco GC2116ABNVY000 Manuale utente
-
mothercare Joie isofix i-Base_0714658 Manuale del proprietario
-
mothercare Joie Juva group 0+ 0720185 Guida utente
-
Silver Cross Simplicity Manuale utente
-
Joie ECE R129-03 i-Spin Safe Enhanced Child Restraint Manuale utente
-
Joie i-Jemini Manuale utente
-
Jole i-Gemm™ 3 Manuale utente
-
