

1
2
3
click
1 64
2 7
3 85
2
1
click
2
2
1
1
click
click
click
1
1
2
1
2
1
2
1
1
2
1
9
10
11
12
13
14
15
16
17
18
19
20
21
22
23
29
30
31 32
24
25
26
27
28
1
1
2
2
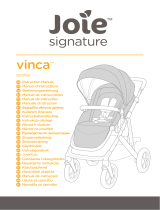
Designed
around your life

EN
2TRIV instructions
Contents
Product Information
Product Registration 3
Warranty 3
Contact 3
Child Usage Requirements 4
Warnings 5
Parts List 9
Product Set Up 11
Product Use 13
Accessories 16
Detach & Assemble Soft Goods 18
Cleaning and Maintenance 19
French (FR 21
German (DE) 43
Dutch (NL) 63
Italian (IT) 83
Spanish (ES) 103
Portuguese (PT) 123
Polish (PL) 143
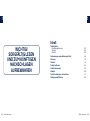
Czech (CZ) 163
Slovak (SK) 185
Croatian (HR) 203
Slovenain (SL) 223
Russian (RU) 243
Swedish (SV) 265
Finnish (FI) 285
Romanian (RO) 305
Greek (EL) 325
Turkish (TR) 345
Arabic (AR) 365
簡中 385
1
1
2 2
1
1
2
33
34
click
36
click
38
40
1
1
2
42
1
1
2
2
44
35
52
click
37
click
39
41
1
2
43
45
click
46
click
47
48
1
2
3
49
1
1
2
2
50
51
53
54
55
56
63
57
58
59
60
61
62
64
65
66
IMPORTANT!
READ CAREFULLY
AND KEEP FOR
FUTURE REFERENCE

EN
EN
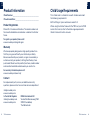
Child Usage Requirements
This stroller seat is suitable for use with children who meet
the following requirements:
Birth to 22 kg or 4 years whichever comes first
When using the stroller frame with the TRIV carry cot or PIPA
series infant carrier, refer to the child usage requirements
listed in those instruction manuals.
3 TRIV instructions 4TRIV instructions
Product Information
Model Number: _______________________________________
Manufactured Date: ___________________________________
Product Registration
Please fill in the above information. The model number and
the manufactured date are located on a label on the stroller
frame.
To register your product please visit:
www.nunababy.com/register-gear
Warranty
We have purposely designed our high-quality products so
that they can grow with both your child and your family.
Because we stand by our product, our gear is covered by a
custom warranty per product, starting from the day it was
purchased. Please have the proof of purchase, model number
and manufactured date available when you contact us.
For warranty information please visit:
www.nunababy.com/warranty
Contact
For replacement parts, service, or additional warranty
questions, please contact our customer service department.
info@nunababy.com
www.nunababy.com
In the United Kingdom:
infouk@nunababy.com
www.nunababy.com
NUNA International B.V.
Van der Valk Boumanweg 178 C
2352JD Leiderdorp
The Netherlands

EN
EN
5 TRIV instructions 6TRIV instructions
WARNING
Failure to follow these warnings and instructions could
result in serious injury or death.
Always use the restraint system.
Check that the pram body or seat unit or car seat
attachment devices are correctly engaged before
use.
Do not let the child play with this product.
Ensure that all the locking devices are engaged
before use.
Never leave the child unattended.
This product is not suitable for running or skating.
To avoid injury ensure that the child is kept away
when unfolding and folding this product.
Accessories which are not approved by the
manufacturer shall not be used. Only replacement
parts supplied or recommended by the
manufacturer/distributor shall be used.
Adult assembly required.
ALWAYS set the parking brake when you stop.
Any damage caused by the use of accessories not
supplied by Nuna will not be covered in terms of
warranty.
Any load attached to the handle and/or on the
back of the backrest and/or on the sides of the
vehicle will affect the stability of the vehicle.
Be certain the stroller is fully erected and latched
before allowing your child near the stroller.
DO NOT carry additional children, goods,
accessories in or on the stroller except as
permitted in this manual. They may cause the
stroller to become unstable.
DO NOT leave the stroller exposed in the vicinity of
a strong source of heat i.e. a radiator or open fire.
DO NOT place any item on the canopy.
DO NOT store the stroller in a damp place. Always
allow the fabric to dry naturally away from direct
heat.
DO NOT use storage basket as a child carrier.
DO NOT use the stroller if any parts are damaged
or missing.
For car seats used in conjunction with a chassis,
this vehicle does not replace a cot or a bed.
Should your child need to sleep, then it should be
placed in a suitable pram body, cot or bed.
It is not suggested to use insert B alone.
Keep small parts away from children as they pose
a choking hazard.
Negotiate curbs and rough ground carefully.
Repeated impact could cause damage to the
stroller.
NEVER allow children to stand on the stroller.
NEVER carry more than one child at a time in the
stroller.
NEVER use the stroller on stairs or escalators. You
may suddenly lose control of the stroller or your
child may fall out.

EN
EN
7 TRIV instructions 8TRIV instructions
The harness must always be correctly fitted and
adjusted. The harness is not a substitute for proper
adult supervision.
The parking break shall be engaged when placing
and removing children.
Overloading, incorrect folding, and the use of
accessories e.g. child seats, bag hooks, rain
covers, buggy boards, etc… other than those
approved by Nuna may damage or make the
stroller unsafe.
Rubber tires may leave black scuff marks on
smooth surfaces such as parquet, laminate and
linoleum.
STRANGULATION HAZARD Do not place items
with a string around your child’s neck, suspend
strings from this product, or attach strings to toys.
To avoid any danger of suffocation, remove all
plastic covers before using this item and destroy
or keep away from babies and children!
To prevent a hazardous, unstable condition, do not
place more than 4.5 kg in the storage basket and
more than 0.45 kg in the storage pocket.
USE the most reclined position for new born
babies.
Use the pushchair with a child weighing no more
than 22 kg. It will cause damage to the pushchair
with an unfitted child.

EN
EN
9 TRIV instructions 10TRIV instructions
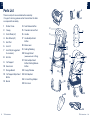
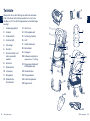
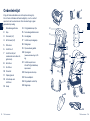
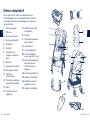
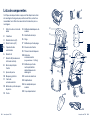
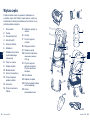
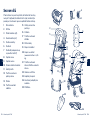
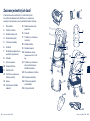
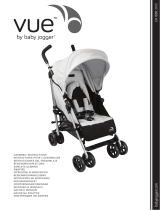
Parts List
Make sure all parts are available before assembly.
If any part is missing, please contact local retailer. No tools
are required for assembly.
1 Stroller Frame
2 Canopy
3 Front Wheel (x2)
4 Rear Wheel (x2)
5 Seat Pad
6 Insert A
7 Insert B (not suggested
to use alone)
8 Arm Bar
9 Calf Support
10 Swivel Lock
11 Storage Basket
12 Calf Support Adjustment
Button
13 Buckle
14 Seat Release Button
15 Shoulder Harness Pad
16 Handle
17 Handle Adjustment
Button
18 Brake Lever
19 Folding Webbing
20 Storage Pocket
(maximum load = 0.45 kg)
21 Recline Adjustment
Button/Folding Release
Button
22 Canopy Window
23 Post Adapters
24 Car Seat Ring Adapter
25 Rain Cover
1
x2
x2
3 4
25
23
24
4
18
16
17
21
20
19
22
7
6
9
5
2
8
10
11
13
14
12
3
15

EN
EN
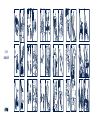
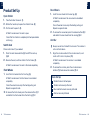
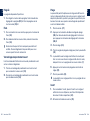
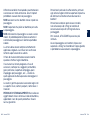
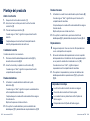
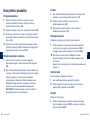
Product Set Up
Open Stroller
1 - Take the stroller frame out. (1)
2 - Rotate the handle up to open the stroller frame. (2)
3 - Pull the seat to open it. (3)
A “click” sound means the seat is open.
Check that the stroller is completely latched open before
continuing.
Switch Seat
Please switch seat if you needed.
1 - Press the seat release button
(4)-1
and lift the seat up
(4)-2
.
2 - Reverse the seat, and then attach it to the frame.
(5)
A “click” sound means the seat is attached completely.
Front Wheels
1 - Insert the front wheel into the front leg.
(6)
A “click” sound means the front wheel is assembled
completely.
Check the wheel is securely attached by pulling out.
Repeat on opposite side.
2 - To remove the front wheel, press the release button
(7)-1
and detach the front wheel from the front leg
(7)-2
.
Rear Wheels
1 - Insert the rear wheel into the rear leg.
(8)
A “click” sound means the rear wheel is assembled
completely.
Check the wheel is securely attached by pulling out.
Repeat on opposite side.
2 - To remove the rear wheel, press the release button
(9)-1
and detach the rear wheel from the rear leg
(9)-2
.
Arm Bar
Always secure the child with the harness. The arm bar is
not a restraint device.
1 - Align the arm bar ends with the arm bar mounts, and
insert until it clicks into place.
(10)
A “click” sound means the arm bar is assembled
completely.
2 - To remove the arm bar, press the arm bar release
buttons
(11)-1
and
remove the arm bar (11)-2
.
Check Set Up
Stroller frame is latched open
Stroller seat securely attached
Rear and front wheels securely attached
Arm bar securely attached
11 TRIV instructions 12TRIV instructions

EN
EN
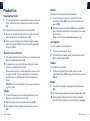
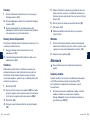
Product Use
Securing Your Child
1 - Push the center button on the buckle to release the buckle
latch, remove the clips and place your child in the stroller.
(12)
2 - Connect the shoulder buckle and hip buckle.
(13)
3 - Secure the shoulder buckle and hip buckle to the buckle
latch and repeat on the opposite side.
(14)
4 - Fit the harness snugly to your child by sliding the lower
adjustment buckles
(15)-1
. Then pull the waist adjustment
straps out (15)-2.
Shoulder Harness Position
1 - The upper shoulder harness buckles can be moved up and
down for added adjustment.
(16)
To avoid serious injury from falling or sliding out, always
secure your child with the harness.
Make sure the harness is adjusted properly and your child
is snugly secured. The space between the child and the
shoulder harness should be about the thickness of one
finger.
DO NOT cross the shoulder belts. This will cause pressure
on child’s neck.
Canopy
1
- To open the canopy, pull the canopy toward the front of
the seat, and to fold, push it back.
(17)
2 - Open the zipper on the canopy for extra shade.
(18)
3 - For added ventilation, flip the canopy window cover up.
(19)
Recline
There are 4 recline positions for the backrest.
1 - To raise or lower the backrest, squeeze the recline
adjustment button
(20)-1
, and pull the backrest up or
down
(20)-2
.
Please do not press the button
(20)-3
on the middle of
the recline adjustment button when adjusting the angle
for the recline.
Make sure the recline is adjusted properly for use.
Calf Support
The calf support has 2 use positions.
1 - To raise the calf support, lift up.
2 - To lower the calf support, press the adjustment button
(21)-1
, and push down
(21)-2
.
Handle
The handle has 5 positions.
1 - To adjust the height of the handle, pull the handle
adjustment button
(22)-1
and pull the handle up or down
(22)-2
.
Brake
1 - To lock the rear wheels, step down on the brake lever.
(23)
2 - To unlock the rear wheels, lift up on the brake lever.
(24)
Always apply the brake when the stroller is stopped.
Push the stroller slightly to ensure the brake is engaged.
13 TRIV instructions 14TRIV instructions

EN
EN
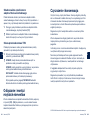
Front Swivel Locks
It is recommended to use the front swivel locks on uneven
surfaces.
1 - Pull the front swivel lock up to lock the front wheel.
(25)
2 - Push the front swivel lock down to unlock.
(26)
Fold
The stroller can be folded with forward facing seat or rear
facing seat or without the seat. Before folding the stroller,
adjust the handle to the lowest position and make sure the
front swivel locks are unlocked.
1 - Fold the canopy.
(27)
2 - Press the folding release button
(28)-1
on the middle
of the recline adjustment button and then squeeze the
recline adjustment button
(28)-2
.
3 - Fold the seat.
(29)
4 - Pull the folding webbing of the seat to fold the stroller.
(30)
5 - The stroller with forward facing seat can stand by
wheels, and with rear facing seat can stand by handle
and the rear wheels.
(31)
6 - Press the folding buttons of the seat mounts.
(32)
7 - Fold the stroller.
(33)
The stroller without seat can stand by handle and the
rear wheels.
Insert
1
- To assemble the insert, place the insert over the seat and
thread the shoulder, waist and crotch harnesses through
their respective slots. (34)
2 - Attach the hook and loop fasteners. (35)
15 TRIV instructions 16TRIV instructions
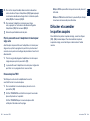
Accessories
Not all accessories are included on some models.
Post Adaptors
For PIPA series infant carrier and TRIV carry cot assembly
and usage, please refer to the infant carrier and carry cot
instruction manual.
1 - To attach the post adapters, place the post adapters
on the seat mounts. A “click” sound means the post
adapters are attached.
(36)(37)
2 - To attach infant carrier, place the infant carrier on the
post adapters. A “click” sound means the infant carrier is
attached.
(38)
3 - To attach carry cot, place the carry cot on the post
adapters. A “click” sound means the carry cot is
attached.
(39)
4 - The infant carrier can be attached rear or forward facing
on the post adapter.
(41)
5 - The carry cot can be attached rear or forward facing on
the post adapters.
(42)
6 - To remove the infant carrier, push the release buttons on
the infant carrier
(42)-1
and lift up
(42)-2
.
7- To remove carry cot, press the release buttons on the
side of the carry cot (43)-1 and lift up (43)-2.
8 - To remove the post adapters, pull the adapter release
buttons (44)-1 and lift up (44)-2.
Remove the infant carrier and carry cot before folding.

EN
EN
17 TRIV instructions 18TRIV instructions
Fold the Stroller with Post Adapters
Before folding the stroller with post adapters, adjust the
handle to the lowest position and make sure the front swivel
locks are unlocked.
1 - Pull the folding webbing of the post adapters to fold the
stroller.
(45)
The stroller with the post adapters can stand by handle
and the rear wheels.
Car Seat Ring Adapter
For PIPA series infant carrier assembly and usage, please
refer to the PIPA series infant carrier instruction manual.
1 - To attach the car seat ring adapter, place the car seat
ring adapter on the seat mount.
(46)
A “click” sound
means the car seat ring adapter is locked.
2 - To attach the infant carrier, place the infant carrier on the
car seat ring adapter. A “click” sound means the infant
carrier is attached.
(47)
3 - The infant carrier and the car seat ring adapter can be
attached rear or forward facing.
(48)
4 - To remove the infant carrier, release the second safety
lock for adapter
(49)-1
, then push the release button
located on the back of the infant carrier
(49)-2
and lift up
(49)-3
.
5 - To remove the car seat ring adapter, push the adapter
release buttons
(50)-1
and lift up
(50)-2
.
Remove the infant carrier before folding.
Fold the stroller with Car Seat ring adapter
Before folding the stroller with car seat ring adapter, adjust
the handle to the lowest position and make sure the front
swivel locks are unlocked.
1 - Pull the folding webbing of the car seat ring adapter to
fold the stroller.
(51)
The stroller with the car seat ring adapter can stand by
handle and the rear wheels.
TRIV Rain Cover
Check that the canopy is completely open before attaching
the rain cover.
1 - To assemble the rain cover, place it over the pushchair.
(52)
ALWAYS check ventilation when the rain cover is on the
product.
ALWAYS check that the rain cover has been cleaned and
dried before folding.
DO NOT fold the pushchair when the rain cover is
attached.
DO NOT place your child in the pushchair in hot weather
with the rain cover attached.
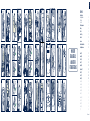
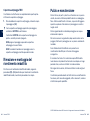
Detach & Assemble Soft Goods
To detach seat soft goods, follow the steps
(
53
)
- (66) as
shown, and to re-assemble seat soft goods, follow the steps
above in reverse.

EN
EN
19 TRIV instructions 20TRIV instructions
©2019 NUNA International B.V. Nuna and all associated logos are trademarks.
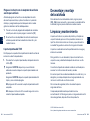
Cleaning and Maintenance
Clean the frame, plastic parts, and fabric with a damp
cloth, but do not use abrasives or bleach. Do not use silicon
lubricants as they will attract dirt and grime. Do not store
your stroller in a damp place.
Clean the stroller wheels regularly with water and remove
any dirt.
To ensure long-lasting use, wipe the stroller off with a soft,
absorbent cloth after using it in rainy weather.
Refer to the care label attached to the soft goods for washing
and drying instructions.
It is normal for fabric to color from sunlight and to show wear
and tear after a long period of use, even when used normally.
For reasons of safety, only use original Nuna parts.
Check regularly if everything functions properly. If any parts
are torn, broken, or missing, stop using this product.

FR
FR
21 Instructions TRIV 22Instructions TRIV
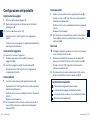
Sommaire
Informations sur le produit
Enregistrement du produit 23
Garantie 23
Contact 23
Exigences d’utilisation avec un enfant 24
Avertissement 25
Liste des pièces 29
Configuration du produit 31
Utilisation du produit 33
Accessoires 37
Détacher et assembler les pièces souples 40
Nettoyage et maintenance 41
IMPORTANT !
À LIRE ATTENTIVEMENT
ET À CONSERVER
POUR CONSULTATION
ULTÉRIEURE

FR
FR
Exigences d’utilisation avec un
enfant
Ce siège de poussette est adapté aux enfants répondant aux
exigences suivantes :
De la naissance jusqu’à 22 kg ou 4 ans à la première des
deux limites atteintes
En cas d’utilisation du cadre de la poussette avec la nacelle
TRIV ou le porte-bébé de la série PIPA, consultez les
exigences d’utilisation avec un enfant mentionnées dans les
manuels d’instructions correspondants.
23 Instructions TRIV 24Instructions TRIV
Informations sur le produit
Numéro de modèle : ___________________________________
Date de fabrication : ___________________________________
Enregistrement du produit
Veuillez indiquer les informations ci-dessus. Le numéro de
modèle et la date de fabrication se situent sur une étiquette
sur le cadre de la poussette.
Pour enregistrer votre produit, veuillez vous rendre sur le site
suivant :
www.nunababy.com/register-gear
Garantie
Nous avons conçu spécialement nos produits de haute
qualité afin qu’ils puissent accompagner le développement
de votre enfant et de votre famille. Nous soutenons
notre produit en couvrant notre matériel par une garantie
personnalisée, commençant le jour de son achat. Veuillez
disposer de la preuve d’achat, du numéro de modèle et de la
date de fabrication lorsque vous nous contactez.
Pour des informations sur la garantie, veuillez vous rendre
sur le site suivant :
www.nunababy.com/warranty
Contact
Pour des demandes de pièces de rechange, de service ou
des questions supplémentaires sur la garantie, veuillez
contacter notre service client
info@nunababy.com
www.nunababy.com

FR
FR
25 Instructions TRIV 26Instructions TRIV
AVERTISSEMENT
Ne pas suivre ces avertissements et instructions peut
conduire à de sérieuses blessures ou la mort.
Toujours utiliser le système de retenue.
Vérifier que les dispositifs de fixation de la nacelle,
du siège ou du siège-auto sont correctement
enclenchés avant utilisation.
Ne pas laisser un enfant jouer avec ce produit.
S’ensurer que tous les dispositifs de verrouillage
sont enclenchés avant utilisation.
Ne jamais laisser un enfant sans surveillance.
Ce produit ne convient pas pour faire du jogging
ou des promenades en rollers.
Pour éviter toute blessure, maintenir l’enfant à
l’écart lors du dépliage et du pliage du produit.
Les accessoires non homologués par le fabricant
ne doivent pas être utilisés. Seules les pièces de
rechange fournies ou conseillées par le fabricant/
distributeur doivent être utilisées.
L’assemblage du produit doit être effectué par un
adulte.
Enclenchez TOUJOURS le frein de stationnement
lorsque vous vous arrêtez.
Tout dommage causé par l’utilisation d’accessoires
non fournis par Nuna ne seront pas couverts en
termes de garantie.
Les charges attachées à la poignée et/ou au
dos du dossier et/ou sur les côtés du dispositif
affectent la stabilité du dispositif.
Assurez-vous que la poussette est complètement
dépliée et verrouillée avant de laisser votre enfant
à proximité de la poussette.
NE TRANSPORTEZ PAS d’enfants, de biens ou
d’accessoires supplémentaires dans ou sur la
poussette, à l’exception des autorisations de ce
manuel. Ils pourraient rendre la poussette instable.
NE LAISSEZ PAS la poussette exposée à proximité
d’une source de chaleur comme un radiateur ou un
feu ouvert.
NE PLACEZ PAS d’objets sur la voilure.
NE CONSERVEZ PAS la poussette dans un endroit
humide. Laissez toujours sécher naturellement le
tissu à l’écart des sources directes de chaleur.
N’UTILISEZ PAS le panier de rangement comme
un porte-bébé.
N’UTILISEZ PAS la poussette si des pièces sont
endommagées ou manquantes.
Pour les sièges auto utilisés avec un châssis, ce
dispositif ne remplace pas un berceau ou un lit. Si
votre enfant a besoin de dormir, il doit être placé
dans un landau, un berceau ou un lit approprié.
Il n’est pas conseillé d’utiliser l’insert B seul.
Gardez les petites pièces à l’écart des enfants car
elles présentent des risques d’étouffement.
Négociez les virages et les terrains délicats
avec prudence. Les chocs répétés peuvent
endommager la poussette.
NE LAISSEZ JAMAIS des enfants se tenir sur la
poussette.

FR
FR
27 Instructions TRIV 28Instructions TRIV
NE TRANSPORTEZ JAMAIS plus d’un enfant à la
fois dans cette poussette.
N’UTILISEZ JAMAIS la poussette dans des
escaliers ou des escaliers mécaniques. Vous
risquez de perdre soudainement le contrôle de la
poussette ou votre enfant risque de tomber.
Le harnais doit toujours être correctement adapté
et ajusté. Le harnais ne se substitue pas à la
surveillance correcte d’un adulte.
Le frein de stationnement doit être enclenché
lorsque vous placez ou retirez l’enfant.
Une surcharge, un pliage incorrect et l’utilisation
d’accessoires tels que des sièges enfants, des
crochets pour sacs, des housses de pluie, des
marche-pieds, etc. autres que ceux approuvés par
Nuna peuvent endommager ou compromettre la
sécurité de la poussette.
Les pneus en caoutchouc peuvent laisser des
marques d’éraflures noires sur les surfaces lisses
telles que le parquet, les sols stratifiés et le
linoléum.
RISQUE D’ÉTRANGLEMENT Ne placez pas
d’objets avec une ficelle autour du cou de votre
enfant, ne suspendez aucune ficelle à ce produit
et n’attachez aucune ficelle aux jouets.
Pour éviter tout risque de suffocation, retirez
toutes les protections en plastique avant d’utiliser
ce produit et détruisez-les ou conservez-les hors
de portée des bébés et des enfants !
Pour éviter une condition instable et dangereuse,
ne placez pas plus de 4,5 kg dans le panier de
rangement et pas plus de 0,45 kg dans la poche
de rangement.
UTILISEZ la position la plus inclinée pour les
nouveaux-nés.
Utilisez la poussette avec un enfant pesant moins
de 22 kg. Cela endommagera la poussette avec un
enfant non installé.

FR
FR
29 Instructions TRIV 30Instructions TRIV
Liste des pièces
Assurez-vous que toutes les pièces sont présentes avant
le montage. Si une pièce est manquante, contactez votre
revendeur local. Le montage ne nécessite aucun outil.
1 Cadre de poussette
2 Voilure
3 Roue avant (x2)
4 Roue arrière (x2)
5 Assise de siège
6 Insert A
7 Insert B (utilisation seul
déconseillée)
8 Barre de sécurité
9 Repose-mollets
10 Verrouillage de
pivotement
11 Panier de rangement
12 Levier de réglage du
repose-mollets
13 Boucle
14 Bouton de déverrouillage
du siège
15 Rembourrage du harnais
d’épaules
16 Poignée
17 Bouton de réglage de la
poignée
18 Levier de frein
19 Sangle de pliage
20 Poche de rangement
(charge maximale = 0,45 kg)
21 Bouton de réglage de
l’inclinaison/Bouton de
déverrouillage du pliage
22 Fenêtre de la voilure
23 Adaptateurs des
éléments de support
24 Adaptateur circulaire
pour siège auto
25 Housse de pluie
1
x2
x2
3 4
25
23
24
4
18
16
17
21
20
19
22
7
6
9
5
2
8
10
11
13
14
12
3
15

FR
FR
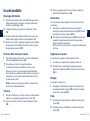
Configuration du produit
Ouverture de la poussette
1
- Retirez le cadre de la poussette. (1)
2 - Tournez la poignée vers le haut pour ouvrir le cadre de la
poussette. (2)
3 - Tirez le siège pour l’ouvrir. (3)
Vous entendrez un « clic » signifiant que le siège est
ouvert.
Vérifiez que la poussette est complètement
désenclenchée avant de poursuivre.
Basculement du siège
Veuillez basculer le siège si nécessaire.
1 - Appuyez sur le bouton de déverrouillage du siège (4)-1 et
soulevez le siège (4)-2.
2 - Retournez le siège, puis fixez-le au cadre. (5)
Vous entendrez un « clic » signifiant que le siège est
complètement fixé.
Roues avant
1
- Insérez la roue avant dans le piètement avant. (6)
Vous entendrez un « clic » signifiant que la roue avant
est complètement assemblée.
Vérifiez que la roue est correctement fixée en tirant
dessus.
Répétez la manipulation sur le côté opposé.
2 - Pour enlever la roue avant, appuyez sur le bouton
de déverrouillage (7)-1 et détachez la roue avant du
piètement avant (7)-2.
Roues arrière
1 - Insérez la roue arrière dans le piètement arrière. (8)
Vous entendrez un « clic » signifiant que la roue arrière
est complètement assemblée.
Vérifiez que la roue est correctement fixée en tirant
dessus.
Répétez la manipulation sur le côté opposé.
2 - Pour enlever la roue arrière, appuyez sur le bouton
de déverrouillage (9)-1 et détachez la roue arrière du
piètement arrière (9)-2.
Barre de sécurité
Attachez toujours l’enfant avec le harnais. La barre de
sécurité n’est pas un dispositif de retenue.
1 - Alignez les extrémités de la barre de sécurité avec les
montants de la barre de sécurité et insérez-la jusqu’à ce
qu’elle s’enclenche en place. (10)
Vous entendrez un « clic » signifiant que la barre de
sécurité est complètement assemblée.
2 - Pour enlever la barre de sécurité, appuyez sur les
boutons de déverrouillage de la barre de sécurité (11)-1 et
enlevez la barre de sécurité (11)-2.
Vérification du montage
Le cadre de la poussette est verrouillé ouvert
Siège de la poussette solidement fixé
Roues arrière et avant solidement fixées
Barre de sécurité solidement fixée
31 Instructions TRIV 32Instructions TRIV

FR
FR
Utilisation du produit
Installation de votre enfant
1 - Appuyez sur le bouton central de la boucle pour
déverrouiller le loquet de la boucle, enlevez les attaches
et placez votre enfant dans la poussette. (12)
2 - Raccordez la boucle d’épaules et la boucle de hanches.
(13)
3 - Fixez la boucle d’épaules et la boucle de hanches sur le
loquet de la boucle et répétez la manipulation sur le côté
opposé. (14)
4 - Ajustez fermement le harnais sur votre enfant en faisant
coulisser les boucles de réglage inférieures (15)-1. Puis
tirez les sangles de réglage au niveau de la taille (15)-2.
Position du harnais d’épaules
1 - Les boucles supérieures du harnais d’épaules
peuvent être remontées et abaissées pour un réglage
supplémentaire. (16)
Attachez toujours votre enfant avec le harnais pour
éviter que l’enfant ne se blesse en tombant ou en
glissant du siège.
Assurez-vous que le harnais est correctement ajusté et
que votre enfant est bien attaché. L’espace entre l’enfant
et le harnais d’épaules doit faire environ l’épaisseur d’un
doigt.
NE CROISEZ PAS les ceintures d’épaules. Ceci
appliquerait une pression sur le cou de l’enfant.
Voilure
1
- Pour ouvrir la voilure, tirez la voilure vers l’avant du
siège. Pour la plier, repoussez-la. (17)
2 - Ouvrez la fermeture éclair sur la voilure pour obtenir
davantage d’ombre. (18)
3 - For added ventilation, flip the canopy window cover up.
(19)
Position
Il existe 4 positions d’inclinaison pour le dossier.
1 - Pour relever ou abaisser le dossier, appuyez sur le
bouton de réglage de l’inclinaison (20)-1 et tirez le
dossier vers le haut ou le bas (20)-2.
Veuillez ne pas appuyer sur le bouton (20)-3 au milieu
du bouton de réglage de l’inclinaison lors du réglage de
l’angle de l’inclinaison.
L’inclinaison doit être ajustée correctement avant
utilisation.
Repose-mollets
Le repose-mollets comprend 2 positions d’utilisation.
1 - Pour remonter le repose-mollets, soulevez.
2 - Pour abaisser le repose-mollets, appuyez sur le bouton
de réglage (21)-1, puis poussez vers le bas (21)-2.
33 Instructions TRIV 34Instructions TRIV

FR
FR
Poignée
La poignée dispose de 5 positions.
1 - Pour régler la hauteur de la poignée, tirez le bouton de
réglage de la poignée (22)-1 et tirez la poignée vers le
haut ou le bas (22)-2.
Frein
1 - Pour verrouiller les roues arrière, appuyez sur le levier de
frein. (23)
2 - Pour déverrouiller les roues arrière, relevez le levier de
frein. (24)
Enclenchez toujours le frein lorsque la poussette est
arrêtée. Poussez légèrement la poussette pour vous
assurer que le frein est enclenché.
Verrouillages de pivotement avant
Il est recommandé d’utiliser les verrous de pivotement avant
sur les surfaces irrégulières.
1 - Tirez le verrouillage de pivotement avant vers le haut
pour verrouiller la roue avant. (25)
2 - Poussez le verrouillage de pivotement avant vers le bas
pour le déverrouiller. (26)
35 Instructions TRIV 36Instructions TRIV
Pliage
La poussette peut être pliée avec le siège orienté face à la
route, le siège orienté dos à la route ou sans le siège. Avant
de plier la poussette, ajustez la poignée à la position la plus
basse et assurez-vous que les verrouillages de pivotement
avant sont déverrouillés.
1 - Pliez la voilure. (27)
2 - Appuyez sur le bouton de déverrouillage du pliage
(28)-1 au milieu du bouton de réglage de l’inclinaison
puis appuyez sur le bouton de réglage de l’inclinaison
(28)-2.
3 - Pliez le siège. (29)
4 - Tirez la sangle de pliage du siège pour plier la poussette.
(30)
5 - La poussette avec le siège orienté face à la route peut
tenir sur ses roues. Avec le siège orienté dos à la route,
elle peut tenir sur sa poignée et ses roues arrière. (31)
6 - Appuyez sur les boutons de pliage des montants du
siège. (32)
7 - Pliez la poussette. (33)
La poussette sans siège peut tenir sur sa poignée et ses
roues arrière.
Insert
1
- Pour assembler l’insert, placez l’insert sur le siège et
enfilez les harnais d’épaules, ventral et d’entrejambe
dans leurs fentes respectives. (34)
2 - Attachez les fermetures velcro. (35)
La pagina si sta caricando...
La pagina si sta caricando...
La pagina si sta caricando...
La pagina si sta caricando...
La pagina si sta caricando...
La pagina si sta caricando...
La pagina si sta caricando...
La pagina si sta caricando...
La pagina si sta caricando...
La pagina si sta caricando...
La pagina si sta caricando...
La pagina si sta caricando...
La pagina si sta caricando...
La pagina si sta caricando...
La pagina si sta caricando...
La pagina si sta caricando...
La pagina si sta caricando...
La pagina si sta caricando...
La pagina si sta caricando...
La pagina si sta caricando...
La pagina si sta caricando...
La pagina si sta caricando...
La pagina si sta caricando...
La pagina si sta caricando...
La pagina si sta caricando...
La pagina si sta caricando...
La pagina si sta caricando...
La pagina si sta caricando...
La pagina si sta caricando...
La pagina si sta caricando...
La pagina si sta caricando...
La pagina si sta caricando...
La pagina si sta caricando...
La pagina si sta caricando...
La pagina si sta caricando...
La pagina si sta caricando...
La pagina si sta caricando...
La pagina si sta caricando...
La pagina si sta caricando...
La pagina si sta caricando...
La pagina si sta caricando...
La pagina si sta caricando...
La pagina si sta caricando...
La pagina si sta caricando...
La pagina si sta caricando...
La pagina si sta caricando...
La pagina si sta caricando...
La pagina si sta caricando...
La pagina si sta caricando...
La pagina si sta caricando...
La pagina si sta caricando...
La pagina si sta caricando...
La pagina si sta caricando...
La pagina si sta caricando...
La pagina si sta caricando...
La pagina si sta caricando...
La pagina si sta caricando...
La pagina si sta caricando...
La pagina si sta caricando...
La pagina si sta caricando...
La pagina si sta caricando...
La pagina si sta caricando...
La pagina si sta caricando...
La pagina si sta caricando...
La pagina si sta caricando...
La pagina si sta caricando...
La pagina si sta caricando...
La pagina si sta caricando...
La pagina si sta caricando...
La pagina si sta caricando...
La pagina si sta caricando...
La pagina si sta caricando...
La pagina si sta caricando...
La pagina si sta caricando...
La pagina si sta caricando...
La pagina si sta caricando...
La pagina si sta caricando...
La pagina si sta caricando...
La pagina si sta caricando...
La pagina si sta caricando...
La pagina si sta caricando...
La pagina si sta caricando...
La pagina si sta caricando...
La pagina si sta caricando...
-
 1
1
-
 2
2
-
 3
3
-
 4
4
-
 5
5
-
 6
6
-
 7
7
-
 8
8
-
 9
9
-
 10
10
-
 11
11
-
 12
12
-
 13
13
-
 14
14
-
 15
15
-
 16
16
-
 17
17
-
 18
18
-
 19
19
-
 20
20
-
 21
21
-
 22
22
-
 23
23
-
 24
24
-
 25
25
-
 26
26
-
 27
27
-
 28
28
-
 29
29
-
 30
30
-
 31
31
-
 32
32
-
 33
33
-
 34
34
-
 35
35
-
 36
36
-
 37
37
-
 38
38
-
 39
39
-
 40
40
-
 41
41
-
 42
42
-
 43
43
-
 44
44
-
 45
45
-
 46
46
-
 47
47
-
 48
48
-
 49
49
-
 50
50
-
 51
51
-
 52
52
-
 53
53
-
 54
54
-
 55
55
-
 56
56
-
 57
57
-
 58
58
-
 59
59
-
 60
60
-
 61
61
-
 62
62
-
 63
63
-
 64
64
-
 65
65
-
 66
66
-
 67
67
-
 68
68
-
 69
69
-
 70
70
-
 71
71
-
 72
72
-
 73
73
-
 74
74
-
 75
75
-
 76
76
-
 77
77
-
 78
78
-
 79
79
-
 80
80
-
 81
81
-
 82
82
-
 83
83
-
 84
84
-
 85
85
-
 86
86
-
 87
87
-
 88
88
-
 89
89
-
 90
90
-
 91
91
-
 92
92
-
 93
93
-
 94
94
-
 95
95
-
 96
96
-
 97
97
-
 98
98
-
 99
99
-
 100
100
-
 101
101
-
 102
102
-
 103
103
-
 104
104


in altre lingue
- English: Nuna Triv User manual
- français: Nuna Triv Manuel utilisateur
- español: Nuna Triv Manual de usuario
- Deutsch: Nuna Triv Benutzerhandbuch
- Nederlands: Nuna Triv Handleiding
- português: Nuna Triv Manual do usuário
- slovenčina: Nuna Triv Používateľská príručka
- čeština: Nuna Triv Uživatelský manuál
- polski: Nuna Triv Instrukcja obsługi
Documenti correlati
Altri documenti
-
 Jole vinca™ Manuale utente
-
 Baby Jogger VUE Assembly Instructions Manual
-
Joie AIRE TWIN ROSY/SEA Manuale utente
-
Joie Litetrax Manuale utente
-
Joie litetrax™ 4 travel system Manuale del proprietario
-
VERTBAUDET TSP106 Manuale utente
-
BOB REVOLUTION PRO User Instructions
-
Britax affinity Guida utente
-
-

