
(US) USB-C TRAVEL DOCK WITH HUB
(NL) USB-C REISDOCK MET HUB
(IT) DOCK DA VIAGGIO USB-C CON DELL’HUB
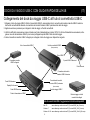
(DE) USB-C TRAVEL DOCK MIT HUB
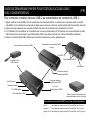
(ES) BASE DE VIAJE USB-C CON EL HUB
(FR) STATION D’ACCUEIL USB-C AVEC CONCENTRATEUR
US Model 34062
EMEA Model 82392


1
Travel Dock and Hub Installation……………
Travel Dock and Hub Diagram.……………..
Hub Driver Updates…………………………..
Reisstation en Hub-installatie.………………
Reisstation en Hub-diagram………………...
Hub stuurprogramma updates………………
Installazione Dock e Hub
di viaggio………………………………..……..
Travel Dock e Hub Diagram…………………
Aggiornamenti del driver Hub…………….....
2
2
2
3
3
3
4
4
4
Reise Dock und Hub Installation………..….
Reisedock und Hub-Diagramm…………..…
Hub-Treiber-Updates..……………….....…...
Instalación de base y muelle de viaje…….…
Travel Dock y Hub Diagram……………….…
Actualizaciones del controlador Hub………..
Installation d'un quai de voyage et d'un
concentrateur………………………………….
Dock de voyage et diagramme de
concentrateur………………………………….
Mises à jour du pilote Hub ……….………….
5
5
5
6
6
6
7
7
7
INDICE (IT) INHOUD (NL)
TABLE OF CONTENTS (US)
TABLE DES MATIÈRES (FR) ÍNDICE (ES) INHALTSVERZEICHNIS (DE)

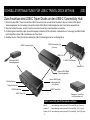
USB-C TRAVEL DOCK WITH HUB QUICK START GUIDE
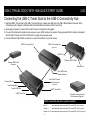
Connecting the USB-C Travel Dock to the USB-C Connectivity Hub
1. Align the USB-C Travel Dock to the USB-C Connectivity Hub, making sure that the Front USB-C Male Module Connector of the
Connectivity Hub is aligned to the Rear USB-C Female Module Connector of the Travel Dock.
2. Gently apply pressure to connect the Travel Dock and Connectivity Hub together.
3. For use of the attached Connectivity Hub, a power source (30W minimum) is required. Plug a powered USB-C cable (not included)
into the USB-C Power Port of the Travel Dock to supply the necessary power.
4. Use the Tethered USB-C Male Connector to connect Travel Dock to a source device.
Mac OS: www.cablestogo.com/docs/drivers/PC_Devices/34062_Mac_Driver.zip
Windows 7: www.cablestogo.com/docs/drivers/PC_Devices/34062_Win7_Driver.zip
Windows 8 & 10: www.cablestogo.com/docs/drivers/PC_Devices/34062_Win10-8_Driver.zip
USB-C Connectivity Hub driver updates available
(US)
2
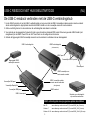
USB-C Connectivity Hub
Front USB-C Male
Module Connector
2 Female USB 2.0 Ports
Ethernet Port
USB-C Port
USB-C Connectivity Hub
(Rear View)
Tethered USB-C Male
Connector
Travel Dock and Connectivity
Hub Connected Together
USB-C Travel Dock
Female VGA Port
Female DisplayPort
Female HDMI Port
USB-C Power Port
Rear USB-C Female
Module Connector
(Not Shown)

3
USB-C REISDOCK MET HUB SNELSTARTGIDS
USB-C verbindingshub
USB-C mannelijke con-
nector aan de voorkant
2 vrouwelijke USB 2.0-poorten
Ethernetpoort
USB-C-poort
USB-C verbindingshub
(Achteraanzicht)
Reisdock en verbindingshub
zijn met elkaar verbonden
Vrouwelijke VGA-poort
Vrouwelijke DisplayPort
Vrouwelijke HDMI-poort
USB-C-stroompoort
Bijgevoegde USB-C
mannelijke connector
USB-C-reisdock
USB-C vrouwelijke module-
connector aan de achterkant
(Niet afgebeeld)
Mac OS: www.cablestogo.com/docs/drivers/PC_Devices/34062_Mac_Driver.zip
Windows 7: www.cablestogo.com/docs/drivers/PC_Devices/34062_Win7_Driver.zip
Windows 8 & 10: www.cablestogo.com/docs/drivers/PC_Devices/34062_Win10-8_Driver.zip
USB-C verbindingshub stuurprogramma-updates beschikbaar
De USB-C-reisdock verbinden met de USB-C-verbindingshub
1. Lijn de USB-C-reisdock uit met de USB-C-verbindingshub en zorg ervoor dat de USB-C mannelijke moduleconnector aan de voorkant
van de verbindingshub is uitgelijnd met de achterste USB-C stekker voor de vrouwelijke connector van de reisdock.
2. Oefen voorzichtig druk uit om de reisdock en de verbindingshub met elkaar te verbinden.
3. Voor gebruik van de aangesloten Connectivity Hub is een stroombron (minimaal 30W) vereist. Steek een gevoede USB-C-kabel (niet
meegeleverd) in de USB-C Power Port van het Travel Dock om de nodige stroom te leveren.
4. Gebruik de bijgevoegde USB-C-mannelijke connector om de reisdock te verbinden met een bronapparaat.
(NL)

DOCK DA VIAGGIO USB-C CON GUIDA RAPIDA DELL’HUB
Mac OS: www.cablestogo.com/docs/drivers/PC_Devices/34062_Mac_Driver.zip
Windows 7: www.cablestogo.com/docs/drivers/PC_Devices/34062_Win7_Driver.zip
Windows 8 & 10: www.cablestogo.com/docs/drivers/PC_Devices/34062_Win10-8_Driver.zip
Hub di connettività USB-C aggiornamenti dei driver disponibili
(IT)
4
Hub di connettività USB-C
Connettore del modulo
maschio USB-C anteriore
2 porte USB 2.0 femmina
Porta Ethernet
Porta USB-C
Hub di connettività USB-C
(Vista posteriore)
Dock da viaggio e hub di
connettività collegati
Dock da viaggio USB-C
Porta VGA femmina
DisplayPort femmina
Porta HDMI femmina
Porta di alimentazione USB-C
Connettore del modulo
femmina USB-C posteriore
(Non mostrato)
Connettore maschio
USB-C collegato
Collegamento del dock da viaggio USB-C all’hub di connettività USB-C
1. Allineare il dock da viaggio USB-C all’hub di connettività USB-C, assicurandosi che il connettore del modulo maschio USB-C anteriore
dell’hub di connettività sia allineato al connettore del modulo femmina USB-C posteriore del dock da viaggio.
2. Applicare una lieve pressione per collegare il dock da viaggio e l’hub di connettività.
3. L'utilizzo dell'hub di connessione incluso richiede una fonte di alimentazione (minimo 30 W). Per fornire l'alimentazione necessaria, colle-
gare un cavo di alimentazione USB-C (non incluso) all'apposita porta USB-C della dock da viaggio.
4. Usare il connettore maschio USB-C collegato per collegare il dock da viaggio a un dispositivo sorgente.

SCHNELLSTARTANLEITUNG FÜR USB-C TRAVEL DOCK MIT HUB
Mac OS: www.cablestogo.com/docs/drivers/PC_Devices/34062_Mac_Driver.zip
Windows 7: www.cablestogo.com/docs/drivers/PC_Devices/34062_Win7_Driver.zip
Windows 8 & 10: www.cablestogo.com/docs/drivers/PC_Devices/34062_Win10-8_Driver.zip
USB-C Connectivity Hub Treiberupdates verfügbar
(DE)
5
USB-C Travel Dock
USB-C Connectivity Hub
Vorderer USB-C Modul
-Verbindungsstecker
2 USB 2.0 Port-Buchsen
Ethernet-Port
USB-C Port
USB-C Connectivity Hub
(Rückansicht)
Verbundene Travel Dock
und Connectivity Hub
VGA-Port-Buchse
DisplayPort-Buchse
HDMI-Port-Buchse
USB-C Power Port
Hintere USB-C Modul-
Verbindungsbuchse
(nicht abgebildet)
Befestigter USB-C
Verbindungsstecker
Zum Anschluss des USB-C Travel Docks an den USB-C Connectivity Hub
1. Richten Sie den USB-C Travel Dock auf den USB-C Connectivity Hub aus und achten Sie darauf, dass der vordere USB-C Modul-
Verbindungsstecker des Connectivity Hubs auf die hintere USB-C Modul-Verbindungsbuchse des Travel Docks ausgerichtet ist.
2. Üben Sie leichten Druck aus, um den Travel Dock und den Connectivity Hub miteinander zu verbinden.
3. Zur Nutzung des Connectivity Hubs ist eine Stromquelle (mindestens 30 W) erforderlich. Verbinden Sie zur Versorgung ein USB-C-Kabel
(nicht inbegriffen) mit der USB-C-Ladebuchse des Travel Dock.
4. Schließen Sie den Travel Dock mit dem befestigten USB-C Verbindungsstecker an ein Quellgerät an.

GUÍA DE INICIO RÁPIDO PARA LA BASE DE VIAJE USB-C CON EL HUB
Mac OS: www.cablestogo.com/docs/drivers/PC_Devices/34062_Mac_Driver.zip
Windows 7: www.cablestogo.com/docs/drivers/PC_Devices/34062_Win7_Driver.zip
Windows 8 & 10: www.cablestogo.com/docs/drivers/PC_Devices/34062_Win10-8_Driver.zip
Hub de conectividad USB-C actualizaciones de controladores disponibles
(ES)
6
Hub de conectividad USB-C
Conector frontal del
módulo macho USB-C
2 puertos USB 2.0 hembra
Puerto Ethernet
Puerto USB-C
Hub de conectividad USB-C
(Vista posterior)
Base de viaje y hub de
conectividad conectados
Base de viaje USB-C
Puerto VGA hembra
DisplayPort hembra
Puerto HDMI hembra
Puerto de alimentación USB-C
Conector trasero del
módulo hembra USB-C
(No se muestra)
Conector incorporado
macho USB-C
Conectar la base de viaje USB-C al hub de conectividad USB-C
1. Alinear la base de viaje USB-C con el hub de conectividad USB-C, asegurándose de que el conector frontal del módulo macho USB-C
del hub de conectividad esté alineado con el conector trasero del módulo hembra USB-C de la base de viaje.
2. Presionar suavemente para conectar la base de viaje y el hub de conectividad.
3. Para el uso del hub de conectividad conectado, se requiere una fuente de alimentación (30 W mínimo). Conecte un cable USB-C de ali-
mentación (no incluido) en el puerto de alimentación USB-C de la base de viaje para suministrar la energía necesaria.
4. Utilizar el conector incorporado macho USB-C para conectar la base de viaje a un dispositivo fuente.

GUIDE DE DÉMARRAGE RAPIDE POUR STATION D’ACCUEIL USB-C
AVEC CONCENTRATEUR
Mac OS: www.cablestogo.com/docs/drivers/PC_Devices/34062_Mac_Driver.zip
Windows 7: www.cablestogo.com/docs/drivers/PC_Devices/34062_Win7_Driver.zip
Windows 8 & 10: www.cablestogo.com/docs/drivers/PC_Devices/34062_Win10-8_Driver.zip
Concentrateur de connectivité USB-C mises à jour du pilote disponibles
(FR)
7
Concentrateur de connectivité USB-C
Connecteur avant du
module mâle USB-C
2 ports femelles USB 2.0
Port Ethernet
Port USB-C
Concentrateur de connectivité USB-C
(vue arrière)
Station d’accueil et concentrateur de
connectivité batterie reliés l’un à l’autre
Station d’accueil USB-C
Port VGA femelle
DisplayPort femelle
Port HDMI femelle
Port d’alimentation USB-C
Connecteur arrière du
module femelle USB-C
(non illustré)
Connecteur mâle
USB-C attaché
Pour connecter la station d’accueil USB-C au concentrateur de connectivité USB-C
1. Alignez la station d’accueil USB-C avec le concentrateur de connectivité USB-C, en vérifiant que le connecteur avant du module
mâle USB-C du concentrateur de connectivité est aligné avec le connecteur arrière du module femelle USB-C de la station d’accueil.
2. Exercez une légère pression pour connecter la station d’accueil et le concentrateur de connectivité l’un à l’autre.
3. Pour l’utilisation du Concentrateur de Connectivité relié, une source d’alimentation (30 W minimum) est requise. Branchez un câble
USB-C alimenté (non fourni) dans le port d’alimentation USB-C de la station d’accueil pour assurer l’alimentation nécessaire.
4. Utilisez le connecteur mâle USB-C attaché pour connecter la station d’accueil à un appareil source.

NOTES (US) / OPMERKINGEN (NL) / GLI APPUNTI (IT) / ANMERKUNGEN (DE) / NOTAS (ES) / REMARQUES (FR)
8
__________________________________________________________
__________________________________________________________
__________________________________________________________
__________________________________________________________
__________________________________________________________
__________________________________________________________
__________________________________________________________
__________________________________________________________
__________________________________________________________
__________________________________________________________
__________________________________________________________
__________________________________________________________
__________________________________________________________
__________________________________________________________
__________________________________________________________
__________________________________________________________


© 2018 Legrand All Rights Reserved rev.03/18 QSG – 34062(US) 82392(EMEA)
FCC Statement
Note: This device complies with part 15 of the FCC Rules. Operation is
subject to the following two conditions:
(1) This device may not cause harmful interference, and
(2) This device must accept any interference received, including interfer-
ence that may cause undesired operation.
FCC Statement - §15.105(b):
"This equipment has been tested and found to comply with the limits for a
Class B digital device, pursuant to part 15 of the FCC Rules. These limits
are designed to provide reasonable protection against harmful interference
in a residential installation. This equipment generates, uses and can radiate
radio frequency energy and, if not installed and used in accordance with the
instructions, may cause harmful interference to radio communications.
However, there is no guarantee that interference will not occur in a particu-
lar installation. If this equipment does cause harmful interference to radio or
television reception, which can be determined by turning the equipment off
and on, the user is encouraged to try to correct the interference by one or
more of the following measures:
• Reorient or relocate the receiving antenna.
• Increase the separation between the equipment and receiver.
• Connect the equipment into an outlet on a circuit different from that to
which the receiver is connected.
• Consult the dealer or an experienced radio/TV technician for help.
FCC Caution - §15.21:
"Changes or modifications not expressly approved by the party responsible
for compliance could void the user's authority to operate the equipment."
60 Woodlawn Street
West Hartford, CT 06110
N. America Phone 800.293.4970
EMEA Phone +44 (0)1952 677300
www.c2g.com
-
 1
1
-
 2
2
-
 3
3
-
 4
4
-
 5
5
-
 6
6
-
 7
7
-
 8
8
-
 9
9
-
 10
10
-
 11
11
-
 12
12


Legrand 34062 Manuale del proprietario
- Tipo
- Manuale del proprietario
- Questo manuale è adatto anche per
in altre lingue
- English: Legrand 34062 Owner's manual
- français: Legrand 34062 Le manuel du propriétaire
- español: Legrand 34062 El manual del propietario
- Deutsch: Legrand 34062 Bedienungsanleitung
- Nederlands: Legrand 34062 de handleiding
Documenti correlati
Altri documenti
-
DeLOCK 82457 Scheda dati
-
C2G 7-Port USB 2.0 Hub Guida utente
-
Belkin F5U706 Manuale del proprietario
-
i-tec C31TRAVELDOCKPD Manuale utente
-
Dicota Replicator 2 Manuale utente
-
Dell H625cdw Cloud MFP Laser Printer Guida Rapida
-
-
Kerbl 70620 Connectivity Module Manuale utente