
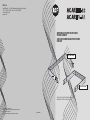
10307034/B

ENGLISH
ITALIANO
IMPORTANTE: Prima di collegare ed utilizzare questo
prodotto, leggere attentamente le istruzioni contenute in
questo manuale, il quale è da conservare per riferimenti futuri.
Il presente manuale costituisce parte integrante del prodotto e
deve accompagnare quest’ultimo anche nei passaggi di proprietà,
per permettere al nuovo proprietario di conoscere le modalità
d’installazione e d’utilizzo e le avvertenze per la sicurezza.
L’installazione e l’utilizzo errati del prodotto esimono la RCF S.p.A.
da ogni responsabilità.
ATTENZIONE: Non collegare a questo diffusore
apparecchi ed accessori non previsti.
Quando è prevista l’installazione sospesa, utilizzare
solamente gli appositi punti di ancoraggio e non cercare di
RCF S.p.A. Vi ringrazia per l’acquisto di questo prodotto, realizzato in modo da garantirne l’affidabilità e prestazioni elevate.
IMPORTANT NOTES: Before connecting and using
this product, please read this instruction manual carefully and keep
it on hand for future reference. The manual is to be considered
an integral part of this product and must accompany it when it
changes ownership as a reference for correct installation and use
as well as for the safety precautions.
RCF S.p.A. will not assume any responsibility for the incorrect
installation and / or use of this product.
WARNING: Do not connect this product to any
equipment or accessories not foreseen.
For suspended installation, only use the dedicated
anchoring points and do not try to hang this loudspeaker by using
elements that are unsuitable or not specific for this purpose.
RCF S.p.A. would like to thank you for having purchased this product, which has been designed to guarantee reliability and high performance.
appendere il diffusore con elementi non idonei o previsti allo
scopo. Verificare inoltre l’idoneità del supporto (parete, soffitto,
struttura ecc.) e dei componenti utilizzati per il fissaggio (tasselli,
viti, staffe non fornite da RCF ecc.) che devono garantire la sicurezza
dell’impianto / installazione nel tempo, anche considerando, ad
esempio, vibrazioni meccaniche normalmente generate da un
trasduttore.
La
RCF S.p.A. raccomanda vivamente che l’installazione
di questo prodotto sia eseguita solamente da installatori
professionali qualificati (oppure da ditte specializzate) in
grado di farla correttamente e certificarla in accordo con
le normative vigenti. T
utto il sistema audio dovrà essere
in conformità c
on le norme e le leggi vigenti in materia di
impianti elettrici.
Also check the suitability of the support surface to which
the product is anchored (wall, ceiling, structure, etc.), and the
components used for attachment (screw anchors, screws, brackets
not supplied by RCF etc.), which must guarantee the security of
the system / installation over time, also considering, for example,
the mechanical vibrations normally generated by transducers.
RCF S.p.A. strongly recommends this product is only installed
by professional qualified installers (or specialised firms) who
can ensure a correct installation and certify it according to the
regulations in force.
The entire audio system must comply with the current
standards and regulations regarding electrical systems.
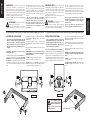
2. Screw the 2 screws-withknobs (P) or the hexa-head screws
(V) supplied into the M10 threaded inserts of the speakers,
without inserting them fully.
3. Couple the speaker to the support, inserting the threads
of the screws (P) or (V) that protrude from the speaker in
the slots of the support.
4. Adjust the angle of the speaker and tighten the screws
(P) or (V) firmly.
WARNING: Do not tighten the screws to fix the speaker
too tightly so as not to risk damaging the M10 threaded
inserts.
5a. (H-BR) Use the 2 little nobs (Q) to lock the speaker on
the correct angle.
5b. (V-BR) If required use Ø 4mm self-thread screw (not
provided) in hole (F) to lock the speaker on the correct
angle.
ISTRUZIONI DI INSTALLAZIONE
• Si raccomanda di eseguire un’installazione sicura del
diffusore, controllando che la superficie di fissaggio
abbia una resistenza e solidità tale da supportare
il peso del diffusore, in modo da evitare cadute che
potrebbero compromettere l’incolumità di persone o
strutture.
L’installazione dell’accessorio si articola nei punti
seguenti (vedi disegno):
1. Utilizzando tasselli e viti appropriati (non forniti), fissare
il supporto nel punto prescelto sulla parete. I tasselli da
utilizzare devono essere accuratamente scelti in base al
tipo di parete (cartongesso, mattoni forati, mattoni pieni,
calcestruzzo, ecc.). Orientare l’accessorio come da disegno
con le asole per l’inserimento del diffusore rivolte verso
l’alto.
2. Avvitare le manopole (P) o le viti (V) fornite in dotazione
negli inserti filettati M10 del
diffusore, senza inserirle
completamente.
3. Accoppiare il diffusore al supporto, inserendo i filetti
delle viti (P) o (V) che sporgono dal diffusore nelle asole dl
supp
orto.
4. Regolare l’inclinazione del diffusore e serrare le manopole
(P) o le viti (V).
ATTENZIONE: Non serrare eccessivamente le viti per il
fissaggio del diffusore, per non rischiare di danneggiare
gli inserti filettati M10.
5a. (H-BR) Utilizzare la manopola (Q) per bloccare
l
’angolazione del diffusore nella posizione scelta.
5b. (V-BR) Utilizzare una vite Ø 4mm autofilettante (non
f
ornita) che va inserita nel foro laterale (F) per bloccare
l
’angolazione del diffusore nella posizione scelta.
INSTALLATION INSTRUCTIONS
• You are recommended to install the speaker safety,
checking that the fixing surface is resistant and solid
enough to support the weight of the speaker, so as to
prevent the risk of it falling that could put the safety
of persons and structures in jeopardy.
The accessory is installed as follows (see the figure):
1. Using suitable plugs and screws (not provided), fix the
support at the chosen point on the wall. The plugs to be
used must be chosen carefully depending on the type of
wall (plasterboard, hollow bricks, solid bricks, concrete,
matchboard panelling, etc.). Please install the accessory as
per figure below, with the slots for the speaker insertion on
top.
non utilizzare queste
asole per il fissaggio del
diffusore a parete/soffito.
Do not use these slots for wall/
ceilling installation
V
P
AC ART H-BR
Q
P
V
AC ART V-BR
TOP
TOP
F
-
 1
1
-
 2
2


RCF ART 310 H-BR Wall Mount Manuale utente
- Tipo
- Manuale utente
- Questo manuale è adatto anche per
in altre lingue
Documenti correlati
-
RCF DM 41 Manuale del proprietario
-
RCF HD3216/T Manuale del proprietario
-
RCF ACUSTICA H series Manuale utente
-
-
-
-
RCF Art 735-A MK IV Manuale utente
-
RCF 4PRO 2031-A Manuale del proprietario
