
Video Conferencing Camera
UVC86
Quick Start Guide (V1.1)
English | 简体中文 | Deutsch | Français | Español
Yealink Documentation
support.yealink.com

CONTENT
C
O
N
T
E
N
TEnglish............................................................1
简体中文 ........................................................8
Deutsch..........................................................15
Français....................................................... ..22
Español..........................................................29

1
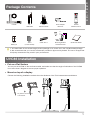
UVC86 7m
USB Cable
7.5m
Ethernet Cable
Power Adapter
48V/0.7A
VCR20
Remote Control
AAA
Battery×2
Cable Tie× 5Velcro
(on the bracket)
Mounting Bracket
and Accessories
Quick Start Guide
1. The USB cable in the UVC86 single-product package is 7m, and 2.5m in the UVC86 bundle package.
2. We recommend that you use the accessories provided or approved by Yealink. The use of unapproved
third-party accessories may result in poor performance.
X 4
X 4
X 5
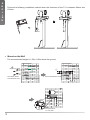
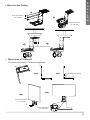
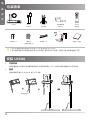
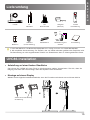
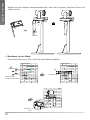
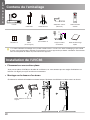
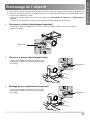
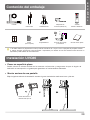
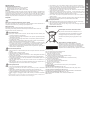
UVC86 Installation
Package Contents
• Mount on top of a display
Choose the following installation method when the thickness of the TV is between 0mm and 50mm.
Pay attention to the direction
of the bracket.
• Put on a Flat Surface
You can put the UVC86 on the conference table, and make sure that the angle of inclination of the UVC86
is not more than 5 degrees to ensure proper operation.
E
N
G
L
I
S
H
English............................................................1
简体中文 ........................................................8
Deutsch..........................................................15
Français....................................................... ..22
Español..........................................................29

2
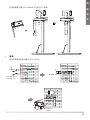
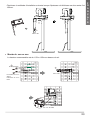
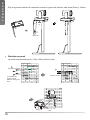
66mm
100mm
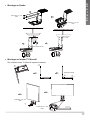
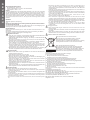
• Mount on the Wall
Hole depth: 30mm
Hole diameter: 6mm
Screw specication: T4×30
Screw specication:
1/4'' -20 UNC
3M Velcro
Choose the following installation method when the thickness of the TV is between 50mm and
150mm.
The recommended height is 1.55m-1.85m above the ground.
Expansion screw
E
N
G
L
I
S
H

3
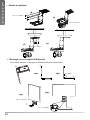
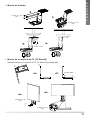
• Mount on the Ceiling
• Mount onto a TV Mount2
Screw specication: T4×30
You need to purchase a TV Mount2 separately.
180°
Screw specication: M3×8
Screw specication:
1/4'' -20 UNC
Screw specication:
1/4'' -20 UNC
Screw specication:
1/4'' -20 UNC
Screw specication:
1/4'' -20 UNC
E
N
G
L
I
S
H

4
E
N
G
L
I
S
H
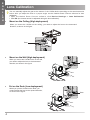
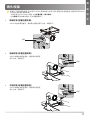
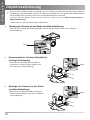
Gear
Gear
When you put the UVC86 on the desk, you
need to adjust the lens to the upward direction,
as shown in the gure.
When you mount the UVC86 on the or the wall,
you need to adjust the lens to the downward
direction, as shown in the gure.
• Put on the Desk (Low deployment)
• Mount on the Wall (High deployment)
Lens Calibration
You can manually adjust the gear at the bottom of the UVC86 device according to the actual scenarios
below. After you adjust the lens to a proper angle, use the Yealink Room Connect software for lens
calibration.
• Open the Yealink Room Connect software, click Device Settings -> Lens Calibration.
• Click OK (the camera cannot be adjusted during the lens calibration).
• Mount on the Ceiling (High deployment)
Gear
When you mount the UVC86 on the ceiling, you need to adjust the lens to the downward
direction, as shown in the gure.

5
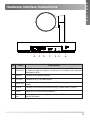
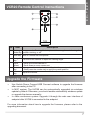
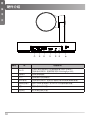
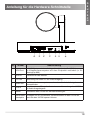
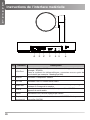
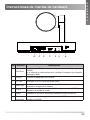
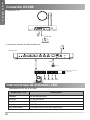
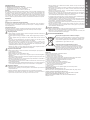
Hardware Interface Instructions
No. Item Description
1 VCH Port
In MVC system, connect to audio device (for example: VCM34).
In video conference system, connect to the endpoint (for example:
MeetingEye 800).
2 DC48V Connect to the power adapter.
3 PC Port Connect to a PC as video output.
4 HDMI out In video conference system, connect for sharing content or camera
image.
5 Line in Connect to an audio input device using an audio cable (3.5mm).
6 Reset Reset the UVC86 to factory defaults.
7Security
slot
Connect a universal security cable to the UVC86 so that you can lock
the UVC86 down.
E
N
G
L
I
S
H

6
VCH3 VCH2 VCH1 Display3Display2Display1Internet
5V
DC 48V
Line in Line out Video in
UVC86 UVC86 UVC86 UVC86
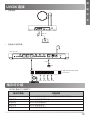
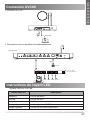
LED Indicator Instructions
LED indicators on the UVC86:
LED Status Description
Off The UVC86 is powered off.
Solid green The UVC86 is active.
Solid red The UVC86 is in sleep mode.
Flashing orange The UVC86 is upgrading rmware.
Flashing red The UVC86 is in recovery mode.
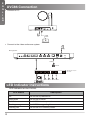
• Connect to the video conference system:
MeetingEye 800
UVC86 Connection
USB
cable
Cat5e
• Connect to PC:
Internet
IEEE 802.3af compliant
PoE Switch
E
N
G
L
I
S
H

7
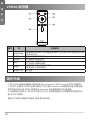
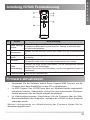
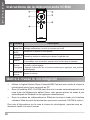
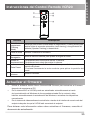
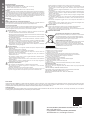
VCR20 Remote Control Instructions
Upgrade the Firmware
No. Item Description
1Tracking
Mode Key
Long press the Tracking Mode key to switch among the auto framing, the
speaker tracking, or off.
2 Mute Key Mute or unmute the microphone.
3Navigation
Key Pan and tilt the camera to adjust the viewing angle.
4Scroll
Wheel
• Scroll up to zoom camera in.
• Scroll down to zoom camera out.
5Preset
Key
• Long press the number key to add/update the preset position.
• Short press the number key to apply the preset position.
6Volume
Key Adjust the volume.
• Use Yealink Room Connect/USB Connect software to upgarde the rmware
after connecting to the PC.
• In MVC system: The UVC86 can be automatically upgraded via windows
update by default. Otherwise, you should enable automatically windows update
or upgrade the devices manually.
• In video conference system: Upgrade it through the web user interface of
endpoint after UVC86 is connected to the endpoint.
For more information about how to upgrade the firmware, please refer to the
upgrading document.
E
N
G
L
I
S
H

8
包装清单
UVC86 7米
USB 线
7.5 米
以太网线
电源适配器
48V/0.7A
VCR20
遥控器
7 号电池 ×2 束线带 ×5魔术贴
(已粘在挂架上)
支架配件 快速入门指南
1. UVC86 单品包材中标配的 USB 线为 7 米,在组合包中为 2.5 米。
2. 我们推荐使用由亿联提供或经亿联认可的配件。使用未经认可的第三方配件可能会导致性能的下降。
X 4
X 4
X 5
简
体
中
文
安装 UVC86
• 挂装
当电视厚度范围为 0-50mm 时,进行以下步骤:
注意支架方向
• 平放安装
将终端摆放在水平桌面。如果桌面略有倾斜,请保证倾斜角小于 5°,以保证终端的摄像机云台正常运转。

9
简
体
中
文
66mm
100mm
• 墙装
打孔深度:30mm
打孔直径:6mm
螺丝规格:T4×30
螺丝规格:1/4''-
20UNC
魔术贴
当电视厚度范围为 50-150mm 时,进行以下步骤:
建议安装高度为距地面 1.55m-1.85m。
膨胀螺丝

10
简
体
中
文
• 吊装
• 安装至电视挂架
螺丝规格:T4×30
用户可以自行选购电视架。
180°
螺丝规格:M3×8
螺丝规格:1/4''-
20UNC
螺丝规格:1/4''-
20UNC
螺丝规格:1/4''-
20UNC
螺丝规格:1/4''-
20UNC

11
简
体
中
文
镜头校准
根据以下实际使用场景,手动调节 UVC86 底部的镜头齿轮。镜头调整至合适角度后,再使用亿联 Room
Connect 软件进行镜头校准。
• 开启亿联 Room Connect 软件,点击设备设置 -> 镜头校准。
• 点击确定(镜头校准过程中,无法调整摄像头)。
• 吊装校准(部署位置较高)
• 平放校准(部署位置较低)
• 墙装校准(部署位置较高)
齿轮
齿轮
齿轮
UVC86 吊在较高位置时,需将镜头调整至朝下方向,如图所示。
UVC86 放置在较低位置时,需将镜头调整至
朝上方向,如图所示。
UVC86 放置在较高位置时,需将镜头调整至
朝下方向,如图所示。

12
硬件介绍
编号 项 功能说明
1VCH 口 在 MVC 会议室系统中,连接音频设备(例如:VCM34)。
在视频会议系统中,连接终端(例如:MeetingEye 800)。
2 电源接口 连接电源适配器。
3 PC 口 连接电脑作为视频输出。
4HDMI 输出 在视频会议系统中,连接显示器进行辅流或投屏摄像机画面。
5音频线性输入 连接 3.5mm 音频接头,将 UVC86 作为音频输出设备。
6重置 重置设备到出厂设置。
7安全锁孔 将主机锁在固定位置。
简
体
中
文

13
VCH3 VCH2 VCH1 Display3Display2Display1Internet
5V
DC 48V
Line in Line out Video in
UVC86 UVC86 UVC86 UVC86
指示灯介绍
UVC86 指示灯介绍如下 :
指示灯状态 功能说明
灭 UVC86 没有正确连接到 PC 上或未处于正常工作状态。
绿色常亮 UVC86 处于正常工作状态。
红色常亮 UVC86 处于休眠状态。
橙色闪烁 UVC86 固件更新中。
红色闪烁 UVC86 处于恢复模式。
• 连接会议电视终端
MeetingEye 800
UVC86 连接
USB 线
Cat5e
• 连接电脑
网口
支持 IEEE 802.3af/ac 协议
PoE Switch
简
体
中
文

14
VCR20 遥控器
固件升级
编号 项 功能说明
1智能取景键 长按智能取景按键时,可切换智能取景模式(在自动框⼈像,语音追踪与关闭
之间依次切换)。
2 静音键 将麦克风静音或取消静音。
3 导航键 调节摄像机的取景范围。
4滚轮 向上滑动放⼤摄像机画面。
向下滑动放⼤摄像机画面。
5预置位 长按数字键,新增 / 更新预设置位。
短按数字键,应用预设置位。
6音量调节键 调节音量。
1. 将 UVC86 连接至电脑后,使用亿联 Room Connect/USB Connect 软件升级固件。
2. 在 MVC 系统中:UVC86 在默认情况下可以通过 windows 自动更新升级。如果设备
软件没有自动升级,你可以启用自动 windows 自动更新或手动升级设备。
3. 在视频会议系统中 : 将 UVC86 通过 VCH 口与终端连接后,在终端的网页界面中升
级 UVC86 的固件。
更多关于如何升级固件的信息,请参考升级文档。
简
体
中
文

15
Lieferumfang
UVC86 7m
USB-Kabel
7,5m
Ethernet-Kabel
Netzgerät
(48V/0,7A)
VCR20
Fernbedienung
AAA
Batterie×2
Kabelbinder×5Klettband
(an der Halterung)
Wandhalterung und
Zubehör
Kurzanleitung
1. Das USB-Kabel im UVC86-Einzelproduktpaket ist 7 m lang und 2,5 m im UVC86-Bundlepaket.
2. Wir empfehlen die Verwendung von Zubehör, das von Yealink entweder geliefert oder empfohlen wird.
Die Verwendung von nicht zugelassenem Zubehör von Drittanbietern kann zu Leistungseinbußen führen.
X 4
X 4
X 5
D
E
U
T
S
C
H
UVC86-Installation
• Montage auf einem Display
Wählen Sie die folgende Installationsmethode, wenn der Fernseher zwischen 0 mm und 50 mm dick ist.
Achten Sie auf die Richtung
der Halterung.
• Aufstellung auf einer achen Oberäche
Sie können die UVC86 auf einen Tisch im Konferenzraum stellen. Vergewissern Sie sich, dass die
Neigung nicht mehr als 5 Grad beträgt, damit das System korrekt funktioniert.

16
66mm
100mm
• Montieren an der Wand
Lochtiefe: 30mm
Lochdurchmesser: 6mm
Schraube: T4×30
Schraube: 1/4'' -20
UNC
3M Velcro
Wählen Sie die folgende Installationsmethode, wenn der Fernseher zwischen 50mm und
150mm dick ist.
Es wird eine Höhe von 1,55m-1,85m über dem Boden empfohlen.
Dehnschraube
D
E
U
T
S
C
H

17
D
E
U
T
S
C
H
• Montage an Decke
• Montage auf einem TV Mount2
Schraube: T4×30
Sie müssen einen TV Mount2 separat erwerben.
180°
Schraube: M3×8
Schraube: 1/4'' -20
UNC
Schraube: 1/4'' -20
UNC
Schraube: 1/4'' -20
UNC
Schraube: 1/4'' -20
UNC

18
D
E
U
T
S
C
H
Gang
Gang
Wenn Sie die UVC86 auf dem Schreibtisch
positionieren, müssen Sie das Objektiv nach
oben ausrichten (siehe Abbildung).
Wenn Sie die UVC86 an der Wand befestigen,
müssen Sie das Objektiv nach unten ausrichten
(siehe Abbildung).
• Kameraposition auf dem Schreibtisch
(niedrige Anbringung)
• Montage der Kamera an der Wand
(erhöhte Aufstellung)
Objektivkalibrierung
Sie können die UVC86 mit Hilfe des Rädchens an der Unterseite des Geräts entsprechend den folgenden
Anweisungen manuell einstellen. Nach der Einstellung des Objektivs auf den gewünschten Winkel, können
Sie die Yealink Room Connect-Software für die Objektivkalibrierung verwenden.
• Starten Sie die Yealink Room Connect-Software, Klicken Sie auf Geräteeinstellungen ->
Objektivkalibirierung.
• Klicken Sie auf „OK“ (die Kamera kann während der
• Montage der Kamera an der Decke (erhöhte Aufstellung)
Gang
Wenn Sie die UVC86 an der Decke befestigen, müssen Sie das Objektiv nach unten ausrichten
(siehe Abbildung).
La pagina si sta caricando...
La pagina si sta caricando...
La pagina si sta caricando...
La pagina si sta caricando...
La pagina si sta caricando...
La pagina si sta caricando...
La pagina si sta caricando...
La pagina si sta caricando...
La pagina si sta caricando...
La pagina si sta caricando...
La pagina si sta caricando...
La pagina si sta caricando...
La pagina si sta caricando...
La pagina si sta caricando...
La pagina si sta caricando...
La pagina si sta caricando...
La pagina si sta caricando...
La pagina si sta caricando...
La pagina si sta caricando...
La pagina si sta caricando...
La pagina si sta caricando...
La pagina si sta caricando...
La pagina si sta caricando...
La pagina si sta caricando...
-
 1
1
-
 2
2
-
 3
3
-
 4
4
-
 5
5
-
 6
6
-
 7
7
-
 8
8
-
 9
9
-
 10
10
-
 11
11
-
 12
12
-
 13
13
-
 14
14
-
 15
15
-
 16
16
-
 17
17
-
 18
18
-
 19
19
-
 20
20
-
 21
21
-
 22
22
-
 23
23
-
 24
24
-
 25
25
-
 26
26
-
 27
27
-
 28
28
-
 29
29
-
 30
30
-
 31
31
-
 32
32
-
 33
33
-
 34
34
-
 35
35
-
 36
36
-
 37
37
-
 38
38
-
 39
39
-
 40
40
-
 41
41
-
 42
42
-
 43
43
-
 44
44


in altre lingue
- English: Yealink UVC86 User guide
- français: Yealink UVC86 Mode d'emploi
- español: Yealink UVC86 Guía del usuario
- Deutsch: Yealink UVC86 Benutzerhandbuch
Documenti correlati
-
Yealink Panel Guida utente
-
Yealink UVC34 Guida utente
-
Yealink T2C-503 room sensor Guida utente
-
Yealink BHM711 Guida utente
-
Yealink BH71 Guida utente
-
Yealink AVHub Guida utente
-
Yealink ETV65 Guida utente
-
-
-