
USB Video Conferencing Endpoint
UVC34
Quick Start Guide(V1.0)
English | 简体中文 | Deutsch | Français | Español
Yealink Documentation
support.yealink.com


1
Note: We recommend that you use the accessories provided or approved by Yealink. The unapproved third-party
accessories may result in reduced performance.
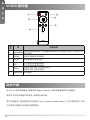
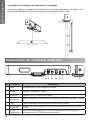
Package Contents
VCR20
Remote Control
UVC34
AAA
Battery×2 7m
USB Cable
Power Adapter
48V/0.7A
Quick Start Guide
Cable Tie× 5
1/4”-20 UNC Screw
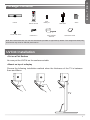
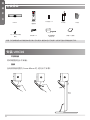
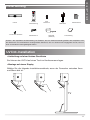
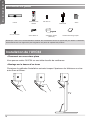
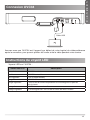
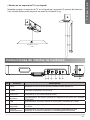
UVC34 Installation
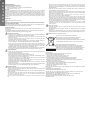
• Put on a Flat Surface
You can put the UVC34 on the conference table.
• Mount on top of a display
Choose the following installation method when the thickness of the TV is between
5mm and 60mm.
TV
Velcro
E
N
G
L
I
S
H

2
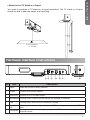
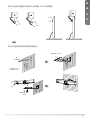
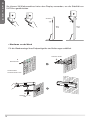
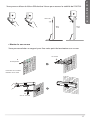
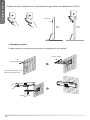
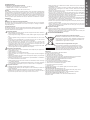
• Mount on the Wall
You can purchase a bracket to mount your endpoint on a wall.
NN
Screw specication:
1/4'' -20 UNC
Hole depth: 30mm
Hole diameter: 6mm
Expansion screw
Screw specication: T4×30
You can use 3M Velcro behind the display to ensure the stability of UVC34.
TV TV
E
N
G
L
I
S
H
E
N
G
L
I
S
H3M Velcro

3
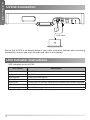
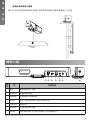
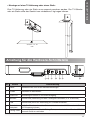
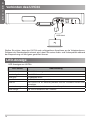
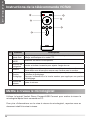
Hardware Interface Instructions
No. Item Description
1 Reset Reset the UVC34 to factory defaults.
2 DC48V Connect to the power adapter.
3 Video Out Connect to a PC as video output.
4 Microphone (Coming soon) Connect to audio device (for example: VCM34/38).
5 USB (Coming soon) Insert DD10 to connect to CPW90.
6Security
slot
Connect a universal security cable to the UVC34 so that you can lock the UVC34
down.
7 Pairing key (Coming soon) Press the pairing key to pair the CPW90 wireless microphone/
Bluetooth device.
• Mount onto a TV Stand or a Tripod
You need to purchase a TV stand or a tripod separately. The TV stand or a tripod
should be able to bear the weight of at least 5kg.
Screw specication:
1/4'' -20 UNC
E
N
G
L
I
S
H

4
UVC34 Connection
LED Indicator Instructions
LED indicators on the UVC34:
LED Status Description
Off The UVC34 is powered off.
Solid green The UVC34 is active.
Flashing green There is an incoming call.
Solid red The UVC34 is muted.
Flashing red The UVC34 is in recovery mode and the rmware has not been upgraded.
Solid orange The UVC34 is initializing or in sleep mode.
Flashing orange The UVC34 is upgrading rmware.
USB Cable
Ensure that UVC34 is the default device of your video conference software after connecting
successfully, and you can enjoy its audio and video in the meeting.
E
N
G
L
I
S
H
E
N
G
L
I
S
H

5
Upgrade the Firmware
Use Yealink Room Connect/USB Connect software to upgarde the firmware after
connecting to the PC.
For more information about how to upgrade the firmware, please refer to the
upgrading document.
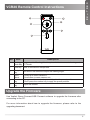
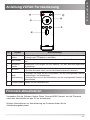
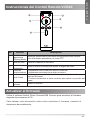
VCR20 Remote Control Instructions
No. Item Description
1Tracking
Mode Key
Long press the Tracking Mode key to switch between auto framing and
PTZ mode.
2 Mute Key Mute or unmute the microphone.
3Navigation
Key Pan and tilt the camera to adjust the viewing angle.
4Scroll
Wheel
• Scroll up to zoom camera in.
• Scroll down to zoom camera out.
5Preset
Key
• Long press the number key to add/update the preset position.
• Short press the number key to apply the preset position.
6Volume
Key Adjust the volume.
E
N
G
L
I
S
H

6
说明 : 我们推荐使用由亿联提供或经亿联认可的配件。使用未经认可的第三方配件可能会导致性能的下降。
包装清单
VCR20
遥控器
UVC34
7 号电池 ×2 7m
USB 线
电源适配器
48V/0.7A
快速入门指南束线带 ×5
1/4”-20 UNC 英制
螺 钉
安装 UVC34
• 平放安装
将终端摆放在水平桌面。
• 挂装
当电视厚度范围为 5mm-60mm 时,进行以下步骤:
TV
3M 胶
E
N
G
L
I
S
H
简
体
中
文

7
• 墙装
你可以选购支架将终端安装在墙上。
NN
螺丝规格:1/4''-
20UNC
打孔深度:30mm
打孔直径:6mm
膨胀螺丝
螺丝规格:T4×30
你可以在显示器后方使用 3M 胶保证 UVC34 的稳固。
简
体
中
文
3M 胶

8
• 安装至电视架或三脚架
用户可以自行选购电视架或三脚架。选购的电视架或三脚架承重至少为 5kg。
螺丝规格:1/4''-
20UNC
硬件介绍
编
号项 功能说明
1 重置 重置设备到出厂设置。
2 电源接口 连接电源适配器。
3 视频输出 连接电脑作为视频输出。
4 麦克风 预留 ( 连接音频设备 , 例如:VCM34/38)。
5 USB 接口 预留接口。
6 安全锁孔 将主机锁在固定位置。
7 配对键 预留(按配对键,进入配对无线麦 / 蓝牙设备状态)。
简
体
中
文

9
指示灯介绍
UVC34 指示灯介绍如下 :
指示灯状态 功能说明
灭 UVC34 没有正确连接到 PC 上或未处于正常工作状态。
绿色常亮 UVC34 处于正常工作状态。
绿色闪烁 来电中状态。
红色常亮 UVC34 处于静音状态。
红色闪烁 UVC34 进入恢复模式,还未固件更新。
橙色常亮 UVC34 处于休眠状态。
橙灯闪烁 UVC34 固件更新中。
UVC34连接
USB 线
连接完成并确保 UVC34 设置为视频会议软件的默认设备后,即可将 UVC34 作为会议中的音视
频设备使用。
简
体
中
文

10
VCR20 遥控器
编
号项 功能说明
1 智能取景键 长按智能取景按键时,可切换智能取景模式(在自动框⼈像与 PTZ 模式之间
依次切换)。
2 静音键 将麦克风静音或取消静音。
3 导航键 调节摄像机的取景范围。
4 滚轮 向上滑动放⼤摄像机画面。
向下滑动放⼤摄像机画面。
5 预置位 长按数字键,新增 / 更新预设置位。
短按数字键,应用预设置位。
6 音量调节键 调节音量。
固件升级
将 UVC34 连接至电脑后,使用亿联 Room Connect/ 亿联设备管理软件升级固件。
更多关于如何升级固件的信息,请参考升级文档。
更多详细信息,请参阅技术支持网站(http://support.yealink.com/)上的文档及软件。你也
可以联系亿联技术支持团队获取帮助。
简
体
中
文

11
Hinweis: Wir empfehlen die Verwendung von Zubehör, das von Yealink entweder geliefert oder empfohlen wird.
Der Gebrauch von Drittanbietern bereitgestellten Zubehörs, das von Yealink nicht freigegeben wurde, kann zu
einer verminderten Leistungsfähigkeit führen.
Lieferumfang
VCR20-
Fernbedienung
UVC34
AAA
Batterie×2 7m
USB-Kabel
Netzgerät
(48V/0,7A)
Kurzanleitung
Kabelbinder×5
1/4”-20 UNC-Schraube
UVC34-Installation
• Aufstellung auf einer achen Oberäche
Sie können das UVC34 auf einen Tisch im Konferenzraum legen.
• Montage auf einem Display
Wählen Sie die folgende Installationsmethode, wenn der Fernseher zwischen 5mm
und 60mm dick ist.
TV
Klettverschluss
D
E
U
T
S
C
H

12
• Montieren an der Wand
Für die Wandmontage Ihres Endpunktgeräts sind Halterungen erhältlich.
NN
Schraube: 1/4'' -20
UNC
Lochtiefe: 30mm
Lochdurchmesser: 6mm
Dehnschraube
Schraube: T4×30
Sie können 3M Klettverschluss hinter dem Display verwenden, um die Stabilität von
UVC34 zu gewährleisten.
TV TV
D
E
U
T
S
C
H3M Velcro

13
Anleitung für die Hardware-Schnittstelle
Nr. Artikel Beschreibung
1 Reset Rücksetzen des UVC34 auf Werkseinstelllungen.
2 DC48V Anschluss an das Netzteil.
3 Video Out Verbindung mit einem PC als Video-Ausgang.
4 Mikrofon (Kommt bald) Verbindung mit dem Audiogerät verbinden (z. B. VCM34/38).
5 USB (Kommt bald) DD10 zur Verbindung mit CPW90 einstecken.
6Sicherheits-
steckplatz
Schließen Sie ein universelles Sicherheitskabel an den UVC34 an, damit Sie den
UVC34 sperren können.
7 Pairing-Taste (Kommt bald) Drücken Sie die Pairing-Taste, um das kabellose Mikrofon CPW90/
Bluetooth-Gerät zu verbinden.
• Montage auf einer TV-Halterung oder einem Stativ
Eine TV-Halterung oder ein Stativ muss separat erworben werden. Der TV-Ständer
oder ein Stativ sollte das Gewicht von mindestens 5 kg tragen können.
Schraube: 1/4'' -20
UNC
D
E
U
T
S
C
H

14
Verbinden des UVC34
LED-Anzeige
LED-Anzeigen am UVC34:
LED-Status Beschreibung
Aus Die UVC34 ist ausgeschaltet.
Dauerhaft grün Die UVC34 ist aktiv.
Blinkt grün Eingehender Anruf.
Dauerhaft rot Die UVC34 ist stummgeschaltet.
Blinkt rot Der UVC34 ist im Recovery-Modus und die Firmware wurde nicht
aktualisiert.
Dauerhaft orange Der UVC34 wird initialisiert oder ist im Sleep-Modus.
Blinkt orange Der UVC34 aktualisiert die Firmware.
USB-Kabel
Stellen Sie sicher, dass das UVC34 nach erfolgreichem Anschluss an die Videokonferenz-
Software als Standardgerät erkannt wird, damit Sie seine Audio- und Videoqualität während
der Besprechung voll und ganz genießen können.
D
E
U
T
S
C
H
D
E
U
T
S
C
H

15
Firmware aktualisieren
Verwenden Sie die Software Yealink Room Connect/USB Connect, um die Firmware
nach dem Anschließen an den PC zu aktualisieren.
Weitere Informationen zur Aktualisierung der Firmware nden Sie im
Aktualisierungsdokument.
Anleitung VCR20 Fernbedienung
Nr. Artikel Beschreibung
1Taste Tracking-
Modus
Drücken Sie lange auf die Tracking-Modus-Taste, um zwischen Auto-
Framing und PTZ-Modus zu wechseln.
2 Stummtaste Schalten Sie das Mikrofon stumm oder heben Sie die Stummschaltung
auf.
3Navigation-
stasten
Schwenken und neigen Sie die Kamera, um den Betrachtungswinkel
einzustellen.
4 Scrollrad • Scrollen Sie nach oben, um mit der Kamera herein zu zoomen.
• Scrollen Sie nach unten, um mit der Kamera heraus zu zoomen.
5Taste
Voreinstellung
• Drücken Sie lange auf die Zifferntasten, um die voreingestellte Position
hinzuzufügen / zu aktualisieren.
• Drücken Sie kurz auf die Zifferntasten, um die voreingestellte Position zu
übernehmen.
6 Lautstärketaste Stellen Sie die Lautstärke ein.
D
E
U
T
S
C
H

16
Remarque : Nous vous recommandons d’utiliser les accessoires fournis et approuvés par Yealink. L’utilisation
d’accessoires tiers non approuvés peut engendrer une perte de capacité des produits.
Contenu du pack
Télécommande
VCR20
UVC34
Pile AAA ×2 7m
Câble USB
Adaptateur secteur
(48V/0,7A)
Guide de démarrage rapide
Serre-câbles ×5
Vis 1/4”-20 UNC
Installation de l'UVC34
• Placement sur une surface plane
Vous pouvez mettre l’UVC34 sur une table de salle de conférence.
• Montage sur le dessus d’un écran
Choisissez la méthode d’installation suivante lorsque l’épaisseur du téléviseur se situe
entre 5mm et 60mm.
TV
Velcro
D
E
U
T
S
C
H
F
R
A
N
Ç
A
I
S

17
• Montez le sur un mur
Vous pouvez acheter un support pour xer votre point de terminaison sur un mur.
NN
Vis: 1/4'' -20 UNC
Profondeur du trou: 30mm
Diamètre du trou: 6mm
Vis d’expansion
Vis: T4×30
Vous pouvez utiliser du Velcro 3M derrière l'écran pour assurer la stabilité de l'UVC34.
TV TV
F
R
A
N
Ç
A
I
S
Velcro 3M

18
Instructions de l’interface matérielle
N° Élément Description
1 Reset réinitialisez l'UVC34 aux réglages par défaut.
2 DC48V branchez à l'adaptateur secteur.
3 Video Out branchez à un PC comme sortie vidéo.
4 Microphone (Bientôt disponible) connectez-vous à l'appareil audio (par exemple : VCM34/
38).
5 USB (Bientôt disponible) insérez le DD10 à connecter au CPW90.
6Emplacement
de sécurité
connectez un câble de sécurité universel à l'UVC86 an de pouvoir verrouiller
l'UVC34.
7Touche
d'appariement
(Bientôt disponible) appuyez sur la touche d'appariement pour apparier le
microphone sans l CPW90/l'appareil Bluetooth.
• Montage sur un support de téléviseur ou un trépied
Vous devez acheter un support de téléviseur ou un trépied séparément. Le support ou
le trépied du téléviseur doit pouvoir supporter un poids d’au moins 5 kg.
Vis: 1/4'' -20 UNC
F
R
A
N
Ç
A
I
S
La pagina si sta caricando...
La pagina si sta caricando...
La pagina si sta caricando...
La pagina si sta caricando...
La pagina si sta caricando...
La pagina si sta caricando...
La pagina si sta caricando...
La pagina si sta caricando...
La pagina si sta caricando...
La pagina si sta caricando...
La pagina si sta caricando...
La pagina si sta caricando...
-
 1
1
-
 2
2
-
 3
3
-
 4
4
-
 5
5
-
 6
6
-
 7
7
-
 8
8
-
 9
9
-
 10
10
-
 11
11
-
 12
12
-
 13
13
-
 14
14
-
 15
15
-
 16
16
-
 17
17
-
 18
18
-
 19
19
-
 20
20
-
 21
21
-
 22
22
-
 23
23
-
 24
24
-
 25
25
-
 26
26
-
 27
27
-
 28
28
-
 29
29
-
 30
30
-
 31
31
-
 32
32


in altre lingue
- English: Yealink UVC34 User guide
- français: Yealink UVC34 Mode d'emploi
- Deutsch: Yealink UVC34 Benutzerhandbuch
