Goldstar GWHD5000 Manuale del proprietario
- Tipo
- Manuale del proprietario

S
www.goI&_pliar_es+com
OWNER'S MANUAL
MANUAL DEL PROPiETARIO
Models/Modelo GWHD5000

S_ P_ons ...........................3
.........................
In_duction ..................................... 8
SyruPs Used in this Manual ............8
Featu_es .......................................... 8
Adap_ ........................................ tl
Tempom_ Use of an
E_r_n Cord ............................ 11
Inml_t_n ........................................._2
WindOw P,equ_ents .................t 2
Size ........................................... 12
Loca_ .......................................13
Oea_n_ ................................. 13
_rat[on of C_is ................14
UnitIn_|la_ ............................15
Ope_ I_tNctJons ..................16
_on a_ Fun_on
of Co_ ........................................16
_l_al Fea_ms ....................... 17
Air Di_n .............................. 17
D=mimPipe................................... "7
_n_va] _ Win_ ............... 17
Main_ance and Se_ ............18
Air Fl_r ....................................18
Cleaning_ _r Cor_ition_ .....t8
HOw_ Re_e
Fm_ Grille.................................18
Co.on Problemsand
,o
FOR YOUR RECORDS
Write _e model8nd s_ r_J_ h_:
Model #
Ser_i #
mYoUcan find_ num_m on a _1 _ _ s_e of the
p_uct.
O_le_s
Date Pu_haeed
m S_p_ your _ipt _ this pa_ in_ _t _ need it
p_ d_ of purch_e o__r warra_ is_s,
READ THIS MANUAL
!_e _ w[!]!fi_d _a_ _lpfu!! hi_ _ h_ t_ use _nd
_int_n _ur _lr co_l_r p_dy, Jus_ta flttliepreventive
_ _ _u_ part _n sa_ you a gm_t _l _ ti_ and
ov_ _ I_ _ _r' air _d_io,_er.
of trou_hoot_g tips._f_u review ou_'_ of
Trou_esh_ng _i_ first, i_ m_' _t n_ to _ll _
_evtce at _fl.
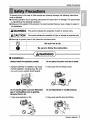
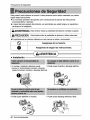
PRECAUTION
Room Air Cond#_,_er

To prevent inju_ _ _e u_r or o_er _ple and property damage, _e _Uowing
must _ _ll_d.
[] In_rrect open, on due to igno_ng ins_ions _U _use harm or damage. The seriousness
is class_ed by tl_ foUowi_
[] Becau_ of the weight _ _e p_du_, it is recommended _at _ have a hel_r _ assist in
the i_!_a_on.
[] Meanings _ sym_!!s us_ in _is ma,nus!!8re as shown be!_,
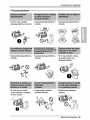
[] Ins liation
" Improper assem_y or ilnstalJa_onim_ cau_
In_ed _n, includinginjiu_, fire, and
poorpe_ormance,el_zic sho_ h_ards.
• it may _u_ fire and ele_ric sh_.
It may _use explosionor fire. " It may _u_ e_ric sh_k and failure.
_er's Manual 3

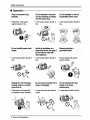
[] Operation
. Obhe_, it will _,use
elec'_c _,o_ or fin,
• Itwillcau_ e_ric sh_ or • Itwill_se elec'_csink or
fire. _re.
• It will _use ele_ic sho_ or ,, It will cau_ e_ric sh_ or ,, No groundi_ m_ cau_
fire. fire. electric sh_.
. Ot_se itwill_u_ _re
and el_ s_ a_ident.
• it _y _u_ _re and ele_c , It may _use e_ric sh_k.
4 Room Air Conditioner

_fe_ Precautions
" _e air _n, di_ner mus_ be _erated in
a enclosed area. to _ most effe_ve.
•. _t_ cau_ explosion,_re,and bum.
, It _1 cause electric sh_k or failure
machine.
• Water may enter the unit _ d_m_
insulation.It may cau_ an electricsh_..
[] Ins llation
•Th,_ aresharpandmay
causeinjury.
*It may cause failure of _pli_ • !f the o_er _e is _aged,
or peffo_an_ detenoratei. _tmu_ be repair_ or
replaced imm_iately..
Leaving k damag_ could
resuff _nthe air _nd_tioner
fallt_ out of the window,
creating a _fety _a_.
_,,ner_ Manual

_ P_ons
_,- ,,,, ::: jj_j_j :::::: : ::: :::: rrrrr rr ::: ,,, - ::
[] O_ratu,on
. It may _use Injiu_:
"It maycauseele_nc _k
and damage.
, It _l w_ power consumption
in vain and it may cau_ ac_idem.
* Since the _n re,ares m high
sp_d during operation, ff may
cause injury:
* This cou_ injure,the pet or
planL
'* it is an _r _nd_i,oner, not a
pr_:ision refngemibn s_t_f.
• Ol_r_ _out _ers will
cause failure.,
* _e appearan_ of _e air
change _ller, er d_l,op.
surface fla_.
* It is not sani_,ry a_ cou_
_use i!lness or pe_:on_
lnju_ hi_,a_,
6 R_m Air Cond#_ner

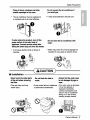
1. Plug in the _wer cord proper_.
2. Use a d_icated circuit. Overloading the line could create a fire h_ard.
3. Do not u_ an extension c,ord. See page 1i for more details.
4. Do not staWstop operation by pluggin_unplugging the power cod.
5. IIf_e power cord is damaged and requires repla_ment, have an Authorized
Se_icer instaB an exact replacement pa_.
i. Being ex_d to direct airflow for _ e_ended peri_ of time could be
hazardous to your health. Do not e_ose o_upants, pets, or plants to dir_
airflow _r extended periods of time.
2. Due to the possibility of oxygen deficiency, ventilate the room when us_
together with stoves or other heating d_i_s.
3. Do not u_ _is air _nditioner for non-specified special purposes (e.g.
preserving precision devices, P_, pets, plants, and art objects). Such u_ge
could damage the items.
4. _e air condiUoner is a consumer _m_ appliance, not a precision climate
control system.
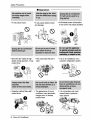
i. Do not touch the metal pa_s of the unit when removing the filter. Injuries can
o_ur when handling sha_ metal _ges.
2:. IDo not use water to clean inside the air condffioner. Exposure to water can
destroy _e insulation, leading to _ssible et_ric sh_.
3. When cleaning the unit, first make sure _at _e power and br_ker are turned
off. The fan rotates at a very high speed during operation. _ere is a
possibil_ of injury if the unit's power is accidentally triggered on whBe
cleaning inner par_ of the unit°
For repair iand mai_enan_, _act an A_odzed Service Center. See the
warranty page for details or ca_l (8,00) 243_0. Have your m_el number and
_dal number avai{a_e.i They should be written on page 2 of this manual
OwneKs M_nua! 7

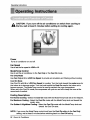
Introductio_
This symbol alerts you to the risk of el_Hc sh_P_
This sym_l alerts you to ha_rds th_ could _u_ harm to t_
air conditioner,
This symbol indicates special notes.
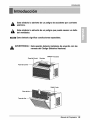
WARNING: This appliance should _ indued in acco_ance with the
N_ionai Ele_ric Cede.
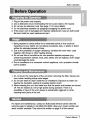
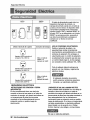
KNOB
C_IINET
AIR DEFLEC'_R
R_KER
FRONT GRILLE
8 Room Air Condi

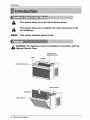
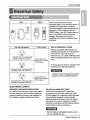
115,V~
Power cord may i_ude a current
inte_pter devi_ A test _d met _tton is
pr_i_ on 'the plug case. Re dev_e
sh@JId be tested ,ona i_rl_ic _Is by first
pressi_ me TEST button and men _e
RESF button, if B_eTEST b,_on d_es not
tdp er if t_ RESF bu_ wlfl, not s_y
engage, di_-ontinue u_ of _e air
cend_i_er a_ _nta,_ a qu_if_ _rv_ce
/iiiiiiii_iiiiiii_iiiiiiii[iiii
UI_ Wall R_eptac_ Power Supply
t_cle tared 1_,, 125V AC
_le rate_ i 5A, 2_V AC
S_ 2_,V, 3-_re groundling
_¢_e rate_ 2CA, 2_V AC
U_ 15 AMP', time
delay fu_ ,o_15 A_P,
drou_: breaker,
Use _0 _P. time
_lay fu_ o__ AMP.
cir_i_t b_a_r,.
Use of e nsion cords
Stro_'y discoum_, _e use of an _e_
cord. _e,_o i_you _sh to use
e_sion co_, use a CSA cer'dfied_L-I_ted
3-_re (glroundi_g) e_t_sion _rd, _ed 1_,
!25V.
AHwi_ng shouldibe m_e _ a_co_,_
I_t el_ri_ _es a_ _egu_tions.
Aluminum I_use winng _y p_ specia_
prowls. Co.It a qualified e_dcia_.,
ELECTRICAL SAF_
IMPORTA_ G_UN_NG INS_UC_S
Air _er_r has a three.prong g_unding pl,ug ee
_r supp_ _rd, which m_st be pluggi_ into
p_perly gr_ _mpr®g _ll re.prate _r
your protectio_ag_n_ possi_e sh_ hazard,
2_, _, and _ _LT U,N_
The_ _s are _ip_ with a three-prong
gmu_ng pl_ on the po'_ su_ly co_d, _h
m_t be _ug_d in¢oa mat_ing properly _o_nd_
th!remp_g wat! receptacle for your p!rot_ion
a_lns! [_ss_ble _: ha_d. If such,an o_et
_ot _e_nt, _e m_st be i_led _ a q_allfl_
ele_ian in a_nce _th the Na_! Ele_ica_
Co_ and Io_ c_s a_d o_dinanees,
N_ USE AN _ENSION CORD _ 2_,
208, a_ _3_2_ V_t units.
_ner'e Manual 9

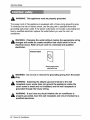
El ! Sa_
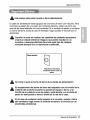
WARNING: This appliance must _ properly grounded.
The power cord of this appi[ance Is equipped wr_ a three-prong grounding plug.
To minimize the risk of electric shock, use the plug with a standard three-siot
grounding wail power outtet, if the power outlet does not include a grounding siot,
have a quaiffied electrician replace the outlet before you use _e room air
conditioner.
WARNING: Changing the o_|et without ma_ng the appropriate wiring
chang_ will crea_ an unsafe _ndition that could result in fire or
ei_trtcai shock. Refer aii such wo_ to a licensed and quaiifled
el_riclan.
Ensureproperg_Jnd
e_ts _ use
WARNING: Do not cut or remove the g_unding prong from the power
plug.
WARNING: hing the adapter ground terminal to the wall
recep_cle cover scr_ does not ground me appllan_ unless the
covet screw is metal and not Insul , and the wall re le is
groun_ through the house wiring.
WARNING: if you h_e any doubt whe_er the air conditioner is
pro_rly grounded, have the wal! recep_cle and circuit checked by a
qualifi_ el_rician.
10 Room Air _n

t Safety
We strongly discourage the use of an adapter due to potential safety h_ards,
For temporary conn_tions, u_ only a UL-listed adapter, available from mo_
local hardware stores. Ensure that the large s_ot in the r is aligned with
the large slot in the receptacle for a proper polart_ connection.
To disconnect the power cord from the adapter, u_ one hand on each to avoid
damaging the ground terminal. Avoid frequently unplugging the power cord as
this can lead to eventual ground termina! damage.
Tem_ m_h_
_le _r
WARNING: Never use the appliance with a broken adapter.
We stmng!y discourage the u_ of an extension cord due to potenti_
hazards. _r temporary situations, use only CSA certified and UL li 3-wire
grounded extension cords, rated 15 A, 125 V.
Owner's Manual

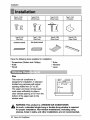
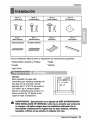
Ty_ 14_ Type B:2 _ T_ C:2 _ Type D:3
(_o_t S_) (W_ _) (W_ _r_) (L S_ket)
T_ E: 1
(SealS_p)
(_h_i_ bsck_)
Ty_ F: 1
(Guide Panel)
T_H: i
,(Upper_e)
Have the _llowing tools available for installation:
* Screwdriver (Slotted and Phillips) * Ruler
* Knife * Hammer
* Pencil * Level
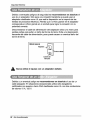
This mum air cond_oner is
design_ _r insbilation in s_ndard
doublmhung _ndows wi_ a_ua_
opening widhhs from 21" to 35".
The up_r and lower window sash
must open s_ciently to allow a
clear verU_l o_ning of 12" _om the
bottom of _e upper sash to the
window stool,
,,o,._ 2i" _ 35° ---,.
i_ rain
WARNING: This p.mduct is a WINDOW _R CONDmONER.
As such, a standard slngle-hung or double-hung window is _quired
_r proper in_!lation. Non_indow in_ilations, including using
sleeves, holes in _!is, and _.er install_ions am not re_mmend_.
Room iAir er

lns_latio_
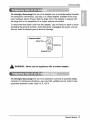
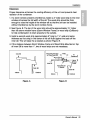
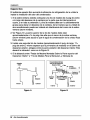
Proper clearance enhances the _oling efficien_ of the unit and preven_ heat
radiation of _e condenser.
!, If a storm window presen_ interference, fasten a 2" wide wo_ stdp to the inner
window si=liacross the full width of the sill. The wood _rip should be thick
enough to raise the height of the window sill _ _at _e un_ can _ installed
without interference by, _e storm window frame.
2. S_ Figure. BoThe top of the wood _rip should be _proximately 3/4" higher
than the sto_ window frame (Storm Window Frame) or wood _rip (Outdoors)
to help condensa_on to drain pro_rly to _e outside,
3. Install a second wo_ _dp (approximately 6" long by 1V2" wide and same
thinness _ fimt stdp) in the center of the sill flush against the ba_ off the
inner sill. This will rai_ the L bracket as shown Figure. B.
4. If the distance between Storm Wind_ Frame and Wood Strip Mounted on Top,
of Inner Sil! is more _an ! ", two of wood _rips are not n_essary.
Fl,gum, A IFlgum, B
Owner's Manual

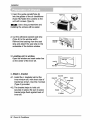
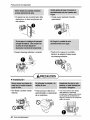
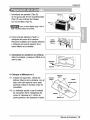
I. Insert the guide panels(Type G)
into _e guides of the air _nditioner
(Type H),Fa_en _e cumins _ the
unit with _rews (Ty_ A).i
: Use a !ong screwdriver and
installing _e s_ews, will _ easier,
Ty_ A
Type A
2. C_ the adhesiv_ba_ed sea! strip
(Type E) _ the window width,
Remove _e backing from the seal
strip and attach me sea{ stdp to me
underside of the bottom window..
3. Locating unit in window
Open _e windowand mark _nter line
on _e centerof the inner sill
//
4. A_ch L bracket
_1. Install _e L brackets behind the,
inner window sill, wi_ sho_ side
bracket as shown. Use the 2 screws
(Type A) provide.
42. The bra_et, helps to. hold un_
s_reiy in pla_,. _e sure to p,lace
bracket _ge flush against ba_ of
iinner sill
Room Air C

ln_llation
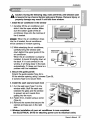
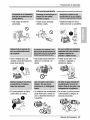
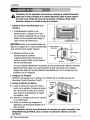
Caution: During the following step,, hold unit firmly until wind_ sash
isi lowered to top channel behind side panel _ames. Personal injury or
pm_f damage may result if unit falls _m _nd_.
1. Instil the air condiUoner in the window
1-1. Carefully !_ the air _ndiUoner and
slide it into he own window. Make
sure the bottom guide of he air
_nditioner drops into the notches of
the L bracket:,
: When the air conditioner drops
into the L bra_et, he air _nditioner
will be centered in wind_ o_ning.
!-2. While steadying the air _nditioner,
_refully bring he window saslh
d_n behind the upper guide of the
air _nditioner.
When he air _nditioner is pro_rly
ins_il_, it should Ult s_ighBy down at
the ba_. If it is set. _rr_[y in the
window, _ wi!! hang !ower in the bac_,
automatically. !f it does no_, there is a
problem wih the installation.
2. _cure the guide panels
Extend the guide panels (Type G) to
fill the window opening using2 _mws. (,Type B),
2 screws _ype C) _osecure them,
3, Instil 'the sash seal and sash lock
_2.
Cut the sash seal (Type F) to the
window _. Stuff he sash seal
between he gla_ and the window
ito prevent air and insects from
getting into he room.
Fasten the L bracket using a screw
(Type A).
3-3. Remove the. screws hat secure the
_binet and ba_ pan in the right
S/_H SEAL
(TY_F)
4, Window ins_llation of room air conditioner is now _mpleted.
S_ ELECTRICAL DATE for a_ching power cord to electrical outleL
_e'r's Manual

Ope_b'ng Instructions
CAUTION: If you turn off the air conditioner or _itch i_om cooling to
the fan, wait at I_st 3 min_es before setting to _oling again,,
• Jrns air ,_nditioner on and off.
Fan Sp_d
Use to set the,fan speed _ LOW _ IHl.
M,o_emp Control
Use to set the air _ndHJoner to the Fan On_ or the Cool On mode,
Fan Onty M_e
Use Fan Onlyat HI or LOW Fan S_ to provide air circulation and filtenng w_hout cr_ling.
Cool On M_
Use C_I On with HI or LOW Fan S_d for cooling. Turn the kn_ toward the c_ler area for
the indoor air to become c_ler. Turn _e kn_ toward the Cool On area for the ind_r air to
i_me warmer. The M_e/Temp _ntro_ is used to main_n the room temperature.
When set in the Cool On m_e, _ compres_r will cycle on _d off to ke_ the room at the
same level of _mfort.
Cooling _riptions
For Normal Cooling - Sel_ the _1 On mode with_e Mode_emp knob setat the midpoint,
For M_lmum Cooling - _lect the Cool On mode w_ the Mode/Temp knob set towa_ the
_oler ar_.
For Qu_r & Nig_ime _oling - Sele_ the Cool Ginmode withthe Mode/'remp knobset
toward the Cool ,Onarea,
NO_: If you move the Mode_emp control knob from the Cool On se_ng to the Fan Only
setting, wait at lea_ 3 minutes befo_ _it_ing ba_ to a _o! On setting.
Room Air Conditi_er

Operatingin,stru_ons
Air Dire_ion
Adjusting the air direcUon using the
horizontal air deflie_or cont_l.
Using Me control tabs, the air now _n
be dire_ to Me !eft, right, straight
ahead, or any _mbination of these
Drain Pipe,
in humid wea_er, excess water may
_use the Base Pan to ove_ow. To
drain Me water, remove the IDmin Cap
and secure the Drain Pipe to,the rear
hole of Me Base Pan.
Pre_ Me drain pi_ into,Me hole by
pushing down and _tay from the fins
toavoid injury.
This air _nditioner is _uipped with a
slinger _n. (See drawing, be!ow:)
The _n has an outer ring that runs in
the water that collects in the ba_ pan
if it gets deep. That _ndensate is then
pick_ up by the fan and expell_
through the _ndenser, making _e air
_nditioner moire emcient.
Be car,_l _,en inserUng the drain pipe, Push _ay _om
the sharp fin area to avoid slipping inju_ng youmelf.
Removal From Wind_
_Jrn Me air cond_ioner off, di_nnect Me p_er cord, _move the L bra_et, Me
screws and Support Bracket installed through Me top and _ttom of the guide
panels, and save _r reinstaHation later. CJose the guide panels. Keeping a fi_ grip
on the air _ndi_oner, raise the sash, and care_iliy Ult Me air _nditioner bac_rd,
draining any _ndensate. Lift Me air cond_ioner from, the window and remove Me
sash seal from betw_n Me windows.
Be sure _ drain ALL condensate from the air _ndiUoner. if you don_, it _uld run
out while you _ the unit,making a mess and creating a slipping h_ard. This
simple step will _ve you much cleaning and make a safer _ environment.
Owners Ma_al

MaintenanceaM Servi_
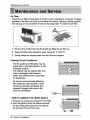
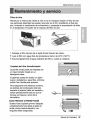
Air Filter
Che_ the air filter at least Mice a month to see ff cleaning is necessary. Trap_d
particl_ in the filter can build up and block the airflow, r_ucing cooling _paci_
and _using an a_umulation of _ost on the evaporator, To.clean the air filter:
i. Remove _e air filter from _e front g_lle by _Jng the air filter up.
2. Wash the filter using lukewarm _ter below 40 ° C (t04 °IF),.
3. Gently shake _e excess water from the filter and replace.
Cleaning The Air Conditioner
The front grille and Inlet grille m_ be
wiped with a cloth dampen_ in a re!lid
dete_ent solution.
The cabinet may be wash_J wi_ mi_d
soap or detergent and lukewarm
water, then polish_ with Liquid Wax
_r Appliances.
To ensure continu_ peak efficiency,
the condenser _ils (ou_ide of unit)
shou!d be checked periodi_lly and
dean_ ff clogged with soot or dirt
from the a_osphere.
• HOW TO REMOVE THE FRONT GRILLE
1. Remove the screws se,curing the Front Gdlle.
2. Push the, gdlle up from the bottom and pull
• e top of the grille away from the _se as
• e top tabs !_ out of their slots.
Room Air Conditioner

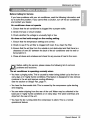
Maint_nce and Service
Before Calling for Service
if you have problems wi_ your air cond_ioner, read the following
information and
t_ to solve the problem. If you cannot find a solution, turn off the air _nditioner
and cont3ct your dealer.
Air _nditioner d_s not o_rate
1. Ensure _at _e air conditioner is plugged into a,proper o_let.
2. Check the fiJse or circuitbreaker.
3, Check whether the _ltage is unusually high or low.
Air d_s n_ _1 cold enough ,onthe c_llng setting
1. Ensure _at the temperature settings are ,corr..
2, Che_ to see if the air filter' is clogged with dust_ If so, ,cleanthe filter,
3. Ensure _at the air flow from the outside is not obstructedand that there is a
cleamn_ of over 20" between the back of the air _nditioner and the wall or
_nce behind it,.
4. Close all dc,om and windows and check for any"_ume of heat in _,e room.
Before callingfor ser¢i_, please review the following HStof _mmon
problemsand sol!utions.
The air c_d#ioner is operating when:
You hear a pinging noi_. This is _used by water being picked up by the fan on
rainy days or in highly humid _nditions. This feature is design_ to help remove
moisture in the air and improve cooling efficient.
See _e section on Slinger Fan, page li7.
• Youhear the thermostat click._is is _used _ the compressor cycle starting
and stopping.
You see water dripping from _e rear of _e un_. Water may be coH_ed in the
base pan in highly humid conditions or ion rainy days. This water overflows and
drips from the rear of the unit.
• You h_r _e fan running while the compressor issilent. This is a normal
operational feature.
_ner's Manual

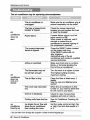
Maintenanceand _r¢ice
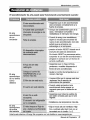
The air conditioner may _ operating abnormallywhen:
does not
does not
cool as it
The air conditioner is
_r _ilu re.
Make sure the .aircondi_oner plug is
push_ completely into the o_let,
Che_ the house fuse/circuit
breaker box and replace the fuse
or reset the breaker.
If _er failure occurs, turn the
mode control to Off.
When power is restored, wait 3
minutes to resta_ the air
conditioner to prevent triADpingof
Press the RESET bu_on {ocated
devi_ is tripod, on the power cord plug.
If the RESET button _ll not
s_y engaged,
discontinue use of the air
conditioner and contact a quailed
service technician.
Air_ow is restri_ed.
be set high enough.
........................
Make sure there are no. curtains,
_inds, or _rni_re bl_ing the
front of the air conditioner.
Turn the, knob to a higher number
The highest se_ng provides,
maximum cooling.
Clean the fllter at least ever,./2
See the care and Maintenan_
hot_
_^_en the air conditioner is first
turned on, you need to allow time
_r the r_m to cool down.
Che_ for open furnace floor
isters and cold air returns.
Cooling coils have iced up. See _r CondiUoner Freezing Up
_r
_eezing up
!ce blo_s the air flow and
from cooling the morn.
Set the m_e control at High Fan
or High Cool with thermostat at 1
or 2.
*You _n refer to the Enemy Star program in detail at www.energystar.gov.
Room Air Conditioner
La pagina si sta caricando...
La pagina si sta caricando...
La pagina si sta caricando...
La pagina si sta caricando...
La pagina si sta caricando...
La pagina si sta caricando...
La pagina si sta caricando...
La pagina si sta caricando...
La pagina si sta caricando...
La pagina si sta caricando...
La pagina si sta caricando...
La pagina si sta caricando...
La pagina si sta caricando...
La pagina si sta caricando...
La pagina si sta caricando...
La pagina si sta caricando...
La pagina si sta caricando...
La pagina si sta caricando...
La pagina si sta caricando...
La pagina si sta caricando...
La pagina si sta caricando...
La pagina si sta caricando...
La pagina si sta caricando...
La pagina si sta caricando...
-
 1
1
-
 2
2
-
 3
3
-
 4
4
-
 5
5
-
 6
6
-
 7
7
-
 8
8
-
 9
9
-
 10
10
-
 11
11
-
 12
12
-
 13
13
-
 14
14
-
 15
15
-
 16
16
-
 17
17
-
 18
18
-
 19
19
-
 20
20
-
 21
21
-
 22
22
-
 23
23
-
 24
24
-
 25
25
-
 26
26
-
 27
27
-
 28
28
-
 29
29
-
 30
30
-
 31
31
-
 32
32
-
 33
33
-
 34
34
-
 35
35
-
 36
36
-
 37
37
-
 38
38
-
 39
39
-
 40
40
-
 41
41
-
 42
42
-
 43
43
-
 44
44


Goldstar GWHD5000 Manuale del proprietario
- Tipo
- Manuale del proprietario
in altre lingue
- English: Goldstar GWHD5000 Owner's manual
- español: Goldstar GWHD5000 El manual del propietario
Altri documenti
-
Electrolux EXP11CKEWI Manuale utente
-
Electrolux EXP09CKEWI Manuale utente
-
Electrolux EXP12HN1WI Manuale utente
-
Electrolux EXP09HN1WI Manuale utente
-
LG LT1030CR Manuale del proprietario
-
Kenmore 25377110512 Guida d'installazione
-
LG LW1510ER Manuale del proprietario
-
Panasonic HQ2050PH Manuale utente
-
Haier QHC15AXW1 Manuale del proprietario
-