
PNI Hunting 550C
4G Hunting Camera / 4G ловна камера / 4G-Jagdkamera / Cámara de
caza 4G / Caméra de chasse 4G / 4G vadászkamera / Telecamera da caccia
4G / 4G jachtcamera / Kamera myśliwska 4G / Camera vanatoare 4G

EN User manual ......................................................... 3
BG Ръководство за употреба ............................. 18
DE Benutzerhandbuch .............................................. 34
ES Manual de usuario ............................................... 50
FR Manuel utilisateur ............................................... 66
HU Használati utasítás .............................................. 82
IT Manuale utente .................................................. 98
NL Handleiding ........................................................ 114
PL Instrukcja obsługi ............................................... 130
RO Manual de utilizare ............................................. 145

User manual - 3 -
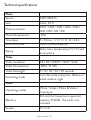
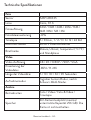
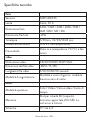
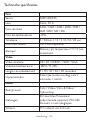
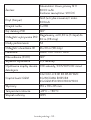
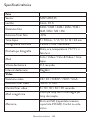
Technical specifications
Photo
Sensor 5MP IMX335
Lens 4mm, F/1.6
Photo resolution 36M / 30M / 24M / 20M / 16M /
12M / 8M / 5M / 3M
Photo file extension .JPG
Time lapse 5 / 30min , 1 / 2 / 3 / 6 / 12 / 24 h
Multishot mode Up to 9 photos/capture
Stamp Date, time, temperature (°C/°F) and
moon phase
Video
Video resolution 4K / 2K / 1080P / 720P / VGA
Video file extension .MP4 / H.265
Video file length 5 / 10 / 30 / 60 / 90 seconds
Recording mode Colorful mode at daytime, Black and
white mode at night
Other
Operating modes Photo / Video / Photo & Video /
Time lapse
Memory SD card slot (maximum supported
capacity 256GB). The card is not
included.
Screen TFT 2.4”

User manual - 4 -
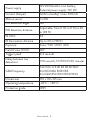
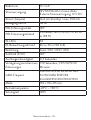
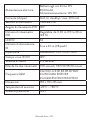
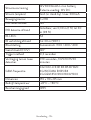
Power supply 12V 8000mAh Li-Ion battery
External power supply: 12V DC
Current (Amper) 1mA(in standby) / max. 300mA
Motion sensor 1 x PIR
PIR detection angle 120°
PIR detection distance Adjustable, from 0.30 m (1 ft) to 30
m (98 ft)
IR LEDs 56
IR illumination distance Up to 30 m (98 ft)
Exposure Auto / 100 / 200 / 400
Field of view (FOV) 120°
Trigger speed 0.3 seconds
Delay between two
detections 1/10 seconds, 1/3/5/10/15/30 minutes
GSM frequency 4G FDD-LTE B1 B3 B5 B7 B20
3G WCDMA B1 B5 B8
2G GSM 850/900/1800/1900
Dimensions 155 x 110 x 85 mm
Operating temperature -26°C ~ +80°C
Protection grade IP65

User manual - 5 -
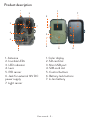
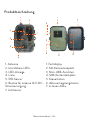
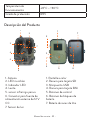
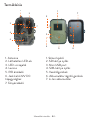
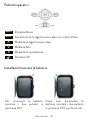
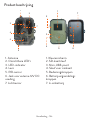
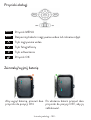
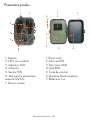
Product description
1
2
3
4
5
6
7
1
2
3
4
56
7
1. Antenna
2. Invisible LEDs
3. LED indicator
4. Lens
5. PIR sensor
6. Jack for external 12V DC
power supply
7. Light sensor
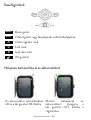
1. Color display
2. SD card slot
3. Mini USB port
4. SIM card slot
5. Control buttons
6. Battery lock buttons
7. Li-Ion battery

User manual - 6 -
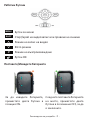
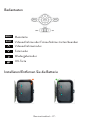
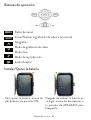
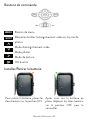
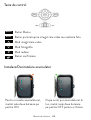
Operating buttons
MENU
K
SHOT
>
>
>
Menu button
Start/end video recording or photo taking
Video recording mode
Photo mode
Playback mode
OK button
Install/Remove the battery
To remove the battery, move the
two buttons to the ON position. After putting the battery in
place, move the two buttons to
the OFF position to lock it.

User manual - 7 -
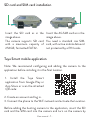
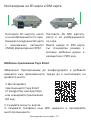
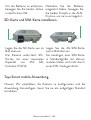
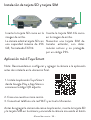
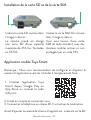
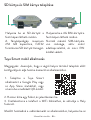
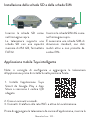
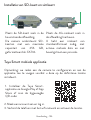
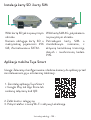
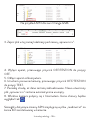
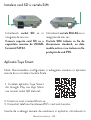
SD card and SIM card installation
Insert the SD card as in the
image above.
The camera supports SD card
with a maximum capacity of
256GB, formatted FAT32.
Insert the 4G SIM card as in the
image above.
You need a standard size SIM
card, with active mobile data and
not protected by a PIN code.
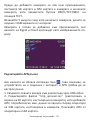
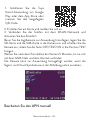
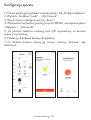
Tuya Smart mobile application
Note: We recommend configuring and adding the camera to the
application before installing it in the final location.
1. Install the Tuya Smart
application from Google Play or
App Store or scan the attached
QR code:
2. Create an account and log in.
3. Connect the phone to the WiFi network and activate the Location.
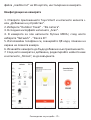
Before adding the hunting camera to the application, insert the SD
card and the SIM card into the camera and turn on the camera by

User manual - 8 -
moving the OFF/TEST/ON button to the TEST position.
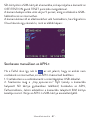
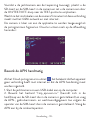
Wait for 5 minutes after turning the camera on until it connects to the
GSM network and to the Internet.
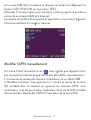
The camera is ready to be added to the application if the Signal and
Cloud icons look like the image below:
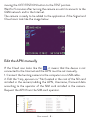
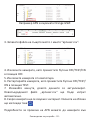
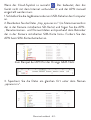
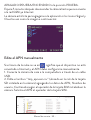
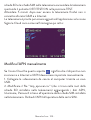
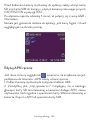
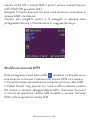
Edit the APN manually
If the Cloud icon looks like this , it means that the device is not
connected to the Internet and the APN must be set manually.
1. Connect the hunting camera to the computer via a USB cable.
2. Edit the “tmp_apnuser.csv” file (located in the root of the SD card
installed in the camera) adding the APN, Username, Password data
according to the operator of the SIM card installed in the camera.
Request the APN from the SIM card operator.

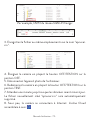
User manual - 9 -
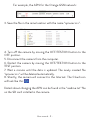
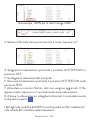
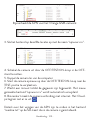
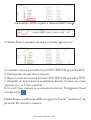
For example, the APN for the Orange GSM network:
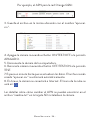
3. Save the file in the same location with the name “apnuser.csv”.
4. Turn o the camera by moving the OFF/TEST/ON button to the
OFF position.
5. Disconnect the camera from the computer.
6. Restart the camera by moving the OFF/TEST/ON button to the
TEST position.
7. Wait a minute until the data is updated. The newly created file
“apnuser.csv” will be deleted automatically.
8. Shortly, the camera will connect to the Internet. The Cloud icon
will look like this:
Details about changing the APN can be found in the “readme.txt” file
on the SD card installed in the camera.

User manual - 10 -
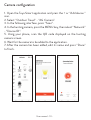
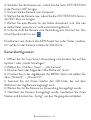
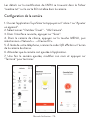
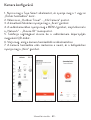
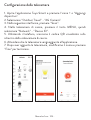
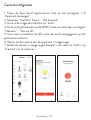
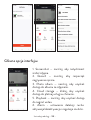
Camera configuration
1. Open the Tuya Smart application and press the + or “Add device “
icon.
2. Select “Outdoor Travel” - “4G Camera”.
3. In the following interface, press “Scan”.
4. In the hunting camera, press the MENU key, then select “Network”
- “Device ID”.
5. Using your phone, scan the QR code displayed on the hunting
camera screen.
6. Wait for the camera to be added to the application.
7. After the camera has been added, edit its name and press “Done”
to finish.

User manual - 11 -
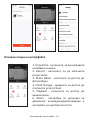
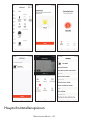
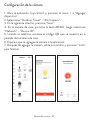
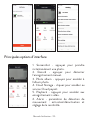
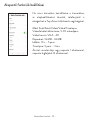
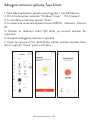
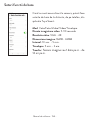
Main interface options
1. Screenshot - press to instantly take a
photo.
2. Record - press to start manual recording.
3. Photo album - press to access the photo
album.
4. Cloud Storage - click to access the
chargeable Cloud service.
5. Playback - press to access video
recordings.
6. Alarm - motion detection settings:
activation/deactivation and sensitivity
adjustment.

User manual - 12 -
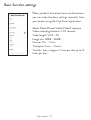
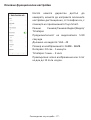
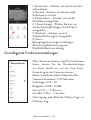
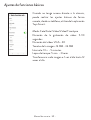
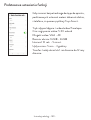
Basic function settings
When you don’t have direct access to the camera,
you can make the basic settings remotely, from
your phone, using the Tuya Smart application.
Mode: Photo/Photo+Video/Video/Timelapse
Video recording duration: 5-90 seconds
Video length: VGA - 4K
Image size: 16MB - 36MB
Interval: 10 s. - 5 min.
Timelapse: 5 min. - 3 hours
Transfer: every image or 1 time per day up to 12
times per day.

User manual - 13 -
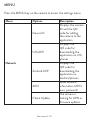
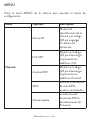
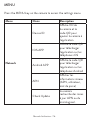
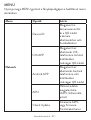
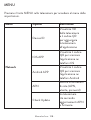
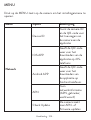
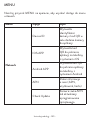
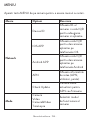
MENU
Press the MENU key on the camera to access the settings menu.
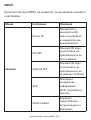
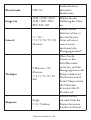
Menu Options Description
Network
Device ID
Displays the camera
ID and the QR
code for adding
the camera to the
application
IOS APP
Displays the
QR code for
downloading the
application on iOS
phones
Android APP
Displays the
QR code for
downloading the
application on
Android phones
APN Show network
information (APN,
user, password)
Check Update The camera is
looking for APN or
firmware updates.

User manual - 14 -
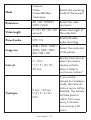
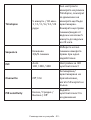
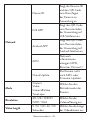
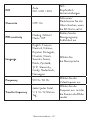
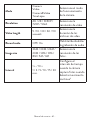
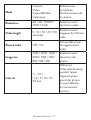
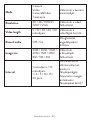
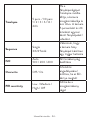
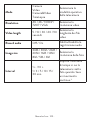
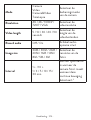
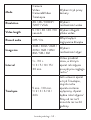
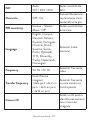
Mode
Camera
Video
Camera&Video
TimeLapse
Select the operating
mode of the camera
Resolution 4K / 2K / 1080P /
720P / VGA Select the video
resolution
Video length 5 / 10 / 30 / 60 / 90
seconds Select the length of
the video files
Record audio O / On Enable/Disable
audio recording
Image size 36M / 30M / 24M /
20M / 16M / 12M /
8M / 5M / 3M
Select the resolution
of the photos
Interval 1 s. / 10 s.
1 / 3 / 5 / 10 / 15 /
30 min.
Set the time interval
when the camera
captures photos
when it detects
continuous motion.1
Timelapse 5 min. / 30 min.
1 / 2 / 3 / 6 / 12 /
24 h
If you set the
camera to Timelapse
mode, the camera’s
motion sensor will be
disabled. The camera
will take photos/
videos from once
every 5 minutes
to once every 24
hours.

User manual - 15 -
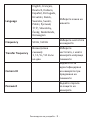
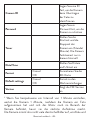
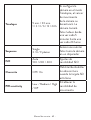
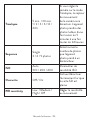
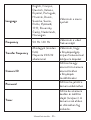
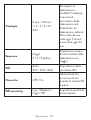
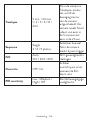
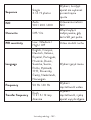
Sequence Single
3 / 6 / 9 photos
Select how many
photos the camera
takes at a trigger
ISO Auto
100 / 200 / 400 ISO sensitivity
settings
Overwrite O / On Enable/Disable
overwriting when SD
card is full
PIR sensitivity Low / Medium /
High / O Set the motion
sensitivity
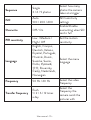
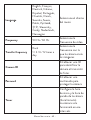
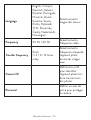
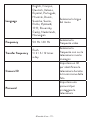
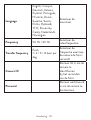
Language
English, Français,
Deutsch, Italiano,
Español, Português,
Hrvatski, Dansk,
Svenska, Suomi,
Polski, Русский,
中文, Slovensky,
Český, Nederlands,
Norwegian
Select the menu
language
Frequency 50 Hz / 60 Hz Select the video
frequency
Transfer frequency Each
1 / 2 / 6 / 12 times
a day
Select the
frequency the
camera sends the
pictures with

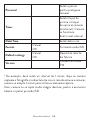
User manual - 16 -
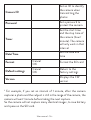
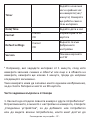
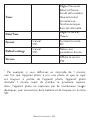
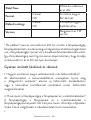
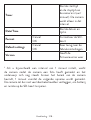
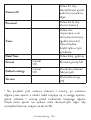
Camera ID
Set an ID to identify
the camera when
transmitting the
photos
Password Set a password to
protect the camera
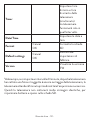
Timer
Set the start time
and the stop time of
the camera (hour/
minute). The camera
will only work in that
interval.
Date/Time Set the date and
time
Format Cancel
OK Format the SD card
Default settings Cancel
OK Return to the
factory settings
Version Displays the FW
version
1 For example, if you set an interval of 1 minute, after the camera
captures a photo and the subject is still in the range of the camera, the
camera will wait 1 minute before taking the next capture.
So the camera will not capture many identical images, to save battery
and space on the SD card.

User manual - 17 -
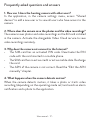
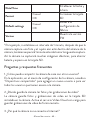
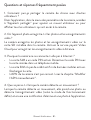
Frequently asked questions and answers
1. How can I share the hunting camera with other users?
In the application, in the camera settings menu, access “Shared
devices” to add a new user or to view all users who have access to the
camera.
2. Where does the camera save the photos and the video recordings?
The camera saves photos and video recordings on the SD card installed
in the camera. Activate the chargeable Video Cloud service to save
video recordings remotely.
3. Why does the camera not connect to the Internet?
• The SIM card has an activated PIN code. Deactivate the PIN
code with the card inserted in a mobile phone.
• The SIM card has no active credit or active mobile data. Recharge
the card.
• The APN of the camera is not correct. Read the “Edit the APN
manually” chapter.
4. What happens when the camera detects motion?
When the camera detects motion, it takes a photo or starts video
recording (depending on the operating mode set) and sends an alarm
notification and a photo to the application.

Ръководство за употреба - 18 -
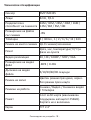
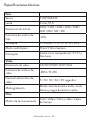
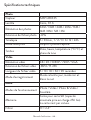
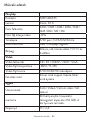
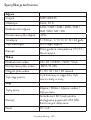
Технически спецификации
Сензор 5MP IMX335
Лещи 4mm, F/1.6
Разделителна
способност на снимката
36M / 30M / 24M / 20M / 16M /
12M / 8M / 5M / 3M
Разширение на файла
със снимки .JPG
Timelapse 5 / 30min , 1 / 2 / 3 / 6 / 12 / 24 h
Режим на много снимки До 9 снимки/заснемане
Печат Дата, час, температура (°C/°F) и
фаза на луната
Видео резолюция 4K / 2K / 1080P / 720P / VGA
Разширение на видео
файл .MP4 / H.265
Дължина на видео
файла 5/10/30/60/90 секунди
Режим на запис Цветен режим през деня, черно-
бял режим през нощта
Режими на работа Снимка / Видео / Снимка и видео
/ Timelapse
Памет
Слот за SD карта (максимален
поддържан капацитет 256GB).
Картата не е включена.
Екран TFT 2.4”

Ръководство за употреба - 19 -
Захранване 12V 8000mAh Li-Ion батерия
Външно захранване: 12V DC
Ток (ампер) 1mA (в режим на готовност) /
макс. 300mA
Датчик за движение 1 x PIR
PIR ъгъл на откриване 120°
PIR разстояние за
откриване
Регулируема, от 0,30 м (1 фут) до
30 м (98 фута)
IR светодиоди 56
Разстояние на ir
осветяване До 30 м (98 фута)
Излагане Авто / 100 / 200 / 400
Зрително поле (fov) 120°
Скорост на задействане 0,3 секунди
Закъснение между две
засичания
1/10 секунди, 1/3/5/10/15/30
минути
Gsm честота
4G FDD-LTE B1 B3 B5 B7 B20
3G WCDMA B1 B5 B8
2G GSM 850/900/1800/1900
Размери 155 x 110 x 85 mm
Работна температура -26°C ~ +80°C
Степен на защита IP65

Ръководство за употреба - 20 -
Описание на продукта
1
2
3
4
5
6
7
1
2
3
4
56
7
1. Антена
2. Невидими светодиоди
3. LED индикатор
4. Обектив
5. PIR сензор
6. Жак за външно 12V DC
захранване
7. Сензор за светлина
1. Цветен дисплей
2. Слот за SD карта
3. Мини USB порт
4. Слот за SIM карта
5. Бутони за управление
6. Бутони за заключване на
батерията
7. Li-Ion батерия
La pagina si sta caricando...
La pagina si sta caricando...
La pagina si sta caricando...
La pagina si sta caricando...
La pagina si sta caricando...
La pagina si sta caricando...
La pagina si sta caricando...
La pagina si sta caricando...
La pagina si sta caricando...
La pagina si sta caricando...
La pagina si sta caricando...
La pagina si sta caricando...
La pagina si sta caricando...
La pagina si sta caricando...
La pagina si sta caricando...
La pagina si sta caricando...
La pagina si sta caricando...
La pagina si sta caricando...
La pagina si sta caricando...
La pagina si sta caricando...
La pagina si sta caricando...
La pagina si sta caricando...
La pagina si sta caricando...
La pagina si sta caricando...
La pagina si sta caricando...
La pagina si sta caricando...
La pagina si sta caricando...
La pagina si sta caricando...
La pagina si sta caricando...
La pagina si sta caricando...
La pagina si sta caricando...
La pagina si sta caricando...
La pagina si sta caricando...
La pagina si sta caricando...
La pagina si sta caricando...
La pagina si sta caricando...
La pagina si sta caricando...
La pagina si sta caricando...
La pagina si sta caricando...
La pagina si sta caricando...
La pagina si sta caricando...
La pagina si sta caricando...
La pagina si sta caricando...
La pagina si sta caricando...
La pagina si sta caricando...
La pagina si sta caricando...
La pagina si sta caricando...
La pagina si sta caricando...
La pagina si sta caricando...
La pagina si sta caricando...
La pagina si sta caricando...
La pagina si sta caricando...
La pagina si sta caricando...
La pagina si sta caricando...
La pagina si sta caricando...
La pagina si sta caricando...
La pagina si sta caricando...
La pagina si sta caricando...
La pagina si sta caricando...
La pagina si sta caricando...
La pagina si sta caricando...
La pagina si sta caricando...
La pagina si sta caricando...
La pagina si sta caricando...
La pagina si sta caricando...
La pagina si sta caricando...
La pagina si sta caricando...
La pagina si sta caricando...
La pagina si sta caricando...
La pagina si sta caricando...
La pagina si sta caricando...
La pagina si sta caricando...
La pagina si sta caricando...
La pagina si sta caricando...
La pagina si sta caricando...
La pagina si sta caricando...
La pagina si sta caricando...
La pagina si sta caricando...
La pagina si sta caricando...
La pagina si sta caricando...
La pagina si sta caricando...
La pagina si sta caricando...
La pagina si sta caricando...
La pagina si sta caricando...
La pagina si sta caricando...
La pagina si sta caricando...
La pagina si sta caricando...
La pagina si sta caricando...
La pagina si sta caricando...
La pagina si sta caricando...
La pagina si sta caricando...
La pagina si sta caricando...
La pagina si sta caricando...
La pagina si sta caricando...
La pagina si sta caricando...
La pagina si sta caricando...
La pagina si sta caricando...
La pagina si sta caricando...
La pagina si sta caricando...
La pagina si sta caricando...
La pagina si sta caricando...
La pagina si sta caricando...
La pagina si sta caricando...
La pagina si sta caricando...
La pagina si sta caricando...
La pagina si sta caricando...
La pagina si sta caricando...
La pagina si sta caricando...
La pagina si sta caricando...
La pagina si sta caricando...
La pagina si sta caricando...
La pagina si sta caricando...
La pagina si sta caricando...
La pagina si sta caricando...
La pagina si sta caricando...
La pagina si sta caricando...
La pagina si sta caricando...
La pagina si sta caricando...
La pagina si sta caricando...
La pagina si sta caricando...
La pagina si sta caricando...
La pagina si sta caricando...
La pagina si sta caricando...
La pagina si sta caricando...
La pagina si sta caricando...
La pagina si sta caricando...
La pagina si sta caricando...
La pagina si sta caricando...
La pagina si sta caricando...
La pagina si sta caricando...
La pagina si sta caricando...
La pagina si sta caricando...
La pagina si sta caricando...
La pagina si sta caricando...
La pagina si sta caricando...
La pagina si sta caricando...
La pagina si sta caricando...
La pagina si sta caricando...
La pagina si sta caricando...
La pagina si sta caricando...
La pagina si sta caricando...
La pagina si sta caricando...
La pagina si sta caricando...
La pagina si sta caricando...
-
 1
1
-
 2
2
-
 3
3
-
 4
4
-
 5
5
-
 6
6
-
 7
7
-
 8
8
-
 9
9
-
 10
10
-
 11
11
-
 12
12
-
 13
13
-
 14
14
-
 15
15
-
 16
16
-
 17
17
-
 18
18
-
 19
19
-
 20
20
-
 21
21
-
 22
22
-
 23
23
-
 24
24
-
 25
25
-
 26
26
-
 27
27
-
 28
28
-
 29
29
-
 30
30
-
 31
31
-
 32
32
-
 33
33
-
 34
34
-
 35
35
-
 36
36
-
 37
37
-
 38
38
-
 39
39
-
 40
40
-
 41
41
-
 42
42
-
 43
43
-
 44
44
-
 45
45
-
 46
46
-
 47
47
-
 48
48
-
 49
49
-
 50
50
-
 51
51
-
 52
52
-
 53
53
-
 54
54
-
 55
55
-
 56
56
-
 57
57
-
 58
58
-
 59
59
-
 60
60
-
 61
61
-
 62
62
-
 63
63
-
 64
64
-
 65
65
-
 66
66
-
 67
67
-
 68
68
-
 69
69
-
 70
70
-
 71
71
-
 72
72
-
 73
73
-
 74
74
-
 75
75
-
 76
76
-
 77
77
-
 78
78
-
 79
79
-
 80
80
-
 81
81
-
 82
82
-
 83
83
-
 84
84
-
 85
85
-
 86
86
-
 87
87
-
 88
88
-
 89
89
-
 90
90
-
 91
91
-
 92
92
-
 93
93
-
 94
94
-
 95
95
-
 96
96
-
 97
97
-
 98
98
-
 99
99
-
 100
100
-
 101
101
-
 102
102
-
 103
103
-
 104
104
-
 105
105
-
 106
106
-
 107
107
-
 108
108
-
 109
109
-
 110
110
-
 111
111
-
 112
112
-
 113
113
-
 114
114
-
 115
115
-
 116
116
-
 117
117
-
 118
118
-
 119
119
-
 120
120
-
 121
121
-
 122
122
-
 123
123
-
 124
124
-
 125
125
-
 126
126
-
 127
127
-
 128
128
-
 129
129
-
 130
130
-
 131
131
-
 132
132
-
 133
133
-
 134
134
-
 135
135
-
 136
136
-
 137
137
-
 138
138
-
 139
139
-
 140
140
-
 141
141
-
 142
142
-
 143
143
-
 144
144
-
 145
145
-
 146
146
-
 147
147
-
 148
148
-
 149
149
-
 150
150
-
 151
151
-
 152
152
-
 153
153
-
 154
154
-
 155
155
-
 156
156
-
 157
157
-
 158
158
-
 159
159
-
 160
160
-
 161
161
-
 162
162
-
 163
163
-
 164
164


in altre lingue
- français: PNI 550C Manuel utilisateur
- Deutsch: PNI 550C Benutzerhandbuch