
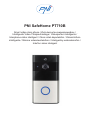
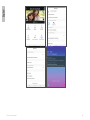
PNI SafeHome PT710B
Smart video door phone / Интелигентен видеодомофон /
Intelligente Video-Türsprechanlage / Videoportero inteligente /
Interphone vidéo intelligent / Okos videó kaputelefon / Videocitofono
intelligente / Slimme videodeurtelefoon / Inteligentny wideodomofon /
Interfon video inteligent

EN User manual ......................................................... 3
BG Ръководство за употреба ............................. 8
DE Benutzerhandbuch .............................................. 13
ES Manual de usuario ............................................... 18
FR Manuel utilisateur ............................................... 23
HU Használati utasítás .............................................. 28
IT Manuale utente .................................................. 33
NL Handleiding ........................................................ 38
PL Instrukcja obsługi ............................................... 43
RO Manual de utilizare ............................................. 48

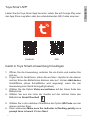
3User manual
English
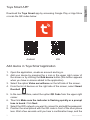
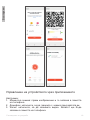
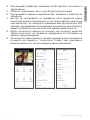
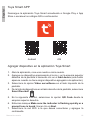
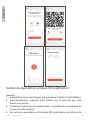
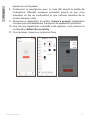
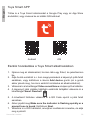
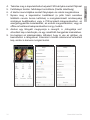
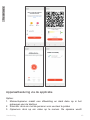
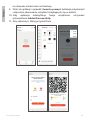
Tuya Smart APP
Download the Tuya Smar t app by accessing Google Play or App Store
or scan the QR codes below:
Android iOS
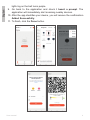
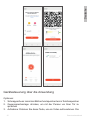
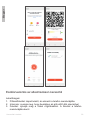
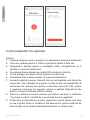
Add device in Tuya Smart application
1. Open the application, create an account and log in.
2. Add your device by pressing the + icon in the upper right corner of
the screen or by clicking the Add device button (this button appears
when you have no device added to the application).
3. Select the option Video surveillance on the left side of the screen.
4. From the list of devices on the right side of the screen, select Smart
Doorbell
5. In the next interface, select the option QR Code from the upper right
corner.
6. Then tick Make sure the indicator is ashing quickly or a prompt
tone is heard. Click Next.
7. Select the WiFi network you want to connect to and add the password.
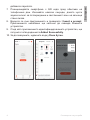
8. Position the smartphone with the QR code in front of the door phone
lens. Wait a few seconds until you hear a conrmation beep, and the

User manual 4
English
light ring on the bell turns purple.
9. Go back to the application and check I heard a prompt. The
application will immediately start scanning nearby devices.
10. After the app identies your device, you will receive the conrmation
Added Successfully.
11. To nish, click the Done button.

5User manual
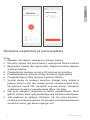
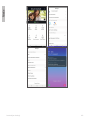
English
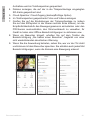
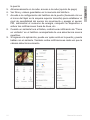
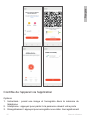
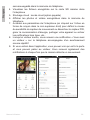
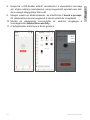
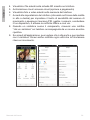
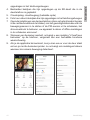
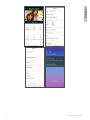
Device control via the application
Options:
1. Snapshot: takes an image and saves it in the phone’s memory
2. Intercom: press to talk to the person in front of your door
3. Recording: press to record video. The recording will be saved in the
phone memory.
4. View les saved on the SD card inserted in the door phone
5. Cloud storage: cloud access (paid option)
6. View photos and videos saved in the phone memory
7. Access the door phone settings (by clicking on the pencil icon in the
upper right corner) to set the sensitivity level of the motion sensor
or turn o the PIR sensor, manage power consumption, share your
device, or turn on oine notications and so on.
8. When a visitor rings the bell, you will receive a “You have a visitor”
notication on the phone accompanied by a repetitive audible warning.
9. If you enter the application, you can see who is at the door and you
can talk to the visitor. You also receive notications every time the
camera detects movement.

User manual 6
English

7User manual
English
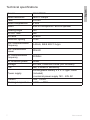
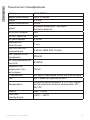
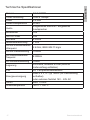
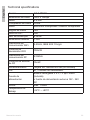
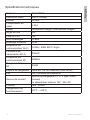
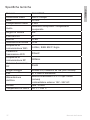
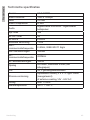
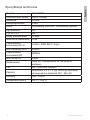
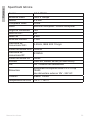
Technical specications
Sensor 1/2.9 CMOS
Video resolution 1920 x 1080px
Lens 3.6 mm
Video compression H.264
Audio Built-in microphone / Built-in speaker
Viewing angle 166°
IR-CUT lter Yes
IR LEDs 6 LEDs
Minimum lighting 1 Lux
WiFi communication
frequency 2.4GHz, IEEE 802.11 b/g/n
WiFi transmission
power 100mW
RF communication
frequency 433MHz
RF emission power 10mW
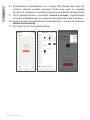
Storage SD card, maximum 64GB (not included)
PIR Yes, 3 levels of sensitivity
Power supply
Rechargeable battery 2 x 3.7V type 18650
(included)
or external power supply 14V - 24V AC
Current max. 170mA
Working temperature -26°C ~ +80°C

Ръководство за употреба
Български
8
Tuya Smart APP
Изтеглете приложението Tuya Smart, като влезете в Google Play или
App Store или сканирайте QR кодовете по-долу:
Android iOS
Добавете устройство в приложението Tuya Smart
1. Отворете приложението, създайте акаунт и влезте.
Добавете вашето устройство, като натиснете иконата + в горния
десен ъгъл на екрана или щракнете върху Add device бутон
(този бутон се появява, когато нямате добавено устройство към
приложението).
2. Изберете опцията Video surveillance от лявата страна на
екрана.
3. От списъка с устройства в дясната част на екрана изберете
Smart Doorbell
4. В следващия интерфейс изберете опцията QR Code от горния
десен ъгъл.
5. След това отметнете Make sure the indicator is ashing quickly
or a prompt tone is heard. Кликнете върху Next.
6. Изберете WiFi мрежата, към която искате да се свържете, и

Ръководство за употреба
Български
9
добавете паролата.
7. Позиционирайте смартфона с QR кода пред обектива на
телефонния дом. Изчакайте няколко секунди, докато чуете
звуков сигнал за потвърждение и светлинният звън на звънеца
стане лилав.
8. Върнете се към приложението и проверете I heard a prompt.
Приложението незабавно ще започне да сканира близките
устройства.
9. След като приложението идентифицира вашето устройство, ще
получите потвърждението Added Successfully.
10. За да завършите, щракнете върху Done бутон.

Ръководство за употреба
Български
10
Управление на устройството чрез приложението
Настроики:
1. Моментна снимка: прави изображение и го запазва в паметта
на телефона
2. Домофон: натиснете, за да говорите с човека пред вратата ви
3. Запис: натиснете, за да запишете видео. Записът ще бъде
запазен в паметта на телефона.

Ръководство за употреба
Български
11
4. Преглеждайте файлове, записани на SD картата, поставена в
портмофона
5. Облачно съхранение: достъп до облак (платена опция)
6. Преглеждайте снимки и видеоклипове, запазени в паметта на
телефона
7. Достъп до настройките на домофона (като щракнете върху
иконата на молив в горния десен ъгъл), за да зададете нивото на
чувствителност на сензора за движение или да изключите PIR
сензора, да управлявате консумацията на енергия, да споделите
вашето устройство или да включите офлайн известия и т.н. .
8. Когато посетител позвъни на звънеца, ще получите известие
„Имате посетител“ на телефона, придружено от повтарящо се
звуково предупреждение.
9. Ако влезете в приложението, можете да видите кой е на вратата
и можете да говорите с посетителя. Освен това получавате
известия всеки път, когато камерата засече движение.

Ръководство за употреба
Български
12
Технически спецификации
Сензор 1/2.9 CMOS
Видео резолюция 1920 x 1080px
Лещи 3.6 mm
Видео компресия H.264
аудио Вграден микрофон / Вграден
високоговорител
Ъгъл на гледане 166°
IR-CUT филтър Yes
IR светодиоди 6 LEDs
Минимално
осветление 1 Lux
Честота на WiFi
комуникация 2.4GHz, IEEE 802.11 b/g/n
WiFi мощност на
предаване 100mW
RF комуникационна
честота 433MHz
Мощност на
радиочестотно
излъчване
10mW
Съхранение SD карта, максимум 64GB (не е включена)
PIR Да, 3 нива на чувствителност
Захранване
Акумулаторна батерия 2 x 3.7V тип 18650
(включена) или външно захранване 14V -
24V AC
Тек ущ max. 170mA
Работна
температура -26°C ~ +80°C

Benutzerhandbuch
Deutsche
13
Tuya Smart APP
Laden Sie die Tuya Smart App herunter, indem Sie auf Google Play oder
den App Store zugreifen oder die untenstehenden QR-Codes scannen:
Android iOS
Gerät in Tuya Smart-Anwendung hinzufügen
1. Önen Sie die Anwendung, erstellen Sie ein Konto und melden Sie
sich an.
2. Fügen Sie Ihr Gerät hinzu, indem Sie auf das +-Symbol in der oberen
rechten Ecke des Bildschirms drücken oder auf . klicken Add device
Schaltäche (diese Schaltäche wird angezeigt, wenn Sie der
Anwendung kein Gerät hinzugefügt haben).
3. Wählen Sie die Option Video surveillance auf der linken Seite des
Bildschirms.
4. Wählen Sie aus der Liste der Geräte auf der rechten Seite des
Bildschirms Smart Doorbell
5. Wählen Sie in der nächsten Oberäche die Option QR Code von der
oberen rechten Ecke.
6. Dann ankreuzen Make sure the indicator is ashing quickly or a
prompt tone is heard. Klicken Next.

Benutzerhandbuch
Deutsche
14
7. Wählen Sie das WLAN-Netzwerk aus, mit dem Sie eine Verbindung
herstellen möchten, und fügen Sie das Passwort hinzu.
8. Positionieren Sie das Smartphone mit dem QR-Code vor der
Türsprechscheibe. Warten Sie einige Sekunden, bis Sie einen
Bestätigungston hören und der Lichtring der Glocke lila wird.
9. Gehen Sie zurück zur Anwendung und überprüfen Sie I heard
a prompt. Die Anwendung beginnt sofort mit dem Scannen von
Geräten in der Nähe.
10. Nachdem die App Ihr Gerät identiziert hat, erhalten Sie die
Bestätigung Added Successfully.
11. Klicken Sie zum Abschluss auf die Schaltäche Fertig.

Benutzerhandbuch
Deutsche
15
Gerätesteuerung über die Anwendung
Optionen:
1. Schnappschuss: nimmt ein Bild auf und speichert es im Telefonspeicher
2. Gegensprechanlage: drücken, um mit der Person vor Ihrer Tür zu
sprechen
3. Aufnahme: Drücken Sie diese Taste, um ein Video aufzunehmen. Die

Benutzerhandbuch
Deutsche
16
Aufnahme wird im Telefonspeicher gespeichert.
4. Dateien anzeigen, die auf der in die Türsprechanlage eingelegten
SD-Karte gespeichert sind
5. Cloud-Speicher: Cloud-Zugang (kostenpichtige Option)
6. Im Telefonspeicher gespeicherte Fotos und Videos anzeigen
7. Greifen Sie auf die Einstellungen der Türsprechanlage zu (indem
Sie auf das Stiftsymbol in der oberen rechten Ecke klicken), um die
Empndlichkeitsstufe des Bewegungssensors einzustellen oder den
PIR-Sensor auszuschalten, den Stromverbrauch zu verwalten, Ihr
Gerät zu teilen oder Oine-Benachrichtigungen zu aktivieren usw. .
8. Wenn ein Besucher klingelt, erhalten Sie auf dem Telefon die
Benachrichtigung „Sie haben einen Besucher“, begleitet von einer
sich wiederholenden akustischen Warnung.
9. Wenn Sie die Anwendung betreten, sehen Sie, wer vor der Tür steht
und können mit dem Besucher sprechen. Sie erhalten auch jedes Mal
Benachrichtigungen, wenn die Kamera eine Bewegung erkennt.

Benutzerhandbuch
Deutsche
17
Technische Spezikationen
Sensor 1/2.9 CMOS
Video Auösung 1920 x 1080px
Linse 3.6 mm
Video-Kompression H.264
Audio Eingebautes Mikrofon / Eingebauter
Lautsprecher
Blickwinkel 166°
IR-CUT-Filter Yes
IR-LEDs 6 LEDs
Mindestbeleuchtung 1 Lux
WLAN-Kommunikation
sfrequenz 2.4GHz, IEEE 802.11 b/g/n
WLAN-Sendeleistung 100mW
HF-Kommunikations
frequenz 433MHz
HF-Emissionsleistung 10mW
Lagerung SD-Karte, maximal 64 GB (nicht im
Lieferumfang enthalten)
PIR Ja, 3 Empndlichkeitsstufen
Energieversorgung
Akku 2 x 3,7V Typ 18650 (im Lieferumfang
enthalten)
oder externes Netzteil 14V - 24V AC
Strom max. 170mA
Arbeitstemperatur -26°C ~ +80°C

Manual de usuario
Español
18
Tuya Smart APP
Descargue la aplicación Tuya Smart accediendo a Google Play o App
Store o escanee los códigos QR a continuación:
Android iOS
Agregar dispositivo en la aplicación Tuya Smart
1. Abra la aplicación, cree una cuenta e inicie sesión.
2. Agregue su dispositivo presionando el icono + en la esquina superior
derecha de la pantalla o haciendo clic en el Add device (este botón
aparece cuando no tiene ningún dispositivo agregado a la aplicación).
3. Seleccione la opcion Video surveillance en el lado izquierdo de la
pantalla.
4. De la lista de dispositivos en el lado derecho de la pantalla, seleccione
Smart Doorbell
5. En la siguiente interfaz, seleccione la opción QR Code desde la
esquina superior derecha.
6. Entonces marque Make sure the indicator is ashing quickly or a
prompt tone is heard. Hacer clic en Next.
7. Seleccione la red WiFi a la que desea conectarse y agregue la
contraseña.

Manual de usuario
Español
19
8. Coloque el teléfono inteligente con el código QR frente a la lente del
teléfono de la puerta. Espere unos segundos hasta que escuche un
pitido de conrmación y el anillo de luz del timbre se vuelva violeta.
9. Regrese a la aplicación y verique I heard a prompt. La aplicación
comenzará a escanear inmediatamente los dispositivos cercanos.
10. Después de que la aplicación identique su dispositivo, recibirá la
conrmación Added Successfully.
11. Para terminar, haga clic en el botón Done.

Manual de usuario
Español
20
Control de dispositivos a través de la aplicación
Opcións:
1. Instantánea: toma una imagen y la guarda en la memoria del teléfono.
2. Intercomunicador: presione para hablar con la persona que está
frente a su puerta
3. Grabación: presione para grabar video. La grabación se guardará en
la memoria del teléfono.
4. Ver archivos guardados en la tarjeta SD insertada en el teléfono de
La pagina si sta caricando...
La pagina si sta caricando...
La pagina si sta caricando...
La pagina si sta caricando...
La pagina si sta caricando...
La pagina si sta caricando...
La pagina si sta caricando...
La pagina si sta caricando...
La pagina si sta caricando...
La pagina si sta caricando...
La pagina si sta caricando...
La pagina si sta caricando...
La pagina si sta caricando...
La pagina si sta caricando...
La pagina si sta caricando...
La pagina si sta caricando...
La pagina si sta caricando...
La pagina si sta caricando...
La pagina si sta caricando...
La pagina si sta caricando...
La pagina si sta caricando...
La pagina si sta caricando...
La pagina si sta caricando...
La pagina si sta caricando...
La pagina si sta caricando...
La pagina si sta caricando...
La pagina si sta caricando...
La pagina si sta caricando...
La pagina si sta caricando...
La pagina si sta caricando...
La pagina si sta caricando...
La pagina si sta caricando...
La pagina si sta caricando...
La pagina si sta caricando...
La pagina si sta caricando...
La pagina si sta caricando...
-
 1
1
-
 2
2
-
 3
3
-
 4
4
-
 5
5
-
 6
6
-
 7
7
-
 8
8
-
 9
9
-
 10
10
-
 11
11
-
 12
12
-
 13
13
-
 14
14
-
 15
15
-
 16
16
-
 17
17
-
 18
18
-
 19
19
-
 20
20
-
 21
21
-
 22
22
-
 23
23
-
 24
24
-
 25
25
-
 26
26
-
 27
27
-
 28
28
-
 29
29
-
 30
30
-
 31
31
-
 32
32
-
 33
33
-
 34
34
-
 35
35
-
 36
36
-
 37
37
-
 38
38
-
 39
39
-
 40
40
-
 41
41
-
 42
42
-
 43
43
-
 44
44
-
 45
45
-
 46
46
-
 47
47
-
 48
48
-
 49
49
-
 50
50
-
 51
51
-
 52
52
-
 53
53
-
 54
54
-
 55
55
-
 56
56


in altre lingue
- français: PNI SafeHome PT710B Manuel utilisateur
- español: PNI SafeHome PT710B Manual de usuario
- polski: PNI SafeHome PT710B Instrukcja obsługi
Documenti correlati
-
PNI PT202L Manuale utente
-
PNI SafeHome DIM202 Manuale utente
-
PNI 550C Manuale utente
-
PNI CT25WIFI Manuale utente
-
PNI IP649 Manuale utente
-
PNI Safe House HS008 wireless outdoor siren Manuale utente
-
PNI House AHD32 Manuale utente
-
PNI MIKE 80 Manuale utente
-
PNI CT36 Manuale utente
-
PNI IP660MP Video Surveillace Camera Manuale utente
Altri documenti
-
Olympia OC 1000 Outdoor Camera Manuale del proprietario
-
Gembird TSL-CAM-WRHD-02 Manuale del proprietario
-
-
Overmax OV-CAMSPOT 4.0 PTZ WHITE Manuale del proprietario
-
Denver SHV-120 Manuale utente
-
-
Helo Camera-B-Kit Guida utente