Denon DCD-F101 Manuale del proprietario
- Categoria
- Lettore CD
- Tipo
- Manuale del proprietario

STEREO CD PLAYER
DCD-F101
TRACK
ON / STANDBY
COMPACT DISC PLAYER DCD-F101
REPEAT
OPERATING INSTRUCTIONS
BEDIENUNGSANLEITUNG
MODE D’EMPLOI
ISTRUZIONI PER L’USO
INSTRUCCIONES DE OPERACION
GEBRUIKSAANWIJZING
BRUKSANVISNING
FOR ENGLISH READERS PAGE 04 ~ PAGE 15
FÜR DEUTSCHE LESER SEITE 16 ~ SEITE 27
POUR LES LECTEURS FRANCAIS PAGE 28 ~ PAGE 39
PER IL LETTORE ITALIANO PAGINA 40 ~ PAGINA 51
PARA LECTORES DE ESPAÑOL PAGINA 52 ~ PAGINA 63
VOOR NEDERLANDSTALIGE LEZERS PAGINA 64 ~ PAGINA 75
FOR SVENSKA LÄSARE SIDA 76 ~ SIDA 87

2
ENGLISH
NOTE ON USE / HINWEISE ZUM GEBRAUCH /
OBSERVATIONS RELATIVES A L’UTILISATION / NOTE SULL’USO
NOTAS SOBRE EL USO / ALVORENS TE GEBRUIKEN / OBSERVERA
• Avoid high temperatures.
Allow for sufficient heat dispersion when
installed on a rack.
• Vermeiden Sie hohe Temperaturen.
Beachten Sie, daß eine ausreichend
Luftzirkulation gewährleistet wird, wenn das
Gerät auf ein Regal gestellt wird.
• Eviter des températures élevées
Tenir compte d’une dispersion de chaleur
suffisante lors de l’installation sur une
étagère.
• Evitate di esporre l’unità a temperature alte.
Assicuratevi che ci sia un’adeguata
dispersione del calore quando installate
l’unità in un mobile per componenti audio.
• Evite altas temperaturas
Permite la suficiente dispersión del calor
cuando está instalado en la consola.
• Vermijd hoge temperaturen.
Zorg voor een degelijk hitteafvoer indien het
apparaat op een rek wordt geplaatst.
• Undvik höga temperaturer.
Se till att det finns möjlighet till god
värmeavledning vid montering i ett rack.
• Keep the set free from moisture, water, and
dust.
• Halten Sie das Gerät von Feuchtigkeit,
Wasser und Staub fern.
• Protéger l’appareil contre l’humidité, l’eau et
lapoussière.
• Tenete l’unità lontana dall’umidità, dall’acqua
e dalla polvere.
• Mantenga el equipo libre de humedad, agua
y polvo.
• Laat geen vochtigheid, water of stof in het
apparaat binnendringen.
• Utsätt inte apparaten för fukt, vatten och
damm.
• Do not let foreign objects in the set.
• Keine fremden Gegenstände in das Gerät
kommen lassen.
• Ne pas laisser des objets étrangers dans
l’appareil.
• E’ importante che nessun oggetto è inserito
all’interno dell’unità.
• No deje objetos extraños dentro del equipo.
• Laat geen vreemde voorwerpen in dit
apparaat vallen.
• Se till att främmande föremål inte tränger in
i apparaten.
• Handle the power cord carefully.
Hold the plug when unplugging the cord.
• Gehen Sie vorsichtig mit dem Netzkabel um.
Halten Sie das Kabel am Stecker, wenn Sie
den Stecker herausziehen.
• Manipuler le cordon d’alimentation avec
précaution.
Tenir la prise lors du débranchement du
cordon.
• Manneggiate il filo di alimentazione con
cura.
Agite per la spina quando scollegate il cavo
dalla presa.
• Maneje el cordón de energía con cuidado.
Sostenga el enchufe cuando desconecte el
cordón de energía.
• Hanteer het netsnoer voorzichtig.
Houd het snoer bij de stekker vast wanneer
deze moet worden aan- of losgekoppeld.
• Hantera nätkabeln varsamt.
Håll i kabeln när den kopplas från el-uttaget.
• Unplug the power cord when not using the
set for long periods of time.
• Wenn das Gerät eine längere Zeit nicht
verwendet werden soll, trennen Sie das
Netzkabel vom Netzstecker.
• Débrancher le cordon d’alimentation lorsque
l’appareil n’est pas utilisé pendant de
longues périodes.
• Disinnestate il filo di alimentazione quando
avete l’intenzione di non usare il filo di
alimentazione per un lungo periodo di
tempo.
• Desconecte el cordón de energía cuando no
utilice el equipo por mucho tiempo.
• Neem altijd het netsnoer uit het stopkontakt
wanneer het apparaat gedurende een lange
periode niet wordt gebruikt.
• Koppla ur nätkabeln om apparaten inte
kommer att användas i lång tid.
• Do not let insecticides, benzene, and thinner
come in contact with the set.
• Lassen Sie das Gerät nicht mit Insektiziden,
Benzin oder Verdünnungsmitteln in
Berührung kommen.
• Ne pas mettre en contact des insecticides,
du benzène et un diluant avec l’appareil.
• Assicuratevvi che l’unità non venga in
contatto con insetticidi, benzolo o solventi.
• No permita el contacto de insecticidas,
gasolina y diluyentes con el equipo.
• Laat geen insektenverdelgende middelen,
benzine of verfverdunner met dit apparaat in
kontakt komen.
• Se till att inte insektsmedel på spraybruk,
bensen och thinner kommer i kontakt med
apparatens hölje.
• Never disassemble or modify the set in any
way.
• Versuchen Sie niemals das Gerät
auseinander zu nehmen oder auf jegliche Art
zu verändern.
• Ne jamais démonter ou modifier l’appareil
d’une manière ou d’une autre.
• Non smontate mai, nè modificate l’unità in
nessun modo.
• Nunca desarme o modifique el equipo de
ninguna manera.
• Nooit dit apparaat demonteren of op andere
wijze modifiëren.
• Ta inte isär apparaten och försök inte bygga
om den.
• Do not obstruct the ventilation holes.
• Die Belüftungsöffnungen dürfen nicht
verdeckt werden.
• Ne pas obstruer les trous d’aération.
• Non coprite i fori di ventilazione.
• No obstruya los orificios de ventilación.
• De ventilatieopeningen mogen niet worden
beblokkeerd.
• Täpp inte till ventilationsöppningarna.
* (For sets with ventilation holes)
ENGLISHDEUTSCHFRANCAISITALIANOESPAÑOLNEDERLANDSSVENSKA
CAUTION
RISK OF ELECTRIC SHOCK
DO NOT OPEN
CAUTION: TO REDUCE THE RISK OF ELECTRIC
SHOCK, DO NOT REMOVE COVER (OR
BACK). NO USER SERVICEABLE PARTS
INSIDE. REFER SERVICING TO
QUALIFIED SERVICE PERSONNEL.
The lightning flash with arrowhead symbol,
within an equilateral triangle, is intended to
alert the user to the presence of uninsulated
“dangerous voltage” within the product’s
enclosure that may be of sufficient
magnitude to constitute a risk of electric
shock to persons.
The exclamation point within an equilateral
triangle is intended to alert the user to the
presence of important operating and
maintenance (servicing) instructions in the
literature accompanying the appliance.
WARNING
:
TO PREVENT FIRE OR SHOCK HAZARD,
DO NOT EXPOSE THIS APPLIANCE TO
RAIN OR MOISTURE.
• DECLARATION OF CONFORMITY
We declare under our sole responsibility that this
product, to which this declaration relates, is in
conformity with the following standards:
EN60065, EN55013, EN55020, EN61000-3-2 and
EN61000-3-3.
Following the provisions of 73/23/EEC, 89/336/EEC and
93/68/EEC Directive.
• ÜBEREINSTIMMUNGSERKLÄRUNG
Wir erklären unter unserer Verantwortung, daß dieses
Produkt, auf das sich diese Erklärung bezieht, den
folgenden Standards entspricht:
EN60065, EN55013, EN55020, EN61000-3-2 und
EN61000-3-3.
Entspricht den Verordnungen der Direktive 73/23/EEC,
89/336/EEC und 93/68/EEC.
• DECLARATION DE CONFORMITE
Nous déclarons sous notre seule responsabilité que
l’appareil, auquel se réfère cette déclaration, est
conforme aux standards suivants:
EN60065, EN55013, EN55020, EN61000-3-2 et
EN61000-3-3.
D’après les dispositions de la Directive 73/23/EEC,
89/336/EEC et 93/68/EEC.
• DICHIARAZIONE DI CONFORMITÀ
Dichiariamo con piena responsabilità che questo
prodotto, al quale la nostra dichiarazione si riferisce, è
conforme alle seguenti normative:
EN60065, EN55013, EN55020, EN61000-3-2 e
EN61000-3-3.
In conformità con le condizioni delle direttive 73/23/EEC,
89/336/EEC e 93/68/EEC.
QUESTO PRODOTTO E’ CONFORME
AL D.M. 28/08/95 N. 548
• DECLARACIÓN DE CONFORMIDAD
Declaramos bajo nuestra exclusiva responsabilidad que
este producto al que hace referencia esta declaración,
está conforme con los siguientes estándares:
EN60065, EN55013, EN55020, EN61000-3-2 y EN61000-
3-3.
Siguiendo las provisiones de las Directivas 73/23/EEC,
89/336/EEC y 93/68/EEC.
• EENVORMIGHEIDSVERKLARING
Wij verklaren uitsluitend op onze verantwoordelijkheid
dat dit produkt, waarop deze verklaring betrekking heeft,
in overeenstemming is met de volgende normen:
EN60065, EN55013, EN55020, EN61000-3-2 en
EN61000-3-3.
Volgens de bepalingen van de Richtlijnen 73/23/EEC,
89/336/EEC en 93/68/EEC.
• ÖVERENSSTÄMMELSESINTYG
Härmed intygas helt på eget ansvar att denna produkt,
vilken detta intyg avser, uppfyller följande standarder:
EN60065, EN55013, EN55020, EN61000-3-2 och
EN61000-3-3.
Enligt stadgarna i direktiv 73/23/EEC, 89/336/EEC och
93/68/EEC.
ATTENZIONE: QUESTO APPARECCHIO E’ DOTATO DI
DISPOSITIVO OTTICO CON RAGGIO LASER.
L’USO IMPROPRIO DELL’APPARECCHIO PUO’ CAUSARE
PERICOLOSE ESPOSIZIONI A RADIAZIONI!
CLASS 1 LASER PRODUCT
LUOKAN 1 LASERLAITE
KLASS 1 LASERAPPARAT
ADVARSEL: USYNLIG LASERSTRÅLING VED ÅBNING, NÅR
SIKKERHEDSAFBRYDERE ER UDE AF FUNKTION.
UNDGÅ UDSAETTELSE FOR STRÅLING.
VAROITUS! LAITTEEN KÄYTTÄMINEN MUULLA KUIN TÄSSÄ
KÄYTTÖOHJEESSA MAINITULLA TAVALLA SAATTAA
ALTISTAA KÄYTTÄJÄN TURVALLISUUSLUOKAN 1
YLITTÄVÄLLE NÄKYMÄTTÖMÄLLE LASERSÄTEILYLLE.
VARNING- OM APPARATEN ANVÄNDS PÅ ANNAT SÄTT ÄN I DENNA
BRUKSANVISNING SPECIFICERATS, KAN ANVÄNDAREN
UTSÄTTAS FÖR OSYNLIG LASERSTRÅLNING SOM
ÖVERSKRIDER GRÄNSEN FÖR LASERKLASS 1.
,
CLASS 1
LASER
PRODUCT
,
,,
CAUTION
• The ventilation should not be impeded by covering
the ventilation openings with items, such as
newspapers, table-cloths, curtains, etc.
• No naked flame sources, such as lighted candles,
should be placed on the apparatus.
• Please be care the environmental aspects of battery
disposal.
• The apparatus shall not be exposed to dripping or
splashing for use.
• No objects filled with liquids, such as vases, shall be
placed on the apparatus.

3
ENGLISH
FRONT PANEL
FRONTPLATTE
PANNEAU AVANT
PANNELLO ANTERIORE
PANEL FRONTAL
VOORPANEEL
FRONT PANELEN
REAR PANEL
RÜCKWAND
PANNEAU ARRIERE
IL PANNELLO POSTERIORE
PANEL TRASERO
ACHTERPANEEL
BAKSIDAN
TRACK
ON / STANDBY
COMPACT DISC PLAYER DCD-F101
REPEAT
q
w
e
r
t
y
!1
i
!0
o
u
!2
!3
!4
!5
ENGLISH DEUTSCH FRANCAIS ITALIANO ESPAÑOL NEDERLANDS SVENSKA
DISPLAY
DISPLAY
AFFICHAGE
DISPLAY
VISUALIZADOR
DISPLAY
DISPLAYEN
!6
!7 !8

4
NOTE:
This CD player uses the semiconductor laser. To allow
you to enjoy music at a stable operation, it is
recommended to use this in a room of 5°C (41°F) ~ 35°C
(95°F).
1. Handle the power supply cord carefully
Do not damage or deform the power supply cord. If it is
damaged or deformed, it may cause electric shock or
malfunction when used. When removing from wall
outlet, be sure to remove by holding the plug
attachment and not by pulling the cord.
2. Do not open the top cover
In order to prevent electric shock, do not open the top
cover.
If problems occur, contact your DENON DEALER.
3. Do not place anything inside
Do not place metal objects or spill liquid inside the CD
player.
Electric shock or malfunction may result.
CAUTION
Thank you for purchasing this DENON Compact Disc
Player. Please read the operation instructions thoroughly
in order to acquaint yourself with the CD player and
achieve maximum satisfaction from it.
Please, record and retain the Model name and serial
number of your set shown on the rating label.
Model No. DCD-F101 Serial No.
TABLE OF CONTENTS
z
MAIN FEATURES ………………………………………4
x
BEFORE USING …………………………………………4
c
CAUTIONS ON INSTALLATION ………………………4
v
CONNECTIONS …………………………………………5
b
PART NAMES AND FUNCTIONS ……………………6
n
REMOTE CONTROL ……………………………………7
m
CAUTIONS ON HANDLING DISCS ………………7, 8
,
OPENING AND CLOSING THE DISC
HOLDER AND LOADING DISCS…………
……………
8
.
NORMAL PLAYBACK …………………………………9
⁄0
VARIOUS PLAYBACK FUNCTIONS ……………9 ~ 12
⁄1
SYSTEM FUNCTIONS ……………………………13, 14
⁄2
TROUBLESHOOTING …………………………………15
⁄3
SPECIFICATIONS ……………………………………15
Check that the following parts are included in the package aside from the main unit:
q Stereo Audio Cord ……………………………………1
w System Connector Cable ……………………………1
e Operating Instructions…………………………………1
r Service Station List ……………………………………1
qw
1
MAIN FEATURES
1. Enhanced Multilevel ∆
-
∑
D/A converter
Enhanced Multilevel noise shaping/
∆-
∑
D/A converters with superior resolution offers reproduction of the original
sound field with rich musical expression.
2. CD-R/RW playback
This set can play finalized CD-R/RW discs. Note however that depending on the recording quality, it may not be able
to play certain CD-R/RW discs.
3. Optical digital output terminals
The DCD-F101 is equipped with optical digital output terminals for digital signal transfer, allowing digital-to-digital
recording onto MDs and DATs with little deterioration of sound quality.
4. Convenient system functions
The DCD-F101 is equipped with such system functions as CD synchronized recording, auto function selection and
auto power on that simplify operation when connected in a system with the D-F101 series. In addition, the major
operations of each the system units can be performed with the system remote control unit (RC-927) included with
the receiver. (DRA-F101)
2
BEFORE USING
Read the following before using the set.
• Before turning on the power
Check again that all connections are correct and that
there are no problems with the connection cords. Be
sure to unplug the power cord before connecting or
disconnecting the connection cords.
• Moving the set
To prevent short-circuits or damage to the connection
cords, always unplug the power cord and disconnect
the connection cords between all other audio
components when moving the set.
• Condensation (dew)
Condensation (water droplets) may be produced on
internal optical lenses or discs in the following cases:
• Directly after a heater is turned on.
• When the set is in a steamy or humid room.
• When the set is moved abruptly from a cold place
(room) to a warm room.
• Should condensation occur:
The signals on the disc cannot be read and the set will
not function properly. Remove the disc then let the set
set with the power on. The condensation will evaporate
in one hour or less, at which time the set will function
normally.
• Store this instructions in safe place
After reading, store this instructions along with the
warranty in a safe place. Also fill in the items on the
back paper for your convenience.
• Illustrations in this manual
Note that some of the illustrations used for
explanations in this manual may differ from the actual
set.
2 Do not set TVs (even small ones) or other objects on
top of this unit.
CAUTIONS ON INSTALLATION
The CD player uses a microcomputer for controlling
internal electronic circuits.
In the event that the player is used while a near-by tuner
or TV is turned on, although unlikely, interference could
occur either in the sound from the tuner or the picture of
the TV. To avoid this, please take the following
precautions.
• Keep the CD player as far away from the tuner or TV set
as possible.
• Keep the power cable and connecting cable of the CD
player separate from the antenna wires of the tuner and
TV.
3
300 Ω/ohms feeder cable 75 Ω/ohms coaxial cable
IMPORTANT TO SAFETY
WARNING:
TO PREVENT FIRE OR SHOCK HAZARD,
DO NOT EXPOSE THIS APPLIANCE TO
RAIN OR MOISTURE.
• Interference is particular likely to occur when an indoor
antenna or a 300 Ω/ohms feeder cable is used. Thus,
use of an outdoor antenna and 75 Ω/ohms coaxial cable
is strongly recommended.
•
ACCESSORIES
ENGLISH

5
ENGLISH
SPEAKER SYSTEM
SYSTEM
CONNECTOR
PRE
OUT
SUB
WOOFER
RECPB
MDTAPEINPUTS
RECPBDVD
/
AUXCDPHONO
1
AM LOOP ANT.
ANTENNA
2
L
+
-
R
SPEAKER IMPEDANCE 4~16
FM COAX.
75
L
R
AC OUTLET
230V 50Hz
SWITCHED
W MAX
1
3
2
4
4
CONNECTIONS
Connecting to the D-F101 Series
2 When connecting to a receiver other than the one in the D-F101 series, there is no need to make connection 2. Note
that in this case none of the system functions (auto power on, etc.) will work.
• System operations such as the auto power on function can only be used if stereo audio cords and system cords are
connected between all the system components. Be sure to securely connect all the connection cords between all the
units.
• Disconnecting a system cord during system operation may result in malfunction. Be sure to unplug the power cords
before changing the connections.
• Install the components in such a way that the ventilation holes of the receiver (DRA-F101) are not obstructed.
• Use the AC OUTLET for audio equipment only. Do not use them for hair driers, etc.
1
Connect the DCD-F101’s LINE OUT jacks to the
receiver’s CD input jacks using the included
stereo audio cord.
2
4
Connect the DCD-F101’s SYSTEM
CONNECTOR jack (1 or 2) to the SYSTEM
CONNECTOR jack (1 or 2) of one of the other
components using the included system cord.
Connect this unit’s power cord to the AC outlet
on the Receiver (DRA-F101) or one of the other
components.
✽ The DCD-F101 can also be used when connected
to a receiver other than the one in the D-F101
series. In this case, none of the system functions
(auto power on, etc.) will work.
• Do not place another component directly on top of the
receiver (DRA-F101).
• For stability, do not stack more than three components
on top of each other.
NOTES:
• Do not plug power cords into power outlets until all
connections have been completed.
• Check the left and right channels and be sure to
interconnect them correctly (R to R, L to L).
• Plug in the power cords securely. Incomplete
connections will result in noise.
• Clasping the power cords and connection cords
together may result in humming or noise.
• After unplugging the power cord, wait at least 5
seconds before plugging it back in.
Recommended System Installation
• To ensure performance and stability, install the D-F101
series as shown below.
3
Connect the DCD-F101’s optical digital output
terminal (DIGITAL OPTICAL OUT) to the digital
input terminal (DIGITAL OPTICAL IN 1 or 2) of
the MD recorder using optical connection cords.
1
18Tr0 2m 46s
-60 40 -30 -20 -12 -6 -2 0
L
dB
R
POWER LOADING MECHANISM
ON / STANDBY
MINIDISC RECORDER DMD-F101
INPUT
-
+
MULTI RECCD SRSEDIT
13
REC LEVEL
/ ENTER
MEMO REC /
CHARACTER
PHONES
SYSTEM
VOLUME
ON / STANDBY
AM-FM STEREO RECEIVER DRA-F101
SOURCE
DIRECT
BANDUPDOWN
TUNING
MEMORY
/ SET
FUNCTION
TIMERTONE RDS
CD SRS
REC
0
1
PLAY
CASSETTE DECK DRR-F101
REC
CD SRS
PLAY
ON / STANDBY
e
DOLBY NR
ON
OFF
TRACK
ON / STANDBY
COMPACT DISC PLAYER DCD-F101
REPEAT
REVERSE
MODE
DRA-F101DMD-F101
DCD-F101 DRR-F101
Power plug
(for U.K. model)
Power plug
AC 230V, 50 Hz
(Plug into a power outlet)
Receiver
DRA-F101
MD-recorder
DMD-F101
CD player
DCD-F101

6
ENGLISH
PART NAMES AND FUNCTIONS
q
Power operation switch (ON/STANDBY)
• When pressed once, the power turns on and the
display lights.
• When pressed again, the standby mode is set.
• The LED color changes as follows, according to
the condition:
During power ON: green
During STANDBY: red
w
Disc holder open/close button ( 5 )
• Press this button to open and close the disc
holder.
• When pressed in the standby mode, the power
turns on automatically and the disc holder opens.
e
Display
• Refer to page 3.
r
Repeat button
• Press this for repeat playback. (Refer to page 11.)
t
Automatic/reverse button ( 8 )
• Use this button to find the beginning of the
desired track. (Refer to page 9.)
y
Manual search reverse button ( 6 )
• Press this button to reverse the disc. (Refer to
page 10.)
u
Manual search forward button ( 7 )
• Press this button to forward the disc. (Refer to
page 10.)
i
Automatic/manual search forward
button ( 9 )
• Use this button to find the beginning of the
desired track. (Refer to page 9.)
o
Stop button ( 2 )
• Press this button to stop playback.
!0
Play/Pause button ( 1/3 )
• Press this button to start playing the disc.
• When pressed while the disc holder is open, the
disc holder closes and playback starts.
• Press this button to stop playback temporarily.
• To resume playback, press either the pause
button (
3 ) or the play button ( 1 ).
!1
Disc holder
• Press the disc holder open/close button ( 5 ) to
open and close the disc holder.
• The disc holder can also be closed by press the
pause button (
3 ) or the play button ( 1 ).
5
(1) Front Panel
!2
Output jacks (LINE OUT)
• Connect these to the CD input jacks on the
amplifier.
• When connecting the DCD-F101 in a system with
the D-F101 series, be sure to connect these jacks
to the CD input jacks on the receiver (DRA-F101).
!
38
Digital output jack
(DIGITAL OUT OPTICAL)
• Digital data is output in optical form from this jack.
• Refer to page 5.
!4
System connectors
(SYSTEM CONNECTOR 1 and 2)
• When connecting the DCD-F101 in a system with
the D-F101 series, connect these to the system
connectors on other components using the
included system cords.
!
5
Power cord
• Connect this unit’s power cord to the AC outlet on
the Receiver (DRA-F101) or the MD recorder
(DMD-F101).
(2) Rear Panel
(3) Display
!
6
Mode indicators
• These indicate the various
modes.
• REPEAT:
These indicators light as
follows each time the repeat
button is pressed:
!8
Time display
• When a disc is loaded
• In the stop mode:
Total disc playing time
• In the play and pause modes:
Elapsed time of current track
• In the play and pause modes:
Elapsed time of current track
• When no disc is loaded or when the disc data
cannot be read properly, “‚‚ ‚‚:‚‚” is
displayed.
• EDIT:
(Editing operations are performed from the
system remote control unit (RC-927) included with
the receiver (DRA-F101). They can only be
performed when the components are connected
in a system.)
• This lights when performing editing operations on
a cassette tape. (Refer to page 14.)
• PROG:
This lights during programming and
programmed playback.
•
lights during playback.
flashes during manual search in the play
mode.
•
lights during the pause mode.
flashes during manual search in the pause
mode.
• RANDOM:
This lights in the random play mode.
!7
Track number display section
• When a disc is loaded
• In the stop mode:
Total number of tracks on disc
• In the play and programmed play modes:
Number of track currently playing
Elapsed time of current track
Remaining time of current track
Total remaining time on disc
• The display switches as follows
each time the time button is
pressed:
(RC-927)
(RC-927)
REPEAT
TIME/
PANEL
All off
REPEAT
1
REPEAT
ALL

7
ENGLISH
Names and Functions of System Remote Control Unit Buttons (The RC-927 is included with
the DRA-F101.)
2 The CD related buttons on the system remote control unit included with the receiver are explained below.
2 Buttons not explained here function in the same way as the corresponding buttons on the main unit.
(Refer to pages 3 and 6.)
REMOTE CONTROL
6
RC-927
REMOTE CONTROL UNIT
CLEAR
123
546
789
10
+10
CD SRS
MDTAPE
TUNING
REPEAT
CALL
PROG/
DIRECT
RANDOM
BAND
RDS
DIMMER
TIME/
PANEL
TIME EDIT
SYSTEM
POWER
OFF ON
STOP PLAY
VOLUME
/SELECT
SLEEP MODE
TAPE
FUNCTION
PRESET
+
-
TUNER
CD
MD
TAPE
Press this button to switch the
system power standby mode.
(You can not switch this unit
independently.)
Power standby button
(SYSTEM POWER STANDBY)
TIME button (TIME)
Play/pause button (
1
/
3
)
Stop button (
2
)
Automatic search forward
buttons (
9
)
Automatic search reverse
buttons (
8
)
Switches the operation of the
buttons.
When you want to operate the
CD, switch to the CD position.
Function selector switch
Press this button to switch the
system power on mode.
You can not switch this unit
independently.
Power on button
(SYSTEM POWER ON)
Press this to clear programmed
tracks. The last track in the
program is cleared each time the
button is pressed.
CLEAR button (CLEAR)
RANDOM button (RANDOM)
Press this to perform edited
recording according to the length
of the cassette tape. (See page
14.)
Time edit button (TIME EDIT)
Manual search forward buttons
(
7
)
Manual search reverse buttons
(
6
)
PROG/DIRECT button
(PROG/DIRECT)
Press this for programmed
playback. (Refer to page 10, 11.)
Press this to check the pro-
grammed tracks.
CALL button (CALL)
Press this for repeat playback.
(Refer to page 11, 12.)
REPEAT button (REPEAT)
7
CAUTIONS ON HANDLING DISCS
• The types of discs listed on the table below can be used on the DCD-F101.
The marks are indicated on the disc labels or jackets.
Usable
discs
CD
CD-R
CD-RW
(NOTE 1)
Mark (logo)
Recorded
signals
Disc
size
Recordable
ReWritable
12 cm
8 cm
Digital
audio
NOTE 1: According to recording quality, some
CD-R/RW cannot be played.
Discs
Only the discs including the marks shown on page 7 can
be played on the DCD-F101.
Note, however, that discs with special shapes (heart-
shaped discs, hexagonal discs, etc.) cannot be played on
the DCD-F101. Do not attempt to play such discs, as they
may damage the player.
Holding Discs
Avoid touching the surface of discs when loading and
unloading them.
Be careful not to get
fingerprints on the signal
surface (the side which shines
in rainbow colors).
Cleaning Discs
2
Fingerprints or dirt on the disc may lower sound and
picture quality or cause breaks in playback. Wipe off
fingerprints or dirt.
2
Use a commercially available disc cleaning set or a soft
cloth to wipe off fingerprints or dirt.
Wipe gently from the middle
outwards.
Do not wipe with a circular
motion.
NOTE:
• Do not use record spray or antistatic. Also do not
use volatile chemicals such as benzene or thinner.
Record
spray
Thinner Benzene
Use these for direct search and
programming.
Number buttons (1 to 10)
Press this to select track
numbers of over 11.
+10 button

8
ENGLISH
Cautions on Handling Discs
• Do not get fingerprints, grease or dirt on discs.
• Be especially careful not to scratch discs when
removing them from their cases.
• Do not bend discs.
• Do not heat discs.
• Do not enlarge the center hole.
• Do not write on the labeled (printed) side with a ball-
point pen or a pencil.
• Water droplets may form on the surface if the disc is
moved suddenly from a cold place to a warm one. Do
not use a hairdryer, etc., to dry the disc.
Cautions on Storing Discs
• Always eject discs after playing them.
• Keep discs in their cases to protect them from dust,
scratches and warping.
• Do not put discs in the following places:
1. Places exposed to direct sunlight for long periods of
time
2. Humid or dusty places
3. Places exposed to heat from heaters, etc.
Cautions on Loading Discs
• Only load one disc at a time. Loading one disc on top
of another may result in damage or scratch the discs.
• Load 8 cm discs securely in the disc guide, without
using an adapter. If the disc is not properly loaded, it
may slip out of the guide and block the disc tray.
• Be careful not to let your fingers get caught when the
disc tray is closing.
• Do not place anything but discs in the disc tray.
• Do not load cracked or warped discs or discs that have
been fixed with adhesive, etc.
• Do not use discs on which the adhesive part of
cellophane tape or glue used to attach the label is
exposed, or discs with traces of tape or labels that
have been peeled off. Such discs may get stuck inside
the player, resulting in damage.
8
OPENING AND CLOSING THE DISC HOLDER AND
LOADING DISCS
1
Turn on the power.
2
3
Press the disc holder
open/close button.
Being careful not to touch the disc’s data
surface, set the disc in the disc tray with the
labeled side facing up.
✽ Make sure the disc holder is fully open when
loading discs.
✽ Set 12 cm discs in the outer disc guide (Fig.
1), 8 cm discs in the inner disc guide (Fig. 2).
Make sure the disc is flat.
✽ When the play button is pressed
after a disc is set on the disc tray,
the disc holder closes and playback
starts.
NOTES:
•
If your finger or another object should get caught in the disc holder, stay calm and press the disc holder open/close
button (
5 ).
•
Do not put foreign objects in the disc holder. Doing so could result in damage.
•
Do not press on the disc holder when the power is turned off. Doing so could damage it.
•
To not press buttons with pencils, etc.
4
Press the disc holder
open/close button to close the
disc holder.
T
R
A
C
K
O
N
/ S
TA
N
DB
Y
C
O
M
P
A
C
T
D
I
S
C
P
L
A
Y
E
R
D
C
D
-
F
1
0
1
RE
P
EAT
T
R
A
C
K
O
N
/
ST
A
N
D
B
Y
C
O
M
P
A
C
T D
IS
C
PLA
Y
ER
D
CD
-F
10
1
R
E
P
EA
T
Figure 1
T
R
A
C
K
O
N
/
ST
A
N
D
B
Y
CO
M
P
A
C
T D
IS
C P
L
AY
E
R D
CD
-F
101
R
E
P
EA
T
Figure 2
(Main unit)
(Main unit)
(Main unit)
Disc tray
Disc holder open/close button
Disc holder
Outer disc
guide
12 cm disc
Inner disc
guide
8 cm disc
• The disc holder opens.
• When the disc holder closes, the total number
of tracks on the disc and the total playing time
appear on the display, and the numbers on the
music calendar light up to the number of
tracks on the disc.
ON / STANDBY
13
(Main unit)

9
ENGLISH
NORMAL PLAYBACK
9
(1) Starting Playback
1
(2) Stopping Playback
1
During playback, press the stop
button.
• Playback stops.
NOTES:
•
Zeros are displayed if no disc is loaded or if the disc is loaded upside-
down.
•
The total remaining time and the remaining time per track are not
displayed if the disc data cannot be read properly due to scratches or dirt on the disc. In this case, some time may
be required for finding the beginnings of tracks, etc.
•
Do not use discs with cellophane tape on them, rental discs on which there is glue seeping out from under the
label, or discs on which there are traces of labels that have been peeled off. If such discs are loaded, they may get
stuck inside the player and cause damage.
✽ Playback also stops automatically after the
last track on the disc has been played.
2
3
✽ For instructions on loading discs, refer to
“OPENING AND CLOSING THE DISC
HOLDER AND LOADING DISCS” (Page 9)
TRACK
ON / STANDBY
COMPACT DISC PLAYER DCD-F101
REPEAT
2
3
21
TRACK
ON / STANDBY
COMPACT DISC PLAYER DCD-F101
REPEAT
1
(Main unit)
Turn on the power.
(Main unit)
ON / STANDBY
Load the disc.
(Main unit)
Press the play button.
• Playback starts.
(Main unit)
13
(1) Stopping playback temporarily ……………………………………………………………
[Pause
]
VARIOUS PLAYBACK FUNCTIONS
10
2 Use this function to stop playback temporarily then resume playback from that point.
1
During playback, press the
pause button.
• Playback pauses.
q
Moving ahead to the beginning of the next track
Press the 9 button.
• Press the button more than
once to move ahead to the
beginning of subsequent
tracks.
1
w
Moving back to the beginning of the current track
Press the
8 button.
• Press the button more than
once to move back to the
beginning of previous tracks.
1
(2) Automatic Search
(Main unit)
Press the play/pause button.
4th track 5th track 6th track
(Pause)
Press the play/pause button.
(Main unit)
Press the 9 button.
2nd track 3rd track 4th track
(Main unit)
Press the 8 button.
3rd track 4th track 6th track
TRACK
ON / STANDBY
COMPACT DISC PLAYER DCD-F101
REPEAT
1
13
• To resume playback from the position at
which the disc is paused, press either the
pause button or the play button.
TRACK
ON / STANDBY
COMPACT DISC PLAYER DCD-F101
REPEAT
1
TRACK
ON / STANDBY
COMPACT DISC PLAYER DCD-F101
REPEAT
1

10
ENGLISH
NOTE
:
• The sound may be interrupted momentarily when resuming normal playback from the manual search mode. This is
not a malfunction.
2 Use this function to skip forward or backward while listening to the sound.
This function comes in handy for finding the desired spot in the middle of long tracks.
(3) Finding the desired spot while listening to the sound ……………………
[Manual Search]
q
Searching forward
During playback, press and hold in the
7
button.
1
w
Searching backward
• When the button is released,
normal playback resumes
from that point.
Press and hold in the 7 button.
2nd track
3rd track
4th track
(Playback)
Skip Skip Skip Skip Skip
✽ If the end of the last track on the disc is reached
while pressing the
7 button, “ ” appears on
the display and the manual search mode is
canceled.
To resume playback, press and hold in the
6
button
until “ ” turns off and the track number
reappears, then perform another operation.
✽ To move ahead at high speed without listening to
the sound, press the
7 button while in the pause
mode.
During playback, press and hold in the 6
button.
1
• When the button is released,
normal playback resumes
from that point.
Press and hold in the 6 button.
4th track
5th track
6th track
Skip Skip Skip Skip
TRACK
ON / STANDBY
COMPACT DISC PLAYER DCD-F101
REPEAT
1
TRACK
ON / STANDBY
COMPACT DISC PLAYER DCD-F101
REPEAT
1
(Main unit) (Main unit)
✽ If the beginning of the first track on the disc is
reached while pressing the
6 button, “ ”
appears on the display and the manual search
mode is canceled.
To resume playback, press and hold in the
7
button
until “ ” turns off and the track number
reappears, then perform another operation.
✽ To move backward at high speed without listening
to the sound, press the
6 button while in the
pause mode.
(4) Selecting the desired track (remote control unit) ………………………………
[Direct Play]
1
Ex.: To select track 4:
To select track 12:
To select track 30:
✽ To perform the direct play
operation during programmed
playback, first press the direct
button to cancel the programmed
play mode.
(RC-927)
(5) Playing the tracks in the desired order (remote control unit) ………
[Programmed Play]
2 Use this function to select the desired tracks on the disc and play them in the desired order.
2 Up to 30 tracks can be programmed.
2
Press the number and +10 buttons to select the
track to be programmed.
• For example, to program the 3rd track and the
12th track, press , , and .
2+103
123
546
789
10
+10
Use the number buttons and the +10 button to
select the desired track.
Playback starts from the selected track.
CLEAR
123
546
789
10
+10
CD SRS
MDTAPE
TUNING
REPEAT
CALL
PROG/
DIRECT
RANDOM
BAND
RDS
DIMMER
TIME/
PANEL
TIME EDIT
SYSTEM
POWER
OFF ON
STOP PLAY
VOLUME
/SELECT
PRESET
+
1
PROG/
DIRECT
CLEAR
123
546
789
10
+10
CD SRS
MDTAPE
TUNING
REPEAT
CALL
PROG/
DIRECT
RANDOM
BAND
RDS
DIMMER
TIME/
PANEL
TIME EDIT
SYSTEM
POWER
OFF ON
STOP PLAY
VOLUME
/SELECT
SLEEP MODE
TAPE
FUNCTION
PRESET
+
-
1
2
2
3
1
Press the PROG/DIRECT button.
“PROG” lights.
Displays when the 3rd track is set at the first place.
d
Displays the total number of programmed tracks and
total playing time.
Displays when the 12th track is set at the
second place.
Displays the total number of programmed tracks and
total playing time.
after 2 seconds
d
after 2 seconds
3
Press the 1/3 (play/pause) button.
The tracks are played in the programmed order.

11
ENGLISH
(6) Playing the tracks in random order (remote control unit) …………………
[Random Play]
2 Use this function to play all the tracks on the disc once in random order.
2
Press the play button.
• A track is selected
automatically and playback
starts.
(RC-927)
✽ To cancel random playback, press the random
button again. Normal playback resumes.
1
In the stop mode, press the
random button.
• The “RANDOM” indicator
lights.
(RC-927)
✽ If pressed during playback, random play
starts from that track.
• During programmed playback:
The programmed tracks are played in random
order.
• During repeat playback:
The tracks are played once in random order,
then played again in a different order, and this
is repeated.
NOTES:
• The total remaining time is not displayed during random playback.
• Random playback is not possible in the editing mode when the DCD-F101 is connected in a system with the F101
series.
NOTES:
• The entire program is canceled when the
5 (open/close) button is pressed.
• Set the stop mode when cancelling tracks from the program. To cancel the program mode, press the
PROG/DIRECT button.
CLEAR
123
546
789
10
+10
CD SRS
MDTAPE
TUNING
REPEAT
CALL
PROG/
DIRECT
RANDOM
BAND
RDS
DIMMER
TIME/
PANEL
TIME EDIT
SYSTEM
POWER
OFF ON
STOP PLAY
VOLUME
/SELECT
SLEEP MODE
TAPE
FUNCTION
PRESET
+
-
1
2
RANDOM
PLAY
• Press the PROG/DIRECT button again to resume normal playback during the stop mode.
• To cancel the entire program, press the PROG/DIRECT button or cancel the program one by one using the CLEAR
button.
• If you program the wrong track, press the CLEAR button then program the right track. (The last track in the program is
erased each time the CLEAR button is pressed.)
• To confirm the programmed playing order, press the CALL button. The programmed playing order appears in the
display.
Press the CLEAR button with a track number appearing in the display automatically erases that specific track from
Program Play.
Other operations possible during programmed playback.
Such operations as quick search, pause and skip monitor are also possible during programmed playback.
For the quick search function, press the automatic search reverse button (
8
) to move back to the beginning of the
track, then press it again while the time display reads “00:00” to move back to the beginning of the preceding track.
To move ahead to the beginning of the next track, press the automatic search forward button (
9 ) regardless of the
time display.
q Playing tracks repeatedly [One-track Repeat]
1
(7) Repeat Play
Press the repeat button once.
• The “ ” indicator lights.
REPEAT
1
✽ If the repeat button is pressed during playback, the
currently playing track is played repeatedly.
✽ To cancel the one-track repeat mode, press the
repeat button until the “REPEAT” indicator turns
off.
NOTE:
• The one-track repeat mode cannot be set during programmed or random playback.
Press the play button.
• Playback starts.
• Once the selected track is played, the pickup
moves back to the beginning of that track and
the track is repeated.
2
Select the track to be repeated.
3
Press the repeat button once.
This operation is
performed
repeatedly.
2nd track 3rd track 4th track
(RC-927)
TRACK
ON / STANDBY
COMPACT DISC PLAYER DCD-F101
REPEAT
2
3
1
PRESET
+
-
123
546
789
10
+10
or
(RC-927)
CLEAR
123
546
789
10
+10
CD SRS
MDTAPE
TUNING
REPEAT
CALL
PROG/
DIRECT
RANDOM
BAND
RDS
DIMMER
TIME/
PANEL
TIME EDIT
SYSTEM
POWER
OFF ON
STOP PLAY
VOLUME
/SELECT
SLEEP MODE
TAPE
FUNCTION
PRESET
+
-
1
2
3
2
(Main unit)
REPEAT
(RC-927)
REPEAT
(Main unit)
(RC-927)
PLAY
(Main unit)
13

12
ENGLISH
w Playing all the tracks repeatedly [All-track Repeat]
TRACK
ON / STANDBY
COMPACT DISC PLAYER DCD-F101
REPEAT
21
CLEAR
123
546
789
10
+10
CD SRS
MDTAPE
TUNING
REPEAT
CALL
PROG/
DIRECT
RANDOM
BAND
RDS
DIMMER
TIME/
PANEL
TIME EDIT
SYSTEM
POWER
OFF ON
STOP PLAY
VOLUME
/SELECT
SLEEP MODE
TAPE
FUNCTION
PRESET
+
-
1
2
1
Press the repeat button twice.
• The “ ” indicator lights.
REPEAT
ALL
(Main unit)
REPEAT
(RC-927)
REPEAT
2
Press the play button.
(Main unit)
13
(RC-927)
PLAY
✽ The all-track repeat mode can also be set by
pressing the repeat button twice during playback.
✽ If the repeat button is pressed during programmed
playback, the programmed tracks are played
repeatedly.
✽ To cancel the all-track repeat mode, press the
repeat button until the “REPEAT” indicator turns
off.
q
Finding the beginning of a track directly
w
Finding the beginning of a track using the
programmed play mode
2 Use this function to set the pause mode at the
beginning of a track with the direct search operation,
for example when you want to record that track onto a
cassette tape or mini-disc.
1
Press the pause button.
2
✽ To start playback, press the play
button.
✽ To perform this operation during
programmed playback, first press
the direct button to cancel the
programmed play mode.
1
Set the programmed play mode.
✽ Refer to page 10.
2
Press the pause button.
✽ The beginning of the first
programmed track is found
and the pause mode is set.
✽ To start playback, press the play
button.
(RC-927)
(RC-927)
(8) Setting the pause mode at the beginning
of a certain track (remote control unit) …………………………………………………
[Pause]
(RC-927)
PLAY
PLAY
PROG/
DIRECT
CLEAR
123
546
789
10
+10
CD SRS
MDTAPE
TUNING
REPEAT
CALL
PROG/
DIRECT
RANDOM
BAND
RDS
DIMMER
TIME/
PANEL
TIME EDIT
SYSTEM
POWER
OFF ON
STOP PLAY
VOLUME
/SELECT
SLEEP MODE
TAPE
FUNCTION
PRESET
+
-
1
2
2
(RC-927)
CLEAR
123
546
789
10
+10
CD SRS
MDTAPE
TUNING
REPEAT
CALL
PROG/
DIRECT
RANDOM
BAND
RDS
DIMMER
TIME/
PANEL
TIME EDIT
SYSTEM
POWER
OFF ON
STOP PLAY
VOLUME
/SELECT
SLEEP MODE
TAPE
FUNCTION
PRESET
+
-
2
PLAY
PLAY
(RC-927)
Select the track to be played.
(RC-927)
PRESET
+
-
123
546
789
10
+10
or
(RC-927)

13
ENGLISH
SYSTEM FUNCTIONS
11
2 Operation is even easier when the components in the D-F101 series are connected to the DCD-F101 with system
connections. (For instructions on connections, refer to the respective operating instructions of receiver (DRA-F101).
2 The system functions will only work when the components of the D-F101 series are connected. They will not work
with other components.
2 The system function signals for operating the components in the D-F101 series are all output from the receiver (DRA-
F101). Thus, when making system connections, be sure to connect the receiver (DRA-F101).
(1) System connection
(2) Auto power on function (when connected to the D-F101 series components)
2 When the system is set to the standby mode, you can start the playback of disc simply by pressing the play/pause
button.
1
Set the function select
switch on the remote
control to
“CD” position.
(RC-927)
2
Press the play/pause button.
• System’s power turn on and
the function of receiver
automatically switches to
“CD”.
And then, the CD starts
playing.
✽ When a CD is loaded with the DCD-F101 in the
standby mode, CD playback can be started simply
by pressing the DCD-F101’s play button.
RC-927
REMOTE CONTROL UNIT
CLEAR
123
546
789
10
+10
CD SRS
MDTAPE
TUNING
REPEAT
CALL
PROG/
DIRECT
RANDOM
BAND
RDS
DIMMER
TIME/
PANEL
TIME EDIT
SYSTEM
POWER
OFF ON
STOP PLAY
VOLUME
/SELECT
SLEEP MODE
TAPE
FUNCTION
PRESET
+
-
TUNER
CD
MD
TAPE
1
2
(RC-927)
PLAY
TUNER
CD
MD
TAPE
RC-927 (system remote control unit)
(3) Auto function selection (when connected to the D-F101 series)
2 Use this function to switch the function to “CD” and start playing the disc simply by pressing a single button.
1
Press the play/pause button while a unit other
than the DCD-F101 (MD recorder or cassette
deck) is playing.
• Playback on the currently playing unit stops.
At the same time, the receiver’s function
switches to “CD” and the CD starts playing.
✽ To perform this operation from the system
remote control unit, first turn the remote
control unit’s function select switch and set
the function to “CD”.
DCD-F101 (this unit)
(Main unit) (RC-927)
TRACK
ON / STANDBY
COMPACT DISC PLAYER DCD-F101
REPEAT
1
RC-927
REMOTE CONTROL UNIT
CLEAR
123
546
789
10
+10
CD SRS
MDTAPE
TUNING
REPEAT
CALL
PROG/
DIRECT
RANDOM
BAND
RDS
DIMMER
TIME/
PANEL
TIME EDIT
SYSTEM
POWER
OFF ON
STOP PLAY
VOLUME
/SELECT
SLEEP MODE
TAPE
FUNCTION
PRESET
+
-
TUNER
CD
MD
TAPE
1
PLAY
13
RC-927
(system remote
control unit)

14
ENGLISH
(4) Editing functions (when connected to the DRA-F101 and DRR-F101)
2 Use this function to automatically edit the tracks on the CD to fit on the tape to be used for recording.
2 The editing function is set from system remote control unit (RC-927) included with the receiver (DRA-F101).
Example: Recording a disc containing 18 tracks with a playing time of 56 minutes onto a 60-minute cassette tape
1
2
Turn on the power of the receiver.
✽ The system’s power turns on.
Load the CD, then close the
disc holder.
(DRA-F101)
Set the function select switch
to “CD” position.
Press the edit button and select
the length of the tape.
• For example, when using a 60-minute (C-60)
tape, press the edit button (EDIT) four times.
(The tape length is the total length of sides A
and B.)
✽ The display switches as follows each time
the edit button (EDIT) is pressed:
• Approximately 3 seconds after the tape length
is set, the remaining time on side A or B of
the tape appears by turns.
PHONES
SYSTEM
VOLUME
ON / STANDBY
AM-FM STEREO RECEIVER DRA-F101
SOURCE
DIRECT
BANDUPDOWN
TUNING
MEMORY
/ SET
FUNCTION
TIMERTONE RDS
1
TRACK
ON / STANDBY
COMPACT DISC PLAYER DCD-F101
REPEAT
2 6
2
CD SRS
REC
0
1
PLAY
CASSETTE DECK DRR-F101
REC
CD SRS
PLAY
ON / STANDBY
e
DOLBY NR
ON
OFF
REVERSE
MODE
3
3
CLEAR
123
546
789
10
+10
CD SRS
MDTAPE
TUNING
REPEAT
CALL
PROG/
DIRECT
RANDOM
BAND
RDS
DIMMER
TIME/
PANEL
TIME EDIT
SYSTEM
POWER
OFF ON
STOP PLAY
VOLUME
/SELECT
PRESET
+
1
4
5
6
SYSTEM
ON / STANDBY
SYSTEM
POWER
ON
(RC-927)
(DCD-F101)
3
4
Load the cassette tape onto
which you want to record into
the cassette deck, then close
the cassette holder.
5
TIME EDIT
(DRR-F101)
(RC-927)
d
DRA-F101 (receiver)
DCD-F101
DRR-F101 (Cassette deck)
RC-927 (system remote control unit)
NOTES:
• The editing function will not work with discs containing more than 21 tracks.
• Load the cassette tape onto which you want to record into the cassette deck's cassette tray with side A facing up
before starting edited recording. The beginning of the tape is automatically found before recording starts.
• When using a recorded cassette tape for edited recording, recording stops and a blank section is left on side B of
the tape if the tape is longer than the set time, so erase the tape beforehand.
• When the editing function is used for recording, the reverse mode is automatically set to even if the
cassette deck's reverse mode switch is set to , and recording continues on side B after recording on side A is
completed.
• In some cases it may not be possible to record all the tracks on the disc, even if the tape is longer than the disc's
recorded time (because of how the tracks are divided onto sides A and B of the tape). The “OVER” indicator
flashes if there are tracks that cannot be recorded.
• Only the stop button (
2
), time mode button (TIME) and power buttons (ON/STANDBY or POWER) will function
during editing.
• When recording using the editing function, the auto space function is activated and blank spaces of approximately
4 seconds are automatically created between tracks. Because of this, when recording CDs containing for example
recordings of concerts without spaces between tracks, blank spaces will be created in the middle of the piece. In
this case, do not record using the editing function.
5
Press the time button.
TIME/
PANEL
• The remaining time on side B
of the tape appears.
• The display switches
between sides A and B each
time the button is pressed.
(Use this to check the
remaining time for side B).
(RC-927)
6
Press the play button on the DCD-F101.
• Playback on the DCD-F101 and recording on
the cassette tape start simultaneously.
• To cancel the editing mode, press the stop button
(
2
) on the DCD-F101 or the cassette deck to stop
playback of the CD.
The editing mode is not canceled if other buttons
are pressed.
(5) CD synchronized recording (when connected to the D-F101 series)
2 This function allows easy recording of CDs.
2 This function allows easy recording from CD to MD, from CD to Tape.
Refer to the respective operating instruction of each model.
(6) Timer functions (when connected to the DRA-F101)
2 The timer functions of the receiver (DRA-F101) can be used to play CDs at set times.
• Refer to the operating instruction included with the DRA-F101.
(Main unit) (RC-927)
PLAY
13

15
ENGLISH
12
TROUBLESHOOTING
If a problem should arise, first check the following:
1. Are the connections correct?
2. Have you operated the receiver according to the Operating Instructions?
3. Are the speakers, turntable, and other components operating properly?
If this unit is not operating properly, check the items listed in the table below. Should the problem persist, there may be
a malfunction.
Disconnect the power immediately and contact your store of purchase.
Symptom Cause Remedy
Refer to
page
Disc holder does not open
and close.
• Is the power turned on? • Turn on the power.
8~9
Zeros are displayed when a
disc is loaded.
• Is the disc loaded properly?
• Load the disc properly.
9
Play mode is not set when
play button (
1 ) is pressed.
• Is the disc dirty or scratched? • Wipe the dirt off the disc or
replace the disc.
9
No sound is produced, or
sound is distorted.
• Are the output cords properly
connected to the amplifier?
•
Is the amplifier adjusted properly
and set to the CD function?
• Check the connections.
• Adjust the amplifier's controls.
5
—
Specified position of disc is
not played.
• Is the disc dirty or scratched?
9
Programmed play function
does not work.
• Have you set the program
properly?
• Reset the program. 10
Set does not work properly
when operated from the
remote control unit.
• Are the batteries worn?
• Is the remote control unit too
far from the set?
• Replace the batteries with new
ones.
• Move the remote control unit
closer to the set.
7
7
• Wipe the dirt off the disc or
replace the disc.
13
SPECIFICATIONS
AUDIO
Number of Channels: 2 channels
Frequency Response: 2 ~ 20,000 Hz
Dynamic Range: 95 dB
Signal-to-noise Ratio: 102 dB
Harmonic Distortion: 0.005 % (1 kHz)
Separation: 95 dB (1 kHz)
Wow and Flutter: Below measurable limit:
(±0.001 % W. peak)
Output Voltage: 1.8 V
DISCS Compact Disc format
GENERAL CHARACTERISTICS
Power Supply: AC 230 V, 50 Hz
Power Consumption: 10 W
Dimensions: 250 (W) x 81.5 (H) x 265 (D)
Mass: 2.6 kg
*
Design and specifications are subject to change without notice in the course of product improvement.

16
DEUTSCH
INHALTSVERZEICHNIS
z
AUSSTATTUNGSMERKMALE ………………………16
x
VOR INBETRIEBNAHME
……………………………16
c
VORSICHTSMASSNAHMEN ZUR
INSTALLATION
………………………………………16
v
ANSCHLÜSSE
…………………………………………17
b
BEZEICHNUNG DER TEILE UND
DEREN FUNKTIONEN
………………………………18
n
FERNBEDIENUNGSGERÄT
…………………………19
m
VORSICHTSMASSNAHMEN ZUR
HANDHABUNG VON DISCS ……………………19, 20
,
ÖFFNEN UND SCHLIESSEN DER PLATTENLADE
UND EINLEGEN EINER CD ……………
……………
20
.
ABSPIELEN EINER CD ………………………………21
⁄0
ZUSÄTZLICHE FUNKTIONEN …………………21 ~ 24
⁄1
WIEDERGABE ……………………………………25, 26
⁄2
PROBLEMANALYSE
…………………………………27
⁄3
TECHNISCHE DATEN
…………………………………27
Stellen Sie sicher, daß die nachfolgend aufgeführten Zubehörteile dem Hauptgerät beiliegen:
q Stereoaudiokabel ……………………………………1
w System-Anschlußkabel ………………………………1
e Betriebsanleitung ……………………………………1
r Servicestation-Liste ……………………………………1
qw
•
ZUBEHÖRS
1
AUSSTATTUNGSMERKMALE
1. Verstärkter Multilevel ∆
-
∑
D/A-Wandler
Verstärkte Multilevel Geräuschformungs/
∆-
∑
D/A-Wandler mit höherer Auflösung bieten eine
Originalklangfeldreproduktion mit reichem musikalischen Ausdruck.
2. CD-R/RW-Wiedergabe
Dieses Gerät kann finalisierte CD-R/RW-Discs wiedergeben. Beachten Sie jedoch, dass abhängig von der
Aufnahmequalität, die Wiedergabe bestimmter CD-R/RW-Discs unter Umständen nicht möglich ist.
3. Optische Digitalausgangsanschlüsse
Der DCD-F101 ist für eine digitale Signalübertragung mit optischen Digitalausgangsanschlüssen ausgestattet, die eine
Digital-Digital-Aufnahme mit leichter Verminderung der Tonqualität auf MDs und DATs ermöglichen.
4. Praktische Systemfunktionen
Der DCD-F101 ist mit Systemfunktionen wie CD-Synchronaufnahme, autom. Funktionswahl und autom. Einschaltung
ausgestattet, die die Bedienung bei Anschluss an ein System der D-F101-Serie vereinfachen. Außerdem können die
Hauptfunktionen jeder Systemeinheit mit der Systemfernbedienung (RC-927) ausgeführt werden, die dem Receiver
(DRA-F101) beiliegt.
2
VOR INBETRIEBNAHME
Beachten Sie vor der Inbetriebnahme des Gerätes die
nachfolgend aufgeführten Hinweise:
• Vor dem Einschalten des Netzschalters
Vergewissern Sie sich noch einmal, daß alle Anschlüsse
richtig ausgeführt worden sind und es keinerlei
Probleme mit den Anschlußkabeln gibt. Stellen Sie den
Netzschalter vor dem Anschließen bzw. Abtrennen von
Anschlußkabeln stets auf die Standby-Position.
• Transport des Gerätes
Um sowohl Kurzschlüsse als auch eine Beschädigung
der Drähte in den Anschlußkabeln zu vermeiden,
müssen vor einem Transport des Gerätes sowohl das
Netzkabel als auch alle Anschlußkabel zwischen den
einzelnen Audio-Komponenten abgetrennt sein.
• Bewahren Sie diese Betriebsanleitung an einem
sicheren Ort auf.
Bewahren Sie diese Betriebsanleitung nach dem
Durchlesen zusammen mit der Garantiekarte an einem
sicheren Ort auf.
• Beachten Sie bitte, daß die Abbildungen in dieser
Betriebsanleitung für Erklärungszwecke vom
aktuellen Gerätemodell abweichen können.
VORSICHTSMASSNAHMEN ZUR INSTALLATION
Dieses Gerät ist zur Steuerung der internen
Elektronikschaltungen mit einem Mikroprozessor
ausgestattet. Falls dieses Gerät gleichzeitig mit einem
Tuner oder einem Fernsehgerät betrieben wird, kann der
Rundfunkempfang sowohl in Ton und Bild gestört
werden. Beachten Sie folgende Vorsichtsmaßnahmen zur
Vermeidung derartiger Störungen:
• Stellen Sie das Gerät so weit wie möglich entfernt vom
Tuner und Fernsehgerät auf.
• Das Netzkabel und alle anderen am Gerät
angeschlossenen Kabel getrennt von den
Antennenkabeln des Tuners bzw. Fernsehgerätes
verlegen.
3
300 Ω/Ohm Flachbandkabel 75 Ω/Ohm Koaxialkabe
• Insbesondere machen sich bei der Verwendung einer
Zimmerantenne bzw. eines 300 Ω/Ohm
Flachbandkabels Empfangsstörungen schnell
bemerkbar, so daß sich stattdessen der Anschluß an
eine Außenantenne über ein 75 Ω/Ohm Koaxialkabel
wärmstens empfiehlt.

17
DEUTSCH
SPEAKER SYSTEM
SYSTEM
CONNECTOR
PRE
OUT
SUB
WOOFER
RECPB
MDTAPEINPUTS
RECPBDVD
/
AUXCDPHONO
1
AM LOOP ANT.
ANTENNA
2
L
+
-
R
SPEAKER IMPEDANCE 4~16
FM COAX.
75
L
R
AC OUTLET
230V 50Hz
SWITCHED
W MAX
1
3
2
4
4
ANSCHLÜSSE
Anschluss an die D-F101-Serie
2 Wenn ein Anschluss an einen anderen Verstärker als den Receiver der D-F101-Serie erfolgt, ist kein Anschluss 2
erforderlich. Beachten Sie, dass in diesem Fall keine der Systemfunktionen (autom. Stromeinschaltung, usw.)
arbeitet.
• Systemfunktionen wie die autom. Einschaltung können nur aktiviert werden, wenn Stereo-Audiokabel und
Systemkabel zwischen allen Systemkomponenten angeschlossen werden. Vergewissern Sie sich, dass alle
Anschlusskabel zwischen den Einheiten fest angeschlossen sind.
• Wenn ein Systemkabel während des Betriebs abgezogen wird, kann eine Fehlfunktion auftreten. Ziehen Sie unbedingt
das Netzkabel ab, bevor Anschlussänderungen vorgenommen werden.
• Installieren Sie die Komponenten so, dass die Ventilationsöffnungen am Receiver (DRA-F101) nicht blockiert werden.
• Schließen Sie nur Audiogeräte an die AC OUTLET an. Verwenden Sie die AC OUTLET nicht zum Anschluß von
Haartrocknern o.ä.
1
Schließen Sie die LINE OUT-Buchsen des DCD-F101
mittels des beiliegenden Stereoaudiokabels an die
CD-Eingangsbuchsen des
Receivers
an.
2
4
Schließen Sie die SYSTEM CONNECTOR-Buchse (1
oder 2) des DCD-F101 mittels des beiliegenden
Systemkabels an die SYSTEM CONNECTOR-Buchse
(1 oder 2) der anderen Komponenten an.
Schließen Sie dieses Netzkabel des Gerätes an
den Wechselstrom-Ausgang am Receiver (DRA-
F101) oder an den Ausgang einer anderen
Komponente an.
✽ Der DCD-F101 kann auch verwendet werden,
wenn er an einen anderen Receiver als den der D-
F101-Serie angeschlossen wird. In diesem Fall
arbeitet keine der Systemfunktionen (autom.
Einschaltung, usw.).
• Stellen Sie keine andere Komponente direkt auf den
Receiver (DRA-F101).
• Stapeln Sie aus Stabilitätsgründen nicht mehr als drei
Komponenten übereinander.
3
Schließen Sie den optischen Digitalausgangsanschluss
(DIGITAL OPTICAL OUT) des DCD-F101 mittels der
optischen Anschlusskabel an den
Digitaleingangsanschluss (DIGITAL OPTICAL IN 1 oder
2) des MD-Recorders an.
1
18Tr0 2m 46s
-60 40 -30 -20 -12 -6 -2 0
L
dB
R
POWER LOADING MECHANISM
ON / STANDBY
MINIDISC RECORDER DMD-F101
INPUT
-
+
MULTI RECCD SRSEDIT
13
REC LEVEL
/ ENTER
MEMO REC /
CHARACTER
PHONES
SYSTEM
VOLUME
ON / STANDBY
AM-FM STEREO RECEIVER DRA-F101
SOURCE
DIRECT
BANDUPDOWN
TUNING
MEMORY
/ SET
FUNCTION
TIMERTONE RDS
CD SRS
REC
0
1
PLAY
CASSETTE DECK DRR-F101
REC
CD SRS
PLAY
ON / STANDBY
e
DOLBY NR
ON
OFF
TRACK
ON / STANDBY
COMPACT DISC PLAYER DCD-F101
REPEAT
REVERSE
MODE
DRA-F101DMD-F101
DCD-F101 DRR-F101
Netzstecker
(für Modelle für Großbritannien)
Netzstecker
AC 230V, 50 Hz
(In eine Netzsteckdose einstecken)
Receiver
DRA-F101
MD-Recorders
DMD-F101
CD-Spielers
DCD-F101
HINWEISE:
• Schließen Sie das Netzkabel erst dann an, wenn alle
Anschlüsse vorgenommen wurden.
• Vergewissern Sie sich, dass der linke und rechte
Kanal richtig angeschlossen ist (links mit links,
rechts mit rechts).
• Stecken Sie die Stecker fest ein. Unvollständige
Anschlüsse erzeugen Rauschen.
• Beachten Sie, dass das Zusammenbinden von
Stiftsteckerkabeln mit Netzkabeln neben einem
Leistungstransformator Brummen oder Rauschen
erzeugt.
• Warten Sie nach Abziehen des Netzkabels
mindestens 5 Sekunden, bevor Sie es wieder
einstecken.
Empfohlene Systeminstallation
• Installieren Sie die D-F101-Serie wie unten beschrieben,
um Leistung und Stabilität zu gewährleisten.

18
DEUTSCH
BEZEICHNUNG DER TEILE UND DEREN FUNKTIONEN
q
Netzbetriebschalter
(ON/STANDBY)
• Einmaliges Drücken der Taste bewirkt, daß das
Gerät Netzspannung erhält.
• Wird die Taste erneut gedrückt, geht das Gerät in
Bereitschaftsmodus (STANDBY).
• Die Farbe der LED wechselt je nach
Betriebszustand:
Gerät eingeschaltet: grün
Im Bereitschaftsmodus (STANDBY): rot
w
Öffnen-/Schließen-Taste
( 5 OPEN/CLOSE)
• Drücken Sie diese Taste einmal, um die Plattelade
zu öffnen und zweimal, um die Plattenlade zu
schließen.
e
Anzeige
• Siehe Seite 3.
r
Wiederholungstaste (REPEAT)
• Siehe Seite 23.
t
Automatik-/Rückwärts-Taste
( 8 )
• Siehe Seite 21.
y
Manuelle Rückwärts-Suchtaste ( 6 )
• Siehe Seite 22.
u
Manuelle Vorwärts-Suchtaste ( 7 )
• Siehe Seite 22.
i
Automatik-/Manuelle Suche-Vorwärts-
Taste
( 9 )
• Siehe Seite 21.
o
Stopptaste ( 2 )
• Drücken Sie diese Taste zum Stoppen der
Wiedergabe.
!0
Wiedergabe/Pausentaste ( 1/3 )
• Diese Taste dient zum Start dre CD-Wiedergabe.
Bei noch geöffnetem CD-Fach wird dieses
zunächst geschlossen, bevor das Gerät mit der
Wiedergabe beginnt.
• Zur vorübergehenden Unterbrechung der CD-
Wiedergabe. Emeutes Drücken der Taste bewirkt
die Abschaltung der Pausenfunktion, d.h. das
Gerät nimmt die Wiedergabe wieder auf.
!1
Plattenlade
• Drücken Sie die Öffnen-/Schließen-Taste ( 5
OPEN/CLOSE), um die Plattenlade zu öffnen und
zu schließen.
• Die Plattenlade kann auch durch Drücken der
Wiedergabetaste (
1 PLAY) oder der Pausentaste
(
3 PAUSE) geschlossen werden.
5
(1) Frontplatte
!2
Ausgangsbuchsen (LINE OUT)
• Verbinden Sie diese Buchsen mit dem Eingang
Ihres Verstärkers.
• Wenn der DCD-F101 an ein System der D-F101-
Serie angeschlossen wird, schließen Sie
unbedingt diese Buchsen an die CD-
Eingangsbuchsen des Receivers (DRA-F101) an.
!
38
Digitale Ausgangsbuchse
(DIGITAL OUT OPTICAL)
• Digitadaten werden in optischer Form von dieser
Buchse ausgegeben.
• Siehe Seite 17.
!4
Systemanschlüsse
(SYSTEM CONNECTOR 1 und 2)
• Schließen Sie bei Anschluss des DCD-F101 an ein
System der D-F101-Serie diese an Systemkabel
an.
!
5
Netzkabel
• Schließen Sie dieses Netzkabel des Gerätes an
den Wechselstrom-Ausgang am Receiver (DRA-
F101) oder MD-Recorder (DMD-F101) an.
(2) Rückwand
(3) Anzeige
!6
Betriebsanzeigen
•
Diese zeigen die verschiedenen
Betriebsarten an.
• REPEAT:
Diese Anzeigen leuchten nach
jedem Drücken der
Wiederholungstaste wie folgt:
!8
Zeitanzeige
• EDIT:
(Bedienschritte zum Editieren werden mit der
Systemfernbedienung (RC-927) ausgeführt, die
dem Receiver (DRA-F101) beiliegt. Sie können nur
ausgeführt werden, wenn die Komponenten zu
einem System zusammengeschlossen sind.)
• Diese Anzeige leuchtet, wenn Editierschritte am
Cassettenband ausgeführt werden. (Lesen Sie die
Seiten 26)
• PROG:
Diese Anzeige leuchtet während der
Programmierung und der programmierten
Wiedergabe.
•
leuchtet während der Wiedergabe.
blinkt während des manuellen
Suchlaufbetriebes im Wiedergabemodus.
•
leuchtet bei aktiviertem Pausemodus.
blinkt während des manuelllen
Suchlaufbetriebes im Pausemodus.
• RANDOM:
Diese Anzeige leuchtet im
Zufallswiedergabebetrieb.
!7
Anzeigebereich für die Titelnummer
• Wenn eine Disc eingelegt ist
• Im Stopp-Betrieb:
Gesamtanzahl der Titel auf der Disc
• Im Wiedergabebetrieb und im programmierten
Wiedergabebetrieb:
Nummer des gegenwärtig wiedergegebenen
Titels
Abgelaufene Wiedergabezeit des gegenwärtigen Titels
Restzeit des gegenwärtigen Titels
Gesamtrestzeit der Disc
• Die Anzeige ändert sich bei
jedem Drücken der Zeit-Taste
wie folgt:
(RC-927)
(RC-927)
REPEAT
TIME/
PANEL
All off
REPEAT
1
REPEAT
ALL

19
DEUTSCH
Bezeichnung und Funktion der Systemfernbedienungstasten (Die RC-927 liegt dem DRA-
F101 bei.)
2 Die CD-Tasten auf der dem Receiver beiliegenden Systemfernbedienung werden unten erklärt.
2 Tasten, die hier nicht erklärt werden, haben die gleiche Funktion wie die Tasten auf der Fernbedienung der
Haupteinheit.
(Siehe Seiten 3 und 18.)
FERNBEDIENUNGSGERÄT
6 7
VORSICHTSMASSNAHMEN ZUR HANDHABUNG VON DISCS
• Die in nachfolgender Tabelle aufgeführten Discs können mit dem DCD-F101 verwendet werden.
Die entsprechenden Zeichen sind auf den Disc-Etiketten oder an den Buchsen aufgeführt.
Anwendbare
Discs
CD
CD-R
CD-RW
(HINWEIS 1)
Markierung (logo)
Aufgenom-
mene
Signale
Disc-
Größe
Recordable
ReWritable
12 cm
8 cm
Digital-
Audio
HINWEIS 1: Entsprechend der Aufnahme-
Qualität können einige CD-R/RWs
nicht wiedergegeben werden.
Discs
Auf dem DCD-F101 können nur die Discs abgespielt
werden, die mit dem auf Seite 19 aufgeführten Zeichen
versehen sind.
Beachten Sie darüber hinaus, daß Discs mit besonderer
Form (z.B. herzförmige Discs, sechseckige Discs usw.)
nicht auf dem DCD-F101 abgespielt werden können. Der
Versuch derartige Discs wiederzugeben kann
Beschädigungen des Gerätes verursachen.
Handhabung von Discs
Vermeiden Sie beim Einlegen und Herausnehmen von
Discs das Berühren der Disc-Oberflächen.
Achten Sie darauf, daß keine
Fingerabdrücke auf die
Signalfläche gelangen (die in
Regenbogenfarben
schimmernde Seite).
Reinigung von Discs
2
Fingerabdrücke oder Staub auf der Disc können zu
einer Verschlechterung der Ton- und Bildqualität führen
und Wiedergabeausfälle verursachen. Beseitigen Sie
möglicherweise vorhandene Fingerabdrücke und
Schmutz mit einem Tuch.
2
Verwenden Sie für die Reinigung ein im Handel
erhältliches Reinigungsset oder wischen Sie
Fingerabdrücke und Schmutz einfach mit einem
weichen Tuch ab.
Wischen Sie sanft von der
Mitte der Disc nach außen
hin.
Wischen Sie nicht in
kreisförmigen Bewegungen.
HINWEIS:
• Verwenden Sie weder Schallplatten- noch
Antistatiksprays. Auch flüchtige Chemikalien wie
z.B. Benzin oder Farbverdünner dürfen nicht für die
Reinigung benutzt werden.
Schallplatten
-spray
Farbver-
dünner
Benzin
RC-927
REMOTE CONTROL UNIT
CLEAR
123
546
789
10
+10
CD SRS
MDTAPE
TUNING
REPEAT
CALL
PROG/
DIRECT
RANDOM
BAND
RDS
DIMMER
TIME/
PANEL
TIME EDIT
SYSTEM
POWER
OFF ON
STOP PLAY
VOLUME
/SELECT
SLEEP MODE
TAPE
FUNCTION
PRESET
+
-
TUNER
CD
MD
TAPE
Drücken Sie diese Taste, um den
Systemnetz-Bereitschaftsbetrieb
ein- und auszuschalten.
(Sie können diese Einheit nicht
unabhängig ein- und ausschalten.)
Bereitschaftsbetriebs-Taste
(SYSTEM POWER STANDBY)
Zeit-Taste (TIME)
Wiedergabe/Pause-Taste (1/3)
Stopp-Taste (2)
Automatische Vorwärts-
Suchtaste (
9)
Automatische Rückwärts-
Suchtaste (
8)
Funktionswahlschalter
Drücken Sie diese Taste, um das
System einzuschalten.
Sie können diese Einheit nicht
unabhängig ein- und ausschalten.
Netztaste
(SYSTEM POWER ON)
PROG/DIRECT-Taste
(PROG/DIRECT)
CALL-Taste (CALL)
CLEAR-Taste (CLEAR)
Wiederholungstaste (REPEAT)
RANDOM-Taste (RANDOM)
Zeit-Editiertaste (TIME EDIT)
Manuelle Vorwärts-Suchtaste
(
7)
Manuelle Rückwärts-Suchtaste
(
6)
Jedesmal, wenn die Taste
gedrückt wird, wird tie jeweils
letzte Spur des Programms
gelöscht.
Zifferntasten (1~10)
+10-Taste (+10)

20
DEUTSCH
8
ÖFFNEN UND SCHLIESSEN DER PLATTENLADE UND
EINLEGEN EINER CD
1
Drücken Sie den POWER-
Schalter, um das Gerät einzu-
schalten.
2
3
Drücken Sie die 5
OPEN/CLOSE-Taste.
Greifen Sie die CD am Rand und legen Sie diese
in das Platten-fach (berühren Sie dabei nicht die
blanke Seite der CD).
✽ Vergewissern Sie sich, daß die Plattenlade
vollständig geöffnet ist.
✽
Wenn Sie eine CD mit einem Durchmesser von
12 cm einlegen, stellen Sie sicher, daß ihr Rand
in die kreisförmige Aussparung des Plattenfachs
paßt (siehe Abbildung 1). Falls Sie eine CD mit
einem Durchmesser von 8 cm einlegen
möchten, legen Sie diese so ein, daß Sie
innerhalb der inneren kreisförmigen Aussparung
zu liegen kommt (siehe Abbildung 2).
✽
Das CD-Fach kann auch durch
Drücken von (Wiedergabe)-Taste
geschlossen werden. In diesem Fall
startet die Wiedergabe automatisch
mit dem ersten Titel der CD (bzw. mit
dem ersten programmierten Titel,
wenn eine bestimmte Titelfolge
programmiert ist).
HINWEISE:
•
Sollte Ihr Finger beim Schließen der Plattenlade eingeklemmt werden, drücken Sie die
5 OPEN/CLOSE-Taste.
•
Legen Sie keine fremdartigen Gegenstände auf das Plattenfach und legen Sie auch niemals mehr als eine CD
gleichzeitig ein. Andernfalls wird das Gerät nicht richtig funktionieren oder beschädigt.
•
Bewegen Sie die Plattenlade nicht manuell auf oder zu wenn sich das Gerät im ausgeschalteten Zustand befindet,
da dies Fehlfunktionen oder Beschädigung zufolge haben kann.
•
Berühren Sie die Taste nicht mit einem Stift, usw.
4
Drücken Sie die 5
OPEN/CLOSE-Taste, um die
Plattenlade zu schließen.
T
R
A
C
K
O
N
/ S
TA
N
DB
Y
C
O
M
P
A
C
T
D
I
S
C
P
L
A
Y
E
R
D
C
D
-
F
1
0
1
RE
P
EAT
T
R
A
C
K
O
N
/
ST
A
N
D
B
Y
C
O
M
P
A
C
T D
IS
C
PLA
Y
ER
D
CD
-F
10
1
R
E
P
EA
T
Abbildung 1
T
R
A
C
K
O
N
/
ST
A
N
D
B
Y
CO
M
P
A
C
T D
IS
C P
L
AY
E
R D
CD
-F
101
R
E
P
EA
T
Abbildung 2
(Haupteinheit)
(Haupteinheit)
(Haupteinheit)
Disc-Fach
Öffnen/Schließen-Taste
für Platteneinschub
Platteneinschub
Äußeres
Disc-Führung
12 cm-Disc
Inneres
Disc-Führung
8 cm-Disc
• Nach dem Schließen der Plattenlade wird der
Inhalt der CD gelesen und nach einigen
Sekunden die Anzahl der vorhandenen Titel
sowie die Gesamtspieldauer in den Feldern
TRACK No. und TIME angezeigt, die Musiktitel
erscheinen in der Anzeige des
Musikkalenders.
ON / STANDBY
13
(Haupteinheit)
Vorsichtsmaßnahmen zur Handhabung
von Discs
• Achten Sie darauf, daß weder Fingerabdrücke, Fett
noch Schmutz auf die Discs gelangen.
• Achten Sie insbesondere darauf, daß die Discs beim
Herausnehmen aus ihrer Box nicht zerkratzt werden.
• Verbiegen Sie Discs nicht.
• Erhitzen Sie Discs nicht.
• Vergrößern Sie die Öffnung in der Mitte der Disc nicht.
• Beschriften Sie die etikettierte (bedruckte) Seite der
Disc nicht mit einem Kugelschreiber oder Bleistift.
• Auf der Oberfläche der Disc können sich
Wassertropfen bilden, wenn die Disc plötzlich von
einem kalten an einen warmen Ort gebracht wird.
Benutzen Sie in der Nähe von Discs keinen Fön usw..
Vorsichtsmaßnahmen zur Aufbewahrung
von Discs
• Werfen Sie Discs nach der Wiedergabe immer aus
dem Gerät aus.
• Bewahren Sie Discs in ihren dazugehörigen Boxen auf,
um sie so vor Staub, Kratzern und Verformungen zu
schützen.
• Bewahren Sie Discs an keinem der nachfolgend
aufgeführten Orte auf:
1. Orte, an denen die Discs über einen längeren
Zeitraum hinweg direktem Sonnenlicht ausgesetzt
wären.
2. An feuchten oder staubigen Orten.
3. Orte, an denen die Discs Wärme von z.B.
Heizkörpern ausgesetzt wären usw..
Vorsichtsmaßnahmen zur Einlegen von
Discs
• Legen Sie immer nur eine Disc zur Zeit ein. Das
Einlegen von mehreren Discs übereinander kann
sowohl Beschädigungen als auch ein Zerkratzen der
Discs zur Folge haben.
• Legen Sie 8 cm Discs ohne Zuhilfenahme eines
Adapters fest in die Disc-Führung ein. Wenn die Disc
nicht richtig eingelegt ist, kann sie aus der Führung
rutschen und das Disc-Fach blockieren.
• Achten Sie darauf, daß Sie sich beim Schließen des
Disc-Faches nicht die Finger klemmen.
• Legen Sie ausschließlich Discs und keinerlei anderen
Gegenstände in das Disc-Fach ein.
• Legen Sie weder zerbrochene, verbogene noch mit
Klebe reparierte Discs in das Gerät ein.
• Verwenden Sie keine Discs, bei denen der Kleber vom
Etikett freiliegt oder bei denen sich das Etikett
teilweise gelöst hat. Derartige Discs könnten sich im
Spieler verklemmen und Beschädigungen verursachen.
La pagina si sta caricando...
La pagina si sta caricando...
La pagina si sta caricando...
La pagina si sta caricando...
La pagina si sta caricando...
La pagina si sta caricando...
La pagina si sta caricando...
La pagina si sta caricando...
La pagina si sta caricando...
La pagina si sta caricando...
La pagina si sta caricando...
La pagina si sta caricando...
La pagina si sta caricando...
La pagina si sta caricando...
La pagina si sta caricando...
La pagina si sta caricando...
La pagina si sta caricando...
La pagina si sta caricando...
La pagina si sta caricando...
La pagina si sta caricando...
La pagina si sta caricando...
La pagina si sta caricando...
La pagina si sta caricando...
La pagina si sta caricando...
La pagina si sta caricando...
La pagina si sta caricando...
La pagina si sta caricando...
La pagina si sta caricando...
La pagina si sta caricando...
La pagina si sta caricando...
La pagina si sta caricando...
La pagina si sta caricando...
La pagina si sta caricando...
La pagina si sta caricando...
La pagina si sta caricando...
La pagina si sta caricando...
La pagina si sta caricando...
La pagina si sta caricando...
La pagina si sta caricando...
La pagina si sta caricando...
La pagina si sta caricando...
La pagina si sta caricando...
La pagina si sta caricando...
La pagina si sta caricando...
La pagina si sta caricando...
La pagina si sta caricando...
La pagina si sta caricando...
La pagina si sta caricando...
La pagina si sta caricando...
La pagina si sta caricando...
La pagina si sta caricando...
La pagina si sta caricando...
La pagina si sta caricando...
La pagina si sta caricando...
La pagina si sta caricando...
La pagina si sta caricando...
La pagina si sta caricando...
La pagina si sta caricando...
La pagina si sta caricando...
La pagina si sta caricando...
La pagina si sta caricando...
La pagina si sta caricando...
La pagina si sta caricando...
La pagina si sta caricando...
La pagina si sta caricando...
La pagina si sta caricando...
La pagina si sta caricando...
La pagina si sta caricando...
La pagina si sta caricando...
-
 1
1
-
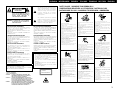 2
2
-
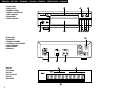 3
3
-
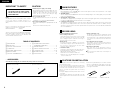 4
4
-
 5
5
-
 6
6
-
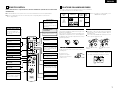 7
7
-
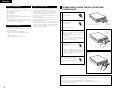 8
8
-
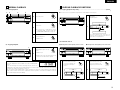 9
9
-
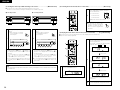 10
10
-
 11
11
-
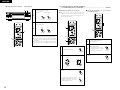 12
12
-
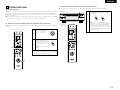 13
13
-
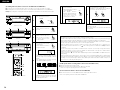 14
14
-
 15
15
-
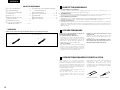 16
16
-
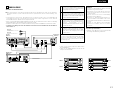 17
17
-
 18
18
-
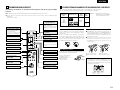 19
19
-
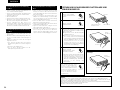 20
20
-
 21
21
-
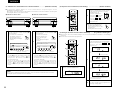 22
22
-
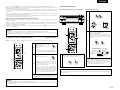 23
23
-
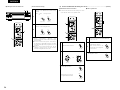 24
24
-
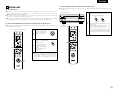 25
25
-
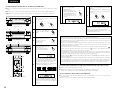 26
26
-
 27
27
-
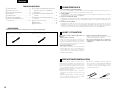 28
28
-
 29
29
-
 30
30
-
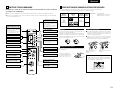 31
31
-
 32
32
-
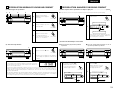 33
33
-
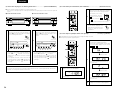 34
34
-
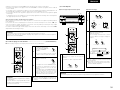 35
35
-
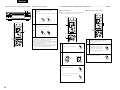 36
36
-
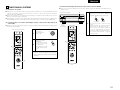 37
37
-
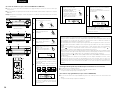 38
38
-
 39
39
-
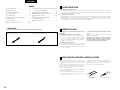 40
40
-
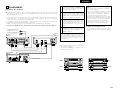 41
41
-
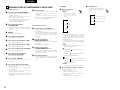 42
42
-
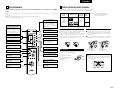 43
43
-
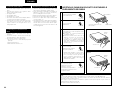 44
44
-
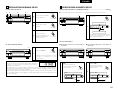 45
45
-
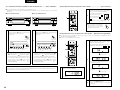 46
46
-
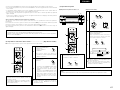 47
47
-
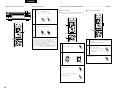 48
48
-
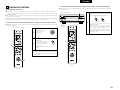 49
49
-
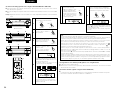 50
50
-
 51
51
-
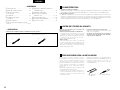 52
52
-
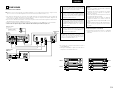 53
53
-
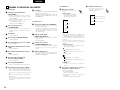 54
54
-
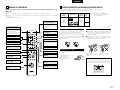 55
55
-
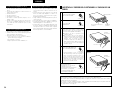 56
56
-
 57
57
-
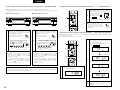 58
58
-
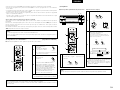 59
59
-
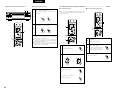 60
60
-
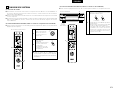 61
61
-
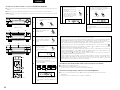 62
62
-
 63
63
-
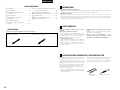 64
64
-
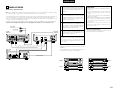 65
65
-
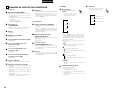 66
66
-
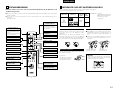 67
67
-
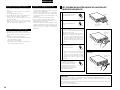 68
68
-
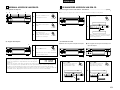 69
69
-
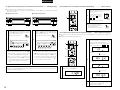 70
70
-
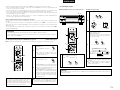 71
71
-
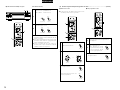 72
72
-
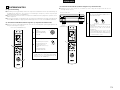 73
73
-
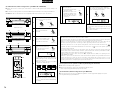 74
74
-
 75
75
-
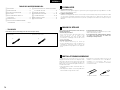 76
76
-
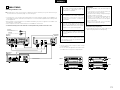 77
77
-
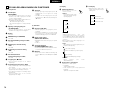 78
78
-
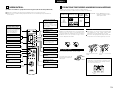 79
79
-
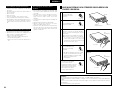 80
80
-
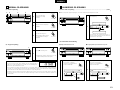 81
81
-
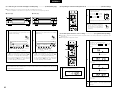 82
82
-
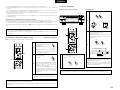 83
83
-
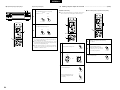 84
84
-
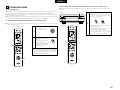 85
85
-
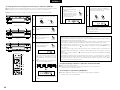 86
86
-
 87
87
-
 88
88
-
 89
89


Denon DCD-F101 Manuale del proprietario
- Categoria
- Lettore CD
- Tipo
- Manuale del proprietario
in altre lingue
- English: Denon DCD-F101 Owner's manual
- français: Denon DCD-F101 Le manuel du propriétaire
- español: Denon DCD-F101 El manual del propietario
- Deutsch: Denon DCD-F101 Bedienungsanleitung
- Nederlands: Denon DCD-F101 de handleiding
- svenska: Denon DCD-F101 Bruksanvisning
Documenti correlati
-
Denon DCD-700AE Manuale utente
-
-
Denon DCD-1500AE Manuale utente
-
-
Technicolor - Thomson DCD-SA1 Manuale utente
-
-
-