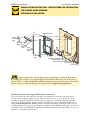
Installation Instructions for Typical Wood Frame Construction.
These instructions were developed and tested for use with typical wood frame wall construction
in a wall system designed to manage water. These instructions are not to be used with any other
construction method. Installation instructions for use with other construction methods, multiple
units or bow and bay windows, may be obtained from Pella Corporation, a local Pella retailer, or by
visiting http://www.pella.com. Building designs, construction methods, building materials, and site
conditions unique to your project may require an installation method different from these instructions
and additional care. Determining the appropriate installation method is the responsibility of you, your
architect, or construction professional.
$PSOFS
'MBTIJOH
5BQF
5PQ
'MBTIJOH
5BQF
$PSOFS
'MBTIJOH
5BQF
'JO
$PSOFS
/BJMJOH'JO
4JMM'MBTIJOH5BQF
4JMM'MBTIJOH5BQF
8BUFS3FTJTUJWF#BSSJFS
4IFBUIJOH
'SBNJOH
4JEF
'MBTIJOH
5BQF
4JEF
'MBTIJOH
5BQF
$IFDLSBJM
Part Number: 802X0104©2009 Pella Corporation
Always read the Pella
®
Limited Warranty before purchasing or installing Pella products.
By installing this product, you are acknowledging that this Limited Warranty is part of the terms of
the sale. Failure to comply with all Pella installation and maintenance instructions may void your Pella
product warranty. See Limited Warranty for complete details at http://warranty.pella.com.
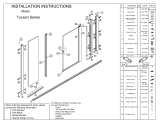
INSTALLATION INSTRUCTION - INSTRUCCIONES DE INSTALACIÓN
FOR DOUBLE-HUNG WINDOW
VENTANA DE GUILLOTINA

REMEMBER TO USE APPROPRIATE PERSONAL PROTECTIVE EQUIPMENT.
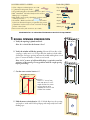
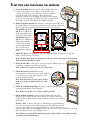
1 ROUGH OPENING PREPARATION
A. Verify the opening is plumb and level.
Note: It is critical that the bottom is level.
Interior
1A
Interior
1B
B. Verify the window will fit the opening. Measure all four sides of the
opening to make sure it is 3/4" larger than the window in both width
and height. On larger openings measure the width and height in several
places to ensure the header or studs are not bowed.
Note: 1-1/2" or more of solid wood blocking is required around the
perimeter of the opening. Fix any problems with the rough opening
before proceeding.
UIDVU
.BLFBDVUVQGSPN
FBDIUPQDPSOFSBUB¡
BOHMFUPBMMPXUIFXBUFS
SFTJTUJWFCBSSJFSUPCF
MBQQFEPWFSUIFmOBUUIF
IFBEPGUIFXJOEPX
TUDVU
OE
DVU
SEDVU
8BUFS3FTJTUJWF#BSSJFS
£
£
&YUFSJPS
C. Cut the water resistive barrier (1C).
D. Fold the water resistive barrier (1D). Fold side flaps into the opening
and staple to inside wall. Fold top flap up and temporarily fasten with
flashing tape.
YOU WILL NEED TO SUPPLY: TOOLS REQUIRED:
s#EDAROR)MPERVIOUSSHIMSSPACERSTO
sGALVANIZEDROOlNGNAILSLB
s#LOSEDCELLFOAMBACKERRODSEALANTBACKERTOFT
s0ELLA
®
SmartFlash
™
foil backed butyl window and door
flashing tape or equivalent
s(IGHQUALITYEXTERIORGRADEPOLYURETHANEORSILICONESEALANT
(1 tube per window)
s'REAT3TUFF
™
Window and Door Insulating Foam Sealant
by the Dow Chemical Company or equivalent low pressure
polyurethane window and door foam - DO NOT use high
PRESSUREORLATEXFOAMS
s)NTERIORTRIMANDORJAMBEXTENSIONSTOFT
s4APEMEASURE
s,EVEL
s3QUARE
s(AMMER
s3TAPLER
s3CISSORSORUTILITYKNIFE
s3EALANTGUN
SEALANT
SEALANT

E. Apply sill flashing tape #1.#UTAPIECEOFmASHINGTAPELONGER
than the opening width. Apply at the bottom of the opening as shown
%SOITOVERHANGSTOTHEEXTERIOR
Note: The tape is cut 12" longer than the width so that it will
extend 6" up each side of the opening.
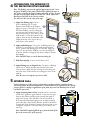
2 WINDOW PREPARATION
A. Remove plastic wrap and cardboard packaging from window. DO NOT remove plastic
shipping spacers located between the window sash and frame. The shipping spacers will
help keep the window square during installation. DO NOT unlock or open the window
until it is fully fastened.
Note: If screens, grilles or hardware are removed from the window
at this time, label them and store them in a protected area.
2C
B. Designer units with half screen only:
1. Remove the screen from the window.&ROMTHEEXTERIOR
pull one side of the screen near the shipping clips until the
clips disengage from the window.
Rotate the screen shipping clipsTOWARDTHEEXTERIOROFTHE
screen (in the direction of the arrows) until they snap free
from the screen.
3. Set the screen aside in a safe location.
4. Discard the screen shipping clips.
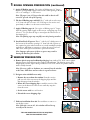
F. Tab the sill flashing tape and fold. Cut 1" wide tabs at each corner
FROMEACHSIDEOFCORNER&&OLDTAPETOTHEEXTERIORAND
PRESSlRMLYTOADHEREITTOTHEWATERRESISTIVEBARRIER
C. Fold out installation fin to 90°. Be careful not to remove or
TEARTHElNCORNERS
Note: If the fin is not at 90
°, the window will not line up
correctly on the interior.
'Apply sill flashing tape #2.#UTAPIECEOFmASHINGTAPELONGER
than the opening width. Apply at the bottom, overlapping tape #1 by
ATLEAST$ONOTALLOWTHETAPETOEXTENDPASTTHEINTERIORFACEOF
THEFRAMING'
Note: The flashing tape may not fully cover the framing members.
(Install and level sill spacers. Place 1" wide by 3/8" thick spacers on
THEBOTTOMOFTHEWINDOWOPENINGFROMEACHSIDE3PACERSARE
also required at points where windows are joined in multiple window
applications. Add shims as necessary to ensure the spacers are level.
Once level, attach spacers and shims to prevent movement.
Note: Improper placement of shims or spacers may result in
bowing the bottom of the window.
£
TWO OR MORE PEOPLE WILL BE REQUIRED
FOR THE FOLLOWING STEPS.
%*4$"3%
164)
%*4$"3%
164)
4IJQQJOH
$MJQ
ÓÓ
Ó£
1VMMTDSFFOOFBS
TIJQQJOHDMJQ
£
£
£
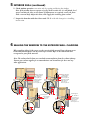
1 ROUGH OPENING PREPARATION (continued)

D. Verify the sill is flat ONTHEEXTERIOREDGENOTBOWEDORHUMPEDPRIORTO
completing attachment of window to opening.
Note: If the sill is not flat screen fit issues may result.
A. Insert the windowFROMTHEEXTERIOROFTHEBUILDING0LACETHE
bottom of the window on the spacers at the bottom of the
opening, then tilt the top into position. Center the window
between the sides of the opening to allow clearance for
SHIMMINGANDINSERTONEROOlNGNAILINTHElRSTHOLEFROMTHE
CORNERONEACHENDOFTHETOPNAILINGlN4HESEAREUSEDTOHOLD
the window in place while shimming it plumb and square.
B. Plumb and square window. Place shims 1" from the bottom and top of
the window between the window and the sides of the opening. Adjust the
shims as required to plumb and square the window in the opening.
For windows up to 53"
tall: Place an additional
shim at the midpoint of
each side of the window.
For windows over 53"
tall: Place two additional
shims along each side
of the window, evenly
spacing them between
the top and bottom
shims and the midpoint
shim.
C. Adjust the shims until the window sides are straight and the space between the sash and
frame is equal from top to bottom.
Note: DO NOT shim above the window or in the space between the spacers at the bottom
of the window. DO NOT over shim.
3 SETTING AND FASTENING THE WINDOW
&YUFSJPS7JFX
Î
Î
&YUFSJPS7JFX
£
Óä Îä
{ä
xä
Èä Çä
Ó
Î
-
Î
Exterior View
3A
Interior View
3B
For windows over 53” tall.
Interior View
3B
3B
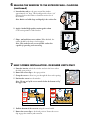
E. Check the interior reveal. Make sure the
measurement from the interior face of the window
to the interior face of the wall is equal at several
points around the window.
Note: If the dimensions are not equal, check to
make sure the fins are folded out to 90° at all
points.
F. Fasten the window to openingBYDRIVINGGALVANIZEDROOlNGNAILSINTO
EACHPREPUNCHEDHOLEINTHENAILINGlN
Note: Make sure the fin corner is lying as flat as possible.
'Check window operation. Cut the checkrail bands and remove the
shipping spacers. Open and close the window a few times to check for
proper operation. Make sure the window will tilt correctly. Close and lock
the window.
ProLine
®
only:4OREMOVESIDESPACERSSLIDETHEMUPTOAPPROXIMATELY
above the bottom sash. Lift the clip by the interior leg and rotate upward
TOREMOVE2AISETHEBOTTOMSASHAPPROXIMATELYANDTILTTHESASHINBY
depressing the jamb liner and pulling inward on the top corners of the sash. Remove the sash
clips and return the sash to its original position.
Note: If there are any problems with the operation of the window, recheck shim locations
and adjust for plumb and square.

5 INTERIOR SEAL
Caution: Ensure use of low pressure polyurethane window and door insulating foams
and strictly follow the foam manufacturer’s recommendations for application. Use of high
pressure foams or improper application of the foam may cause the window frame to bow
and hinder operation.
A. Apply insulating foam sealant. From the interior, insert the
NOZZLEOFTHEAPPLICATORAPPROXIMATELYDEEPINTOTHESPACE
between the window and the rough opening and apply a 1"
DEEPBEADOFFOAM4HISWILLALLOWROOMFOREXPANSIONOF
THEFOAMANDWILLMINIMIZESQUEEZEOUT)FUSINGINSULATING
FOAMOTHERTHAN'REAT3TUFF7INDOWAND$OOR)NSULATION
Foam by the Dow Chemical Company, allow the foam to cure
COMPLETELYUSUALLYTOHOURSBEFOREPROCEEDINGTOTHE
NEXTSTEP
Note: DO NOT completely fill the space from the back of the
fin to the interior face of the opening.
Interior
5A
A. Apply side flashing tape. Cut two
pieces of flashing tape 4" longer
than the frame height of the window.
!PPLYONEPIECETOEACHSIDEONTO
THEFRAMECLADDINGOVERTHENAILINGlN
and onto the water resistive barrier. The
TAPESHOULDEXTEND" above the top of the
WINDOWANDBELOWTHEBOTTOMOFTHE
WINDOW0RESSTHETAPEDOWNlRMLYWHILE
FOLDINGDOWNTHEEXCESSTAPEATTHETOP
and bottom of the window.
B. Apply top flashing tape. Cut a piece of flashing tape long
ENOUGHTOGOACROSSTHETOPOFTHEWINDOWANDEXTENDAT
least 1" past the side flashing tape on both sides. Apply the
TAPEONTOTHEFRAMECLADDINGOVERTHETOPNAILINGlN
as shown. Fold the overlapping tape down, and press all tape
DOWNlRMLY
Note: DO NOT tape or seal the bottom nailing fin.
C. Fold down top flap of water resistive barrier (4C).
D. Apply flashing tape to diagonal cuts. Cut pieces of flashing
tape at least 1" longer than the diagonal cuts in the water
resistive barrier. Apply the tape covering the entire diagonal
cut in the water resistive barrier at both upper corners of the
window.
Note: Be sure to overlap the top corners (4D).
Note: The flashing tape must be applied approximately 1/2" onto
the frame cladding at the jambs and head. Pre-folding the tape at
1/2" before removing the paper backing will make it easier to apply
the tape correctly. If the siding is less than 1/2" thick, adjust the
dimension of the fold so the exterior sealant
line will cover the exterior edge of the tape.
4
INTEGRATING THE WINDOW TO
THE WATER RESISTIVE BARRIER
&YUFSJPS7JFX
{
&YUFSJPS7JFX
{
{
&YUFSJPS7JFX
{
{
{

6 SEALING THE WINDOW TO THE EXTERIOR WALL CLADDING
When applying siding, brick veneer or other exterior finish material, leave adequate space
between the window frame and the material for sealant. Refer to the illustration that
corresponds to your finish material.
Note: The sealant details shown are standard recommendations from the sealant industry.
Contact your sealant supplier for recommendations and instructions for these and any
other applications.
B. Check window operation (vent units only) by opening and closing the window.
Note: If the window does not operate correctly, check to make sure it is still plumb, level,
square and that the sides are not bowed. If adjustments are required, remove the foam
with a serrated knife. Adjust the shims, and reapply the insulating foam sealant.
800%
4*%*/(
$MFBSBODF
4FBMBOUUZQJDBM
*OTVMBUJOH
GPBN
"DDFTTPSZ
(SPPWF
#3*$,7&/&&3
$MFBSBODF
#BDLFS3PEBOE
4FBMBOUUZQJDBM
1FSJNFUFS4FBMBOU
NVTUFYUFOEUP
SPPNTJEFPG
"DDFTTPSZ(SPPWF
"DDFTTPSZ(SPPWF
*OTVMBUJOH
GPBN
.JO
7*/:-45&&-
4*%*/(
$MFBSBODF
#BDLFS3PEBOE
4FBMBOUUZQJDBM
*OTVMBUJOH
GPBN
1FSJNFUFS4FBMBOU
NVTUFYUFOEUP
SPPNTJEFPG
"DDFTTPSZ(SPPWF
"DDFTTPSZ(SPPWF
.JO
800%4*%*/(
8*5)53*.
$MFBSBODF
*OTVMBUJOH
GPBN
1FSJNFUFS4FBMBOU
NVTUFYUFOEUP
SPPNTJEFPG
"DDFTTPSZ(SPPWF
4FBMBOUUZQJDBM
.JO
"DDFTTPSZ(SPPWF
C. Inspect the foam for voids after it has cured. Fill all voids with foam prior to installing
interior trim.
5 INTERIOR SEAL (continued)

A. From the interior, unlock the window and raise the lower sash to
the fully open position.
B. Rotate the screen clips to the open position.
C. Grasp the screen to allow it to pass through the lower sash opening.
D. Position the screen into the window.
Note: The top rail of the screen must be below the bottom rail of
the upper sash.
Ç
$30444&$5*0/0'$)&$,3"*-
4DSFFO
5PQ
3BJM
6QQFS
4BTI
#PUUPN
3BJM
Ç
$30444&$5*0/0'+".#-08&34"4)
4DSFFO
$MJQ
8JOEPX
+BNC
&YUSVTJPO
Ç
E. Pull the bottom of the screen in using the screen handle.
A. Insert backer rod into the space around the window
APPROXIMATELYDEEP4HISSHOULDPROVIDEATLEASTA
CLEARANCEBETWEENTHEBACKERRODANDTHEEXTERIORFACEOF
the window.
Note: Backer rod adds shape and depth for the sealant line.
B. Apply a bead of high quality exterior grade sealant
to the entire perimeter of the window.
!
6B
C. Shape, tool and clean excess sealant.7HENlNISHEDTHE
sealant should be the shape of an hourglass.
Note: This method creates a more flexible sealant line
capable of expanding and contracting.
F. Rotate the screen clips to the closed position. Ensure the screen
CLIPENGAGESTHEWINDOWJAMBEXTRUSION
7 HALF SCREEN INSTALLATION - DESIGNER UNITS ONLY:
6 SEALING THE WINDOW TO THE EXTERIOR WALL CLADDING
(continued)

INTERIOR FINISHING
)FPRODUCTSCANNOTBElNISHEDIMMEDIATELYCOVERWITHCLEARPLASTICTOPROTECTFROMDIRT
DAMAGEANDMOISTURE2EMOVEANYCONSTRUCTIONRESIDUEBEFORElNISHING3ANDALLWOODSURFACES
LIGHTLYWITHGRITORlNERSANDPAPER$/./4USESTEELWOOL"%#!2%&5,./44/
3#2!4#(4(%',!332EMOVESANDINGDUST
0ELLAPRODUCTSMUSTBElNISHEDPERTHEBELOWINSTRUCTIONSFAILURETOFOLLOWTHESEINSTRUCTIONS
voids the Limited Warranty.
s/NCASEMENTANDAWNINGSITISOPTIONALTOPAINTSTAINORlNISHTHEVERTICALANDHORIZONTAL
sash edges.
s/NSINGLEHUNGANDDOUBLEHUNG$/./4PAINTSTAINORlNISHTHEVERTICALSASHEDGESANY
lNISHONTHEVERTICALSASHEDGESMAYCAUSETHESASHTOSTICKITISOPTIONALTOPAINTSTAINOR
lNISHTHEHORIZONTALSASHEDGES
s/NPATIODOORSITISOPTIONALTOPAINTSTAINORlNISHTHEVERTICALANDHORIZONTALPANELEDGES
Note: To maintain proper product performance do not paint, finish or remove the weather-
stripping, mohair dust pads, gaskets or vinyl parts. Air and water leakage will result if
these parts are removed. After finishing, allow venting windows and doors to dry completely
before closing them.
0ELLA#ORPORATIONISNOTRESPONSIBLEFORINTERIORPAINTANDSTAINlNISHIMPERFECTIONSFORANY
PRODUCTTHATISNOTFACTORYAPPLIEDBY0ELLA#ORPORATION5SEOFINAPPROPRIATElNISHESSOLVENTS
brickwash, or cleaning chemicals will cause adverse reactions with window and door materials
and voids the Limited Warranty.
&ORADDITIONALINFORMATIONONlNISHINGSEETHE0ELLA/WNERgS-ANUALORGOTOwww.pella.com.
CARE AND MAINTENANCE
Care and maintenance information is available in the Pella Owner’s Manual. You can obtain
an owner’s manual by contacting your local Pella retailer. This information is also available
on www.pella.com.
EXTERIOR FINISH
4HEEXTERIORFRAMEANDSASHAREPROTECTEDBYALUMINUMCLADDINGWITHOURTOUGH%NDURA#LAD
®
OR%NDURA#LAD0LUSBAKEDONFACTORYlNISHTHATNEEDSNOPAINTING#LEANTHISSURFACEWITHMILD
soap and water. Stubborn stains and deposits may be removed with mineral spirits. DO NOT use
abrasives. DO NOT scrape or use tools that might damage the surface.
5SEOFINAPPROPRIATElNISHESSOLVENTSBRICKWASHORCLEANINGCHEMICALSWILLCAUSEADVERSE
reactions with window and door materials and voids the Limited Warranty.
IMPORTANT NOTICE
"ECAUSEALLCONSTRUCTIONMUSTANTICIPATESOMEWATERINlLTRATIONITISIMPORTANTTHATTHEWALL
system be designed and constructed to properly manage moisture. Pella Corporation is not
RESPONSIBLEFORCLAIMSORDAMAGESCAUSEDBYANTICIPATEDANDUNANTICIPATEDWATERINlLTRATION
DElCIENCIESINBUILDINGDESIGNCONSTRUCTIONANDMAINTENANCEFAILURETOINSTALL0ELLAPRODUCTSIN
ACCORDANCEWITH0ELLASINSTALLATIONINSTRUCTIONSORTHEUSEOF0ELLAPRODUCTSINWALLSYSTEMSWHICH
do not allow for proper management of moisture within the wall systems. The determination of the
suitability of all building components, including the use of Pella products, as well as the design and
installation of flashing and sealing systems are the responsibility of the Buyer or User, the architect,
contractor, installer, or other construction professional and are not the responsibility of Pella.
Pella products should not be used in barrier wall systems which do not allow for proper
MANAGEMENTOFMOISTUREWITHINTHEWALLSYSTEMSSUCHASBARRIER%XTERIOR)NSULATIONAND&INISH
3YSTEMS%)&3ALSOKNOWNASSYNTHETICSTUCCOOROTHERNONWATERMANAGEDSYSTEMS%XCEPT
INTHESTATESOF#ALIFORNIA.EW-EXICO!RIZONA.EVADA5TAHAND#OLORADOPella makes no
warranty of any kind on and assumes no responsibility for Pella windows and doors installed
in barrier wall systems. In the states listed above, the installation of Pella Products in barrier
wall or similar systems must be in accordance with Pella’s installation instructions.
0RODUCTMODIlCATIONSTHATARENOTAPPROVEDBY0ELLA#ORPORATIONWILLVOIDTHE,IMITED7ARRANTY
-
 1
1
-
 2
2
-
 3
3
-
 4
4
-
 5
5
-
 6
6
-
 7
7
-
 8
8