
Clover Mobile
Feature Guide

English
Deutsch
Español
Français
Italiano
Nederlands
Polski
1
14
28
42
56
70
84

1 Clover Mobile Feature Guide English 2
We are continuously
improving our software.
To see the latest version
of this guide, visit
clover.com/setup.
In Europe, visit eu.clover.com/setup
This guide describes
Clover Mobile’s hardware
and software features.

3 Clover Mobile Feature Guide English 4
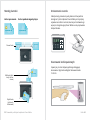
Clover Mobile is a powerful Point of Sale
device that goes wherever you want in your
store (and beyond). Its integrated hardware
lets you take payments, scan inventory, and
run your day-to-day business operations
where you choose.
Whether it is in your hand or on the
countertop or wall, Clover Mobile securely
enables credit and debit card transactions
via swipe (MSR), insert (EMV Chip), or tap
(EMV Contactless).
Clover Mobile is estimated to fully charge in less than
4.5 hours via Clover USB wall charger or with Clover
Mobile Dock.
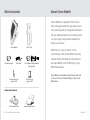
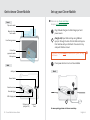
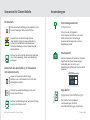
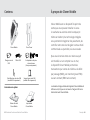
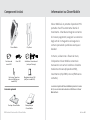
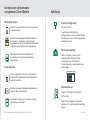
What’s included About Clover Mobile
Clover Mobile Clover Clip
Clover Mobile Dock Clover Mobile Printer
USB wall charger
SIM door eject pin
(only for 3G)
SIM card tray
(only for 3G)
USB cable
Optional Accessories
2 international plug adapters
(Europe only)

5 Clover Mobile Feature Guide English 6
3456
9012 3
9
9
456
9012 34
9
9
3456
3456
9012 34
9012 34
9
9
9
9
1234 5678 9012 3456
4 5678 9012 34
1234 5678 9012 3456
5678 9012 3
1234 5678 90123 456
1234 5678 9012 3456
5678 90123 4
5678 9012 34
1234
3456
012 3
90
5678
9
1234
456
34
2 3
5678 901
12
1234
1234
3456
3456
012 34
012 34
9012
9012 3
5678 901
5678 901
9012
9012
For more pairing options visit clover.com/setup.
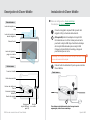
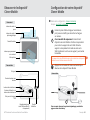
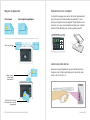
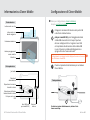
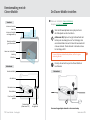
Front
Back
Back
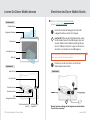
Get to know Clover Mobile Set up your Clover Mobile
A SIM card tray must always be inserted, even if you’re not using
a SIM card.
Chip card reader
Magnetic stripe
card reader
Front facing camera
Microphone
Contactless
payment reader
Audio jack
Power button
USB charger port
Lanyard
hook
SIM card slot
(only for 3G)
Barcode scanner
Barcode trigger
Video set up: clover.com/setup
Europe: eu.clover.com/setup
1
3
2
1
3
2
Plug USB wall charger into USB charger port and
power source
Press power button to turn on Clover Mobile
(Only for 3G) Open SIM card tray using SIM door
eject pin through the hole. Pick the SIM card tray size
that matches with your SIM card. Place card on tray
and push SIM door closed.

7 Clover Mobile Feature Guide English 8
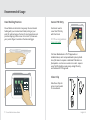
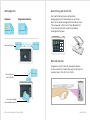
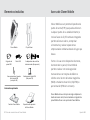
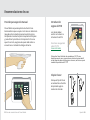
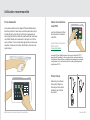
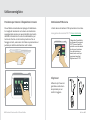
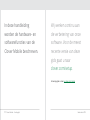
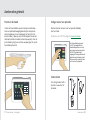
Recommended Usage
Hand Holding Position
Clover Mobile can be held in many ways. We recommend
holding with your non-dominant hand (resting on your
wrist) for optimal range of motion for card acceptance and
precision tapping on the screen. For correct t, make sure
your pointer nger is located on the barcode trigger.
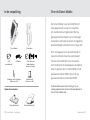
Secure PIN Entry
Customers need to
cover their PIN Entry
with their hand.
PCI PTS security guidelines:
clover.com/setup
12 3
45 6
78 9
00 0
1
2
3
4
0
5
6
7
8
00
4
5
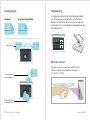
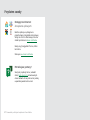
Clover Clip
Slide Clover Clip into
apron or pant pocket
for convenience.
The Clover Mobile device is PCI PTS approved as a
handheld device, and is not provided with a privacy shield.
Use of this device to capture a cardholder’s PIN while in a
xed position - such as on a counter or in a dock - requires
use of the PIN shield to ensure privacy during PIN entry
and continued PCI PTS approval.

9 Clover Mobile Feature Guide English 10
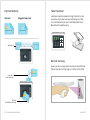
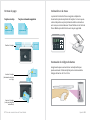
Table Placement
Landscape orientation allows full range of motion for card
acceptance. If your main use case is stationary on a table,
it is recommended to pair your Clover Mobile with Clover
Mobile Dock for added security.
Barcode Scanning
Ensure you are in an app where scanning can be performed.
Optimal barcode scanning range: 4-12 inches (10cm-30cm).
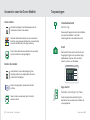
Payment Methods
Chip Card
Insert Card
(chip card only)
Magnetic Stripe Card
Tap Card
(contactless card only)
Swipe Card
1234 5678 9012 3456
1234 5678 9012 3456
1234 5678 9012 3456
1234 5678 9012 3456
1234 5678 9012 3456
1234 5678 9012 3456
1234 5678 9012 3456
1234 5678 9012 3456
1234 5678 9012 3456
1234 5678 9012 3456
1234 5678 9012 3456
1234 5678 9012 3456
2
2
2
2
1234
5678
9012
3456
1234
5678
9012
3456

11 Clover Mobile Feature Guide English 12
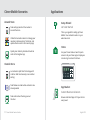
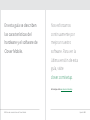
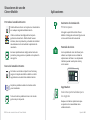
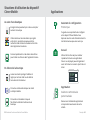
Clover Mobile Scenarios Applications
Around Store
Outside Store
Take card payments at the counter or
around the store.
Utilize the barcode scanner to manage your
inventory: add new items, nd items, and
update stock counts in the Inventory app.
Quickly scan items by barcode to build an
order in the Register app.
Let customers split their bill and pay with
credit or debit card securely in an outdoor
setting.
Take follow-on orders when customers are
already seated.
Take orders when the line goes out
the door.
Setup Wizard
Let’s Get Started
This is your guide for setting up Clover
Mobile. Your activation code is in your
welcome email.
Home
Use your Clover Home screen for quick
access to all your Clover apps. Employees
can also log in and out from here.
App Market
Custom Business Solutions
Browse and install apps to t your store’s
every need.

13 Clover Mobile Feature Guide Deutsch 14
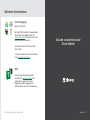
Useful Resources
Web Access
Manage Your Apps
Some apps allow you to access them via
your web browser. We’ve put shortcuts to
these web pages at clover.com/home.
Please use Chrome, Safari, or Firefox.
In Europe, visit eu.clover.com/home
Need Help?
Visit help.clover.com, use the Help app,
or call us anytime at the phone number
given in your welcome email.
Funktionsübersicht Clover Mobile

15 Funktionsübersicht Clover Mobile Deutsch 16
Unsere Software
wird fortlaufend
aktualisiertund optimiert.
Auf clover.com/setup
nden Sie die aktuelle
Version dieser Übersicht.
Für Europa nden Sie diese auf eu.clover.com/setup.
Dieses Handbuch
beschreibt die Hardware-
und Softwarefunktionen
von Clover Mobile.

17 Funktionsübersicht Clover Mobile Deutsch 18
Clover Mobile ist ein leistungsstarkes POS-Gerät,
das Sie in Ihrem Geschäft oder mobil vielseitig
einsetzen können. Mit seiner integrierten
Hardware können Sie an jedem Ort Zahlungen
annehmen, Bestände überprüfen und Ihre
alltäglichen Geschäfte abwickeln.
Ob direkt in Ihrer Hand, auf dem Ladentisch
oder an der Wand: Mit Clover Mobile können
Kreditkarten- und Debitkartentransaktionen
sicher mit Magnetstreifenkarten, EMV-
Chipkarten und kontaktlosen Karten
durchgeführt werden.
Clover Mobile kann mit dem USB-Ladekabel oder über
die Clover Mobile-Dockingstation aufgeladen werden. Der
Ladevorgang dauert üblicherweise maximal 4,5Stunden.
Lieferumfang Übersicht über Clover Mobile
Clover Mobile Clover-Clip
Clover Mobile-
Dockingstation
Clover Mobile-Drucker
USB-Ladegerät
Auswurfnadel für SIM-Klappe
(nur für 3G)
SIM-Kartenhalter
(nur für 3G)
USB-Kabel
Optionales Zubehör
2 internationale Steckeradapter
(nur Europa)

19 Funktionsübersicht Clover Mobile Deutsch 20
3456
9012 3
9
9
456
9012 34
9
9
3456
3456
9012 34
9012 34
9
9
9
9
1234 5678 9012 3456
4 5678 9012 34
1234 5678 9012 3456
5678 9012 3
1234 5678 90123 456
1234 5678 9012 3456
5678 90123 4
5678 9012 34
1234
3456
012 3
90
5678
9
1234
456
34
2 3
5678 901
12
1234
1234
3456
3456
012 34
012 34
9012
9012 3
5678 901
5678 901
9012
9012
Weitere Optionen in Bezug auf das Koppeln von Geräten nden
Sie auf clover.com/setup.
Vorderansicht
Rückansicht
Rückansicht
Lernen Sie Clover Mobile kennen Einrichten des Clover Mobile-Geräts
Es muss immer ein SIM-Kartenhalter eingeschoben werden, selbst
dann, wenn Sie keine SIM-Karte verwenden.
Chipkartenleser
Magnetstreifenleser
Frontkamera
Mikrofon
Kontaktloser Leser
Audio-Buchse
Ein-/Aus-Taste
USB-
Ladegerätanschluss
Aufhängung für
Trageband
SIM-Kartensteckplatz
(nur 3G)
Barcode-Scanner
Barcode-Auslöser
Video zur Einrichtung: clover.com/setup
Europa: eu.clover.com/setup
1
3
2
Verbinden Sie das USB-Ladegerät mit dem USB-
Ladegerätanschluss und der Stromquelle.
Drücken Sie die Ein-/Aus-Taste, um das Clover
Mobile-Gerät einzuschalten.
(nur für 3G) Önen Sie den SIM-Kartenhalter, indem
Sie die Auswurfnadel für die SIM-Klappe in das Loch
stecken. Wählen Sie die SIM-Kartenhaltergröße aus,
die Ihrer SIM-Karte entspricht. Legen Sie die Karte in
den Halter, und drücken Sie die SIM-Klappe zu.
1
3
2

21 Funktionsübersicht Clover Mobile Deutsch 22
Empfehlungen für die Verwendung
Halteposition
Clover Mobile kann ganz unterschiedlich gehalten
werden. Es wird jedoch empfohlen, das Gerät in der nicht
dominanten Hand (auf dem Handgelenk auiegend) zu
halten. So erzielen Sie einen optimalen Bewegungsbereich
für das Akzeptieren von Karten und für präzise Berührungen
auf dem Bildschirm. Achten Sie darauf, dass Ihr Zeigenger
auf dem Bedienelement für den Barcode-Scanner liegt.
Sichere PIN-Eingabe
Kunden sollten die PIN-
Eingabe mit ihrer Hand
verdecken.
PCI PTS-
Sicherheitsrichtlinien:
clover.com/setup
Clover-Clip
Befestigen Sie den
praktischen Clover-Clip
an einer Schürze oder
Hosentasche.
12 3
45 6
78 9
00 0
1
2
3
4
0
5
6
7
8
00
4
5
Das Clover Mobile-Gerät wurde nach PCI PTS als tragbares Gerät
zugelassen und wird ohne Sichtschutz geliefert. Durch die Verwendung
des Geräts für Zahlungen auf einem Tisch, einer Theke oder in einem
Dock wird die PCI PTS-Zulassung ungültig.

23 Funktionsübersicht Clover Mobile Deutsch 24
Ausrichtung auf dem Tisch
Das Querformat bietet einen umfassenden
Bewegungsbereich für das Akzeptieren von Karten.
Wenn Sie das Gerät vorwiegend feststehend auf einem
Tisch verwenden, sollten Sie Ihr Clover Mobile-Gerät
für noch mehr Sicherheit mit der Clover Mobile-
Dockingstation koppeln.
Barcode-Scanner
Vergewissern Sie sich, dass die verwendete App das
Scannen unterstützt. Ideale Entfernung für das Scannen
eines Barcodes: 10 bis 30cm (4–12 Zoll)
Zahlungsarten
Chipkarte
Karte einführen
(nur Chipkarte)
Magnetstreifenkarte
Karte kurz auegen
(nur kontaktlose Karten)
Karte durchziehen
1234 5678 9012 3456
1234 5678 9012 3456
1234 5678 9012 3456
1234 5678 9012 3456
1234 5678 9012 3456
1234 5678 9012 3456
1234 5678 9012 3456
1234 5678 9012 3456
1234 5678 9012 3456
1234 5678 9012 3456
1234 5678 9012 3456
1234 5678 9012 3456
2
2
2
2
1234
5678
9012
3456
1234
5678
9012
3456

25 Funktionsübersicht Clover Mobile Deutsch 26
Szenarien für Clover Mobile Anwendungen
Im Geschäft
Außerhalb des Geschäfts (z. B. Restaurant
mit Außenbereich)
Wickeln Sie Kartenzahlungen am Ladentisch oder
an einer beliebigen Stelle im Geschäft ab.
Verwalten Sie mit dem Barcode-Scanner
Ihren Bestand: Fügen Sie neue Artikel hinzu,
suchen Sie nach Artikeln und aktualisieren
Sie Bestandszählungen in der Anwendung für
Bestandsdaten.
Scannen Sie schnell Artikel anhand des Barcodes,
um in der Anwendung „Kasse“ eine Bestellung
anzulegen.
Lassen Sie Kunden ihre Rechnungen
aufteilen und sicher draußen mit Kredit- oder
Zahlungskarte zahlen.
Nehmen Sie weitere Bestellungen auf, wenn
Kunden bereits sitzen.
Nehmen Sie Bestellungen auf, wenn die Schlange
bereits nach draußen reicht.
Einrichtungsassistent
Erste Schritte
Führen Sie die im Folgenden
beschriebenen Schritte aus, um Clover
Mobil einzurichten. Sie benötigen
dazu den Aktivierungscode aus Ihrer
Begrüßungs-E-Mail.
Startansicht
Über die Startansicht haben Sie schnellen
Zugri auf alle Clover-Anwendungen.
Außerdem dient sie zur An- und
Abmeldung der Mitarbeiter, die das Gerät
bedienen.
App-Markt
Angepasste Geschäftslösungen
Durchsuchen und installieren
Sie Anwendungen, die Ihren
Geschäftsanforderungen entsprechen.

27 Funktionsübersicht Clover Mobile Español 28
Weitere Informationen
Internetzugang
Apps verwalten
Der Zugri auf bestimmte Anwendungen
erfolgt über Ihren Webbrowser. Auf
clover.com/home nden Sie Links zu den
entsprechenden Webseiten.
Verwenden Sie hierzu Chrome, Safari
oder Firefox.
In Europa nden Sie diese Informationen
unter eu.clover.com/home
Hilfe
Nutzen Sie die Anwendung „Hilfe“,
besuchen Sie help.clover.com oder
setzen Sie sich unter der in Ihrer
Begrüßungs-E-Mail angegebenen
Telefonnummer mit uns in Verbindung.
Guía de características de
Clover Mobile

29 Guía de características de Clover Mobile Español 30
Nos esforzamos
continuamente por
mejorar nuestro
software. Para ver la
última versión de esta
guía, visite
clover.com/setup.
En Europa, visite eu.clover.com/setup
En esta guía se describen
las características del
hardware y el software de
Clover Mobile.

31 Guía de características de Clover Mobile Español 32
Clover Mobile es un potente dispositivo de
punto de venta (TVP) que puede utilizar en
cualquier punto de su establecimiento (o
incluso fuera de él). El hardware integrado
permite efectuar cobros, comprobar
el inventario y realizar operaciones
empresariales cotidianas desde el lugar que
desee.
Tanto si lo usa como dispositivo de mano,
de mostrador o pared, Clover Mobile
permite realizar con total seguridad
transacciones con tarjetas de débito o
crédito con el lector de banda magnética
(MSR) o mediante inserción (chip EMV) o
aproximación (EMV sin contacto).
Clover Mobile tiene un tiempo de carga completa esti-
mada de menos de 4,5 horas mediante el cargador de
pared USB de Clover o el soporte de Clover Mobile.
Elementos incluidos Acerca de Clover Mobile
Clover Mobile Clip de Clover
Dock de Clover Mobile Dispositivo de impresión
de Clover Mobile
Cargador de
pared USB
Llave para extraer la puerta
de la tarjeta SIM
(solo para 3G)
Bandeja para tarjeta SIM
(solo para 3G)
Cable USB
Accesorios opcionales
2 adaptadores de enchufes
internacionales (Europa solo)

33 Guía de características de Clover Mobile Español 34
3456
9012 3
9
9
456
9012 34
9
9
3456
3456
9012 34
9012 34
9
9
9
9
1234 5678 9012 3456
4 5678 9012 34
1234 5678 9012 3456
5678 9012 3
1234 5678 90123 456
1234 5678 9012 3456
5678 90123 4
5678 9012 34
1234
3456
012 3
90
5678
9
1234
456
34
2 3
5678 901
12
1234
1234
3456
3456
012 34
012 34
9012
9012 3
5678 901
5678 901
9012
9012
Para obtener más información sobre las opciones de
emparejado, visite clover.com/setup.
Parte delantera
Parte trasera
Parte trasera
Descripción de Clover Mobile Instalación de Clover Mobile
La bandeja con la tarjeta SIM debe estar siempre insertada, incluso
si no se está usando dicha tarjeta.
Lector de tarjetas con
chip
Lector de tarjetas con
banda magnética
Cámara frontal
Micrófono
Lector de tarjetas de
pago sin contacto
Conector de audio
Botón de encendido
Puerto del cargador
USB
Gancho
con cordón
Ranura para
tarjeta SIM (solo
para 3G)
Escáner de códigos de
barras
Activador de códigos
de barras
Vídeo de configuración: clover.com/setup
Para Europa: eu.clover.com/setup
1
3
2
Conecte el cargador de pared USB al puerto del
cargador USB y la fuente de alimentación.
Pulse el botón de alimentación para que se encienda
Clover Mobile.
(Solo para 3G) Abra la bandeja de la tarjeta SIM
introduciendo en el oricio la llave para extraer la
puerta de la tarjeta SIM. Elija el tamaño de bandeja
de la tarjeta SIM adecuado para su tarjeta SIM.
Coloque la tarjeta SIM en la bandeja y empuje la
puerta hasta que se cierre.
1
3
2

35 Guía de características de Clover Mobile Español 36
Recomendaciones de uso
Posición para sujeción manual
Clover Mobile se puede sujetar de muchas formas.
Recomendamos que se sujete con la mano no dominante
(apoyado sobre la muñeca) para aprovechar la gama
completa de movimientos para la aceptación de tarjetas
y para utilizar la pantalla con total precisión. Para una
sujeción correcta, asegúrese de que el dedo índice se
encuentra en el activador de códigos de barras.
Introducción
segura del PIN
Los clientes deben
ocultar con la mano la
introducción del PIN.
Directrices de seguridad
sobre PCI PTS:
clover.com/setup
Clip de Clover
Coloque el Clip de Clover
en su delantal o el bolsillo
del pantalón según le
resulte más cómodo.
12 3
45 6
78 9
00 0
1
2
3
4
0
5
6
7
8
00
4
5
El dispositivo Clover Mobile ha sido aprobado por PCI PTS como
dispositivo manual y no se proporciona con protector de privacidad. El
uso del dispositivo para realizar pagos en una mesa, escritorio o soporte
invalidará la aprobación de PCI PTS.
La pagina si sta caricando...
La pagina si sta caricando...
La pagina si sta caricando...
La pagina si sta caricando...
La pagina si sta caricando...
La pagina si sta caricando...
La pagina si sta caricando...
La pagina si sta caricando...
La pagina si sta caricando...
La pagina si sta caricando...
La pagina si sta caricando...
La pagina si sta caricando...
La pagina si sta caricando...
La pagina si sta caricando...
La pagina si sta caricando...
La pagina si sta caricando...
La pagina si sta caricando...
La pagina si sta caricando...
La pagina si sta caricando...
La pagina si sta caricando...
La pagina si sta caricando...
La pagina si sta caricando...
La pagina si sta caricando...
La pagina si sta caricando...
La pagina si sta caricando...
La pagina si sta caricando...
La pagina si sta caricando...
La pagina si sta caricando...
La pagina si sta caricando...
La pagina si sta caricando...
La pagina si sta caricando...
La pagina si sta caricando...
La pagina si sta caricando...
-
 1
1
-
 2
2
-
 3
3
-
 4
4
-
 5
5
-
 6
6
-
 7
7
-
 8
8
-
 9
9
-
 10
10
-
 11
11
-
 12
12
-
 13
13
-
 14
14
-
 15
15
-
 16
16
-
 17
17
-
 18
18
-
 19
19
-
 20
20
-
 21
21
-
 22
22
-
 23
23
-
 24
24
-
 25
25
-
 26
26
-
 27
27
-
 28
28
-
 29
29
-
 30
30
-
 31
31
-
 32
32
-
 33
33
-
 34
34
-
 35
35
-
 36
36
-
 37
37
-
 38
38
-
 39
39
-
 40
40
-
 41
41
-
 42
42
-
 43
43
-
 44
44
-
 45
45
-
 46
46
-
 47
47
-
 48
48
-
 49
49
-
 50
50
-
 51
51
-
 52
52
-
 53
53


in altre lingue
- English: Clover Mobile
- français: Clover Mobile
- español: Clover Mobile
- Deutsch: Clover Mobile
- Nederlands: Clover Mobile
- polski: Clover Mobile


