
Clover Flex
Starter Kit
Quick Start Guide


English
Deutsch
Español
Français
Italiano
Polski
1
12
24
36
48
60

1 Clover Flex Starter Kit Quick Start Guide
We are continuously
improving our software.
To see the latest version
of this guide, visit
help.clover.com/devices/ex

English 2
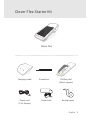
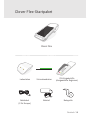
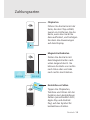
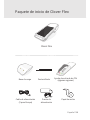
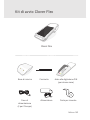
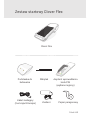
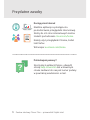
Clover Flex Starter Kit
Clover Flex
Power cord
(2 for Europe)
Charging cradle
Receipt paper
Screwdriver PIN Entry Aid
(Select regions)
Power brick

3 Clover Flex Starter Kit Quick Start Guide
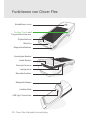
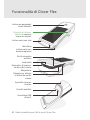
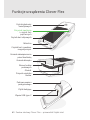
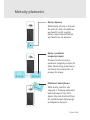
Clover Flex Features
Contactless
payment reader
Power button
& fingerprint sensor
Microphone
Magnetic stripe
card reader
Anti-theft security slot
Audio jack
Barcode scanner
Barcode trigger
Receipt paper door
Charging pads
USB Type-C connector
Speaker
Chip card reader

English 4
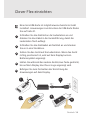
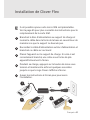
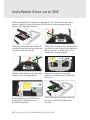
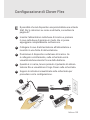
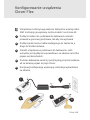
Set Up your Clover Flex
A micro SIM card may be pre-installed in the device. See
page 9 for instructions on how to replace the SIM.
Plug the power brick into the charging cradle and press the
cord into the rubber base so that it is ush on the counter.
Attach the power cord to the power brick and plug the
power cord into a power source.
Place the device on the charging cradle. If it's properly
connected, a battery icon will briey appear on the screen.
While it charges, press and hold the power button until the
Clover logo appears on the screen.
Follow the on-screen instructions to continue setting up.
1
2
4
3
5
1
2
3
5
4

5 Clover Flex Starter Kit Quick Start Guide
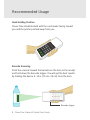
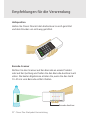
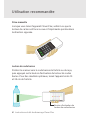
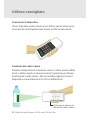
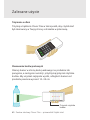
Recommended Usage
Clover Flex should be held with the card reader facing toward
you and the printer pointed away from you.
Barcode Scanning
Point the scanner toward the barcode on the item or the receipt
and hold down the barcode trigger. You will get the best results
by holding the device 4–10 in (10 cm–25 cm) from the item.
Barcode trigger
Hand Holding Position

English 6
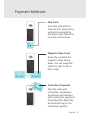
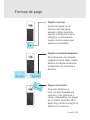
Payment Methods
Magnetic Stripe Cards
Swipe the card with the
magnetic stripe facing
down. You can swipe the
card from right to left or
left to right.
Chip Cards
Insert the card with the
chip end first. Remove the
card when prompted by
the device, then follow the
on-screen instructions.
Contactless Payments
Tap chip cards with
contactless capabilities,
and phones and watches
with contactless payments
(including NFC, Apple Pay
and Android Pay) on the
contactless symbol.

7 Clover Flex Starter Kit Quick Start Guide
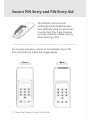
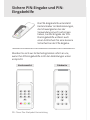
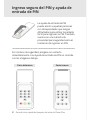
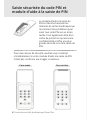
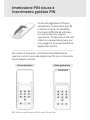
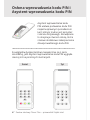
Secure PIN Entry and PIN Entry Aid
Front Back
The PIN Entry Aid can assist
cardholders with disabilities who
have diculty using a touchscreen
to enter their PIN. It also features
a privacy shield for added security
when entering a PIN.
For security purposes, contact us immediately if your PIN
Entry Aid does not match the images below.

English 8
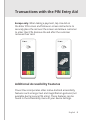
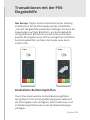
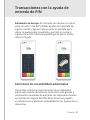
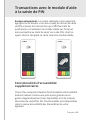
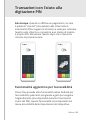
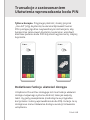
Transactions with the PIN Entry Aid
Europe only. When taking a payment, tap Use Aid on
the Enter PIN screen and follow on-screen instructions to
securely place the aid over the screen and allow a customer
to enter their PIN. Remove the aid after the customer
removes their card.
Additional Accessibility Features
Clover Flex incorporates other native Android accessibility
features such as larger text and magnication gestures (not
available during secure PIN entry). These features can be
found in the Accessibility menu in your device Settings.

9 Clover Flex Starter Kit Quick Start Guide
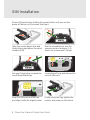
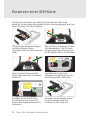
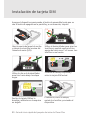
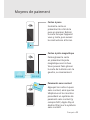
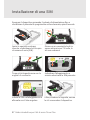
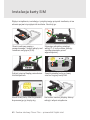
SIM Installation
Power off the device by holding the power button until you see the
power off button on the screen, then tap it.
7-8
Open the receipt paper door and
locate the screws above the serial
number (S/N).
Use the screwdriver to turn the
screws counter-clockwise 7–8
times; the screws won’t fall out.
Use your fingernail or screwdriver
to pull down black ap.
Slide the SIM card into the tray
and align it with the angled corner.
Finally, close the ap, tighten the
screws, and power on the device.
Locate the left tray and remove the
current SIM card.

English 10
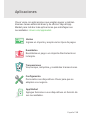
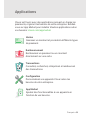
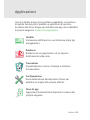
Applications
Clover comes with apps that take payments, run your front of
house, and manage your back of house. Go to App Market to
install more apps to meet your needs: clover.com/appmarket.
Sale
Enter an amount and take multiple payment types.
Refund
Refund a payment or an amount directly on a card.
Transactions
View, search, reprint, and refund transactions.
Setup
Personalize your Clover devices to suit your
business.
App Market
Add features to your devices based on your needs.

11 Clover Flex Starter Kit Quick Start Guide
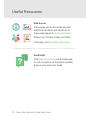
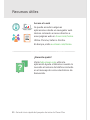
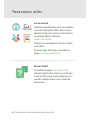
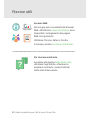
Useful Resources
Web Access
Some apps can be accessed via your
web browser. We’ve put shortcuts to
these web pages at clover.com/home.
Please use Chrome, Safari, or Firefox.
In Europe, visit eu.clover.com/home.
Need Help?
Visit help.clover.com, use the Help app,
or call us anytime at the phone number
given in your welcome email.

Deutsch 12
Clover Flex-Startpaket
Kurzanleitung
Deutsch 12

13 Clover Flex-Startpaket Kurzanleitung
Wir entwickeln unsere
Software ständig weiter.
Die neueste Version dieser
Anleitung nden Sie auf
help.clover.com/devices/flex

Deutsch 14
Clover Flex-Startpaket
Netzkabel
(2 für Europa)
Ladestation
Belegrolle
Schraubendreher
PIN-Eingabehilfe
(Ausgewählte Regionen)
Netzteil
Clover Flex

15 Clover Flex-Startpaket Kurzanleitung
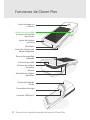
Funktionen von Clover Flex
Kontaktloser Leser
Ein/Aus-Taste und
Fingerabdrucksensor
Mikrofon
Magnetstreifenleser
Kensington-Buchse
Audio-Buchse
Barcode-Scanner
Barcode-Auslöser
Belegrollenklappe
Ladekontakte
USB-Typ-C-Anschluss
Lautsprecher
Chipkartenleser

Deutsch 16
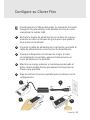
Clover Flex einrichten
Eine microSIM-Karte ist möglicherweise bereits im Gerät
installiert. Anweisungen zum Ersetzen der SIM-Karte nden
Sie auf Seite 21.
Schließen Sie das Netzteil an der Ladestation an und
drücken Sie das Kabel in die Gummiführung, damit die
Ladestation ach auiegt.
Schließen Sie das Netzkabel am Netzteil an und stecken
Sie es in eine Steckdose.
Setzen Sie das Gerät auf die Ladestation. Wenn das Gerät
richtig positioniert ist, wird auf dem Display kurz ein
Batteriesymbol angezeigt.
Halten Sie während des Ladens die Ein/Aus-Taste gedrückt,
bis auf dem Display das Clover-Logo angezeigt wird.
Befolgen Sie zum Fortsetzen der Einrichtung die
Anweisungen auf dem Display.
1
2
4
3
5
1
2
3
5
4

17 Clover Flex-Startpaket Kurzanleitung
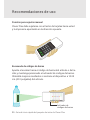
Empfehlungen für die Verwendung
Halten Sie Clover Flex mit dem Kartenleser zu sich gerichtet
und dem Drucker von sich weg gerichtet.
Barcode-Scanner
Richten Sie den Scanner auf den Barcode an einem Produkt
oder auf der Quittung und halten Sie den Barcode-Auslöser nach
unten. Die besten Ergebnisse erzielen Sie, wenn Sie das Gerät
10–25 cm vom Barcode entfernt halten.
Barcode-Auslöser
Halteposition
La pagina si sta caricando...
La pagina si sta caricando...
La pagina si sta caricando...
La pagina si sta caricando...
La pagina si sta caricando...
La pagina si sta caricando...
La pagina si sta caricando...
La pagina si sta caricando...
La pagina si sta caricando...
La pagina si sta caricando...
La pagina si sta caricando...
La pagina si sta caricando...
La pagina si sta caricando...
La pagina si sta caricando...
La pagina si sta caricando...
La pagina si sta caricando...
La pagina si sta caricando...
La pagina si sta caricando...
La pagina si sta caricando...
La pagina si sta caricando...
La pagina si sta caricando...
La pagina si sta caricando...
La pagina si sta caricando...
La pagina si sta caricando...
La pagina si sta caricando...
La pagina si sta caricando...
La pagina si sta caricando...
La pagina si sta caricando...
La pagina si sta caricando...
La pagina si sta caricando...
La pagina si sta caricando...
La pagina si sta caricando...
La pagina si sta caricando...
La pagina si sta caricando...
La pagina si sta caricando...
La pagina si sta caricando...
La pagina si sta caricando...
La pagina si sta caricando...
La pagina si sta caricando...
La pagina si sta caricando...
La pagina si sta caricando...
La pagina si sta caricando...
La pagina si sta caricando...
La pagina si sta caricando...
La pagina si sta caricando...
La pagina si sta caricando...
La pagina si sta caricando...
La pagina si sta caricando...
La pagina si sta caricando...
La pagina si sta caricando...
La pagina si sta caricando...
La pagina si sta caricando...
La pagina si sta caricando...
La pagina si sta caricando...
La pagina si sta caricando...
La pagina si sta caricando...
La pagina si sta caricando...
La pagina si sta caricando...
La pagina si sta caricando...
La pagina si sta caricando...
-
 1
1
-
 2
2
-
 3
3
-
 4
4
-
 5
5
-
 6
6
-
 7
7
-
 8
8
-
 9
9
-
 10
10
-
 11
11
-
 12
12
-
 13
13
-
 14
14
-
 15
15
-
 16
16
-
 17
17
-
 18
18
-
 19
19
-
 20
20
-
 21
21
-
 22
22
-
 23
23
-
 24
24
-
 25
25
-
 26
26
-
 27
27
-
 28
28
-
 29
29
-
 30
30
-
 31
31
-
 32
32
-
 33
33
-
 34
34
-
 35
35
-
 36
36
-
 37
37
-
 38
38
-
 39
39
-
 40
40
-
 41
41
-
 42
42
-
 43
43
-
 44
44
-
 45
45
-
 46
46
-
 47
47
-
 48
48
-
 49
49
-
 50
50
-
 51
51
-
 52
52
-
 53
53
-
 54
54
-
 55
55
-
 56
56
-
 57
57
-
 58
58
-
 59
59
-
 60
60
-
 61
61
-
 62
62
-
 63
63
-
 64
64
-
 65
65
-
 66
66
-
 67
67
-
 68
68
-
 69
69
-
 70
70
-
 71
71
-
 72
72
-
 73
73
-
 74
74
-
 75
75
-
 76
76
-
 77
77
-
 78
78
-
 79
79
-
 80
80


Clover Flex Guida Rapida
- Tipo
- Guida Rapida
- Questo manuale è adatto anche per
in altre lingue
- English: Clover Flex Quick start guide
- français: Clover Flex Guide de démarrage rapide
- español: Clover Flex Guía de inicio rápido
- Deutsch: Clover Flex Schnellstartanleitung
- polski: Clover Flex Skrócona instrukcja obsługi


