
Color Side 1:
BLACK +
PMS 2925C
Flat size:
15 x 20 in.
Fold 1:
3-panel
accordian
Fold 2:
5-panel
accordian
Color Side 2:
BLACK +
PMS 2925C
Finished size:
5 x 4 in.
17015 Seven Pines Dr.,
Bldg. #2
Spring, TX 77379
832.717.4331
1
.
2
. AAAA
3
.
4
5
A
. Bluetooth
.
D
Bluetooth
Bluetooth
.
Bluetooth ةلاح ءوض
.
.
A
.
A
Bluetooth
.
.
C
B
A
.
.
Phillips Bluetooth
319
.
*
1
Nyalakan tablet Anda.
2
Masukkan baterai pena AAAA.
3
Nyalakan pena dengan mengetuk ujungnya ke
permukaan mana pun.
4
Tekan dan tahan tombol
A
selama 5 detik untuk
mengaktifkan penyandingan Bluetooth. Jika pena
sudah siap untuk disandingkan dengan perangkat,
lampu Bluetooth
D
akan menyala biru secara
perlahan. Untuk petunjuk pembuatan sambungan
Bluetooth, lihat dokumentasi perangkat Anda.
Status lampu Bluetooth
Berkedip pelan Pena dalam mode penyandingan.
Menyala biru dengan cepat Pena telah berhasil disandingkan.
Berkedip biru saat tombol
A
diklik Pena bekerja dengan normal.
Berkedip merah saat tombol
A
diklik
Pena memerlukan baterai
Bluetooth baru.
Tergantung pada tablet Anda, fungsi tombol
A
,
B
, dan
C
tombol-tombol ini, gunakan aplikasi pena di tablet Anda.
Untukmaklumat pengaturan dan keselamatan, lihat
Maklumat Produk yang disertakan bersama produk Anda.
Untuk mengganti baterai Bluetooth, gunakan obeng
Phillips untuk membuka kompartemen baterai, lalu ganti
kedua baterai sel-koin 319.
* Hanya produk tertentu
1
2
3
4
A
D
A
A
A
,
B
C
.
,
*
1
2
3
Kle
4
A
na dobu 5 sekund,
kontrolka rozhraní Bluetooth
D
pomalu bliká
Kontrolka rozhraní Bluetooth
Pomalu bliká
A
A
Bluetooth.
V závislosti na vašem tabletu se mohou lišit funkce
A
,
B
a
C
. Chcete-li zobrazit nebo
pera ve vašem tabletu.
Informace
v dokumentu
s produktem.
*
1
Tænd for din tablet.
2
Indsæt pennens AAAA-batteri.
3
Tænd for pennen ved at trykke spidsen mod en
4
Tryk på
A
-knappen, og hold den nede i tre
sekunder for at aktivere Bluetooth-parring.
Når pennen er klar til at blive parret med en
enhed, lyser Bluetooth-lysdioden
D
blå.
Få instruktioner til, hvordan du opretter en
Bluetooth-tilslutning, i dokumentationen for
din enhed.
Lysdiode for Bluetooth-status
Blinker langsomt Pennen er i parringstilstand.
Blinker hurtigt blå Pennen er parret.
Blinker blå, når der trykkes på
A
-knappen
Pennen fungerer normalt.
Blinker rød, når der trykkes på
A
-knappen
Pennen har brug for nye
Bluetooth-batterier.
Afhængigt af din tablet varierer funktionen for
knapperne
A
,
B
og
C
. Hvis du vil se eller redigere
appen på din tablet.
Se , som fulgte med dit
produkt, for lovgivningsmæssige bemærkninger og
sikkerhedsbemærkninger.
Når du skal udskifte Bluetooth-batterierne, skal du bruge
en krydskærvsskruetrækker til at åbne batterirummet og
derefter udskifte de to 319 møntcellebatterier.
* Kun udvalgte produkter
1
Schalten Sie Ihr Tablet ein.
2
Setzen Sie die Stiftbatterie (AAAA) ein.
3
Schalten Sie den Stift ein, indem Sie mit der
4
Drücken und halten Sie die Taste
A
für
5 Sekunden, um die Bluetooth-Kopplung zu
aktivieren. Wenn der Stift für die Kopplung mit
LED
D
blau. Informationen zum Herstellen
Bluetooth-Statusanzeige
Blinkt langsam Der Stift ist im Kopplungsmodus.
Blinkt schnell blau Der Stift wurde erfolgreich gekoppelt.
Blinkt blau, wenn die
Taste
A
gedrückt wird
Der Stift funktioniert normal.
Blinkt rot, wenn die
Taste
A
gedrückt wird
Der Stift benötigt neue
Bluetooth-Batterien.
Die Funktionen der Tasten
A
,
B
und
C
variieren
anzuzeigen oder zu bearbeiten, verwenden Sie die App
für den Stift auf Ihrem Tablet.
Informieren Sie sich über die Sicherheits- und
Zulassungshinwei
, die im Lieferumfang Ihres
Produkts enthalten sind.
Verwenden Sie einen Kreuzschlitzschraubenzieher, um das
.
Ersetzen Sie dann die beiden 319 Knopfzellen.
* Nur bestimmte Produkte.
1
Encienda su tablet.
2
Inserte la batería AAAA en el lápiz.
3
Encienda el lápiz dando un golpecito con la
4
Mantenga presionado el botón
A
durante
5 segundos para permitir el emparejamiento
del Bluetooth. Cuando el lápiz está listo para
emparejarse con el dispositivo, el indicador
luminoso de Bluetooth
D
parpadea en color
azul lentamente. Para obtener instrucciones
sobre cómo crear una conexión Bluetooth,
consulte la documentación de su dispositivo.
Indicador luminoso de estado de Bluetooth
Parpadea lentamente El lápiz está en modo de emparejamiento.
Parpadeo rápido en azul El lápiz se emparejó correctamente.
Parpadea en azul cuando
se hace clic en el botón
A
El lápiz funciona normalmente.
Parpadea en rojo al hacer
clic en el botón
A
El lápiz necesita nuevas baterías
Bluetooth.
Dependiendo de su tablet, las funciones de los
botones
A
,
B
y
C
pueden variar. Para ver o editar
del lápiz en su tablet.
Para obtener información sobre los avisos normativos
y de seguridad, consulte los
incluidos con su producto.
Para reemplazar las baterías de Bluetooth, use un
destornillador Phillips para abrir el compartimiento de la
batería y luego reemplace las dos baterías tipo moneda 319.
* Solo en ciertos productos
1
2
3
4
Α
Δ
A
A
Α
,
Β
C
.
*
1
Mettez votre tablette sous tension.
2
3
Mettez le stylet sous tension en tapotant la
pointe sur n’importe quelle surface.
4
Appuyez sur le
A
bouton et maintenez-le
couplage Bluetooth. Une fois que le stylet est
prêt à se coupler avec un appareil, le voyant
Bluetooth
D
clignote lentement en bleu.
d’une connexion Bluetooth, consultez la
documentation de votre appareil.
Voyant d’état Bluetooth
Clignotement lent Le stylet est en mode de couplage.
Clignotement rapide en bleu
Clignote en bleu lorsque vous
cliquez sur le bouton
A
Le stylet fonctionne normalement.
Clignote en rouge lorsque vous
cliquez sur le bouton
A
pour le Bluetooth.
En fonction de votre tablette, les fonctions des
boutons
A
,
B
, et
C
l’application stylet de votre tablette.
fourni avec votre produit.
Pour remplacer les piles Bluetooth, utilisez un tournevis
Phillips pour ouvrir le compartiment de la batterie, puis
remplacez les deux piles boutons 319.
* Certains produits uniquement
1
2
Umetnite AAAA bateriju za olovku.
3
olovku tako da vrhom dodirnete bilo
koju površinu.
4
A
pet sekundi da
tehnologije. Kada olovka bude spremna za
za Bluetooth
D
Olovka je uspješno uparena.
gumb
A
gumb
A
Olovci su potrebne nove baterije za
Bluetooth.
Funkcije gumba
A
,
B
i
C
razlikuju se ovisno o
.
tvrtke Phillips otvorite odjeljak za baterije i zamijenite
dvije okrugle baterije 319.
* Samo odabrani proizvodi
1
Accendere il tablet.
2
Inserire la batteria stilo AAAA.
3
Accendere la penna premendo la punta su una
4
Premere e tenere premuto il pulsante
A
per
5 secondi per abilitare l’associazione Bluetooth.
Quando la penna è pronta per essere associata
a un dispositivo, la spia Bluetooth
D
diventa
blu e lampeggia lentamente. Per le istruzioni
su come creare un collegamento Bluetooth,
consultare la documentazione del dispositivo.
Spia di stato Bluetooth
Lampeggia lentamente La penna è nella modalità di
associazione.
Diventa blu e lampeggia
velocemente
La penna è stata associata
correttamente.
Diventa blu e lampeggia quando si
seleziona il pulsante
A
La penna funziona normalmente.
Diventa rossa e lampeggia quando
si seleziona il pulsante
A
È necessario cambiare le batterie
Bluetooth della penna.
Le funzioni dei pulsanti
A
,
B
e
C
variano a seconda
penna sul tablet.
Per le normative e gli avvisi sulla sicurezza, consultare
la documentazione fornita
con il prodotto.
Per sostituire le batterie Bluetooth, utilizzare un
cacciavite Phillips per aprire lo scomparto delle batterie,
quindi sostituire le due batterie 319 tipo moneta.
* Solo in determinati prodotti
1
2
3
4
A
D
A
A
A
,
B
C
.
*
1
2
Ievietojiet pildspalvas AAAA bateriju.
3
pie jebkuras virsmas.
4
Nospiediet un 5 sekundes turiet nospiestu
pogu
A
D
kad nospiesta poga
A
Pildspalva darbojas atbilstoši.
kad tiek nospiesta poga
A
Pildspalvai nepieciešamas jaunas
Bluetooth baterijas.
A
,
B
un
C
lietojumprogrammu.
un nomainiet abas 319 tabletes
veida baterijas.
*
1
2
3
4
A
D
mygtukas
A
mygtukas
A
A
,
B
ir
C
.
ir saugos informacija pateikiama su gaminiu
gautuose .
, tada pakeiskite dvi 319 monetos
formos baterijas.
* Tik tam tikruose gaminiuose
1
2
Helyezze be az AAAA elemeket a tollba.
3
Kap
4
A
gombot 5 másodpercig a Bluetooth-párosítás
az eszközzel való párosításra, a Bluetooth
D
) lassan, villog.
dokumentációját.
Lassan villog A toll párosítás üzemmódban van.
A toll párosítása sikeres.
A
gomb
megnyomásakor
Pirosan villog az
A
gomb
megnyomásakor
-
emeket.
A
, a
B
C
gomb
.
dokumentumban találhatók.
csavarhúzóval nyissa ki az elemtartót,
*
1
Schakel uw tablet in.
2
Plaats de AAAA-batterij van de pen.
3
U schakelt de pen in door met de punt op een
oppervlak te tikken.
4
Druk op de knop
A
en houd deze vijf seconden
ingedrukt om Bluetooth-koppeling in te schakelen.
Zodra de pen aan een apparaat gekoppeld kan
worden, gaat het Bluetooth-lampje
D
langzaam
blauw knipperen. Raadpleeg de documentatie
over uw apparaat voor instructies om een
Bluetooth-verbinding te maken.
Langzaam knipperen De pen staat in de koppelmodus.
Snel blauw knipperen De pen is gekoppeld.
Knippert blauw als op de
A
-knop is geklikt
De pen werkt normaal.
Knippert rood als op de
A
-knop is geklikt
De pen heeft nieuwe
Bluetooth-batterijen nodig.
Afhankelijk van uw tablet variëren de functies van de
knoppen
A
,
B
en
C
. Gebruik de pen-app op uw
geven of te bewerken.
Raadpleeg de informatie over voorschriften en
veiligheid. Deze vindt u in de
die bij het product zijn meegeleverd.
Gebruik voor het vervangen van de Bluetooth-batterijen
een kruiskopschroevendraaier om het batterijvak te
openen en vervang de twee 319-knoopcelbatterijen.
* Alleen bepaalde producten
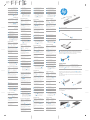
1
Turn on your tablet.
2
Insert the AAAA pen battery.
+
-
3
Turn on the pen by tapping the tip to any surface.
4
Press and hold the
A
button for 5 seconds to enable Bluetooth®
pairing. When the pen is ready to be paired with a device, the
Bluetooth light
D
s on creating a
Bluetooth connection, see your device documentation.
C
A
D
B
Bluetooth status light
The pen is in pairing mode.
The pen has paired successfully.
Blinks blue when the
A
button is clicked The pen is working normally.
Blinks red when the
A
button is clicked The pen needs new Bluetooth batteries.
Depending on your tablet, the functions of buttons
A
,
B
and
C
vary.
your tablet.
For regulatory and safety notices, refer to the included
with your product.
1
2
1
To replace the Bluetooth batteries, use a Phillips screwdriver to open
the battery compartment, and then replace the two 319
coin-cell batteries.
+
-
* Select products only
*
1
2
A B
La pagina si sta caricando...
-
 1
1
-
 2
2


HP 4931873 Manuale utente
- Tipo
- Manuale utente
- Questo manuale è adatto anche per
in altre lingue
- English: HP 4931873 User manual
- français: HP 4931873 Manuel utilisateur
- español: HP 4931873 Manual de usuario
- Deutsch: HP 4931873 Benutzerhandbuch
- русский: HP 4931873 Руководство пользователя
- Nederlands: HP 4931873 Handleiding
- português: HP 4931873 Manual do usuário
- slovenčina: HP 4931873 Používateľská príručka
- dansk: HP 4931873 Brugermanual
- čeština: HP 4931873 Uživatelský manuál
- polski: HP 4931873 Instrukcja obsługi
- svenska: HP 4931873 Användarmanual
- Türkçe: HP 4931873 Kullanım kılavuzu
- suomi: HP 4931873 Ohjekirja
- română: HP 4931873 Manual de utilizare
Documenti correlati
-
HP Rechargeable Active Pen Guida Rapida
-
HP OMEN SteelSeries (X7Z95AA) Manuale utente
-
HP OMEN 800 (1KF76AA) Manuale utente
-
-
-
-
-
-
-
Altri documenti
-
Lanier D6510 Read this first
-
Samsung EJ-PW700 Manuale utente
-
Trust Slimline Sketch Tablet Manuale utente
-
-
Acer SmartPen 2 Manuale utente
-
-
Genius MousePen i608X Manuale utente
-
promethean Digital Pen Guida utente
-
 Microsoft Surface Pro Series Surface Pro 4 v1.0 Quick Start
