
© Copyright 2015 ATEN® International Co., Ltd.
ATEN and the ATEN logo are trademarks of ATEN International Co., Ltd. All rights reserved. All
other trademarks are the property of their respective owners.
This product is RoHS compliant.
Part No. PAPE-1223-741G Printing Date: 01/2015
CS1942/CS1944 2/4-Port USB2.0 Mini DisplayPort Dual View KVMP Switch
Commutateur KVMP USB 2.0 Mini DisplayPort Dual View CS1942 / CS1944 - Guide de mise en route rapide
CS1942 / CS1944 Mini DisplayPort-Zweischirm-KVMP-Switch für USB 2.0 Kurzanleitung
Conmutador KVMP USB 2.0 Mini DisplayPort para dos pantallas CS1942 / CS1944 Guía rápida
Requirements
Console
• Two Mini DisplayPort monitors*
• A USB mouse; A USB keyboard
• Microphone and speakers
Computers
• Mini DisplayPort*
• USB Type A Ports ; Audio Ports (optional)
* DisplayPort requires MDP adapter
Cables
• Two/Four Mini DisplayPort 1.1a - 1 m Cables, and Two/Four Mini DisplayPort 1.1a -2 m
Cables, included with the package
• Two/Four USB 2.0 x 1 and 3.5mm two/four Audio Jack x 2 - 1.8 m Cable Sets, included
with the package
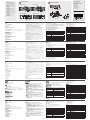
Hardware Review
A
CS1942/CS1944 Front View
1. LED Status Panel
2. Port Selection Touch Panels
3. Mode Selection Touch Panel
4. Analog Audio Ports
5. USB 2.0 Peripheral Port
CS1942/CS1944 Rear View
1. Console Port Section
2. KVM Port Section
3. Power Jack
4. USB 2.0 Hub
CS1944 Side View
2. KVM Port Section
Hardware Installation
B
1. Plug your USB keyboard and USB mouse into the USB console ports located on the
unit’s rear panel.
Confi guration minimale
Console
• Deux moniteurs avec connecteur Mini DisplayPort*
• Une souris USB ; un clavier USB
• Un microphone et des haut-parleurs
Ordinateurs
• Connecteur Mini DisplayPort*
• Ports USB de type A ; ports audio (facultatifs)
* Le connecteur DisplayPort nécessite un adaptateur MDP
Câbles
• Deux/quatre câbles Mini DisplayPort 1.1a de 1 m ; et Deux/quatre câbles Mini
DisplayPort 1.1a de 2 m, fournis
• Deux/quatre câbles à un connecteur USB 2.0 et deux/quatre jeux de câbles de 1,8 m à
deux connecteurs audio de 3,5 mm, fournis
Description de l’appareil
A
Vue avant du CS1942/CS1944
1. Voyants d'état
2. Touches de sélection de port du panneau tactile
3. Touche de sélection de mode du panneau tactile
4. Ports audio analogiques
5. Port périphérique USB 2.0
Vue arrière du CS1942/CS1944
1. Section des ports de console
2. Section des ports KVM
3. Prise d’alimentation
4. Concentrateur USB 2.0
Vue latérale du CS1944
2. Section des ports KVM
Requisitos
Consola
• Dos monitores con puerto Mini DisplayPort*
• Un mouse USB y un teclado USB
• Un micrófono y altavoces
PCs
• Puerto Mini DisplayPort*
• Puertos USB de tipo A; puertos de audio (opcional)
* si la computadora tiene un puerto DisplayPort convencional, se requiere un adaptador
Mini DisplayPort
Cables
• Dos/cuatro cables Mini DisplayPort 1.1a de 1 m y dos/cuatro cables Mini DisplayPort
1.1a de 2 m están incluidos en el paquete.
• Dos/cuatro juegos de cables USB 2.0 x 1 y de audio de tipo clavija de 3,5 mm x 2 de 1.8
m están incluidos en el paquete.
Presentación del hardware
A
Vista frontal del CS1942/CS1944
1. Panel de indicadores LED
2. Panel táctil de selección de puertos
3. Panel táctil de selección del modo operativo
4. Puertos de audio analógicos
5. Puerto USB 2.0 para periféricos
Vista posterior del CS1942/CS1944
1. Sección de puertos de consola
2. Sección de puertos KVM
3. Entrada de alimentación
4. Concentrador USB 2.0
Vista lateral del CS1944
2. Sección de puertos KVM
Instalar el hardware
B
1. Conecte el teclado USB y el mouse USB a los puertos de consola USB ubicados en el
panel posterior del equipo.
Voraussetzungen
Konsole
• Zwei Monitore mit Mini DisplayPort*
• Eine USB-Maus und eine USB-Tastatur
• Mikrofon und Lautsprecher
Computer
• Mini DisplayPort*
• USB-Ports des Typs A; Audioports (optional)
* zum Anschluss an einen herkömmlichen DisplayPort ist ein Mini DisplayPort-Adapter
erforderlich
Kabel
• Zwei bzw. vier Mini DisplayPort-Kabel 1.1a (1 m lang) und zwei bzw. vier Mini
DisplayPort-Kabel 1.1a (2 m lang) gehören zum Lieferumfang.
• Zwei bzw. vier USB 2.0- x 1 und zwei bzw. vier 3,5-mm-Audio-Klinkenstecker x 2 (1,8 m
lang) Kabelsets gehören zum Lieferumfang.
Hardwareübersicht
A
Vorderseitige Ansicht des CS1942/CS1944
1. LED-Statusanzeigefeld
2. Berührungsempfi ndliches Feld zur Portauswahl
3. Berührungsempfi ndliches Feld zur Betriebsartenauswahl
4. Analoge Audioports
5. USB 2.0-Port für Peripheriegeräte
Rückseitige Ansicht des CS1942/CS1944
1. Konsolportabschnitt
2. KVM-Portabschnitt
3. Stromeingangsbuchse
4. USB 2.0-Hub
Seitliche Ansicht des CS1944
2. KVM-Portabschnitt
2. Plug your console monitor(s) into the Mini DisplayPort console ports located on the
unit’s rear panel and power on the monitors.
* Connections may require a DP to mDP adapter.
3. Plug your analog microphone and headphones into the console microphone and
speaker jacks located on the unit’s front panel.
* The microphone and headphones plugged into this panel have priority over those
plugged into the rear panel. Analog audio cables are required on the CPU side for
this connection.
4. Plug your analog/digital (Mini-TOSLINK) microphone and speakers into the audio
console ports located on the unit’s rear panel.
* Digital sound equipment may need extra Mini-TOSLINK cables.
5. Using the Mini DisplayPort 1.1a cable set, plug the Mini DisplayPort connector into an
available Mini DisplayPort “A” socket on the KVM port section of the switch (CPU 1,
CPU 2, etc.), then plug the accompanying USB 2.0 cable, microphone/speaker cables
into their corresponding sockets.
6. At the other end of the cable sets from step 5, plug the Mini DisplayPort 1.1a, USB 2.0
cable and microphone/speaker cables into their respective ports on the computer.
7. Using another Mini DisplayPort 1.1a cable, plug the Mini DisplayPort cable connector
into the Mini DisplayPort socket B in the same KVM port section of the switch.
8. At the other end of the Mini DisplayPort 1.1a cable from step 7, plug the monitor cable
into its respective port on the computer.
Note: Repeat steps 5, 6, 7, and 8 for each dual-screen PC system you are installing.
9. Plug your USB peripherals into the front or rear USB peripheral ports (optional).
10. Plug the power adapter that came with your switch into an AC power source, then
plug power adapter cable into the switch’s Power Jack.
11. Power on the computers
Operation
Manual port operation:
To bring complete focus (audio, KVM, and USB) to a computer, either: a) press the port
selection touch panel that corresponds to that computer; or: b) press the Mode touch
panel once (the Mode touch panel three icons fl ashes) and then press the port selection
touch panel that corresponds to that computer. All three port icons light up.
Hotkey Operation
All port switches begin with tapping the Scroll Lock key twice. The tables below describe
the actions that each combination performs.
Installation du matériel
B
1. Branchez votre clavier USB et votre souris USB sur les ports de console USB situés à
l'arrière de l'appareil.
2. Branchez le(s) moniteur(s) de console sur les ports de console Mini DisplayPort situés
sur le panneau arrière de l’appareil puis allumez les moniteurs.
* Les connexions peuvent nécessiter un adaptateur DP vers mDP.
3. Branchez votre microphone et vos haut-parleurs analogiques sur les prises micro et
haut-parleurs situées à l'avant de l’appareil.
* Le microphone et les haut-parleurs branchés sur ce panneau ont la priorité sur ceux
branchés à l'arrière. Pour réaliser cette connexion, des câbles audio analogiques
sont nécessaires dans la partie UC.
4. Branchez le microphone et les haut-parleurs analogiques/numériques (Mini-TOSLINK)
sur les ports de console audio situés à l'arrière de l’appareil.
* Un équipement audio numérique peut nécessiter l’utilisation de câbles Mini-
TOSLINK supplémentaires.
5. À l’aide du jeu de câbles Mini DisplayPort 1.1a, branchez le connecteur Mini
DisplayPort sur une prise Mini DisplayPort A libre de la section des ports KVM du
commutateur (UC 1, UC 2, etc.), puis branchez le câble USB 2.0 et les câbles micro/
haut-parleurs correspondants sur les prises prévues à cet effet.
6. A l’autre extrémité des câbles, à partir de l’étape 5, branchez les câbles Mini
DisplayPort 1.1a, USB 2.0 et les câbles micro/haut-parleurs dans leurs ports respectifs
sur l’ordinateur.
7. À l'aide d’un autre câble Mini DisplayPort 1.1a, branchez le connecteur Mini
DisplayPort sur la prise Mini DisplayPort B de la même section des ports KVM du
commutateur.
8. À l'autre extrémité du câble Mini DisplayPort 1.1a, à partir de l’étape 7, branchez le
câble du moniteur sur le port correspondant de l'ordinateur.
Remarque : répétez les étapes 5, 6, 7 et 8 pour chaque ordinateur à double écran
que vous installez.
9. Connectez les périphériques USB aux ports de périphériques USB situés à l’avant ou
à l’arrière (facultatif).
10. Branchez l’adaptateur secteur fourni sur une prise de courant, puis le câble de
l’adaptateur secteur dans la prise d'alimentation du commutateur.
11. Allumez les ordinateurs.
2. Conecte su(s) monitor(es) de consola a los puertos Mini DisplayPort de consola
ubicados en el panel posterior de la unidad y encienda los monitores.
* Es posible que para la conexión se requiera un adaptador DisplayPort a Mini
DisplayPort.
3. Conecte el micrófono y los auriculares analógicos a las entradas para micrófono y
altavoces de consola ubicadas en el panel frontal de la unidad.
* El micrófono y los auriculares conectados al panel frontal tienen prioridad sobre los
conectados al panel posterior. Para esta conexión tienen que estar instalados los
cables de audio en la CPU.
4. Conecte el micrófono y los altavoces analógicos/digitales (Mini-TOSLINK) a los
puertos de consola de audio ubicados en el panel posterior de la unidad.
* Para conectar dispositivos de audio digitales, es posible que tenga que adquirir
cables Mini-TOSLINK.
5. Con el juego de cables Mini DisplayPort 1.1a , conecte el conector Mini DisplayPort
a un puerto Mini DisplayPort de tipo A libre de la sección de puertos KVM del
conmutador (CPU 1, CPU 2, etc.) y los cables USB 2.0, para micrófono y altavoces a
los puertos correspondientes.
6. En el otro extremo del cable del paso 5, enchufe los cables Mini DisplayPort 1.1a,
USB 2.0, del micrófono y de los altavoces en los puertos correspondientes de la
computadora.
7. Con otro el cable Mini DisplayPort 1.1a, conecte el conector Mini DisplayPort al puerto
Mini DisplayPort de tipo B de la misma sección de puertos KVM del conmutador.
8. En el otro extremo del cable Mini DisplayPort 1.1a del paso 7, conecte el cable para
monitor al puerto correspondiente de la computadora.
Nota: repita los pasos 5, 6, 7 y 8 para cada computadora de doble pantalla que
instale.
9. Enchufe sus periféricos USB en los puertos USB del panel posterior (opcional).
10. Conecte el adaptador de alimentación incluido a una toma eléctrica y el cable del
adaptador a la entrada de alimentación del conmutador.
11. Encienda las computadoras.
Funcionamiento
Conmutación manual de puertos:
Para pasar el control y todas las señales (audio, KVM y USB) a una computadora,
o bien: a) puntee en el botón táctil de selección de puertos correspondiente a la
computadora deseada; o: b) puntee una vez en el botón táctil Mode (los tres iconos del
panel táctil Mode parpadean) y luego puntee en el botón táctil de selección del puerto de
la computadora deseada. Los tres iconos de puerto se iluminan.
Hardware installieren
B
1. Verbinden Sie Ihre USB-Tastatur und USB-Maus mit den USB-Konsolanschlüssen auf
der Rückseite des Gerätes.
2. Verbinden Sie Ihre(n) Konsolmonitor(e) mit den Mini DisplayPort-Konsolanschlüssen
auf der Geräterückseite, und schalten Sie die Monitore ein.
* Für die Anschlüsse ist möglicherweise ein DisplayPort-auf-Mini DisplayPort-Adapter
notwendig.
3. Verbinden Sie das analoge Mikrofon und die Lautsprecher mit den Mikrofon- und
Lautsprecher-Konsolanschlüssen auf der Gerätevorderseite.
* Diese Mikrofon- und Kopfhörerbuchsen haben Priorität gegenüber denjenigen, die
sich auf der Rückseite des Gehäuses befi nden. Für diesen Anschluss sind analoge
Audiokabel auf Seiten der CPU erforderlich.
4. Verbinden Sie Ihr analoges bzw. digitales (Mini-TOSLINK) Mikrofon und die
Lautsprecher mit den Audio-Konsolanschlüssen auf der Geräterückseite.
* Für digitale Soundgeräte werden möglicherweise Mini-TOSLINK-Kabel benötigt.
5. Verbinden Sie den Mini DisplayPort-Stecker des Mini DisplayPort 1.1a-Kabelsets mit
einer freien Mini DisplayPort-Buchse („A“) im KVM-Portabschnitt des Switch (CPU 1,
CPU 2, etc.). Verbinden Sie anschließend die zugehörigen USB 2.0-, Mikrofon- und
Lautsprecherkabel mit den entsprechenden Buchsen.
6. Verbinden Sie am anderen Ende des Kabelsets aus Schritt 5 die Mini DisplayPort
1.1a-, USB 2.0-, Mikrofon- und Lautsprecherkabel mit den geeigneten Buchsen am
Computer.
7. Verbinden Sie den Mini DisplayPort-Stecker eines weiteren Mini DisplayPort
1.1a-Kabelsets mit der Mini DisplayPort-Buchse B desselben KVM-Portabschnitts am
Switch.
8. Verbinden Sie das andere Ende des Mini DisplayPort 1.1a-Kabels aus Schritt 7 mit der
zugehörigen Buchse am Computer.
Hinweis: Wiederholen Sie die Schritte 5, 6, 7 und 8 für alle weiteren
Zweischirmsysteme, die Sie anschließen möchten.
9. Schließen Sie Ihre USB-Peripheriegeräte an die USB-Ports für Peripheriegeräte auf
der Vorder- oder Rückseite an (optional).
10. Verbinden Sie das mitgelieferte Netzteil mit einer stromführenden Steckdose und
anschließend mit der Netzeingangsbuchse am Switch.
11. Schalten Sie die Computer ein.
Note: If using the Scroll Lock key confl icts with other programs running on the computer,
the Ctrl key can be used, instead.
Going Directly to a Port
Hotkey Action
[Scroll Lock] [Scroll
Lock] [n] [Enter]
Brings the KVM, USB hub, and audio focus to the computer
attached to the port corresponding to the specifi ed Port ID.
[Scroll Lock] [Scroll
Lock] [n] [K] [Enter]
Brings only the KVM focus to the computer attached to the
specifi ed port. The USB hub and audio focus remain where they
are.
[Scroll Lock] [Scroll
Lock] [n] [U] [Enter]
Brings only the USB hub focus to the computer attached to the
specifi ed port. The KVM and audio focus remain where they are.
[Scroll Lock] [Scroll
Lock] [n] [S] [Enter]
Brings only the audio focus to the computer attached to the
specifi ed port. The KVM and USB hub focus remain where they
are.
[Scroll Lock] [Scroll
Lock] [n] [K] [U] [Enter]
Brings the KVM and USB hub focus to the computer attached to
the specifi ed port. The audio focus remains where it is.
[Scroll Lock] [Scroll
Lock] [n] [K] [S] [Enter]
Brings the KVM and audio focus to the computer attached to the
specifi ed port. The USB hub focus remains where it is.
[Scroll Lock] [Scroll
Lock] [n] [U] [S] [Enter]
Brings the USB hub and audio focus to the computer attached
to the specifi ed port. The KVM focus remains where it is.
Note: The n stands for the computer’s Port ID number (1, 2, 3, or 4).
Hotkey Setting Mode
Invoking HSM
To invoke HSM do the following:
1. Press and hold down the Num Lock key
2. Press and release the minus key
3. Release the Num Lock key
HSM Summary Table
Key Function
[B] Toggles the beeper On and Off.
[E] Toggles between Power on Detection enable and disable.
[H] Toggles between the default and alternate HSM invocation keys.
Fonctionnement
Commutation manuelle des ports :
Pour transférer le contrôle total (audio, KVM et USB) à un ordinateur, vous pouvez soit
: a) appuyer sur la touche de sélection du port correspondant à votre ordinateur sur le
panneau tactile ; soit : b) appuyer une fois sur la touche de mode du panneau tactile
(les trois icônes du panneau tactile de mode clignotent) puis appuyer sur la touche de
sélection de port qui correspond à cet ordinateur sur le panneau tactile. Les trois icônes
de port s’allument.
Utilisation des raccourcis clavier
Pour sélectionner un port à l’aide des touches de raccourci, vous devez d’abord
appuyer deux fois sur la touche Arrêt défi l. Les tableaux ci-dessous décrivent les actions
correspondant aux différentes combinaisons de touches de raccourci.
Remarque : si la touche Arrêt défi l crée des confl its avec d’autres programmes actifs,
utilisez la touche Ctrl à la place.
Accès direct à un port
Raccourci clavier Action
[Arrêt défi l] [Arrêt défi l]
[n] [Entrée]
Transfère les contrôles KVM, USB et audio sur l'ordinateur connecté au
port correspondant à l'ID de port spécifi é.
[Arrêt défi l] [Arrêt défi l]
[n] [K] [Entrée]
Transfère uniquement le contrôle KVM sur l'ordinateur connecté au port
spécifi é. Les contrôles USB et audio ne changent pas de port.
[Arrêt défi l] [Arrêt défi l]
[n] [U] [Entrée]
Transfère uniquement le contrôle USB sur l'ordinateur connecté au port
spécifi é. Les contrôles KVM et audio ne changent pas de port.
[Arrêt défi l] [Arrêt défi l]
[n] [S] [Entrée]
Transfère uniquement le contrôle audio sur l'ordinateur connecté au port
spécifi é. Les contrôles KVM et USB ne changent pas de port.
[Arrêt défi l] [Arrêt défi l]
[n] [K] [U] [Entrée]
Transfère les contrôles KVM et USB sur l'ordinateur connecté au port
spécifi é. Le contrôle audio ne change pas de port.
[Arrêt défi l] [Arrêt défi l]
[n] [K] [S] [Entrée]
Transfère les contrôles KVM et audio sur l'ordinateur connecté au port
spécifi é. Le contrôle USB ne change pas de port.
[Arrêt défi l] [Arrêt défi l]
[n] [U] [S] [Entrée]
Transfère les contrôles USB et audio sur l'ordinateur connecté au port
spécifi é. Le contrôle KVM ne change pas de port.
Remarque : Le n correspond au numéro d’ID de port de l’ordinateur (1, 2, 3 ou 4).
Hotkey Setting Mode
Manejo con teclas de acceso directo
Para seleccionar un puerto mediante teclas de acceso directo, primero debe pulsar
dos veces la tecla Bloq Despl. Las tablas siguientes describen las acciones de cada
combinación de teclas.
Nota: si la tecla Bloq Despl es utilizada por otros programas instalados y crea confl ictos,
puede emplear la tecla Ctrl en su lugar.
Pasar directamente a un puerto
Teclas de acceso directo Acción
[Bloq Despl] [Bloq Despl]
[n] [Intro]
Pasa el control KVM, USB y de audio a la computadora conectada al
puerto del ID de puerto especifi cado.
[Bloq Despl] [Bloq Despl]
[n] [K] [Intro]
Pasa solamente el control KVM a la computadora que está conectada
al puerto especifi cado. La transmisión de la señal USB y la de audio se
mantienen en los puertos que ya están activados.
[Bloq Despl] [Bloq Despl]
[n] [U] [Intro]
Pasa solamente la transmisión de la señal USB a la computadora que
está conectada al puerto especifi cado. El control KVM y la transmisión de
la señal de audio se mantienen en los puertos que ya están activados.
[Bloq Despl] [Bloq Despl]
[n] [S] [Intro]
Pasa solamente la transmisión de la señal de audio a la computadora que
está conectada al puerto especifi cado. El control KVM y la transmisión de
la señal USB se mantienen en los puertos que ya están activados.
[Bloq Despl] [Bloq Despl]
[n] [K] [U] [Intro]
Pasa el control KVM y la transmisión de la señal USB a la computadora
que está conectada al puerto especifi cado. La transmisión de la señal de
audio se mantiene en el puerto que ya está activado.
[Bloq Despl] [Bloq Despl]
[n] [K] [S] [Intro]
Pasa el control KVM y la transmisión de la señal de audio a la
computadora que está conectada al puerto especifi cado. La transmisión
de la señal USB se mantiene en el puerto que ya está activado.
[Bloq Despl] [Bloq Despl]
[n] [U] [S] [Intro]
Pasa la transmisión de la señal USB y la de audio a la computadora que
está conectada al puerto especifi cado. El control KVM se mantiene en el
puerto que ya está activado.
Nota: La n identifi ca el ID de puerto de la computadora (1, 2, 3 ó 4).
Modo de teclas de acceso directo
Activar el modo de teclas de acceso directo
Para activar el modo de teclas de acceso directo:
1. Mantenga pulsada la tecla Bloq Num.
2. Pulse la tecla Menos [-] y suéltela.
3. Suelte la tecla Bloq Num.
Bedienung
Manuelle Portumschaltung:
Um alle Signale (Audio, KVM und USB) auf einen bestimmten Computer
umzuschalten, führen Sie einen der folgenden Schritte aus: a) Tippen Sie auf das
berührungsempfindliche Portauswahlfeld, das zum gewünschten Computer gehört,
oder: b) Tippen Sie einmal auf das berührungsempfindliche Betriebsartenauswahlfeld
Mode (die drei Betriebsartenanzeigen blinken), und tippen Sie anschließend auf das
berührungsempfindliche Portauswahlfeld, das zum gewünschten Computer gehört.
Daraufhin leuchten alle drei Portsymbole.
Hotkey-Bedienung
Die Portumschaltung erfolgt grundsätzlich durch doppeltes Betätigen der Taste Rollen.
In den folgenden Tabellen werden die einzelnen Aktionen beschrieben, die über die
verschiedenen Tastenkombinationen aufgerufen werden können.
Hinweis: Wenn die Taste Rollen mit anderen Programmen
Ports direkt anwählen
Hotkey Aktion
[Rollen] [Rollen] [n]
[Enter]
Schaltet den KVM, USB-Hub und die Audiosignale auf den Computer um,
der mit dem Port n verbunden ist.
[Rollen] [Rollen] [n]
[K] [Enter]
Schaltet nur die KVM-Signale auf den Computer um, der mit dem
angegebenen Port verbunden ist. Die USB- und Tonsignale bleiben davon
unberührt.
[Rollen] [Rollen] [n]
[U] [Enter]
Schaltet nur die USB-Signale auf den Computer um, der mit dem
angegebenen Port verbunden ist. Die KVM- und Tonsignale bleiben davon
unberührt.
[Rollen] [Rollen] [n]
[S] [Enter]
Schaltet nur die Tonsignale auf den Computer um, der mit dem angegebenen
Port verbunden ist. Die KVM- und USB-Signale bleiben davon unberührt.
[Rollen] [Rollen] [n]
[K] [U] [Enter]
Schaltet die KVM- und USB-Signale auf den Computer um, der mit dem
angegebenen Port verbunden ist. Die Tonübertragung bleibt davon unberührt.
[Rollen] [Rollen] [n]
[K] [S] [Enter]
Schaltet die KVM- und Tonsignale auf den Computer um, der mit dem
angegebenen Port verbunden ist. Die USB-Signale bleiben davon unberührt.
[Rollen] [Rollen] [n]
[U] [S] [Enter]
Schaltet die USB- und Tonsignale auf den Computer um, der mit dem
angegebenen Port verbunden ist. Die KVM-Steuerung bleibt davon unberührt.
Hinweis: Der Parameter n steht für die Port-ID des betreffenden Computers (1, 2, 3 oder 4).
[L]
Switches the front panel USB function from Datalink mode to Quick
Charge mode.
[M] Toggles between mouse emulation enable and disable.
[N] Toggles between Keyboard Emulation mode enable and disable.
[T] Toggles between the default and alternate Port Switching keys.
[W]
Toggles between Mouse Port Switching enabled and disabled. When
Mouse Port Switching is enabled click the mouse wheel twice to switch
ports. Mouse emulation must be enabled fi rst for this feature to work.
[R] [Enter] Resets the hotkey settings to their default status.
[X] [Enter] Enables/Disables the Port Switching keys.
[u][p][g][r][a][d]
[e] [Enter]
Invokes Firmware Upgrade Mode.
[F1]
To set the Keyboard and mouse to use SPC mode so that it can work
under special operating systems as a standard (104 key) keyboard and
mouse .
[F2] Enables Mac keyboard emulation.
[F4] Print the switch’s current settings via a text editor or word processor.
[F5] Performs a reset on all USB devices.
[F10] Auto detects the keyboard operating platform
Mode de raccourcis clavier
Activation du mode de raccourcis clavier
Pour activer le mode de raccourcis clavier, procédez comme suit :
1. Appuyez sur la touche Verr num et maintenez-la enfoncée.
2. Appuyez sur la touche Moins [-], puis relâchez-la.
3. Relâchez la touche Verr num.
Tableau récapitulatif du mode de raccourcis clavier
Touche Fonction
[B] Active ou désactive le signal sonore.
[E] Active ou désactive la détection des dispositifs sous tension.
[H]
Bascule entre les touches par défaut et les autres touches d'activation du mode
de raccourcis clavier.
[L]
Fait basculer la fonction du port USB du panneau avant entre le mode Liaison de
données et le mode Recharge rapide.
[M] Active ou désactive l'émulation de souris.
[N] Active ou désactive l'émulation du clavier.
[T]
Bascule entre les touches par défaut et les autres touches de commutation de
ports.
[W]
Active ou désactive la commutation de port par la souris. Lorsque la commutation
de port par la souris est activée, cliquez deux fois sur la molette de la souris
pour changer de port. Pour que cette fonction marche, il faut d’abord avoir activé
l’émulation de la souris.
[R] [Entrée] Rétablit les paramètres par défaut des raccourcis clavier.
[X] [Entrée] Active ou désactive les touches de commutation de ports.
[u][p][g][r][a][d][e]
[Entrée]
Active le mode de mise à jour du microprogramme.
[F1]
Paramètre le clavier et la souris pour qu’ils utilisent le mode SPC (Special PC)
afi n de pouvoir fonctionner sous des systèmes d’exploitation spéciaux comme
une souris et un clavier standards (clavier de 104 touches).
[F2] Active l'émulation de clavier Macintosh.
[F4]
Imprime les paramètres actuels du commutateur par le biais d’un éditeur ou d’un
traitement de texte.
[F5] Réinitialise tous les périphériques USB.
[F10] Détecte automatiquement la plateforme de fonctionnement du clavier.
Resumen de las teclas de acceso directo
Tecla Función
[B] Activa o desactiva las señales acústicas.
[E] Activa o desactiva la detección automática de computadoras encendidas.
[H]
Alterna entre las teclas estándar o alternativa para invocar el modo de teclas de
acceso directo.
[L]
Alterna el modo operativo del puerto USB de la transmisión de datos al modo de
carga rápida para dispositivos USB conectados.
[M] Activa o desactiva la emulación del mouse.
[N] Activa o desactiva la emulación del teclado.
[T] Alterna entre las teclas estándar o alternativa de conmutación de puertos.
[W]
Activa o desactiva la conmutación de puertos con el mouse. Si la función está
activada, pulse dos veces en el botón del rodillo del mouse para pasar a otro
puerto. Para que esta opción funcione, la emulación del mouse tiene que estar
activada.
[R] [Intro]
Restablece los ajustes de las teclas de acceso directo a sus valores
predeterminados.
[X] [Intro] Activa o desactiva las teclas de conmutación de puertos.
[u][p][g][r][a][d][e]
[Intro]
Activa el modo de actualización del fi rmware.
[F1]
Establece el modo para sistemas operativos especiales del teclado y mouse,
simulando en este caso un teclado (de 104 teclas) y un mouse estándar.
[F2] Activa la emulación de teclado Macintosh.
[F4]
Imprime los ajustes actuales del conmutador mediante un editor o procesador de
textos.
[F5] Efectúa un reseteo en todos les dispositivos USB.
[F10] Detecta el tipo de teclado automáticamente.
Hotkey-Einrichtung
Hotkey-Modus (HSM) aktivieren
Gehen Sie zur Aktivierung des HSM folgendermaßen vor:
1. Halten Sie die Taste Num gedrückt.
2. Drücken Sie die Taste Minus, und lassen Sie sie los.
3. Lassen Sie die Taste Num los.
Hotkey-Übersichtstabelle
Taste Funktion
[B] Schaltet die Tonsignale ein bzw. aus.
[E] Aktiviert bzw. deaktiviert die automatische Erkennung eingeschalteter Geräte.
[H]
Schaltet zwischen den vordefi nierten und den alternativen Hotkey-
Aktivierungstasten um.
[L]
Schaltet die USB-Signalübertragung der vorderseitigen USB-Ports aus und dafür
die Schnellladefunktion ein.
[M] Aktiviert bzw. deaktiviert die Mausemulation.
[N] Aktiviert bzw. deaktiviert die Tastaturemulation.
[T] Schaltet zwischen den vordefi nierten und den alternativen Portumschalttasten um.
[W]
Aktiviert bzw. deaktiviert die Portumschaltung per Mausklick. Bei aktivierter
Portumschaltung per Maus klicken Sie zweimal mit der Radtaste, um zwischen den
Ports umzuschalten. Damit diese Funktion ordnungsgemäß funktioniert, müssen
Sie zuvor die Mausemulation aktiviert haben.
[R] [Enter] Setzt die Hotkey-Einstellungen auf die Standardwerte zurück.
[X] [Enter] Aktiviert bzw. deaktiviert die Tasten zur Portumschaltung.
[u][p][g][r][a][d]
[e][Enter]
Aktiviert den Modus zur Firmwareaktualisierung.
[F1]
Aktiviert eine Tastatur- und Maus-Kompatibilitätsart für spezielle PCs, sodass sie
unter besonderen Betriebsystemen als Standardtastatur (104 Tasten) und -Maus
arbeiten.
[F2] Aktiviert die Macintosh-Tastaturemulation.
[F4]
Druckt die aktuelle Konfi guration des Switch über einen Texteditor oder ein
Textverarbeitungsprogramm aus.
[F5] Setzt alle USB-Geräte zurück.
[F10] Erkennt die verwendete Tastaturplattform automatisch.
Hardware Installation
B
CS1942 Front View
CS1944 Front View
CS1942/CS1944 Rear View
CS1944 Side View
Package Contents
1 CS1942 / CS1944 2/4-port USB 2.0 Dual View Mini DisplayPort KVMP Switch
2 Mini DisplayPort 1.1a 1 m Cable (CS1942)
2 Mini DisplayPort 1.1a 2 m Cable (CS1942)
2 USB 2.0 1.8 m Cable (CS1942)
2 Audio Jack 1.8 m Cable Sets (CS1942)
4 Mini DisplayPort 1.1a 1 m Cable (CS1944)
4 Mini DisplayPort 1.1a 2 m Cable (CS1944)
4 USB 2.0 1.8 m Cable (CS1944)
4 Audio Jack 1.8 m Cable Sets (CS1944)
1 Power Adapter
1 User Instructions
USB 2.0 Mini DisplayPort
Dual View KVMP Switch
Quick Start Guide
CS1942 / CS1944
2 3 2
1 4 5
4 3
2 1
32 2
1 4 5
2
Mini DisplayPort Cable
3
42
7
5
9
1
10
9
6
8
Important Notice
Considering environmental protection, ATEN does not provide a fully
printed user manual for this product. If the information contained in the
Quick Start Guide is not enough for you to confi gure and operate your
product, please visit our website www.aten.com, and download
the full user manual.
Online Registration
http://eservice.aten.com
Technical Phone Support
International:
886-2-86926959
North America:
1-888-999-ATEN Ext: 4988
United Kingdom:
44-8-4481-58923
All information, documentation, firmware, software utilities, and
specifi cations contained in this package are subject to change without
prior notification by the manufacturer. Please visit our website http://
www.aten.com/download/?cid=dds for the most up-to-date versions.
EMC Information
FEDERAL COMMUNICATIONS COMMISSION INTERFERENCE STATEMENT:
This equipment has been tested and found to comply with the limits for a Class B
digital service, pursuant to Part 15 of the FCC rules. These limits are designed to provide
reasonable protection against harmful interference in a residential installation. Any
changes or modifi cations made to this equipment may void the user s authority to
operate this equipment. This equipment generates, uses, and can radiate radio frequency
energy. If not installed and used in accordance with the instructions, may cause harmful
interference to radio communications. However, there is no guarantee that interference
will not occur in a particular installation. If this equipment does cause harmful
interference to radio or television reception, which can be determined by turning the
equipment off and on, the user is encouraged to try to correct the interference by one or
more of the following measures:
- Reorient or relocate the receiving antenna;
- Increase the separation between the equipment and receiver;
- Connect the equipment into an outlet on a circuit different from that to
which the receiver is connected;
- Consult the dealer/an experienced radio/television technician for help.
FCC Caution: Any changes or modifi cations not expressly approved by the party
responsible for compliance could void the user's authority to operate this equipment.
This device complies with Part 15 of the FCC Rules. Operation is subject to the following
two conditions:(1) this device mat not cause harmful interference, and(2) this device
must accept any interference received, including interference that may cause undesired
operation.
The following contains information that relates to China:
www.aten.com
www.aten.com
www.aten.com
www.aten.com
Hardware Review
A

サポートお問合せ窓口:+81-3-5615-5811
Switch KVMP Dual View USB 2.0 Mini DisplayPort CS1942/CS1944 – Guida di avviamento rapido
CS1942 / CS1944 USB 2.0 Mini DisplayPortデュアルディスプレイ対応 KVMPスイッチ クイックスタートガイド
CS1942 / CS1944 USB 2.0 미니 디스플레이 포트 듀얼 뷰 KVMP 스위치 퀵 스타트 가이드
CS1942 / CS1944 USB 2.0 Mini DisplayPort 双屏幕多电脑切换器快速安装卡
Online Registration
http://eservice.aten.com
Technical Phone Support
International:
886-2-86926959
North America:
1-888-999-ATEN Ext: 4988
United Kingdom:
44-8-4481-58923
Hardware Installation
B
CS1942 Front View CS1944 Front View
CS1942/CS1944 Rear View CS1944 Side View
Package Contents
1 CS1942 / CS1944 2/4-port USB 2.0
Dual View Mini DisplayPort KVMP
Switch
2 Mini DisplayPort 1.1a 1 m Cable
(CS1942)
2 Mini DisplayPort 1.1a 2 m Cable
(CS1942)
2 Custom USB 2.0 1.8 m KVM Cable
Sets (CS1942)
2 Audio Jack 1.8 m Cable Sets
(CS1942)
4 Mini DisplayPort 1.1a 1 m Cable
(CS1944)
4 Mini DisplayPort 1.1a 2 m Cable
(CS1944)
4 Custom USB 2.0 1.8 m KVM Cable
Sets (CS1944)
4 Audio Jack 1.8 m Cable Sets
(CS1944)
1 Power Adapter
1 User Instructions
2 3 2
1 4 5
4 3
2 1
32 2
1 4 5
2
Mini DisplayPort Cable
3
42
7
5
9
1
10
9
6
8
Hardware Review
A
Requisiti
Console
• Due monitor* Mini DisplayPort
• Un mouse USB e una tastiera USB
• Microfono e altoparlanti
Computer
• Mini DisplayPort*
• Porte USB di tipo A; porte audio (opzionali)
* DisplayPort richiede l’adattatore MDP
Cavi
• Due/Quattro cavi Mini DisplayPort 1.1a da 1m e due/quattro cavi Mini DisplayPort 1.1a
da 2 m, acclusi nella confezione
• Due/Quattro cavi USB 2.0 x 1 e due/quattro set di cavi jack audio da 3,5mm x 2 da 1,8 m,
acclusi nella confezione
Hardware
A
CS1942/CS1944 vista anteriore
1. Pannello del LED di stato
2. Touch panel selezione porta
3. Touch panel selezione modalità
4. Porte audio analogiche
5. Porta USB 2.0 periferica
CS1942/CS1944 vista posteriore
1. Sezione della porta di collegamento alla console
2. Sezione delle porte KVM
3. Presa d’alimentazione
4. Hub USB 2.0
CS1944 vista laterale
2. Sezione delle porte KVM
•
•
•
•
•
•
•
A
요구사항
콘솔
•
두 개의 미니 디스플레이 포트 모니터*
•
A USB 마우스 ; A USB 키보드
•
마이크 와 스피커
Computers
•
Mini DisplayPort*
•
USB 타입 A 포트 ; 오디오 포트 (옵션)
* 디스플레이 포트는 MDP 아답터가 필수임
케이블
•
2/4 미니 디스플레이 포트 1.1a - 1 m 케이블과 2/4미니 디스플레이 포트 1.1a -2 m 케
이블은 패키지에 포함되어 있습니다.
•
2/4 USB 2.0 x 1 와 3.5mm 2/4 오디오 잭 x 2 - 1.8 m 케이블 세트는 패키지에 포함되
어 있습니다.
하드웨어 리뷰
A
CS1942/CS1944 정면
1. LED 상태패널
2. 포트 선택 터치 패널
3. 모드 선택 터치 패널
4. 아날로그 오디오 포트
5. USB 2.0 주변장치 포트
CS1942/CS1944 후면
1. 콘솔 포트 부분
2. KVM 포트 부분
3. 전원 잭
4. USB 2.0 허브
CS1944 옆 면
2. KVM 포트 부분
系统需求
控制端
•
两台Mini DisplayPort 显示器
•
一组USB鼠标, 一组USB键盘
•
麦克风和喇叭
电脑端
•
Mini DisplayPort*
•
USB Type A 连接端口;
•
音频连接端口 (选择性)
* 如使用DisplayPort接口需使用DP转mDP 接口转换器
线缆
•
包装内附有两条/四条1米Mini DisplayPort 1.1a –线缆, 及两条/四条-2米
Mini DisplayPort 1.1a线缆
•
包装内附有两条/四条USB 2.0线缆及两条/四条 1.8 米的3.5mm音频线缆组
硬件检视
A
CS1942/CS1944前视图
1. LED状态面板
2. 触控式面板连接端口选择按键
3. 模式选择按钮
4. 模拟音频连接端口
5. USB 2.0 外围连接端口
CS1942/CS1944 后视图
1. 控制端连接端口区
2. 电脑连接端口区
3. 电源插孔
4. USB 2.0 外围连接端口
•
•
•
•
•
•
•
•
A
Installazione dell’hardware
B
1. Collegare la tastiera e il mouse USB alle porte USB della console poste sul pannello
posteriore del dispositivo.
2. Collegare lo/gli schermo/i della console alla porta Mini DisplayPort della console situata
sul pannello posteriore del dispositivo e accendere i(l) monitor.
*Per i collegamenti potrebbe essere necessario un adattatore da DP a mDP.
3. Collegare il microfono e le cuffi e alle prese del microfono e dei diffusori per il
collegamento alla console poste sul pannello anteriore del dispositivo.
* Il microfono e le cuffi e collegati a questo pannello hanno la precedenza su quelli del
pannello posteriore. I cavi audio analogici sono necessari sul lato CPU di questo
collegamento.
4. Collegare il microfono ed i diffusori analogici/digitali (Mini-TOSLINK) alle porte audio
poste sul pannello posteriore dell'unità.
* Potrebbero essere necessari dei cavi Mini-TOSLINK per l’apparecchiatura audio
digitale.
5. Utilizzare il set di cavi Mini DisplayPort 1.1.a per collegare il connettore Mini
DisplayPort in una porta libera Mini DisplayPort “A” nella sezione porte KVM dello
switch (CPU 1, CPU 2 ecc.) e poi inserire il cavo USB 2.0 e cavi del microfono/diffusori
nelle rispettive prese.
6. All’altra estremità dei set di cavi del punto 5, inserire i cavi Mini DisplayPort 1.1a, USB,
del microfono e dei diffusori nelle rispettive porte sul computer.
7. Utilizzando il cavo Mini DisplayPort 1.1a, inserire il connettore del cavo Mini
DisplayPort nella presa Mini DisplayPort B nella stessa sezione di porte KVM dello
switch.
8. All’altra estremità del cavo Mini DisplayPort 1.1a del punto 7, inserire i cavi del monitor
nelle rispettive porte sul computer.
Nota: ripetere i passaggi 5, 6, 7 e 8 per ciascun sistema PC a doppio schermo da
installare.
9. Collegare le periferiche USB alla sezione periferiche USB posta sul pannello anteriore
o posteriore (opzionale).
10. Collegare l’alimentatore in dotazione a una presa di corrente CA, quindi inserire il
cavo dell’alimentatore nella presa d’alimentazione dello switch.
11. Accendere i computer.
B
하드웨어 설치
B
1. 장비의 후면 패널에 있는 USB 콘솔 포트에 USB 키보드와 USB 마우스를 꽂으세요.
2. 모니터 장치의 후면 패널 및 전원에 위치한 미니 디스플레이 포트 콘솔로 모니터(들)을 연
결합니다.
*연결 시 DP to mDP 아답터가 필요할 수 있습니다.
3. 장치 전면 패널에 있는 콘솔 마이크와 스피커 잭에 아날로그 마이크와 헤드폰을 연결합니
다.
* 아날로그 케이블은 CPU에 연결하게 되며, 앞서 후면에는 마이크와 헤드폰을 패널에 연
결이 되어 있어야 합니다.
4. 아날로그/디지털 (미니 TOSLINK) 마이크와 스피커를 장치의 후면에 있는 오디오 콘솔포
트에 연결 합니다.
*디지털 사운드 장비는 별도의 미니-TOSLINK 케이블이 필요할 수 있습니다.
5. 미니 디스플레이 포트 1.1a 케이블 세트를 이용하여, 스위치의 KVM 포트 섹션에서 사용
가능한 미니 디스플레이포트가 “A” 소켓에 미니 디스플레이 포터 커넥터에 플러그 합니
다.(CPU 1, CPU 2, etc.), 그 후에 해당 소켓에 동반 USB 2.0 케이블, 마이크 / 스피커
케이블을 연결합니다.
6. 5단계에서 케이블 다른 끝 쪽에 있는 미니 디스플레이 포트 1.1a, USB 2.0 케이블과 컴퓨
터에 각각의 포트에 마이크/스피커 케이블을 연결합니다.
7. 스위치의 동일한 KVM 포트 섹션의 미니 디스플레이 포트 소켓 B를 다른 미니 디스플레이
포트 1.1 a 케이블을 사용하여 미니 디스플레이 포트 케이블 커넥터에 연결합니다.
8. 7단계에서 케이블 다른 끝 쪽에 있는 미니 디스플레이 포트 1.1a 케이블과 컴퓨터의 해당
포트에 모니터 케이블을 연결합니다.
노트: 설치하는 각각 듀얼 스크린 PC 시스템에서 5,6,7과 8단계를 반복합니다.
9. 전면 또는 후면의 USB 주변장치 포트를(옵션)연결합니다.
10. 스위치 제품과 함께 들어있는 전원 아답터를 AC 전원 후 연결 합니다. 그 후에 제품의 전
원 잭에 연결합니다.
11. 컴퓨터에 전원을 켭니다.
작동
수동 포트 작업:
컴퓨터로부터 KVM 포커스 (오디오, KVM, 그리고 USB)를 가져오기 위해서는 a, 컴퓨터와
상응하는 터치패널의 포트 선택을 눌러보거나 또는 b, 모드 터치 패널(세 아이콘이 모드 터치
CS1944 侧视图
2 电脑连接端口区
硬件安装
B
1. 请将USB键盘及鼠标,插入KVM切换器后方的USB控制端连接端口。
2. 将控制端屏幕连接至位于KVM切换器后方面板的Mini DisplayPort的控制
端连接端口,并且开启屏幕电源。
注意: *如欲连接DisplayPort 接口, 需使用DP转mDP 接口转换器。
3. 请将模拟麦克风和喇叭插入KVM切换器前方的音频连接端口
注意: 相较于插在切换器后方的麦克风跟喇叭,可优先使用音频功能。连接
电脑端模拟音频时, 需使用模拟音频线缆
4. 将模拟/数字(Mini-TOSLINK) 麦克风和喇叭插入位于KVM切换器后方面板
上的音频控制端连接端口。
注意: 数字音响设备需要使用Mini-TOSLINK 线缆
5. 将Mini DisplayPort 1.1a 线缆一端插入KVM切换器电脑端区标注为A的连
接端口插孔,然后再将USB 2.0,麦克风和喇叭线缆的一端插入相对应的连接
端口。
注意: 所有接线,必须要插在同一组电脑连接端口上(例如:全部都在第1端
口或者全部都在第2端口)。
每一个插座上均有标示相对应的图示。
6. 延续步骤5的安装, 将所有线缆的另外一端插入电脑端相对应的连接端口.
7. 将另外一条 Mini DisplayPort 1.1a 线缆一端插入KVM切换器电脑端区标
注为B的连接端口
8. 延续步骤7的安装, 将所有线缆的另外一端插入电脑端相对应的连接端口.
注意: 当您正在安装双屏幕系统时,请重复步骤5,6,7和8。
9. 请将您的USB2.0外围设备,连接至前板或后板的USB Type A 外围连接端口
(可选择的)。
10. 将包装所附的电源变压器,插至AC电源,并将电源变压器另外一端,插到
KVM切换器上的电源插孔。
11. 开启电脑电源。
B
Funzionamento
Funzionamento manuale delle porte:
Per spostare tutti i dispositivi (audio, KVM e USB) su un computer, procedere in uno
dei seguenti modi: a) premere il touch panel di selezione della porta corrispondente al
computer oppure: b) premere una volta il touch panel Mode (l’icona del touch panel
Mode lampeggerà) e poi premere il touch panel di selezione dalla porta corrispondente al
computer. Tutte e tre le icone delle porte si illumineranno.
Funzionamento dei tasti di scelta rapida
Tutte le commutazioni di porta iniziano premendo due volte il tasto Bloc Scorr. La tabella
seguente descrive le azioni eseguite da ogni combinazione.
Nota: Se l’impiego del tasto Bloc Scorr entra in confl itto con altri programmi in uso sul
computer, è possibile utilizzare il tasto Ctrl.
Andare direttamente ad una porta
Tasti di scelta rapida Azione
[Bloc Scorr] [Bloc
Scorr] [n] [Invio]
Seleziona il gruppo KVM, hub USB e l’audio del computer
collegato alla porta corrispondente all’ID della porta specifi cato.
[Bloc Scorr] [Bloc
Scorr] [n] [K] [Invio]
Seleziona solo il KVM del computer collegato alla porta
specifi cata. L’hub USB e l’audio rimangono sulla porta su cui
erano.
[Bloc Scorr] [Bloc
Scorr] [n] [U] [Invio]
Seleziona solo l’hub USB del computer collegato alla porta
specifi cata. Il KVM e l’audio rimangono sulla porta su cui erano.
[Bloc Scorr] [Bloc
Scorr] [n] [S] [Invio]
Seleziona solo l’audio del computer attaccato alla porta
specifi cata. Il KVM e l’hub USB rimangono sulla porta su cui
erano.
[Bloc Scorr] [Bloc
Scorr] [n] [K] [U] [Invio]
Seleziona il KVM e l’hub USB del computer collegato alla porta
specifi cata. L’audio selezionato rimane lo stesso.
[Bloc Scorr] [Bloc
Scorr] [n] [K] [S] [Invio]
Seleziona il KVM e l’audio del computer collegato alla porta
specifi cata. L’hub USB selezionato rimane lo stesso.
[Bloc Scorr] [Bloc
Scorr] [n] [U] [S] [Invio]
Seleziona l’hub USB e l’audio del computer collegato alla porta
specifi cata. Il KVM selezionato rimane lo stesso.
Nota: n indica il numero ID della porta del computer (1, 2, 3 o 4).
패널에서 깜빡임)을 한번 누른 후, 컴퓨터에 상응하는 포트 선택 터치패널을 누릅니다. 세 개
포트 아이콘이 점등합니다.
핫키 동작방법
모든 포트 스위치는 스크롤 잠금 키를 두 번 누르면서 시작합니다. 아래 표는 각 조합에서 수
행하는 동작을 설명합니다.
노트: 컴퓨터에서 실행중인 다른 프로그램으로 스크롤 잠금 키 충돌하는 경우 ‘Ctrl’키를
대신 사용할 수 있습니다.
빠른 포트 전환
핫키 반응
[Scroll Lock] [Scroll
Lock] [n] [Enter]
KVM, USB hub, 그리고 audio 를 지정된 포트 ID에 해당 포트에
연결된 컴퓨터로 불러옵니다.
[Scroll Lock] [Scroll
Lock] [n] [K] [Enter]
지정된 포트에 연결된 컴퓨터에 KVM 연결을 합니다. USB허브와
오디오 연결은 그대로 남습니다.
[Scroll Lock] [Scroll
Lock] [n] [U] [Enter]
지정된 포트에 연결된 컴퓨터에 USB 허브를 연결 합니다. KVM 과
오디오 연결은 그대로 남습니다.
[Scroll Lock] [Scroll
Lock] [n] [S] [Enter]
지정된 포트에 연결된 컴퓨터에 오디오를 연결 합니다. KVM 과
USB 허브는 그대로 남습니다.
[Scroll Lock] [Scroll
Lock] [n] [K] [U]
[Enter]
지정된 포트에 연결된 컴퓨터에 KVM 과 USB 허브를 연결
합니다. 오디오는 그대로 남습니다.
[Scroll Lock] [Scroll
Lock] [n] [K] [S]
[Enter]
지정된 포트에 연결된 컴퓨터에 KVM 과 오디오를 연결 합니다.
USB 허브는 그대로 남습니다.
[Scroll Lock] [Scroll
Lock] [n] [U] [S]
[Enter]
지정된 포트에 연결된 컴퓨터에 USB 허브와 오디오를 연결
합니다. KVM은 그대로 남습니다.
Note: n 의 준말은 컴퓨터 포트 ID 번호입니다. (1, 2, 3, or 4).
핫키 설정 모드
HSM 호출
HSM을 호출하기 위해 다음을 수행합니다.:
操作方法
手动切换
如欲切换完整的KVM,音源和USB到电脑上,简单的按下连接端口选择按键以对
应到适合的电脑上。全部三个连接端口的图示都会亮灯。
键盘连接端口操作
敲击Scroll Lock 键两次即可切换连接端口.下表为热键执行说明
注意: 如Scroll Lock 键与执行其它程序热键冲突时, 可改为敲击Ctrl 键两次
直接切换至各连接端口
热键 执行工作
[Scroll Lock] [Scroll
Lock] [n] [Enter]
KVM、USB外围、音频切换到指定连接端口所对
应的电脑。
[Scroll Lock] [Scroll
Lock] [n] [K] [Enter]
KVM切换到指定连接端口所对应的电脑。USB跟
音频会停留在同样的位置。
[Scroll Lock] [Scroll
Lock] [n] [U] [Enter]
将USB外围切换到指定连接端口所对应的电脑;而
KVM跟音频会停留在同样的位置。
[Scroll Lock] [Scroll
Lock] [n] [S] [Enter]
将音频切换到指定连接端口所对应的电脑;而
KVM跟USB外围会停留在同样的位罝。
[Scroll Lock] [Scroll
Lock] [n] [K] [U] [Enter]
将KVM跟USB外围同时切换到指定连接端口所对
应的电脑;而音频会在同样的位置。
[Scroll Lock] [Scroll
Lock] [n] [K] [S] [Enter]
将KVM跟音频同时切换到指定连接端口所对应的
电脑;而USB外围会在同样的位罝。
[Scroll Lock] [Scroll
Lock] [n] [U] [S] [Enter]
将USB外围跟音频同时切换到指定连接端口所对应
的电脑;而KVM会停留在同样的位罝。
注意: n 代表电脑的ID 号码 (1, 2, 3或 4).
热键设定模式
启动热键设定模式
Modalità d’impostazione dei tasti di scelta rapida (HSM)
Richiamare HSM
Per attivare HSM, procedere come segue:
1. Premere e tenere premuto il tasto Bloc Num.
2. Premere e rilasciare il tasto ‘meno’
3. Rilasciare il tasto Bloc Num
Tabella riassuntiva dei tasti di scelta rapida
Tasto Funzione
[B] Attiva e disattiva il segnale acustico di On/Off
[E] Attiva e disattiva la funzione di rilevamento dei computer accesi.
[H] Si sposta fra i tasti di attivazione HSM predefi nito ed alternativo
[L]
Passa la modalità della funzione USB del pannello anteriore da collegamento dati
a ricarica rapida per i dispositivi USB colelgati.
[M] Attiva e disattiva l’emulazione del mouse.
[N] Attiva e disattiva l’emulazione della tastiera.
[T] Si sposta fra i tasti di cambiamento della porta predefi nito ed alternativo
[W]
Attiva e disattiva il cambio della porta facendo clic con il mouse. Quando il cambio
della porta con il clic del mouse è abilitato, fare due volte clic con la rotellina del
mouse per cambiare porta. L’emulazione del mouse deve prima essere abilitata
per poter utilizzare questa funzione.
[R] [Invio] Ripristina le impostazioni predefi nite di fabbrica dei tasti di scelta rapida.
[X] [Invio] Attiva/disattiva i tasti di cambio della porta.
[u] [p] [g] [r] [a] [d]
[e] [Invio]
Richiama la Modalità aggiornamento fi rmware
[F1]
Per impostare tastiera e mouse per utilizzare la modalità SPC in modo da poter
funzionare con sistemi operativi speciali come mouse e tastiera standard (a 104
tasti).
[F2] Attiva/disattiva l’emulazione della tastiera Mac.
[F4]
Stampa le impostazioni attuali dello switch per mezzo di un editor o di un
elaboratore di testo.
[F5] Esegue un ripristino di tutti i dispositivi USB.
[F10] Rileva automaticamente la piattaforma operativa della tastiera.
1. Num Lock 키를 누르고 있는다.
2. 마이너스 키를 눌렀다가 뗀다.
3. Num Lock 를 뗀다.
HSM Summary Table
키 기능
[B] On 및 Off 호출기를 전환합니다.
[E] 전원 감지 활성화와 비활성화를 전환합니다.
[H] 기본과 대체 HSM 호출 키 사이에서 전환합니다.
[L]
데이터 연결 모드에서 빠른 충전 모드로 전면 패널USB 기능을 스위치
합니다.
[M] 마우스 에뮬레이션 간에 활성화와 비활성에서 전환 합니다.
[N] 키보드 에뮬레이션 모드 사이에서 활성화 와 비활성화에서 전환합니다.
[T] 기본 및 대체 포트 스위칭 키 사이에서 전환합니다..
[W]
마우스 포트 스위칭 활성화와 비활성화 에서 전환합니다. 마우스 포트
스위칭이 활성화일 때 마우스 휠을 두번 클릭하여 포트를 전환합니다. 이
기능이 작동하기 위해서 먼저 마우스 에뮬레이션은 활성화 되어야 합니다.
[R] [Enter] 핫키 세팅을 초기화 하고 기본값으로 돌아갑니다.
[X] [Enter] 활성화 / 비활성화 포트 스위칭 키
[u][p][g][r][a]
[d][e] [Enter]
펌웨어 업그레이드 모드 호출
[F1]
키보드와 표준(104키) 키보드 및 마우스와 같은 특수 운영체제에서 동작
할 수 있도록 SPC 모드를 사용하기 위해 마우스를 설정합니다.
[F2] Mac 키보드 에뮬레이션을 활성화 합니다.
[F4]
워드 프로세서를 위한 텍스트 편집을 통해 스위치의 현재 설정을
인쇄합니다.
[F5] 모든 USB 장치에 대한 재설정을 수행합니다.
[F10] 자동 키보드 운영 플랫폼을 감지합니다.
执行下列步骤即可启动热键设定模式:
1. 按住【Num Lock】键不放
2. 再按【-】键后放掉
3. 最后放掉【Num Lock】键
HSM 总表
热键 功能
[B] 开关蜂鸣器功能。
[E] 开启/关闭电源启动侦测功能.。
[H] 在默认和备用的热键设定模式启动热键之间切换。
[L] 将前板USB datalink 功能切换为快速充电模式
[M] 开启/关闭鼠标仿真功能。.
[N] 开启/关闭键盘仿真功能。
[T] 在默认和替代的连接端口切换键间进行切换。.
[W]
开启/关闭鼠标连接端口切换功能。开启鼠标切换连接端口功能
后, 只需轻按滚轮两次即可切换连接端口.
[R] [Enter] 重置热键设定回默认状态。
[X] [Enter] 启动/关闭连接端口切换键。
[u][p][g][r]
[a][d][e]
[Enter]
启动固件升级模式。
[F1]
将键盘及鼠标设定为使用SPC模式,以在特殊的操作系统下,如同
使用标准的键盘(104键)及鼠标一样进行操作。
[F2] 启动Mac键盘仿真。
[F4] 通过文字编辑或文书处理以打印切换器目前的设定。
[F5] 在USB设备上执行重置动作。.
[F10] 关闭键盘仿真,启动(by pass) 键盘模式。
The following contains information that relates
to China:
www.aten.com
www.aten.com
www.aten.com
www.aten.com
010-5255-0110
www.aten.com
Phone: 02-467-6789
-
 1
1
-
 2
2


in altre lingue
- English: ATEN CS1942 Quick start guide
- français: ATEN CS1942 Guide de démarrage rapide
- español: ATEN CS1942 Guía de inicio rápido
- Deutsch: ATEN CS1942 Schnellstartanleitung
- 日本語: ATEN CS1942 クイックスタートガイド