Eizo MX210 Manuale del proprietario
- Categoria
- TV
- Tipo
- Manuale del proprietario

Important
Please read this User’s Manual and Setup Manual (separate volume)
carefully to familiarize yourself with safe and effective usage.
• Please refer to the Setup Manual for basic information ranging from
connection of the monitor to a PC to using the monitor.
• The latest User’s Manual is available for download from our web site:
http://www.eizo.com
Instructions for Use
■User’s Manual

2
SAFETY SYMBOLS
SAFETY SYMBOLS
This manual uses the safety symbols below. They denote critical information. Please read them carefully.
WARNING
Failure to abide by the information in a WARNING may result in serious injury and can be life
threatening.
CAUTION
Failure to abide by the information in a CAUTION may result in moderate injury and/or
propertyor product damage.
Indicates a prohibited action.
Indicates to ground for safety.
No part of this manual may be reproduced, stored in a retrieval system, or transmitted, in any form or by any
means, electronic, mechanical, or otherwise, without the prior written permission of EIZO Corporation.
EIZO Corporation is under no obligation to hold any submitted material or information confidential unless
prior arrangements are made pursuant to EIZO Corporation’s receipt of said information. Although every
effort has been made to ensure that this manual provides up-to-date information, please note that EIZO
monitor specifications are subject to change without notice.
Apple, Mac, Macintosh, iMac, eMac, Mac OS, MacBook, PowerBook, ColorSync, QuickTime, and iBook are
registered trademarks of Apple Inc.
Windows, Windows Vista, Windows Media, SQL Server, and Xbox 360 are registered trademarks of Microsoft
Corporation in the United States and other countries.
VESA is a registered trademark or a trademark of the Video Electronics Standards Association in the United
States and other countries.
EIZO, the EIZO Logo, ColorEdge, DuraVision, FlexScan, FORIS, RadiForce, RadiCS, RadiNET, Raptor, and
ScreenManager are registered trademarks of EIZO Corporation in Japan and other countries.
All other company and product names are trademarks or registered trademarks of their respective owners.
This product has been adjusted specifically for use in the region to which it was originally shipped. If
operated outside this region, the product may not perform as stated in the specifications.
• It shall be assured that the final system is in compliance to IEC60601-1-1 requirement.
• Power supplied equipment can emit electromagnetic waves, that could influence, limit or result in
malfunction of the monitor. Install the equipment in a controlled environment, where such effects are
avoided.
• This is a monitor intended for use in a medical imaging system. It does not support the display of
mammography images for diagnosis.

PRECAUTIONS
3
PRECAUTIONS
IMPORTANT!
• This product has been adjusted specifically for use in the region to which it was originally shipped.
If operated outside the region to which it was originally shipped, the product may not perform as
stated in the specifications.
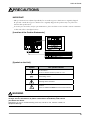
• To ensure personal safety and proper maintenance, please read this section and the caution statements
on the unit (refer to the figure below).
[Location of the Caution Statements]
[Symbol on the Unit]
Symbol This symbol indicates
Power Button
Press to turn the monitor’s power on or off.
Alternating current
Alerting electrical hazard
Caution
Refer to SAFETY SYMBOLS section in this manual.
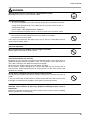
WARNING
If the unit begins to emit smoke, smells like something is burning, or makes
strange noises, disconnect all power connections immediately and contact
your dealer for advice.
Attempting to use a malfunctioning unit may result in fire, electric shock, or
equipment damage.

4
PRECAUTIONS
WARNING
Do not open the cabinet or modify the unit.
Opening the cabinet or modifying the unit may result in fire, electric shock, or burn.
Refer all servicing to qualified service personnel.
Do not attempt to service this product yourself as opening or removing covers may
result in fire, electric shock, or equipment damage.
Keep small objects or liquids away from the unit.
Small objects accidentally falling through the ventilation slots into the cabinet or
spillage into the cabinet may result in fire, electric shock, or equipment damage. If an
object or liquid falls/spills into the cabinet, unplug the unit immediately. Have the unit
checked by a qualified service engineer before using it again.
Place the unit at the strong and stable place.
A unit placed on an inadequate surface may fall and result in injury or equipment
damage.
If the unit falls, disconnect the power immediately and ask your dealer for advice.
Do not continue using a damaged unit. Using a damaged unit may result in fire or
electric shock.
Use the unit in an appropriate location.
Not doing so may result in fire, electric shock, or equipment damage.
• Do not place outdoors.
• Do not place in the transportation system (ship, aircraft, trains, automobiles,
etc.)
• Do not place in a dusty or humid environment.
• Do not place in a location where water is splashed on the screen (bathroom,
kitchen, etc.).
• Do not place in a location where the steam comes directly on the screen.
• Do not place near heat generating devices or a humidifier.
• Do not place in a location where the product is subject to direct sunlight.
• Do not place in an inflammable gas environment.
To avoid danger of suffocation, keep the plastic packing bags away from
babies and children.
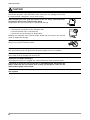
Use the enclosed power cord and connect to the standard power outlet of your
country.
Be sure to remain within the rated voltage of the power cord.Not doing so may result
in fire or electric shock.
Power supply: 100-120/200-240 Vac, 50/60 Hz
To disconnect the power cord, grasp the plug firmly and pull.
Tugging on the cord may damage and result in fire or electric shock. OK

PRECAUTIONS
5
WARNING
The equipment must be connected to a grounded main outlet.
Not doing so may cause in fire or electric shock.
Use the correct voltage.
• The unit is designed for use with a specific voltage only. Connection to another
voltage than specified in this User's Manual may cause fire, electric shock, or
equipment damage.
Power supply: 100-120/200-240 Vac, 50/60 Hz
• Do not overload your power circuit, as this may result in fire or electric shock.
Handle the power cord with care.
• Do not place the cord underneath the unit or other heavy objects.
• Do not pull on or tie the cord.
If the power cord becomes damaged, stop using it. Use of a damaged cord may
result in fire or electric shock.
For the electrical safety, do not connect or disconnect the power cord in the
presence of patients.
Never touch the plug and power cord if it begins to thunder.
Touching them may result in electric shock.
When attaching an arm stand, please refer to the user’s manual of the arm
stand and install the unit securely.
Not doing so may cause the unit to become unattached, which may result in injury or
equipment damage. Before installation, make sure that desks, walls, and others an
arm stand is fixed on have adequate mechanical strength.
When the unit is dropped, please ask your dealer for advice.
Do not continue using a damaged unit. Using a damaged unit may result in fire or
electric shock. When reattaching the tilt stand, please use the same screws and
tighten them securely.
Do not touch a damaged LCD panel directly with bare hands.
The liquid crystal which leaks from the panel is poisonous if it enters the eyes or
mouth.
If any part of the skin or body comes in direct contact with the panel, please wash
thoroughly. If some physical symptoms result, please consult your doctor.
Fluorescent backlight lamps contain mercury (the products that have LED
backlight lamps contain no mercury), dispose according to local, state or
federal laws.
Exposure to elemental mercury can result in effects on the nervous system, including
tremor, memory loss, and headache.

6
PRECAUTIONS
CAUTION
Handle with care when carrying the unit.
Disconnect the power cord and cables when moving the unit. Moving the unit with
the cord attached is dangerous. It may result in injury.
When handling the unit, grip the bottom of the unit firmly with both hands
ensuring the panel faces outward before lifting.
Dropping the unit may result in injury or equipment damage.
Do not block the ventilation slots on the cabinet.
• Do not place any objects on the ventilation slots.
• Do not install the unit in a closed space.
• Do not use the unit laid down or upside down.
Blocking the ventilation slots prevents proper airflow and may result in fire, electric
shock, or equipment damage.
Do not touch the plug with wet hands.
Doing so may result in electrical shock.
Use an easily accessible power outlet.
This will ensure that you can disconnect the power quickly in case of a problem.
Periodically clean the area around the plug.
Dust, water, or oil on the plug may result in fire.
Unplug the unit before cleaning it.
Cleaning the unit while it is plugged into a power outlet may result in electric shock.
If you plan to leave the unit unused for an extended period, disconnect the
power cord from the wall socket after turning off the power switch for the
safety and the power conservation.
This product is only suitable for a patient environment, but not for contact
with a patient.

Notice for this monitor
7
Notice for this monitor
This product is suited to clinical review. It does not support the display of mammography images for diagnosis.
This product has been adjusted specically for use in the region to which it was originally shipped. If the product is
used outside the region, it may not operate as specied in the specications.
This product may not be covered by warranty for uses other than those described in this manual.
The specications noted in this manual are only applicable when the following are used:
· Power cords provided with the product
· Signal cables specied by us
Only use optional products manufactured or specied by us with this product.
As it takes about 30 minutes for the performance of electrical parts to stabilize, adjust the monitor 30 minutes or more
after the monitor power has been turned on.
Monitors should be set to a lower brightness to reduce changes in luminosity caused by long-term use and maintain a
stable display.
When the screen image is changed after displaying the same image for extended periods of time, an afterimage may
appear. Use the screen saver or power save function to avoid displaying the same image for extended periods of time.
Periodic cleaning is recommended to keep the monitor looking new and to prolong its operation lifetime. (Refer to
“Cleaning" on the next page.)
The screen may have defective pixels or a small number of light dots on the screen. This is due to the characteristics of
the panel itself, and is not a malfunction of the product.
The backlight of the LCD panel has a xed lifetime. When the screen becomes dark or begins to icker, please contact
your dealer.
Do not press on the panel or edge of the frame strongly, as this may result in display malfunctions, such as interference
patterns, etc. If pressure is continually applied to the panel, it may deteriorate or damage your panel. (If the pressure
marks remain on the panel, leave the monitor with a black or white screen. The symptom may disappear.)
Do not scratch or press on the panel with any sharp objects, as this may result in damage to the panel. Do not attempt
to brush with tissues as this may scratch the panel.
When the monitor is cold and brought into a room or the room temperature goes up quickly, dew condensation may
occur on the interior and exterior surfaces of the monitor. In that case, do not turn the monitor on. Instead wait until
the dew condensation disappears, otherwise it may cause some damage to the monitor.

8
Notice for this monitor
Cleaning
Attention
• Chemicals such as alcohol and antiseptic solution may cause gloss variation, tarnishing, and fading of the cabinet or
panel, and also quality deterioration of the image.
• Never use any thinner, benzene, wax, and abrasive cleaner, which may damage the cabinet or panel.
Note
• The optional ScreenCleaner is recommended for cleaning the cabinet and panel surface.
If necessary, the stains on the cabinet and panel surface can be removed by moistening part of a soft
cloth with water.
To use the monitor comfortably
• An excessively dark or bright screen may affect your eyes. Adjust the brightness of the monitor
according to the environmental conditions.
• Staring at the monitor for a long time tires your eyes. Take a 10-minute rest every hour.

Table of Contents
9
Table of Contents
Cover ............................................................. 1
PRECAUTIONS...................................................... 3
Noticeforthismonitor.......................................... 7
Cleaning................................................................. 8
Tousethemonitorcomfortably........................... 8
TableofContents.................................................. 9
1.Introduction...................................................... 10
1-1.Features............................................................ 10
1-2.ButtonsandIndicators.....................................11
1-3.UtilityDisk......................................................... 12
2.Installation........................................................ 13
2-1.ConnectingTwoPCstotheMonitor............... 13
2-2.MakingUseofUSB(UniversalSerialBus)......14
3.ScreenAdjustmentandSettings................... 15
3-1.BasicOperationandFunctions...................... 15
Functions............................................................. 16
3-2.ScreenAdjustment........................................... 17
AnalogInput........................................................ 17
3-3.ColorAdjustment............................................. 20
Simpleadjustment[CALSwitchmode]............. 20
AdvancedAdjustments[Adjustmentmenu]...... 21
3-4.Power-saveSetup............................................ 23
AnalogInput........................................................ 23
DigitalInput.......................................................... 23
3-5.OffTimer........................................................... 24
3-6.Lockingthesettings........................................ 24
3-7.PowerIndicatorSetting................................... 25
3-8.Automaticbrightnessadjustment.................. 25
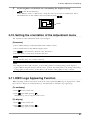
3-9.DisplayingLowerResolutions........................ 26
3-10.SettingtheorientationoftheAdjustmentmenu
27
3-11.EIZOLogoAppearingFunction.................... 27
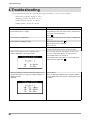
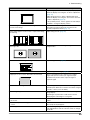
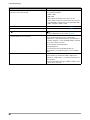
4.Troubleshooting............................................... 28
5.Reference......................................................... 31
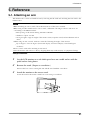
5-1.Attachinganarm.............................................. 31
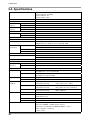
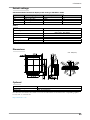
5-2.Specications................................................... 32
Defaultsettings................................................... 33
Dimensions.......................................................... 33
Optional................................................................ 33
PinAssignment................................................... 34
5-3.Glossary............................................................ 35
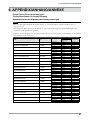
6.APPENDIX/ANHANG/ANNEXE....................... 37
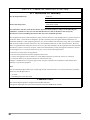
FCCDeclarationofConformity.......................... 38
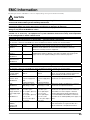
EMCInformation.................................................. 39
LIMITEDWARRANTY.......................................... 42

10
1. Introduction
1. Introduction
Thank you very much for choosing an EIZO Color Monitor.
1-1. Features
• Dual-input compliant (DVI-I and D-sub mini 15-pin connectors)
• DVI Digital input (TMDS ) compliant
• [Horizontal scanning frequency]
Analog: 24 - 80kHz
Digital: 31 - 76 kHz
[Vertical scanning frequency]
Analog: 49 - 76Hz (1600x1200: 49 - 61Hz )
Digital: 59- 61Hz (VGA text: 69 - 71Hz)
[Resolution] 1600 dots x 1200 lines
• Frame Synchronous mode supported (59 - 61Hz)
• BrightRegulator function incorporate
• DICOM mode (CAL Switch function)
• CAL Switch function for selecting an optimal calibration mode
• Smoothing function incorporated for the adjustment of an enlarged image
• The quality control software "RadiCS LE" (for Windows) used to calibrate the monitor is
included(refer to the EIZO LCD Utility Disk).
• The utility software "ScreenManager Pro for Medical" (for Windows) to control the monitor from
a PC with mouse/keyboard is included (refer to the EIZO LCD Utility Disk).
• Height adjustable stand
• Ultra slim bezel
• Portrait/Landscape display available (rotate 90 degrees clockwise)
Tips
• This monitor supports the Portrait/Landscape display. This function allows you to change the
orientation of the Adjustment menu when using the monitor screen in vertical display position.
(Refer to "3-10. Setting the Orientation of the Adjustment Menu" on page 27.)
• For using the monitor with “Portrait” position, the graphics board supporting portrait display is
required. When using the monitor with “Portrait” position, the setting needs to be changed
depending on the graphics board used in your PC. Refer to the manual of the graphics board for
details.

1. Introduction
11
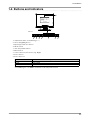
1-2. Buttons and Indicators
1. Adjustment menu (ScreenManager ®*)
2. Senser (BrightRegulator)
3. Input Signal Selection button
4. Mode button
5. Auto Adjustment button
6. Enter button
7. Control buttons (Left, Down, Up, Right)
8. Power button
9. Power indicator
Indicator status Operation status
Blue The screen is displayed
Orange Power saving
Off Power off
*ScreenManager® is an EIZO's nickname of the Adjustment menu.
Buttons

12
1. Introduction
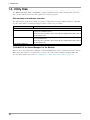
1-3. Utility Disk
An "EIZO LCD Utility Disk" (CD-ROM) is supplied with the monitor. The following table shows the
disk contents and the overview of the application software programs.
Disk contents and software overview
The disk includes application software programs for adjustment, and User’s Manual. Refer to "Readme.
txt” file on the disk for software startup procedures or file access procedures.
Item Overview
A "Readme.txt" file
RadiCS LE RadiCS LE is quality control software used to calibrate the monitor and
manage the calibration history.
(A PC must be connected to the monitor with the supplied USB cable.) Refer to
the description later.
ScreenManager Pro for Medical A utility software program to control monitor adjustments from a PC using its
mouse and keyboard.
(A PC must be connected to the monitor with the supplied USB cable.) Refer to
the description later.
User’s Manual (PDF file)
To RadiCS LE or ScreenManager Pro for Medical
Refer to the corresponding User's Manual on the CD-ROM disk in order to install and use the software.
When using this software, you will need to connect a PC to the monitor with the supplied USB cable.
For more information refer to the "2-2. Making Use of USB (Universal Serial Bus)" (page 14).

2. Installation
13
2. Installation
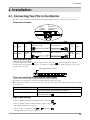
2-1. Connecting Two PCs to the Monitor
Two PCs can be connected to the monitor through the DVI-I connector on the back of the monitor.
Connection examples
PC 1 PC 2
(Ex.1) Digital DVI
Signal Cable
(FD-C39 enclosed)
Signal Cable
(MD-C87 optional) D-Sub
mini 15
pin
Analog
(Ex.2) Analog
D-Sub
mini 15
pin
Signal Cable
(FD-C16 optional)
Signal Cable
(MD-C87 optional) D-Sub
mini 15
pin
Analog
Selecting input signal
Switch the input signal with . Input signal switches each time is pressed. When the signal is
switched, the active signal type (Signal 1 or 2/ Analog or Digital) appears at the top right corner of the
screen for two seconds.
To set auto-switching of input signals [Input Signal]
The monitor recognizes the connector through which PC signals are input.
When either PC is turned off or enters the power-saving mode, the monitor automatically displays signals
of another PC.
Prioritysetting Function
Auto When either PC is turned off or enters the power-saving mode, the
monitor automatically displays signals of another PC.
Manual The monitor does not detect the PC’s signals automatically. Select an
active input signal with .
[Input signal setting]
1. Choose <Others> from the Adjustment menu, and press .
2. Choose <Input Signal> from the <Others> menu, and press .
The <Input Signal> menu appears.
3. Select "Auto" or "Manual" with or , and press .
The Input Priority setting is completed.
Input Signal Selection button
D-sub mini
15-pin Connector
(SIGNAL2)
DIV-I
connector
(SIGNAL1)

14
2. Installation
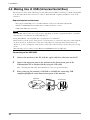
2-2. Making Use of USB (Universal Serial Bus)
This monitor provides a hub which supports the USB standard. When connecting to a USB compliant PC
or another hub, the monitor functions as a hub to which the USB compliant peripherals can be easily
connected.
Required system environment
• PC equipped with USB ports or another USB hub connected to the USB compliant PC
• Windows 2000/XP/Vista/7/8 // Mac OS 9.2.2/Mac OS X 10.2 or later
• USB Cable (MD-C93, enclosed)
NOTE
• The USB hub function may not work properly depending on the PC or peripherals. Please consult the
manufacturer of each device about the USB support.
• Using the USB Rev. 2.0 compatible PC or peripherals is recommended.
• If the monitor is in the power saving mode, or if the monitor is connected to the power outlet with the
monitor turned off, all the devices connected to the USB ports (upstream and downstream) work.
Therefore, power consumption of the monitor varies with connected devices even in the power saving
mode.
• The followings are procedures for the Windows 2000/XP/Vista/7/8 and Mac OS.
Connecting to the USB HUB
1
Connect the monitor to the PC with the signal cable first, then turn on the PC.
2
Connect the upstream port of the monitor to the downstream port of the
USBcompliant PC or another hub by using the USB cable.
After connecting the USB cable, the USB function can be set up automatically.
3
After setting up, the monitor's USB hub is available for connecting USB
compliantperipherals to the downstream ports of the monitor.
Downstream
Upstream

3. Screen Adjustment and Settings
15
3. Screen Adjustment and Settings
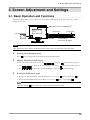
3-1. Basic Operation and Functions
Adjustment menu allows you to adjust screen performance though the main menu and select a CAL
Switch mode easily.
NOTE
•The Adjustment menu and the CAL Switch mode name cannot be displayed at the same time.
1
Entering the Adjustment menu
Press once to display the main menu of the Adjustment menu.
2
Making Adjustments and Settings
1. Select the desired sub menu icon using and press . The sub menu appears.
2. Use to select the desired setting icon and press . The setting menu appears.
3. Use to make all required adjustments and press save the settings.
3
Exiting the Adjustment menu
1. To return to the main menu, select the <Return> icon or press twice, followed by .
2. To exit the Adjustment menu, select <Exit> icon or press twice, followed by .
Tips
• Double clicking at any time also exits the Adjustment menu menu.
Adjustment menu (ScreenManagaer®)
Mode button Control buttons
(Left, Down, Up, Right)
Power button
Enter button
CAL Switch Menu

16
3. Screen Adjustment and Settings
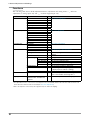
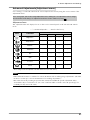
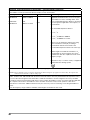
Functions
The following table shows all the Adjustment menu's adjustment and setting menus. "*" indicates
adjustments of analog input only and "**" indicates digital input only.
Main menu Sub menu Reference
Screen Clock *3-2. Screen Adjustment
Phase *
Position *
Resolution *
Range Adjustment *
Smoothing
Signal Filter *
Color(Custom)*1Brightness 3-3. Color Adjustment
Temperature
Gamma
Saturation
Hue
Gain
6 Colors
Reset
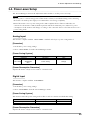
PowerManager DVI DMPM ** 3-4. Power-save Setup
VESA DPMS *
OFF
Others Screen Size 3-9. Displaying Lower Resolutions
Border Intensity
Input Signal Set the input signal selection of automatic or
manual.
Off Timer Set the monitor's Off Timer to on or off.
Menu Settings Menu Size Change the size of the menu.
Menu Position Adjust the menu position.
Menu Off Timer Set the menu displaying time.
Translucent Set the transparency of the background.
Orientation Set the orientation of the Adjustment menu.
BrightRegulator Set automatic brightness adjustment.
Power Indicator Make non-light for blue lighting when the screen
is displayed (Power Indicator Setting).
Reset Return to the factory Default settings.
Information Information Review the Adjustment menu's settings, model
name, serial number and usage time.*2
Language English, German, French,
Spanish, Italian, Swedish and
Japanese
Select the Adjustment menu's language.
*1 The adjustable functions on the <Color> menu depend on the selected CAL Switch mode. The above table shows the sub
menus when the "Custom" mode is selected (See "3-3. Color Adjustment").
*2 Due to the inspection on the factory, the usage time may not "0 hour" at shipping.

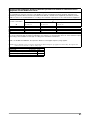
3. Screen Adjustment and Settings
17
3-2. Screen Adjustment
NOTE
• Allow the LCD monitor to stabilize for at least 30 minutes before making image adjustments.
The monitor displays the digital input image correctly based on its pre-setting data.
Analog Input
Screen adjustments for the LCD monitor should be used in suppressing screen flickering and also for
adjusting the screen to its proper position. There is only one correct position for each display mode. It is
also recommended to use the adjustment function when first installing the display or whenever changing
the system.
Adjustment Procedure
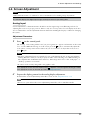
1
Press on the control panel.
The message "Your setting will be lost if you press again now." appears and remains on the screen
for 5 seconds. While the message is on the screen, press the again to automatically adjust the
clock, phase, screen position and resolution. If you do not wish to do adjust the screen, do not
press again.
NOTE
• The Auto adjustment function is intended for use on the Macintosh and on AT-compatible PC
running Windows. It may not work properly in either of the following cases. When running an
AT-compatible PC on MS-DOS (Not windows). The background color for the "wall paper" or
"desktop" pattern is set to black.
• It cannot work correctly using with some graphics cards.
If the appropriate screen cannot be made by using , adjust the screen through the following procedures.
If the appropriate screen can be made, proceed to 5. Range Adjustment .
2
Prepare the display pattern for the analog display adjustment.
Download the "Screen adjustment pattern files" from our site: http://www.eizo.com.
Tips
• For how to open and use the screen adjustment pattern files, refer to"Readme.txt"file.

18
3. Screen Adjustment and Settings
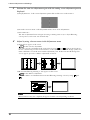
3
Perform the auto size adjustment again with the analog screen adjustment pattern
displayed.
(1)Display Pattern 1 of the screen adjustment pattern files in full screen on the monitor.
(2)From the <Screen> menu on the Adjustment menu, select <Auto Adjustment>.
(3)Select"Execute".
The Auto Adjustment function begins (showing a running status icon) to adjust flickering,
screen position, and screen size automatically.
4
Adjust by using <Screen> menu in the Adjustment menu
(1)Vertical bars appear on the screen
Use the <Clock> adjustment.
Select the <Clock> and eliminate the vertical bars by using and of the Control buttons.
Do not continuously press the Control buttons, as the adjustment value will change quickly and
make it difficult to locate the most suitable adjustment point. If the horizontal flickering, blur
or bars appear, proceed to <Phase> adjustment as follows.
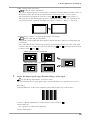
(2)Horizontal flickering, blurring or bars appear on the screen.
Use the <Phase> adjustment.
Select the <Phase> and eliminate the horizontal flickering, blurring or bars by using and
.
NOTE
• Horizontal bars may not completely disappear from the screen depending on the PC.

3. Screen Adjustment and Settings
19
(3)The screen position is incorrect.
Use the <Position> adjustment.
The correct displayed position of the monitor is decided because the number and the position of
the pixels are fixed. The <Position> adjustment moves the image to the correct position.
Select <Position> and adjust the position by using , , and . If vertical bars of
distortion appear after finishing the <Position> adjustment, return to <Clock> adjustment and
repeat the previously explained adjustment procedure. ("Clock" => "Phase" => "Position")
(4)Screen image is smaller or larger than the actual screen images.
Use the <Resolution> adjustment.
Adjustment is needed when the input signal resolution and the resolution now being displayed
are different.
Select <Resolution> and confirm if the resolution now being displayed is the same as the input
resolution. If it is not, adjust the vertical resolution using and and adjust the horizontal
resolution using and .
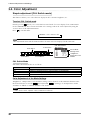
5
Adjust the output signal range (Dynamic Range) of the signal.
Use the <Range Adjustment> of <Screen> menu.
This controls the level of output signal range to display the whole color gradation (256 colors).
[Procedure]
(1)Display Pattern 2 of the screen adjustment pattern files in full screen on the monitor.
(2)Choose <Range Adjustment> from the <Screen> menu, and press .
(3)Select"Execute".
Color gradation is adjusted automatically.
(4)Close the Pattern 2.
Smaller than the actual screen images.
Larger than the actual screen images.

20
3. Screen Adjustment and Settings
3-3. Color Adjustment
Simple adjustment [CAL Switch mode]
This function allows you to select the best display mode for monitor brightness, etc.
To select CAL Switch mode
Directly pressing allows you to select the best suited mode for screen display from 4 CAL Switch
modes; DICOM-CL, Text, Custom and CAL. Color settings each mode can be adjusted by using the
<Color> menu of the Adjustment menu.
Press to exit the menu.
->DICOM-CL -> Text -> Custom-> CAL
Tips
• The Adjustment menu and the CAL Switch mode name cannot be displayed at the same time.
CAL Switch Mode
Selectable CAL Switch modes are as follows.
Mode Purpose
DICOM-CL Available for setting tailored to X-ray lm color (clear base).
Text Suitable for displaying texts for word processing or spreadsheets.
Custom Available for making desired setting.
CAL Used for monitor calibration.
Color Adjustment of the Mode Settings
<Brightness>, <Temperature> and <Gamma> settings can be adjusted on the CAL Switch menu. Select
the desired function icon with and adjust with . (Setting(s) of <Temperature> and/or
<Gamma> is defined as standard default in some modes.
NOTE
• "CAL" mode can be adjusted only by Calibration Software.
Current Mode
Mode button
Power button
CAL Switch Menu
[EX.]Custom
Settings status
of Brightness,
Temperature and
Gamma
Enter button
Control buttons
La pagina si sta caricando...
La pagina si sta caricando...
La pagina si sta caricando...
La pagina si sta caricando...
La pagina si sta caricando...
La pagina si sta caricando...
La pagina si sta caricando...
La pagina si sta caricando...
La pagina si sta caricando...
La pagina si sta caricando...
La pagina si sta caricando...
La pagina si sta caricando...
La pagina si sta caricando...
La pagina si sta caricando...
La pagina si sta caricando...
La pagina si sta caricando...
La pagina si sta caricando...
La pagina si sta caricando...
La pagina si sta caricando...
La pagina si sta caricando...
La pagina si sta caricando...
La pagina si sta caricando...
La pagina si sta caricando...
La pagina si sta caricando...
La pagina si sta caricando...
La pagina si sta caricando...
La pagina si sta caricando...
La pagina si sta caricando...
La pagina si sta caricando...
La pagina si sta caricando...
La pagina si sta caricando...
La pagina si sta caricando...
-
 1
1
-
 2
2
-
 3
3
-
 4
4
-
 5
5
-
 6
6
-
 7
7
-
 8
8
-
 9
9
-
 10
10
-
 11
11
-
 12
12
-
 13
13
-
 14
14
-
 15
15
-
 16
16
-
 17
17
-
 18
18
-
 19
19
-
 20
20
-
 21
21
-
 22
22
-
 23
23
-
 24
24
-
 25
25
-
 26
26
-
 27
27
-
 28
28
-
 29
29
-
 30
30
-
 31
31
-
 32
32
-
 33
33
-
 34
34
-
 35
35
-
 36
36
-
 37
37
-
 38
38
-
 39
39
-
 40
40
-
 41
41
-
 42
42
-
 43
43
-
 44
44
-
 45
45
-
 46
46
-
 47
47
-
 48
48
-
 49
49
-
 50
50
-
 51
51
-
 52
52


Eizo MX210 Manuale del proprietario
- Categoria
- TV
- Tipo
- Manuale del proprietario
in altre lingue
- English: Eizo MX210 Owner's manual
- français: Eizo MX210 Le manuel du propriétaire
Documenti correlati
-
Eizo MX220W Manuale del proprietario
-
-
-
-
Eizo FDSV1201T Manuale utente
-
-
-
-
-