Wellue Remote Linker power your Health Manuale utente
- Categoria
- Router
- Tipo
- Manuale utente

Remote Linker
User Manual
User Manual (EN)
Benutzerhandbuch (DE)
Manuale d'uso (IT)
Manual de usuario (ES)
Manuel de l'utilisateur (FR)

Contents
User Manual…….…............…............English 1-12
Benutzerhandbuch...........….................Deutsch 13-26
Manuale d'uso........…..…....….............Italiano 27-39
Manual de usuario…………................Español 40-53
Manuel de l'utilisateur.......…...............Français 54-67

1
User Manual
Contents
1. Safety Instructions............................................................2
2. Overview.......................................................................... 2
3. Installing the App.............................................................4
4. Setting up Remote Linker................................................5
5. Sharing Data.....................................................................9
6. Troubleshooting..............................................................11
7. Specification...................................................................12

2
This manual provides the instructions on how to set up the
Remote Linker to connect to Pulse Oximeter on ViHealth
app. Please note that features of Remote Linker may vary
slightly depending on the model and software version you
have, contact customer service for the latest manual.
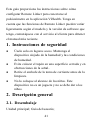
1. Safety Instructions
Use in dry locations only. Keep the device away
from humidity and moisture conditions.
Avoid placing plug on closed surface and in signal
obstructions.
Remove plug from the mains socket before
cleaning.
Do not place in reach of children. This device is not
a toy and should not be given to children.
2. Overview
2.1. Unpacking
Main Unit; User manual;
2.2. What’s Needed
Wellue Pulse Oximeter
Router works on Wi-Fi 2.4 GHz range

3
Download ViHealth app from App Store or Google
Play
Recommended: Apple phone with iOS 9.0 or higher
/ Android phones with OS 5.0 or higher
Create your ViHealth app account
USB power adapter
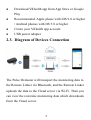
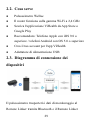
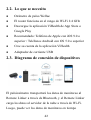
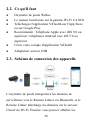
2.3. Diagram of Devices Connection
The Pulse Oximeter will transport the monitoring data to
the Remote Linker via Bluetooth, and the Remote Linker
uploads the data to the Cloud server via Wi-Fi. Then you
can view the real-time monitoring data which downloads
from the Cloud server.

4
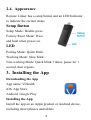
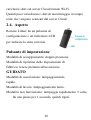
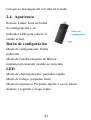
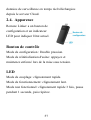
2.4. Appearance
Remote Linker has a setup button and an LED Indicator
to indicate the current status.
Setup Button
Setup Mode: Double press.
Factory Reset Mode: Press
and hold when power on.
LED
Pairing Mode: Quick blink.
Working Mode: Slow blink.
Non-working Mode: Quick blink 3 times, pause for 1
second, then repeats.
3. Installing the App
Downloading the App
App name: ViHealth
iOS: App Store
Android: Google Play
Installing the App
Install the app on an Apple product or Android device,
including smart phones and tablets.

5
Note: For Android devices, please accept the requested
permissions when you run the app.
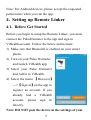
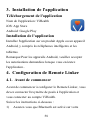
4. Setting up Remote Linker
4.1. Before Get Started
Before you begin to setup the Remote Linker, you must
connect the PulseOximeter to the app and sign in
ViHealth account. Follow the below instructions:
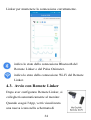
1) Make sure that Bluetooth is enabled on your smart
phone.
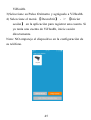
2) Turn on your Pulse Oximeter
and launch ViHealth app.
3) Select your Pulse Oximeter
and Add it to ViHealth.
4) Select the menu 【Discover】
-->【Sign in】on the app to
register an account. If you
already had a ViHealth
account, please sign in
directly.
Note: DO NOT pair the device in the settings of your

6
phone.
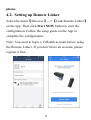
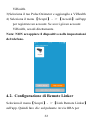
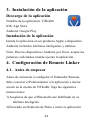
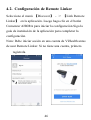
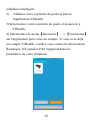
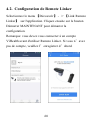
4.2. Setting up Remote Linker
Select the menu【Discover】-->【Link Remote Linker】
on the app. Then click Start NOW button to start the
configuration. Follow the setup guide on the App to
complete the configuration.
Note: You need to login a ViHealth account before using
the Remote Linker. If you don’t have an account, please
register it first.

7
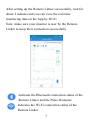
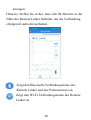
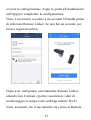
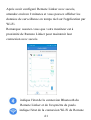
After setting up the Remote Linker successfully, wait for
about 2 minutes and you can view the real-time
monitoring data on the App by Wi-Fi.
Note: make sure your monitor is near by the Remote
Linker to keep their connection successfully.
indicates the Bluetooth connection status of the
Remote Linker and the Pulse Oximeter.
indicates the Wi-Fi connection status of the
Remote Linker.

8
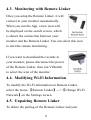
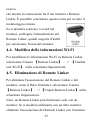
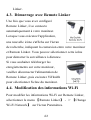
4.3. Monitoring with Remote Linker
Once you setup the Remote Linker, it will
connect to your monitor automatically.
When you run the App, a new icon will
be displayed on the search screen, which
is shown the connection between your
monitor and the Remote Linker. You can select this icon
to start the remote monitoring.
If you want to download the records in
your monitor, please disconnect the power
of the Remote Linker, then run ViHealth
to select the icon of the monitor.
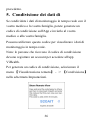
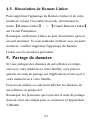
4.4. Modifying Wi-Fi Information
To modify the Wi-Fi information on Remote Linker,
select the menu 【Remote Linker】-->【Change Wi-Fi
Network】on the Settings screen.
4.5. Unpairing Remote Linker
To delete the pairing of the Remote Linker and your

9
monitor, such as the Pulse Oximeter, select the menu
【Remote Linker】-->【Unpair Remote Linker】on the
Settings screen.
Note: One Remote Linker can only work with one
monitor. If you want to use it with another monitor, please
delete the pairing of the Remote Linker with the previous
monitor.
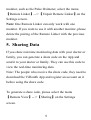
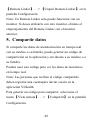
5. Sharing Data
If you share real-time monitoring data with your doctor or
family, you can generate a share code on the App and
send it to your doctor or family. They can use this code to
view the real-time monitoring data.
Note: The people who receive the share code, they need to
download the ViHealth App and register an account on it
before using the share code.
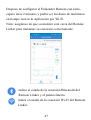
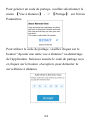
To generate a share code, please select the menu
【Remote View】-->【Sharing】on the Settings
screen.

10
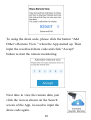
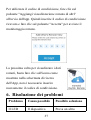
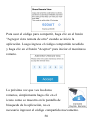
To using the share code, please click the button “Add
Other’s Remote View ” when the App started up. Then
input the recedived share code and click “Accept”
button to start the remote monitoring.
Next time to view the remote data, just
click the icon as shown on the Search
screen of the App, no need to input the
share code again.

11
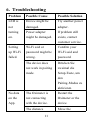
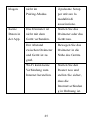
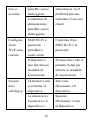
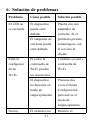
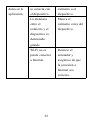
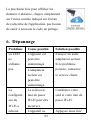
6. Troubleshooting
Problem
Possible Cause
Possible Solution
LED is
not
turning
on.
Device might be
damaged.
Try another power
adapter.
If problem still
exists, contact
customer service.
Power adapter
might be damaged.
Setting
up Wi-Fi
failed.
Wi-Fi ssid or
password might be
wrong.
Conifrm your
Wi-Fi ssid and
password.
The device does
not work in pairing
mode.
Drücken Sie
zweimal die
Setup-Taste, um
den
Pairing-Modus zu
aktivieren.
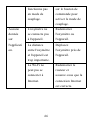
No data
on the
App.
The Oximeter is
not connecting
with the device.
Restart the
Oximeter or the
device.
The distance
Move the

12
between the
oximeter and the
device is too far.
Oximeter near the
device.
Wi-Fi can not
connect to the
Internet.
Restart the router
and make sure the
Internet
connection is ok.
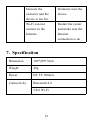
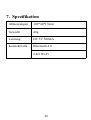
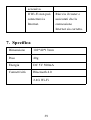
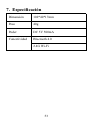
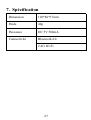
7. Specification
Dimension
102*40*17mm
Weight
40g
Power
DC 5V 500mA
Connectivity
Bluetooth 4.0
2.4G Wi-Fi

13
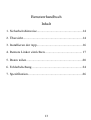
Benutzerhandbuch
Inhalt
1. Sicherheitshinweise........................................................14
2. Übersicht.........................................................................14
3. Installieren der App........................................................16
4. Remote Linker einrichten..............................................17
5. Daten teilen.....................................................................20
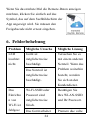
6. Fehlerbehebung..............................................................24
7. Spezifikation...................................................................26

14
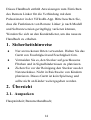
Dieses Handbuch enthält Anweisungen zum Einrichten
des Remote Linker für die Verbindung mit dem
Pulsoximeter in der ViHealth-App. Bitte beachten Sie,
dass die Funktionen von Remote Linker je nach Modell
und Softwareversion geringfügig variieren können,
Wenden Sie sich an den Kundendienst, um das neueste
Handbuch zu erhalten.
1. Sicherheitshinweise
Nur an trockenen Orten verwenden. Halten Sie das
Gerät von Feuchtigkeit und Feuchtigkeit fern.
Vermeiden Sie es, den Stecker auf geschlossene
Flächen und in Signalhindernissen zu platzieren.
Ziehen Sie vor der Reinigung den Stecker aus der
Netzsteckdose. Nicht in Reichweite von Kindern
platzieren. Dieses Gerät ist kein Spielzeug und
sollte nicht an Kinder weitergegeben werden.
2. Übersicht
2.1. Auspacken
Haupteinheit; Benutzerhandbuch;

15
2.2. Was wird benötigt?
Wellue Pulsoximeter
Router arbeitet im Wi-Fi 2,4 GHz-Bereich
ViHealth-App aus dem App Store oder Google Play
herunterladen
Empfohlen: Apple-Telefon mit iOS 9.0 oder höher /
Android-Telefone mit OS 5.0 oder höher
Erstellen Sie Ihr ViHealth-App-Konto
USB-Netzteil
2.3. Diagramm der Geräteverbindung
Das Pulsoximeter transportiert die Überwachungsdaten
über Bluetooth zum Remote Linker, und der Remote
Linker lädt die Daten über Wi-Fi auf den Cloud-Server
hoch. Anschließend können Sie die
chtzeitüberwachungsdaten anzeigen, die vom

16
Cloud-Server heruntergeladen werden.
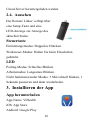
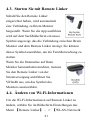
2.4. Aussehen
Der Remote Linker verfügt über
eine Setup-Taste und eine
LED-Anzeige zur Anzeige des
aktuellen Status.
Steuertaste
Einrichtungsmodus: Doppeltes Drücken.
Werksreset-Modus: Halten Sie beim Einschalten
gedrückt.
LED
Pairing-Modus: Schnelles Blinken.
Arbeitsmodus: Langsames Blinken.
Nicht funktionierender Modus: 3 Mal schnell blinken, 1
Sekunde pausieren und dann wiederholen.
3. Installieren der App
App herunterladen
App-Name: ViHealth
iOS: App Store
Android: Google Play

17
App installieren
Installieren Sie die App auf einem Apple-Produkt oder
Android-Gerät, einschließlich Smartphones und Tablets.
Hinweis: Bei Android-Geräten akzeptieren Sie bitte die
angeforderten Berechtigungen, wenn Sie die App
ausführen.
4. Remote Linker einrichten
4.1. Bevor Sie loslegen
Bevor Sie mit der Einrichtung des Remote Linkers
beginnen, müssen Sie das Pulsoximeter mit der
Anwendung verbinden und sich im ViHealth-Konto
anmelden. Folgen Sie den nachstehenden Anweisungen:
1)Stellen Sie sicher, dass Bluetooth auf Ihrem
Smartphone aktiviert ist.
2)Schalten Sie Ihr Pulsoximeter ein und starten Sie die
ViHealth-App.
3)Wählen Sie Ihr Pulsoximeter aus und fügen Sie es zu
ViHealth hinzu.
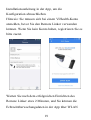
4) Wählen Sie in der App das Menü 【Entdecken】->
【Anmelden】, um ein Konto zu registrieren. Wenn Sie

18
bereits ein ViHealth-Konto hatten, melden Sie sich bitte
direkt an.
Hinweis: Koppeln Sie das Gerät NICHT in den
Einstellungen Ihres Telefons.
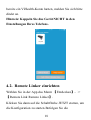
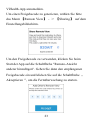
4.2. Remote Linker einrichten
Wählen Sie in der App das Menü 【Entdecken】->
【Remote Link Remote Linker】.
Klicken Sie dann auf die Schaltfläche JETZT starten, um
die Konfiguration zu starten.Befolgen Sie die
La pagina si sta caricando...
La pagina si sta caricando...
La pagina si sta caricando...
La pagina si sta caricando...
La pagina si sta caricando...
La pagina si sta caricando...
La pagina si sta caricando...
La pagina si sta caricando...
La pagina si sta caricando...
La pagina si sta caricando...
La pagina si sta caricando...
La pagina si sta caricando...
La pagina si sta caricando...
La pagina si sta caricando...
La pagina si sta caricando...
La pagina si sta caricando...
La pagina si sta caricando...
La pagina si sta caricando...
La pagina si sta caricando...
La pagina si sta caricando...
La pagina si sta caricando...
La pagina si sta caricando...
La pagina si sta caricando...
La pagina si sta caricando...
La pagina si sta caricando...
La pagina si sta caricando...
La pagina si sta caricando...
La pagina si sta caricando...
La pagina si sta caricando...
La pagina si sta caricando...
La pagina si sta caricando...
La pagina si sta caricando...
La pagina si sta caricando...
La pagina si sta caricando...
La pagina si sta caricando...
La pagina si sta caricando...
La pagina si sta caricando...
La pagina si sta caricando...
La pagina si sta caricando...
La pagina si sta caricando...
La pagina si sta caricando...
La pagina si sta caricando...
La pagina si sta caricando...
La pagina si sta caricando...
La pagina si sta caricando...
La pagina si sta caricando...
La pagina si sta caricando...
La pagina si sta caricando...
La pagina si sta caricando...
La pagina si sta caricando...
-
 1
1
-
 2
2
-
 3
3
-
 4
4
-
 5
5
-
 6
6
-
 7
7
-
 8
8
-
 9
9
-
 10
10
-
 11
11
-
 12
12
-
 13
13
-
 14
14
-
 15
15
-
 16
16
-
 17
17
-
 18
18
-
 19
19
-
 20
20
-
 21
21
-
 22
22
-
 23
23
-
 24
24
-
 25
25
-
 26
26
-
 27
27
-
 28
28
-
 29
29
-
 30
30
-
 31
31
-
 32
32
-
 33
33
-
 34
34
-
 35
35
-
 36
36
-
 37
37
-
 38
38
-
 39
39
-
 40
40
-
 41
41
-
 42
42
-
 43
43
-
 44
44
-
 45
45
-
 46
46
-
 47
47
-
 48
48
-
 49
49
-
 50
50
-
 51
51
-
 52
52
-
 53
53
-
 54
54
-
 55
55
-
 56
56
-
 57
57
-
 58
58
-
 59
59
-
 60
60
-
 61
61
-
 62
62
-
 63
63
-
 64
64
-
 65
65
-
 66
66
-
 67
67
-
 68
68
-
 69
69
-
 70
70


Wellue Remote Linker power your Health Manuale utente
- Categoria
- Router
- Tipo
- Manuale utente
in altre lingue
Altri documenti
-
iHealth PO3M Manuale utente
-
-
ANCEL BD200 Guida utente
-
Abus TVVR33802 Manuale del proprietario
-
Medisana PM 150 connect Manuale del proprietario
-
Yamaha MusicCast ANXN500WH Blanc Manuale del proprietario
-
-
 Viatom PD-30092 Checkme Lite Health Monitor Manuale utente
-
Apex Digital MD300M Manuale utente
-
Turbosound iP12B Guida Rapida
