
Instructions “Oil Filled Radiators with electro-
nic climate control”
Istruzioni “Radiatore elettrico a bagno d’olio con
comandi elettronici”
Mode d’emploi “Radiateur électrique à bain d’hui-
le avec commandes électroniques”
Anleitungen “Elektro Öl-Radiator mit elektroni-
schen Steuerungen”
Gebruiksaanwijzingen “Elektrische olieradia-
tor met elektronische bedieningen”
Instrucciones “Radiador eléctrico de baño de
aceite con mandos electrónicos”
Instruções “Radiador eléctrico a óleo com coman-
dos electrónicos”
√‰ËÁ›Â˜ "∏ÏÂÎÙÚÈÎfi ηÏÔÚÈÊ¤Ú Ï·‰ÈÔ‡ ÌÂ
ËÏÂÎÙÚÔÓÈο ¯ÂÈÚÈÛÙ‹ÚÈ· "
Brugsanvisning “Elektrisk olieradiator
med elektronisk styring”
Bruksanvisning “Oljefylt radiator med elek-
troniske kommandoer”
Bruksansivning “Oljefylld elradiator med
elektroniska kontroller”
Käyttöohjeet “Elektronisesti säädettävä öljy-
täytteinen sähköpatteri”
Használati utasítás “Elektronikus
vezérlésű elektromos olajradiátor”
Instrukcje “Elektryczny grzejnik olejowy z elek-
tronicznymi funkcjami”
ààÌÌÒÒÚÚÛÛÍ͈ˆËËËË““ùùÎÎÂÂÍÍÚÚˢ˜ÂÂÒÒÍÍËËÈÈ Ïχ‡ÒÒÎÎflflÌÌ˚˚ÈÈ
‡‡‰‰Ëˇ‡ÚÚÓÓ ÒÒ ˝˝ÎÎÂÂÍÍÚÚÓÓÌÌÌÌ˚˚ÏÏ ÛÛÔÔ‡‡‚‚ÎÎÂÂÌÌËËÂÂÏÏ””
Návod “Elektrick˘ olejov˘ radiátor s elektro-
nick˘m ovládáním”
10

2
1
2
3
4
5
6
7
8
9
10

3
General instructions
Remove the heater from the packaging.
Turn the heater upside down and rest on the polystyrene.
Check that neither the heater nor the power cable has been damaged in any way during transportation.
Do not operate the heater if damaged.
Models with “easy wheel”system
Turn the radiator upside-down on a rug or a soft surface in order to prevent
damaging the paint finish. Fully unfold the castors by turning them outwards
(Fig. 1).
Turn the radiator back to its upright position.
Using for the first time
On using the appliance for the first time we advise that you turn it on to the maximum power setting for
at least 2 hours. This is to eliminate the “new odour”, which is released by the appliance. During this
time ensure that the room is well ventilated.
Electrical connection
- Before plugging the radiator into the mains, check that your supply voltage is the same as that shown
on the rating plate of the appliance.
- If using more than one appliance at a time, it is important to ensure that the ring main is adequate
to cope with the power requirements.
- It is important to ensure that the socket is adequately earthed.
- This appliance complies with EEC Directive 89/336 relating to electromagnetic compatibility.
How to use your heater
Plug the heater into the electric socket and the light will come on.
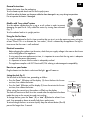
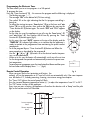
Setting the clock (fig. 2)
Set the clock to the correct time, proceeding as follows:
•Press the “hour” (9) button until the display (1) shows the hours for the cor-
rect time, then release the button.
•Press the “min” (8) button until the display (1) shows the minutes for the cor-
rect time, then release the button.
When setting the correct time, the numbers will flash on the display.
The clock will continue to flash for a few seconds after the adjustment has been
made then stop on the correct time and start working.
To change the time, press the “hour” (9) or “min” (8) button for at least 5 sec-
onds, then proceed as above to modify both hours and minutes.
To move through the hours or minutes quickly keep the relevant button (9 or 8)
pressed for longer than 3 seconds.
fig. 1
:
correct time
set temperature
fig. 2
GB

4
Operation of heater - without timer - (manual)
To operate the heater without timer press the “ON MODE” (7) button. By pressing the “ON MODE” (7)
button one or more times the appliance will select the operating heating power as follows:
Tip: At any time during “manual operation”, pressing the “ON MODE” (7) button once will display the
selected power level for 5 seconds. After this 5 seconds period, the display will return to showing the
current operating power.
Setting the temperature (thermostat)
Once the power has been selected, press the “ +” (5) or “ -” (6) button to
select the desired comfort temperature from 5°C to 35°C (shown on the right
side of the display, fig. 3). This will increase or decrease by 1°C. Keep either
button pressed down to move through the temperature in fast move.
Electronic Climate Control
This heater has Electronic Climate Control which automatically monitors and selects the ideal power set-
ting to maintain your chosen temperature.
If the selected temperature is higher than the actual room temperature, the appliance will start auto-
matically and rapidly heat the room until it reaches the selected temperature. If maximum power has
been selected the unit will automatically maintain the temperature at a constant level, by switching
between maximum, medium, minimum power and OFF (If the room temperature exceeds the selected
temperature level the appliance will switch off).
If medium power level has been selected using the “ON MODE” (7) button, the appliance will modulate
between medium, minimum power and OFF to maintain a selected temperature.
Note: the display (1) will always show the power setting you have chosen, not the one it is current-
ly working at.
Frost Stat Function (fig. 4)
Press the “ON MODE” (7) button (it is recommended to select the maximum
power level). Set the temperature to 5°C with the “ -” (6) button. “TIMER
ON” yellow lamp starts to flash and this situation will persist as long as 5°C is
set.
When set in this way, the appliance will switch on automatically only if the
room temperature falls below 5°C, thereby preventing freezing, at minimum
energy consumption.
Note: This function is not garanteed in the event of power failures, lasting more
then 2 minutes.
°
C
MAN
:
MAN
:
°
C
°
C
MAN
:
:
Maximum
power
Medium
power
Minimum
power
Off
:
correct time
set temperature
fig. 3
°
C
MAN
:
fig. 4

5
Programming the Electronic Timer
The timer allows you to set two programs in a 24h period.
To program the timer:
Press the “Timer function A“ (2) ; this accesses the program and the following is displayed:
- The flashing message “--:--“;
- The message “ON” at the bottom left (ON time setting);
- The symbol “A” at the right indicating that the first program controlling is
being set;
To setting the starting time press “hour button” (9) to set the hour and “min
button” (8) to set the minutes, then confirm the ON time by pressing the
“Timer function A” (2) button again. The words “OFF” and “00:00” appear
on the display.
- Set the time you want the appliance to go off using the “hour button” (9)
and “min button” (8), then confirm the off time by pressing the “Timer
Function A” (2) button again (fig.5).
- At this point, the word “AUTO” appears at the top of the display and the
“TIMER ON” (3) indicator light comes on to indicate that the appliance is
ready to operate at the programmed time maintaining the preset comfort
temperature.
-To set the program B press “Timer function B” (4) button and follow the
same procedure as described for the program A.
- Use the “ +” (6) or “ -” (5) buttons to set the desired comfort tempera-
ture, as described above.
- When set in this way the heater will automatically switch on at the set time
for the designated time period and automatically maintain the preset com-
fort temperature.
To cancel a preset programme, press the timer button A or B once and then press
the hour button until the display shows “--:--“ (fig.6).
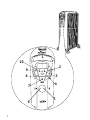
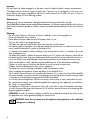
Remote Control Operation
-When you press the the frost protection push button, the
radiator will set the temperature to 5°C and will switch on automatically only if the room tempera-
ture falls below 5°C, thereby preventing freezing, at minimum energy consumption.
The “Timer ON” light on the control panel will flash.
-Press the increase/decrease temperature button (+/-) to adjust the temperature from 5°C to 35°C.
- The “Off” button switches off the appliance.
Every time you press a button, the appliance will confirm the selection with a “beep” and the pilot
light on the remote control will illuminate.
AUTO
1
2
3
4
5
6
7
8
9
10
fig. 5
fig. 6
OFF
+
-
Frost protection button
Increase temperature
button
Decrease temperature
button
Pilot light

6
Important
You must leave the heater plugged in at the mains socket to keep the heater’s memory programmed.
If the heater loses its electricity supply for more than 2 minutes, e.g. if unplugged or in the event of a
power failure, the heater’s programmes will be lost, and the timer will not work until reset. In such an
instance the display will show flashing numbers.
Maintenance
Before carrying out any maintenance, unplug the heater from the mains and wait for it to cool.
The oil-filled electric radiator requires no particular maintenance. It is sufficient to remove the dust with a soft, dry
cloth. Never use abrasive powders or solvents. If necessary remove concentrated areas of dirt with a vacuum
cleaner.
Warnings
- Do not use this heater in the vicinity of showers, bathtubs, sinks, swimming pools etc.
-Never use the heater to dry laundry.
-Never place the power cable on top of the heater while it is hot.
- Only use the heater in an upright position.
- The heater must be positioned at least 50cm from furniture or other objects.
- If the power cable is damaged, it must be replaced by the manufacturer, an authorised service cen-
tre or a qualified electrician in order to eliminate all risk.
- It is normal for the heater to make 'crackling' noises during the first time it is switched on (or in the
case of infrequent use)
- The body of the heater is filled with an exact quantity of oil. If repairs are necessary which call for
the opening of the heater, they must be done only by the manufacturer or an authorised service cen-
tre. In the unlikely event of oil leakage, contact the manufacturer or an authorised service centre.
- Do not use this heater in rooms which have an area smaller than 4m
2
as this may lead to overheating.
- Children or infirm persons should not be allowed to use this product unsupervised
- Children should not be allowed to play with this appliance
- The heater must never be placed immediately under a fixed mains socket.
- When scrapping the appliance, respect legislation on the disposal of oil.
-The use of an extension lead is not recommended, however if it is neccessary then follow carefully
the extension lead’s instructions, and most importantly ensure that the extension lead is correctly rated
in accordance with the heater being used and NEVER overloaded.
- As with any electrical appliance, whilst the instructions aim to cover as many eventualities as possi-
ble, caution and common sense should be applied when operating your appliance, particularly in
the vicinity of young children.
- The appliance is fitted with a safety device which will switch off it in case of accidental overheating.
To reset, disconnect the plug from the power for 30 minutes, remove the cause of overheating then
plug the appliance in again.
ATTENTION: in order to avoid any danger caused by an accidental resetting of the safety system,
this appliance must not be powered through an external timer.
IMPORTANT: Never for any reason cover the appliance during operation as this could lead
to dangerous overheating.
-
 1
1
-
 2
2
-
 3
3
-
 4
4
-
 5
5
-
 6
6


