Hoover HVI 381 TY Manuale utente
- Categoria
- Piani cottura
- Tipo
- Manuale utente

- 1 -
GLASS CERAMIC HOB - Operating instructions
PLAQUE VITROCERAMIQUE - Notice d’utilisation
PIANO VETROCERAMICA - Istruzioni per l’uso
GLASKERAMIK-KOCHFELD - Gebrauchsanweisung
VITROKERAMISCHE KOOKPLAAT - Gebruiksaanwijzing
PLACA EM VITROCERÂMICA - Instruções para a utilização
D
P
NL
F
I
GB

- 2 -
Dear customer,
Thank you for choosing our induction TEPPAN YAKI.
In order to use our appliance correctly, we advise you to read the following notes carefully, and to keep them
for later use.
SUMMARY
SAFETY ........................................................................................................................................................................................................3
Precautions before using .....................................................................................................................................................................3
Using the appliance ...............................................................................................................................................................................3
Precautions not to damage the appliance .....................................................................................................................................4
Precautions in case of appliance failure ..........................................................................................................................................5
Other protections ...................................................................................................................................................................................5
DESCRIPTION OF THE APPLIANCE .....................................................................................................................................................6
Technical characteristics .......................................................................................................................................................................6
Control panel ............................................................................................................................................................................................6
USE OF THE APPLIANCE ........................................................................................................................................................................6
Display ........................................................................................................................................................................................................6
Ventilation .................................................................................................................................................................................................7
STARTING-UP AND APPLIANCE MANAGEMENT ...........................................................................................................................7
Before the rst use ..................................................................................................................................................................................7
Induction principle .................................................................................................................................................................................7
Sensitive touch .........................................................................................................................................................................................7
Power selection zone “SLIDER” and timer setting zone .............................................................................................................7
Starting-up ................................................................................................................................................................................................8
Residual heatindication .......................................................................................................................................................................8
Timer ............................................................................................................................................................................................................9
Stop&Go function ...................................................................................................................................................................................9
Recall Function ......................................................................................................................................................................................10
Bridge Function ....................................................................................................................................................................................10
Control panel locking .........................................................................................................................................................................10
Clean function ......................................................................................................................................................................................10
COOKING ADVICES ..............................................................................................................................................................................11
Setting up the cooking levels / temperatures ...........................................................................................................................11
Maximum temperature and «smoking point» ........................................................................................................................11
Cooking advice .....................................................................................................................................................................................11
MAINTENANCE AND CLEANING ..................................................................................................................................................... 12
Glass cleaning .......................................................................................................................................................................................12
Cooking surface cleaning .................................................................................................................................................................12
WHAT TO DO IN CASE OF A PROBLEM .........................................................................................................................................12
ENVIRONMENT PRESERVATION ......................................................................................................................................................13
INSTALLATION INSTRUCTIONS ........................................................................................................................................................14
ELECTRICAL CONNECTION ...............................................................................................................................................................15
GB

- 3 -
SAFETY
Precautions before using
• Unpack all the materials.
• The installation and connection of this appliance has to be done
by approved specialists. The manufacturer cannot be held re-
sponsible for damage caused by building-in or connection er-
rors.
• This appliance can only be used when installed in a well-equip-
ped kitchen unit with an adapted and approved work-surface.
• This domestic appliance is exclusively for the cooking of food,
to the exclusion of any other domestic, commercial or industrial
use.
• Remove all labels and self-adhesives from the ceramic glass.
• Do not change or alter the appliance.
• The cooking plate cannot be used freestanding nor can it be
used as a work-surface.
• The appliance must be grounded and connected in accordance
with local standards.
• Do not use any extension cord to connect it.
• The appliance cannot be used above a dishwasher or a tumble-
dryer: steam may damage the electronic appliances.
• The appliance is not intended to be operated by means of exter-
nal timer or separate remote control system.
Using the appliance
• Switch the heating zones o after use.
• Keep an eye on the food when using grease or oils: it may quic-
kly ignite.
• Be careful not to burn yourself while or after using the applian-
ce.
• Make sure no cable of any xed or movable appliance comes in

- 4 -
contact with the glass or the hot saucepan.
• Magnetic objects (credit cards, oppy disks, calculators) should
not be placed near the appliance when it is running.
• Metallic objects such as knives, forks, spoons and lids should not
be placed on the hob because they can get hot.
• Use proper induction saucepans. In general, do not place any
metallic object on the glass surface, except heat-resistant con-
tainers. If the appliance is switched on too soon or in case of
residual heat, other materials could melt or ignite.
• Never cover the appliance with a cloth or a protection sheet. It
can get very hot and catch re.
• This appliance can be used by children aged from 8 years and
above and persons with reduced physical, sensory or mental ca-
pabilities or lack of experience and knowledge if they have been
given supervision or instruction concerning use of the applian-
ce in a safe way and understand the hazards involved.
• Children shall not play with the appliance.
• Cleaning and user maintenance shall not be made by children
without supervision.
Precautions not to damage the appliance
• Sand or other abrasive materials may damage ceramic glass.
• Avoid dropping objects, even little ones, on the vitroceramic.
• Do not hit the edges of the glass with a saucepan.
• Make sure that the ventilation system of the appliance works
according to the manufacturer’s instructions.
• Do not put or leave empty saucepans on the vitroceramic hobs.
• Sugar, synthetic materials or aluminium sheets must not be ex-
posed to the hot areas. These may cause cracks or other altera-
tions of the vitroceramic glass by cooling: switch the applian-
ce o and remove them immediately (be careful: do not burn
yourself).
• WARNING: Danger of re: do not store items on the cooking
surface.

- 5 -
• Never put any hot container on the control panel.
• If a drawer is situated under the built-in appliance, make sure
that the space between the content of the drawer and the infe-
rior part of the appliance is large enough (2 cm). This is essential
to guarantee correct ventilation.
• Never put any inammable object (e.g. spray) in the drawer si-
tuated under the vitroceramic hob. Any cutlery drawer must be
heat-resistant.
Precautions in case of appliance failure
• In case of a malfunction, switch o the appliance and turn o
the electrical supply.
• If the ceramic glass is cracked or ssured, you must unplug the
appliance and contact the after sales service.
• Repair should be done by specialists. Do not open the appliance
yourself.
• WARNING: If the surface is cracked, switch o the appliance to
avoid the possibility of an electric shock.
Other protections
• For people with a pacemaker, the magnetic eld could inuence
its function. We recommend you to retrieve further information
from the retailer or the doctor.
• Do not use aluminium or synthetic containers: they can melt on
hot cooking zones.
• NEVER try to extinguish a re with water, but switch o the ap-
pliance and then cover ame e.g. with a lid or a re blanket.

- 6 -
DESCRIPTION OF THE APPLIANCE
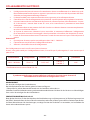
Technical characteristics
Total Power Position of the heating zone Nominal Power
2800 W 2 zones Ø145 mm 2 x 1400 W
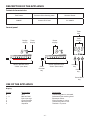
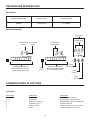
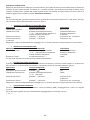
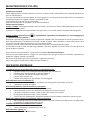
Control panel
USE OF THE APPLIANCE
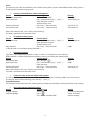
Display
Display Designation Description
0 Zero The heating zone is activated.
1…9 Booster level Selection of the cooking level.
E Error message Electronic failure.
C Clean function Clean function is active.
H Residual heat The heating zone is hot.
II Stop&Go The hob is in pause.
Power selection zone
“Slider” (rear zone)
Power selection zone
“Slider” (front zone)
Locking
key
Timer
display
Timer
keys
Power
display
Timer
display
Bridge
display
Pause/Recal
key
On/O
key
Clean
function
key

- 7 -
Ventilation
The cooling system is fully automatic. The cooling fan starts at a low speed when the calories generated by
the electronic system reach a certain level. The ventilation starts its high speed level when the hob is intensi-
vely used. The cooling fan reduces its speed and stops automatically when the electronic circuit has cooled
down enough.
STARTING-UP AND APPLIANCE MANAGEMENT
Before the rst use
Clean your hob with a damp cloth and then dry the surface thoroughly. Do not use detergent because this
can create a blue-tinted colour on the glass surface.
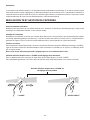
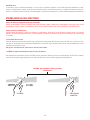
Induction principle
An induction coil is located under each heating zone. When it is working, it produces a variable electroma-
gnetic eld which produces inductive currents in the ferromagnetic plate. The result is a heating-up of the
plate located on the heating zone.
Sensitive touch
Your ceramic hob is equipped with electronic controls with sensitive touch keys. When your nger presses
the key, the corresponding command is activated. This activation is validated by a control light, a letter or a
number in the display and/or a “beep” sound.
In case of normal use, press only one key at a time.
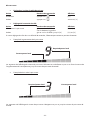
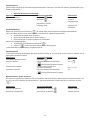
Power selection zone “SLIDER” and timer setting zone
To select the power with the slider, slide your nger on the “SLIDER” zone. You can already have direct access
if you put your nger directly on the chosen level.
“ SLIDER “
“ DIRECT ACCESS“
Power selection zone “SLIDER” and timer
setting zone

- 8 -
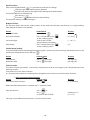
Starting-up
- Start-up / switch o the hob:
Action Control panel Display
To start press key [ ] [ 0 ]
To stop press key [ ] nothing or [ H ]
-Start-up / switch o a heating zone:
Action Control panel Display
To set slide on the “SLIDER“ [ 1 ] to [ 9 ]
(adjust the power) to the right or to the left
To stop slide to [ 0 ] on “SLIDER“ [ 0 ] or [ H ]
If no action is taken within 20 seconds, the electronics return in waiting position.
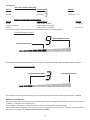
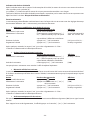
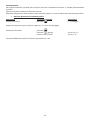
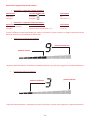
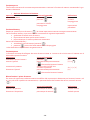
- Example of power increase:
The segments from the power display are turning on one by one until the required power level is reached.
- Example of power decrease:
The segments from the power display are turning o one by one until the required power level is reached.
Residual heatindication
After the switch o of a heating zone or the complete stop of the hob, the heating zones are still hot and the
symbol [ H ] indicates this on the display.
The symbol [ H ] disappears when the heating zones may be touched without danger.
Do not touch the heating zones and do not put any heat sensitive objects on them, as long as the residual heat
indicators are switched on. There are risks of burns and re.
Required power level
Required power level Current power level
Current power level

- 9 -
Timer
The timer can be used simultaneously with all the heating zones, and this with dierent time settings (from 1
to 999 minutes) for each heating zone.
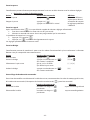
• Setting and modication of the cooking time:
Action Control panel Display
Select the power level slide on the “SLIDER“ [ 1 ] to [ 9 ]
Select the timer Press simultaneously key [ - ] and [ + ] Timer display on
from the timer until the
desired display is on
Decrease the time Press key [ - ] from the timer [ 60 ] to 59, 58...
Increase the time Press key [ + ] from the timer Time increase
After a few seconds, the [ min ] display stops blinking.
The time is conrmed and the timer starts.
• To stop the cooking time:
Action Control panel Display
Select the Timer Press simultaneously key [ - ] and [ + ] Timer display on
from the timer until the
desired display is on
Stop the time Press key [ - ] from the timer [ 000 ]
If several timers are activated, repeat the process.
• Egg timer function:
Egg timer is an independent function. It stops as soon as a heating zone starts working.
When the hob is switched o, the timer continues until it has reached the selected time.
Action Control panel Display
Activate the hob press display [ ] [ 0 ]
Select the Timer Press simultaneously key [ - ] and [ + ] [ 000 ]
from the timer
Decrease the time Press key [ - ] from the timer [ 60 ] to 59, 58...
Increase the time Press key [ + ] from the timer Time increase
After a few seconds, the [ min ] display stops blinking.
The time is conrmed and the timer starts.
• Automatic stop at the end of the cooking time:
As soon as the selected cooking time has nished, the timer display is blinking [ 000 ] and a sound rings.
To stop the sound and the blinking, press the key [ - ] and [ + ].
Stop&Go function
This function brakes the entire hob’s cooking activity temporarily and allows restarting with the same settings.
• Start-up/stop the stop&go function:
Action Control panel Display
Engage stop&go press [ ] [ II ] and control light on
Stop the stop&go press [ ] “Slider” animated
Press on the animated “slider” previous settings

- 10 -
Recall Function
After switching o the hob [ ], it is possible to recall the last settings.
cooking stages of all cooking zones (Booster)
minutes and seconds of programmed cooking zone-related timers
The recall procedure is the following:
Press the key [ ]
Then press [ ] before the light stops blinking.
The previous settings are activated again.
Bridge Function
This function allows the use of 2 cooking zones at the same time with the same features as a single cooking
zone. Booster function is not allowed.
Action Control panel Display
Activate the hob Press display [ ] [ 0 ]
Activate the bridge Press simultaneously on [ ] [ 0 ] and [ ]
of the 2 cooking zones
Increase bridge Slide on the “SLIDER“ [ 1 ] to [ 9 ]
which indicates the power
Stop bridge Press simultaneously on [ ] [ 0 ]
of the 2 cooking zones
Control panel locking
To avoid modication of the setting of the cooking zones , particularly when cleaning, the control panel can be
locked (with exception to the On/O key [ ]).
Action Control panel Display
Lock the hob Press [ ] during 6s lock light on
Unlock the hob Press [ ] during 6s lock light o
Clean function
The clean function guarantees a satisfactory temperature to clean your teppan yaki (see Maintenance and
cleaning chapter).
Each zone has its own clean function.
It is also possible to combine 2 cooking zones (bridge function), then to activate the clean function.
Start-up/stop the clean function:
Action Control panel Display
Activate the clean function press [ ] [ C ] is blinking
When the clean temperature is reached, the [ C ] becomes xed.
Stop the function press [ ] or
press [ ] nothing or [ H ]
or slide on the “SLIDER“ [ 0 ] à [ 9 ]
Cleaning can be eected with positions 4, 5 or 6 from the slider.

- 11 -
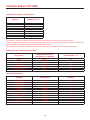
COOKING ADVICES
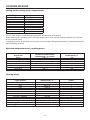
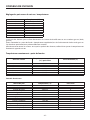
Setting up the cooking levels / temperatures
Cooking levels Temperature (°C)
1
50
2 75
3 100
4 125
5 150
6 170
7 190
8 205
9 220
You can cook directly on the heating surface with or without fat (oil or grease).
Avoid reaching the «smoking point» (too high temperature) when you are cooking with oil or fat. Food will
lose its nutritive value.
In order to conserve all the avour and quality, be sure to adjust the right temperature in accordance with the
type of cooking required.
Maximum temperature and «smoking point»
Grease / Oil
Maximum recommended
temperature (°C) / power
Smoke point (°C)
Butter 130 / 4 150
Lard 170 / 6 200
Beef fat 180 / 6 210
Olive oil 180 / 6 200
Sunower oil 200 / 7 220
Peanut oil 200 / 7 235
Coconut oil 200 / 7 240
Cooking advice
Types of food Temperature (°C) Power
Fish and seafood 170-180 6
Veal 160-180 6
Beef 200-210 8
Pork 180-210 7
Lamb 180-200 7
Poultry 160-180 6
Sausage 200 7-8
Fried egg 140 4-5
Pancake / omelette 140-160 5
Fruits 140-160 5
Vegetables 140-160 5
Simmering previously cooked rice 140-160 5
Simmering previously cooked pasta 140-160 5

- 12 -
MAINTENANCE AND CLEANING
Glass cleaning
Clean the control panel using a little washing-up liquid diluted in water or a recommended commercial vitro-
ceramic product.
Highly corrosive or abrasive detergents and cleaning equipment likely to cause scratches must be avoided at
all costs.
Dry the appliance with a clean rag.
Spillages of sugar, jam, jelly, etc. must be removed immediately.
Cooking surface cleaning
Cold cooking surface: Remove light marks with a damp cloth using washing up liquid diluted in a little water.
Then rinse with cold water and dry the surface thoroughly with movements that follow the natural grooves of
the cooking surface (no circular movements).
Warm cooking surface: Press the key [ ] and wait to the [ C ] becomes xe (see paragraph “Clean
function”).
Put icicles on the cooking surface and remove light marks with a spatula and push them into the drain. Clean
the drain with absorbent paper for example. Cold water can replace the icicles.
Then dry the surface thoroughly with movements that follow the natural grooves of the cooking surface (no
circular movements) with a clean rag.
Some marks that come from acid naturally contained in food can be cleaned with lemon juice when the ap-
pliance is cold.
Do not clean the hob if the glass is too hot: risk of burn.
Highly corrosive or abrasive detergents and cleaning equipment likely to cause scratches must be avoided at
all costs.
Never use any steam-cleaner or pressure washer.
WHAT TO DO IN CASE OF A PROBLEM
The hob or the cooking zone does not start:
• The hob is badly connected to the electrical network.
• The safety fuse is cut o.
• The lock function is activated.
• The sensitive touch keys are covered with grease or water.
• An object is put on a sensitive touch key.
The control panel displays [ E ]:
• Disconnect and reconnect the hob.
• Call after sales service.
One or all cooking zone(s) cut o:
• The safety system functioned.
• This system works when you forgot to switch o the cooking zone.
• One or more sensitive touch keys are covered.
• The pan is empty and its bottom overheated.
• The hob also has an automatic reduction of Booster level and breaking Automatic overheating
The ventilation system is still working after switching the hob o:
• This is not a failure, the fan continues to protect the electronic device.
• The fan stops automatically.
The automatic cooking system does not start:
• The cooking zone is still hot [ H ].
• The highest Booster level is set [ 9 ].

- 13 -
The control panel displays [ C ]:
• See chapter “Clean function“.
The control panel displays [ II ]:
• See chapter “Stop&Go“.
The control panel displays [ Π ]:
• See chapter “Bridge“.
The control panel displays [ ] or [ Er03 ] :
• An object or liquid covers the control keys. The symbol disappears as soon as the key is released or
cleaned.
The control panel displays [ E2 ] :
• The hob is overheated, let it cool and then turn it on again.
The control panel displays [ E8 ]:
• The air inlet of the ventilator is obstructed, release it.
The control panel displays [ U400 ] :
• The hob is not connected to the network. Check the connection and reconnect the hob.
The control panel displays [ Er47 ] :
• The hob is not connected to the network. Check the connection and reconnect the hob.
If one of the symbols above persists, call the SAV.
ENVIRONMENT PRESERVATION
• The materials of packaging are ecological andrecyclable.
• The electronicappliancesare composed ofprecious metals. Ask your commune for recycling pos-
sibilities.
• Don’t throw your appliance in the household refuse
• Get in touch with the waste collection centre of your commune
that is adapted to the recycling of the household appliances.

- 14 -
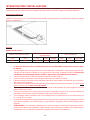
INSTALLATION INSTRUCTIONS
The installation is the exclusive responsibility of specialists.
The user of this appliance is held to respect the legislation and the standards enforced in his home country.
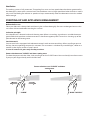
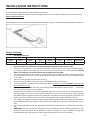
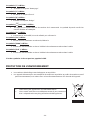
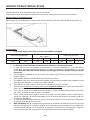
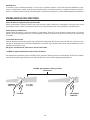
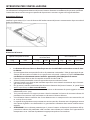
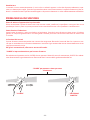
How to stick the gasket:
Stick the gasket (2) two millimetres from the external edge of the glass, after removing the protection sheet (3).
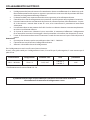
Fitting - installing:
• The dimensions are:
Cut size Flush mounting Glass size
Width Depth Width Depth Radius Width Depth Thickness
360 490 386 526 8 380 520 6
• Ensure that there is a distance of 50 mm between the hob and the wall or sides.
• The hobs are classied as “Y” class for heat protection. Ideally the hob should be installed with plen-
ty of space on either side. There may be a wall at the rear and tall units or a wall at one side. On the
other side, however, no unit or device can be higher than the hob.
• The piece of furniture or the support in which the hob is to be tted, as well as the edges of furni-
ture, the laminate coatings and the glue used to x them, must be able to resist temperatures of
up to 100 °C.
• The mural rods of edge must be heat-resisting.
• Do not install the hob to the top of a non- ventilated oven or a dishwasher.
• To ensure good air circulation of the electronic device, maintain a space of 20 mm under the bot-
tom of the hob casing.
• If a drawer is placed under the work, avoid putting ammable objects in this drawer (for exam-
ple: sprays) or non-heat-resistant objects.
• Materials which are often used to make worktops expand on contact with water. To protect the cut-
out edge, apply a coat of varnish or special sealant. Particular care must be given when applying
the adhesive joint supplied with the hob to prevent any leakage into the supporting furniture. This
gasket guaranties a correct seal when used in conjunction with smooth work top surfaces.
• The safety gap between the hob and the cooker hood placed above must respect the indications
of the hood manufacturer. Respect a distance of at least 760 mm if you do not have further instruc-
tions.
• The connecting cable cannot be subjected to mechanical constraint (e.g. a drawer) after construc-
tion.
• WARNING: Use only hob guards designed by the manufacturer of the cooking appliance or indi-
cated by the manufacturer of the appliance in the instructions for use as suitable or hob guards
incorporated in the appliance. The use of inappropriate guards can cause accidents.

- 15 -
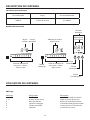
ELECTRICAL CONNECTION
• The installation of this appliance and the connection to the electrical network should be entrusted
only to an electrician who is aware of the normative regulations and who respects them scrupu-
lously.
• The electrical parts should always be protected after the building-in.
• The necessary data of connection are on the stickers placed on the bottom of the appliance.
• The appliance should be separated from the mains by using a multipolar circuit breaker. The contact
opening must be at least 3 mm.
• The electrical circuit must be separated from the mains by using adapted devices, such as circuit
breakers, fuses or (dierential) contactors.
• If the appliance is not tted with an accessible plug, disconnecting means must be incorporated in
the xed installation, in accordance with the installation regulations.
• The inlet hose must be positioned so that it does not touch any of the hot parts of the hob or oven.
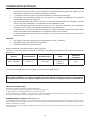
Caution!
• This appliance can only be connected to a network 230 V~ 50/60 Hz.
• You should always connect the earth wire.
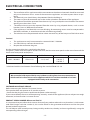
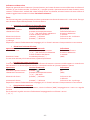
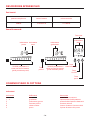
• Respect the connection diagram.
Use the connecting cable that is attached to the device.
The green / yellow wire corresponds to the earth wire, the blue wire corresponds to the neutral one and the
brown wire corresponds to the phase.
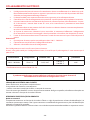
Mains Connection Cable diameter Cable Protection calibre
230V~ 50/60Hz 1 Phase + N 3 x 1,5 mm²
H 05 VV - F
H 05 RR - F
16 A *
* calculated with the simultaneous factor following the standard EN 60 335-2-6
We cannot be held responsible for any incident resulting from incorrect connection or
which could arise from the use of an appliance which has not been earthed or has been
equipped with a faulty earth connection.
CUSTOMER ASSISTANCE SERVICE
Before contacting the Technical Assistance Service:
If the product does not operate at all, we advise you to:
- check that the plug has been inserted into the power socket correctly.
If you cannot identify the cause of the operating anomaly: switch o the appliance (do not subject it to rough
treatment) and contact the Assistance Service.
PRODUCT SERIAL NUMBER. Where can I nd it?
It is important that you inform the Assistance Service of your product code and its serial number (a 16-character
code which begins with the number 3); this can be found on the guarantee certicate or on the data plate
located inside the appliance.
This will help to avoid wasted journeys being made by technicians, thereby (and most signicantly) saving the
corresponding callout charges.

- 16 -
Chère cliente, cher client,
Nous vous remercions de la conance que vous nous avez accordée en choisissant notre TEPPAN YAKI à in-
duction.
An de bien connaître cet appareil, nous vous recommandons de lire attentivement cette notice d’utilisation
dans son intégralité et de la conserver pour une consultation ultérieure.
SOMMAIRE
SECURITE ...............................................................................................................................................................................................17
Précautions avant utilisation en cuisson .....................................................................................................................................17
Utilisation de l’appareil ......................................................................................................................................................................17
Précautions pour ne pas détériorer l’appareil ...........................................................................................................................19
Précautions en cas de défaillance de l’appareil ........................................................................................................................20
Autres protections ...............................................................................................................................................................................20
DESCRIPTION DE L’APPAREIL ........................................................................................................................................................... 21
Caractéristiques techniques ............................................................................................................................................................21
Bandeau de commande ....................................................................................................................................................................21
UTILISATION DE L’APPAREIL ..............................................................................................................................................................21
Achage .................................................................................................................................................................................................21
Ventilation ..............................................................................................................................................................................................22
MISE EN ROUTE ET GESTION DE L’APPAREIL ...............................................................................................................................22
Avant la première utilisation ...........................................................................................................................................................22
Principe de l’induction ........................................................................................................................................................................22
Touches sensitives ...............................................................................................................................................................................22
Zone de sélection de puissance « SLIDER» et de réglage de la minuterie ....................................................................22
Mise en route ........................................................................................................................................................................................23
Indicateur de chaleur résiduelle .....................................................................................................................................................24
Fonction minuterie .............................................................................................................................................................................24
Fonction pause .......................................................................................................................................................................................25
Fonction rappel ....................................................................................................................................................................................25
Fonction Bridge ....................................................................................................................................................................................25
Verrouillage du bandeau de commande ....................................................................................................................................25
Fonction nettoyage ............................................................................................................................................................................26
CONSEILS DE CUISSON ......................................................................................................................................................................27
Réglage des puissances de cuisson / températures ...............................................................................................................27
Températures maximum et «point de fumée» ........................................................................................................................27
Conseils de cuissons ...........................................................................................................................................................................27
ENTRETIEN ET NET TOYAGE ...............................................................................................................................................................28
Nettoyage du bandeau de commande. ......................................................................................................................................28
Nettoyage de la zone de cuisson. ..................................................................................................................................................28
QUE FAIRE EN CAS DE PROBLÈME ..................................................................................................................................................28
PROTECTION DE L’ENVIRONNEMENT ...........................................................................................................................................29
INSTRUCTIONS D’INSTALLATION ....................................................................................................................................................30
CONNEXION ÉLECTRIQUE ..................................................................................................................................................................31
F

- 17 -
SECURITE
Précautions avant utilisation en cuisson
• Retirez toutes les parties de l’emballage.
• L’installation et le branchement électrique de l’appareil sont
à coner à des spécialistes agrées. Le fabricant ne saurait être
tenu responsable des dommages résultant d’une erreur d’enca-
strement ou de raccordement.
• L’appareil ne doit être utilisé que s’il est monté et installé dans
un meuble et un plan de travail homologué et adapté.
• Son utilisation est uniquement destinée à l’usage domestique
habituel (préparation des aliments), à l’exclusion de toute autre
utilisation domestique, commerciale ou industrielle.
• Enlevez toutes les étiquettes et autocollants du verre vitrocéra-
mique.
• Ne pas transformer ou modier l’appareil.
• La table de cuisson ne doit pas servir de support ou de plan de
travail.
• La sécurité n’est assurée que si l’appareil est raccordé à une terre
de protection conforme aux prescriptions en vigueur.
• Pour le raccordement au réseau électrique n’utilisez pas de ral-
longe.
• L’appareil ne doit pas être utilisé au-dessus d’un lave-vaisselle
ou d’un sèche-linge : les vapeurs d’eau dégagées pourraient
détériorer l’électronique.
• Ne faites pas fonctionner l’appareil avec un minuteur externe ou
un système de commande à distance.

- 18 -
Utilisation de l’appareil
• Coupez toujours les foyers après utilisation.
• Surveillez constamment les cuissons qui utilisent des graisses
et des huiles, car elles sont susceptibles de s’enammer rapide-
ment.
• Prenez garde aux risques de brûlures pendant et après l’utilisa-
tion de l’appareil.
• Assurez-vous qu’aucun câble électrique d’appareil xe ou mobi-
le ne vienne en contact avec la vitre ou la casserole chaude.
• Les objets magnétisables (cartes de crédits, disquettes infor-
matiques, calculatrices) ne doivent pas se trouver à proximité
immédiate de l’appareil en fonction.
• Les objets métalliques tels que des couteaux, des fourchettes,
des cuillères et des couvercles ne devraient pas être placés la
surface vitrée puisqu’ils peuvent devenir chauds.
• De façon générale ne placez aucun objet métallique autre que
les récipients de chaue sur la surface vitrée. En cas d’enclen-
chement intempestif ou de chaleur résiduelle, celui-ci risquerait
selon le matériau de chauer, de fondre ou de commencer à
brûler.
• Ne jamais couvrir l’appareil d’un chion ou d’une feuille de pro-
tection. Il pourrait devenir très chaud et prendre feu.
• Cet appareil peut être utilisé par des enfants âgés de 8 ans et
plus et des personnes dont les capacités physiques, sensorielles
ou mentales sont réduites ou dont les expériences et les con-
naissances sont inadaptées, uniquement si elles sont surveillées,
formées à l’utilisation de l’appareil en conditions de sécurité et
informées des risques susceptibles de se présenter. Les enfants
ne doivent pas jouer avec l’appareil.
• Le nettoyage et l’entretien ne doivent pas être conés à des en-
fants sans surveillance d’adultes.
• Les enfants doivent être informés pour s’assurer qu’ils ne jouent
pas avec l’appareil.

- 19 -
Précautions pour ne pas détériorer l’appareil
• La présence de sable ou d’autres matériaux abrasifs peut en-
dommager la vitrocéramique.
• Evitez de faire chuter des objets, mêmes petits, sur la vitrocéra-
mique.
• Ne heurtez pas les bords de la vitre avec les casseroles.
• S’assurer que la ventilation de l’appareil se fasse suivant les in-
structions du constructeur.
• Ne posez pas ou ne pas laisser de casseroles vides sur la table de
cuisson.
• Eviter que le sucre, les matières synthétiques ou une feuille d’a-
luminium ne touchent les zones chaudes. Ces substances peu-
vent au refroidissement provoquer des cassures ou d’autres
modications de la surface vitrocéramique: Eteindre l’appareil
et enlevez-les immédiatement de la zone de cuisson encore
chaude (attention: risque de brûlures).
• MISE EN GARDE: Risque d’incendie : ne pas entreposer d’objets
sur la surface de cuisson
• Ne placez jamais de récipients chauds au-dessus de la zone de
commande.
• Si un tiroir est situé sous l’appareil encastré, assurer un écart suf-
sant (2 cm) entre le contenu de ce tiroir et la partie inférieure
de l’appareil an d’assurer une bonne ventilation.
• Ne déposez pas d’objets inammables (ex. sprays) dans le tiroir
placé sous la table de cuisson. Les éventuels casiers à couverts
doivent être en matériau résistant à la chaleur.

- 20 -
Précautions en cas de défaillance de l’appareil
• Si un défaut est constaté, il faut débrancher l’appareil et couper
l’alimentation électrique.
• En cas de fêlure ou de ssure de la vitrocéramique il faut impéra-
tivement débrancher l’appareil du réseau électrique et prévenir
le service après-vente.
• Les réparations doivent être entreprises exclusivement par un
personnel spécialisé. N’ouvrez en aucun cas l’appareil vous-
même.
• ATTENTION : Si la surface vitrée est ssurée, coupez l’alimenta-
tion de l’appareil pour éviter une éventuelle décharge électri-
que.
Autres protections
• Pour les utilisateurs portant un régulateur de rythme cardiaque,
le champ magnétique pourrait inuencer son fonctionnement.
Nous recommandons de se renseigner auprès du revendeur ou
du médecin.
• N’utilisez pas de récipients en matière synthétique ou en alumi-
nium : ils pourraient fondre sur des foyers encore chauds.
• NE JAMAIS essayer d’éteindre un incendie avec de l’eau, mais
arrêter l’appareil puis couvrir les ammes par exemple avec un
couvercle ou une couverture anti-feu.
La pagina si sta caricando...
La pagina si sta caricando...
La pagina si sta caricando...
La pagina si sta caricando...
La pagina si sta caricando...
La pagina si sta caricando...
La pagina si sta caricando...
La pagina si sta caricando...
La pagina si sta caricando...
La pagina si sta caricando...
La pagina si sta caricando...
La pagina si sta caricando...
La pagina si sta caricando...
La pagina si sta caricando...
La pagina si sta caricando...
La pagina si sta caricando...
La pagina si sta caricando...
La pagina si sta caricando...
La pagina si sta caricando...
La pagina si sta caricando...
La pagina si sta caricando...
La pagina si sta caricando...
La pagina si sta caricando...
La pagina si sta caricando...
La pagina si sta caricando...
La pagina si sta caricando...
La pagina si sta caricando...
La pagina si sta caricando...
La pagina si sta caricando...
La pagina si sta caricando...
La pagina si sta caricando...
La pagina si sta caricando...
La pagina si sta caricando...
La pagina si sta caricando...
La pagina si sta caricando...
La pagina si sta caricando...
La pagina si sta caricando...
La pagina si sta caricando...
La pagina si sta caricando...
La pagina si sta caricando...
La pagina si sta caricando...
La pagina si sta caricando...
La pagina si sta caricando...
La pagina si sta caricando...
La pagina si sta caricando...
La pagina si sta caricando...
La pagina si sta caricando...
La pagina si sta caricando...
La pagina si sta caricando...
La pagina si sta caricando...
La pagina si sta caricando...
La pagina si sta caricando...
La pagina si sta caricando...
La pagina si sta caricando...
La pagina si sta caricando...
La pagina si sta caricando...
La pagina si sta caricando...
La pagina si sta caricando...
La pagina si sta caricando...
La pagina si sta caricando...
La pagina si sta caricando...
La pagina si sta caricando...
La pagina si sta caricando...
La pagina si sta caricando...
La pagina si sta caricando...
La pagina si sta caricando...
La pagina si sta caricando...
La pagina si sta caricando...
La pagina si sta caricando...
La pagina si sta caricando...
La pagina si sta caricando...
La pagina si sta caricando...
La pagina si sta caricando...
La pagina si sta caricando...
La pagina si sta caricando...
La pagina si sta caricando...
La pagina si sta caricando...
La pagina si sta caricando...
La pagina si sta caricando...
La pagina si sta caricando...
-
 1
1
-
 2
2
-
 3
3
-
 4
4
-
 5
5
-
 6
6
-
 7
7
-
 8
8
-
 9
9
-
 10
10
-
 11
11
-
 12
12
-
 13
13
-
 14
14
-
 15
15
-
 16
16
-
 17
17
-
 18
18
-
 19
19
-
 20
20
-
 21
21
-
 22
22
-
 23
23
-
 24
24
-
 25
25
-
 26
26
-
 27
27
-
 28
28
-
 29
29
-
 30
30
-
 31
31
-
 32
32
-
 33
33
-
 34
34
-
 35
35
-
 36
36
-
 37
37
-
 38
38
-
 39
39
-
 40
40
-
 41
41
-
 42
42
-
 43
43
-
 44
44
-
 45
45
-
 46
46
-
 47
47
-
 48
48
-
 49
49
-
 50
50
-
 51
51
-
 52
52
-
 53
53
-
 54
54
-
 55
55
-
 56
56
-
 57
57
-
 58
58
-
 59
59
-
 60
60
-
 61
61
-
 62
62
-
 63
63
-
 64
64
-
 65
65
-
 66
66
-
 67
67
-
 68
68
-
 69
69
-
 70
70
-
 71
71
-
 72
72
-
 73
73
-
 74
74
-
 75
75
-
 76
76
-
 77
77
-
 78
78
-
 79
79
-
 80
80
-
 81
81
-
 82
82
-
 83
83
-
 84
84
-
 85
85
-
 86
86
-
 87
87
-
 88
88
-
 89
89
-
 90
90
-
 91
91
-
 92
92
-
 93
93
-
 94
94
-
 95
95
-
 96
96
-
 97
97
-
 98
98
-
 99
99
-
 100
100


Hoover HVI 381 TY Manuale utente
- Categoria
- Piani cottura
- Tipo
- Manuale utente
Documenti correlati
Altri documenti
-
Bertazzoni P905INE Manuale del proprietario
-
Foster 7341 245 Manuale utente
-
Foster 7341/645 Use And Installation Manual
-
-
Foster S4000.Line.IS.4 Manuale utente
-
Bertazzoni P60 4 I NE Manuale del proprietario
-
Barazza 1PKS90N Istruzioni per l'uso
-
Bompani BOCP424/E Scheda dati
-
-
Bauknecht CTDIK940C Manuale del proprietario