
CORDLESS IMPACT DRILL 20V / AKKU-SCHLAG-
BOHRSCHRAUBER 20 V / PERCEUSE-VISSEUSE
À PERCUSSION SANS FIL 20 V PSBSAP 20-Li B3
PERCEUSE-VISSEUSE À PERCUSSION
SANS FIL 20 V
Traduction des instructions d’origine
AKKU-SCHLAGBOHRSCHRAUBER
20 V
Originalbetriebsanleitung
CORDLESS IMPACT DRILL 20V
Translation of the original instructions
PŘÍKLEPOVÁ VRTAČKA 20 V
Překlad originálního provozního návodu
ACCU- SLAGBOOR-
SCHROEFMACHINE 20 V
Vertaling van de originele gebruiksaanwijzing
AKU PRÍKLEPOVÁ VŔTAČKA 20 V
Preklad originálneho návodu na obsluhu
WKRĘTAK UDAROWY
AKUMULATOROWY 20 V
Tłumaczenie oryginalnej instrukcji obsługi
ATORNILLADORA TALADRADORA
DE PERCUSIÓN RECARGABLE 20 V
Traducción del manual de instrucciones original
BATTERIDREVET SLAGBORESKRUE-
MASKINE 20 V
Oversættelse af den originale driftsvejledning
TRAPANO A PERCUSSIONE
RICARICABILE 20 V
Traduzione delle istruzioni d’uso originali
AKKUS ÜTVEFÚRÓ-
CSAVAROZÓ 20 V
Az originál használati utasítás fordítása
AKUMULATORSKI UDARNI
VRTALNIK 20 V
Prevod originalnega navodila za uporabo
IAN 391008_2201

GB / IE Translation of the original instructions Page 1
DE / AT / CH Originalbetriebsanleitung Seite 15
FR / BE Traduction des instructions d’origine Page 31
NL / BE Vertaling van de originele gebruiksaanwijzing Pagina 49
CZ Překlad originálního provozního návodu Strana 65
PL Tłumaczenie oryginalnej instrukcji obsługi Strona 79
SK Preklad originálneho návodu na obsluhu Strana 95
ES Traducción del manual de instrucciones original Página 111
DK Oversættelse af den originale driftsvejledning Side 127
IT Traduzione delle istruzioni d’uso originali Pagina 141
HU Az originál használati utasítás fordítása Oldal 157
SI Prevod originalnega navodila za uporabo Stran 173
Before reading, unfold the page containing the illustrations and familiarise yourself with all functions of
the device.
Klappen Sie vor dem Lesen die Seite mit den Abbildungen aus und machen Sie sich anschließend mit allen
Funktionen des Gerätes vertraut.
Avant de lire le mode d‘emploi, ouvrez la page contenant les illustrations et familiarisez-vous ensuite avec
toutes les fonctions de l‘appareil.
Vouw vóór het lezen de pagina met de afbeeldingen open en maak u vertrouwd met alle functies van het
apparaat.
Před čtením si otevřete stranu s obrázky a potom se seznamte se všemi funkcemi přístroje.
Przed przeczytaniem proszę rozłożyć stronę z ilustracjami, a następnie proszę zapoznać się z wszystkimi
funkcjami urządzenia.
Pred čítaním si odklopte stranu s obrázkami a potom sa oboznámte so všetkými funkciami prístroja.
Antes de empezar a leer abra la página que contiene las imágenes y, en seguida, familiarícese con todas
las funciones del dispositivo.
Før du læser, vend siden med billeder frem og bliv bekendt med alle apparatets funktioner.
Prima di leggere aprire la pagina con le immagini e prendere confidenza con le diverse funzioni
dell‘apparecchio.
Olvasás előtt kattintson az ábrát tartalmazó oldalra és végezetül ismerje meg a készülék mindegyik funkcióját.
Pred branjem odprite stran s slikami in se nato seznanite z vsemi funkcijami naprave.

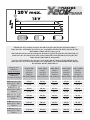
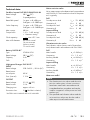
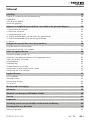
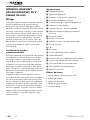
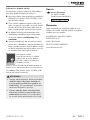
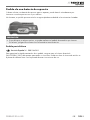
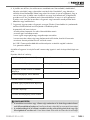
A

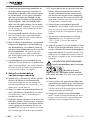
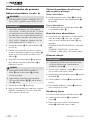
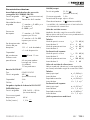
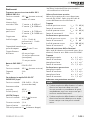
All Parkside tools and the chargers PLG20A1/A4/C1/A2/C2/A3/C3/PDSLG20A1/
PLGS2012A1 of the X20V Team series are compatible with the PAP 20 A1/A2/A3/B1/B3/
PAPS 204 A1/PAPS 208 A1 battery pack.
Alle Parkside Geräte und die Ladegeräte PLG20A1/A4/C1/A2/C2/A3/C3/PDSLG20A1/
PLGS2012A1 der X20V Team Serie sind mit dem Akku-Pack PAP 20 A1/A2/A3/B1/B3/
PAPS204 A1/PAPS 208 A1 kompatibel.
Tous les outils Parkside et les chargeurs PLG20A1/A4/C1/A2/C2/A3/C3/PDSLG20A1/
PLGS2012A1 de la série X20V Team sont compatibles avec la batterie PAP 20 A1/A2/A3/
B1/B3/PAPS 204 A1/PAPS 208 A1.
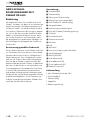
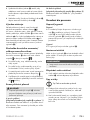
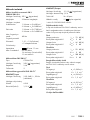
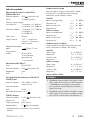
Charging times
Ladezeiten
Temps de charge
Charging currents
Ladeströme
Courants de charge
max. 2,4 A
Charger
Ladegerät
Chargeur
PLG 20 A1/A4/C1
max. 3,5 A
Charger
Ladegerät
Chargeur
PLG 20 A2/C2
max. 4,5 A
Charger
Ladegerät
Chargeur
PLG 20 A3/C3
max. 4,5 A
Charger
Ladegerät
Chargeur
PDSLG 20 A1
max. 12,0 A
Charger
Ladegerät
Chargeur
PLGS 2012 A1
2 Ah PAP 20 A1/B1
Battery pack · Akku ·
Batterie
60 min
2,4 A
45 min
3,5 A
35 min
3,8 A
35 min
3,8 A
35 min
3,8 A
3 Ah PAP 20 A2
Battery pack · Akku ·
Batterie
90 min
2,4 A
60 min
3,5 A
45 min
4,5 A
45 min
4,5 A
32 min
5,3 A
4 Ah PAP 20 A3/B3
Battery pack · Akku ·
Batterie
120 min
2,4 A
80 min
3,5 A
60 min
4,5 A
60 min
4,5 A
35 min
7,8 A
4 Ah PAPS 204 A1
Battery pack · Akku ·
Batterie
120 min
2,4 A
80 min
3,5 A
50 min
4,5 A
50 min
4,5 A
35 min
6,0 A
8 Ah PAPS 208 A1
Battery pack · Akku ·
Batterie
210 min
2,4 A
165 min
3,5 A
120 min
4,5 A
120 min
4,5 A
45 min
12,0 A

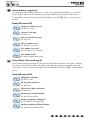
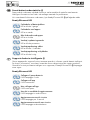
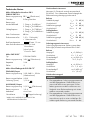
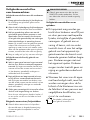
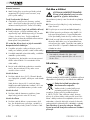
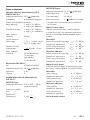
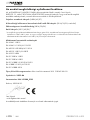
Smart battery supportp
This appliance supports advanced functions when using special smart batteries. For more infor-
mation, please refer to the accompanying material provided by the respective manufacturer.
If smart battery functions are supported, the Ready2Connect LEDp lights up in the following
manner:
Ready2Connect LED
Connect the battery pack
LED flashes 3 times
Connect to the app
LED stays on
Not connected to the app
LED stays off
Tool in update mode
LED flashes continuously
Tool update successful
The LED flashes for 5 seconds
Tool update failed
LED flashes rapidly alternately
Smart-Akku Unterstützungp
Dieses Gerät unterstützt erweiterte Funktionen bei Verwendung spezieller Smart-Akkus. Weitere
Informationen entnehmen Sie bitte den Begleitmateria lien der jeweiligen Hersteller. Wenn die
Smart-Akku-Funktionen unterstützt werden, leuchtet die Ready2Connect LEDp in nachfolgender
Weise:
Ready2Connect LED
Akkupack verbinden
LED blinkt 3 mal
Mit der App verbinden
LED bleibt an
Nicht mit der App verbunden
LED bleibt aus
Werkzeug im Update Modus
LED blinkt kontinuierlich
Werkzeug Update erfolgreich
Die LED blinkt 5 Sekunden lang
Werkzeug Update fehlgeschlagen
LED blinkt abwechselnd schnell

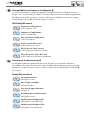
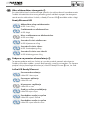
Compatibilité avec batterie intelligentep
En utilisant des batteries intelligentes spéciales, cet appareil prend en charge des fonctions
élargies. Vous trouverez de plus amples informations dans les documents d‘accompagnement
des fabricants respectifs. Lorsque les fonctions de batterie intelligente sont prises en charge,
laLEDReady2Connectp s‘allume de la façon suivante:
LED Ready2Connect
Connecter le bloc-batterie
La LED clignote 3fois
Connecter à l'application
La LED reste allumée
Non connecté à l'application
La LED reste éteinte
Outil en mode Mise à jour
La LED clignote en continu
Mise à jour de l'outil réussie
La LED clignote pendant 5secondes
Échec de la mise à jour de l'outil
La LED clignote en alternance rapidement
Smart-accu ondersteuningp
Dit apparaat ondersteunt geavanceerde functies bij gebruik van speciale smart-accu‘s.
Voor nadere informatie wordt verwezen naar het begeleidend materiaal van de respectieve
fabrikanten. Als de smart-accu-functies worden ondersteund, licht de Ready2Connect led p
alsvolgt op:
Ready2Connect-led
Accupak aansluiten
Led knippert 3 keer
Met de app verbinden
Led blijft branden
Niet met de app verbonden
Led blijft uit
Gereedschap in update-modus
Led knippert continu
Update gereedschap gelukt
Led knippert 5 seconden lang
Update gereedschap mislukt
Led knippert afwisselend snel

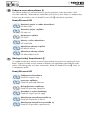
Podpora smart akumulátorup
Toto zařízení podporuje rozšířené funkce při použití speciálních smart akumulátorů. Další
informace naleznete v doprovodných materiálech příslušných výrobců. Když jsou podporovány
funkce smart akumulátoru, tak svítí Ready2Connect LEDp následujícím způsobem:
Ready2Connect LED
Navázání spojení se sadou akumulátorů
LED bliká 3krát
Navázání spojení s aplikací
LED stále svítí
Nespojeno s aplikací
LED nesvítí
Nástroj v režimu aktualizace
LED trvale bliká
Aktualizace nástroje úspěšná
LED bliká 5 sekund
Aktualizace nástroje selhala
LED bliká střídavě rychle
Obsługa funkcji Smart bateriip
To urządzenie obsługuje zaawansowane funkcje podczas korzystania ze specjalnych Smart
baterii. Więcej informacji można znaleźć w dołączonych materiałach odpowiednich produ-
centów. Gdy obsługiwane są funkcje Smart baterii, dioda LED Ready2Connect p świeci się
wnastępujący sposób:
Ready2Connect LED
Podłączanie akumulatora
Dioda LED mignie 3 razy
Łączenie z aplikacją
Dioda LED pozostaje włączona
Brak połączenia z aplikacją
Dioda LED pozostaje wyłączona
Narzędzie w trybie aktualizacji
Dioda LED miga w sposób ciągły
Aktualizacja narzędzia powiodła się
Dioda LED miga przez 5 sekund
Aktualizacja narzędzia nie powiodła się
Dioda LED miga szybko naprzemiennie

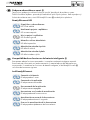
Podpora akumulátora smartp
Tento prístroj podporuje rozšírené funkcie pri použití špeciálnych akumulátorov smart.
Ďalšie informácie nájdete v sprievodných materiáloch príslušných výrobcov. Keď sa podporujú
funkcie akumulátora smart, svieti LED Ready2Connectp nasledujúcim spôsobom:
Ready2Connect LED
Pripojiť box s akumulátorom
LED 3-krát zabliká
Nadviazať spojenie s aplikáciou
LED zostane zapnutá
Nie je spojené s aplikáciou
LED zostane vypnutá
Náradie v režime aktualizácie
LED bliká nepretržite
Aktualizácia náradia úspešná
LED bliká 5 sekúnd
Aktualizácia náradia zlyhala
LED bliká striedavo rýchlo
Compatibilidad con funciones de batería inteligentep
Este aparato admite funciones avanzadas si se emplea una batería inteligente especial.
Encontrará más información en la documentación y material adjunto del fabricante que
corresponda. Si se admiten las funciones de batería inteligente, el led Ready2Connectp
se ilumina de la manera siguiente:
Led Ready2Connect
Conexión a la batería
El led parpadea 3veces
Conectado a la aplicación
El led permanece encendido
Desconectado de la aplicación
El led permanece apagado
Herramienta en el modo de actualización
El led parpadea de forma continua
Actualización correcta de la herramienta
El led parpadea durante 5segundos
Error en la actualización de la herramienta
El led parpadea rápidamente de forma alterna

Smart-batteri-understøttelsep
Dette produkt understøtter udvidede funktioner ved anvendelse af specielle smart-batterier.
Yderligere informationer kan findes ide vedlagte materialer fra producenten.
Hvis smart-batteri-funktionerne understøttes, lyser Ready2Connect LEDp på følgende måde:
Ready2Connect LED
Forbindelse af batteripakken
LED’en blinker 3 gange
Forbindelse med appen
LED’en er tændt
Ikke forbundet med appen
LED’en er slukket
Værktøj i opdateringsmodus
LED’en blinker permanent
Værktøjsopdatering udført
LED’en blinker i 5 sekunder
Værktøjsopdatering mislykkedes
LED’en blinker hurtigt
Supporto batteria intelligentep
Questo apparecchio supporta funzioni avanzate quando si utilizzano speciali batterie intelligenti.
Per ulteriori informazioni, consultare il materiale messo a disposizione dai rispettivi pro duttori.
Quando le funzioni per batterie intelligenti sono supportate, il Ready2Connect LEDp lampeggia
come segue:
Ready2Connect LED
Collegare il pacco batteria
Il LED lampeggia 3 volte
Collegare all'app
Il LED resta acceso
Non collegato all'app
Il LED resta spento
Utensile in modalità di aggiornamento
Il LED lampeggia in modo continuo
Aggiornamento utensile riuscito
Il LED lampeggia per 5 secondi
Aggiornamento utensile non riuscito
Il LED lampeggia a velocità alterne

Okos akkumulátor támogatásp
Ez a készülék bővített funkciókat támogat speciális okos akkumulátorok használata esetén.
További információkért tekintse meg az adott gyártók mellékelt anyagait. Ha támogatva
vannak az okos akkumulátor funkciók, a Ready2Connect LEDp az alábbi módon világít:
Ready2Connect LED
Akkumulátor-telep csatlakoztatása
A LED 3-szor villog
Csatlakoztatás az alkalmazáshoz
A LED világít
Nincs csatlakoztatva az alkalmazáshoz
A LED nem világít
Szerszám frissítés módban van
A LED folyamatosan villog
Szerszám frissítése sikeres
A LED 5 másodpercig villog
Szerszám frissítése nem sikerült
A LED felváltva gyorsan villog
Podpora za pametne akumulatorjep
Ta naprava podpira razširjene funkcije pri uporabi posebnih pametnih akumulatorjev.
Dodatne informacije najdete v spremni dokumentaciji ustreznih proizvajalcev. Če naprava
podpira funkcije pametnega akumulatorja, lučka LED Ready2Connectp sveti, kot sledi:
Lučka LED Ready2Connect
Povezava akumulatorja
Lučka LED 3-krat utripne
Povezava z aplikacijo
Lučka LED sveti
Ni povezave z aplikacijo
Lučka LED ne sveti
Orodje v načinu posodabljanja
Lučka LED trajno utripa
Posodobitev orodja je uspešna
Lučka LED utripa 5 sekund
Posodobitev orodja ni uspešna
Lučka LED utripa izmenično hitro

PSBSAP 20-Li B3 GB│IE │ 1 ■
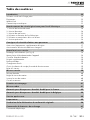
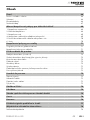
Contents
Introduction ............................................................2
Intended use ........................................................................2
Features ...........................................................................2
Package contents ....................................................................2
Technical data ......................................................................3
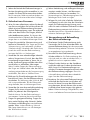
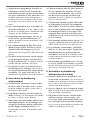
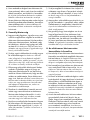
General power tool safety warnings ....................................... 4
1. Work area safety ..................................................................4
2. Electrical safety ...................................................................4
3. Personal safety ....................................................................4
4. Power tool use and care ............................................................5
5. Use and handling of the cordless electrical power tool .....................................5
6. Service ..........................................................................6
Safety instructions for drills ............................................... 6
Original accessories/attachments .......................................................6
Safety guidelines for battery chargers ....................................................7
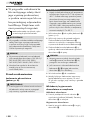
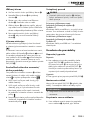
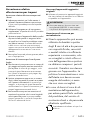
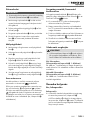
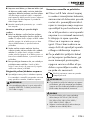
Before use .............................................................7
Charging the battery pack (seefig.A) ....................................................7
Inserting/removing the battery pack .....................................................8
Checking the battery charge level .......................................................8
Additional handle ....................................................................8
Depth stop .........................................................................8
Changing tools ......................................................................8
Torque selection/selecting the operating mode .............................................8
2-speed gearbox ....................................................................8
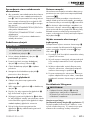
Operation .............................................................9
Switching on/off .....................................................................9
Setting the rotational speed ............................................................9
Changing the direction of rotation .......................................................9
Tips and tricks .......................................................................9
Maintenance and cleaning ...............................................10
Disposal ..............................................................10
Kompernass Handels GmbH warranty ....................................11
Service ............................................................... 12
Importer .............................................................12
Translation of the original Conformity Declaration ...........................13
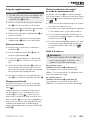
Ordering a replacement battery ..........................................14
Telephone ordering .................................................................14

PSBSAP 20-Li B3
■ 2 │ GB│IE
CORDLESS IMPACT DRILL 20V
PSBSAP 20-Li B3
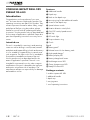
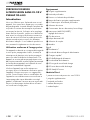
Introduction
Congratulations on the purchase of your new
tool. You have chosen a high-quality product. The
operating instructions are part of this product. They
contain important information about safety, usage
and disposal. Before using the product, please
familiarise yourself with all operating and safety
instructions. Use the product only as described and
for the range of applications specified. Please also
pass these operating instructions on to any future
owner.
Intended use
This tool is intended for screwing in and removing
screws as well as drilling in wood, metal, ceramic
and plastic and impact drilling in bricks and masonry.
It is not suitable for impact drilling in natural stone
such as granite. The light on this tool is intended to
illuminate the immediate work area of the tool.
Use this product only as described and for the
areas of applications specified. The tool is not
intended for commercial use. Any other usage or
modification of the tool is deemed to be improper
and carries a significant risk of accidents. The
manufacturer accepts no responsibility for damage
attributable to misuse.
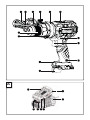
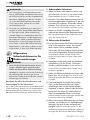
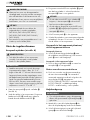
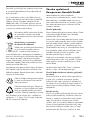
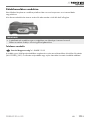
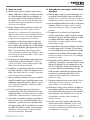
Features
1 Additional handle
2 Depth stop
3 Teeth on the depth stop
4 Mounting ring for the additional handle
5 Screw for the depth stop
6 Speed selector switch
7 Rotation direction switch/lock
8 ON/OFF switch/speed control
9 Belt clip
0 LED work light
q Torque selection ring
w Chuck
Fig. A
e Battery pack*
r Release button for the battery pack
t High-speed charger*
z Battery display LED
u Battery charge level button
i Red charge control LED
o Green charge control LED
p Ready2Connect LED
Package contents
1 cordless impact drill 20V
1 additional handle
1 depth stop
1 carrying case
1 set of operating instructions

PSBSAP 20-Li B3 GB│IE │ 3 ■
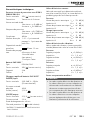
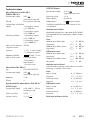
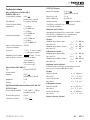
Technical data
Cordless Impact Drill 20V PSBSAP 20-Li B3
Rated voltage 20 V (DC)
Gears 2-speed gearbox
Rated idle speed 1st gear: n0 0–400 rpm
2nd gear: n0 0–2000 rpm
Stroke frequency 1st gear: n0 0–7200 rpm
2nd gear: n0 0–36000 rpm
Max. torque 80 Nm
Torque levels 1–21 + 1 drill setting/
+ 1 hammer setting
Chuck capacity max. Ø 13 mm
Max. drill diameter 65 mm for wood
16 mm concrete
(without stones)
13 mm for steel
Battery PAP 20 B1*
Type LITHIUM ION
Rated voltage 20 V (DC)
Capacity 2 Ah
Cells 5
High-speed charger PLG 20 C2*
INPUT
Rated voltage 230–240 V ∼, 50 Hz (AC)
Rated power
consumption 85 W
Fuse (internal) 3.15 A T3.15A
OUTPUT
Rated voltage 21.5 V (DC)
Rated current 3.5 A
Charging time approx. 45 min
Protection class II / (double insulation)
* BATTERY AND CHARGER ARE NOT INCLUDED
Noise emission value
Noise measurement value determined in accordance
with EN 62841. The A-rated noise level of the power
tool is typically:
Drill
Sound pressure level LPA = 78 dB (A)
Uncertainty K KPA = 5 dB
Sound power level LWA = 86 dB (A)
Uncertainty K KWA = 5 dB
Impact drilling
Sound pressure level LPA = 92 dB (A)
Uncertainty K KPA = 5 dB
Sound power level LWA = 100 dB (A)
Uncertainty K KWA = 5 dB
Vibration emission value
Total vibration values (vector total of three direc-
tions) determined in accordance with EN 62841:
Drill
Main handle aH = 2.585 m/s2
Uncertainty K = 1.5 m/s2
Auxiliary handle aH = 4.262 m/s2
Uncertainty K = 1.5 m/s2
Impact drilling
Main handle aH = 6.521 m/s2
Uncertainty K = 1.5 m/s2
Auxiliary handle aH = 5.495 m/s2
Uncertainty K = 1.5 m/s2
Wear ear muffs!
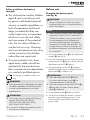
NOTE
► The vibration emission values and the noise
emission values given in these instructions
have been measured in accordance with
a standardised test procedure and can be
used for comparison of the power tool with
another tool.
► The specified total vibration values and the
noise emission values can also be used to
make a provisional load estimate.

PSBSAP 20-Li B3
■ 4 │ GB│IE
WARNING!
► Depending on the manner in which the power
tool is being used and, in particular, the kind
of workpiece being worked, the vibration and
noise emission values can deviate from the
values given in these instructions during actual
use of the power tool.
► Try to keep the vibration load as low as
possible. Measures to reduce the vibration
load are, e.g. wearing gloves and limiting the
working time. Wherein all states of operation
must be included (e.g. times when the power
tool is switched off and times where the power
tool is switched on but running without load).
General power
tool safety warnings
WARNING!
►Read all safety warnings, instructions,
illustrations and specifications provided
with this power tool. Failure to follow all
instructions listed below may result in electric
shock, fire and/or serious injury.
Save all warnings and instructions for future
reference.
The term "power tool" in the warnings refers to your
mains-operated (corded) power tool or battery-
operated (cordless) power tool.
1. Work area safety
a) Keep work area clean and well lit.
Cluttered or dark areas invite accidents.
b) Do not operate power tools in explosive atmos-
pheres, such as in the presence of flammable
liquids, gases or dust. Power tools create sparks
which may ignite the dust or fumes.
c) Keep children and bystanders away while
operating a power tool. Distractions can
cause you to lose control.
2. Electrical safety
a) Power tool plugs must match the outlet.
Never modify the plug in any way. Do not
use any adapter plugs with earthed (ground-
ed) power tools. Unmodified plugs and match-
ing outlets will reduce risk of electric shock.
b) Avoid body contact with earthed or grounded
surfaces, such as pipes, radiators, ranges and
refrigerators. There is an increased risk of elec-
tric shock if your body is earthed or grounded.
c) Do not expose power tools to rain or wet
conditions. Water entering a power tool will
increase the risk of electric shock.
d) Do not abuse the cord. Never use the cord
for carrying, pulling or unplugging the power
tool. Keep cord away from heat, oil, sharp
edges or moving parts. Damaged or entangled
cords increase the risk of electric shock.
e) When operating a power tool outdoors, use
an extension cord suitable for outdoor use.
Use of a cord suitable for outdoor use reduces
the risk of electric shock.
f) If operating a power tool in a damp location
is unavoidable, use a residual current device
(RCD) protected supply. Use of an RCD reduces
the risk of electric shock.
3. Personal safety
a) Stay alert, watch what you are doing and
use common sense when operating a power
tool. Do not use a power tool while you are
tired or under the influence of drugs, alcohol
or medication. A moment of inattention while
operating power tools may result in serious
personal injury.
b) Use
personal protective equipment. Always
wear eye protection. Protective equipment such
as a dust mask, non-skid safety shoes, hard hat
or hearing protection used for appropriate condi-
tions will reduce personal injuries.
c) Prevent unintentional starting. Ensure the switch
is in the off-position before connecting to power
source and/or battery pack, picking up or
carrying the tool. Carrying power tools with
your finger on the switch or energising power
tools that have the switch on invites accidents.

PSBSAP 20-Li B3 GB│IE │ 5 ■
d) Remove any adjusting key or wrench before
turning the power tool on. A wrench or a key
attached to a rotating part of the power tool
can result in personal injury.
e) Do not overreach. Keep proper footing and
balance at all times. This enables better control
of the power tool in unexpected situations.
f) Dress properly. Do not wear loose clothing or
jewellery. Keep your hair and clothing away
from moving parts. Loose clothes, jewellery or
long hair can be caught in moving parts.
g) If devices are provided for the connection of
dust extraction and collection facilities, ensure
these are connected and properly used.
Use of dust collection can reduce dust-related
hazards.
h) Do not allow yourself to get lulled into a false
sense of security and do not ignore the safety
rules for power tools, even if you are familiar
with the power tool after repeated use.
A careless action can cause severe injury within
a fraction of a second.
4. Power tool use and care
a) Do not force the power tool. Use the correct
power tool for your application. The correct
power tool will do the job better and safer at
the rate for which it was designed.
b) Do not use the power tool if the switch does
not turn it on and off. Any power tool that can-
not be controlled with the switch is dangerous
and must be repaired.
c) Disconnect the plug from the power source
and/or remove the battery pack, if detacha-
ble, from the power tool before making any
adjustments, changing accessories, or storing
power tools. Such preventive safety measures
reduce the risk of starting the power tool acci-
dentally.
d) Store idle power tools out of the reach of
children and do not allow persons unfamiliar
with the power tool or these instructions to
operate the power tool. Power tools are
dangerous in the hands of untrained users.
e) Maintain power tools and accessories. Check
for misalignment or binding of moving parts,
breakage of parts and any other condition
that may affect the power tool’s operation.
If damaged, have the power tool repaired
before use. Many accidents are caused by
poorly maintained power tools.
f) Keep cutting tools sharp and clean. Properly
maintained cutting tools with sharp cutting edges
are less likely to bind and are easier to control.
g) Use the power tool, accessories and tool bits
etc. in accordance with these instructions,
taking into account the working conditions
and the work to be performed. Use of the
power tool for operations different from those
intended could result in a hazardous situation.
h) Keep handles and grasping surfaces dry,
clean and free from oil and grease. Slippery
handles and grasping surfaces do not allow
for safe handling and control of the tool in
unexpected situations.
5. Use and handling of the cordless
electrical power tool
a) Charge a rechargeable battery using only the
charger recommended by the manufacturer.
Chargers are often designed for a particular type
of rechargeable battery unit. There is a risk of
fire if the battery charger specified for a particu-
lar type of battery is used with other batteries.
b) Only the rechargeable battery units supplied
are to be used with an electrical power tool.
The use of other rechargeable battery units
may lead to the danger of injury or fire.
c) When they are not being used, store re-
chargeable battery units away from paper-
clips, coins, keys, nails, screws or other small
metal objects that could cause the contacts to
be bridged. Short-circuiting the contacts of
a rechargeable battery unit may result in heat
damage or fire.

PSBSAP 20-Li B3
■ 6 │ GB│IE
d) Fluids may leak out of rechargeable battery
units if they are misused. If this happens, avoid
contact with the fluid. If contact occurs, flush
the affected area with water. Seek additional
medical help if any of the fluid gets into your
eyes. Escaping battery fluid may cause skin
irritation or burns.
e) Do not use a damaged or modified battery.
Damaged or modified batteries may behave
unexpectedly and cause fires, explosions or
pose a risk of injury.
f) Do not expose a battery to fire or excessively
high temperatures. Fire or temperatures in
excess of 130°C (265°F) can cause an
explosion.
g) Follow all instructions regarding charging
and never charge the battery or the cordless
tool outside of the temperature range given in
the operating instructions. Incorrect charging
or charging outside of the permissible tempera-
ture range can destroy the battery and increase
the risk of fire.
CAUTION! RISK OF EXPLOSION!
Never charge non-rechargeable
batteries.
Protect the rechargeable
battery from heat (for example, from
continuous exposure to sunlight), fire, water
and moisture. There is a risk of explosion.
6. Service
a) Have your power tool serviced by a qualified
repair person using only identical replace-
ment parts. This will ensure that the safety of
the power tool is maintained.
b) Never try to repair damaged batteries.
Maintenance of batteries should only be car-
ried out by the manufacturer or an approved
customer service centre.
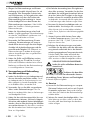
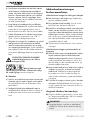
Safety instructions for drills
Safety instructions for all work
■Wear ear muffs when hammer drilling.
Exposure to loud noise can lead to hearing loss.
■Use the additional handle(s). Loss of control
can lead to injuries.
■Hold the tool by the insulated gripping surfac-
es when performing work where the screws
or the accessory tool may hit hidden power
lines. If the accessory tool or the screws come
into contact with a live wire, this may make
exposed metal parts of the power tool live and
result in an electric shock.
■ Collect any dust that is produced; for example,
using a vacuum cleaner.
Safety information for using long drill bits
■Do not use a higher rotational speed than
the maximum permissible speed. At higher
speeds, the drill bit can bend slightly if allowed
to turn freely without being in contact with the
workpiece and this can lead to injuries.
■Always start drilling at a low speed and with
the drill bit in contact with the workpiece. At
higher speeds, the drill bit can bend slightly if
allowed to turn freely without being in contact
with the workpiece and this can lead to injuries.
■Do not exert excessive pressure and only
apply pressure along the length of the drill bit
(no lateral pressure). Drill bits can bend and
break which can lead to a loss of control and
injuries.
Original accessories/attachments
■ Use only the accessories and attachments
which are specified in the operating instructions
and are compatible with the tool.
WARNING!
■ Do not use any accessories that are not
recommended by PARKSIDE. This can lead to
electric shock and fire.

PSBSAP 20-Li B3 GB│IE │ 7 ■
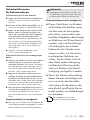
Safety guidelines for battery
chargers
■ This tool may be used by children
aged 8 years and above and
by persons with limited physical,
sensory or mental capabilities or
lack of experience and knowl-
edge, provided that they are
under supervision or have been
told how to use the tool safely
and are aware of the potential
risks. Do not allow children to
use the tool as a toy. Cleaning
and user maintenance tasks may
not be carried out by children
unless they are supervised.
■ To avoid potential risks, dam-
aged mains cables should be
replaced by the manufacturer,
their customer service department
or a similarly qualified person.
The charger is suitable for indoor use
only.
WARNING!
■ To avoid potential risks, damaged mains cables
should be replaced by the manufacturer, their
customer service department or a similarly
qualified person.
ATTENTION!
♦ This charger can only charge the following
batteries: PAP20A1/PAP20A2/
PAP20A3/PAP20B1/PAP20B3/
PAPS204A1/PAPS208A1.
♦ A current list of battery compatibility can be
found at www.Lidl.de/Akku.
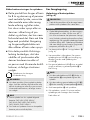
Before use
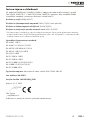
Charging the battery pack
(seefig.A)
CAUTION!
► Always unplug the tool before you remove
the battery pack from or connect the battery
pack to the charger.
NOTE
► Never charge the battery pack if the ambient
temperature is below 10°C or above 40°C.
If a lithium-ion battery is going to be stored
for an extended period, the charge level
should be checked regularly. The optimum
charge level is between 50% and 80%. The
storage climate should be cool and dry and
the ambient temperature should be between
0°C and 50°C.
♦ Connect the battery packe to the high-speed
charger t (see fig. A).
♦ Insert the power plug into the socket. The green
charge control LEDo lights up briefly, then the
red charge control LEDi lights up.
♦ The green charge control LED o indicates
that the charging process is complete and the
battery packe is ready for use.
ATTENTION!
♦ If the red charge control LEDi flashes,
this means that the battery packe has
overheated and cannot be charged.
♦ If the red and green charge control LEDsi/
o both flash, this means that the battery
packe is defective.
♦ Push the battery packe back into the tool.
♦ Switch off the charger for at least 15 minutes
between successive charging sessions. Also
disconnect the power plug from the mains
power socket.

PSBSAP 20-Li B3
■ 8 │ GB│IE
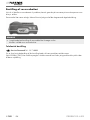
Inserting/removing the battery pack
Inserting the battery pack
♦ Set the rotation direction switch7 to the middle
position (lock). Push the battery packe into
the handle until it clicks into place.
Removing the battery pack
♦ Press the release buttonr and remove the
battery packe.
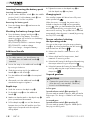
Checking the battery charge level
♦ Press the battery charge level buttonu to
check the status of the battery. The status/
remaining charge will be shown on the battery
display LEDz as follows:
RED/ORANGE/GREEN = maximum charge
RED/ORANGE = medium charge
RED = low charge – charge the battery
Additional handle
NOTE
► For safety reasons, you should never use
this tool without the additional handle1
attached.
♦ Loosen the strap on the additional handle1
by turning it clockwise.
♦ Slide the mounting ring for the additional
handle4 over the chuckw.
♦ Turn the additional handle1 to the required
position.
♦ Afterwards, twist the additional handle1
anticlockwise again to tighten it.
Depth stop
♦ Undo the screw on the depth stop 5.
♦ Fit the depth stop2 into the additional
handle1.
♦ Make sure that the teeth on the depth stop3
point upwards and downwards.
♦ Pull the depth stop2 out until the distance
between the tip of the drill and the tip of the
depth stop corresponds with the required
drilling depth.
♦ Tighten the screw on the depth stop 5 to
lock the depth stop 2 into place.
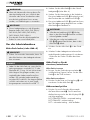
Changing tools
Your cordless impact drill driver has a fully auto-
matic spindle lock .
When the motor is stopped, the power train is
locked so that the chuckw can be opened by
turning . After you have attached the desired
tool and tightened it by turning the chuck , you
can continue working. The spindle lock is released
automatically when the motor is started (by pressing
the ON/OFF switch8).
Torque selection/selecting
the operating mode
You can set the torque using the torque selection
ringq or by choosing between the drill setting
and the hammer drill setting .
♦ Select a low level for small screws or soft
materials.
♦ Select a high level for large screws, hard
materials or removing screws.
♦ Select the drill setting for drilling work by adjusting
the torque selection ring to the position .
♦ Select the hammer drill setting for hammer drilling
work by adjusting the torque selection ring to
the position .
2-speed gearbox
CAUTION!
► Operate the speed selector switch6 only
when the tool is at a standstill. Otherwise,
the tool could be damaged.
In first gear
(speed selector switch6 in position 1),
you can reach a speed of approx. 400 rpm and a
high torque. This setting is suitable for all screwing
work.
In second gear
(speed selector switch6 in position 2),
you can reach a speed of approx. 2000 rpm for
carrying out drilling work.

PSBSAP 20-Li B3 GB│IE │ 9 ■
Operation
Switching on/off
Turn on
♦ Press and hold the ON/OFF switch8 to start
the tool. The LED work light 0 lights up when
the ON/OFF switch8 is pressed lightly or
fully. This provides illumination of the work
area in poor lighting conditions.
Switching off
♦ Release the ON/OFF switch8 to switch off
the tool.
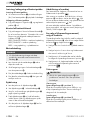
Setting the rotational speed
Pressing the ON/OFF switch8 lightly yields a low
speed. Increasing the pressure increases the speed.
NOTE
► The integrated motor brake ensures that the
tool stops quickly.
Changing the direction of rotation
♦ Change the direction of rotation by pushing the
rotation direction switch7 to the right or left.
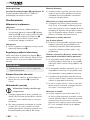
Tips and tricks
Tip! How to do things correctly.
♦ Before operation, check whether the screw
or drill bit is correctly fitted, i.e. centred in the
chuck.
♦ Screw bits are labelled according to their di-
mensions and their shape. If you are uncertain,
always check first whether the bit fits tightly in
the screw head without any play.
Torque
♦ Smaller screws/bits can be damaged if you
set too high a torque or too high a speed.
Hard screw joints (in metal)
♦ Particularly high torques occur, e.g. in metal
screw joints when using drive sockets. Select
a low rotational speed.
Soft screw joints (e.g. in soft wood)
♦ Here, too, use a low speed to avoid damaging
the wood surface when it comes into contact
with the metal screw head. Use a countersink.
Small screws can be screwed directly into soft
wood without predrilling.
When drilling in wood, metal and other
materials, observe the following:
♦ Use a high speed for drill bits with a small
diameter and a low speed for drill bits with
a large diameter.
♦ Select a low speed for hard materials and
a high speed for soft materials.
♦ Mark the spot where you want to drill using
a centre punch or nail. Select a low rotational
speed when starting.
♦ Pull the rotating drill bit from the hole repeatedly
to remove dust and chips and clear the hole.
Drilling in metal
♦ Use a metal drill (HSS). For optimum results,
you should cool the drill bit with oil.
Metal drill bits can also be used to drill into
plastics. Start with a 3 mm drill bit and then
increase the size until the desired hole diameter
is achieved.
Drilling in brick
♦ Use a carbide-tipped masonry drill (max.
recommended drill diameter 16 mm).
Drilling in wood
♦ Use a wood drill with a lathe centre; for deep
holes, use an auger bit; for large-diameter
holes, use a Forstner bit.

PSBSAP 20-Li B3
■ 10 │ GB│IE
Maintenance and cleaning
WARNING! RISK OF INJURY! Always
switch the tool off and remove the
battery before carrying out any
work on it.
The cordless impact drill driver is maintenance-free.
■ The tool must always be kept clean, dry and
free from oil or grease.
■ Never allow liquids to get into the tool.
■ Use a dry cloth to clean the housing. Never use
petrol, solvents or cleansers which can damage
plastic.
■ If a lithium-ion battery is going to be stored for
an extended period, the charge level should be
checked regularly. The optimum charge level is
between 50% and 80%. The optimum storage
environment is cool and dry.
NOTE
► Replacement parts not listed (such as switches)
can be ordered via our Service Hotline.
Disposal
The product and packaging are recyclable. They
are subject to extended producer responsibility and
are collected separately.
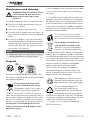
Do not dispose of power tools
in your normal domestic waste!
The adjacent symbol of a crossed-out
dustbin means that this appliance is
subject to Directive 2012/19/EU. This directive
states that this appliance may not be disposed of in
the normal household waste at the end of its useful
life, but must be taken to specially set-up collection
locations, recycling depots or disposal companies.
The disposal is free of charge for the user.
Protect the environment and dispose of this
appliance properly.
If your old appliance has stored any personal data,
you are responsible for deleting it yourself before
returning it.
If it is possible to do so without destroying the old
appliance, remove the old batteries or rechargea-
ble batteries before returning the appliance for dis-
posal and take them to a separate collection point.
In the case of permanently installed rechargeable
batteries, you must indicate during disposal that the
appliance contains a battery.
Your local community or municipal
authorities can provide information on
how to dispose of the worn-out product.
Do not dispose of batteries in
your normal household waste!
Defective or worn-out rechargeable
batteries must be recycled according
to Directive 2006/66/EC. Batteries/rechargeable
batteries must be treated as hazardous waste and
must therefore be disposed of in an environmentally
sound manner by appropriate bodies (dealers, spe-
cialist dealers, public municipal bodies, commercial
disposal companies). Batteries/recharge able
batteries may contain toxic heavy metals.
For this reason, do not dispose of batteries/
rechargeable batteries in domestic waste. Take
them to a specialist collection point. Only return
batteries that are fully discharged.
The packaging is made from environ-
mentally friendly material and can be
disposed of at your local recycling plant.
Dispose of the packaging in an
environmentally friendly manner.
Note the labelling on the packaging
and separate the packaging material
components for disposal if necessary. The packag-
ing material is labelled with abbreviations (a) and
numbers (b) with the following meanings:
1–7: plastics, 20–22: paper and cardboard,
80–98: composites.
La pagina si sta caricando...
La pagina si sta caricando...
La pagina si sta caricando...
La pagina si sta caricando...
La pagina si sta caricando...
La pagina si sta caricando...
La pagina si sta caricando...
La pagina si sta caricando...
La pagina si sta caricando...
La pagina si sta caricando...
La pagina si sta caricando...
La pagina si sta caricando...
La pagina si sta caricando...
La pagina si sta caricando...
La pagina si sta caricando...
La pagina si sta caricando...
La pagina si sta caricando...
La pagina si sta caricando...
La pagina si sta caricando...
La pagina si sta caricando...
La pagina si sta caricando...
La pagina si sta caricando...
La pagina si sta caricando...
La pagina si sta caricando...
La pagina si sta caricando...
La pagina si sta caricando...
La pagina si sta caricando...
La pagina si sta caricando...
La pagina si sta caricando...
La pagina si sta caricando...
La pagina si sta caricando...
La pagina si sta caricando...
La pagina si sta caricando...
La pagina si sta caricando...
La pagina si sta caricando...
La pagina si sta caricando...
La pagina si sta caricando...
La pagina si sta caricando...
La pagina si sta caricando...
La pagina si sta caricando...
La pagina si sta caricando...
La pagina si sta caricando...
La pagina si sta caricando...
La pagina si sta caricando...
La pagina si sta caricando...
La pagina si sta caricando...
La pagina si sta caricando...
La pagina si sta caricando...
La pagina si sta caricando...
La pagina si sta caricando...
La pagina si sta caricando...
La pagina si sta caricando...
La pagina si sta caricando...
La pagina si sta caricando...
La pagina si sta caricando...
La pagina si sta caricando...
La pagina si sta caricando...
La pagina si sta caricando...
La pagina si sta caricando...
La pagina si sta caricando...
La pagina si sta caricando...
La pagina si sta caricando...
La pagina si sta caricando...
La pagina si sta caricando...
La pagina si sta caricando...
La pagina si sta caricando...
La pagina si sta caricando...
La pagina si sta caricando...
La pagina si sta caricando...
La pagina si sta caricando...
La pagina si sta caricando...
La pagina si sta caricando...
La pagina si sta caricando...
La pagina si sta caricando...
La pagina si sta caricando...
La pagina si sta caricando...
La pagina si sta caricando...
La pagina si sta caricando...
La pagina si sta caricando...
La pagina si sta caricando...
La pagina si sta caricando...
La pagina si sta caricando...
La pagina si sta caricando...
La pagina si sta caricando...
La pagina si sta caricando...
La pagina si sta caricando...
La pagina si sta caricando...
La pagina si sta caricando...
La pagina si sta caricando...
La pagina si sta caricando...
La pagina si sta caricando...
La pagina si sta caricando...
La pagina si sta caricando...
La pagina si sta caricando...
La pagina si sta caricando...
La pagina si sta caricando...
La pagina si sta caricando...
La pagina si sta caricando...
La pagina si sta caricando...
La pagina si sta caricando...
La pagina si sta caricando...
La pagina si sta caricando...
La pagina si sta caricando...
La pagina si sta caricando...
La pagina si sta caricando...
La pagina si sta caricando...
La pagina si sta caricando...
La pagina si sta caricando...
La pagina si sta caricando...
La pagina si sta caricando...
La pagina si sta caricando...
La pagina si sta caricando...
La pagina si sta caricando...
La pagina si sta caricando...
La pagina si sta caricando...
La pagina si sta caricando...
La pagina si sta caricando...
La pagina si sta caricando...
La pagina si sta caricando...
La pagina si sta caricando...
La pagina si sta caricando...
La pagina si sta caricando...
La pagina si sta caricando...
La pagina si sta caricando...
La pagina si sta caricando...
La pagina si sta caricando...
La pagina si sta caricando...
La pagina si sta caricando...
La pagina si sta caricando...
La pagina si sta caricando...
La pagina si sta caricando...
La pagina si sta caricando...
La pagina si sta caricando...
La pagina si sta caricando...
La pagina si sta caricando...
La pagina si sta caricando...
La pagina si sta caricando...
La pagina si sta caricando...
La pagina si sta caricando...
La pagina si sta caricando...
La pagina si sta caricando...
La pagina si sta caricando...
La pagina si sta caricando...
La pagina si sta caricando...
La pagina si sta caricando...
La pagina si sta caricando...
La pagina si sta caricando...
La pagina si sta caricando...
La pagina si sta caricando...
La pagina si sta caricando...
La pagina si sta caricando...
La pagina si sta caricando...
La pagina si sta caricando...
La pagina si sta caricando...
La pagina si sta caricando...
La pagina si sta caricando...
La pagina si sta caricando...
La pagina si sta caricando...
La pagina si sta caricando...
La pagina si sta caricando...
La pagina si sta caricando...
La pagina si sta caricando...
La pagina si sta caricando...
La pagina si sta caricando...
La pagina si sta caricando...
La pagina si sta caricando...
La pagina si sta caricando...
La pagina si sta caricando...
La pagina si sta caricando...
La pagina si sta caricando...
La pagina si sta caricando...
La pagina si sta caricando...
La pagina si sta caricando...
La pagina si sta caricando...
La pagina si sta caricando...
La pagina si sta caricando...
La pagina si sta caricando...
-
 1
1
-
 2
2
-
 3
3
-
 4
4
-
 5
5
-
 6
6
-
 7
7
-
 8
8
-
 9
9
-
 10
10
-
 11
11
-
 12
12
-
 13
13
-
 14
14
-
 15
15
-
 16
16
-
 17
17
-
 18
18
-
 19
19
-
 20
20
-
 21
21
-
 22
22
-
 23
23
-
 24
24
-
 25
25
-
 26
26
-
 27
27
-
 28
28
-
 29
29
-
 30
30
-
 31
31
-
 32
32
-
 33
33
-
 34
34
-
 35
35
-
 36
36
-
 37
37
-
 38
38
-
 39
39
-
 40
40
-
 41
41
-
 42
42
-
 43
43
-
 44
44
-
 45
45
-
 46
46
-
 47
47
-
 48
48
-
 49
49
-
 50
50
-
 51
51
-
 52
52
-
 53
53
-
 54
54
-
 55
55
-
 56
56
-
 57
57
-
 58
58
-
 59
59
-
 60
60
-
 61
61
-
 62
62
-
 63
63
-
 64
64
-
 65
65
-
 66
66
-
 67
67
-
 68
68
-
 69
69
-
 70
70
-
 71
71
-
 72
72
-
 73
73
-
 74
74
-
 75
75
-
 76
76
-
 77
77
-
 78
78
-
 79
79
-
 80
80
-
 81
81
-
 82
82
-
 83
83
-
 84
84
-
 85
85
-
 86
86
-
 87
87
-
 88
88
-
 89
89
-
 90
90
-
 91
91
-
 92
92
-
 93
93
-
 94
94
-
 95
95
-
 96
96
-
 97
97
-
 98
98
-
 99
99
-
 100
100
-
 101
101
-
 102
102
-
 103
103
-
 104
104
-
 105
105
-
 106
106
-
 107
107
-
 108
108
-
 109
109
-
 110
110
-
 111
111
-
 112
112
-
 113
113
-
 114
114
-
 115
115
-
 116
116
-
 117
117
-
 118
118
-
 119
119
-
 120
120
-
 121
121
-
 122
122
-
 123
123
-
 124
124
-
 125
125
-
 126
126
-
 127
127
-
 128
128
-
 129
129
-
 130
130
-
 131
131
-
 132
132
-
 133
133
-
 134
134
-
 135
135
-
 136
136
-
 137
137
-
 138
138
-
 139
139
-
 140
140
-
 141
141
-
 142
142
-
 143
143
-
 144
144
-
 145
145
-
 146
146
-
 147
147
-
 148
148
-
 149
149
-
 150
150
-
 151
151
-
 152
152
-
 153
153
-
 154
154
-
 155
155
-
 156
156
-
 157
157
-
 158
158
-
 159
159
-
 160
160
-
 161
161
-
 162
162
-
 163
163
-
 164
164
-
 165
165
-
 166
166
-
 167
167
-
 168
168
-
 169
169
-
 170
170
-
 171
171
-
 172
172
-
 173
173
-
 174
174
-
 175
175
-
 176
176
-
 177
177
-
 178
178
-
 179
179
-
 180
180
-
 181
181
-
 182
182
-
 183
183
-
 184
184
-
 185
185
-
 186
186
-
 187
187
-
 188
188
-
 189
189
-
 190
190
-
 191
191
-
 192
192
-
 193
193
-
 194
194
-
 195
195
-
 196
196
-
 197
197


in altre lingue
- français: Parkside IAN 391008_2201 Manuel utilisateur
- español: Parkside IAN 391008_2201 Manual de usuario
- Deutsch: Parkside IAN 391008_2201 Benutzerhandbuch
- Nederlands: Parkside IAN 391008_2201 Handleiding
- slovenčina: Parkside IAN 391008_2201 Používateľská príručka
- dansk: Parkside IAN 391008_2201 Brugermanual
- polski: Parkside IAN 391008_2201 Instrukcja obsługi
Documenti correlati
-
Parkside PAAS 20-Li Manuale utente
-
Parkside PMKA 20-Li A1 Manuale utente
-
Parkside PDSSA 20-Li A1 Manuale utente
-
Parkside IAN 404419_2110 Manuale utente
-
Parkside PABH 20-Li B2 Translation Of The Original Instructions
-
-
Parkside PAMFW 20-LI A1 Translation Of The Original Instructions
-
Parkside PSBSA 20-LI B2 Istruzioni per l'uso
-
Parkside 331789 1907 Operating Instructions Manual
-