NITECORE Ultra Comact Dual-Fuel Searchlight Manuale utente
- Categoria
- Torce elettriche
- Tipo
- Manuale utente

MH12GTS
• Maximum output of 1,800 lumens
• USB Charging
• Blue power indicator
Ultra Compact
Dual-Fuel Searchlight
(English) MH12GTS (Deutsch) MH12GTS
(Francais)
MH12GTS Features
• Utilizes CREE XHP35 HD LED, with a maximum output of 1,800 lumens
• Maximum peak beam intensity of 12,760cd and maximum throw of 226 meters
•
An optical system combined with crystal coating and “Precision Digital Optics Technology” (PDOT)
• Higheciencyconstantcircuitprovidesstableoutputupto250hours
• Themetalsideswitchcontrols5brightnesslevelsand3specialmodes
• STROBEModeofrandomlychangingfrequenciesforstrongerdizzyingeects
• A power indicator beneath the side switch indicates the remaining battery power
(Patent No. ZL201220057767.4)
• Thepowerindicatorcanalsodisplaythebatteryvoltage(±0.1V)
• Built-in Li-ion battery charging circuit with a Micro-USB port
• NITECORE 18650 rechargeable Li-ion battery (NL1835HP 3,500mAh) included
• Rigid double layer tube design
• IncorporatedAdvancedTemperatureRegulation(ATR)module
(Patent No. ZL201510534543.6)
• Electronicreversepolarityprotection
• Optical lenses with double-sided scratch resistant coating
• Constructed from aero grade aluminum alloy
• HAIIImilitarygradehard-anodizednish
• Waterproof in accordance with IPX8 (2 meters submersible)
• Impact resistant to 1 meter
• Tail stand capability
Specications
Accessories
Length: 144mm (5.67”)
Head Diameter: 25.4mm (1”)
Tail Diameter: 26mm (1.02”)
Weight: 99.5g (3.51oz)
NITECORE 18650 Rechargeable
Li-ion Battery (NL1835HP 3,500mAh),
USB Charging Cable, Holster, Clip,
Tactical Ring, Lanyard, Spare O-ring
Battery Options
Type NominalVoltage Compatibility
NITECORE NL1835HP (3500mAh) 18650 3.6V Y (Recommended)
IMR 18650 High-Drain
Rechargeable Li-ion Battery IMR18650 3.6V/3.7V Y (Recommended)
18650 Rechargeable Li-ion Battery
(Outputover8A) 18650 3.6V/3.7V Y (Compatible)
Primary Lithium Battery CR123 3V Y (Compatible)
Rechargeable Li-ion Battery RCR123 3.6V/3.7V Y (Compatible)
18650 Rechargeable Li-ion Battery
(Output below 8A) 18650 3.6V/3.7V N (Incompatible)
Technical Data
Battery Installation
FL1 STANDARD
TURBO HIGH MID LOW ULTRALOW STROBE BEACON SOS
1800
Lumens 900
Lumens 240
Lumens 70
Lumens 1
Lumen 1800
Lumens 1800
Lumens 1800
Lumens
*30min 2h15min
5h45min
19h 250h ─ ─ ─
226m 152m 86m 48m 4m ─ ─ ─
12760cd 5780cd 1880cd 570cd 5cd ─ ─ ─
1m (Impact Resistance)
IPX8, 2m (Waterproof and Submersible)
Note:Thestateddataismeasuredinaccordancewiththeinternationalashlighttestingstandards
ANSI/NEMAFL1,using1x18650Li-ionbattery(3500mAh)underlaboratoryconditions.Thedata
mayvaryinrealworlduseduetodierentbatteryusageorenvironmentalconditions.
* The runtime for TURBO mode is tested without the temperature regulation.
*
TURBOAvailability:TheTURBOlevelisonlyaccessiblewhenusingan18650rechargeableLi-ion
batteryofanoutputover8AoranIMR18650high-drainrechargeableLi-ionbattery.Itisinaccessible
whenusingCR123/RCR123batteries.
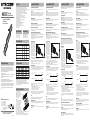
Insert the battery(s) as illustrated and
screw to tighten the tail cap.
Note: After the battery insertion, the
powerindicatorwillashtoindicatethe
remaining battery power. Please refer
to the “Power Indication” section of this
manual for more details.
Warnings:
1.Ensurethebattery(s)is/areinserted
withthepositiveendtowardsthe
head. The product will not work if the
battery(s)is/areincorrectlyinserted.
2. CAUTION! Possible dangerous
radiation! Don't look into the light!
Maybe dangerous for your eyes.
3.Whenthepowerlevelislowusingan
IMR 18650 Li-ion battery, please stop
usingtheproductandremovethe
batterytopreventdamagetothebattery.
4.Whentheproductiskeptinabackpackorleftunusedforprolongedtime,pleaseremoveall
batteriestopreventaccidentalactivationorbatteryleakage.
5. DO NOT submerge the light into any liquid when it is hot. Doing so may cause irreparable
damagetothelightduetothedierenceofairpressureinsideandoutsideofthetube.
Mode Button
Tactical Momentary Illumination
HalfpressandholdtheTailSwitchtoturnonthelightmomentarily.Releasetoturnito.
On / O
On:Whenthelightiso,presstheTailSwitchuntilaclicksoundisheardtoturnonthelight.
O:Whenthelightison,presstheTailSwitchuntilaclicksoundisheardtoturnothelight.
Note: MH12GTShasmodememory.Whenreactivated,theashlightwillautomaticallyaccess
thepreviousmemorizedbrightnesslevelorSTROBEmode(SOSandBEACONexcluded).
Brightness Levels
When the light is on, short press the mode button to cycle through the following brightness
levels:ULTRALOW–LOW–MID–HIGH–TURBO.
Direct Access to ULTRALOW
Whenthelightiso,pressandholdtheModeButton,thenclicktheTailSwitchandrelease
bothtoaccessULTRALOW.(Thisaccessdoesnothavethemodememory.)
Momentary Access to TURBO
When the light is on, press and hold the Mode Button to access TURBO. Release to return to the
previousmemorizedbrightnesslevel.
Special Mode (STROBE / BEACON / SOS)
Access: When the light is on, double press the Mode Button to access STROBE.
Switch: When STROBE is on, long press the Mode Button to cycle through the following special
modes:BEACON–SOS–STROBE.
Exit: When one of the special modes is on, short press the Mode Button to exit special modes
andaccessthepreviousmemorizedbrightnesslevel;orclicktheTailSwitchtoexitspecial
modesandturnothelight.
Charging Function
MH12GTS is equipped with an
intelligent charging system. As
illustrated, screw to fully tighten
the tail cap after inserting the
battery, and then use the USB
cable to connect an external power
supply (e.g. a USB adaptor, a
computer or other USB charging
devices)totheMicro-USBport
located on the tail cap to begin the
charging process.
• When the charging status is
normal, the charging indicator
willashslowlytoinformthe
user.
• When the battery is fully charged, MH12GTS will cease the charging process and the charging
indicator will become steadily turned on to inform the user.
• Whenthechargingstatusisabnormal(e.g.thebatteryisbroken/insertedincorrectly),
MH12GTSwillceasethechargingprocessandthechargingindicatorwillashquicklyto
inform the user.
• The charging time for an 18650 Li-ion battery is approx. 8 hours.
Power Indication
• Whenthebatteryisinserted,thepowerindicatorbeneaththesideswitchwillashtoshow
thebatteryvoltage(±0.1V).Forexample,whenthebatteryvoltageisat4.2V,thepower
indicatorwillash4timesfollowedbyaonesecondpauseand2moreashes.Dierent
voltagesrepresentthecorrespondingremainingbatterypowerlevels:
1×18650 battery
2×CR123 batteries
Note:whenusingtwoCR123/RCR123inseries,theindicatorwillshowtheaveragevoltage
between the two batteries.
• WhentheModeButtonispressedwhenthelightiso,thepowerindicatorwillashto
indicate the remaining power of the batteries:
1.Flashingthreetimesindicatesthatthepowerisabove50%;
2.Flashingtwiceindicatesthatthepowerisbelow50%;
3.Flashingonceindicatesthatthepowerisbelow10%.
• Whenthelightisonandthepowerleveliscloseto50%,thepowerindicatorwillashevery
2 seconds to inform the user. When the light is on and the power is close to depleted, the
powerindicatorwillashquicklyandcontinuouslytoinformtheuser.
ATR
WithincorporatedAdvancedTemperatureRegulationmodule,MH12GTSregulatesitsoutput
andadaptstotheambientenvironment,maintainingoptimalperformance.
Changing Batteries
Thebatteriesshouldbereplacedwhenthepowerindicatorashesquicklyandcontinuouslyand
theoutputappearstobedimortheashlightbecomesunresponsiveduetolowpower.
Maintenance
Every6months,threadsshouldbewipedwithacleanclothfollowedbyathincoatingofsilicon-
based lubricant.
Low power Full power
3.5V 3.7V 3.9V 4.2V
Low power Full power
4.8V 5.6V 6.0V 6.4V
ACHTUNG! Möglicherweise gefährliche optische Strahlung! Bei Betrieb nicht direkt in das Licht
blicken. Kann für die Augen gefährlich sein.
Momentlicht
Drücken Sie den Schalter der Heckkappe halb durch, um das Licht einzuschalten. Zum
Ausschalten die Taste einfach loslassen.
Ein-/Ausschalten
Einschalten: Drücken Sie den Heckschalter ganz durch, bis Sie ein "Click" hören.
Ausschalten: Drücken Sie den Heckschalter erneut ganz durch, bis Sie den "Click" hören.
Hinweis: Die MH12GTS speichert die zuletzt genutzte Helligkeitsstufe sowie den Strobe-Mode
zum nächsten Einschalten (SOS- und Location-Beacon-Mode werden nicht gespeichert).
Helligkeitsstufen
Bei eingeschalteter MH12GTS drücken Sie wiederholt den Mode-Schalter, um nacheinander
fortlaufend durch die Helligkeitsstufen "Ultralow" - "Low" - "Mid" - "High" - "Turbo" zu schalten.
Direkter Zugang zu "Ultralow"
Wenn das Licht aus ist, drücken und halten Sie den Mode-Schalter. Dann klicken Sie auf den
HeckschalterundlassenbeideSchalterlos,umauf"Ultralow"zuzugreifen.(BeidiesemZugri
wird der Mode nicht gespeichert.)
Momentlicht in "Turbo"
Wenn das Licht an ist, drücken und halten Sie den Mode-Schalter, um auf "Turbo" zuzugreifen.
WennSiedenMode-SchalterloslassenkehrenSiezurvorhergenutztenHelligkeitsstufezurück.
Spezial-Modi (Strobe / Location-Beacon/ SOS )
Klicken Sie zweimal kurz nacheinander auf den Mode-Schalter, um in den Strobe-Mode zu
schalten. Im Strobe-Mode drücken und halten Sie den Mode-Schalter, um nacheinander
fortlaufend durch die Modi "Location-Beacon" - SOS" und "Strobe" zu schalten. Um den
Spezial-ModezuverlassenundzurzuletztgenutztenHelligkeitsstufezurückzukehren,drücken
Sie einfach kurz den Mode-Schalter oder betätigen Sie den Heckschalter, um das Licht
auszuschalten.
Ladefunktion
MH12GTS ist mit einem
intelligenten Ladesystem
ausgestattet. Schrauben Sie die
Endkappe nach dem Einlegen
des/derAkkusfestundschließen
Sie dann - wie abgebildet - ein
externes Netzteil (z. B. einen USB-
Adapter, einen Computer oder
andere USB-Ladegeräte) über
das USB-Kabel an den Micro-USB-
Anschluss in der Endkappe an, um
denLadevorgangzubeginnen.
• Wenn der Ladezustand normal
ist, blinkt die Ladeanzeige
langsam.
• WennderAkkuvollständiggeladenist,beendetdieMH12GTSdenLadevorgangunddie
Ladeanzeige leuchtet stetig.
• Wenn der Ladezustand unnormal ist (z. B. wenn der Akku defekt oder falsch eingelegt ist),
beendetdieMH12GTSdenLadevorgangunddieLadeanzeigeblinktschnell.
• Die Ladezeit für einen 18650 Lithium-Ionen-Akku beträgt ca. 8 Stunden.
Leistungsanzeige
• Wenn der Akku eingelegt ist, blinkt die Betriebsanzeige unter dem seitlichen Schalter, um
dieAkkuspannung(±0,1V)anzuzeigen.WenndieSpannungbeispielsweise4,2Vbeträgt,
blinktdieBetriebsanzeigeviermal,gefolgtvoneinerPausevoneinerSekundeundzwei
weiteren Blinksignalen. Unterschiedliche Spannungen repräsentieren die entsprechenden
verbleibendenLeistungspegel:
1×18650 battery
2×CR123 batteries
Hinweis:WennSiezweiCR123/RCR123inReiheverwenden,zeigtdieAnzeigedie
durchschnittlicheSpannungderbeidenAkkus/Batterienan.
• Wenn der Mode-Schalter bei ausgeschaltetem Licht gedrückt wird, blinkt die Betriebsanzeige,
umdieverbleibendeBatterieleistunganzuzeigen:
1.DreimaligesBlinkenzeigtan,dassdieLeistungüber50%liegt;
2.ZweimaligesBlinkenzeigtan,dassdieLeistungunter50%liegt.
3.EinmaligesBlinkenzeigtan,dassdieLeistungunter10%liegt.
• WenndasLichtanistunddieLeistungfast50%beträgt,blinktdieBetriebsanzeigealle2
Sekunden. Wenn das Licht an ist und der Strom fast erschöpft ist, blinkt die Stromanzeige
schnell.
ATR
Die automatische Temperaturregulierung (ATR) steuert die Ausgangsleistung der MH12GTS
entsprechend den Bedingungen der Umgebung, um eine optimale Leistung zu gewährleisten.
Batteriewechsel / Auaden der Akkus
Die Batterien sollten ausgetauscht oder die Akkus aufgeladen werden, wenn die Betriebsanzeige
schnell blinkt, der Lichtkegel dunkel erscheint oder die Taschenlampe nicht mehr reagiert.
Wartung
Alle6MonatesolltedasGewindemiteinemsauberenTuchabgewischtundanschließendmit
einer dünnen Schicht Silikonfett geschmiert werden.
Allgemeine Hinweise
Altbatterien gehören nicht in den Hausmüll. Sie können gebrauchte Batterien unentgeltlich
anunserVersandlagerzurückgeben.AlsVerbrauchersindSiezurRückgabevonAltbatterien
gesetzlichverpichtet.
Low power Full power
3.5V 3.7V 3.9V 4.2V
Low power Full power
4.8V 5.6V 6.0V 6.4V
Eclairage momentané
Appuyez sur l’interrupteur jusqu’à mi-course pour éclairer. Relâchez simplement pour éteindre
ON/OFF
Pour allumer : Pressez l’interrupteur jusqu’à entendre un clic.
Pouréteindre:Pressezunenouvellefoisl’interrupteurjusqu’àentendreunclic
Note :lalampepossèdeunefonctionmémoire.Quandelleestréactivée,ellerevientaumode
etniveauenregistréouenmodestroboscope.(lesmodesSOSetBalisenesontpasconcernés).
Niveaux d’éclairage
Lorsquelalampeestallumée,appuyezplusieursfoissurleboutonModepournaviguerentre
lesniveauxTrèsbas,Bas,Moyen,Fort,turbo.
Accès direct à Ultra low
Quand la lumière est éteinte, maintenir appuyé le bouton mode, puis appuyer légèrement sur le
bouton arrière et relacher en même temps pour entre en mode ultralow .
Accès direct à Turbo
Quandlalumièreestallumé,maintenirappuyéleboutonmode.Relâcherpourreveniraumode
précédent.
Mode Spécial Stroboscope/SOS/Balise
Lorsque la lampe est allumée, appuyez sur le bouton Mode pendant plus d’une seconde pour
accéder au mode Stroboscope.
Danscemode,appuyezànouveausurleboutonpendantplusd’unesecondepournaviguer
entrelesmodesSOS,baliseetstroboscope.Pourquittercesmodesetreveniraudernierniveau
d’éclairageutilisé,appuyezsimplementsurleboutonModeànouveau.
Charge
La lampe MH12GTS est équipée
d’un circuit de charge intelligent.
Commeillustré,vissezàfond
lecapuchonarrièreaprèsavoir
inséré la batterie, puis utilisez le
câble USB pour connecter une
alimentation externe (par exemple
un adaptateur USB, un ordinateur
ou d’autres périphériques de
chargement USB) au port micro-
USB situé sur l’ arrière pour
commencer le processus de
charge.
• Lorsque l'état de charge est
normal, le témoin de charge
clignote lentement pour informer l'utilisateur.
• Lorsque la batterie est terminée, MH12GTS interrompt le processus et le témoin de charge
reste allumé pour informer l'utilisateur.
• Lorsquelachargenefonctionnepasnormalement(parexemple,labatterieestcassée/
insérée de manière incorrecte), MH12GTS arrêtera le processus de charge et le témoin de
charge clignotera rapidement pour informer l'utilisateur.
• LetempsdechargepourunebatterieLi-ion18650estd’environ8heures.
Batterie
• Lorsquelabatterieestinsérée,levoyantd'alimentationsituésousleboutonlatéralclignote
pourindiquerlatensiondelabatterie(±0,1V).Parexemple,lorsquelatensiondelabatterie
està4,2V,levoyantd'alimentationclignote4fois,suivid'unepaused'unesecondeetde2
autresclignotements.Diérentestensionsreprésententlesniveauxdepuissancerestantsde
la batterie :
1×18650 battery
2×CR123 batteries
Note:lorsquevousutilisezdeuxCR123/RCR123ensérie,l’indicateurachelatension
moyenne entre les deux batteries.
• LorsquelalampeestéteinteetvousappuyezsurleboutonMode,letémoind'alimentation
clignote pour indiquer la puissance restante:
3clignotementsindiquentquelapuissanceestsupérieureà50%;
2clignotementsindiquentquelapuissanceestinférieureà50%;
1clignotementindiquequelapuissanceestinférieureà10%.
• Lorsquelalampeestalluméeetqueleniveaud’alimentationestprochede50%,levoyant
d’alimentation clignote toutes les 2 secondes pour informer l’utilisateur. Lorsque la lampe est
alluméeetquelecourantestpresqueépuisé,levoyantd'alimentationclignoterapidement
en continu pour informer l'utilisateur.
Système ATR
Lesystèmeavancéderégulationdelatempérature(ATR)permetàlalamped’ajusterdefaçon
dynamiquesonniveaud’éclairageenfonctiondesatempératureinterne.Celapermetd’éviter
toutesurchauedelalampeetd’augmentersaduréedevie.
Changement des batteries
Si la lampe ne répond plus ou si l’intensité d’éclairage diminue, si l’indicateur lumineux clignote
rapidement, merci de recharger les batteries .
Maintenance
Touslessixmois,leletagedoitêtreessuyéavecunchionpropreetrecouvertd’unlubriant
à base de silicone.
Low power Full power
3.5V 3.7V 3.9V 4.2V
Low power Full power
4.8V 5.6V 6.0V 6.4V
Warranty Service
All NITECORE®productsarewarrantedforquality.AnyDOA/defectiveproductcan
beexchangedforareplacementthroughalocaldistributor/dealerwithin15days
ofpurchase.Afterthat,alldefective/malfunctioningNITECORE® products can be
repaired free of charge within 60 months from the date of purchase. Beyond 60
months,alimitedwarrantyapplies,coveringthecostoflaborandmaintenance,but
not the cost of accessories or replacement parts.
Thewarrantywillbenulliedif
1.theproduct(s)is/arebrokendown,reconstructedand/ormodiedbyunauthorized
parties;
2.theproduct(s)is/aredamagedduetoimproperuse;(e.g.reversedpolarity
installation)
3.theproduct(s)is/aredamagedduetobatteryleakage.
For the latest information on NITECORE®productsandservices,pleasecontacta
local NITECORE®distributororsendanemailto[email protected]
※Allimages,textandstatementsspeciedhereinthisusermanualareforreference
purpose only. Should any discrepancy occur between this manual and information
speciedonwww.nitecore.com,SysmaxInnovationsCo.,Ltd.reservestherights
to interpret and amend the content of this document at any time without prior
notice.
SYSMAX Innovations Co., Ltd.
TEL: +86-20-83862000
FAX: +86-20-83882723
E-mail: [email protected]
Web: www.nitecore.com
Address:Rm2601-06,CentralTower,
No.5XiancunRoad,Tianhe
District,Guangzhou,510623,
Guangdong,China
Please find us on facebook : NITECORE Flashlight
Thanks for purchasing NITECORE!
MH050312GTS20
Made in China
(Español) MH12GTS
Tactical Momentary Illumination
HalfpressandholdtheTailSwitchtoturnonthelightmomentarily.Releasetoturnito.
On / O
On: Whenthelightiso,presstheTailSwitchuntilaclicksoundisheardtoturnonthelight.
O:Whenthelightison,presstheTailSwitchuntilaclicksoundisheardtoturnothelight.
Note:MH12GTShasmodememory.Whenreactivated,theashlightwillautomaticallyaccess
thepreviousmemorizedbrightnesslevelorSTROBEmode(SOSandBEACONexcluded).
Brightness Levels
When the light is on, short press the mode button to cycle through the following brightness
levels:ULTRALOW–LOW–MID–HIGH–TURBO.
Direct Access to ULTRALOW
Whenthelightiso,pressandholdtheModeButton,thenclicktheTailSwitchandrelease
bothtoaccessULTRALOW.(Thisaccessdoesnothavethemodememory.)
Momentary Access to TURBO
When the light is on, press and hold the Mode Button to access TURBO. Release to return to the
previousmemorizedbrightnesslevel.
Special Mode (STROBE / BEACON / SOS)
Access: When the light is on, double press the Mode Button to access STROBE.
Switch: When STROBE is on, long press the Mode Button to cycle through the following special
modes:BEACON–SOS–STROBE.
Exit: When one of the special modes is on, short press the Mode Button to exit special modes
andaccessthepreviousmemorizedbrightnesslevel;orclicktheTailSwitchtoexitspecial
modesandturnothelight.
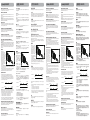
Función de carga
La MH12GTS está equipada con
un Sistema inteligente de carga.
Como se muestra, atornille hasta
apretar por completo la tapa
trasera después de insertar la
batería, luego utilice el cable
USB para conectar una fuente
de alimentación externa (por
ejemplo, un adaptador USB,
una computadora o algún otro
dispositivodecarga)alpuerto
Micro-USB localizado en la tapa
trasera para comenzar el proceso
de carga.
• Cuando el proceso de carga es normal, el indicador de carga parpadeará lentamente para
informar al usuario.
• Cuando la batería está completamente cargada, la MH12GTS detendrá el proceso de carga y
el indicador de carga permanecerá encendido para informar al usuario.
• Cuandoelprocesodecargaesanormal,(porejemplo,labateríaestárota/insertada
incorrectamente), la MH12GTS detendrá el proceso de carga y el indicador de carga
parpadeará rápidamente para informar al usuario.
• El tiempo de carga para una batería Li-ion 18650 es de aproximadamente 8 horas.
Power Indication
• Whenthebatteryisinserted,thepowerindicatorbeneaththesideswitchwillashtoshow
thebatteryvoltage(±0.1V).Forexample,whenthebatteryvoltageisat4.2V,thepower
indicatorwillash4timesfollowedbyaonesecondpauseand2moreashes.Dierent
voltagesrepresentthecorrespondingremainingbatterypowerlevels:
1×18650 battery
2×CR123 batteries
Note: whenusingtwoCR123/RCR123inseries,theindicatorwillshowtheaveragevoltage
between the two batteries.
• WhentheModeButtonispressedwhenthelightiso,thepowerindicatorwillashto
indicate the remaining power of the batteries:
1.Flashingthreetimesindicatesthatthepowerisabove50%;
2.Flashingtwiceindicatesthatthepowerisbelow50%;
3.Flashingonceindicatesthatthepowerisbelow10%.
• Whenthelightisonandthepowerleveliscloseto50%,thepowerindicatorwillashevery
2 seconds to inform the user. When the light is on and the power is close to depleted, the
powerindicatorwillashquicklyandcontinuouslytoinformtheuser.
ATR
WithincorporatedAdvancedTemperatureRegulationmodule,MH12GTSregulatesitsoutput
andadaptstotheambientenvironment,maintainingoptimalperformance.
Changing Batteries
Thebatteriesshouldbereplacedwhenthepowerindicatorashesquicklyandcontinuouslyand
theoutputappearstobedimortheashlightbecomesunresponsiveduetolowpower.
Maintenance
Every6months,threadsshouldbewipedwithacleanclothfollowedbyathincoatingofsilicon-
based lubricant.
Low power Full power
3.5V 3.7V 3.9V 4.2V
Low power Full power
4.8V 5.6V 6.0V 6.4V

( 한국어 )
MH12GTS
(Română)
MH12GTS
(日本語)
MH12GTS
(Italiano)
MH12GTS
(简体中文)
MH12GTS
战术点亮
轻按尾部开关,电筒即开启,松手电筒熄灭。
开启 / 关闭
开启:关闭状态下,按下尾部开关,直到有“嗒”的一声后松手,手电筒开启。
关闭:开启状态下,按下尾部开关,直到有“嗒”的一声后松手,手电筒关闭。
注:MH12GTS 设有档位记忆功能,再次开启电筒时,将自动进入记忆的照明档位或
暴闪档位(SOS 和信标档位除外)。
亮度调节
在开启状态下,每次短按调档按键,电筒亮度将按照“节能档 - 低亮档 - 中亮档 - 高亮
档 - 极亮档”顺序循环切换。
直接开启节能档
关闭状态下,先按住调档按键,再按下尾部开关,直到有“嗒”的一声后松手,即开
启节能档。(此模式不设记忆功能)
瞬时开启极亮档
开启状态下,长按调档按键,即开启极亮档,松手即返回记忆档位。
使用特殊功能(暴闪 / 信标 /SOS)
开启:在开启状态下,快速短按两下调档按键,即可开启暴闪。
切 换:在开启暴闪后,每次长按调档按键,手电筒将按“信标 -SOS- 暴闪”顺序循环切换。
关闭:开启特殊档位后,短按一下调档按键,即可退出特殊档位并返回此前使用的照
明档位;或按下尾部开关,即可退出特殊档位并关闭手电筒。
充电
本产品自带智能充电功能。如
图所示,装入电池后拧紧尾盖,
把USB充电线一端连接至尾
盖充电接口,并把另一端接上
USB 充电设备(USB 适配器、
电脑或其他 USB 充电器设备)
即可进行充电。
• 当处于正常充电状态时,位
于充电接口旁的充电指示灯
会慢闪提示用户。
• 当充 满电 时,MH12GTS 将
自动停止充电,并且充电指
示灯长亮提示用户。
• 当检测到充电出现异常情况时(如电池损坏、装入错误电池等),MH12GTS 将自
动停止充电,且充电指示灯快速闪烁提示用户。
• 当对 1 节 18650 锂充电电池进行充电时,充电时间约为 8 小时。
电量提示
• 每次装入电池后,位于调档按键的电量指示灯将以闪烁的方式报出电池电压(精确
到 ±0.1V)。例如,电池电压为 4.2V 时,指示灯将闪烁 4 次,停顿一秒后再闪烁
2 次来表示 4.2V。
1×18650电池
2×CR123电池
注:当使用两节 CR123/RCR123电池串联时,手电筒只报单节电池电压(两节电池电
压平均值)。
• 在关闭状态下,短按调档按键,电量指示灯将以闪烁方式报出电池剩余电量:
1.指示灯闪3次,代表电量大于50%;
2.指示灯闪2次,代表电量少于50%;
3.指示灯闪1次,代表电量少于10%。
• 当手电筒开启,并且电池电量剩余将近一半时,蓝色电量指示灯将每 2 秒闪烁 1 次
提示用户;当手电筒开启,并且电池电量将近耗尽时,蓝色电量指示灯将连续快速
闪烁提示用户。
ATR 温控模块
MH12GTS 内置温控模块,根据工作状态和外界温度自动调节亮度输出以达到最佳工
作状态。
更换电池
当电池电量不足,蓝色电量指示灯将连续快速闪烁,电筒甚至会出现亮度变暗或者无
法调光的情况。此时,应更换电池。
保养电筒
请每半年使用软布清洁电筒的螺牙,并使用硅润滑油润滑螺牙。
保固
NITECORE®产品拥有售后保固服务。在购买本产品的 15 天内,如果有任何质量问题均可
向经销商要求免费更换。在购买本产品的 5 年内享受免费保固服务。在超过 5 年免费保固
期后,本产品享有终身有限度保固服务,如需要更换重要部件则需收取成本费用。本保固
规则不适用于以下情况:
1. 人为破坏,拆解,改装本产品。
2. 错误操作导致产品损坏(如反装电池等)。
3. 电池漏液导致产品损坏。
如对奈特科尔产品有任何疑问,欢迎联系当地的代理商或发邮件到 [email protected]
※ 本说明书的所有图片、陈述及文字信息仅供参考,请以官网 www.nitecore.cn 实际信
息为准。广州希脉创新科技有限公司拥有对说明书内容的最终解释权和修改权。
电量不足 满电
3.5V 3.7V 3.9V 4.2V
电量不足 满电
4.8V 5.6V 6.0V 6.4V
Iluminarea tactică momentană
Apăsațiparțialșimenținețiînaceastăpozițiecomutatoruldincoadalanterneipentruaporni
iluminareamomentană.Eliberațipentruaoopri.
On/ O
On:Cândlanternaesteoprită,apăsațicomutatoruldincoadaeipânăcândauzițiunclickpentru
a porni lanterna.
O:Cândlanternaestepornită,apăsațicomutatoruldincoadaeipânăcândauzițiunclick
pentru a o opri.
Notă:MH12GTSaremoddememorare.Cândoreporniți,lanternavaaccesaautomattreapta
deluminozitateutilizatăanteriorsaumodulstroboscop(SOSșiBEACONsuntexcluse).
Trepte de luminozitate
Cândlanternaestepornită,apăsațiscurtbutonul“Mode”pentruatreceprintreptelede
luminozitateînurmătoareaordine:ULTRALOW–LOW–MID–HIGH–TURBO.
Acces direct la ULTRALOW
Cândlanternaesteoprită,apăsațișimenținețiînaceastăpozițiebutonulMode,apoiclickpe
switch-uldincoadășieliberați-lepeamândouăpentruaaccesaULTRALOW.(Acesttipde
accesare nu are disponibil modul de memorare).
Acces momentan la TURBO
Cândlanternaestepornită,apăsațișimenținețiînaceastăpozițiebutonulModepentruaaccesa
TURBO.Eliberațipentruavăîntoarcelaniveluldeluminozitatememoratanterior.
Moduri speciale (STROBE/ BEACON/ SOS)
Acces:Culanternapornită,apăsațidedouăoributonulModepentruaaccesastroboscopul.
Schimbare:Custroboscopulpornit,apăsațilungbutonulModepentruatreceprinurmătoarele
modurispecialeBEACON–SOS–STROBE.
Ieșire:Cândunuldintremodurilespecialeestepornit,apăsațiscurtbutonulModepentruaieși
dinmodurilespecialeșipentruaaccesatreaptamemoratăanterior;sauclickpeswitch-uldin
coadalanterneipentruaieșidinmodurilespecialșiaoprilanterna.
Funcția de încărcare
MH12GTS este echipat cu un
sisteminteligentdeîncărcare.
Dupăcumesteilustrat,înșurubați
complet capacul din coada
lanterneidupăintroducereabateriei
șiapoiutilizațicablulUSBpentru
aconectaosursădealimentare
externă(deex.unadaptorUSB,
uncomputersaualtedispozitive
deîncărcareUSB)laportulmicro-
USB situat pe capacul din coada
lanterneipentruaîncepeprocesul
deîncărcare.
• Cândîncărcareasedesfășoarăîncondițiinormale,indicatoruldeîncărcareclipeșterarpentru
a informa utilizatorul.
• Cândacumulatorulestecompletîncărcat,MH12GTSopreșteprocesuldeîncărcareși
indicatorulrămâneactivatconstantpentruainformautilizatorul
• Cândîncărcareanudecurgeîncondițiinormale(deex.acumulatorulestestricat/introdus
incorect),MH12GTSînceteazăprocesuldeîncărcareșiindicatorulclipeșterapidpentrua
informa utilizatorul
• TimpuldeîncărcarepentruunacumulatorLi-Ion18650estedeaproximativ8ore.
Indicații pentru putere
• Cândbateriaesteintrodusă,indicatoruldeputeredinspateleswitch-uluilateralclipește
pentruaarătavoltajulbateriei(±0.1V).Deexemplu,cândvoltajulbaterieiestela4.2V,
indicatoruldeputereclipeștede4ori,urmatdeopauzădeosecundășialtedouăclipiri.
Voltajelediferitereprezintăniveleledeputerecorespunzătoarealebateriei:
1×18650 battery
2×CR123 batteries
Notă:cândutilizațidouăbateriiCR123/RCR123înserie,indicatorularatămediavoltajuluidintre
celedouăbaterii.
• DacăapăsațibutonulModecândlanternaesteoprită,indicatoruldeputereclipeștepentrua
indicaputereadisponibilădinbateriiînfelulurmător:
1.3ash-uriindicăputerepeste50%;
2.2ash-uriindicăputeresub50%;
3.1ashindicăputeresub10%.
• Cândlanternaestepornitășiniveluldeputereesteaproapede50%,indicatorulclipeștela
ecaredouăsecundepentruainformautilizatorul.Cândlanternaestepornitășibateriaeste
aproapeepuizată,indicatoruldeputereclipeșterapid,înmodcontinuu,pentruainforma
utilizatorul.
ATR (Reglare Avansată a Temperaturii)
Cumodulul“ReglareAvansatăaTemperaturii”,PMH12GTSîșiregleazăputereașioadaptează
mediului,menținândperformanțeleoptime.
Schimbarea bateriilor
Bateriiletrebuieînlocuitecândindicatoruldeputereclipeșterapidșicontinuușidacăputerea
esteslabăsaulanternanurăspundelacomenzidincauzaputeriiscăzute.
Întreținere
Dinșaseînșaseluni,circuiteletrebuieștersecuopânzăcurată,dupăcareseaplicăunstrat
subțiredelubriantpebazădesilicon.
Low power Full power
3.5V 3.7V 3.9V 4.2V
Low power Full power
4.8V 5.6V 6.0V 6.4V
ライトの一時点灯
テールスイッチを半押しすると、押しているあいだライトが点灯します。ボタンを
はなすと消灯します。
オン・オフ
オン : ライトが消えているとき、カチッと音がするまでテールスイッチを押し込むと
点灯します。
オフ : ライトがついているとき、カチッと音がするまでテールスイッチを押し込むと
消灯します。
ノート : MH12GTS はモードのレジューム機能があります。再点灯時は、前回使用
していた最後の明るさまたはストロボモードで点灯します(SOS とビーコンはメモ
リーされません)。
明るさレベル
ライトがついているとき、モードボタンを押すと明るさが「ウルトラローーローー
ミドルーハイーターボ」の順に切り替わります。
ウルトラローを直接点灯するには
ライトが消えているとき、モードボタンを長押ししながらテールボタンを押し、両
方のボタンを同時にはなすとウルトラローで点灯します(この点灯方法ではウルト
ラローはメモリーされません)。
ターボを一時点灯するには
ライトがついているとき、モードボタンを長押しするとターボで点灯します。はな
すと元の明るさに戻ります。
スペシャルモード ( ストロボ / ビーコン / SOS)
アクセス方法 : ライトがついているとき、モードボタンをダブルクリックするとスト
ロボモードになります。
切り替え :ストロボモードのとき、モードボタンを長押しすると「ビーコンー SOS―
ストロボ」の順に切り替わります。
スペシャルモードから抜けるには :スペシャルモード中に、モードボタンを押すと元
の明るさに戻ります。もしくはテールスイッチを押してライトを消します。
充電機能
MH12GTSは高性能充電シス
テムを搭載しています。充電
を始めるには、充電池を入れ
たあとテールキャップをしっ
かりと締め、図のように USB
ケーブルを接続して外部電源
より充電します(例:USB ア
ダプター、PC、USB 充電デバ
イスなど)。
• 充電中はチャージインジケ
ーターがゆっくり点滅しま
す。
• フル充電されると、MH12GTS は自動的に充電を停止しチャージインジケーター
が点灯したままになります。
• 充電中に異常が発生した場合(例:電池の故障、入れ間違いなど)、MH12GTS
は充電を停止しチャージインジケーターが高速で点滅します。
• 18650 リチウムイオン充電池の充電時間は約 8 時間です。
パワーインジケーター
• 電池を入れると、サイドスイッチ下のパワーインジケーターが点滅して電圧をお
知らせします。(±0.1V)。例えば電池の残量が 4.2V だった場合、パワーインジケ
ーターが4回点滅し、1 秒後に2回点滅します。点滅は実際の電圧ではなく、最
大容量を 4.2Vと仮定して行われますので、電池の最大容量が違うときは下図の
ように読み替えてください。
1×18650 battery
2×CR123 batteries
ノート : CR123/RCR123使用時は、2 本の平均電圧をお知らせします。
• ライトが消えているときにモードボタンを押すと、パワーインジケーターが点滅
して電池残量をお知らせします :
1.残量が 50% 以上の場合は 3 回点滅します。
2.残量が 50% 以下の場合は 2 回点滅します。
3.残量が 10% 以下の場合は 1 回点滅します。
• ライトがついているときに電池残量が 50% に近づくと、パワーインジケーター
が 2 秒に 1 回点滅します。ライトがついていて電池残量が残りわずかになると、
パワーインジケーターが高速で点滅します。
高性能温度調節機能 (ATR)
本器は高性能温度調節機能(ATR) を搭載しており、最適な性能が発揮できるよう状
況に応じて出力レベルを調節します。
電池の交換時期
パワーインジケーターが高速で点滅したり、光源が暗くなったりライトが反応しな
くなったら電池を交換してください。
メンテナンス
6 ヶ月ごとに、ねじ山をきれいな布で拭いてからシリコンベースの潤滑剤を薄く塗っ
てください。
Low power Full power
3.5V 3.7V 3.9V 4.2V
Low power Full power
4.8V 5.6V 6.0V 6.4V
전술적인 순간 조명
테일 스위치를 반쯤 누르고 있으면 잠시 표시등이 켜집니다 . 손을 떼어 해제하십시오 .
On / Off
On: 전원이 꺼져 있을 때 클릭 소리가 들릴 때까지 테일 스위치를 눌러 전원을 켜십시오.
Off: 전원이 켜져 있을 때 클릭 소리가 들릴 때까지 테일 스위치를 눌러 전원을 끕니다 .
참고 : MH12GTS 에는 모드 메모리가 있습니다 . 재활성화되면 손전등이 자동으로 이전에
기억 된 밝기 레벨 또는 STROBE 모드 (SOS 및 BEACON 제외 ) 에 액세스합니다 .
밝기 레벨
전원이 켜져있을 때 모드 버튼을 짧게 눌러 ULTRALOW - LOW - MID - HIGH - TURBO
의 밝기 레벨을 순환합니다 .
ULTRALOW 에 직접 액세스
전원이 꺼져 있을 때 모드 버튼을 길게 누른 다음 테일 스위치를 누르고 손을 떼면
ULTRALOW 에 액세스합니다 . 이 액세스에는 모드 메모리가 없습니다 .
TURBO 에 대한 일시적인 액세스
전원이 켜져 있을 때 모드 버튼을 길게 눌러 TURBO 에 액세스하십시오 . 버튼을 놓으면
이전에 기억 된 밝기 레벨로 돌아갑니다 .
특수 모드 (STROBE / BEACON / SOS)
액세스 : 전원이 켜져 있을 때 모드 버튼을 두 번 눌러 STROBE 에 액세스합니다 .
모드 변경 : STROBE 가 켜져 있을 때 모드 버튼을 길게 눌러 다음과 같은 특수 모드를 반
복하십시오 : BEACON - SOS - STROBE.
종료 : 특수 모드 중 하나가 켜져 있을 때 모드 버튼을 짧게 눌러 특수 모드를 종료하고
이전에 기억 된 밝기 레벨에 액세스하십시오 . 특수 모드를 종료하고 표시등을 끄려면 테
일 스위치를 클릭하십시오 .
충전기능
MH12GTS 에는 지능형 충전 시
스템이 장착되어 있습니다 . 그림
과 같이 배터리를 삽입 한 후 테
일 캡을 완전히 돌려 나사를 조
인 다음 USB 케이블을 사용하여
외부 전원 공급 장치 ( 예 : USB
어댑터 , 컴퓨터 또는 기타 USB
충전 장치 ) 를 꼬리 캡을 사용하
여 충전 과정을 시작하십시오 .
• 충전 상태가 정상이면 충전
표시등이 천천히 깜박여 사용
자에게 알립니다 .
• 배터리가 완전히 충전되면
MH12GTS 는 충전 과정을 중단하고 충전 표시등이 계속 켜져 사용자에게 알려줍니다 .
• 충전 상태가 비정상적 일 때 ( 예 : 배터리가 고장 나거나 잘못 삽입 된 경우 )
MH12GTS 는 충전 과정을 중단하고 충전 표시등이 빠르게 깜박여 사용자에게 알립니
다.
• 18650 리튬 이온 배터리의 충전 시간은 약입니다 . 8 시간 .
전력 표시
• 배터리를 넣으면 사이드 스위치 밑의 전원 표시등이 깜박 거리면서 배터리 전압 ( ±
0.1V) 을 표시합니다 . 예를 들어 , 배터리 전압이 4.2V 일 때 전원 표시등이 4 번 깜박
이고 1 초 정지 후 2 번 깜박입니다 . 각기 다른 전압은 해당 배터리 잔량을 나타냅니
다.
1×18650 battery
2×CR123 batteries
참고 : 두 개의 CR123 / RCR123 을 직렬로 사용하는 경우 두 배터리 사이의 평균 전압이
표시됩니다 .
• 전원이 꺼져 있을 때 모드 버튼을 누르면 배터리의 남은 전력을 나타내는 전원 표시등
이 깜박입니다 :
1. 세 번 깜박이면 전원이 50 % 이상임을 나타냅니다 .
2. 두 번 깜박이면 전원이 50 % 미만임을 나타냅니다 .
3. 한 번 깜박이면 전원이 10 % 미만임을 나타냅니다 .
• 전원이 켜져 있고 전원 수준이 50 % 에 가까워 지면 전원 표시등이 2 초마다 깜박이면
서 사용자에게 알립니다 . 표시등이 켜지고 전원이 거의 소모되면 전원 표시등이 신속
하고 지속적으로 깜박여 사용자에게 알립니다 .
ATR
통합 고급 온도 조절 모듈을 통해 MH12GTS 는 출력을 조절하고 최적의 성능을 유지하
면서 주변 환경에 적응합니다 .
배터리 교체
전원 표시등이 빠르게 연속으로 깜박이고 출력이 어두워 지거나 저전력으로 인해 플래시
가 응답하지 않으면 배터리를 교체해야 합니다 .
유지보수
6 개월마다 나사를 깨끗한 천으로 닦아 실리콘 기반 윤활제를 얇게 코팅해야합니다 .
Low power Full power
3.5V 3.7V 3.9V 4.2V
Low power Full power
4.8V 5.6V 6.0V 6.4V
Illuminazione Tattica Momentanea
Premeteametàilpulsanteposterioredellatorciaperaccenderemomentaneamentelaluce;
rilasciate la pressione per spegnerla.
Accensione e Spegnimento
Accensione:atorciaspenta,premereilpulsanteposteriorenoadudireunsuonodi“click”.
Spegnimento: atorciaaccesa,premereilpulsanteposteriorenoadudireunsuonodi“click”.
Nota: laMH12GTSmantieneinmemorial’ultimapotenzaluminosautilizzata.Quandoviene
accesa, propone all’utente l’ultima modalità utilizzata (ad eccezione delle modalità SOS e BEACON).
Selezione dei vari livelli luminosi
A torcia accesa, premere rapidamente il pulsante MODE lateriale per selezionare in modo ciclico
levariepotenzeluminose:ULTRALOW–LOW–MID–HIGH–TURBO.
Accesso diretto alla modalità ULTRALOW
A torcia spenta, premere e tenere premuto il pulsante laterale MODE e quindi premere il
pulsantePOWERposteriore;rilasciandolientrambiavreteaccessoallamodalitàULTRALOW.
(Questo metodo di accensione non farà tenere in memoria alla torcia la modalità luminosa
selezionata).
Accesso diretto alla modalità TURBO
A torcia accesa, premere e tenere premuto il pulsante laterae MODE per accedere
temporaneamente alla modalità TURBO. Rilasciando il pulsante la torcia riproporrà la modalità
luminosa usata precedentemente.
Modalità Speciali (STROBO / BEACON / SOS)
Accesso:atorciaaccesa,premererapidamente2volte,inrapidasequenza,ilpulsantelaterale
MODE per abilitare la modalità STROBO.
Selezione: con la modalità STROBO accesa, premere a lungo il pulsante laterale MODE per
selezionareinmodociclicolealtermodalitàspeciali:BEACON–SOS–STROBO.
Uscita: con qualsiasi modalità speciale inserita, premere rapidamente il pulsante laterale MODE
perritornareallamodalitàluminosastandardedalprecedentelivelloluminosomemorizzato;
utilizzandoinveceilpulsantePOWERposteriore,spegneretelatorciaedusciretedallemodalità
speciali.
Modalità di Ricarica
La MH12GTS è equipaggiata con
un sistema di ricarica intelligente
dellabatteria.Comedagura
econbatteriainserita,avvitare
completamente il codolo della
torciaedinserireilcavodi
ricarica USB a qualsiasi fonte
di alimentazione esterna (un
adattatore USB, un trasformatore
per smartphone o tablet o un
PC),inseritapoiilcavoMicro-USB
nella porta dedicata sul retro della
torcia per cominciare il processo di
carica.
• A carica in atto, l’indicatore a luce blu posto accanto al plug di ricarica inizierà a lampeggiare
lentamente.
• Quando la batteria è completamente carica, la MH12GTS interromperà automaticamente il
processo di carica e l’indicatore a luce blu posto accanto al plug di ricarica resterà acceso in
modosso.
• Seilprocessodicaricadovesseincontraredeiproblemi(es.batteriainseritaalcontrario)
la MH12GTS interromperà la carica e l’indicatore a luce blu posto accanto al plug di ricarica
lampeggeràvelocementeperinformarvi.
• Iltempodicaricaapprossimativoperuna18650Li-ionèdicirca8ore.NOTA:èpossibile
ricaricare internamente alla torcia solo batterie di tipo IMR o Li-ion di tipo 18650, non è
possibile ricaricare altri formati di batterie.
Suggerimenti
• Ognivoltachevieneinseritaunabatteria,l'indicatoreblusottol'interruttoreriporteràil
voltaggio(conun'approssimazionedi±0.1V)Adesempio,quandoilvoltaggiodellabatteria
èallamassimacaricadi4.2V,ilpotenziometrolampeggerà4volte,seguiteda1.5secondidi
pausa e 2 ulteriori lampeggi prima di entrare in standby.
Dierentivoltaggicorrispondonoadierentiautonomieresidue:
1×18650 battery
2×CR123 batteries
Attenzione:quandosiusanoCR123/RCR123inserie,latorciaindicasolamentelamediadeidue
voltaggi.
• A torcia spenta, premendo il pulsante laterale MODE, l’indicatore blu lampeggerà per indicare
lo stato di carica restante nella batteria inserita:
1.Trerapidilampeggiindicanochelacaricaresiduaèsuperioreal50%;
2.Duerapidilampeggiindicanochelacaricaresiduaèinferioreal50%;
3.Ununicolampeggioindicachelacaricaresiduaèinferioreal10%elabatteriaèda
ricaricare.
• Atorciaaccesa,quandolacaricaresiduaèvicinaa50%,l’indicatoreblulampeggerà
automaticamenteogni2secondiperinformarel’utente.Seinvecelacaricaèinesaurimento,
l’indicatoreblulampeggeràcontinuamenteperinformarel’utentedieettuarelaricarica.
ATR (Advanced Temperature Regulation)
ConilmoduloAdvancedTemperatureRegulation,laMH12GTSregolalapropriapotenzad'uscita
adattandosi all'ambiente circostante, mantenendo prestazioni ottimali.
Sostituzione delle batterie
Sostituirelebatteriequandolaluminositàrisultaaevolitaononvaria.
Manutenzione
Ogni6mesi,lelettaturevannopuliteconunpannopulito,applicandopoiunsottilestratodi
lubricanteabasesiliconica.
Low power Full power
3.5V 3.7V 3.9V 4.2V
Low power Full power
4.8V 5.6V 6.0V 6.4V
(Русский) MH12GTS
Мгновенное включение света
Нажмитеторцевойвыключательдополовиныиудерживайтедлямгновенноговключения
света.Отпуститевыключатель,чтобыотключитьсвет.
Включение/Выключение
Включение:Привыключенномсветенажмитеторцевойвыключательдощелчка,чтобы
включитьсвет.
Выключение:Привключенномсветенажмитеторцевойвыключательдощелчка,чтобы
выключитьсвет.
Примечание: УMH12GTSимеетсяпамятьрежима.Приповторномвключениифонарь
автоматическипереключитсянапредыдущийсохраненныйуровеньяркостииливрежим
СТРОБОСКОПА(кромережимовSOSиМАЯК).
Уровни яркости
Привключенномсветеосуществляйтекратковременноенажатиенакнопку«Режим»для
того,чтобыпоследовательнопереключатьследующиеуровнияркости:МИНИМАЛЬНЫЙ-
НИЗКИЙ-СРЕДНИЙ-ВЫСОКИЙ-ТУРБО
Быстрый переход в режим МИНИМАЛЬНЫЙ
Привыключенномсветенажмитеиудерживайтекнопку«Режим»,затемнажмите
торцевуюкнопкуиотпуститеобекнопки,чтобыактивироватьрежимМИНИМАЛЬНЫЙ.
(Указанныйрежимнесохраняетсявпамяти.)
Быстрый переход в режим ТУРБО
Привключенномсветенажмитеиудерживайтекнопку«Режим»,чтобыактивировать
режимТУРБО.Отпуститекнопку,чтобывернутьсякпредыдущемууровнюяркости.
Особые режимы (СТРОБОСКОП/МАЯК/SOS)
Активация: Привключенномсветедваждынажмитекнопку«Режим»,чтобыактивировать
режимСТРОБОСКОП.
Переключение:ПривключенномрежимеСТРОБОСКОПдлительнымнажатиемкнопки«Режим»
можнопоследовательнопереключатьследующиеособыережимы:МАЯК-SOS-СТРОБОСКОП.
Выход из режима:Еслиодинизособыхрежимоввключен,кратковременноенажатиекнопки
«Режим»позволитвыключитьособыйрежимивернутьсякпредыдущемусохраненномууровню
яркости;крометого,нажатиеторцевоговыключателяпозволитвыйтиизособыхрежимови
выключитьсвет.
Зарядка
MH12GTSоснащен
интеллектуальнойсистемой
зарядки.Послеустановки
аккумуляторазавинтитедоупора
торцевуюкрышку,какпоказано
нарисунке,азатемиспользуйте
USB-кабельдляподключения
внешнегоисточникапитания
(например,USB-адаптер,
компьютерилидругиеустройства
зарядкичерезUSB)кпорту
Micro-USB,расположенномуна
торцевойкрышке,чтобыначать
процессзарядки.
• Впроцессезарядкииндикаторбудетмедленномигать.
• Когдааккумуляторполностьюзарядится,MH12GTSпрекратитпроцессзарядки,аиндикатор
зарядкистанетгоретьпостоянно.
• Еслизарядканепроисходит(например,аккумуляторнеисправен/установленнеправильно),
MH12GTSпрекратитпроцессзарядки,аиндикаторзарядкистанетбыстромигать.
• Времязарядкилитий-ионногоаккумулятора18650составляетоколо8часов.
Индикация питания
• Когдааккумуляторвставлен,лампочкаиндикаторапитанияподбоковым
переключателемначнетмигать,показываянапряжениеаккумулятора(±0,1В).
Например,когданапряжениеаккумуляторасоставляет4,2В,лампочкаиндикатора
питаниябудетмигать4раза,заэтимпоследуютпаузадлительностьюоднусекундуи
еще2миганиялампочки.Различныезначениянапряженияуказываютнаразличные
уровниоставшегосязарядааккумулятора:
1×18650 battery
2×CR123 batteries
Примечание: Прииспользованиидвухустановленныхпоследовательноаккумуляторов
CR123/RCR123фонарьпокажеттолькосреднеезначениенапряжениядвухаккумуляторов.
• Принажатиикнопки«Режим»втовремя,когдафонарьвыключен,лампочка
индикаторапитаниябудетмигать,показываяоставшийсязарядаккумуляторов:
1.Троекратноемиганиеуказывает,чтоуровеньзарядавыше50%;
2.Двукратноемиганиеуказывает,чтоуровеньзаряданиже50%;
3.Однократноемиганиеуказывает,чтоуровеньзаряданиже10%.
• Еслисветвключен,ауровеньзарядаблизокк50%,лампочкаиндикаторапитания
будетмигатьчерезкаждые2секунды.Еслисветвключен,ауровеньзарядаблизокк
нулю,лампочкаиндикаторапитаниябудетмигатьбыстроинепрерывно.
Усовершенствованное регулирование температуры
БлагодарямодулюусовершенствованногорегулированиятемпературыфонарьMH12GTS
регулируетсобственнуюмощностьиподстраиваетсякусловиямокружающейсреды,
поддерживаяоптимальныеэксплуатационныепоказатели.
Замена аккумуляторов
Аккумуляторыследуетзаменятьвтомслучае,когдалампочкаиндикаторапитания
мигаетбыстроинепрерывно,иприэтомсветстановитсяслабым,илифонарьперестает
реагироватьнанажатияиз-занизкогоуровнязаряда.
Техническое обслуживание
Разв6месяцеврезьбовыесоединениянеобходимопротиратьчистойтканьюинаносить
нанихсмазкунасиликоновойоснове.
Low power Full power
3.5V 3.7V 3.9V 4.2V
Low power Full power
4.8V 5.6V 6.0V 6.4V
-
 1
1
-
 2
2


NITECORE Ultra Comact Dual-Fuel Searchlight Manuale utente
- Categoria
- Torce elettriche
- Tipo
- Manuale utente
in altre lingue
- English: NITECORE Ultra Comact Dual-Fuel Searchlight User manual
- français: NITECORE Ultra Comact Dual-Fuel Searchlight Manuel utilisateur
- Deutsch: NITECORE Ultra Comact Dual-Fuel Searchlight Benutzerhandbuch
- 日本語: NITECORE Ultra Comact Dual-Fuel Searchlight ユーザーマニュアル
- română: NITECORE Ultra Comact Dual-Fuel Searchlight Manual de utilizare
Documenti correlati
-
NITECORE E4K 4400 Lumen EDC Flashlight Manuale utente
-
NITECORE HC65 V2 Manuale utente
-
NITECORE MT21C Manuale utente
-
-
NITECORE NITECORE Manuale utente
-
NITECORE P20i Manuale utente
-
NITECORE MH25 V2 Manuale utente
-
NITECORE SRT6i Manuale utente
-
-
Altri documenti
-
Fenix LD50 Manuale utente
-
KLARUS K10 Manuale utente
-
Fenix C6 V3.0 Manuale utente
-
OL-Olight Olight S2R II Cu 1150 Lumens Magnetic Rechargeable Variable Output Side Switch LED Flashlight,with 18650 Battery and SKYBEN Battery Case (Limited Edition Cu) Manuale utente
-
Fenix HM60R Manuale utente
-
KLARUS XT11GT Pro Manuale utente