La pagina si sta caricando...

cover
Climbing Technology by Aludesign S.p.A. via Torchio 22
24034 Cisano B.sco BG ITALY www.climbingtechnology.com 1/56
Member of IST31-3I770CT_rev.0 10-22
CRAMPONS
G
=+S
Regulation (EU) 2016/425
Personal Protective Equipment against the risk of slips during mountaineering.
MADE IN ITALY
EN 893
EN Crampons for mountainering.
IT Ramponi per alpinismo.
FR Crampons pour l'alpinisme.
DE Bergsteigen Steigeisen.
ES Crampones para Alpinismo.
PL Raki do alpinizmu.
PT Grampos para alpinismo.
SE Stegjärn för alpinism.
FI Jääraudat vuorikiipeilyyn.
NO Stegjern for klatring.
DK Klatrejern til bjergbestigning.
NL Stijgijzers voor alpinisme.
SI Dereze za alpinizem in gorništvo.
SK Mačky na horolezectvo.
RO Colţari pentru alpinism.
CZ Horolezecké mačky.
HU Hágóvas hegymászáshoz.
GR Καρφιά πάγου για ορειβασία.
EE Tanghaaratsid mägironimiseks.
LV Alpīnismam paredzētie dzelkšņi.
LT Alpinizmui skirti kapliukai.
BG Котки за алпинизъм.
HR Dereze za planinarenje.
CN 登山冰爪。
JP アルパインクライング用クランポン。

drawings
Climbing Technology by Aludesign S.p.A. via Torchio 22
24034 Cisano B.sco BG ITALY www.climbingtechnology.com 2/56
Member of IST31-3I770CT_rev.0 10-22
The UKCA Marking certifies that the PPE
complies with the PPE Regulation
2016/425 as amended to apply in GB.
1
PRODUCT SHEET
PRODUCT
TECHNICAL DATA SUGGESTED USE
REF. No.
STANDARDS
MATERIALS
1) Steel alloy;
2) Stainless steel;
3) Light alloy.
POINTS
SKI TOURING
(Fig. 12.1)
GLACIER TRAVEL
(Fig. 12.2)
CLASSIC
ALPINISM
(Fig.12.3÷12.6)
TECHNICAL
ALPINISM
(Fig.12.7÷12.8)
ICE FALLS
(Fig. 12.9)
BODIES BARS
HYPER-SPIKE 3I894* 990 g
EN 893:2019
1 1 11/12 / / / ��� ���
LYCAN SEMIAUTOMATIC 3I773D 1115 g 1 1 12 /� �� ��� ��
LYCAN AUTOMATIC 3I774D 1090 g 1 1 / � �� ��� ��
NUPTSE EVO CLASSIC 3I770D 985 g 1 1
12
�� ��� ��� �� /
NUPTSE EVO CLASSIC FLEX 3I770C 950 g 1 2 / ��� � / /
NUPTSE EVO SEMIAUTOMATIC 3I771D 1050 g 1 1 �� ��� ��� �� /
NUPTSE EVO SEMIAUTOMATIC FLEX 3I771C 1025 g 1 2 �� ��� ��� �� /
NUPTSE EVO AUTOMATIC 3I772D 1025 g 1 1 �� ��� ��� �� /
NUPTSE EVO AUTOMATIC FLEX 3I772C 1015 g 1 2 �� ��� ��� �� /
NEVIS 3I818D** 830 g 1 1 10
�� ��� �� / /
NEVIS FLEX 3I818C** 820 g 1 2 �� ��� �� / /
SNOW FLEX CLASSIC 2I864 560 g 3 2
10
��� ��� / / /
SNOW FLEX SEMIAUTOMATIC 2I865 630 g 3 2 ��� ��� / / /
SNOW FLEX AUTOMATIC 2I866 590 g 3 2 ��� ��� / / /
ICE CLASSIC 3I882 1010 g
EN 893:2010
1 1
12
��� ��� �� / /
ICE SEMIAUTOMATIC 3I883 1075 g 1 1 ��� ��� �� / /
ICE AUTOMATIC 3I884 1095 g 1 1 ��� ��� �� / /
*automatic binding; **classic binding. Suggested use legend: /= Not suitable; �= Suitable; �� = Recommended; ��� = Highly recommended.
g
C
A
B
E
D
FI
GL
H1
C
A
B
E
D
FI
GM
H1
C
A
BE
D
FN
GM
H1
H2
O*
2NOMENCLATURE / BINDING SYSTEMS
2.1 - Classic 2.2 - Semi-automatic 2.3 - Automatic (*only SNOW FLEX model)

Climbing Technology by Aludesign S.p.A. via Torchio 22
24034 Cisano B.sco BG ITALY www.climbingtechnology.com 3/56
Member of IST31-3I770CT_rev.0 10-22
12
EU 42÷47
EU 36÷43
1
2
3
12
EU 42÷47
EU 36÷43
1
2
3
N
N
O
O
!
!
max
10 mm
12
4LENGTH ADJUSTMENT - Attention! Simplified views for a better understanding.
4.1 - Nevis / Ice models
4.2 - Hyper-Spike 4.4 - Lycan / Nuptse Evo models
4.3 - Hyper-Spike 4.5 - Lycan / Nuptse Evo models
4.6 4.7 4.8 4.9
24034CisanoB.sco/ITALY
AludesignS.p.A. ViaTorchio,22
MM-YYYY
C
EN 893
ITALY
T8
T3
30
48
11
6
T9
13
21
7
3MARKING
10
8
6
4
2
BBBB

Climbing Technology by Aludesign S.p.A. via Torchio 22
24034 Cisano B.sco BG ITALY www.climbingtechnology.com 4/56
Member of IST31-3I770CT_rev.0 10-22
4
3
2
1
5 (See fig. 6.3)
5 (See fig. 6.3)
34
2
1
2
1
5
3
4
2
1
3
4
5 (See fig. 6.3)
5 (See fig. 6.3)
5ATTACHMENT TO BOOT
5.1 - Classic 5.2 - Semi-automatic
5.3 - Automatic A
5.4 - Automatic B
5.5 - Automatic C

Climbing Technology by Aludesign S.p.A. via Torchio 22
24034 Cisano B.sco BG ITALY www.climbingtechnology.com 5/56
Member of IST31-3I770CT_rev.0 10-22
O
O
K
K
!
!
N
N
O
O
!
!
O
O
K
K
!
!
N
N
O
O
!
!
N
N
O
O
!
!
O
O
K
K
!
!
max L/2
O
O
K
K
!
!
L
N
N
O
O
!
!
N
N
O
O
!
!
8SHARPENING
8.1 8.2 8.3
min 8 cm
R
Right
L
Left
6BUCKLES SETTING
6.1 6.2 6.3
7COMFORT SETTING
7.1
7.37.2

Climbing Technology by Aludesign S.p.A. via Torchio 22
24034 Cisano B.sco BG ITALY www.climbingtechnology.com 6/56
Member of IST31-3I770CT_rev.0 10-22
ANTIBOTTS FOR
HYPER-SPIKE
(Ref. No. 6V894)
STANDARD BAR
(Ref. No. 3I788)
HYPER-SPIKE BAR
(Ref. No. AAST18)
FLEX BAR-B
(Ref. No. 4AST20)
LONG FLEX BAR-B
(Ref. No. 4AST19)
ANTIBOTTS FOR
ICE/PRO LIGHT
(Ref. No. 6V816)
ANTIBOTTS FOR
NEVIS/SNOW FLEX
(Ref. No. 6V825)
ANTIBOTTS FOR
LYCAN/NUPTSE EVO
(Ref. No. 6V834)
2x
2x
2x
2x
LONG BAR
(Ref. No. AAST22)
2x
HOOK
(Ref. No APUN03)
BLADE
(Ref. No APUN04)
2,5 mm
STANDARD BAR
(Ref. No. AAST23)
2x
9ACCESSORIES / SPARE PARTS
9.1 - Antibotts 9.2 - Bars
9.3 - Hyper-Spike points 9.4 - Change of points
9.5 - Examples of configuration
9.6 - Compatibility
PRODUCT REF. No.
HYPER-SPIKE
LYCAN
NUPTSE EVO
ICE
NEVIS
SNOW FLEX
ANTIBOTTS
6V894
6V816
6V825
6V834
STANDARD BAR
3I788 (36÷46)
AAST23 (36÷47)(36÷47)(33÷44)
LONG BAR AAST22 (50)(50)(50)(47)
HYPER-SPIKE BAR AAST18 (36÷47)
FLEX BAR-B 4AST20 (36÷47)(33÷44)(33÷44)
LONG FLEX BAR-B 4AST19 (50)(47)(47)
HOOK APUN03
BLADE APUN04

Climbing Technology by Aludesign S.p.A. via Torchio 22
24034 Cisano B.sco BG ITALY www.climbingtechnology.com 7/56
Member of IST31-3I770CT_rev.0 10-22
1
1
2
2
3
3
10 ANTIBOTTS 6V834
INSTALLATION
10.1
10.2
10.3
11 ANTIBOTTS 6V894
INSTALLATION
12 TECHNIQUES
12.1 - Ski touring 12.2 - Glacier travel
12.3 -
Classic 12.4 -
Classic 12.5 -
Classic 12.6 -
Classic
12.7 - Technical 12.8 -
Technical 12.9 -
Ice falls
13 ANTI-WEAR BUCKLE
MadeinItaly
SNOW FLEX NEVIS FLEX

Climbing Technology by Aludesign S.p.A. via Torchio 22
24034 Cisano B.sco BG ITALY www.climbingtechnology.com 8/56
Member of IST31-3I770CT_rev.0 10-22
ENGLISH
The instruction manual for this device consists of general and specific instructions,
both must be carefully read and understood before use. Attention! This leaflet
shows the specific instruction only.
SPECIFIC INSTRUCTIONS EN 893.
This note contains the necessary information for a correct use of the following
product/s: crampons for mountaineering.
1) FIELD OF APPLICATION.
EN 893. Mountaineering equipment – Crampons. This product, that complies with
Regulation (EU) 2016/425, is a Personal Protective Equipment (PPE) against the
risk of slips on ice, snow or mixed terrain, depending on the intended use of the
device. See the summary table to check, depending on the model, the range of
use recommended: ski touring (Fig. 12.1), glacier travel (Fig. 12.2), classic moun-
taineering (Fig. 12.3÷12.6), technical mountaineering (Fig. 12.7÷12.8), ice falls
(Fig. 12.9). Attention! Light-alloy crampons are intended for snow travel only: do
not use them for progression on ice or mixed terrain.
2) NOTIFIED BODIES.
Refer to the legend in the general instructions (paragraph 9 / table D): M1, M6.
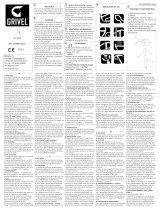
3) NOMENCLATURE (Fig. 2).
Parts of the crampon: Front half (A); Rear half (B); Adjustment bar with holes (C);
Size adjustment system (D); Front anti-balling plate (E); Rear anti-balling plate (F);
Binding strap (G); Strap fastening system with double rings (H1); Fastening system
with quick-release buckle (H2); Toe binding (I); Heel binding (L); Heel lever (M);
Wire toe bail (N); Anti-wear buckle (O). Binding systems: CLASSIC (Fig. 2.1) for
all types of boot; SEMIAUTOMATIC (Fig. 2.2) for boots with heel welt to hold
lever; AUTOMATIC (Fig. 2.3) with front and rear grooves/welts.
3.1 - Main materials. Refer to the legend in the general instructions (paragraph
2.4): 2 (toe bails, heel levers and rivets); 7/10 (strap & bindings). Attention! The
materials of bodies (A-B) e bars (C) are indicated in the table (Fig. 1): 1) Steel
alloy; 2) Stainless steel; 3) Light alloy.
4) MARKING.
Numbers/letters without caption: refer to the legend in the general instructions
(paragraph 5). Numbers/letters with asterisk (*): indication shown depending on
the model.
4.1 - General (Fig. 3). Indications: 4; 6; 7; 8; 11; 13; 21*) UKCA Marking; 30)
Bar numbering for size adjustment.
4.2 - Traceability (Fig. 3). Indications: T3; T8; T9.
5) CHECKS.
Further to the checks listed below, comply with what indicated in the general
instructions (paragraph 3).
Before each use, verify that: the size adjustment system can be securely fastened
and the adjustment bar slides freely through the crampon body; the buckle is
working properly; the heel lever adjustment screws turn without sticking; the wire
toe bails can rotate freely in their mounting holes; the points are well-sharpened
(for sharpening see the relative paragraph). Attention! During use check regularly
that the crampons are properly adjusted and well fastened to the boots. Attention!
Even if the crampons are equipped with an anti-balling system, it is necessary to
be cautious and to pay attention to snow built-up under the crampons: danger of
slipping and falling.
6) ADJUSTMENT AND MOUNTING.
The crampons must fit perfectly onto the boots that will be used. Attention! It is ad-
visable to check the compatibility and proper fitting of the crampons indoors before
using them outdoors. Attention! The Flex models are equipped with an adjustment
bar, ideal for use with boots with a semi-rigid sole. Attention! Please make sure
that the adjustment bars that come standard on the Snow Flex model are always
correctly equipped with anti-wear buckles. (Fig. 13). Adjusting the crampons is
a two-stage process: the first is to the broad size range 36÷43 or 42÷47 (mac-
ro-adjustment), the second is the adjustment inside on of these broad size ranges
(size adjustment). Attention! Some views are simplified for a better understanding.
6.1 - Macro-adjustment. There are two macro-adjustment systems:
• screw system (Ice): push the adjustment bar forwards, insert the shortening screw
into the square hole in the bar and screw on the auto-locking nut. Pull the bar rear-
wards until the shortening screw fits into the front half of the crampon. To return to
size range 42÷47 remove the shortening screw.
• rapid system (Hyper Spike model): push the adjusting bar forwards lifting it slight-
ly until it surmounts the intermediate crosspiece of the front body. Insert the notches
of the bar into the crossbar. Pull back the adjusting bar until the end of it engages
the crossbar (Fig. 4.3). To return to the size range 42÷47, repeat the indicated
operations in reverse.
• rapid system (Lycan, Nuptse Evo models): push the adjustment bar forwards,
lifting it slightly until its end overcomes, with its end part, the intermediate cross-
piece
of the front body. Pull back the adjusting bar until the end of it engages
the crossbar (Fig. 4.5). To return to the size range 42÷47, repeat the indicated
operations in reverse.
6.2 - Size adjustment. There are two size adjustment systems:
• single lever system (Ice, Nevis Flex, Snow Flex): lift the lever with your fingers and
move the bar to the desired position. Release the lever making sure that the locking
pin is correctly inserted into the hole of the bar (Fig. 4.1).
• double lever system (Hyper Spike, Lycan, Nuptse Evo): lift the command lever
so as to be able to lift the main lever and adjust the bar to the desired position.
Then release the command lever making sure that that the locking pin is correctly
inserted into the hole of the bar (Fig. 4.2). Important! The bar should not protrude
more than 10 mm (Fig. 4.6). Important! Check the fit of the rear crampon half to
the heel of the boot (Fig. 4.4-4.5).
6.3 - Additional adjustment. For larger boots (size 44÷50) you can buy a longer
adjustment bar (LONG BAR / LONG FLEX BAR, LONG FLEX BAR-B), except for
the Nevis Flex and Snow Flex models that are sold with two adjustment bars of
different lengths (a short one for EU sizes 34÷41 and a long one for EU sizes
40÷47). For all crampons with SEMIAUTOMATIC or AUTOMATIC bindings ad-
just the height of the heel lever by loosening and then retightening the adjustment
screws, so that when it is snapped on the heel lever stays firmly in position (Fig.
4.7). For only the models Hyper Spike, Lycan, Nuptse Evo and Snow Flex with
AUTOMATIC bindings is it possible to adjust how much the front points stick out
by modifying which of the holes in the front half of the crampon the toe bail wire
is inserted into (Fig. 7).
6.4 - Fitting to the boot. For all models there is a right foot and a left foot crampon
and they cannot be fitted to the other boot. Check the curve of the adjustment
bar and the binding strap with buckle is always on the outside of the foot (Fig.
6.1-6.2).
• CLASSIC binding (Fig. 5.1): put the toe of the boot into the toe binding; position
the heel of the boot onto the rear half of the crampon; thread the strap through the
rear binding, then through the front binding, then through the buckle and tighten
it. Remember to always pass the strap back through the second ring (Fig. 6.3).
• SEMIAUTOMATIC binding (Fig. 5.2): put the toe of the boot into the toe bind-
ing; Position the heel of the boot onto the rear half of he crampon; position the
heel lever on the rear welt of the boot and rotate it forwards until it snaps onto the
closed position; thread the strap through the front binding, then through the buckle
and tighten it. Remember to always pass the strap back through the second ring
(Fig. 6.3).
• Binding AUTOMATIC / A (mod. Hyper Spike / Lycan / Nuptse Evo - Fig. 5.3):
position the welt on the toe of the boot under the toe bail wire; position the heel of
the boot onto the rear half of he crampon; position the heel lever on the rear welt
of the boot and rotate it forwards until it snaps into the closed position; pass the
binding band around the upper part of the boot , then through the buckle and tight-
en it. Remember to always pass the strap back through the second ring (Fig. 6.3).
• Binding AUTOMATIC / B (Mod. Ice - Fig. 5.4): follow the instructions already
indicated for AUTOMATIC / A version, passing in this case the webbing binding
band through the eyelet of the tongue, connected to the front wire toe bail, as
illustrated.
• Binding AUTOMATIC / C (mod. Snow Flex - Fig. 5.5): position the welt on the
toe of the boot under the toe bail wire; position the heel of the boot onto the rear
half of he crampon; position the heel lever on the rear welt of the boot and rotate
it forwards until it snaps into the closed position; close the quick-release buckle and
pull the strap until tight.
6.5 - Test of function. After having tightened the strap, check the crampon is fitted
correctly by kicking into the ice or snow: if the boot can be moved, remove it
from the crampon and readjust the fitting of the crampon. Attention! During use
check periodically that the crampon is firmly fitted to the boot, since during use the
binding can work loose.
6.6 - Hyper Spike. The Hyper Spike model is equipped with a modular front sec-
tion, compatible with the main Hook point and with the Blade accessory point. The
Blade point, mounted to one side of laterally onto the Hook point, provides greater
stability on ice and mixed climbing. The possible combinations configurations are
shown in Fig. 9.5. Attention! The Blade accessory point must always be used
together with the main Hook point.
7) MAINTENANCE.
1) Always check before and during use that the crampons are in good condition.
2) If the crampons are very heavily loaded or you are unsure of their condition,
replace them. 3) We recommend having the crampons checked annually by a
competent person (e.g. manufacturer). 4) If the points are worn, sharpen them with
a hand file: don’t use a powered grinder since the heat generated could affect
the characteristics of the metal (steel or light alloy) and reduce holding power (Fig.
8). For Hyper Spike and Lycan models do not file back to beyond the first half of
the first tooth. Attention! Maintain the thickness of the metal or you may reduce the
point’s holding power.
8) REPLACEMENT PARTS / ACCESSORIES.
The accessories / spare parts are listed in the table (Fig. 9): antibots*; standard,
long (Long Bar model) and/or flexible (Flex Bar/Long Flex Bar models) regulation
bars*; additional tips* for the Hyper Spike model. The adjustment bars mounted
on each model, if necessary, can be replaced either with identical or compatible
bars (Fig. 9.6). In case of replacement, it is necessary to keep track of the fabrica-
tion date marked on the original bars, since it identifies the fabrication date of
the whole product. Attention! The use of the flexible adjustment regulation bars is

Climbing Technology by Aludesign S.p.A. via Torchio 22
24034 Cisano B.sco BG ITALY www.climbingtechnology.com 9/56
Member of IST31-3I770CT_rev.0 10-22
recommended with semi-rigid and/or oversized boots (over 42 size), since they
improve the comfort of use and the life span of the crampons. Attention! Spare
bars 4AST19 e 4AST20 include two anti-wear buckles that can only be used with
the Snow Flex model, never with Nevis Flex crampons. (Fig. 13). Attention! Ac-
cessories/spare parts marked with an asterisk (*) by themselves do not constitute
PPE. Attention! Before installing an accessory/replacement part, carefully read
and understand the instructions for use of the device on which it will be installed.
Attention! Before use make sure that the accessory/spare part is correctly installed.

Climbing Technology by Aludesign S.p.A. via Torchio 22
24034 Cisano B.sco BG ITALY www.climbingtechnology.com 10/56
Member of IST31-3I770CT_rev.0 10-22
ITALIANO
Le istruzioni d’uso di questo dispositivo sono costituite da un’istruzione generale e
da una specifica ed entrambe devono essere lette attentamente prima dell’utilizzo.
Attenzione! Questo foglio costituisce solo l’istruzione specifica.
ISTRUZIONI SPECIFICHE EN 893.
Questa nota contiene le informazioni necessarie per un utilizzo corretto del seguen-
te prodotto/i: ramponi per alpinismo.
1) CAMPO DI APPLICAZIONE.
EN 893. Attrezzatura per alpinismo - Ramponi. Questo prodotto, conforme al re-
golamento (UE) 2016/425, è un dispositivo di protezione individuale (D.P.I.) con-
tro gli scivolamenti su ghiaccio, neve o terreni misti a seconda della destinazione
d’uso del dispositivo. Consultare la tabella riassuntiva per verificare, a seconda del
modello, il campo di utilizzo consigliato: scialpinismo (Fig. 12.1), attraversamento
di ghiacciai (Fig. 12.2), alpinismo classico (Fig. 12.3÷12.6), alpinismo tecnico
(Fig. 12.7÷12.8), cascate di ghiaccio (Fig. 12.9). Attenzione! I ramponi in lega
leggera sono destinati unicamente alla progressione su neve: non utilizzare per la
progressione su ghiaccio o misto.
2) ORGANISMI NOTIFICATI.
Consultare la legenda nelle istruzioni generali (paragrafo 9 / tabella D): M1, M6.
3) NOMENCLATURA (Fig. 2).
Parti del rampone: Corpo anteriore (A); Corpo posteriore (B); Asta forata di rego-
lazione (C); Sistema di regolazione taglia (D); Sistema anti-zoccolo anteriore (E);
Sistema anti-zoccolo posteriore (F); Fettuccia (G); Sistema di blocco fettuccia ad
anelli (H1); Sistema di blocco con fibbia a sgancio rapido (H2); Fascia anteriore
(I); Fascia posteriore (L); Talloniera su archetto (M); Archetto (N); Fibbia anti-usura
(O). Sistemi di allacciatura: CLASSIC (Fig. 2.1) per tutti i tipi di scarponi; SEMIAU-
TOMATIC (Fig. 2.2) per scarponi con tacca di aggancio posteriore; AUTOMATIC
(Fig. 2.3) per scarponi con tacca di aggancio anteriore e posteriore.
3.1 - Materiali principali. Consultare la legenda nelle istruzioni generali (paragra-
fo 2.4): 2 (talloniera, archetti e rivetti); 7/10 (fettuccia, fascia anteriore e posterio-
re). Attenzione! I materiali di corpo (A-B) e astina (C) sono indicati in tabella (Fig.
1): 1) Acciaio legato; 2) Acciaio inox; 3) Lega leggera.
4) MARCATURA.
Numeri/lettere senza didascalia: consultare la legenda nelle istruzioni generali
(paragrafo 5). Numeri/lettere con asterisco (*): indicazione presente a seconda
del modello.
4.1 - Generale (Fig. 3). Indicazioni: 4; 6; 7; 8; 11; 13; 21*) Marchio UKCA; 30)
Numerazione astina per regolazione taglie.
4.2 - Tracciabilità (Fig. 3). Indicazioni: T3; T8; T9.
5) CONTROLLI.
Oltre ai controlli indicati di seguito rispettare quanto indicato nelle istruzioni gene-
rali (paragrafo 3).
Prima di ogni utilizzo verificare che: il sistema di regolazione della taglia si blocchi
correttamente e l’astina di regolazione scorra liberamente all’interno delle cave dei
corpi; il sistema di allacciatura funzioni correttamente; la vite di regolazione della
talloniera ruoti senza impuntamenti; gli archetti possano ruotare nei fori dei corpi;
le punte siano ben affilate (per un’eventuale affilatura vedere il paragrafo manuten-
zione). Attenzione! Durante l’utilizzo verificare regolarmente la buona regolazione
ed allacciatura dei ramponi sugli scarponi. Attenzione! Anche se i ramponi sono
provvisti di sistema anti-zoccolo è necessario essere prudenti e prestare attenzione
all’accumulo di neve sotto i ramponi: pericolo di scivolamento o caduta.
6) REGOLAZIONE E INSTALLAZIONE.
I ramponi devono adattarsi perfettamente agli scarponi che si intendono utilizzare.
Attenzione! È consigliabile verificare la compatibilità e la corretta regolazione dei
ramponi in una situazione di adeguata stabilità e calma, prima di un effettivo utiliz-
zo. Attenzione! I modelli FLEX sono provvisti di astina flessibile, ideale per l’utilizzo
con scarponi a suola semi-rigida. Attenzione! Verificare che le astine fornite di se-
rie sul modello Snow Flex siano sempre correttamente provviste di fibbie anti-usura
(Fig. 13). Esistono due livelli di regolazione dei ramponi: il primo consente il pas-
saggio tra i diversi intervalli di taglie 36÷43 e 42÷47 (macro-regolazione), l’altro
la regolazione della taglia all’interno di uno dei due intervalli (regolazione della
taglia). Attenzione! Alcune viste sono semplificate per una migliore comprensione.
6.1 - Macro-regolazione. Esistono due sistemi di macro regolazione:
• sistema a vite (modelli Ice): spingere in avanti l’astina di regolazione, inserire
la vite di accorciamento nel foro quadrato della stessa e avvitare l’apposito dado
autobloccante. Tirare l’astina di regolazione indietro sino ad agganciare la vite
di accorciamento al corpo anteriore. Per tornare all’intervallo di taglie 42÷47
togliere la vite di accorciamento.
• sistema rapido (modello Hyper Spike): spingere in avanti l’astina di regolazione
sollevandola leggermente fino a sormontare il traversino intermedio del corpo an-
teriore. Inserire le tacche dell’astina nel traversino. Tirare indietro l’astina di regola-
zione fino ad agganciare la parte terminale della stessa al traversino (Fig. 4.3). Per
tornare all’intervallo di taglie 42÷47 ripetere le operazioni indicate al contrario.
• sistema rapido (modelli Lycan, Nuptse Evo): spingere in avanti l’astina di rego-
lazione sollevandola leggermente fino a superare, con la sua parte terminale, il
traversino intermedio del corpo anteriore. Tirare indietro l’astina di regolazione fino
ad agganciare la parte terminale della stessa al traversino (Fig. 4.5). Per tornare
all’intervallo di taglie 42÷47 ripetere le operazioni indicate al contrario.
6.2 - Regolazione delle taglia. Esistono due sistemi di regolazione della taglia:
• sistema a leva singola (mod. Ice, Nevis Flex, Snow Flex): sollevare con le dita
la leva e regolare la misura dell’astina. Rilasciare infine la leva verificando che la
spina di tenuta sia ben inserita nel foro dell’astina (Fig. 4.1).
• sistema a doppia leva (mod. Hyper Spike, Lycan, Nuptse Evo): sollevare con le
dita la leva di comando in modo da alzare la leva principale e regolare quindi
la misura dell’astina. Rilasciare infine la leva di comando verificando che la spina
di tenuta sia ben inserita nel foro dell’astina (Fig. 4.2). Attenzione! La sporgenza
dell’astina rispetto al corpo non deve superare i 10 mm (Fig. 4.6). Attenzione!
Verificare la sporgenza del corpo posteriore rispetto al tacco dello scarpone (Fig.
4.4-4.5).
6.3 - Ulteriori regolazioni. Per raggiungere un intervallo di taglie superiore
(44÷50) è possibile acquistare un’astina di regolazione più lunga (mod. LONG
BAR / LONG FLEX BAR / LONG FLEX BAR-B), ad eccezione dei modelli Nevis
Flex e Snow Flex che sono già venduti con due astine (una corta per le taglie
34÷41 ed una lunga per le taglie 40÷47). Per tutti i ramponi con sistema di
allacciatura SEMIAUTOMATIC o AUTOMATIC regolare l’altezza della talloniera
agendo sulla vite di regolazione, verificando che al momento dell’aggancio la
talloniera rimanga in posizione e sia sufficientemente in tensione (Fig. 4.7). Solo
per i modelli Hyper Spike, Lycan, Nuptse Evo e Snow Flex con sistema di allac-
ciatura AUTOMATIC è possibile regolare e perfezionare la sporgenza delle punte
frontali modificando la posizione dell’archetto mediante i fori presenti nel corpo
anteriore (Fig. 7).
6.4 - Montaggio sullo scarpone. Per tutti i modelli è necessario verificare il lato
del rampone: non invertire destro con sinistro, verificare la curvatura dell’asta di
regolazione, tenere sempre all’esterno le fibbie di blocco e sblocco fettuccia (Fig.
6.1-6.2).
• Allacciatura CLASSIC (Fig. 5.1): posizionare la punta dello scarpone all’interno
della fascia anteriore; posizionare il tacco dello scarpone sul corpo posteriore;
infilare la fettuccia attraverso la fascia posteriore, quindi passarla nella fascia an-
teriore, poi nel sistema di blocco fettuccia e infine metterla in tensione. Ricordarsi
sempre di ripassare la fettuccia nel secondo anello (Fig. 6.3).
• Allacciatura SEMIAUTOMATIC (Fig. 5.2): posizionare la punta dello scarpone
all’interno della fascia anteriore; posizionare il tacco dello scarpone sul corpo
posteriore; posizionare la talloniera sulla tacca posteriore dello scarpone, quindi
far ruotare la talloniera sino a farla scattare in posizione di chiusura; infilare la
fettuccia attraverso la fascia anteriore, quindi infilarla nel sistema di blocco fettuc-
cia e metterla in tensione. Ricordarsi sempre di ripassare la fettuccia nel secondo
anello (Fig. 6.3).
• Allacciatura AUTOMATIC / A (mod. Hyper Spike / Lycan / Nuptse Evo - Fig.
5.3): posizionare la tacca della punta dello scarpone all’interno dell’archetto an-
teriore; posizionare il tacco dello scarpone sul corpo posteriore; posizionare la
talloniera sulla tacca posteriore dello scarpone, quindi far ruotare la talloniera
sino a farla scattare in posizione di chiusura; passare la fettuccia attorno alla
parte superiore dello scarpone, infilarla nel sistema di blocco fettuccia e mettere in
tensione. Ricordarsi sempre di ripassare la fettuccia nel secondo anello (Fig. 6.3).
• Allacciatura AUTOMATIC / B (Mod. Ice - Fig. 5.4): seguire la procedura indica-
ta per la versione AUTOMATIC / A, ma passare la fettuccia attraverso l’occhiolo
della linguetta collegata all’archetto anteriore, come mostrato.
• Allacciatura AUTOMATIC / C (mod. Snow Flex - Fig. 5.5): posizionare la tacca
della punta dello scarpone all’interno dell’archetto anteriore; posizionare il tacco
dello scarpone sul corpo posteriore; posizionare la talloniera sulla tacca posteriore
dello scarpone, quindi far ruotare la talloniera sino a farla scattare in posizione di
chiusura; chiudere la fibbia a sgancio rapido e tirare la fettuccia sino a metterla
in tensione.
6.5 - Test di funzionamento. Dopo aver allacciato il rampone allo scarpone verifi-
carne la corretta regolazione tirando alcuni colpi nel ghiaccio o nella neve: se lo
scarpone risultasse mobile e tendesse a muoversi, toglierlo dal rampone e verifi-
carne la regolazione. Attenzione! Durante l’utilizzo controllare periodicamente la
buona tenuta dell’allacciatura del rampone, perché a causa del continuo uso la
stessa potrebbe allentarsi.
6.6 - Hyper Spike. Il modello Hyper Spike è provvisto di corpo anteriore modulare,
compatibile con la punta principale Hook e con la punta accessoria Blade. La
punta Blade, montata lateralmente alla punta Hook, offre una maggiore stabilità su
ghiaccio e misto. Le configurazioni possibili sono rappresentate in fig. 9.5. Atten-
zione! La punta accessoria Blade deve essere sempre utilizzata in combinazione
con la punta principale Hook.
7) MANUTENZIONE.
1) Verificare sempre prima e durante l’utilizzo il buono stato dell’attrezzo. 2) Sosti-
tuire sempre l’attrezzo in caso di forti sollecitazioni o di incertezza sul buono stato
dello stesso. 3) Si raccomanda di fare controllare almeno una volta l’anno l’attrez-
zo a persone competenti (es. costruttore). 4) Qualora le punte fossero usurate, riaf-
filarle mediante l’utilizzo di una lima: non utilizzare una mola meccanica perché il
calore generato potrebbe compromettere le caratteristiche del materiale (acciaio o

Climbing Technology by Aludesign S.p.A. via Torchio 22
24034 Cisano B.sco BG ITALY www.climbingtechnology.com 11/56
Member of IST31-3I770CT_rev.0 10-22
lega leggera) e peggiorare la tenuta delle punte (Fig. 8). Per i modelli Hyper Spike
e Lycan non riaffilare le punte frontali oltre la metà del primo dente. Attenzione!
Non assottigliare lo spessore del materiale per non ridurre la tenuta delle punte.
8) PARTI DI RICAMBIO/ACCESSORI.
Gli accessori / parti di ricambio sono indicati in tabella (Fig. 9): antibotts*; astine
di regolazione* standard, lunghe (Mod. Long Bar) e/o flessibili (Mod. Flex Bar/
Long Flex Bar); punte addizionali* per modello Hyper Spike. Le astine di regola-
zione presenti su ciascun modello, in caso di necessità, possono essere sostituite
con delle astine identiche o compatibili (Fig. 9.6). In caso di sostituzione delle asti-
ne di regolazione è necessario tenere traccia della data di fabbricazione presente
sulle astine originali perché è quella che identifica la data di fabbricazione dell'in-
tero prodotto. Attenzione! Si consiglia l’utilizzo delle astine di regolazione flessibili
con scarponi a suola semi-rigida e/o di grande misura (numeri superiori a 42)
perché migliorano il comfort di utilizzo e la durata di vita dei ramponi. Attenzione!
Le astine di ricambio 4AST19 e 4AST20 includono due barrette anti-usura che
andranno utilizzato solo sul modello Snow Flex e non sul modello Nevis Flex (Fig.
13). Attenzione! Gli accessori/parti di ricambio contrassegnati con un asterisco
(*) da soli non costituiscono dei DPI. Attenzione! Prima di installare un accessorio/
parte di ricambio, leggere e comprendere le istruzioni d’uso del dispositivo sul
quale verrà installato. Attenzione! Prima dell’utilizzo verificare che l’accessorio/
parte di ricambio sia correttamente installato.

Climbing Technology by Aludesign S.p.A. via Torchio 22
24034 Cisano B.sco BG ITALY www.climbingtechnology.com 12/56
Member of IST31-3I770CT_rev.0 10-22
FRANÇAIS
Les instructions d’utilisation de ce dispositif comprennent une partie générale et
une partie spécifique, lesquelles doivent toutes les deux être lues attentivement
avant utilisation. Attention ! La présente fiche ne contient que les instructions spé-
cifiques.
INSTRUCTIONS SPÉCIFIQUES EN 893.
Cette note contient les informations nécessaires à l’utilisation correcte du produit/s
suivant/s : crampons pour alpinisme.
1) CHAMP D’APPLICATION.
EN 893. Equipement d’alpinisme - Crampons. Ce produit, conforme à la ré-
glementation (UE) 2016/425, est un équipement de protection individuel (EPI)
contre les glissements sur glace, la neige ou les terrains mixtes selon la destination
d'usage du dispositif. Consulter le tableau récapitulatif pour vérifier le domaine
d’application conseillé pour chaque modèle : ski alpinisme (Fig. 12.1), traver-
sée de glaciers (Fig. 12.2), alpinisme classique (Fig. 12.3 à12.6), alpinisme
technique (Fig. 12.7 et 12.8), cascade de glace (Fig. 12.9). Attention ! Les
crampons en alliage léger sont destinés uniquement à la progression sur neige:
ne pas les utiliser pour la progression sur glace et en mixte.
2) ORGANISMES NOTIFIÉS.
Consulter la légende dans les instructions générales (paragraphe 9/tableau D)
: M1, M6.
3) NOMENCLATURE (Fig. 2).
Parties du crampon : Bloc avant (A) ; Bloc arrière (B) ; Barrette de réglage perforée
(C) ; Système de réglage de la taille (D) ; Système antibott avant (E) ; Système
antibott arrière (F) ; Lanière (G) ; Système de blocage de la sangle par des
anneaux (H1); Système de blocage par une boucle à décrochage rapide (H2);
Fixation avant (I) ; Fixation arrière (L) ; Talonnière à fil acier (M) ; Fil acier arqué
(N); Élément anti-usure (O). Systèmes de fixation : CLASSIC (Fig. 2.1) pour tous les
types de chaussures ; SEMIAUTOMATIC (Fig. 2.2) pour chaussures avec débord
arrière ; AUTOMATIC (Fig. 2.3) pour chaussures avec débords avant et arrière.
3.1 - Matériaux principaux. Consulter la légende dans les instructions générales
(paragraphe 2.4) : 2 (talonnière, les fils et les rivets); 7/10 (la lanière et les
fixations avant et arrière).
Attention ! Les matériaux du bloc (A-B) et de la barrette (C) sont indiqués dans le
tableau (Fig. 1) : 1) Alliage d’acier; 2) Acier inoxydable; 3) Alliage léger.
4) MARQUAGE.
Chiffres/lettres sans légende : consulter la légende dans les instructions générales
(paragraphe 5). Chiffres/lettres avec astérisque (*) : indication présente selon le modèle.
4.1 - Général (Fig. 3). Indications : 4; 6; 7; 8 ; 11; 13 ; 21*) Marquage
UKCA; 30) Numération de la barrette pour le réglage de la taille.
4.2 - Traçabilité (Fig. 3). Indications : T3; T8; T9.
5) CONTROLES.
En plus des contrôles indiqués en suite, il faut respecter ce qui est indiqué dans les
instructions générales (paragraphe 3).
Avant chaque utilisation vérifier que : que le système de réglage de la taille
s’enclenche correctement et que la barrette de réglage glisse bien à l’intérieur des
deux blocs ; que le système de fixation fonctionne correctement; que les vis de
réglage de la talonnière tournent sans à-coups; que les pointes soient bien aigui-
sées (pour un éventuel affûtage, voir le paragraphe Entretien). Attention ! Durant
l’utilisation, s’assurer régulièrement du bon réglage et de la tenue des crampons
sur les chaussures. Attention ! Même si les crampons sont dotés d’un système anti-
botte, il est important de rester prudent et de faire attention à toute accumulation
de neige sous les crampons : danger de glissade ou de chute.
6) RÉGLAGE ET FIXATION.
Les crampons doivent s’adapter parfaitement aux chaussures que l’on souhaite uti-
liser. Attention ! Avant tout usage effectif, il est conseillé de vérifier la compatibilité
et le réglage correct des crampons dans une situation adaptée de stabilité et de
calme. Attention ! Les modèles FLEX sont dotés d’une barrette flexible, idéale pour
une utilisation avec des chaussures à semelle semi-rigide. Attention! Vérifier que
les barrettes de réglage fournies de série sur le modèle Snow Flex sont toujours
dotées d’un élément anti-usure (Fig. 13). Il existe deux niveaux de réglage des
crampons : le premier permet de passer d’un intervalle de tailles à l’autre, 36 à
43 et 42 à 47 (macro-réglage), le second permet d’ajuster la taille à l’intérieur
des intervalles (réglage de la taille). Attention ! Certaines vues ont été simplifiées
pour une meilleure compréhension.
6.1 - Macro-réglage. Il existe deux systèmes de macro-réglage :
• système à vis (modèles Ice) : pousser en avant la barrette de réglage, insérer la
vis de réduction dans le trou carré de cette dernière et visser l’écrou auto-bloquant
prévu à cet effet. Tirer la barrette de réglage en arrière jusqu’à ce que la vis de
réduction s’encastre dans le bloc avant. Pour revenir à l’intervalle de tailles 42-47,
enlever la vis de réduction;
• système rapide (modèle Hyper Spike) : pousser la barrette de réglage vers
l’avant en la soulevant légèrement jusqu'à ce qu'elle surmonte l’axe intermédiaire
du bloc avant. Insérer la tête de la barrette dans l’encoche de l’axe du bloc avant.
Tirer la barrette de réglage en arrière jusqu’à ce que sa partie terminale s’encastre
dans l’axe du bloc avant (Fig. 4.3). Pour revenir à l’intervalle de tailles 42÷47,
répéter les opérations indiquées en sens contraire.
• système rapide (modèles Lycan / Nuptse Evo) : pousser la barrette de réglage
vers l’avant en la soulevant légèrement jusqu'à ce qu'elle dépasse, avec sa par-
tie terminale, l’axe intermédiaire du bloc avant. Tirer la barrette de réglage an
arrière jusqu’à ce qu’elle s’y encastre (Fig. 4.5). Pour revenir à l’intervalle de tailles
42÷47, répéter les opérations indiquées en sens contraire.
6.2 - Réglage de la taille. Il existe deux systèmes de réglage de la taille : •
système à languette simple (modèles Ice, Nevis Flex, Snow Flex) : soulever la
languette avec les doigts et régler la longueur de la barrette. Relâcher la languette
en s’assurant que le picot de maintien soit bien inséré dans le trou de la barrette
(Fig. 4.1); • système à double languette (modèles Hyper Spike, Lycan, Nuptse
Evo) : tirer sur la languette de commande avec les doigts de manière à soulever la
languette principale et régler ainsi la longueur de la barrette. Relâcher la languette
de commande en s’assurant que le picot de maintien soit bien inséré dans le trou
de la barrette (Fig. 4.2). Attention ! La barrette ne doit pas sortir de plus de 10
mm par rapport au corps du crampon (Fig 4.6). Attention ! Contrôler la position
du bloc arrière du crampon par rapport au talon de la chaussure (Fig. 4.4-4.5).
6.3 - Autres réglages. Pour atteindre un intervalle de tailles supérieur (44-50),
il est possible d’acquérir une barrette de réglage plus longue (modèles LONG
BAR / LONG FLEX BAR / LONG FLEX BAR-B), sauf pour les modèles Nevis Flex
et Snow Flex qui sont déjà vendus avec deux barrettes de réglage (une courte
pour les pointures 34-41 et une longue pour les pointures 40-47). Pour tous les
crampons avec système de fixation SEMIAUTOMATIC ou AUTOMATIC, ajuster
la hauteur de la talonnière en agissant sur la vis de réglage puis, au moment de
la fixation, s’assurer que la talonnière reste en position et est suffisamment tendue
(Fig. 4.7). Uniquement pour les modèles Hyper Spike, Lycan, Nuptse Evo et Snow
Flex avec système de fixation AUTOMATIC, il est possible d’ajuster et d’améliorer
la position des pointes frontales en modifiant la position du fil acier grâce aux
trous présents sur le bloc avant (Fig. 7).
6.4 - Fixation sur la chaussure. Pour tous les modèles il est nécessaire de contrôler
le côté des crampons : ne pas intervertir droite et gauche, vérifier la courbure de
la barrette de réglage et toujours garder les boucles de blocage et de déblocage
de la lanière à l’extérieur (Fig. 6.1-6.2).
• Fixation CLASSIC (Fig. 5.1) : positionner la pointe de la chaussure à l’intérieur
de la fixation avant ; positionner le talon de la chaussure sur le bloc arrière ; enfiler
la lanière dans la fixation arrière, la faire ensuite passer dans la fixation avant puis
dans la boucle de blocage de la lanière et la mettre en tension. Ne pas oublier
de repasser la lanière dans le second anneau (Fig. 6.3).
• Fixation SEMIAUTOMATIC (Fig. 5.2) : positionner la pointe de la chaussure
à l’intérieur de la fixation avant ; positionner le talon de la chaussure sur le bloc
arrière ; positionner la talonnière sur le débord arrière de la chaussure puis faire
basculer la talonnière jusqu’au passage en position fermée ; enfiler la lanière dans
la fixation avant, puis la faire passer dans la boucle de blocage de la lanière
et la mettre en tension. Ne pas oublier de repasser la lanière dans le second
anneau (Fig. 6.3).
• Fixation AUTOMATIC / A (modèles Hyper Spike / Lycan / Nuptse Evo - Fig.
5.3) : positionner le débord avant de la chaussure à l’intérieur du fil acier avant
; positionner le talon de la chaussure sur le bloc arrière ; positionner la talonnière
sur le débord arrière de la chaussure puis faire basculer la talonnière jusqu’au
passage en position fermée ; passer la lanière autour de la partie supérieure de
la chaussure, puis la faire passer dans la boucle de blocage de la lanière et la
mettre en tension. Ne pas oublier de repasser la lanière dans le second anneau
(Fig. 6.3).
• Fixation AUTOMATIC / B (Modèles Ice - Fig. 5.4) : suivre la procédure indi-
quée pour la version AUTOMATIC / A, mais passer la lanière par l’œillet de la
languette attachée au fil acier arqué antérieur (comme indiqué).
• Fixation AUTOMATIC / C (modèles Snow Flex - Fig. 5.5) : positionner le
débord avant de la chaussure à l’intérieur du fil acier avant ; positionner le talon
de la chaussure sur le bloc arrière ; positionner la talonnière sur le débord arrière
de la chaussure puis faire basculer la talonnière jusqu’au passage en position
fermée ; fermer la boucle à décrochage rapide et tirer sur la sangle jusqu’à ce
qu’elle soit en tension.
6.5 - Test de fonctionnement. Une fois le crampon fixé sur la chaussure, vérifier
que le réglage soit correct en donnant quelques coups de pied dans la glace ou
la neige : si la chaussure est mobile ou a tendance à bouger, détacher le crampon
et ajuster le réglage. Attention ! Durant l’utilisation, contrôler de temps en temps
la bonne tenue de la fixation du crampon car, en raison de l’usage continu, elle
pourrait se desserrer.
6.6 - Hyper Spike. Le modèle Hyper Spike est doté d’une partie avant modu-
lable, compatible avec la pointe principale Hook et la pointe accessoire Blade.
La pointe Blade, montée latéralement à la pointe Hook, offre une plus grande
stabilité en glace et en mixte. Les configurations possibles sont représentée sur
la fig. 9.5. Attention ! La pointe accessoire Blade doit toujours être utilisée en
combinaison avec la pointe principale Hook.
7) ENTRETIEN.
1) Toujours contrôler avant et durant l’utilisation le bon état de l’équipement. 2)

Climbing Technology by Aludesign S.p.A. via Torchio 22
24034 Cisano B.sco BG ITALY www.climbingtechnology.com 13/56
Member of IST31-3I770CT_rev.0 10-22
Toujours renouveler l’équipement en cas de fortes sollicitations ou d’incertitude
sur son état. 3) Il est recommandé de faire contrôler au moins une fois par an
l’équipement à une personne compétente (ex. fabricant). 4) Si les pointes sont
émoussées, les affûter à l’aide d’une lime : ne pas utiliser une meule mécanique
car la chaleur générée pourrait altérer les caractéristiques du matériel (acier ou
alliage léger) et réduire la tenue des pointes (Fig. 8). Pour les modèles Hyper
Spike et Lycan ne pas affûter les pointes frontales au-delà de la moitié de la
première dent. Attention ! Ne pas réduire l’épaisseur du matériel afin de ne pas
diminuer la tenue des pointes.
8) PIÈCES DE RECHANGE/ACCESSOIRES.
Les accessoires / pièces de rechange sont indiqués dans le tableau (Fig. 9) :
antibotts* ; barrettes de réglage* standard, longues (Modèle Long Bar) et/ou
flexibles (Modèles Flex Bar/Long Flex Bar) ; pointes additionnelles* pour le mo-
dèle Hyper Spike. Les barrettes de réglage installées sur chaque modèle peuvent,
s’il est nécessaire, être remplacées avec des barrettes égales ou compatibles (Fig.
9.6). En cas de remplacement, il faut conserver trace de la date de fabrication
indiquée sur les barrettes originales, parce que c’est celui-là qu’identifie la date de
fabrication du produit entier. Attention! Il est recommandé d’utiliser des barrettes
de réglage flexibles avec des chaussures semi-rigides et / ou surdimensionnées
(numéros supérieurs à 42), car elles améliorent le confort d’utilisation et la durée
de vie des crampons. Attention! Les barrettes de réglage de rechange 4AST19
et 4AST20 incluent deux éléments anti-usure utilisables uniquement sur le modèle
Snow Flex et non sur le modèle Nevis Flex (Fig. 13). Attention ! Les accessoires/
pièces de rechange marqués d’un astérisque (*) ne constituent pas en eux-mêmes
un EPI. Attention ! Avant d’installer un accessoire/une pièce de rechange, lisez
et comprenez les instructions d’utilisation du dispositif sur lequel il sera installé.
Attention ! Avant utilisation, vérifiez que l’accessoire/la pièce de rechange est
correctement installé.

Climbing Technology by Aludesign S.p.A. via Torchio 22
24034 Cisano B.sco BG ITALY www.climbingtechnology.com 14/56
Member of IST31-3I770CT_rev.0 10-22
DEUTSCH
Die Gebrauchsanweisung zu diesem Produkt setzt sich aus einem allgemeinen
und einem spezifischen Teil zusammen, wobei beide Teile vor der Verwendung
des Produkts genau durchgelesen werden müssen. Achtung! Dieses Blatt enthält
nur den allgemeinen Teil der Anleitung.
SPEZIFISCHE ANWEISUNGEN EN 893.
Diese Anmerkung enthalt die notwendige Informationen für einen korrekten
Gebrauch des folgenden Produktes/e: Steigeisen für Alpinismus.
1) ANWENDUNGSBEREICH.
EN 893. Ausrüstung für Alpinismus – Steigeisen. Dieses Produkt gehört gemäß
der Verordnung (EU) 2016/425 zur persönlichen Schutzausrüstung (P.S.A.),
die gegen Ausrutscher auf Eis, Schnee oder in gemischtem Gelände schützt, je
nach Verwendungszweck des Geräts. Die zusammenfassende Tabelle für das
empfohlene Anwendungsfeld je nach verschiedenem Modell prüfen: Skitouring
(Abb. 12.1), Gletscherüberquerungen (Abb. 12.2), klassischer Alpinismus (Abb.
12.3÷12.6), technisches Bergsteigen (Abb. 12.7÷12.8), Eisfälle (Abb. 12.9).
Achtung! Die Steigeisen aus Leichtmetall dienen einzig der Fortbewegung im
Schnee; nicht für eisiges oder gemischtes Gelände verwenden.
2) BENANNTEN STELLEN.
Die Legende in der allgemeine Gebrauchsanweisungen lesen (Absatz 9 / Tabelle
D): M1, M6.
3) NOMENKLATUR (Abb. 2).
Teile des Steigeisens: Vordere Komponente (A); Hintere Komponente (B); Verbin-
dungssteg mit Einstelllöchern (C); Vorrichtung zur Größeneinstellung (D); Vordere
Antistollplatte (E); Hintere Antistollplatte (F); Riemen (G); Klemmsystem für Riemen
mit Ringen (H1); Sperrsystem mit Schnalle mit schnell öffnendem Clip (H2); Zehen-
bindung (I); Fersenbindung (L); Fersenhebel auf Fersenbügel (M); Zehenbügel (N);
Schnalle gegen Verschleiß. (O). Bindungssysteme: CLASSIC (Abb. 2.1) eignet
sich für alle Schuhtypen; SEMIAUTOMATIC (Abb. 2.2) für Schuhe mit Sohlenrand
hinten; AUTOMATIC (Abb. 2.3) für Schuhe mit Sohlenrand hinten und vorne.
3.1 - Wesentlicen Materialien. Die Legende in der allgemeine Gebrauchsan-
weisunge0n lesen (Absatz 2.4): 2 (Fersenhebel, Bügel und Nietnägel); 7/10
(Riemenband, vorderes und hinteres Band). Achtung! Die Materialien des Körpers
(A-B) und der Stange (C) werden in der Tabelle angeführt (Abb. 1): 1) legierter
Stahl; 2) rostfreier Edelstahl; 3) Aluminiumlegierung.
4) MARKIERUNG.
Zahlen / Buchstaben ohne Bildunterschriften: die Legende in der allgemeine Ge-
brauchsanweisungen lesen (Absatz 5). Zahlen / Buchstaben mit Sternchen (*):
vorhandene Angabe nach dem Modell.
4.1 - Allgemeine (Abb. 3). Angaben: 4; 6; 7; 8; 11; 13; 21*) Marke UKCA;
30) Nummerierung des Verbindungsstegs zur Größeneinstellung.
4.2 - Rückverfolgbarkeit (Abb. 3). Angaben: T3; T8; T9.
5) KONTROLLEN.
Zusätzlich zu den nachstehenden gemeldeten Kontrollen, man muss die Anmerkun-
gen beschreibt in der allgemeine Gebrauchsanweisungen beachten (Absatz 3).
Vor jeder Benutzung muss überprüft werden: die Vorrichtung zur Größeneinstellung
korrekt einschnappt und der Verbindungssteg flüssig in die Komponentenschie-
nen läuft; das Bindungssystem korrekt funktioniert; die Regulierungsschraube des
Fersenhebels nicht stockt; die Bügel in den Komponentenlöchern gut drehe; die
Zacken geschärft sind (für den Schleifvorgang den Absatz zur Pflege lesen). Ach-
tung! Während des Gebrauchs regelmäßig eine optimale Regulierung und Bin-
dung der Steigeisen am Schuh kontrollieren. Achtung! Auch wenn die Steigeisen
mit einem Antistollplatten-System ausgestattet sind, ist notwendigerweise Vorsicht
geboten und man sollte auf die Schneeansammlungen unter dem Steigeisen ach-
ten: Es besteht Rutsch- oder Sturzgefahr.
6) REGULIERUNG UND ANPASSUNG.
Das Steigeisen muss sich perfekt an den Schuh anpassen, der verwendet werden
soll. Achtung! Vor dem Gebrauch sollten Kompatibilität und korrekte Anpassung
der Steigeisen bereits in ruhigem und stabilem Umfeld getestet worden sein. Ach-
tung! Die Modelle FLEX sind mit einem flexiblen Stäbchen ausgestattet, ideal für
Schuhe mit einer halbstarren Sohle. Achtung! Überprüfen, dass die serienmäßig
gelieferten Einstellstäbe des Modells Snow Flex stets korrekt mit den Schnallen
gegen Verschleiß ausgestattet sind (Fig. 13). Es gibt zwei Regulierungsmöglich-
keiten: eine erlaubt das Einstellen der Schuhgrößeneinheit 36÷43 oder 42÷47
(Makro-Regulierung), die andere das Einstellen der Größe innerhalb einer der bei-
den Einheiten (Regulierung der exakten Schuhgröße). Achtung! Einige Ansichten
wurden sie vereinfacht, um einen besseren Verständnis zu geben.
6.1 - Makro-Regulierung. Es gibt zwei Makro-Regulierungssysteme:
• Schraubsystem (Modelle Ice): den Verbindungssteg nach vorne schieben, die
Verkürzungsschraube in das quadratische Loch einfügen und die selbstblockieren-
de Mutter festschrauben. Den Verbindungssteg nach hinten ziehen, bis sich die
Verkürzungsschraube an der vorderen Komponente verhakt. Um wieder auf die
Größeneinheit 42÷47 zurückzukehren, die Verkürzungsschraube entfernen.
• Schnelles Einstellsystem (Modell Hyper Spike): Die Einstellstange nach vorne
schieben, dazu muss sie leicht angehoben werden, bis sie den mittleren Querträ-
ger des vorderen Steigeisenteils überragt. Die Kerben der Stange in das Quer-
stück einrasten lassen. Die Einstellstange zurückziehen, bis das Ende der Stange
an der Querstange eingehakt ist (Abb. 4.3). Um wieder auf die Größen 42 ÷ 47
zu erweitern, die angegebenen Schritte in umgekehrter Reihenfolge wiederholen.
• Schnelles Einstellsystem (Modell Lycan und Nuptse Evo): Die Einstellstange nach
vorne schieben, dazu muss sie leicht angehoben werden, bis sie mit ihrem Endteil
den mittleren Querträger des vorderen Steigeisenteils überragt. Die Einstellstange
zurückziehen, bis das Ende der Stange am Querträger eingehakt ist (Abb. 4.5).
Um wieder auf die Größen 42 ÷ 47 zu erweitern, die angegebenen Schritte in
umgekehrter Reihenfolge wiederholen.
6.2 - Einstellung der Schuhgröße.
Es gibt zwei Systeme zur Einstellung der Schuhgröße:
• Einzelhebel-System (Mod. Ice, Nevis Flex, Snow Flex): den Hebel mit den
Fingern hochziehen und die Größe am Verbindungssteg regulieren. Anschließend
den Hebel loslassen und prüfen, dass der Haltestift korrekt in das Loch des Stegs
eingesetzt wurde (Abb. 4.1).
• Doppelhebel-System (Mod. Hyper Spike, Lycan, Nuptse Evo): mit den Fingern
den Oberhebel anheben und somit den Haupthebel hochziehen und anschlie-
ßend die Größe am Steg regulieren. Den Oberhebel loslassen und prüfen, dass
der Haltestift korrekt in das Loch des Stegs eingesetzt wurde (Fig. 4.2). Achtung!
Der Steg darf nicht mehr als 10 mm über die Komponente hinausragen (Abb.
4.6). Achtung! Stets das Übereinstimmen der hinteren Komponente mit dem Schu-
habsatz prüfen (Abb. 4.4 und 4.5).
6.3 - Weitere Einstellungen. Für die Regulierung von Übergrößen (44÷50), gibt
es einen längeren Verbindungssteg (Mod. LONG BAR / LONG FLEX BAR /
LONG FLEX BAR-B), mit Ausnahme der Modelle Nevis Flex und Snow Flex, wel-
che bereits mit zwei Stegen verkauft werden (ein kurzer für die Größen 34÷41
und ein langer für die Größen 40÷47). Bei allen Steigeisen des Bindungssystems
SEMIAUTOMATIC oder AUTOMATIC muss die Höhe des Fersenhebels mithilfe
der Regulierungsschraube eingestellt werden. Der Fersenhebel muss während des
Anschnallens in Position bleiben und ausreichend unter Spannung stehen. (Abb.
4.7). Nur die Modelle Hyper Spike, Lycan, Nuptse Evo und Snow Flex mit dem
AUTOMATIC-Bindungssystem ermöglichen ein Einstellen und Perfektionieren des
Herausragens der Zacken, indem man die Bügelposition durch die zusätzlichen
Löcher an der vorderen Komponente verändert (Abb. 7).
6.4 - Befestigung am Schuh. Für alle Steigeisenmodelle gilt es, die richtige
Ausrichtung zu beachten: links und rechts dürfen nicht verkehrt befestigt werden,
man beachte die Biegung des Verbindungsstegs, die Verschlussschnallen des
Riemens müssen sich immer außen befinden (Abb. 6.1-6.2).
• Bindung CLASSIC (Abb. 5.1): die Schuhspitze in die vordere Bindung stellen;
die Ferse auf die hintere Komponente stellen; den Riemen durch die hintere Bin-
dung fädeln und dann durch die Vordere. Anschließend in die Verschlussschnalle
einfügen und gut anziehen. Der Riemen muss immer noch mal durch den zweiten
Ring (Abb. 6.3).
• Bindung SEMIAUTOMATIC (Abb. 5.2): die Schuhspitze in die vordere Bindung
stellen; die Ferse auf die hintere Komponente stellen; den Fersenbügel mit dem
Fersenhebel auf die hintere Schuhleiste positionieren, den Hebel in die Verschluss-
position einrasten lassen; den Riemen durch die vordere Bindung fädeln und dann
durch die Hintere. Anschließend in die Verschlussschnalle fädeln, durchziehen
und gut anziehen. Der Riemen muss immer noch mal durch den zweiten Ring
(Abb. 6.3).
• Bindung AUTOMATIC / A (mod. Hyper Spike / Lycan / Nuptse Evo - Abb.
5.3): die vordere Schuhleiste in den Zehenbügel stellen; die Ferse auf die hintere
Komponente stellen; den Fersenbügel mit dem Entriegelungshebel auf die hintere
Schuhleiste positionieren, den Riemen rund um die untere Teile des Schuhes einle-
gen; den Riemen durch die Öse des Zehenbügels fädeln (falls vorhanden), dann
in die Verschlussschnalle und anziehen. Der Riemen muss immer noch mal durch
den zweiten Ring (Abb. 6.3).
• Bindung AUTOMATIC / B (Mod. Ice - Abb. 5.4): das Verfahren, das für das
AUTOMATIC Modell angezeigt ist, befolgen, aber den Riemen durch die Öse
der Zunge, die mit dem unteren Zehenbügel verbunden ist, fädeln (wie gezeigt).
• Bindung AUTOMATIC / C (mod. Snow Flex - Fig. 5.5): die vordere Schuhleiste
in den Zehenbügel stellen; die Ferse auf die hintere Komponente stellen; den
Fersenbügel mit dem Entriegelungshebel auf die hintere Schuhleiste positionieren,
den Riemen rund um die untere Teile des Schuhes einlegen; die Schnalle mit
schnell öffnendem Clip schließen und zum Anspannen am Riemen ziehen.
6.5 - Arbeitsweisetest. Nach der Befestigung des Steigeisens einige Male ins Eis
oder in den Schnee treten und den korrekten Sitz prüfen: Sollte der Schuh locker
sitzen, noch mal ausbinden und das Steigeisen richtig einstellen. Achtung! Wäh-
rend des Gebrauchs periodisch die Bindungen prüfen, Sie könnten sich durch die
kontinuierliche Belastung lockern.
6.6 - Hyper Spike. Das Modell Hyper Spike ist mit einem modularen Vorderteil
ausgestattet, kompatibel mit dem Hauptzacken Hook und dem Zubehör-Zacken
Blade. Der Zacken Blade, der seitlich neben dem Hook befestigt wird, bietet mehr
Stabilität im Eis und in gemischtem Gelände. Die verschiedenen Konfigurationen
werden in Abb. 9.5 dargestellt. Achtung! Der Zubehör-Zacken Blade muss in
Kombination mit dem Hauptzacken Hook verwendet werden.

Climbing Technology by Aludesign S.p.A. via Torchio 22
24034 Cisano B.sco BG ITALY www.climbingtechnology.com 15/56
Member of IST31-3I770CT_rev.0 10-22
7) PFLEGE.
1) Vor und während des Gebrauchs immer den Zustand des Produkts prüfen. 2)
Im Falle starker Belastungen oder bei Zweifel hinsichtlich des Zustands ersetzen. 3)
Wir empfehlen das Produkt mindestens einmal im Jahr von Fachpersonal (z.B. Her-
steller) begutachten zu lassen. 4) Sollten die Zacken abgenutzt sein, nur mit Hilfe
einer Feile schärfen. Die von einer Schleifmaschine erzeugte Hitze könnte die
Eigenschaften des Materials beinträchtigen (Stahl oder Leichtmetall) und den Halt
der Zacken vermindern (Abb. 8). Für die Modelle Hyper Spike und Lycan dürfen
die Vorderzacken nicht über die Hälfte des ersten Zackens geschärft werden. Ach-
tung! Um den Halt der Zacken nicht zu beinträchtigen, darf die Materialdichte
nicht verringert werden.
8) ERSATZTEILE/ZUBEHÖR.
Das Zubehör / die Ersatzteile werden in der Tabelle angeführt (Abb.9): Antis-
tollplatten *; lange Standardeinstellstäbchen * (Mod. Long Bar) und/oder die
flexible Version (Mod. Flex Bar/Long Flex Bar); Zusatzzacken * für das Modell
Hyper Spike. Die bei jedem Modell vorhandenen Einstellstäbe können bei Bedarf
durch identische oder kompatible Stegen ersetzt werden (Abb. 9.6). Im Falle
eines Austauschs der Einstellstäbe muss das auf die Originalstege vorhandene
Herstellungsdatum nachverfolgt werden, da es das Herstellungsdatum des gesam-
ten Produkts angibt. Achtung! Wir empfehlen den Einsatz flexibler Standardein-
stellstäbchen mit halbstarren und / oder übergroßen Stiefeln (über 42), da sie
den Bedienkomfort und die Lebensdauer der Steigeisen verbessern. Achtung! Die
Ersatzstäbe 4AST19 und 4AST20 beinhalten zwei Schnallen gegen Verschleiß,
die nur für das Modell Snow Flex und nicht für das Modell Nevis Flex verwendet
werden können (Fig. 13). Achtung! Mit einem Sternchen (*) gekennzeichnete
Zubehörteile/Ersatzteile sind keine PSA. Achtung! Lesen und verstehen Sie vor
dem Installieren eines Zubehörteils/Ersatzteils die Gebrauchsanweisung des Ge-
räts, auf dem es installiert werden soll. Achtung! Vergewissern Sie sich vor dem
Gebrauch, dass das Zubehör/Ersatzteil korrekt installiert ist.

Climbing Technology by Aludesign S.p.A. via Torchio 22
24034 Cisano B.sco BG ITALY www.climbingtechnology.com 16/56
Member of IST31-3I770CT_rev.0 10-22
ESPAÑOL
Las instrucciones de uso de este dispositivo están constituidas por una parte
general y una específica, ambas deben leerse cuidadosamente antes del uso.
¡Atención! Este folio presenta sólo las instrucciones específicas.
INSTRUCCIONES ESPECÍFICAS EN 893.
Esta anotación incluye las informaciónes necesarias para el uso correcto del
siguiente producto/s: crampones para alpinismo.
1) ÁMBITO DE APLICACIÓN.
EN 893. Equipos de alpinismo - Crampones. Este producto, respeta el regla-
mento (UE) 2016/425, es un dispositivo de protección individual (D.P.I.) para
evitar resbalones sobre el hielo, nieve o terrenos mixtos dependiendo del tipo de
utilización. Consultar el recuadro riepilogativo para verificar, según el modelo,
el tipo de utilización aconsejado: esquí de montaña (Fig. 12.1), travesías en
glaciares (Fig. 12.2), alpinismo clásico (Fig. 12.3÷12.6), alpinismo técnico (Fig.
12.7÷12.8), cascadas de hielo (Fig. 12.9). ¡Atención! Los crampones de alea-
ción ligera están únicamente destinados a la progresión sobre nieve: no utilizar
para la progresión en hielo o mixto.
2) ORGANISMOS NOTIFICADOS.
Consulten la leyenda en las instrucciones generales (sección 9 / tabla D): M1,
M6.
3) NOMENCLATURA (Fig. 2).
Partes del crampón: Cuerpo delantero (A); Cuerpo trasero (B); Hoja de ensambla-
je de ajuste (C); Sistema de ajuste de la talla (D); Sistema anti-boot delantero (E);
Sistema anti-boot posterior (F); Cinta (G); Sistema de cierre de la cinta con hebilla
de anillas (H1); Sistema de cierre con hebilla de enganche rápido (H2); Banda
delantera (I); Banda trasera (L); Talonera en arco (M); Arco (N); Trabilla anti-des-
gaste (O). Sistemas de abrochadura: CLASSIC (Fig. 2.1) para todos los tipos de
botas; SEMIAUTOMATIC (Fig. 2.2) para botas con regleta de enganche trasero;
AUTOMATIC (Fig. 2.3) para botas con regleta de enganche delantero y trasero.
3.1 - Materiales principales. Consulten la leyenda en las instrucciones generales
(sección 2.4): 2 (talonera, arcos y remaches); 7/10 (cinta, banda anterior y
posterior). ¡Atención! Los materiales de cuerpo (A-B) y barra (C) están indicados
en la tabla (Fig. 1): 1) acero aleado; 2) acero inoxidable; 3) aleación ligera.
4) MARCADO.
Números/letras sin título: consulten la leyenda en las instrucciones generales (pá-
rrafo 5). Números/letras con asterisco (*): indicación presente según el modelo.
4.1 - General (Fig. 3). Indicaciones: 4; 6; 7; 8; 11; 13; 21*) Marca UKCA; 30)
Numeración de la varilla para ajustar las tallas.
4.2 - Trazabilidad (Fig. 3). Indicaciones: T3; T8; T9.
5) CONTROLES.
Además de las inspecciones siguientes, respetar lo que es indicado en las instruc-
ciones generales (paragrafo 3).
Antes de cada utilización comprobar que: el sistema de ajuste de la talla se
bloquee correctamente y la varilla de regulación se deslice fácilmente en el in-
terior de los huecos de los cuerpos; el sistema de cierre funcione correctamente;
el tornillo de ajuste de la talonera gire sin interferencias; los arcos puedan girar
dentro de los agujeros de los cuerpos; las puntas estén bien afiladas (si es ne-
cesario afilar, véase el apartado de mantenimiento). ¡Atención! Durante el uso,
compruebe debidamente el buen ajuste y cierre de los crampones de las botas.
¡Atención! Aunque los crampones están equipados con sistema antizueco, es
necesario tener cuidado y prestar atención que no haya acumulación de nieve
bajo los crampones: peligro de resbalarse o caerse.
6) AJUSTE E INSTALACIÓN.
Los crampones deben adaptarse correctamente a las botas que se quiere utilizar.
¡Atención! Es aconsejable comprobar la compatibilidad y el correcto ajuste de
los crampones en una situación de adecuada estabilidad y calma, antes de un
uso efectivo. ¡Atención! Los modelos FLEX están equipados con una barra [de
regulación] flexible, ideal para botas con suelas semi-rígidas. ¡Atención! Com-
probar que las barras de regulación que son estándares en el modelo Snow Flex
sean siempre correctamente provistas de trabillas anti-desgaste (Fig. 13). Existen
dos niveles de ajuste de los crampones: el primeo permite el pasaje entre los
distintos intervalos de tallas 36÷43 y 42÷47 (macro-ajuste), el otro, el ajuste de
la talla dentro de uno de los dos intervalos (ajuste de talla). ¡Atención! Algunas
vistas se han simplificado para una mejor comprensión.
6.1 - Macro-ajuste. Existen dos sistemas de macro-ajuste:
• sistema de rosca (modelos Ice): presione hacia adelante la varilla de regula-
ción, introduzca el tornillo de acortamiento en el agujero cuadrado de la misma
y enrosque la tuerca apropiada de auto bloqueo. Ajuste la varilla de regulación
hacia dentro hasta enganchar el tornillo de acortamiento al cuerpo delantero.
Para volver al intervalo de tallas 42÷47 retire el tornillo de acortamiento.
• sistema rápido (modelos Hyper Spike): empujar hacia adelante la palanca
del sistema de regulación levantándola ligeramente hasta sobrepasar la traviesa
intermedia del bloque delantero. Insertar los tacos del sistema de regulación en la
traviesa. Tirar hacia atrás de la palanca de regulación hasta que la parte terminal
de ésta quede enganchada a la traviesa (Fig. 4.3). Para retomar el intervalo de
tallas 42÷47 repertir al contrario la operación anterior.
• sistema rápido (modelos Lycan / Nuptse Evo): empujar hacia adelante la
palanca del sistema de regulación levantándola ligeramente hasta sobrepasar
la traviesa intermedia del bloque delantero. Tirar hacia atrás de la palanca de
regulación hasta que la parte terminal de ésta quede enganchada a la traviesa
(Fig. 4.5). Para retomar el intervalo de tallas 42÷47 repertir al contrario la ope-
ración anterior.
6.2 - Ajuste de tallas. Existen dos sistemas de ajuste de tallas:
• sistema de palanca individual (mod. Ice, Nevis Flex, Snow Flex): levante con
los dedos la palanca y regule la medida de la varilla. Libere por último la palan-
ca comprobando que la clavija de juntas esté bien introducida en el agujero de
la varilla (Fig. 4.1).
• sistema de doble palanca (mod. Hyper Spike, Lycan, Nuptse Evo): levante con
los dedos la palanca de mando de modo que se levante la palanca principal y
luego regule la medida de la varilla. Libere por último la palanca comprobando
que la clavija de juntas esté bien introducida en el agujero de la varilla (Fig. 4.2).
¡Atención! El saliente de la varilla respecto al cuerpo no debe superar los 10 mm
(Fig. 4.6). ¡Atención! Compruebe el saliente del cuerpo trasero respecto al tacón
de la bota (Fig. 4.4 e 4.5).
6.3 - Otros ajustes. Para alcanzar un intervalo de tallas superior (44÷50) se
puede comprar una varilla de ajuste más larga (mod. LONG BAR / LONG
FLEX BAR / LONG FLEX BAR-B), con la excepción de los modelos Nevis Flex y
Snow Flex que ya se venden con dos barras de regulación (una corta para las
tallas 34÷41 y una larga para las tallas 40÷47). Para todos los crampones con
sistema de cierre SEMIAUTOMATIC o AUTOMATIC ajuste la altura de la talonera
manipulando los tornillos de ajuste, comprobando que al momento del cierre la
talonera permanezca en su posición y esté lo suficientemente tensa (Fig. 4.7).
Sólo para los modelos Hyper Spike, Lycan, Nuptse Evo y Snow Flex con sistema
de cierre AUTOMATIC es posible ajustar y perfeccionar el saliente de las puntas
frontales modificando la colocación del arco mediante los agujeros presentes en
el cuerpo delantero (Fig. 7).
6.4 - Montaje en la bota. Para todos los modelos es necesario comprobar el lado
del crampón: no invierta el derecho con el izquierdo, compruebe la curvatura
de la barra de ajuste, mantenga siempre hacia afuera las hebillas de bloqueo y
desbloqueo de la cinta (Fig. 6.1-6.2).
• Cierre CLASSIC (Fig. 5.1): coloque la punta de la bota dentro de la banda
delantera; coloque el tacón de la bota en el cuerpo trasero; introduzca la cinta a
través de la banda trasera, luego pásela por la banda delantera, después, por
el sistema de bloqueo de cintas y al final ténsela. Acuérdese siempre de volver a
pasar la cinta siempre por el segundo agujero (Fig. 6.3).
• Cierre SEMIAUTOMATIC (Fig. 5.2): coloque la punta de la bota dentro de la
banda delantera; coloque el tacón de la bota en el cuerpo trasero; coloque la
talonera en la regleta posterior de la bota, después gire la talonera hasta que se
dispare en posición de cierre; introduzca la cinta a través de la banda delantera,
luego pásela por la banda trasera, después, por el sistema de bloqueo de cintas
y al final ténsela. Acuérdese siempre de volver a pasar la cinta siempre por el
segundo agujero (Fig. 6.3).
• Cierre AUTOMATIC / A (mod. Hyper Spike / Lycan / Nuptse Evo - Fig. 5.3):
coloque la regleta de la punta de la bota dentro del arco anterior; coloque el
tacón de la bota en el cuerpo trasero; coloque la talonera en la regleta posterior
de la bota, a continuación gire la talonera hasta que se dispare en posición de
cierre; introduzca la cinta a través de la banda delantera, luego pásela por el
sistema de bloqueo de cintas y ténsela. Acuérdese siempre de volver a pasar la
cinta siempre por el segundo agujero (Fig. 6.3).
• Cierre AUTOMATIC / B (Mod. Ice - Fig. 5.4): siga el procedimiento indicado
para la versión AUTOMATIC / A, pero pase la regleta a través del ojo de la
lengüeta conectada al arco delantero, como se muestra.
• Cierre AUTOMATIC / C (mod. Snow Flex - Fig. 5.5): coloque la regleta de la
punta de la bota dentro del arco anterior; coloque el tacón de la bota en el cuer-
po trasero; coloque la talonera en la regleta posterior de la bota, a continuación
gire la talonera hasta que se dispare en posición de cierre; cerrar la hebilla de
enganche rápido y tirar de la cinta hasta tensarla.
6.5 - Prueba de funcionamiento. Después de haber abrochado el crampón a la
bota, compruebe el ajuste correcto dando golpes en el hielo o en la nieve: si la
bota resulta móvil y con tendencia a moverse, quítela del crampón y compruebe
el ajuste. ¡Atención! Durante su uso controle periódicamente que la junta del
cierre del crampón sea buena, porque a causa del uso continuo de la misma
podría aflojarse.
6.6 - Hyper Spike. El modelo Hyper Spike está equipado con un cuerpo anterior
modular, compatible con la punta principal Hook y la punta accesoria Blade. La
punta Blade, montada al lado de la punta Hook, ofrece una mayor estabilidad
sobre hielo y mixto. Las posibles configuraciones están indicadas en fig. 9.5.
¡Atención! La punta accesoria Blade siempre debe utilizarse en combinación con
la punta principal Hook.
7) MANTENIMIENTO.
1) Compruebe siempre antes y durante el uso el buen estado del piolet. 2) Susti-
tuya siempre el piolet en caso de fuertes esfuerzos o incertidumbre sobre el buen

Climbing Technology by Aludesign S.p.A. via Torchio 22
24034 Cisano B.sco BG ITALY www.climbingtechnology.com 17/56
Member of IST31-3I770CT_rev.0 10-22
estado del mismo. 3) Se aconseja que , por lo menos una vez al año, el piolet
sea revisado por personas competentes (p.ej. el fabricante). 4) En el caso de que
las punteras estén desgastadas, vuelva a afilarlas mediante el uso de una lima:
no utilice una muela mecánica porque el calor generado podría comprometer
las características del material (acero o aleación ligera) y empeorar la junta de
las puntas (Fig. 8). Para los modelos Hyper Spike y Lycan no vuelva a afilar las
puntas frontales más de la mitad del primer diente. ¡Atención! No disminuya el
grosor del material para no reducir la junta de las puntas.
8) PIEZAS DE REPUESTO / ACCESORIOS.
Los accesorios / partes de repuesto están indicados en la tabla (Fig.9): antibotts
*; barras de regulación * estándares, largas (Mod. Long Bar) y/o flexibles (Mod.
Flex Bar/Long Flex Bar); puntas adicionales para el modelo Hyper Spike. Las
barras de regulación presentes en cada modelo, si es necesario, se pueden reem-
plazar con barras idénticas o compatibles. (Fig. 9.6). En caso de sustitución de
las las barras de regulación, es necesario conservar el seguimiento de la fecha
de fabricación presente en las barras originales porque esta es la que identifica
la fecha de fabricación de todo el producto. ¡Atención! Recomendamos el uso
de barras de regulación flexibles con botas semirrígidas y/o de gran tamaño
(más de 42) porque mejoran la comodidad de uso y la vida útil de los crampo-
nes. ¡Atención! Las barras de recambio 4AST19 e 4AST20 incluyen dos trabillas
anti-desgaste que sólo se utilizarán con el modelo Snow Flex, nunca con el Nevis
Flex (Fig. 13). ¡Atención! Los accesorios/repuestos marcados con un asterisco
(*) por sí mismos no constituyen PPE. ¡Atención! Antes de instalar un accesorio/
pieza de repuesto, lea y comprenda las instrucciones de uso del dispositivo en el
que se instalará. ¡Atención! Antes de usar, compruebe que el accesorio/pieza
de repuesto esté correctamente instalado.

Climbing Technology by Aludesign S.p.A. via Torchio 22
24034 Cisano B.sco BG ITALY www.climbingtechnology.com 18/56
Member of IST31-3I770CT_rev.0 10-22
POLSKI
Instrukcja użytkowania tego urządzenia składa się z instrukcji ogólnej i szczegó-
łowej i obie muszą być uważnie przeczytane przed użyciem. Uwaga! Niniejsza
nota stanowi tylko instrukcję szczegółową.
INSTRUKCJA SZCZEGÓŁOWA EN 893.
Niniejsza nota zawiera informacje niezbędne do prawidłowego używania nastę-
pujących produktów: raki do alpinizmu.
1) ZAKRES ZASTOSOWANIA
EN 893. Sprzęt alpinistyczny - Raki. Ten produkt, zgodny z rozporządzeniem
(UE) 2016/425, jest sprzętem ochrony osobistej (PPE) przed ryzykiem poślizgnię-
cia się na lodzie, śniegu lub w terenie mieszanym, w zależności odprzeznacze-
nia urządzenia. Zobacz tabelę podsumowującą, aby sprawdzić, w zależności
odmodelu, zalecany zakres zastosowania: narciarstwo alpejskie (Rys. 12.1),
podróż po lodowcu (Rys. 12.2), alpinizm klasyczny (Rys. 12.3 ÷ 12.6), alpinizm
techniczny (Rys. 12.7 ÷ 12,8), upadki na lodowcu (Rys. 12.9). Uwaga! Raki ze
stopów lekkich są przeznaczone wyłącznie do jazdy pośniegu: nie używaj ich
do jazdy po lodzie lub terenie mieszanym.
2) JEDNOSTKI NOTYFIKOWANE.
Należy zapoznać się z legendą w instrukcji ogólnej (paragraf 9 / tabela D):
M1, M6.
3) NAZEWNICTWO (Rys. 2).
Części składowe raków: Przednia połowa (A); Tylna połowa (B); Pręt regulacyj-
ny zotworami (C); System regulacji rozmiaru (D); Przednia płytka przeciwpo-
ślizgowa (E); Tylna płytka przeciwpoślizgowa (F); Pasek wiązania (G); System
zapinania pasów z podwójnymi pierścieniami (H1); System zapinania z szybko
zwalnianą klamrą (H2); Wiązanie palców (I); Wiązanie pięty (L); Dźwignia pięty
(M); Pałąk na czubek buta (N); Klamra przeciw zużyciu (O). Systemy wiążące:
KLASYCZNY (Rys. 2.1) dla wszystkich typów butów; PÓŁAUTOMATYCZNY (Rys.
2.2) do butów z obcasem znacięciami do trzymania dźwigni; AUTOMATYCZ-
NY (Rys. 2.3) zprzednimi itylnymi rowkami / nacięciami.
3.1 - Główne materiały. Należy zapoznać się z legendą w instrukcji ogólnej
(paragraf 2.4): 2 (Zaczepy do raków, klamry na pięty i nity mocujące); 7/10
(pasek i wiązania). Uwaga! Materiały korpusów (A-B) i prętów (C) są wskazane
w tabeli (Rys.1): 1) Staliwo; 2) Stal nierdzewna; 3) Stop lekki.
4) OZNACZENIA.
Numery/litery bez podpisu: należy zapoznać się z legendą w instrukcji ogólnej
(paragraf 5). Cyfry/litery z gwiazdką (*): wskazanie obecne w zależności od
modelu.
4.1 - Ogólne (rys. 3). Wskazania: 4; 6; 7; 8; 11; 13; 21*) Oznaczenie UKCA;
30) Numeracja pręta do regulacji rozmiaru.
4.2 - Identyfikowalność (rys. 3). Wskazania: T3; T8; T9.
5) KONTROLE.
Oprócz kontroli wskazanych poniżej, należy postępować zgodnie z instrukcją
ogólną (paragraf 3). Przed każdym użyciem sprawdź, czy: system regulacji
rozmiaru może być bezpiecznie umocowany, a drążek regulacyjny swobodnie
przesuwa się przez korpus raka; klamra działa prawidłowo; śruby regulacji dźwi-
gni pięty obracają się bez zacięć (przyklejania); pałąki uchwytów na but mogą
swobodnie obracać się wotworach montażowych; punkty są dobrze wyostrzone
(dla problemu wyostrzenia - patrz odpowiedni akapit). Uwaga! Podczasużywa-
nia należy regularnie sprawdzać, czy raki są odpowiednio ustawione i dobrze
przymocowane do butów. Uwaga! Nawet jeśli raki są wyposażone w system
przeciwpoślizgowy, należy zachować ostrożność i zwracać uwagę na nagroma-
dzony śnieg pod rakami: istnieje niebezpieczeństwo poślizgnięcia się iupadku.
6) REGULACJA I MONTAŻ.
Raki muszą idealnie pasować do butów, które będą używane. Uwaga! Zaleca
się sprawdzenie kompatybilności i właściwego dopasowania raków w pomiesz-
czeniach, przed użyciem ich nazewnątrz. Uwaga! Modele Flex są wyposażone
w pasek regulacyjny, idealny dostosowania z butami z półsztywną podeszwą.
Uwaga! Upewnij się, że pręty regulacyjne standardowe w modelu SnowFlex są
zawsze prawidłowo wyposażone wklamry przeciw zużyciu. (Rys. 13). Regula-
cja raków jest procesem dwuetapowym: pierwszy dotyczy szerokiego zakresu
rozmiarów 36 ÷ 43 lub 42 ÷ 47 (regulacja makro), drugi to regulacja wewnątrz
tych szerokich zakresów rozmiarów (regulacja rozmiaru). Uwaga! Niektóre wido-
ki (rysunki) są uproszczone, dla lepszego zrozumienia.
6.1 - Regulacja makro. Istnieją dwa systemy regulacji makro:
• system śrubowy (lód): popchnij drążek regulacyjny do przodu, włóż śrubę skra-
cającą do kwadratowego otworu wpręcie iprzykręć nakrętkę zabezpieczającą.
Pociągnij pręt do tyłu, aż śruba do skracania znajdzie się wprzedniej części
raka. Aby powrócić do zakresu rozmiarów 42 ÷ 47, usuń śrubę skracającą.
• rapid system (model Hyper Spike): przesuń drążek regulacyjny do przodu,
podnosząc go lekko, aż do momentu, gdy znajdzie się na poprzeczce korpusu
przedniego. Umieść wycięcia drążka w poprzeczce. Pociągnij do tyłu drążek
regulacyjny, aż jego koniec zatrzaśnie się w poprzeczce (Ryc. 4.3). Aby po-
wrócić do zakresu rozmiarów 42÷47 należy powtórzyć wskazane operacje w
odwrotnej kolejności.
• rapid system (modele Lycan / Nuptse Evo): przesuń drążek regulacyjny do
przodu, lekko go unosząc, aż jego koniec przejdzie, wraz z częścią końcową,
poprzeczkę korpusu przedniego. Pociągnij do tyłu drążek regulacyjny, aż jego
koniec zatrzaśnie się w poprzeczce (Ryc. 4.5). Aby powrócić do zakresu roz-
miarów 42÷47 należy powtórzyć wskazane operacje w odwrotnej kolejności.
6.2 - Regulacja rozmiaru. Istnieją dwa systemy regulacji rozmiaru:
• system pojedynczej dźwigni (Ice, Nevis Flex, Snow Flex): podnieś dźwignię
palcami i przesuń pręt do żądanej pozycji. Zwolnij dźwignię upewniając się, że
bolec blokujący jest prawidłowo włożony w otwór pręta (Rys. 4.1).
• system podwójnej dźwigni (Hyper Spike, Lycan, Nuptse Evo): podnieś dźwi-
gnię sterowania, aby móc podnieść główną dźwignię iustawić pręt w żądanej
pozycji. Następnie zwolnij dźwignię sterowania, upewniając się, że bolec blo-
kujący jest prawidłowo włożony do otworu pręta (Rys. 4.2). Ważne! Pręt nie po-
winien wystawać więcej niż 10 mm (Rys. 4.6). Ważne! Sprawdź dopasowanie
tylnej połowy raka do pięty buta (Rys.4.4-4.5).
6.3 - Dodatkowa regulacja. W przypadku większych butów (rozmiar 44 ÷ 50)
można kupić dłuższy pasek regulacji (LONG BAR / LONG FLEX BAR, LONG
FLEX BAR-B), z wyjątkiem modeli Nevis Flex i Snow Flex, które są sprzedawane
zdwoma prętami regulacyjnymi o różnych długościach (krótki dla UE o rozmia-
rach 34 ÷ 41 i długi dla rozmiarów UE 40 ÷ 47). Dla wszystkich raków z opa-
skami PÓŁAUTOMATYCZNYMI lub AUTOMATYCZNYMI wyreguluj wysokość
dźwigni pięty przez poluzowanie, a następnie dokręć mocno śruby regulacyjne
tak, aby po zatrzaśnięciu na dźwigni piętowej pozostała ona mocno umoco-
wana wswoim położeniu (Rys. 4.7). Tylko w modelach Hyper Spike, Lycan,
Nuptse Evo iSnow Flex związaniami AUTOMATYCZNYM istnieje możliwość
regulacji, ile punktów przednich wystaje po modyfikacji polegającej natym, w
które zotworów w przedniej części raka zostanie wsunięty pałąk uchwytu na
but (Rys. 7).
6.4 - Dopasowanie do buta. Dla wszystkich modeli istnieje rak dla prawej stopy i
rak dla lewej stopy i nie można ich dopasowywać zamiennie do drugiego buta.
Sprawdź krzywkę paska regulacyjnego, a pasek wiążący ze sprzączką (klamrą)
ma być zawsze po zewnętrznej stronie stopy (Rys. 6.1-6.2).
• Wiązanie KLASYCZNE - CLASSIC (Rys. 5.1): włóż czubek buta w wiązanie;
ustaw piętę buta na tylnej połowie raka; przeciągnij pasek przez tylne wiązanie,
następnie przez przednie wiązanie, a następnie przez klamrę i dociągnij go.
Pamiętaj, aby zawsze przesuwać pasek z powrotem przez drugi pierścień (Rys.
6.3).
• Wiązanie PÓŁAUTOMATYCZNE (Rys. 5.2): włóż czubek buta wwiązanie;
umieść piętę buta na tylnej połowie raka; ustaw dźwignię pięty na tylnym rowku
buta i obróć ją do przodu, aż zaskoczy w pozycję zamkniętą; przeciągnij pasek
przez przednie wiązanie, a następnie przez klamrę i dociągnij go. Pamiętaj, aby
zawsze przesuwać pasek z powrotem przez drugi pierścień (Rys. 6.3).
• Wiązanie AUTOMATYCZNE / A (mod. Hyper Spike / Lycan / Nuptse Evo
- Rys. 5.3): umieść lamówkę na czubku buta pod pałąkiem uchwytu na but;
umieść piętę buta na tylnej połowie raka; ustaw dźwignię pięty na tylnym rowku
buta iobróć ją do przodu, aż zaskoczy i zatrzaśnie się w pozycji zamkniętej;
przełóż opaskę mocującą wokół górnej części buta, anastępnie przez klamrę i
dociągnij ją. Pamiętaj, aby zawsze przesuwać pasek z powrotem przez drugi
pierścień (Rys. 6.3).
• Wiązanie AUTOMATYCZNE / B (Mod. Ice - Rys. 5.4): postępuj zgodnie ze
wskazówkami już ukazanymi dla wersji AUTOMATYCZNEJ / A, przekazując
w tym przypadku taśmę wiążącą przez oczko języka, połączoną z przednim
pałąkiem na czubek buta tak, jak pokazano na ilustracji.
• Wiązanie AUTOMATYCZNE / C (mod. Snow Flex - Rys. 5.5): umieść lamów-
kę na czubku buta pod drutem pałąkowym; umieść piętę buta na tylnej połowie
raka; ustaw dźwignię pięty na tylnej lamówce buta i obróć ją do przodu, ażza-
trzaśnie się w pozycji zamkniętej; zamknij szybko-uwalnianą klamrę i pociągnij
pasek aż do oporu.
6.5 - Test funkcyjny działania. Po dociągnięciu paska sprawdź, czy raki są pra-
widłowo założone, kopiąc w lód lub śnieg: jeśli but będzie można jednak prze-
sunąć, zdejmij go z raka i ponownie dopasuj rak. Uwaga! Podczas użytkowania
należy okresowo sprawdzać, czy raki są mocno przymocowane do butów, po-
nieważ podczas użytkowania wiązania mogą się poluzować.
6.6 - Model Hyper Spike. Model Hyper Spike jest wyposażony w modułową sek-
cję przednią, kompatybilną zgłównym punktem zaczepu (Hook point) i punktem
akcesoriów ostrza (Blade accessory point). Ostrze (Blade point), zamontowane
z jednej strony po bokach na punkcie zaczepu (Hook point), zapewnia większą
stabilność podczas wspinaczki lodowej i mieszanej. Możliwe kombinacje konfi-
guracji pokazano na Rys. 9.5. Uwaga! Punkt akcesoriów ostrza (Blade accessory
point) musi być zawsze używany razem z głównym punktem zaczepu (Hook
point).
7) UŻYTKOWANIE I KONSERWACJA.
1) Zawsze sprawdzaj przed i podczas użytkowania, czy raki są wdobrym
stanie. 2) Jeśli raki są bardzo mocno obciążane lub nie jesteś pewien ich stanu,
wymień je. 3) Zalecamy coroczne sprawdzanie raków przez kompetentną osobę
(np. producenta). 4) Jeśli punkty są zużyte, wyostrz je pilnikiem: nie używaj szlifier-
ki znapędem, ponieważ wytwarzane ciepło może mieć wpływ na właściwości

Climbing Technology by Aludesign S.p.A. via Torchio 22
24034 Cisano B.sco BG ITALY www.climbingtechnology.com 19/56
Member of IST31-3I770CT_rev.0 10-22
metalu (stal lub lekki stop) i zmniejszyć siłę trzymania na lodzie lub zmrożonym
śniegu (Rys. 8). Dla modeli Hyper Spike i Lycan nie składaj z powrotem poza
pierwszą połowę pierwszego zęba. Uwaga! Utrzymuj dobrą grubość metalu, bo
inaczej możesz zmniejszyć siłę utrzymania się w żądanym punkcie.
8) CZĘŚCI ZAMIENNE / AKCESORIA.
Akcesoria / części zamienne są wymienione w tabeli (Rys. 9): anty buty - an-
tibots*; pręty regulacyjne* - standardowe, długie (model Long Bar) i/lub ela-
styczne (modele Flex Bar / Long Flex Bar); dodatkowe wskazówki* dotyczą-
ce modelu Hyper Spike. Pręty regulacyjne zamontowane w każdym modelu,
w razie potrzeby, można wymienić na identyczne lub kompatybilne (Rys. 9.6).
W przypadku wymiany należy zwrócić uwagę na datę produkcji umieszczo-
ną na oryginalnych prętach, ponieważ identyfikuje ona datę produkcji całego
wyrobu. Uwaga! Stosowanie elastycznych regulacyjnych prętów regulacyjnych
jest zalecane w przypadku butów półsztywnych i / lub ponad gabarytowych
(rozmiar powyżej 42), ponieważ poprawiają one komfort użytkowania i żywot-
ność raków. Uwaga! Zapasowe pręty 4AST19 i 4AST20 zawierają dwie klamry
przeciw zużyciu, które można stosować tylko w modelu śniegowym Snow Flex,
nigdy wmodelach raków Nevis Flex. (Rys. 13). Uwaga! Akcesoria/części za-
mienne oznaczone gwiazdką (*) samodzielnie nie stanowią ŚOI. Uwaga! Przed
zamontowaniem akcesoria/części zamiennej należy przeczytać i zrozumieć in-
strukcję użycia urządzenia, na którym zostaną one zainstalowane. Uwaga! Przed
użyciem należy sprawdzić, czy akcesorium/część zamienna zostały właściwie
zamontowane.

Climbing Technology by Aludesign S.p.A. via Torchio 22
24034 Cisano B.sco BG ITALY www.climbingtechnology.com 20/56
Member of IST31-3I770CT_rev.0 10-22
PORTUGUÊS
As instruções para o uso deste dispositivo consistem de uma instrução geral e de
uma específica e ambas devem ser lidas cuidadosamente antes do uso. Aten-
ção! Esta folha constitui apenas a instrução específica.
INSTRUÇÕES ESPECÍFICAS EN 893.
Esta nota contém as informações necessárias para um uso correto do(s) seguinte(s)
produto(s): grampões para alpinismo.
1) CAMPO DE APLICAÇÃO.
EN 893. Equipamento de montanhismo - Grampões. Este produto, em confor-
midade com o Regulamento (UE) 2016/425, é uma peça de Equipamento de
Proteção Individual (EPI) que protege contra o risco de escorregamento sobre o
gelo, a neve ou em terrenos mistos, dependendo da utilização pretendida para
o dispositivo. Consultar a tabela de resumo para verificar, segundo o modelo, o
campo de utilização aconselhado: esqui-alpinismo (Fig. 12.1), atravessamento
de geleiras (Fig. 12.2), alpinismo clássico (Fig. 12.3÷12.6), alpinismo técnico
(Fig. 12.7÷12.8), cascatas de gelo (Fig. 12.9). Atenção! Os grampões em
liga leve são destinados exclusivamente a progressão na neve: não usar para
progressão em gelo ou mista.
2) ÓRGÃOS NOTIFICADOS.
Consultar a legenda nas instruções gerais (parágrafo 9 / tabela D): M1, M6.
3) NOMENCLATURA (Fig. 2).
Partes do grampo: Corpo anterior (A); Corpo posterior (B); Haste perfurada de
regulação (C); Sistema de regulação de tamanho (D); Sistema anti-calço anterior
(E); Sistema anti-calço posterior (F); Tira de reforço (G); Sistema de travamento da
fita a aneis (H1); Sistema de travamento com fivela de liberação rápida (H2);
Faixa anterior (I); Faixa posterior (L); Suporte para calcanhar sobre pequeno arco
(M); Pequeno arco (N); Fivela anti-desgaste (O). Sistemas de ligamento: CLASSIC
(Fig. 2.1) para todos os tipos de calçados; SEMIAUTOMATIC (Fig. 2.2) para cal-
çados com entalhe de engate posterior; AUTOMATIC (Fig. 2.3) para calçados
com entalhe de engate anterior e posterior.
3.1 - Principais materiais. Consultar a legenda nas instruções gerais (parágrafo
2.4): 2 (estribos para os pés, alavancas para calcanhares e rebites); 7/10 (a
fita, a faixa anterior e posterior). Atenção! Os materiais do corpo (A-B) e haste
(C) estão indicados na tabela (Fig. 1): 1) Aço em liga; 2) Aço inox; 3) Liga leve.
4) MARCAÇÃO.
Números/letras sem legenda: consultar a legenda nas instruções gerais (pará-
grafo 5). Números/letras com asterisco (*): indicação presente dependendo do
modelo.
4.1 - Geral (Fig. 3). Indicações: 4; 6; 7; 8; 11; 13; 21*) Marca UKCA; 30)
Numeração da haste para regulação dos tamanhos.
4.2 - Rastreabilidade (Fig. 3). Indicações: T3; T8; T9.
5) CONTROLES.
Além dos controles indicadas abaixo, observar o quanto indicado nas instruções
gerais (parágrafo 3).
Antes de cada uso, verificar que: o sistema de regulação do tamanho bloqueia-
-se correctamente e a haste de regulação desliza livremente no interior das ca-
vidades dos corpos; o sistema de ligamento funciona correctamente; o parafuso
de regulação do suporte do calcanhar roda sem emperramentos; os pequenos
arcos possam rodar nos furos dos corpos; as pontas tenham sido bem afiadas
(para uma possível afiação, ver o parágrafo de manutenção). Atenção! Durante
a utilização, verificar regularmente a boa regulação e ligamento dos grampos
nos calçadosi. Atenção! Também se os grampões possuirem um sistema anti-entu-
pimento é necessario ser prudente e prestar atenção à acumulação de neve sob
os grampões: perigo de escorregamento ou queda.
6) REGULAÇÃO E INSTALAÇÃO.
Os grampos devem se adaptar perfeitamente aos calçados que se pretende
utilizar. Atenção! Recomenda-se verificar a compatibilidade e a correcta regula-
ção dos grampos numa situação de adequada estabilidade e calma, antes de
uma efectiva utilização. Atenção! Os modelos Flex são equipados com haste
flexível, ideal para uso com botas de sola semi-rígida. Atenção! Verificar que as
hastes fornecidas de série no modelo Snow Flex estejam sempre corretamente
equipadas com fivelas anti-desgaste (Fig. 13). Há dois níveis de regulação dos
grampos: o primeiro permite a passagem entre os diversos intervalos de tama-
nhos 36÷43 e 42÷47 (macro-regulação), o outro a regulação do tamanho no
interior de um dos dois intervalos (regulação do tamanho). Atenção! Algumas
vistas são simplificadas para uma melhor compreensão.
6.1 - Macro-regulação. Há dois sistemas de macro-regulação:
• sistema de parafuso (modelos Ice): empurrar para frente a haste de regulação,
inserir o parafuso de encurtamento no furo quadrado da mesma e apertar a
relativa porca de autobloqueio. Puxar a haste de regulação para trás até engatar
o parafuso de encurtamento ao corpo anterior. Para voltar ao intervalo de tama-
nhos 42÷47, retirar o parafuso de encurtamento.
• sistema rápido (modelo Hyper Spike): empurre a barra de regulação para a
frente, levantando-a ligeiramente até ficar acima da travessa intermédia do corpo
dianteiro. Insira os entalhes da barra na travessa. Puxe para trás a barra de regu-
lação até a extremidade encaixar na travessa (Fig. 4.3). Para regressar para a
gama de tamanhos 42÷47, repita as operações indicadas pela ordem inversa.
• sistema rápido (modelos Lycan/Nuptse Evo): empurre a barra de regulação
para a frente, levantando-a ligeiramente até a extremidade ficar acima, com a
extremidade, da travessa intermédia do corpo dianteiro. Puxe para trás a barra
de regulação até a extremidade encaixar na travessa (Fig. 4.5). Para regressar
para a gama de tamanhos 42÷47, repita as operações indicadas pela ordem
inversa.
6.2 - Regulação do tamanho. Há dois sistemas de regulação do tamanho:
• sistema de alavanca simples (mod. Ice, Nevis Flex, Snow Flex): levantar com
os dedos a alavanca e regular a medida da haste. Por fim, liberar a alavanca
e verificar se a ficha de retenção foi bem inserida no furo da haste (Fig. 4.1).
• sistema com alavanca dupla (mod. Hyper Spike, Lycan, Nuptse Evo): levantar
com os dedos a alavanca de comando para levantar a alavanca principal e
regular assim a medida da haste. Liberar enfim a alavanca de comando, ve-
rificando se a ficha de retenção foi bem inserida no furo da haste (Fig. 4.2).
Atenção! A saliência da haste em relação ao corpo não deve superar os 10 mm
(Fig. 4.6). Atenção! Verificar a saliência do corpo posterior em relação ao salto
do calçado (Fig. 4.4-4.5).
6.3 - Posteriores regulações. Para alcançar um intervalo de tamanhos superior
(44÷50), é possível adquirir uma haste de regulação mais longa (mod. LONG
BAR / LONG FLEX BAR / LONG FLEX BAR-B), com exceção dos modelos Nevis
Flex e Snow Flex que já são vendidos com duas hastes (uma curta para tamanhos
34÷41 e uma longa para os tamanhos 40÷47). Para todos os grampos com
sistema de ligamento SEMIAUTOMATIC ou AUTOMATIC regular a altura do
calço, agindo no parafuso de regulação, verificando se no momento do engate
o calço permanece em posição e fica suficientemente sob tensão (Fig. 4.7). Só
para os modelos Hyper Spike, Lycan, Nuptse Evo e Snow Flex com sistema de
ligamento AUTOMATIC é possível regular e aperfeiçoar a saliência das pontas
frontais ao modificar a posição do pequeno arco com os furos presentes no
corpo anterior (Fig. 7).
6.4 - Montagem sobre o calçado. Para todos os modelos, é necessário verificar o
lado do grampo: não inverter direito com esquerda, verificar a curvatura da haste
de regulação, manter sempre no exterior as fivelas de bloqueio e desbloqueio da
tira de reforço (Fig. 6.1-6.2).
• Ligamento CLASSIC (Fig. 5.1): posicionar a ponta do calçado no interior da
faixa anterior; posicionar o salto no corpo posterior; Inserir a tira de reforço por
meio da faixa posterior, depois passá-la na faixa anterior, depois no sistema de
bloqueio da tira de reforço e enfim colocá-la sob tensão. Lembrar de repassar a
tira de reforço no segundo anel (Fig. 6.3).
• Ligamento SEMIAUTOMATIC (Fig. 5.2): posicionar a ponta do calçado no in-
terior da faixa anterior; posicionar o salto do calçado no corpo posterior; posicio-
nar o calço sobre a marca posterior do calçado, depois fazer rodar o calço até
fazê-lo encaixar em posição de fecho; inserir a tira de reforço por meio da faixa
anterior, depois inseri-la no sistema de bloqueio da tira de reforço e a colocar sob
tensão. Lembrar sempre de repassar a tira de reforço no segundo anel (Fig. 6.3).
• Ligamento AUTOMATIC / A (mod. Hyper Spike / Lycan / Nuptse Evo - Fig.
5.3): posicionar a marca da ponta do calçado no interior do pequeno arco ante-
rior; posicionar o salto do calçado no corpo posterior; posicionar o calço sobre a
marca posterior do calçado, depois fazer rodar o calço até fazê-lo encaixar em
posição de fecho; passar a tira de reforço em torno à parte superior do calçado,
inseri-la no sistema de bloqueio da tira de reforço e colocar sob tensão. Lembrar
sempre de repassar a tira de reforço no segundo anel (Fig. 6.3).
• Ligamento AUTOMATIC / B (Mod. Ice - Fig. 5.4): seguir o procedimento indi-
cado para a versão AUTOMATIC / A, mas passar a tira de reforço por meio do
olhar da lingueta, ligada ao pequeno arco anterior, como mostrado.
• Fechamento AUTOMATIC / C (mod. Snow Flex - Fig. 5.5): posicionar a ponta
da bota dentro do arco frontal; posicionar o calcanhar da bota no corpo traseiro;
posicionar o apoio do calcanhar no encaixe traseiro da bota e, em seguida, gi-
rar o apoio do calcanhar até encaixar na posição de fechamento; fechar a fivela
de liberação rápida e puxar a alça até colocá-la sob tensão.
6.5 - Prova de funcionamento. Depois de ter amarrado o grampo ao calçado,
verificar a sua correcta regulação dando alguns golpes no gelo ou na neve:
se o calçado estiver móvel e tender a mover-se, retirá-lo do grampo e verificar
a regulação. Atenção! Durante a utilização, controlar periodicamente a boa
retenção do ligamento do calço, porque por causa do uso contínuo a mesma
pode soltar-se.
6.6 - Hyper Spike. O modelo Hyper Spike possui corpo anterior modular, compa-
tível com a ponta principal Hook e com a ponta acessória Blade. A ponta Blade,
montada lateralmente em relação à ponta Hook, oferece uma maior estabilidade
no gelo e mista. As configurações possíveis são representadas na fig. 9.5. Aten-
ção! A ponta acessória Blade deve ser sempre utilizada em combinação com a
ponta principal Hook.
7) MANUTENÇÃO.
1) Verificare sempre antes e durante a utilização do bom estado do equipa-
mento. 2) Substituir sempre o equipamento em caso de fortes solicitações ou de
incerteza sobre o bom estado do mesmo. 3) Recomenda-se fazer controlar o
/