Avitech Sequoia 4H Manuale utente
- Categoria
- Switch KVM
- Tipo
- Manuale utente

User Manual
Sequoia 4H
One of a kind multiviewing
Revision 1.0.8, (March, 2014)

User Manual
ii
ABOUT THIS MANUAL
This manual contains information on how to use the Avitech Sequoia 4H mouse keyboard controller. There are
three chapters in this manual.
Getting Started, introduces the features and specifications as well as the external components of the Avitech
Sequoia 4H.
System Configuration, discusses the process of setting up the Sequoia 4H.
Basic Operations, introduces the two types of operating modes. Also demonstrates use of the mouse and
keyboard hot-keys to perform basic operations and its compatibility with the touch-screen display with Avitech
Sequoia 4H.
The following conventions are used to distinguish elements of text throughout the manual.
provides additional hints or information that requires special attention.
identifies warnings which must be strictly followed.
Any name of a menu, command, icon or button displayed on the screen is shown in a bold typeset.
For example: On the Start menu select Settings.
To assist us in making improvements to this user manual, we welcome any comments and constructive criticism.
Please email us at: [email protected].
WARNING
Do not attempt to disassemble the Sequoia 4H. Doing so may void the warranty. There are no serviceable parts
inside. Please refer all servicing to qualified personnel.
TRADEMARKS
All brand and product names are patented or registered trademarks of their respective companies.
COPYRIGHT
The information in this manual is subject to change without prior notice. No part of this document may be
reproduced or transmitted in any form or by any means, electronic or mechanical for any purpose, without the
express written permission of Avitech International Corporation. Avitech International Corporation may have
patents, patent applications, trademarks, copyrights or other intellectual property rights covering the subject matter
in this document. Except as expressly written by Avitech International Corporation, the furnishing of this document
does not provide any license to patents, trademarks, copyrights or other intellectual property of Avitech International
Corporation or any of its affiliates.
TECHNICAL SUPPORT
For any questions regarding the information provided in this guide, call our technical support help line at
425-885-3863, or our toll free help line at 1-877-AVI-TECH, or email us at: [email protected].

iii
Contents
About This Manual .................................................................................................................... ii
User Manual Application .......................................................................................................... v
User Manual History ................................................................................................................. v
Warranty ................................................................................................................................... vii
Limitation of Liability .............................................................................................................. vii
Extended Warranty Options ................................................................................................... vii
Services and Repairs Outside the Warranty Period ............................................................ vii
Regulatory Information .......................................................................................................... vii
Federal Communications Commission (FCC) Statement ................................................... vii
European Union CE Marking and Compliance Notices ...................................................... vii
Australia and New Zealand C-Tick Marking and Compliance Notice ................................ vii
1. Getting Started ............................................................................................................ 1
1.1 Package Contents .............................................................................................................. 1
1.2 Product Features ............................................................................................................... 3
1.3 Specifications .................................................................................................................... 4
1.4 Connections to the Sequoia 4H ....................................................................................... 5
2. System Configuration ................................................................................................. 7
2.1 Getting the Sequoia 4H Ready ......................................................................................... 7
2.1.1 Basic Setup When Connecting to a Regular or Touch-screen Display ........... 7
2.1.2 Basic Setup When Cascading Sequoia Devices ................................................ 9
3. Basic Operations ....................................................................................................... 11
3.1 Host Operation Mode ...................................................................................................... 12
3.1.1 Pop-up Selections ............................................................................................... 12
3.1.2 Functions ............................................................................................................. 12
3.1.3 Hot-keys ............................................................................................................... 13
3.2 Remote Operation Mode ................................................................................................. 14
3.2.1 Hot-keys ............................................................................................................... 14
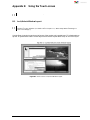
Appendix A Using the Surfer Feature .......................................................................... 16
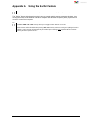
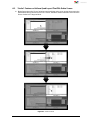
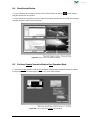
A.1 “Surfer” Feature on Uniform Quad Layout That Fills Entire Screen .......................... 17
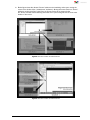
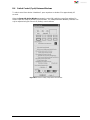
A.2 “Surfer” Feature on Non-uniform Quad Layout ........................................................... 19
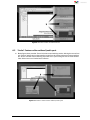
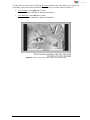
A.3 “Surfer” Feature on Full Screen “Source” Window ..................................................... 20
A.4 “Surfer” Feature on Cascaded System ......................................................................... 20
Appendix B Using the Touch-screen ........................................................................... 22
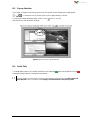
B.1 Lock/Unlock Window Layout .......................................................................................... 22
B.2 Pop-up Selection ............................................................................................................. 23
B.3 Audio Tally ....................................................................................................................... 23
B.4 Move/Resize Window ...................................................................................................... 24

iv
B.5 Exit from Remote Operation Mode to Host Operation Mode ...................................... 24
B.6 Switch Control (Cycle) Between Windows.................................................................... 26
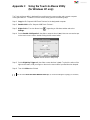
Appendix C Using the Touch-to-Mouse Utility (for Windows XP only) ..................... 28
Appendix D Resetting to the Factory-Default State .................................................... 29

v
USER MANUAL APPLICATION
This manual contains information that is compatible to the following Sequoia 4H model:
Cascade and “Surfer” feature version
Cascade and Touch-Screen version
Hardware
Main Board
R5
R5
Upper Board
R6
R6
Firmware
USB Host
V0.00.39S11.26.2013
V0.00.33 05.27.2013
USB Device
V0.01.12s 4h bldr1.40
11.13.2013
V0.01.09m 4h bldr1.40
06.29.2012*
V0.01.09t 4h bldr1.40 06.29.2012
(* apply for regular shipment only)
Control Board
V1.00.17 12.24.2013
V1.00.17 12.24.2013
Upper Board FPGA
V1.00.g9 04.11.2012
V1.00.g9 04.11.2012
ST
V5.01.g0 04.01.2013
V5.01.g0 04.01.2013
Software (Utility)
Phoenix-G
V1.03 or later
V1.03 or later
Hook
V1.06
V1.06
USB Touch Tool
V1.03
V1.03
Avitech Control Panel
(ACP)
V2.04
V2.04
ASCII Test
V4.3
V4.3
USER MANUAL HISTORY
Revision No.
Date
Changes Applied
1.0.0
4/28/2011
First version
5/13/2011
Replaced 3 sample illustrations of labels on 4 windows
(should be no transparency, background width must be the
same as window's width).
6/24/2011
Added "touchscreen" portion.
7/8/2011
Edited package contents portion.
7/15/2011
Edited package contents and software features portions.
8/1/2011
Added effect of enabling/disabling Phoenix-G's Sequoia
Properties' "Swap With Active Window" on F# (or
double-click) and Shift+F# (or Shift+double-click) hot-keys.
8/5/2011
Placed emphasis on press "Ctrl+Esc" before connecting via
Phoenix-G. Added audio tally on/off on chapter 2 "Using the
Mouse."
8/22/2011
Added "Cascading" portion.
8/24/2011
Added a missing step #3 to the H/W installation portion in
chapter 1 (ordinary monitor, touch-screen monitor, and
cascading portions).
11/11/2011
Updated hot-keys portion.
2/16/2012
Removed mention of "touch-screen and cascade function
cannot co-exist on your Sequoia" in chapter 1.
2/23/2012
Added "audio impedance level" info into specs portion.
3/8/2012
Added "Touch-to-Mouse Utility" portion to chapter 1.
1.0.3
5/11/2012
Edited chapter 2 portion (new switching control and pop-up
icon behavior).
Added "Ctrl + X" hotkey to chapter 2 portion.
1.0.4
5/18/2012
Replaced all front/rear photos.
Changed the "specs" table's output voltage to "30 W."

vi
Revision No.
Date
Changes Applied
5/22/2012
Copied the illustration from NAB PPT product presentation
(PDF format).
5/29/2012
Removed all mention of 10-bit and 12-bit input format
support.
1.0.5
6/5/2012
Removed all mention of "Host" appearing in all application
diagrams.
Added "(optional)" to "All-in-one cable" in "package
contents" portion.
Changed all mention of "All-in-one cable/connector" to
"5-in-one cable/connector."
1.0.6
6/15/2012
Added new hot-key functions.
1.0.8
7/9/2013
Added "Shift+P" hot-key info.
7/16/2013
Changed "Shift+P" to "Shift+L" hot-key info.
8/28/2013
Added the rack mount kit items to "Package Contents"
portion.
11/14/2013
Added Appendix C "Resetting to Default Setting" portion.
11/21/2013
Added "Surfer" function and detection of no USB mouse will
cause host cursor to disappear from screen feature.
Added "note" to "Surfer" function description.
1/24/2014
Added various "Surfer" function limitations.
2/13/2014
Added new appendix on "Surfer" feature and updated
various portions.

vii
Warranty
Avitech International Corporation (herein after referred to as “Avitech”)
warrants to the original purchaser of the products manufactured in its
facility (the “Product”), that these products will be free from defects in
material and workmanship for a period of 1 year or 15 months from the
date of shipment of the Product to the purchaser. There is a 3 month
grace period between shipping and installation.
If the Product proves to be defective during the 1 year warranty period,
the purchaser’s exclusive remedy and Avitech’s sole obligation under
this warranty is expressly limited, at Avitech’s sole option, to:
(a) repairing the defective Product without charge for parts and labor;
or (b) providing a replacement in exchange for the defective Product;
or (c) if after a reasonable time is unable to correct the defect or
provide a replacement Product in good working order, then the
purchaser shall be entitled to recover damages subject to the limitation
of liability set forth below.
Limitation of Liability
Avitech’s liability under this warranty shall not exceed the purchase
price paid for the defective product. In no event shall Avitech be liable
for any incidental, special, or consequential damages, including
without limitation, loss of profits for any breach of this warranty.
If Avitech replaces the defective Product with a replacement Product
as provided under the terms of this Warranty, in no event will the term
of the warranty on the replacement Product exceed the number of
months remaining on the warranty covering the defective Product.
Equipment manufactured by other suppliers and supplied by Avitech
carries the respective manufacturer’s warranty. Avitech assumes no
warranty responsibility either expressed or implied for equipment
manufactured by others and supplied by Avitech.
This Warranty is in lieu of all other warranties expressed or implied,
including without limitation, any implied warranty of merchantability or
fitness for a particular purpose, all of which are expressly disclaimed.
This Hardware Warranty shall not apply to any defect, failure, or
damage: (a) caused by improper use of the Product or inadequate
maintenance and care of the Product; (b) resulting from attempts by
other than Avitech representatives to install, repair, or service the
Product; (c) caused by installation of the Product in a hostile operating
environment or connection of the Product to incompatible equipment;
or (d) caused by the modification of the Product or integration with
other products when the effect of such modification or integration
increases the time or difficulties of servicing the Product.
Any Product which fails under conditions other than those specifically
covered by the Hardware Warranty, will be repaired at the price of
parts and labor in effect at the time of repair. Such repairs are
warranted for a period of 90 days from date of reshipment to customer.
Extended Warranty Options
Avitech offers OPTIONAL Extended Warranty plans that provide
continuous coverage for the Product after the expiration of the
Warranty Period. Contact an Avitech sales representative for details
on the options that are available for the Avitech equipment.
Services and Repairs Outside the Warranty Period
Avitech makes its best offer to repair a product that is outside the
warranty period, provided the product has not reached its end of life
(EOL). The minimum charge for such repair excluding shipping and
handling is $200 (US dollars).
AVITECH INTERNATIONAL CORPORATION
● 15377 NE 90th Street Redmond, WA 98052 USA
● TOLL FREE 1 877 AVITECH
● PHONE 1 425 885 3863
● FAX 1 425 885 4726
● info@avitechvideo.com
● http://avitechvideo.com
Regulatory Information
Marking labels located on the exterior of the device indicate the
regulations that the model complies with. Please check the marking
labels on the device and refer to the corresponding statements in this
chapter. Some notices apply to specific models only.
Federal Communications Commission (FCC) Statement
This equipment has been tested and found to comply with the limits for
a Class B digital device, pursuant to Part 15 of the FCC Rules. These
limits are designed to provide reasonable protection against harmful
interference when the equipment is operated in a commercial
environment. This equipment generates, uses, and can radiate radio
frequency energy and, if not installed and used in accordance with the
instruction manual, may cause harmful interference to radio
communications. Operation of this equipment in a residential area is
likely to cause harmful interference, in which case the user will be
required to correct the interference at his own expense. Properly
shielded and grounded cables and connectors must be used in order
to meet FCC emission limits. Avitech is not responsible for any radio or
television interference caused by using other than recommended
cables and connectors or by unauthorized changes or modifications to
this equipment. Unauthorized changes or modifications could void the
user's authority to operate the equipment. Operation is subject to the
following two conditions: (1) this device may not cause harmful
interference, and (2) this device must accept any interference
received, including interference that may cause undesired operation.
European Union CE Marking and Compliance Notices
Statements of Compliance
English
This product follows the provisions of the European Directive
1999/5/EC.
Dansk (Danish)
Dette produkt er i overensstemmelse med det europæiske direktiv
1999/5/EC.
Nederlands (Dutch)
Dit product is in navolging van de bepalingen van Europees Directief
1999/5/EC.
Suomi (Finnish)
Tämä tuote noudattaa EU-direktiivin 1999/5/EC määräyksiä.
Français (French)
Ce produit est conforme aux exigences de la Directive Européenne
1999/5/EC.
Deutsch (German)
Dieses Produkt entspricht den Bestimmungen der Europäischen
Richtlinie 1999/5/EC.
Ελληνικά (Greek)
To προϊόν αυτό πληροί τις προβλέψεις της Ευρωπαϊκής Οδηγίας
1999/5/EC.
Íslenska (Icelandic)
Þessi vara stenst reglugerð Evrópska Efnahags Bandalagsins númer
1999/5/EC.
Italiano (Italian)
Questo prodotto è conforme alla Direttiva Europea 1999/5/EC.
Norsk (Norwegian)
Dette produktet er i henhold til bestemmelsene i det europeiske
direktivet 1999/5/EC.
Português (Portuguese)
Este produto cumpre com as normas da Diretiva Européia 1999/5/EC.
Español (Spanish)
Este producto cumple con las normas del Directivo Europeo
1999/5/EC.
Svenska (Swedish)
Denna produkt har tillverkats i enlighet med EG-direktiv 1999/5/EC.
Australia and New Zealand C-Tick Marking and
Compliance Notice
Statement of Compliance
This product complies with Australia and New Zealand's standards for
radio interference.

1
1. Getting Started
Avitech Sequoia 4H is a highly innovative device. Sequoia integrates functions of a KVM (keyboard
video mouse) switch and a robust multi-viewer into a single enclosure. Sequoia 4H provides a simple
solution for any user who works in an environment with multiple computers. The Sequoia 4H is able to
seamlessly switch and control up to 4 computers with just a keyboard and mouse. Additionally, its
scalability (through cascading) allows Sequoia to be ideal for both individual users and corporate
applications.
The Sequoia features a visual user interface (Host operation mode) which allows users to configure the
layout through an OSD (on screen display). While in Host operation mode, it easily converts video
images to full screen, adjusts windows to any size and moves windows to any position. Also, for a more
hands-on user experience, the Sequoia 4H can be used with a touch-screen display. The touch-screen
controls are receptive and intuitive; it switches sources, resizes windows, moves windows to any
position, and controls a remote computer with a tap of your finger.
This chapter introduces the features and specifications, as well as the external components of the
Sequoia 4H.
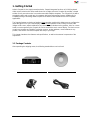
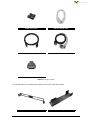
1.1 Package Contents
After unpacking the shipping carton, the following standard items can be found:
Avitech Sequoia 4H
Utility Disc (software and user manual)
12 V DC/5A Power Adapter
Standard Power Cord (USA customer only)

2
Rubber Foot (4 pcs)
D
USB-A to USB-B Cable
HDMI Cable (optional)
D
Sequoia 5-in-1 Cable (optional)
DVI to HDMI Adapter (optional)
D
Table 1-1 Package Contents
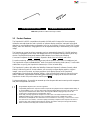
The following items are included if the optional rack mount kit was also ordered.
Front Bracket
Power Adapter Tray

3
Multi angle hex driver (2 mm)
FH MSH AB 3×6 Screws (12 pieces)
Table 1-2 Optional Rack Mount Package Contents
1.2 Product Features
The Sequoia 4H is HDCP-compatible and capable of HDMI and DVI output (DVI via an adapter).
It features automatic detection and a selection of optimum display resolution, automatic input signal
detection, a more flexible window configuration (any size, any position), Picture-in-Picture (PiP) overlay
display, video loss detection, image/gain that can be adjusted manually or automatically, and crop/pan
image.
The Sequoia can control up to four computers, and can automatically detect PS/2 & USB interfaces.
It is also Hot-pluggable, which allows the addition/removal of computers without powering down any
devices. The Sequoia’s front panel features LED indicators for monitoring the following:
Connected Computers (Active or Standby), Operation Mode (Host or Remote) and Power.
For audio monitoring, the Sequoia 4H features two built-in speakers and a 1/8 inch headphone jack.
The Sequoia 4H accepts embedded/HDMI
®
audio (2ch-stereo) and analog audio (stereo). To assist with
audio/video re-syncing, the Sequoia 4H features up to 170ms of audio delay.
The Sequoia 4H is able to fully utilize the flexibility of Avitech’s Phoenix-G software (formerly called
Galaxy). With the Phoenix-G control software, you can easily configure display options, crop/pan
images, save up to 23 presets, and even program a list of display layouts for the Sequoia to
automatically cycle through (the “Briefing” feature – refer to Sequoia 4H Phoenix-G manual for more
details). Moreover, with Avitech’s Hook utility (patent pending), a laptop can be used to control the
Sequoia 4H via the USB port located on the front panel .
For larger applications, it’s possible to cascade up to five Sequoia 4H’s and control up to 20 computers
with just one keyboard and mouse.
1. Non-standard keyboards (e.g., keyboards with a USB hub, keyboards that need driver installation and
programmable keyboard, etc.) are not supported.
2. Compatibility between the computer and the Sequoia 4H may depend on the computer’s BIOS Setup. If
an incompatibility occurs, you may refer to the computer’s BIOS Setup and make sure USB port and
PS/2 port are enabled if these items exist in the computer’s BIOS Setup (typically found in the
"Advanced" or "Onboard Device Configuration" menu).
3. Hook utility currently supports the Sequoia solo series (non-cascaded) and the Pacific X-HDU (an
HDMI transmitter-Pacific X-HDUT (TX) and an HDMI receiver-Pacific X-HDUR (RX) allows
transmission of 1080p60 HD over 100 meters based on HDBaseT
®
technology – refer to Pacific X-HDU
user manual for more details). Connect a laptop (or desktop) computer to the Sequoia solo series or
Pacific X-HDU and simulate keyboard/mouse function for remote control processing (KVM feature).
4. Refer to Avitech Hook utility user manual for more details.

4
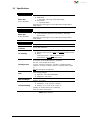
1.3 Specifications
Input
HDMI or DVI
(via DVI to HDMI adapter)
Automatic sensing
HDMI mode:
480i, 480p, 576i, 576p, 720p, 1080i, 1080p
DVI-D mode:
Up to 1920×1200
Transmission of audio signal is not included when using the DVI to
HDMI adapter.
Output
HDMI or DVI
(via DVI to HDMI adapter)
Automatic sensing or user selectable
Up to 1920×1200 (WUXGA) at 50Hz/60Hz or 1600×1200
(UXGA) 75Hz
Transmission of audio signal is not included when using the DVI to
HDMI adapter.
Others
Peripheral Sharing
USB type A port (for USB 2.0 hub) × 2
Computer
Connection
Up to 4 units (maximum)
Port Switching
Method:
Keyboard hot-keys (both in Host and Remote operation modes)
Mouse
OSD (pop-up menu – in Host operation mode)
Surfer feature (in Remote operation mode)
Operating System
Microsoft Windows 98 Special Edition, 2000 Professional, XP, Vista,
Server 2003, Server 2008, Windows 7, Windows 8
Mac (O/S X 10.5 or later version only)
Linux OS: Fedora 10, Ubuntu 8.1, Scientific 5.2, RedHat, Mint 6.0,
Debian 5.0, PC Linux OS 2009, SUSE 11.1, Mandriva 2009, CentOS
5.2
Note: Windows NT is not supported
Power
Power consumption is 25W
Power Supply (adapter):
Input (AC): 100 to 240V 50Hz/60Hz
Output (DC): 12V DC/5A
Dimension/Weight
Dimension, 261×174×44 mm (10.3×6.9×1.7 inch)
Weight, 1.3 kg (2.8 lb)
Environment/Safety
Temperature:
Operating: 0
C (32
F) to 40
C (104
F)
Storage: –10
C (14
F) to 50
C (122
F)
Humidity, 0% to 80% relative, non-condensing
Safety, FCC/CE/C-Tick/Class B
Table 1-3 Specifications

5
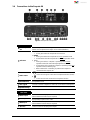
1.4 Connections to the Sequoia 4H
Figure 1-1 Sequoia 4H Components
Front Panel
Stereo Speaker
Set
Embedded speakers for monitoring audio.
(Volume can be adjusted and output can be enabled/disabled.)
Indicators
PWR
Glows green when the Sequoia 4H is turned ON
MODE
Glows green when the Sequoia 4H is in Host operation mode
Glows amber when the Sequoia 4H is in Remote operation mode
1 to 4
Glows green when a computer is operating under Remote
operation mode (full control through keyboard and mouse)
Glows amber when a particular computer is operating under Host
operation mode (monitoring only)
Blinks amber when a rebooting or powered-off computer is
connected to the Sequoia 4H
Audio In/Out
Connects to the green connector for headphone function (stereo)
Connects to the red connector for microphone function
USB Type A
(keyboard/mouse)
Connects to a USB mouse and keyboard. Use these ports for control in
Host operation mode
USB Type B
Connects to remote computer for control via a USB mouse and keyboard
USB Type A
(peripheral sharing)
These two ports can connect to a USB 2.0 hub, USB flash disk, etc.
Rear Panel
HDMI Output
Connects a monitor/display via HDMI or DVI signal cable.
(a DVI to HDMI converter may be required)
5-in-1 Input
Connects the remote computer’s USB, PS/2, and audio connectors via
the proprietary Sequoia 5-in-1 cable
HDMI Input
Connects HDMI/DVI inputs via HDMI or DVI signal cable.
(a DVI to HDMI converter may be required)
Power
(DC 12V)
Connects to the 12V DC/5A power adapter

6
Rear Panel
Ethernet (IP)
For setup using the Phoenix-G software (Galaxy) and control using ASCII
Z commands via a network connection
(Protocol: TCP/IP, UDP)
Dip Switches
Resets the Sequoia to factory-default settings; or updates firmware
Power Switch
Turns the Sequoia 4H power ON and OFF
Table 1-4 Sequoia 4H Component Description

7
2. System Configuration
This chapter discusses the process of setting up Sequoia 4H.
2.1 Getting the Sequoia 4H Ready
The Sequoia 4H can be connected to most monitors and some touch-screen displays. It can also be
cascaded with up to five (5) Sequoias for larger applications.
To control the Sequoia 4H directly, connect a keyboard and mouse to the USB port on its front
panel. Alternatively, to control the Sequoia remotely, use a laptop (or desktop) computer and connect it
to the Sequoia’s USB (type B) port on its front panel, (use a USB A/B cable). Then, run Avitech’s
Hook software utility on the controlling computer to simulate mouse and keyboard operation.
1. Hook utility currently supports the Sequoia solo series (non-cascaded) and the Pacific X-HDU (an
HDMI transmitter-Pacific X-HDUT (TX) and an HDMI receiver-Pacific X-HDUR (RX) allows
transmission of 1080p60 HD over 100 meters based on HDBaseT
®
technology – refer to Pacific X-HDU
user manual for more details). Connect a laptop (or desktop) computer to the Sequoia solo series or
Pacific X-HDU and simulate keyboard/mouse function for remote control processing (KVM feature).
2. Refer to Avitech Hook utility user manual for more details.
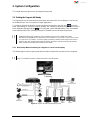
2.1.1 Basic Setup When Connecting to a Regular or Touch-screen Display
The following figure shows a typical setup with an Avitech Sequoia 4H connected to four computers.
DO NOT place any object on the top or side panels of the Sequoia 4H.
Doing so could affect its internal components and/or its heat dissipation.
Figure 2-1 Sequoia 4H with Regular Display Setup

8
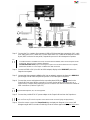
Figure 2-2 Sequoia 4H with Touch-screen Display Setup
Step 1. Connect the 5-in-1 cable to first computer’s USB or PS/2 port and then connect the 5-in-1 cable
to its audio ports (mic in, audio out). Connect other end of 5-in-1 cable to the Sequoia’s source
1 port (DB15 connector at rear panel). Repeat this process for all subsequent computers.
1. We highly recommend using a USB connection instead of a PS/2 connection when available. In case
no USB connection is available and a PS/2 connection must be utilized, make sure to first power on the
Sequoia 4H, then turn on the computer afterwards.
2. (For Windows 2000 users) Upon connecting the Sequoia via USB for the first time to the computer,
perform the windows on-screen steps to initialize the USB connection.
Step 2. Connect a HDMI or DVI (via a DVI to HDMI adapter) display to the HDMI OUT port on the
Sequoia’s rear panel.
Step 3. Connect the first computer’s HDMI or DVI (via an adapter) output to the Sequoia’s HDMI IN 1
port through a HDMI cable. Repeat this process for all subsequent computers.
Step 4. Connect the mouse and keyboard to the mouse/keyboard USB ports located on the
Sequoia 4H front panel. When connecting 3 or more devices at the same time such as a
touch-screen, a mouse and a keyboard, you can connect a USB hub to increase the number of
USB connections. (Refer to Figure 2-2.)
Non-standard keyboards (e.g., keyboards with a USB hub, keyboards that need driver installation and
programmable keyboard, etc.) are not supported.
Step 5. Connect the provided 12V DC power adapter to the Sequoia 4H and turn the Sequoia on.
1. For computers using the PS/2 connection instead of a USB connection; re-boot at this time.
2. It is not necessary to re-boot computers connected via USB connection (plug and play feature).
Step 6. Move the mouse or press the Pause/Break key to display the Sequoia’s Host cursor (will
disappear again after 5 seconds of inactivity). Move the mouse again to display the Host cursor.

9
Step 7. Pop-up menu will appear upon moving Host cursor to the window’s top right position.
Click the symbol or double-click the left mouse button on the desired window to enter
Remote operation mode.
Remote operation mode connects you directly to the selected computer.
The Sequoia’s (Host) keyboard and mouse will now control the selected computer.
Item not applicable for Sequoia 4H with touch-screen display setup or PS/2 connection –
“Surfer” feature (default setting is “on”) is enabled, moving the mouse to a border that is
shared with another remote computer will cause the Sequoia’s (Host) keyboard and
mouse to control the other computer
Pressing Alt + Ctrl + Shift + F10 will toggle this feature “off” and “on.”
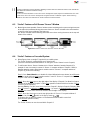
When connecting to touch-screen display
Press Ctrl + T on the keyboard to perform a screen calibration.
This is necessary when connecting to a touch-screen for first time or upon resetting the Sequoia 4H.
The following symbol will appear in the top left portion of the screen:
Use a stylus or a finger to press on the center of the symbol until the next symbol appears
(takes approximately five seconds).
Perform this step each time the symbol appears (top left, top right, lower left, lower right).
Upon completing screen calibration the Sequoia will return to Host mode and the four source
windows will re-appear on screen.
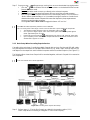
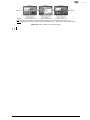
2.1.2 Basic Setup When Cascading Sequoia Devices
Cascading is the technique of combining multiple Sequoia devices (up to five) through USB A/B cables.
Only the keyboard and mouse are cascaded. Other functions (e.g., audio, video, and USB hub) are not,
and depend on the output from each individual computer and the associated Sequoia. (See Figure 2-3.)
The following figure shows three Sequoia 4H’s cascaded together; with each Sequoia 4H connected to
four computers.
Cascading is available on the Sequoia 4H, 2H2U, and 2x2V. A combination of any of these Sequoia devices
can be cascaded to meet custom applications.
Figure 2-3 Cascading Three Sequoia 4H’s Setup
Step 1. Perform steps 1 – 3 for the first Sequoia as outlined in the previous section (2.1.1)
“Basic Setup When Connecting to a Regular or Touch-screen Display.”

10
Step 2. Repeat the aforementioned steps for the second and third Sequoia 4H to be cascaded.
Step 3. Connect a mouse and keyboard to the USB ports located on the Sequoia’s front panel.
(First Sequoia only)
Step 4. Connect first Sequoia’s USB (type-B) port to second Sequoia’s USB (type-A) port
using a standard USB A/B cable. Repeat this procedure to connect second Sequoia to the third.
Step 5. Move the mouse or press Pause/Break key and the Host mouse cursor will appear on display
(will disappear again after 5 seconds of inactivity). Move the mouse again to display the Host
cursor.
Step 6. Place the cursor on the display of the first Sequoia 4H with the mouse and keyboard connected
to it, then perform a system configuration reset by pressing: Ctrl + Shift + Alt + R.
The reset takes approximately four seconds for each module. During this process each
Sequoia’s Mode – LED turns off one at a time.
Step 7. Move the Host mouse cursor across all three displays in order for the system to complete the
USB device initialization.
If the cursor is unable to move over all three displays, perform steps 5 and 6 again.
Step 8. The pop-up menu appears when the Host cursor is moved over the top right portion of
a window.
Click the symbol or double-click the left mouse button on the desired window to enter
Remote operation mode.
Remote operation mode connects you directly to the selected computer.
The Sequoia’s (Host) keyboard & mouse will now control the selected computer.
Item is not applicable for Sequoia 4H with touch-screen display cascaded setup or with
PS/2 connection –
“Surfer” feature (default setting is “on”) is enabled, moving the mouse to a border shared
with another remote computer will cause the Sequoia’s (Host) keyboard and mouse to
control the other computer.
Pressing Alt + Ctrl + Shift + F10 will toggle this feature “off” and “on.”

11
3. Basic Operations
There are two types of operating modes while using the Sequoia 4H; the Host mode and the Remote
mode. This chapter discusses both operational modes.
Host Operation Mode
When the Sequoia 4H is in Host operation mode, the Host cursor is controlled by the mouse connected
to the Sequoia 4H. Or in the case of a cascaded setup, the cursor is controlled by the mouse that is
connected to the Master Sequoia. The Host cursor controls the positions and sizes of the windows for up
to four remote computers (up to 20 when cascaded).
Upon re-connecting a keyboard or mouse, the cursor may disappear.
Press the Pause/Break key to solve this problem.
Remote Operation Mode
When the Sequoia 4H is in Remote operation mode, the mouse cursor and keyboard are used to control
a computer connected to the Sequoia 4H.
Understanding the Terminology:
USB host – refers to the mouse/keyboard USB ports located on the front panel of the
Sequoia 4H.
USB device – refers to the DB15 connector (source 1 – 4 ports) located on the Sequoia 4H rear
panel that connects to the computer’s USB port through the 5-in-1 cable.
Tips on Navigating the Sequoia 4H:
Up to four computers are able to connect with a single Sequoia 4H. The Sequoia puts each
remote computer in a window, and displays all four windows on one monitor. This is how four
computers can be displayed and controlled from a single monitor.
When Host operation mode is active, use the mouse connected to the Sequoia to re-size and
re-position any window on the output display.
To switch operation to a remote computer; move the Host cursor into a specific window on the
screen and then click the “enter icon” or double-click the left mouse button.
Remote operation mode works with computers only. Remote operation mode cannot be entered
on other video sources (e.g., Blu-Ray players).
When Remote operation mode is active, use mouse and keyboard to operate a single computer.
Note: The computer is displayed within a window on the monitor.
When in Remote operation mode, the master Sequoia 4H automatically transfers the mouse
and keyboard control to the selected computer.
To switch back to the Host operation mode, use the keyboard hot-key “Pause/Break.” The Host
cursor should reappear.

12
3.1 Host Operation Mode
In this mode, you can monitor up to four screens or double-click the window of a computer to be
controlled. The following are the basic operations that can be performed in Host operation mode
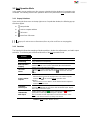
3.1.1 Pop-up Selections
Upon moving the Host cursor to the top right corner of a particular window, the following pop-up
selections appear.
: swap window
: enter a computer window
: full screen
: return from full screen
When the Sequoia detects that a particular computer’s USB (or PS/2) port is not connected, then the enter
pop-up icon will not show on that window. (Note: only USB connections are hot-pluggable).
3.1.2 Functions
The Sequoia 4H allows the swapping of window positions, window size adjustments, and audio output
selections. The following are summarized functions of the Host operation mode.
Function
Window resizing
Drag the border of a window to a desired size
Window
repositioning
Drag a window to a new position
Window position
swapping
Move the Host cursor to the top right corner of a window, click the S icon,
and then move the cursor (now a capital letter S) to the destination
window and click the left mouse button.
Full screen
window
Move the Host cursor to the top right corner of a window and click on the
icon to maximize to full screen. Select to return back from full
screen.
Access a remote
computer
Method 1:
Move the Host cursor to the top right corner of a remote computer
window, click to access the Remote operation mode.
Method 2:
Move the Host cursor so that it is on the desired remote computers’
window and double-click.
Lock/unlock
window layout
Move the Host cursor to the top left corner of the display until the cursor
becomes a capital letter L, then click to lock the window layout. Repeat
these steps to unlock the layout.
Enable/disable
audio output
Double-click the audio tally
(green) and it will turn to
(red) to
signify that an audio output is coming from a window.
Note: To enable an audio output from a source that is not the active
window, refer to the Phoenix-G (Galaxy) user manual.
Table 3-1 Host Operation Mode Functions

13
3.1.3 Hot-keys
Hot-keys are available when utilizing the Sequoia 4H under the Host operation mode.
Detailed below are the Host operation mode hot-keys.
Keys
Alt + F#
(F1 – F12)
Use Alt + F1 – F12 function keys (up to F23 with special keyboard) to load
user-created preset files. Sequoia can store up to 23 user-created
presets.
Alt + F
Toggle a particular window’s full screen mode on/off.
Note: The window selected is where the Host cursor is currently residing.
Alt + L
Toggle lock/unlock window layout.
Ctrl + Esc
This allows Ethernet communication so that you can use the Phoenix-G
(Galaxy) control software and send ASCII Z commands.
Ctrl + F#
(F1 – F4)
This loads the window to full screen mode, while making the other
window(s) fade from view; Where F# is the source window number (e.g.,
Ctrl + F1 will call up the source 1 window). In a cascaded system: First
move the Host cursor to the desired module then select the source.
Ctrl + L
Toggle lock/unlock keyboard and mouse. When locked the keyboard and
mouse are inoperable.
Ctrl + O
Toggle the audio output on/off (mute).
Ctrl + P
Toggle a window on and off where P is the source/window number
(e.g., Ctrl + 1 will turn on/off the source 1 window).
Ctrl + R
Toggles between aspect ratios for the window that the Host cursor is on.
Available settings: 4:3, 16:9 and off.
Ctrl + S
Saves latest preset to the Sequoia so that on the next boot-up the latest
preset will be loaded.
Note: Also saves latest presets for cascaded modules.
Ctrl + X
When a video signal does not fill up the entire frame, a black border fills in
the empty space that is left behind. Pressing Ctrl + X crops the black
bars. When applying this function, make sure the image does not have a
black or dark grey background to avoid cropping part of the actual image.
Ctrl + Y
Redo: redo up to ten previously “undone” actions.
Ctrl + Z
Undo: undo up to ten previous actions.
Ctrl + Shift + Alt + R
Reset the cascaded module’s system configuration only.
F#
(F1 – F4)
Access a remote computer, F# represents keys F1 to F4. F1 corresponds
to the source 1 window and F2 source 2, etc.
Note: Window can also be selected by double-clicking it.
Upon selection, enters Remote operation mode of the selected window.
Window swapping can be enabled from the Phoenix-G (Galaxy) control
software. While in Phoenix-G, go to Sequoia Properties and check the
Swap with Active Window parameter.
Home
While in full screen mode, toggle between full screen in foreground and
full screen in background.
Page Up/
Page Down
Switch between the three factory-default presets.
Shift + F#
(F1 – F4)
Access a remote computer (with active window swapping). F# represents
keys F1 to F4. F1 corresponds to source 1, F2 source 2, etc. You can
also hold Shift and Double-Click the mouse on the desired window for
the same effect.
Upon selection, enters Remote operation mode of the selected window.
Note: When the parameter inside the Phoenix-G (Galaxy) software
“Swap with Active Window” is enabled (with checkmark) then the
functions of F# and Shift + F# switch. Thus, the hot-key Shift + F# will not
cause swapping. F# will cause swapping.
Shift + I
Switch audio input source between HDMI IN and source ports. The audio
tally (red) shows that audio output is coming from a particular
window.
La pagina si sta caricando...
La pagina si sta caricando...
La pagina si sta caricando...
La pagina si sta caricando...
La pagina si sta caricando...
La pagina si sta caricando...
La pagina si sta caricando...
La pagina si sta caricando...
La pagina si sta caricando...
La pagina si sta caricando...
La pagina si sta caricando...
La pagina si sta caricando...
La pagina si sta caricando...
La pagina si sta caricando...
La pagina si sta caricando...
La pagina si sta caricando...
-
 1
1
-
 2
2
-
 3
3
-
 4
4
-
 5
5
-
 6
6
-
 7
7
-
 8
8
-
 9
9
-
 10
10
-
 11
11
-
 12
12
-
 13
13
-
 14
14
-
 15
15
-
 16
16
-
 17
17
-
 18
18
-
 19
19
-
 20
20
-
 21
21
-
 22
22
-
 23
23
-
 24
24
-
 25
25
-
 26
26
-
 27
27
-
 28
28
-
 29
29
-
 30
30
-
 31
31
-
 32
32
-
 33
33
-
 34
34
-
 35
35
-
 36
36


Avitech Sequoia 4H Manuale utente
- Categoria
- Switch KVM
- Tipo
- Manuale utente
in altre lingue
- English: Avitech Sequoia 4H User manual
Altri documenti
-
Lindy KVM over IP Access DVI-I, USB & PS/2 Manuale utente
-
DirekTronik SKM-04 Manuale utente
-
Smart-AVI SKM-04 Manuale utente
-
Petzl Attachment bridge for SEQUOIA and SEQUOIA SRT harnesses Technical Notice
-
Toyota Sequoia Guida di riferimento
-
-
-
Roland S-4000S-3208 Manuale del proprietario
-
Roland UA-1X Manuale del proprietario
-