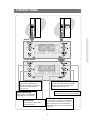
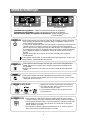
Samsung RS2577SL Manuale utente
- Categoria
- Frigo-congelatori side-by-side
- Tipo
- Manuale utente

SIDE BY SIDE
REFRIGERATOR
OWNER’S MANUAL AND INSTALLATION
DA99-00275J REV(0.2)
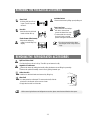
CONTENTS
SAFETY WARNING SIGNS...............................................................2
OPERATING INSTRUCTIONS ........................................................4
SETTING UP THE REFRIGERATOR.........................................................4
MAJOR FEATURES.....................................................................................4
CONTROL PANEL........................................................................................5
DIGITAL PANEL...........................................................................................6
TEMPERATURE CONTROL .......................................................................7
ICE and COLD WATER DISPENSER.........................................................7
SHELVES and BINS.....................................................................................8
FOOD STORAGE GUIDE ...........................................................................9
CoolSelect Zone
TM
Drawer GUIDE.............................................................11
REMOVING THE FREEZER ACCESSORIES..........................................13
REMOVING THE REFRIGERATOR ACCESSORIES.............................13
BEVERAGE STATION
TM
(RS2577)............................................................14
CLEANING THE ACCESSORIES.............................................................14
CHANGING THE INTERIOR LIGHT.........................................................15
WATER FILTER ..........................................................................................16
DOORS.......................................................................................................16
INSTALLATION INSTRUCTIONS................................................17
INSTALLATION OF THE REFRIGERATOR .............................................17
REMOVING THE REFRIGERATOR DOORS..........................................18
REATTACHING THE REFRIGERATOR DOORS ....................................21
ADJUSTING THE CLEARANCE BETWEEN THE DOORS ....................24
CHECKING THE WATER DISPENSER LINE...........................................26
INSTALLING THE WATER DISPENSER LINE.........................................26
TROUBLESHOOTING ...............................................................................29
In the CANADA for questions about features,
operation/performance, parts, accesories or service, call:
1-800-726-7864 (1-800-SAMSUNG)
www.samsung.ca
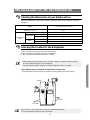
Write the model and serial number here:
Model #
Serial #
Find these numbers on a label of the
refrigerator cabinet at the left hand-side wall.
ENGLISH

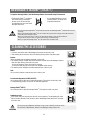
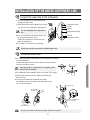
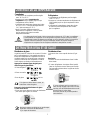
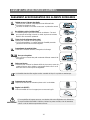
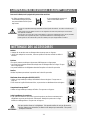
SAFETY WARNING SIGNS
2
Because these warning signs are to prevent injury from users or other persons, please follow
safety warning signs. After reading the warning signs, keep them in a safe place for future refer-
ence.
WARNING
•
Before operating the appliance, please read this manual thoroughly and retain it for your reference.
•
Because these following operating instructions cover various models, the characteristics of your
refrigerator may differ slightly from those described in this manual
• The appliance is not intended for use by children or infirm persons without adult supervision.
• Children should be supervised to ensure that they do not play with the appliance.
Do not plug several appliances into the same multiple
receptical.
• This could cause overheating and the risk of fire.
Make sure that the power plug is not squashed or dam-
aged by the back of the refrigerator .
• A damaged power plug may overheat and cause fire.
Do not directly spray water inside or outside the refrig-
erator
/ freezer. .
• There is a risk of electric shock.
Do not use aerosols near the refrigerator .
• There is a risk of explosion or fire.
Do not bend the power cord excessively or place
heavey articles on it .
• This constitutes a fire hazard. If the power cord is dam-
aged, have it replaced immediately by the manufacturer
or its service agent.
Do not insert the power plug with wet hands.
• You may receive an electric shock.
Do not put a container filled with water on the refrigera-
tor.
• If spilled, there is a risk of fire or electric shock.
Do not install the refrigerator in a damp place or a
place where it may come in contact with water.
• Deteriorated insulation of the electrical parts may cause
electric shock or fire.
Pull the power plug out of the socket before chang-
ing the interior light of the refrigerator.
• Otherwise, there is a risk of electric shock.
If you wish to dispose of the
refrigerator / freezer
throw
it away after first removing the doors and seals.
• Do so in a way that it is not possible for a child to remain
trapped inside.
Do not store volatile or flammable substances in the
refrigerator.
• The storage of benzene, thinner, alcohol, ether, LP gas and
other such products may cause explosions.
Do not disassemble or repair the
refrigerator
by yourself.
• You run the risk of causing a fire, malfunctions and/or
personal injury.
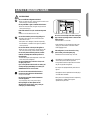
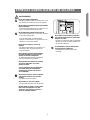
WARNING SIGNS
The refrigerator must be grounded.
•
You must ground the refrigerator to prevent any power
leakages or electric shocks caused by current leakage
from the refrigerator.
Never use gas pipes, telephone lines or other poten-
tial lightening rods as ground.
Improper use of the ground plug can result in a risk of
electric shock. If it is necessary to use an extention cord,
use only a 3-wire extention cord that has a 3-blade ground
plug and a 3-slot receptacle that will accept the plug on the
appliance.The marked rating of the extension cord should
be AC 115V~120V, 10A, or more.if a grounding adapter is
used, make sure the receptacle box is fully grounded.
•
CAUTION/WARNINGS USED OTHER SIGNS USED
Indicates that a danger of
death or serious injury exists.
Indicates that a risk of
personal injury or material
damage exists.
WARNING
CAUTION
Represents something you must NOT touch.
Represents something you must follow.
Indicates that you must disconnect the
power plug from the socket.
Represents a ground is needed to prevent
electric shock.
Represents something you must NOT
disassemble.
Represents something you must NOT do.
It is recommended that this sentence be
handled by service man.

3
SAFETY WARNING SIGNS
Do not disconnect the power cord by pulling on it.
• Damage to the cord may cause a short-circuit, fire
and/or electric shock.
• If the power cord is damaged, it must be replaced by
the manufacturer, a certified service agent or qualified
service personnel.
Do not store articles on the top of the appliance .
• When you open or close the door, the articles may fall
and cause personal injury and/or material damage.
Do not store pharmaceuticals products, scientific
materials and temperature-sensitive products in
the refrigerator.
• Products that require strict temperature controls must
not be stored in the refrigerator.
Do not let children hang on the door. If not, a seri-
ous injury may occur.
If you sense pharmaceuticals smells or smoke, pull
out the power plug immediately and contact your
SAMSUNG Electronics service center.
Do not touch the inside walls of the freezer or
products stored in the freezer with wet hands.
• It may cause frostbite.
Do not insert your hands into the bottom area
under the appliance.
• Any sharp edges may cause personal injury.
Never put fingers or other objects into the
dispenser hole and ice chute. It may cause per-
sonal injury or material damage
If the refrigerator is not to be used for a long
period of time, pull out the power plug.
• Deterioration in the insulation may cause fire.
Do not use a wet or damp cloth when cleaning the
plug. Remove any foreign matter or dust from the
power plug pins.
• Otherwise there is a risk of fire.
• If the refrigerator is disconnected from the power
supply, you should wait for at least five minutes
before plugging it back.
• The appliance is not intended for use by young chil-
dren or infirm persons without supervision.
Young children should be supervised to ensure that
they do not play with the appliance.
• Do not place the equipment directly under the sun-
light. etc
• The appliance must be positioned so that the plug is
accessible after installation
• If the power cord is damaged it must be replaced by
manufacturer, a certified service agent or
qualified service personnel.
CAUTION SIGNS
Do not overfill the refrigerator with food.
• When you open the door, an item may fall out and cause
personal injury or material damage.
Do not put bottles or glass containers in the
freezer
.
• When the contents freeze, the glass may break and
cause personal injury.
If the wall socket is loose, do not insert the power
plug.
• There is a risk of electric shock or fire.

4
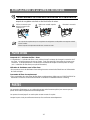
MAJOR FEATURES
Twin Cooling System
•
The refrigerator and the freezer have two evaporators. Given this inde-
pendent system, the freezer and the refrigerator are cooled individually
as required and are, therefore, more efficient. Food odor from the refrig-
erator does not affect food in the freezer due to separate air flow circu-
lation.
Multi-Flow System
•
Cool air circulates through multiple vents on every shelf level.This pro-
vides even distribution of cooling inside cabinets to keep your food fresh
longer.
Xtra Space
TM
• Vertical room next to the ice maker in the freezer provides space for
pizza etc.
Door Alarm
•
Beeper reminds you that the door is open.
Xtra Fresh
TM
• Optimized humidity control keeps vegetables & fruits fresh.
Deodorizer
• Reusable deodorizer keeps the refrigerator air fresh and odor free.
CoolSelect Zone
TM
Drawer (RS2555, RS2577)
• User can select Quick Cool, Thaw and Select buttons for quickly
chill, thaw and cools items. Select Soft Freeze, Cool or Chill to control
the temperature of drawer.
SETTING UP THE
REFRIGERATOR
Once you have performed the following steps, your refrigerator should be fully operational. If not, check
the power supply and electricity source. If you have any questions, contact your SAMSUNG
service center.
Place the refigerator in an appropriate loca-
tion with reasonable clearance between the
wall and the refigerator.
(refer to installation instructions in this man-
nal)
Set the temperature control to the coldest
temperature and wait for an hour.The
freezer should get slightly chilled and the
motor should run smoothly.
Once the refrigerator temperature is suffi-
ciently low, you can store food in the
refrigerator. After starting the refrigerator, it
takes a few hours to reach the appropriate
temperature.
When the refrigerator is plugged in,
the interior light should come on when
you open the doors.

5
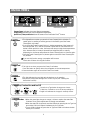
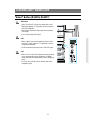
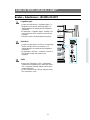
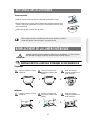
CONTROL PANEL
RS2533
RS2555, RS2577
FREEZER TEMP. BUTTON
To set the freezer temperature, press
the button repeatedly to change the set
temperature in sequence between
-14°C and -25°C.
FRIDGE TEMP. BUTTON
To set the fridge temperature, press the button
repeatedly to change the set temperature in
sequence between 7°C and 1°C.
POWER COOL BUTTON
Speeds up the cooling process in the
refrigerator
POWER FREEZE BUTTON
Speeds up the ice making process &
the freezing process in the freezer.
CHILD LOCK BUTTON
When this button is pressed for 3 sec., the Power
Freeze, Power Cool, Freezer Temp. and Fridge
Temp. are locked and can not be modified.The
Water and Ice dispensers are not locked they can
still be used.
ICE TYPE BUTTON
Use this button to choose Cubed or
Crushed Ice or Ice off.

6
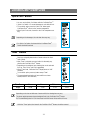
DIGITAL PANEL
•
This light indicates the recyclable twin deodorizers are in operation.
•
Recycle the honeycomb cartridge once or twice a year (see “Cleaning the
Accessories” section)
•
This light is on when you press the Power Cool button.
Press the button to quickly return the refrigerator to the set temperature.
•
Press the button again to cancel the Power Cool mode.
•
This light will turn on when you press the Power Freeze(Quick Ice) button.To
speed up the ice making or freezing process in the freezer, press the Power
Freeze(Quick Ice) button.
•
If you select the Power Freezer(Quick Ice), interior temperature of the freezer will
be controlled with -25°C until the Ice bucket is filled with ice cube. When the Ice
bucket is filled up with ice cubes, the freezer will return to original set temperatures.
Also, whenever the Ice bucket is released from being filled with ice cube by
dispensing ice, the freezer will perform the Power Freezer(Quick Ice) function again.
•
Press the Power Freeze(Quick Ice) button again to cancel the Power Freeze(Quick
Ice) function.
If you use this function, energy consumption will increase.
Please turn off when not using this function.
or
RS2533
RS2555,RS2577
•
Press the Ice Type button in seqence to choose
Cubed Ice, Crushed Ice or Ice Off to stop making ice.
•
Bright icon indicates the ice type is currently chosen.
Cubed Ice, Crushed Ice and Ice Off
•
When the green light changes to orange, it is time to replace the water filter.
If indicator is red, quick replacement is strongly recommended.
•
When the water filer is replaced, reset the indicator by pressing the Ice Type but-
ton and the Child Lock buttons simultaneously for 3 seconds.
•
To turn off this indicator off, press the Ice Type and Child Lock buttons simulta-
neously for 5 seconds.
Filter Indicator
Power Freeze
Power Cool
Deodorizer
Freezer Temp. indicates the current freezer temperature.
Fridge Temp. indicates the current
refrigerator
temperature.
Quick Cool,Thaw, and Select show the status of the CoolSelect Zone
TM
Drawer

Press the Ice Type button to select the type of ice:
•
Cubed ice
•
Crushed ice
•
No ice
If the Ice remains in the Ice bucket, the
cubed ice is obtained.
Push the ice dispenser lever with a cup.
•
Place a cup in line with the dispenser lever the
dispenser to prevent the ice from jumping out.
7
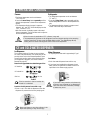
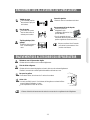
ICE and COLD WATER DISPENSER
Ice Dispenser
The ice maker produces 10 cubes at once and about
120 cubes a day automatically.
This quantity may be influ-
enced by factors such as the freezer temperature, Power
Freeze function and the number of door openings.When
your
refrigerator
is plugged in, the Cubed ice mode is
automatically selected .
Water Dispenser
The capacity of the water tank is approximely 0.3 gal.
Cold Water
•
Push the water dispenser lever with a cup.
•
If you have just installed the
refrigerator
, throw
away the first six glassfuls of water to flush out
impurities in the water supply system.
Never put fingers or any other objects in the
dispenser opening. It may cause injury.
If you have a long vacation or business trip
and won’t use the water or ice dispensers,
close the water valve. Otherwise, leakage
of water may occur.
Push
Push
CAUTION
TEMPERATURE CONTROL
Freezer
•
The freezer temperature can be set between
-14°C and -25°C.
•
Press the Freezer Temp. button repeatedly until the
desired set temperature is shown in the temperature
display.
•
The temperature display changes in sequence
between -14°C and -25°C.When the display reaches
-14°C, it returns to -25°C.
•
After five seconds, the display reverts to the actual
freezer temperature.The unit will then work to adjust to
the new desired temperature.
Refrigerator
•
The refrigerator temperature can be set between
7°C and 1°C.
•
Press the Fridge Temp. button repeatedly until the
desired temperature is shown in the temperature dis-
play.
•
The temperature display changes in sequence and
reverts in the same way as the freezer.
•
When ice cream is stored above -15°C in freezer, it may melt.
•
The temperature of the freezer or the refrigerator rises from frequent openings, when sweeping
and from warm food.This may cause the digital display to blink .The digital display will stop
blinking when the freezer and refrigerator return to the normal temperature.
WARNING
No ice
NOTE
NOTE

8
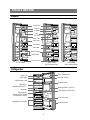
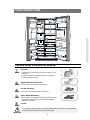
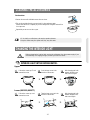
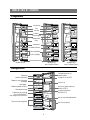
SHELVES AND BINS
Door Bin
Xtra Space
TM
Ice Maker
Light
Ice Chute
Glass Shelf
Wire Shelf
Light Switch
Light Switch
Deodorizer
Plastic Drawers
Wire Drawers
Front Leg Cover
Tilt Pockets
Freezer
RS2533 Model
Egg Container
Foldable Shelf (RS2577)
Light (upper)
Water Filter
Spill-proof glass Shelf
Dairy Compartment
Wine Self (RS2577)
Gallon Door Bin
Beverage Station
TM
(RS2577)
Lights (lower) (RS2555,2577)
Gallon Door Bins
Door Bin Top Lips
CoolSelect Zone
TM
Drawer
( Chilled Bin for RS2533)
Vegetable & Fruit Drawers
Refrigerator
RS2577 Model
with CoolSelect Zone
TM
RS2555 Model
with CoolSelect Zone
TM

9
FOOD STORAGE GUIDE
FROZEN FOOD STORAGE IN FREEZER
Xtra Space
TM
•
Can be used for frozen foods such as pizza, pasta, burri tos,
and fajitas.
•
In order to prevent odor penetration to the ice, stored food
should be wrapped securely.
Tempered Glass Shelf ( Wire Shelf )
•
Can be used to store all types of frozen food.
Door Bin (Tilt Pocket)
•
Can be used for small packages of frozen food.
Plastics Drawer (Wire Drawer )
•
Can be used to store meat and dry foods. Stored food should
be wrapped securely using foil or other suitable wrapping
materials or containers.
Ice chute
WARNING
Do not put your fingers, hands or any other insuitable objects in the chute or ice-maker bucket.
As this may result in personal injury or material damage.

10
FOOD STORAGE GUIDE
Tempered Spill Proof Glass Shelf
•
Can be used to store all types of chilled food.
•
Safe and hard to break resistant.
•
Circular marks on the glass surface are a normal phenomenon.
Chilled Bin or CoolSelect Zone
TM
Drawer
•
Helps to preserve the taste of food and prolongs its freshness. Use
to store cheese, meat, poultry, fish or any other foods used quickly.
Fruit & Vegetable Drawer (Upper and Lower)
•
Is used to store fruits and vegetables.
•
This drawer is airtight. Optimized humidity control design helps to
preserve the freshness of the stored vegetables and fruits.
Dairy Compartment
•
Can be used to store butter, margarine and cheese.
Gallon Door Bins
•
Can be used to store foods in small packages, such as milk and
yogurt.
Beverage Station
TM
(
RS2577)
•
Can be used to store the frequently used items, such as canned
beverages and snacks and allows access to these items without
opening the refrigerator door.
Egg Container
•
Put eggs in the container and place them on the shelf.
Wine Shelf (
RS2577)
•
Place your wine bottle on the shelf to maintain their taste.
CHILLED FOOD STORAGE IN REFRIGERATOR
Bottles should be stored tightly together so that they do not fall out.
•
If you have a long vacation planned, you must decide to empty the refrigerator and turn it off. Wipe
excess moisture from the inside and leave the doors open. Otherwise, odor and mold may develop.
WARNING
NOTE

11
CoolSelect Zone
TM
Drawer GUIDE
“Select” Button (RS2555, RS2577)
Soft Freeze
•
When “Soft Freeze” is chosen, the temperature on the
digtal panel displays -5
o
C regardless of the set tempera-
ture of the refrigerator.
•
“Soft-Freeze” temperature helps keep meats and fishes
fresh longer.
•
Can cut meat easily without drips.
Chill
•
When “Chill” is chosen, the temperature of the
CoolSe-
lect Zone
TM
Drawer is kept at -1
o
C regardless of the set
refrigerator temperature.
•
“Chill” temperature helps keep meat or fish fresh longer.
Cool
•
When “Cool” is chosen, the temperature will be the same
as the set temperature of the refrigerator.The digital
panel shows the same temperature as that of the display
panel.
•
For “Cool,” the CoolSelect Zone
TM
Drawer allows extra
refrigerator space.
C

12
CoolSelect Zone
TM
Drawer GUIDE
“Quick Cool”Button
“Thaw” Button
•
You can use the Quick Cool feature with the CoolSelect Zone
TM
.
•
“Quick Cool” allows 1~3 canned beverages to cool within 60 min.
•
To cancel this option, press the “Quick Cool” button again.
CoolSelect Zone
TM
returns to the previous temperature.
•
When “Quick Cool” ends, it returns to the “Cool” temperature set-
ting.
Depending on the beverages, the cool-down time may vary.
•
Drips loss and quality deterioration of meats reduces the fresh-
ness of foods.
•
After “Thaw” is selected, warm and cold air is alternately sup-
plied into the
CoolSelect Zone
TM
Drawer
.
•
Depending on the weight of meat, thawing time can be selected
for 4 hrs, 6 hrs, 10 hrs, and 12 hrs sequentially.
•
When “Thaw” ends,
CoolSelect Zone
TM
displayreturns to “chill”
condition.
•
To cancel this option, press any button except “Thaw”.
•
The approximate thawing time of meat and fish are shown
below. (Based on 1inch thickness)
C
C
Thaw
Time 4 hours 6 hours 10 hours 12 hours
Weight 0.8 lb 1.3 lb 1.7 lb 2.2 lb
•
For “Quick Cool” option, food stored in the CoolSelect Zone
TM
Drawer should be removed.
NOTE
NOTE
NOTE
NOTE
Depending on the size and thickness of meat and fish, the thawing time may vary.
The above weight represents the total weight of food in the CoolSelect Zone
TM
Drawer.
Ex) The total thawing time for 1.3 lb frozen beef and 0.8 lb frozen chicken will be 10 hours.
•
With the “Thaw” option, food stored in the CoolSelect Zone
TM
Drawer should be removed.

13
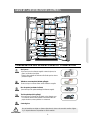
REMOVING THE FREEZER ACCESSORIES
•
Do not use excessive force when
removing the cover. It may cause an
injury.
Glass Shelf
•
Pull the shelf out as far as
it goes.Then lift it up and
remove it.
Door Bin
•
Hold the door bin with both
hands and then lift it up.
Plastic Drawer (Wire Drawer)
•
Remove the drawer by
pulling it out and lifting it up
slightly.
Ice Maker Bucket
•
Remove the bucket by lifting up and pulling out.
Front Leg Cover
•
Open the freezer and refriger-
ator doors, remove three
screws and detach the cover.
•
To reassemble the cover leg
front, put it back to original
position and tighten the three screws.
NOTE
REMOVING THE REFRIGERATOR ACCESSORIES
Spill Proof Glass Shelf
•
Pull the shelf out as far as it will go.Then lift it up and remove it softly.
Vegetable & Fruit Drawer
•
Remove the drawer by holding the handle, pulling the drawer out and lifting it up smoothly..
•
Remove the optimized humidity control cover by pulling it towards you.
Gallon Door Bin
•
Hold the bin with both hands and remove it by lifting it up.
Wine Shelf
•
It is attached to the cabinet wall.To remove wine shelf, slide the
wine shelf in the direction of the arrow as shown.
•
Simply take the shelf out of the tabs.
NOTE
•
Before
removing the freezer and refrigerator accessories, please move the stored foods to other space.

14
CLEANING THE ACCESSORIES
•
Do not spray the refrigerator with water. It may cause a death by an electric shock.
•
Do not clean it with benzene, thinner or car detergent. It may cause a fire.
Beverage Station
TM
(
RS2577 )
•
Use a damp cloth to clean the
Beverage Station
TM
.Then wipe it out with a dry cloth.
Rubber door seals
•
If the rubber door seals are dirty, the door will not close properly, The refrigerator will not be
able to function efficiently. Clean the doors with a mild detergent and damp cloth.Then wipe
with a dry cloth.
Ice and water dispenser (RS2555, RS2577)
•
Use a damp cloth to clean the ice and water dispenser.Then wipe it out with a dry cloth.
•
To keep drainage grid dry, do not touch ice and water dispenser.
Interior
•
Clean the accessories with a mild detergent, then wipe out with a dry cloth.
•
After washing the accessories, make sure that they are dry before using them again.
Exterior
•
Wipe the digital panel and display panel with a clean cloth.
•
The surface of doors, handles and cabinet should be cleaned with a mild detergent and soft
cloth, then wipe off the surface with a dry cloth.
- Do not use Benzene, Thinner and clorox for cleaning
- Do not spray water directly on the surface of refrigerator while cleaning.
•
The exterior part of refrigerator should be polished once or twice a year.
Rear
•
Use a vacuum cleaner to remove dust once or twice a year.
WARNING
•
The Beverage Station
TM
is convenient
and reduces energy consumption,
because you do not need to open
the refrigerator door to access stored
beverages and snacks.
•
The door of the Beverage Station
TM
should never be removed.The Beverage Station
TM
cannot function if its door
is missing.
•
When closing the Beverage Station
TM
door, be careful not to put your hands or fingers around the door frame
where they can be caught or injured.
•
When you use the open door as a tray, do not place heavy objects on it. Do not allow children to
hang on the door because there is a risk of personal injury or material damage.
•
When you open the beverage station
TM
door, be careful not to hit children head.
BEVERAGE STATION
TM
(
RS2577 )
WARNING
•
It is recommended that you use the
Beverage Station
TM
for storing most
frequently needed foods
To open the Beverage Station
TM
, hold the Beverage Station
TM
door handle and pull it downward.

15
CHANGING THE INTERIOR LIGHT
INTERIOR LIGHT IN THE REFRIGERATOR .
Before changing the interior light, unplug the
refrigerator
from the power supply. If you
have difficulty in changing the light, contact your service center.
WARNING
Pull out the screw cap
➀
and
remove the screw.
Push the lamp cover in the
direction of the arrows.
After changing the bulb,
reattach the light cover
and screw it in again.
Pull out the screw cap and
remove the screw.
Take the lamp cover out in the
direction of the arrows.
After changing the bulb,
reattach the light cover
and screw it again.
Twin Deodorizer
•
Remove the cover with a flat blade screw driver as shown.
•
Take out the cartridge from the cover and soak it in clean and warm water
at least more than 4 hrs.Completely dry out the cartridge with sunlight for at least 8 hrs
in an open area.
•
Repeat this process once or twice a year.
•
If it is dried in a confined area, odor may be spread to that area.
•
Keep the children away from yellow water, they may drink water.
CLEANING THE ACCESSORIES
NOTE
Upper
Lower (RS2555,RS2577)

16
CHANGING THE INTERIOR LIGHT
INTERIOR LIGHT IN THE FREEZER
.
NOTE
Use a screwdriver to remove
the light cover (
➀
).
Change the bulb with a new
one (
➁
)
Reattach the light cover
Replacement bulbs for both the freezer and refrigerator are at retail outlets such as Wal-mart, The Home
Depot and Lowe's.
Use replacement bulb size E17, maximum 30 watts.
WATER FILTER
The water “Filter Indicator” light
•
“Filter Indicator” light lets you know when it is time change your water filter cartridge.The light
will change from green to orange.This tells you that it is almost time to change the current cartridge.
It is recommended that you replace the cartridge when the light changes to red.
(see “Install the water filter” section for more informmation)
Using the dispenser without the water filter
•
You can not use the water and ice dispenser without a water filter cartridge because the water line
blocks at water supply.
Ordering replacement filters
•
To order more water filter cartridges, call 1-800-SAMSUNG and ask for accessory Part # DA29-
00003A or contact your authorized Samsung dealer.
DOORS
The refrigerator doors have a special door opening and closing feature to make sure that the doors
close all the way and are securely sealed.
When opening the door, it will only open so far. After reaching a certain point, it will remain open.
When the door is partially open, it will close automatically.
The freezer light is located in the bottom of the auger motor case.

17
INSTALLATION OF THE REFRIGERATOR
Check the dimensions of your entrance door to determine whether the refrigerator can pass
through it.
• Select a location with easy access to the water supply.
• Select a location with enough space for the refrigerator.
• Select a location without direct exposure to sunlight.
• Before disassembling the freezer door, the water supply line needs to be disconnected.
(If not, the water supply line can be damaged.)
• See “Separating the water supply line from the refrigerator” on the next page.
Dimension
(inch)
Width
Capacity (Cu. Ft)
Model
RS2533, RS2555, RS2577
25.2
without Hinge
Case Height
with Hinge
with door
Depth
without door
36
69
70
35
28
Checking the Dimensions of your Entrance Door
Selecting the Location for the Refrigerator
Allow clearance to the right, left, back and top when installing the refrigerator.
This has the advantage of reducing power consumption.
Allow sufficient space to circulate the air at the internal cooling system.
•
When refrigerator has not enough space, the internal cooling system may not work correctly.
NOTE
inch
1
0.1 inch
1 inch
NOTE

18
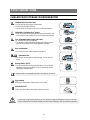
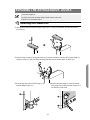
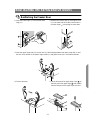
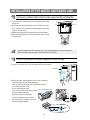
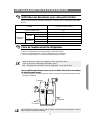
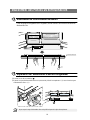
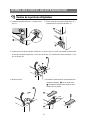
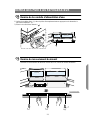
REMOVING THE REFRIGERATOR DOORS
1) Remove the screw from clamp ( ).
2) Remove the water tube by pressing the coupler (➁) and pulling the water tube (➀) away.
Open the freezer and refrigerator doors, and then take off the front leg cover by turning the
three screws counter-clockwise.
a
a
FRONT LEG COVER
SCREW
Removing the Front Leg Cover
Separating the Water Supply Line from the Refrigerator
Do not cut the water tube but separate it from the coupler.
NOTE

19
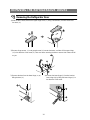
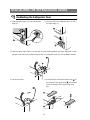
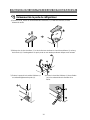
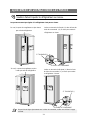
REMOVING THE REFRIGERATOR DOORS
1) With the door closed, remove the upper hinge cover (➀) using a screwdriver, and then disconnect
the wires (➁).
2) Remove hinge screws (
➂
) and ground screw (
➃
) counter-clockwise, and take off the upper hinge (➄)
along the arrow (➅).Take care when removing the door to ensure that it does not fall on you.
3) Remove
the door from the lower hinge
(➆)
by
carefully lifting the door (➇).
4) Remove the lower hinge (➈) from the bracket
lower hinge (➉) by lifting the lower hinge (➈) in
the direction of the arrow.
Removing the Freezer Door
•
Lift the door straight up.
•
Be careful not to pinch the water tubing and wire harness on the door.
•
Place doors on a protected surface.
NOTE

20
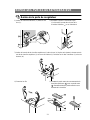
REMOVING THE REFRIGERATOR DOORS
3) Remove
the door from the lower hinge
(➆)
by
lifting the door (➇).
4) Remove the lower hinge (➈) from the bracket
lower hinge (➉) by lifting the lower hinge (➈) in
the direction of the arrow.
1) With the door closed, remove the upper hinge cover (➀) using a screwdriver, and then disconnect
the wires (➁).
2) Remove hinge screws (
➂
) and ground screw (
➃
) counter-clockwise, and take off the upper hinge
(➄) in the direction of the arrow (➅).Take care when removing the door to ensure that it does not fall
on you.
Removing the Refrigerator Door
La pagina sta caricando ...
La pagina sta caricando ...
La pagina sta caricando ...
La pagina sta caricando ...
La pagina sta caricando ...
La pagina sta caricando ...
La pagina sta caricando ...
La pagina sta caricando ...
La pagina sta caricando ...
La pagina sta caricando ...
La pagina sta caricando ...
La pagina sta caricando ...
La pagina sta caricando ...
La pagina sta caricando ...
La pagina sta caricando ...
La pagina sta caricando ...
La pagina sta caricando ...
La pagina sta caricando ...
La pagina sta caricando ...
La pagina sta caricando ...
La pagina sta caricando ...
La pagina sta caricando ...
La pagina sta caricando ...
La pagina sta caricando ...
La pagina sta caricando ...
La pagina sta caricando ...
La pagina sta caricando ...
La pagina sta caricando ...
La pagina sta caricando ...
La pagina sta caricando ...
La pagina sta caricando ...
La pagina sta caricando ...
La pagina sta caricando ...
La pagina sta caricando ...
La pagina sta caricando ...
La pagina sta caricando ...
La pagina sta caricando ...
La pagina sta caricando ...
La pagina sta caricando ...
La pagina sta caricando ...
-
 1
1
-
 2
2
-
 3
3
-
 4
4
-
 5
5
-
 6
6
-
 7
7
-
 8
8
-
 9
9
-
 10
10
-
 11
11
-
 12
12
-
 13
13
-
 14
14
-
 15
15
-
 16
16
-
 17
17
-
 18
18
-
 19
19
-
 20
20
-
 21
21
-
 22
22
-
 23
23
-
 24
24
-
 25
25
-
 26
26
-
 27
27
-
 28
28
-
 29
29
-
 30
30
-
 31
31
-
 32
32
-
 33
33
-
 34
34
-
 35
35
-
 36
36
-
 37
37
-
 38
38
-
 39
39
-
 40
40
-
 41
41
-
 42
42
-
 43
43
-
 44
44
-
 45
45
-
 46
46
-
 47
47
-
 48
48
-
 49
49
-
 50
50
-
 51
51
-
 52
52
-
 53
53
-
 54
54
-
 55
55
-
 56
56
-
 57
57
-
 58
58
-
 59
59
-
 60
60


Samsung RS2577SL Manuale utente
- Categoria
- Frigo-congelatori side-by-side
- Tipo
- Manuale utente
in altre lingue
- English: Samsung RS2577SL User manual
- français: Samsung RS2577SL Manuel utilisateur
Documenti correlati
-
Samsung RL44PGPS Manuale utente
-
Samsung RS7568THCSR Manuale utente
-
Samsung RSH7ZNRS Manuale utente
-
Samsung RSH5UTTS Manuale utente
-
Samsung RS7* Manuale utente
-
-
-
Samsung RSJ1KERS Manuale utente
-
-
Altri documenti
-
AEG RMB76121NX Manuale utente
-
LG LSR200B Manuale utente
-
LG GT5240AVFW Manuale utente
-
Bosch B36CL80ENS Guida d'installazione
-
Whirlpool CTAA 55 NF WD Guida utente
-
LG LSR200W Manuale del proprietario
-
ROSIERES CCMN 7182 IXS/1 Manuale utente
-
AEG RMB96716CX Manuale utente
-
Panasonic NRBS53VW3 Manuale del proprietario
-
Panasonic NRB54X1 Istruzioni per l'uso