
VM0404HA 4x4 4K HDMI Matrix Switch Quick Start Guide
VM0808HA 8 x 8 4K HDMI Matrix Switch Quick Start Guide
B
Package Contents
1 VM0404HA 4x4 4K HDMI Matrix Switch
1 Power Adapter
1 IR Remote Control
1 IR Receiver
1 Mounting Kit
1 User Instructions
Front View
IR Remote Control
Rear View
Hardware Installation
1
2
2
3 4
1
2
3 4
1
1
2
3
41 2 3 5 6 7 8
Important Notice
Considering environmental protection, ATEN does not provide a fully
printed user manual for this product. If the information contained in the
Quick Start Guide is not enough for you to confi gure and operate your
product, please visit our website www.aten.com, and download
the full user manual.
Online Registration
http://eservice.aten.com
Technical Phone Support
International:
886-2-86926959
All information, documentation, firmware, software utilities, and
specifi cations contained in this package are subject to change without
prior notification by the manufacturer. Please visit our website http://
www.aten.com/download/?cid=dds for the most up-to-date versions.
이 기기는 업무용(A급) 전자파적합기기로서 판매자 또는 사용자는 이 점을
주의하시기 바라며, 가정외의 지역에서 사용하는 것을 목적으로 합니다.
The following contains information that relates to China:
North America:
1-888-999-ATEN Ext: 4988
United Kingdom:
44-8-4481-58923
EMC Information
FEDERAL COMMUNICATIONS COMMISSION INTERFERENCE STATEMENT:
This equipment has been tested and found to comply with the limits for a Class A
digital device, pursuant to Part 15 of the FCC Rules. These limits are designed to provide
reasonable protection against harmful interference when the equipment is operated
in a commercial environment. This equipment generates, uses, and can radiate radio
frequency energy and, if not installed and used in accordance with the instruction
manual, may cause harmful interference to radio communications. Operation of this
equipment in a residential area is likely to cause harmful interference in which case the
user will be required to correct the interference at his own expense.
FCC Caution: Any changes or modifi cations not expressly approved by the party
responsible for compliance could void the user's authority to operate this equipment.
CE Warning: This is a class A product. In a domestic environment this product may cause
radio interference in which case the user may be required to take adequate measures.
This device complies with Part 15 of the FCC Rules. Operation is subject to the following
two conditions:(1) this device mat not cause harmful interference, and(2) this device
must accept any interference received, including interference that may cause undesired
operation.
© Copyright 2016 ATEN
®
International Co., Ltd.
ATEN and the ATEN logo are trademarks of ATEN International Co., Ltd. All rights reserved. All
other trademarks are the property of their respective owners.
This product is RoHS compliant.
Part No. PAPE-1223-E70G Printing Date: 04/2016
4x4 4K HDMI Matrix Switch
Quick Start Guide
VM0404HA
ATEN VanCryst
™
Guide de démarrage rapide du commutateur matriciel 4x4 4K HDMI VM0404HA
www.aten.com
VM0404HA 4K-HDMI-Matrix-Switch, 4 x 4 – Schnellstartanleitung
www.aten.com
Guía de inicio rápido Conmutador matriz HDMI VM0404HA 4x4 de 4K
www.aten.com
Guida rapida VM0404HA 4x4 4K HDMI Matrix Switch
www.aten.com
2
6
3
5
4
1
HDMI Display Devices
HDMI Source Devices
Hardware / Software
Controller
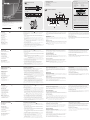
Aperçu du matériel
A
Vue de devant
1. Boutons poussoirs d'entrée
2. Boutons poussoirs de sortie
Vue de derrière
1. Borne de terre
2. Bouton d'alimentation
3. Fiche d'alimentation
4. Ports de sortie HDMI
5. Ports d'entrée HDMI
6. Port du récepteur IR externe
7. Port micro USB
8. Port série RS-232
Télécommande IR
1. Marche/Arrêt
2. Boutons poussoirs de sortie 1–4
3. Boutons poussoirs d'entrée 1–4
Installation du matériel
B
Assurez-vous que l'alimentation des appareils que vous connectez à
l'installation a été coupée.
Pour installer le commutateur, consultez le schéma d'installation en effectuant
les étapes suivantes :
1. Si vous utilisez la fonction de commande série, utilisez un câble série RS-232
approprié pour relier l'ordinateur ou contrôleur série au port RS-232 femelle
du VM0404HA.
2. Utilisez un fi l de mise à la terre en reliant une extrémité du fi l à la borne de
terre et l'autre extrémité à un objet mis à la terre adapté.
Remarque : N'ignorez pas cette étape. Une bonne mise à la terre prévient
des dommages sur l'appareil causés par les surtensions et
l'électricité statique.
3. Utilisez des câbles HDMI pour connecter les dispositifs d'affi chage vidéo aux
ports de sortie HDMI à l'arrière du VM0404HA.
4. Utilisez des câbles HDMI pour connecter les dispositifs de source vidéo aux
ports de sortie HDMI à l'arrière du VM0404HA.
5. Connectez le récepteur IR au port d'entrée du récepteur IR externe.
6. Branchez l'adaptateur secteur fourni à une source d'alimentation CA
appropriée ; branchez le câble de l'adaptateur secteur dans la prise
d'alimentation du VM0404HA.
Cela termine l'installation de base du commutateur matriciel 4x4 4K HDMI.
Vous pouvez à présent mettre sous tension l'écran et les appareils source.
Installer le contrôleur RS-232
Afi n d'utiliser l'interface série RS-232 pour raccorder un contrôleur haut de
gamme (tel qu'un PC) au VM0404HA, utilisez un câble série approprié (tel
qu'un câble de modem). L'extrémité se connectant au VM0404HA doit avoir
un connecteur mâle 9 broches.
Fonctionnement
Sélection des appareils source
Le VM0404HA propose une sélection facile et fl exible des appareils source et
du dispositif d'affi chage à l'aide des boutons poussoirs du panneau avant, de
la télécommande ou de l'interface série RS-232.
Sélection manuelle
Pour sélectionner manuellement une source HDMI pour un écran, appuyez
d’abord sur le bouton Sortie correspondant au port auquel est connecté le
dispositif d'affi chage. Appuyez ensuite sur le bouton Entrée pour le port
auquel le dispositif source est connecté.
Remarque : Les LED des boutons poussoirs s'allument pour indiquer l'appareil
source actuellement sélectionné pour chaque écran.
Fonctionnement de la télécommande
La télécommande permet de modifi er la source d'entrée d'un affi chage de
sortie, d’allumer/éteindre les affi chages en sortie individuellement, et de tous
les allumer/éteindre simultanément. Avant d'utiliser la télécommande, le
récepteur IR externe doit d'abord être branché à l'arrière du VM0404HA et
placé à un endroit où les signaux IR peuvent être reçus.
Interface série RS-232
L'interface série RS-232 bidirectionnelle intégrée du VM0404HA permet de
contrôler le système avec un contrôleur haut de gamme, un PC et/ou un
ensemble logiciel de domotique/home cinéma.
Hardwareübersicht
A
Ansicht von vorne
1. Eingangsdrucktasten
2. Ausgangsdrucktasten
Ansicht von hinten
1. Erdungsklemme
2. Ein-/Ausschalter
3. Netzanschluss
4. HDMI-Ausgänge
5. HDMI-Eingänge
6. Externer IR-Empfängeranschluss
7. Micro-USB-Port
8. Serieller RS-232-Anschluss
IR-Fernbedienung
1. Ein-/Austaste
2. Ausgangsdrucktasten 1 – 4
3. Eingangsdrucktasten 1 – 4
Hardwareinstallation
B
Stellen Sie sicher, dass alle Geräte, die Sie mit der Installation verbinden
möchten, ausgeschaltet sind.
Führen Sie zur Installation des Switch unter Bezugnahme der
Installationsabbildung die nachstehenden Schritte durch:
1. Wenn Sie die serielle Steuerungsfunktion nutzen möchten, verwenden Sie
ein geeignetes serielles RS-232-Kabel zur Verbindung des Computers oder
seriellen Controllers mit der RS-232-Buchse des VM0404HA.
2. Verwenden Sie zum Erden des Gerätes ein Erdungskabel; verbinden Sie ein
Ende des Kabels mit der Erdungsklemme und das andere Ende mit einem
geeigneten geerdeten Objekt.
Hinweis: Lassen Sie diesen Schritt nicht aus. Eine angemessene Erdung hilft
bei der Verhinderung von Geräteschäden durch Spannungsspitzen
oder statische Elektrizität.
3. Verbinden Sie Videoanzeigegeräte über HDMI-Kabel mit den HDMI-
Ausgängen an der Rückseite des VM0404HA.
4. Verbinden Sie Videoeingangsgeräte über HDMI-Kabel mit den HDMI-
Eingängen an der Rückseite des VM0404HA.
5. Verbinden Sie den IR-Empfänger mit dem externen IR-Empfängereingang.
6. Verbinden Sie das mitgelieferte Netzteil mit einer geeigneten Steckdose;
schließen Sie das Netzteilkabel am Netzanschluss des VM0404HA an.
Damit ist die grundlegende Installation des 4K-HDMI-Matrix-Switch (4 x 4)
abgeschlossen. Sie können die Anzeige- und Eingangsgeräte nun einschalten.
RS-232-Controller installieren
Wenn Sie über die serielle RS-232-Schnittstelle einen Highend-Controller
(wie z. B. einen PC) am VM0404HA anschließen möchten, müssen Sie ein
geeignetes serielles Kabel (z. B. ein Modemkabel) verwenden. Das Ende,
das am VM0404HA angeschlossen wird, sollte über einen 9-poligen Stecker
verfügen.
Bedienung
Eingangsgerät wählen
Das VM0404HA bietet eine einfache und fl exible Auswahl des Eingangs- und
Anzeigegerätes über die Drucktasten an der Frontblende, die Fernbedienung
oder die serielle RS-232-Schnittstelle.
Manuell wählen
Drücken Sie zur manuellen Auswahl einer HDMI-Quelle für ein Anzeigegerät
zunächst die Ausgang-Drucktaste, die dem Port entspricht, mit dem das
Anzeigegerät verbunden ist. Drücken Sie anschließend die Eingang-Drucktaste
des Ports, mit dem das Eingangsgerät verbunden ist.
Hinweis: Die Drucktasten-LEDs zeigen an, welches Eingangsgerät aktuell bei
den einzelnen Displays ausgewählt ist.
Fernbedienung
Mit der Fernbedienung können Sie die Eingangsquelle eines beliebigen
Ausgangsdisplays ändern, individuelle Ausgangsdisplays ein-/ausschalten
und alle Ausgangsdisplays gleichzeitig ein-/ausschalten. Vor Verwendung
der Fernbedienung müssen Sie den externen IR-Empfänger an der Rückseite
des VM0404HA anschließen und an einer Stelle platzieren, an der IR-Signale
empfangen werden können.
Serielle RS-232-Schnittstelle
Die integrierte bidirektionale serielle RS-232-Schnittstelle des VM0404HA
ermöglicht die Systemsteuerung über einen Highend-Controller, einen PC und/
oder ein Heimautomations-/Heimkino-Softwarepaket.
Revisión del hardware
A
Vista frontal
1. Pulsadores de entrada
2. Pulsadores de salida
Vista posterior
1. Terminal de toma de tierra
2. Interruptor de alimentación
3. Conector de alimentación
4. Puertos de salida HDMI
5. Puertos de entrada HDMI
6. Puerto receptor IR externo
7. Puerto micro USB
8. Puerto serie RS-232
Mando a distancia IR
1. Encender/Apagar Alimentación
2. Pulsadores de salida 1-4
3. Pulsadores de entrada 1-4
Instalación del hardware
B
Asegúrese de que la alimentación de cualquier dispositivo que se conecta a la
instalación ha sido desactivada.
Para instalar el conmutador, consulte el diagrama de instalación a medida que
realiza los siguientes pasos:
1. Si está utilizando la función de control de serie, utilice un cable serie RS232
adecuado para conectar el PC o el controlador de serie al puerto RS-232
hembra del VM0404HA.
2. Utilice un cable de toma de tierra para establecer la conexión a tierra de la
unidad, conectando un extremo del cable al terminal de toma de tierra y el
otro extremo del cable a un objeto adecuadamente conectado a tierra.
Nota: No omita este paso. La adecuada conexión a tierra ayuda a prevenir
daños a la unidad en el caso de sobretensiones o electricidad
estática.
3. Utilice cables HDMI para conectar dispositivos de visualización de vídeo a los
puertos Salida HDMI situados en la parte posterior de su VM0404HA.
4. Utilice cables HDMI para conectar dispositivos de fuente de vídeo a los
puertos Entrada HDMI situados en la parte posterior de su VM0404HA.
5. Conecte el receptor IR en el puerto de entrada externo del receptor IR.
6. Enchufe el adaptador de alimentación suministrado a una fuente de
alimentación CA adecuada; conecte el cable de alimentación del adaptador
en la toma de corriente del VM0404HA.
Esto completa la instalación básica del conmutador matriz HDMI VM0404HA
4x4 de 4K. Ahora puede encender los dispositivos de visualización y fuente.
Instalación del controlador RS-232
Para utilizar la interfaz serie RS-232 para conectar un controlador de alta gama
(por ejemplo, un PC) a la VM0404HA, utilice un cable serie adecuado (por
ejemplo, un cable de módem). El extremo de conexión a la VM0404HA debe
tener un conector macho de 9 pines.
Funcionamiento
Selección de dispositivo fuente
El VM0404HA ofrece una selección fácil y fl exible del dispositivo fuente y de
visualización, utilizando los pulsadores del panel frontal, el mando a distancia o
la interfaz serie RS-232.
Selección manual
Para seleccionar manualmente una fuente HDMI para una pantalla, presione
primero el pulsador Salida correspondiente al puerto al que está conectado
el dispositivo de visualización. A continuación, presione el pulsador Entrada
correspondiente al puerto al que está conectado el dispositivo fuente.
Nota: Los LEDs de los pulsadores se iluminan para indicar qué dispositivo
fuente está seleccionado actualmente para cada pantalla.
Funcionamiento del mando a distancia
El mando a distancia puede cambiar la fuente de entrada de cualquier pantalla
de salida, encender y apagar pantallas de salida individuales y encender y
apagar todas las pantallas de salida simultáneamente. Antes de utilizar el
mando a distancia, el receptor externo IR se debe enchufar a la parte posterior
de su VM0404HA y colocarse donde se puedan recibir las señales IR.
Interfaz serie RS-232
El sistema integrado de interfaz serie bidireccional RS-232 del VM0404HA
permite el control del sistema a través de un controlador de alta gama, PC y/o
un paquete de software para domótica/cine en casa.
Descrizione hardware
A
Vista anteriore
1. Tasti di ingresso
2. Tasti di uscita
Vista posteriore
1. Terminale di massa
2. Interruttore di alimentazione
3. Connettore d'alimentazione
4. Porte HDMI Out
5. Porte HDMI In
6. Porta ricevitore infrarosso esterno
7. Porta micro USB
8. Porta seriale RS-232
Telecomando infrarosso
1. Accensione/spegnimento
2. Tasti uscita 1-4
3. Tasti ingresso 1-4
Installazione dell'hardware
B
Assicurarsi che qualsiasi dispositivo che si collega all’installazione sia stato
spento.
Per installare lo switch, fare riferimento allo schema di installazione mentre si
eseguono i seguenti passaggi:
1. Se si utilizza la funzione di controllo seriale, utilizzare un cavo seriale RS-
232 appropriato per collegare il computer o il controller seriale alla porta
femmina RS-232 di VM0404HA.
2. Utilizzare un fi lo di terra a terra per la messa a terra dell'unità collegando
un'estremità del fi lo al terminale di terra e l'altra estremità del fi lo ad un
oggetto con messa a terra adeguata.
Nota: Non saltare questo passaggio. Una corretta messa a terra aiuta a
evitare danni all'unità provocati da picchi di correnti o dall'elettricità
statica.
3. Utilizzare cavi HDMI per collegare i dispositivi di visualizzazione video alle
porte HDMI Out sulla parte posteriore di VM0404HA.
4. Utilizzare cavi HDMI per collegare i dispositivi di origine video alle porte
HDMI In sulla parte posteriore di VM0404HA.
5. Collegare il ricevitore IR alla porta ingresso del ricevitore IR esterno.
6. Collegare l'alimentatore fornito in dotazione ad una presa di corrente
appropriata; collegare il cavo dell’adattatore di corrente nella presa di
corrente di VM0404HA.
Questo completa l’installazione dello switch 4x4 4KHDMI Matrix. Adesso è
possibile accendere i dispositivi di visualizzazione e di origine.
Installazione del controller RS-232
Per poter utilizzare l'interfaccia seriale RS-232 per collegare un controller di
fascia alta (come un PC) a VM0404HA, utilizzare un cavo seriale appropriato
(ad esempio un cavo modem). L'estremità che si collega a VM0404HA
dovrebbe avere un connettore maschio a 9 pin.
Funzionamento
Selezione del dispositivo d'origine
VM0404HA offre una selezione facile e flessibile dei dispositivi di origine e
di visualizzazione utilizzando i tasti del pannello frontale, il telecomando, o
l'interfaccia seriale RS-232.
Selezione manuale
Per selezionare manualmente l'origine HDMI di un dispositivo di visualizzazione,
per prima cosa premere il tasto Output che corrisponde alla porta a cui è
collegato il dispositivo di visualizzazione. Quindi, premre il tasto Input della
porta a cui è collegato il dispositivo di origine.
Nota: I LED del tasto si accendono per indicare quale dispositivo di origine è
correntemente selezionato per ogni display.
Funzionamento del telecomando
Il telecomando può cambiare l'origine di qualsiasi dispositivo di visualizzazione,
accendere/spegnere singolarmente i dispositivi di visualizzazione e accendere/
spegnere contemporaneamente tutti i dispositivi di visualizzazione. Prima
di utilizzare il telecomando, sul retro di VM0404HA deve essere collegato il
ricevitore IR esterno che deve essere collocato in un luogo dove i segnali IR
possono essere ricevuti.
Interfaccia seriale RS-232
L’interfaccia seriale RS-232 bi-direzionale integrata di VM0404HA permette
il controllo del sistema tramite un controller di fascia alta, PC, e/o pacchetto
software domotica/Home Theater.
Hardware Review
A
Front View
1. Input Pushbuttons
2. Output Pushbuttons
Rear View
1. Grounding Terminal
2. Power Switch
3. Power Jack
4. HDMI Out Ports
5. HDMI In Ports
6. External IR Receiver Port
7. Micro USB Port
8. RS-232 Serial Port
IR Remote Control
1. Power ON/OFF
2. Output Pushbuttons 1–4
3. Input Pushbuttons 1–4
Hardware Installation
B
Make sure that the power to any device that you connect to the installation
has been turned off.
To install the switch, refer to the installation diagram as you perform the
following steps:
1. If you are using the serial control function, use an appropriate RS-232 serial
cable to connect the computer or serial controller to the VM0404HA’s
female RS-232 port.
2. Use a grounding wire to ground the unit by connecting one end of the
wire to the grounding terminal and the other end of the wire to a suitable
grounded object.
Note: Do not omit this step. Proper grounding helps to prevent damage to
the unit from surges or static electricity.
3. Use HDMI cables to connect video display devices to the HDMI Out ports on
the rear of the VM0404HA.
4. Use HDMI cables to connect video source devices to the HDMI In ports on
the rear of the VM0404HA.
5. Connect the IR Receiver to the External IR Receiver Input Port.
6. Plug the provided power adapter into an appropriate AC power source; plug
the power adapter cable into the Power Jack on the VM0404HA.
This completes the basic installation of the 4x4 4K HDMI Matrix Switch. You
may now power on the display and source devices.
Installing the RS-232 Controller
In order to use the RS-232 serial interface to attach a high-end controller (such
as a PC) to the VM0404HA, use an appropriate serial cable (such as a modem
cable). The end connecting to the VM0404HA should have a 9-pin male
connector.
Operation
Source Device Selection
The VM0404HA offers easy and flexible source and display device selection
using the front panel pushbuttons, the remote control, or the RS-232 serial
interface.
Manual Selection
To manually select an HDMI source for a display, first press the Output
pushbutton that corresponds with the port that the display device is connected
to. Next, press the Input pushbutton for the port that the source device is
connected to.
Note: The Pushbutton LEDs light to indicate which source device is currently
selected for each display.
Remote Control Operation
The remote control can change the Input source of any Output display,
power on/off individual Output displays, and power on/off all Output displays
simultaneously. Before using the remote control, the IR External Receiver must
first be plugged into the rear of the VM0404HA and placed where the IR
signals can be received.
RS-232 Serial Interface
The VM0404HA’s built-in bi-directional RS-232 serial interface allows system
control through a high-end controller, PC, and/or home automation/home
theater software package.
www.aten.com
A
Hardware Review
La pagina sta caricando ...
-
 1
1
-
 2
2


in altre lingue
- English: ATEN VM0404HA Quick start guide
- français: ATEN VM0404HA Guide de démarrage rapide
- español: ATEN VM0404HA Guía de inicio rápido
- Deutsch: ATEN VM0404HA Schnellstartanleitung
- русский: ATEN VM0404HA Инструкция по началу работы
- português: ATEN VM0404HA Guia rápido
- 日本語: ATEN VM0404HA クイックスタートガイド