
B
Hardware Installation
© Copyright 2019 ATEN
®
International Co., Ltd.
ATEN and the ATEN logo are trademarks of ATEN International Co., Ltd. All rights reserved.
All other trademarks are the property of their respective owners.
Part No. PAPE-1223-S60G Printing Date: 10/2019
4 x 4 True 4K HDMI Matrix Switch with Scaler
Quick Start Guide
VM6404HB
ATEN VanCryst
™
Package Contents
1 VM6404HB 4 x 4 True 4K HDMI Matrix Switch with Scaler
1 Power Cord
1 IR Remote Control
1 IR Receiver
1 Mounting Kit
1 User Instructions
A
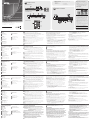
Hardware Review
VM6404HB Front View
VM6404HB Rear View
IR Remote Control
1
2
3
1
1
2
2
3
3
4
4
1 2 54
3
6
4
3 7
1 2 98
5
7
4
2
3
8 9 1
6
5
Display Devices
Source Devices
Speaker IR Receiver
RS-232
Controller
Internet/
LAN
A
Description de l’appareil
Vue de face
1
Affi chage LCD
2
Boutons-poussoirs des entrées
3
Boutons-poussoirs des sorties
4
Boutons-poussoirs Prev/Next
5
Boutons-poussoirs de fonction
Vue de dos
1
Prise d’alimentation
2
Interrupteur
3
Prise terre
4
Ports de sortie HDMI
5
Ports d’entrée HDMI
6
Sortie audio stéréo
7
Port du récepteur infrarouge externe
8
Port Ethernet
9
Port série RS-232
Télécommande infrarouge
1
Marche/Arrêt
2
Boutons-poussoirs des sorties
3
Boutons-poussoirs des entrées
B
Installation matérielle
Suivez les étapes suivantes pour installer le VM6404HB en toute sécurité.
1
Utilisez un fi l de mise à la terre pour mettre l’appareil à la terre en connectant
une extrémité à la borne de mise à la terre et l’autre extrémité à un objet
approprié mis à la terre.
Remarque : N’ignorez pas cette étape. Une mise à la terre appropriée aide à
éviter que l’appareil ne soit endommagé par des surtensions ou de
l’électricité statique.
2
Connectez l’appareil à un maximum de quatre sources vidéo compatibles HDMI.
3
Connectez l’appareil à un maximum de quatre écrans compatibles HDMI.
4
Pour accéder aux paramètres du système via l’interface utilisateur graphique
Web, utilisez un câble Ethernet pour raccorder le port Ethernet de l’appareil à
un commutateur réseau.
5
(Facultatif) Pour extraire l’audio HDMI, connectez un haut-parleur au port de
sortie audio stéréo.
6
(Facultatif) Pour utiliser la télécommande infrarouge, connectez le récepteur IR
fourni au port de récepteur IR.
7
(Facultatif) Pour confi gurer les paramètres de l’appareil via une interface RS-232,
connectez un contrôleur matériel ou logiciel au port série RS-232.
8
Connectez le câble d’alimentation à la prise d’alimentation.
9
Mettez l’interrupteur sur Marche.
10
Allumez tous les appareils connectés.
Fonctionnement
Vous pouvez manipuler le VM6404HB localement via le panneau avant ou la
télécommande infrarouge et à distance via l’interface Web ou un contrôleur série RS-232.
Boutons-poussoirs du panneau avant/Télécommande infrarouge
•
L’accès au panneau avant est protégé par un mot de passe. Pour déverrouiller le
panneau avant, appuyez sur 1234 en utilisant les boutons-poussoirs d’entrée.
•
Bouton-poussoir Menu : Appuyez sur ce bouton-poussoir pour confi gurer les
paramètres de base du système.
•
Bouton-poussoir Profi le : Utilisez ce bouton-poussoir pour parcourir et appliquer
un profi l d’affectations d’entrée préconfi gurées.
•
Bouton-poussoir Prev/Next : Utilisez ces boutons-poussoirs pour naviguer dans le
menu LCM.
•
Bouton-poussoir Enter : Utilisez ce bouton-poussoir pour passer au niveau de
réglage suivant ou confi rmer les opérations.
•
Pour confi gurer l’affectation d’une entrée :
1.
Appuyez sur le bouton-poussoir Entrée de l’entrée que vous souhaitez confi gurer.
Les boutons-poussoirs Sortie des sorties affectées à cette entrée s’allument.
Commutateur matriciel VM6404HB 4 x 4 True 4K HDMI avec Scaler
www.aten.com
2.
Pour affecter l’entrée à une sortie, appuyez sur le bouton-poussoir Sortie de
la sortie correspondante. Le bouton-poussoir Sortie s’allume pour indiquer
que la confi guration a réussi.
3.
Pour supprimer l’affectation d’une sortie, appuyez sur le bouton-poussoir Sortie
de la sortie correspondante. Le bouton-poussoir Sortie diminue d’intensité pour
indiquer qu’il n’est pas affecté à l’entrée.
•
Pour extraire et lire un fi chier audio HDMI sur le haut-parleur connecté :
1.
Appuyez sur le bouton-poussoir Menu.
2.
Allez à Operation Mode > Output Status > Audio Extract.
3.
Appuyez sur le bouton-poussoir Entrée de l’entrée cible.
Interface Web
L’interface Web vous permet d’accéder aux paramètres système avancés, tels que
les calendriers de profi l et les comptes d’utilisateur. Le VM6404HB prend en charge
jusqu’à 16 connexions simultanées. Utilisez les informations suivantes pour accéder
à l’interface Web pour la première fois.
•
Adresse IP par défaut : 192.168.0.60
•
Nom d’utilisateur/mot de passe par défaut : administrator/password
Remarque : Le nom d’utilisateur du VM6404HB ne peut contenir que des minuscules.
Interface série RS-232
L’interface série RS-232 intégrée vous permet de confi gurer le VM6404HB via un
contrôleur haut de gamme, tel qu’un ordinateur.
A
Hardwareübersicht
Ansicht von vorn
1
LCD-Display
2
Eingangstasten
3
Ausgangstasten
4
Prev-/Next-Tasten
5
Funktionstasten
Ansicht von hinten
1
Netzbuchse
2
Netzschalter
3
Erdungsklemme
4
HDMI-Ausgangsports
5
HDMI-Eingangsports
6
Stereo-Audioausgang
7
Externer IR-Empfängerport
8
Ethernet-Port
9
Serieller RS-232-Port
IR-Fernbedienung
1
Ein/Aus
2
Ausgangstasten
3
Eingangstasten
B
Installation der Hardware
Folgen Sie den nachstehenden Schritten, um den VM6404HB sicher anzuschließen.
1
Erden Sie das Gerät mit Hilfe einer Erdungsleitung, indem Sie das eine Ende der
Erdungsleitung an der Erdungsklemme anschließen und das andere Ende mit
einem geeigneten geerdeten Gegenstand verbinden.
Hinweis: Überspringen Sie diesen Schritt nicht. Eine ordnungsgemäße
Erdung hilft dabei, Schäden am Gerät durch Überspannung oder
elektrostatische Aufl adung vorzubeugen.
2
Schließen Sie bis zu vier HDMI-fähige Videoquellen am Gerät an.
3
Schließen Sie bis zu vier HDMI-fähige Displays am Gerät an.
4
Verbinden Sie den Ethernet-Port des Geräts über ein Ethernetkabel mit
dem Port eines Netzwerk-Switches, um über die Webschnittstelle auf die
Systemeinstellungen zuzugreifen.
5
(Optional) Schließen Sie am Stereo-Ausgangsport einen Lautsprecher an, wenn
Sie das HDMI-Audiosignal abgreifen möchten.
6
(Optional) Schließen Sie am IR-Empfängerport den mitgelieferten IR-Empfänger
an, wenn Sie die IR-Fernbedienung benutzen möchten.
7
(Optional) Schließen Sie am seriellen RS-232-Port einen Soft- oder Hardwarecontroller
an, wenn Sie das Gerät über die serielle RS-232-Schnittstelle konfi gurieren möchten.
8
Schließen Sie an der Netzbuchse das Netzkabel an.
9
Schalten Sie den Netzschalter auf die Stellung ON.
10
Schalten Sie nun die verbundenen Geräte ein.
Bedienung
Sie können den VM6404HB lokal über das Bedienfeld oder die Fernbedienung sowie
Remote über die Webschnittstelle oder einen seriellen RS-232-Controller bedienen.
Bedienfeldtasten/IR-Fernbedienung
•
Der Zugriff auf das Bedienfeld ist passwortgeschützt. Geben Sie mit Hilfe der
Eingangstasten 1234 ein, um das Bedienfeld zu entsperren.
•
Menu-Taste: Stellen Sie durch Drücken dieser Taste die grundlegenden
Systemeinstellungen des Geräts ein.
•
Profi le-Taste: Blättern Sie mit Hilfe dieser Taste durch die verschiedenen Profi le und
wenden Sie ein Profi l mit voreingestellten Eingangszuweisungen an.
•
Prev-/Next-Taste: Benutzen Sie diese Tasten für die Navigation im LCM-Menü.
•
Enter-Taste: Wechseln Sie mit Hilfe dieser Taste bei Einstellungen in die nächste
Ebene oder bestätigen Sie mit mittels dieser Taste Bedienvorgänge.
•
Konfi guration der Zuweisung für einen Eingang:
1.
Drücken Sie die Eingangstasten des Eingangs, den Sie konfi gurieren möchten.
Daraufhin leuchten die Ausgangstasten, die diesem Eingang zugewiesen sind.
2.
Drücken Sie nun die Ausgangstasten, deren Ausgang Sie dem Eingang
zuweisen möchten. Daraufhin leuchtet die Ausgangstasten, um Ihnen
anzuzeigen, dass die Konfi guration erfolgreich war.
VM6404HB 4x4-4K True HDMI-Matrix-Switch mit Video-Skalierer
www.aten.com
3.
Drücken Sie die Ausgangstasten des jeweiligen Ausgangs, wenn Sie die
Zuweisung zu dem jeweiligen Ausgang aufheben möchten. Daraufhin wird
diese Ausgangstasten abgedunkelt, um Ihnen anzuzeigen, dass sie diesem
Eingang nicht mehr zugewiesen ist.
•
Abgreifen und Wiedergeben von HDMI-Audio auf dem angeschlossenen
Lautsprecher:
1.
Drücken Sie die Menu-Taste.
2.
Navigieren Sie zu Operation Mode > Output Status > Audio Extract.
3.
Drücken Sie die Eingangstasten des Zieleingangs.
Webschnittstelle
Die Webschnittstelle ermöglicht Ihnen den Zugriff auf erweiterte
Systemeinstellungen wie beispielsweise Profi l-Zeitpläne und Benutzerkonten. Der
VM6404HB unterstützt bis zu 16 gleichzeitige Anmeldungen. Benutzen Sie für den
erstmaligen Zugriff auf die Webschnittstelle die nachstehenden Informationen.
•
Standard-IP-Adresse: 192.168.0.60
•
Standardbenutzername/Standardpasswort: administrator/password
Hinweis: Der VM6404HB unterstützt nur kleingeschriebene Benutzernamen.
Serielle RS-232-Schnittstelle
Die integrierte serielle RS-232-Schnittstelle ermöglicht Ihnen die Konfi guration des
VM6404HB über einen High-End-Controller wie beispielsweise ein Computer.
A
Reseña del hardware
Vista frontal
1
Pantalla LCD
2
Botones de comando de entrada
3
Botones de comando de salida
4
Botones de comando «Prev»/«Next»
5
Botones de comando de función
Vista posterior
1
Toma de corriente
2
Interruptor de alimentación
3
Toma de tierra
4
Puertos de salida HDMI
5
Puertos de entrada HDMI
6
Salida de audio estéreo
7
Puerto receptor de infrarrojos externo
8
Puerto Ethernet
9
Puerto serie RS-232
Mando a distancia IR
1
Encendido/apagado
2
Botones de comando de salida
3
Botones de comando de entrada
B
Instalación del hardware
Realice el siguiente procedimiento para instalar el modelo VM6404HB de forma segura.
1
Use un cable a tierra para conectar a tierra la unidad, conectando un extremo al
borne de tierra y el otro extremo a un objeto apropiado conectado a tierra.
Nota: No omita este paso. Una conexión a tierra apropiada evita que se dañe la
unidad debido a sobrecargas eléctricas o electricidad estática.
2
Puede conectar la unidad a hasta cuatro orígenes de vídeo habilitados para HDMI.
3
Puede conectar la unidad a hasta cuatro pantallas habilitadas para HDMI.
4
Para acceder a la confi guración del sistema a través de la interfaz gráfi ca de
usuario en la web, utilice un cable Ethernet para conectar el puerto Ethernet de
la unidad a un interruptor de red.
5
(Opcional) Para extraer audio HDMI, conecte un altavoz al puerto de salida de
audio estéreo.
6
(Opcional) Para usar el mando a distancia por infrarrojos, conecte el receptor de
infrarrojos suministrado al puerto receptor de infrarrojos.
7
(Opcional) Para confi gurar los ajustes de la unidad a través de una interfaz RS-232,
conecte un controlador de hardware o de software al puerto serie RS-232.
8
Conecte el cable de alimentación a la toma de corriente.
9
Coloque el interruptor de alimentación en la posición «ON».
10
Encienda todos los dispositivos conectados.
Funcionamiento
Puede operar localmente el modelo VM6404HB usando el panel frontal o el mando
a distancia por infrarrojos, y operar a distancia a través de la interfaz web o un
controlador serie RS-232.
Botones de comando del panel frontal/unidad de mando a distancia
por infrarrojos
•
El acceso al panel frontal está protegido por contraseña. Para desbloquear el
panel frontal, pulse 1234 usando los botones de comando de entrada.
•
Botón de comando «Menu»: pulse este botón de comando para confi gurar los
ajustes básicos.
•
Botón de comando «Profi le»: utilice este botón de comando para ir
haciendo selecciones sucesivas y aplicar un perfi l de asignaciones de entrada
preconfi guradas.
•
Botones de comando «Prev»/«Next»: utilice estos botones de comando para
navegar por el menú LCM.
•
Botón de comando «Enter»: utilice este botón de comando para acceder al
siguiente nivel de confi guración o para confi rmar las operaciones.
•
Para confi gurar la asignación para una entrada:
1.
Pulse el botón de comando de entrada de la entrada que desee confi gurar.
Los botones de comando de salida de las salidas que se han asignado con la
luz de esta entrada encendida.
Conmutador de matriz HDMI 4K real 4 x 4 modelo VM6404HB con escalador
www.aten.com
2.
Para asignar la entrada a una salida, pulse el botón de comando de salida de
la salida correspondiente. El botón de comando de salida se enciende para
indicar que la confi guración se ha realizado correctamente.
3.
Para anular la asignación a una salida, pulse el botón de comando de salida de
la salida correspondiente. El botón de comando de salida se atenúa para indicar
que no está asignado a la entrada.
•
Para extraer y reproducir un audio HDMI en el altavoz conectado:
1.
Pulse el botón de comando «Menu».
2.
Acceda a Operation Mode > Output Status > Audio Extract.
3.
Pulse el botón de comando de entrada de la entrada objetivo.
Interfaz web
La interfaz web le permite acceder a los ajustes avanzados del sistema, como los
programas de perfi l y las cuentas de usuario. El modelo VM6404HB es compatible
con hasta 16 inicios de sesión simultáneos. Utilice la información siguiente para
acceder a la interfaz web por primera vez.
•
Dirección IP predeterminada: 192.168.0.60
•
Nombre de usuario/contraseña por defecto: administrator/password
Nota: El modelo VM6404HB solo admite nombres de usuario con caracteres en
minúsculas.
Conexión serie RS-232
La conexión serie RS-232 integrada le permite confi gurar el modelo VM6404HB a
través de un controlador de gama alta, por ejemplo, un ordenador.
A
Panoramica hardware
Vista anteriore
1
Display LCD
2
Pulsanti degli ingressi
3
Pulsanti delle uscite
4
Pulsanti Prev/Next
5
Pulsanti funzione
Vista posteriore
1
Presa di alimentazione
2
Interruttore di alimentazione
3
Terminale di messa a terra
4
Porte di uscita HDMI
5
Porte di ingresso HDMI
6
Uscita audio stereo
7
Porta ricevitore IR esterno
8
Porta Ethernet
9
Porta seriale RS-232
Telecomando IR
1
Accensione/Spegnimento
2
Pulsanti delle uscite
3
Pulsanti degli ingressi
B
Installazione hardware
Applicando la seguente procedura, è possibile effettuare un'installazione sicura
dell'unità VM6404HB.
1
Usando un apposito cavo, effettuare la messa a terra dell'unità, collegando
un'estremità del cavo al terminale di messa a terra e l'altra a un oggetto
adeguatamente collegato al suolo.
Nota: eseguire sempre questo passo. Un'adeguata messa a terra permette di
evitare danni all'unità dovuti a sovratensioni o elettricità statica.
2
Collegare l'unità a un massimo di quattro sorgenti video che supportano l'HDMI.
3
Collegare l'unità a un massimo di quattro display che supportano l'HDMI.
4
Per accedere al sistema tramite interfaccia utente grafi ca via web, usare un cavo
Ethernet che collega la porta Ethernet dell'unità a uno switch di rete.
5
(Opzionale) Per estrarre l'audio HDMI, è possibile collegare un altoparlante alla
porta di uscita audio stereo.
6
(Opzionale) Per usare un telecomando IR, è possibile collegare il ricevitore IR in
dotazione alla porta del ricevitore IR.
7
(Opzionale) Per confi gurare le impostazioni dell'unità tramite interfaccia RS-232,
collegare un controller hardware o software alla porta seriale RS-232.
8
Collegare il cavo di alimentazione a una presa di corrente
9
Posizionare l'interruttore di accensione su ON.
10
Attivare l'alimentazione di tutti i dispositivi collegati.
Funzionamento
L'unità VM6404HB può essere utilizzata in locale, tramite il pannello anteriore o il
telecomando, oppure da remoto, tramite interfaccia web o controller seriale RS-232.
Pulsanti del pannello anteriore/telecomando IR
•
L'acceso al pannello anteriore è protetto da password. Per sbloccare il pannello
anteriore, digitare 1234 tramite i pulsanti di ingresso.
•
Pulsante Menu: Premendo questo pulsante, è possibile confi gurare le impostazioni
base di sistema.
•
Pulsante Profi le: Usando questo pulsante, è possibile selezionare e applicare uno
dei profi li con assegnazioni preconfi gurate degli ingressi.
•
Pulsanti Prev/Next: Questi pulsanti permettono di navigare nei menu LCM.
•
Pulsante Enter: Questo pulsante permette di accedere al livello successivo delle
impostazioni o di confermare le operazioni.
•
Confi gurazione dei parametri di ingresso:
1.
Premere il pulsante dell'ingresso che si intende confi gurare. I pulsante
dell'uscita assegnate all'ingresso selezionato si accendono.
2.
Per assegnare un ingresso a un'uscita, premere il pulsante dell'uscita
corrispondente. Il pulsante dell'uscita si illumina per indicare che la
confi gurazione è andata a buon fi ne.
Matrice HDMI 4x4 True 4k VM6404HB con scaler
www.aten.com
3.
Per rimuovere l'assegnazione di un'uscita, premere il pulsante dell'uscita
corrispondente. Il pulsante dell'uscita in questione si spegne per indicare che
non è più assegnato all'ingresso.
•
Per estrarre e riprodurre l'audio HDMI su un altoparlante connesso:
1.
premere il pulsante Menu.
2.
Accedere alla voce Operation Mode > Output Status > Audio Extract.
3.
Premere il pulsante dell'ingresso di destinazione.
Interfaccia web
L'interfaccia web permette di accedere alle impostazioni avanzate di sistema,
come la defi nizione di profi li e account utente. L'unità VM6404HB supporta fi no
a 16 accessi contemporanei. Per il primo accesso all'interfaccia web, usare le
informazioni seguenti.
•
Indirizzo IP predefi nito: 192.168.0.60
•
Nome utente/Password predefi niti: administrator/password
Nota: L'unità VM6404HB accetta solo nomi utente in caratteri minuscoli.
Interfaccia seriale RS-232
L'interfaccia seriale RS-232 integrata permette di confi gurare l'unità VM6404HB
tramite controller sofi sticati, ad esempio un computer.
A
Обзор оборудования
Вид спереди
1
ЖК-дисплей
2
Кнопки Ввода
3
Кнопки Вывода
4
Кнопки Prev и Next
5
Функциональные кнопки
Вид сзади
1
Разъем питания
2
Переключатель питания
3
Клемма заземления
4
Порты вывода HDMI
5
Порты ввода HDMI
6
Звуковой стереовыход
7
Порт внешнего ИК-приемника
8
Порт Ethernet
9
Последовательный порт RS-232
ИК-пульт дистанционного управления
1
Включение/отключение питания
2
Кнопки Вывода
3
Кнопки Ввода
B
Установка оборудования
Чтобы безопасно установить VM6404HB, выполните следующие шаги.
1
Заземлите устройство с помощью провода заземления, подключив его
одним концом к клемме заземления, а другим концом — к подходящему
заземленному объекту.
Примечание: не пропускайте этот шаг. Надлежащее заземление
помогает защитить устройство от перепадов напряжения и
статического электричества.
2
Подключите источники видеосигнала к устройству (до четырех
источников с поддержкой HDMI).
3
Подключите дисплеи к устройству (до четырех дисплеев с поддержкой HDMI).
4
Чтобы получить доступ к системным настройкам через веб-интерфейс,
подключите Ethernet-порт устройства к сетевому коммутатору с помощью
Ethernet-кабеля.
5
(Дополнительно) Чтобы извлечь звук, выводимый через интерфейс
HDMI, подключите динамик к звуковому стереовыходу.
6
(Дополнительно) Чтобы использовать ИК-пульт дистанционного управления,
подключите комплектный ИК-приемник к порту ИК-приемника.
7
(Дополнительно) Чтобы настроить параметры устройства через
интерфейс RS-232, подключите аппаратный или программный
контроллер к последовательному порту RS-232.
8
Подключите шнур питания к разъему питания.
9
Переведите переключатель питания в положение включения.
10
Включите все подключенные устройства.
Эксплуатация
VM6404HB поддерживает локальное управление на передней панели,
дистанционное управление посредством ИК-пульта, а также удаленное
управление через веб-интерфейс или контроллер, подключенный к
последовательному порту RS-232.
Кнопки на передней панели/ИК-пульт дистанционного управления
•
Доступ к передней панели защищен паролем. Чтобы разблокировать
переднюю панель, введите 1234 с помощью кнопок для ввода данных.
•
Кнопка Menu: используется для изменения основных настроек системы.
•
Кнопка Pro le: используется для циклического переключения и применения
профиля предварительно настроенных назначений для портов ввода.
•
Кнопки Prev и Next: используется для навигации по меню LCM.
•
Кнопка Enter: используется для перехода к следующему уровню настроек
или подтверждения команд.
•
Чтобы настроить назначение для входа, выполните следующие действия:
1.
Нажмите кнопку Ввод, соответствующую входу, который нужно
настроить. Загорятся индикаторы кнопок Вывод, которые
соответствуют выходам, назначенным этому входу.
Матричный коммутатор-масштабатор VM6404HB 4 x 4 True 4K HDMI
www.aten.com
2.
Чтобы назначить вход для конкретного выхода, нажмите кнопку Вывод
соответствующего выхода. Индикатор кнопки Вывод загорится,
оповещая об успешном изменении конфигурации.
3.
Чтобы удалить назначение, связанное с выходом, нажмите кнопку
Вывод соответствующего выхода. Индикатор на кнопке Вывод погаснет,
обозначая отмену назначения входа.
•
Чтобы извлечь звук, передаваемый через интерфейс HDMI, и
воспроизвести его на подключенном динамике:
1.
Нажмите кнопку Menu.
2.
Перейдите в меню Operation Mode > Output Status > Audio Extract.
3.
Нажмите кнопку Ввод целевого входа.
Веб-интерфейс
Веб-интерфейс служит для доступа к расширенным настройкам системы
(например, расписаниям профилей и учетным записям пользователей).
VM6404HB поддерживает до 16 одновременных входов пользователей в систему.
Используйте следующие данные для первого доступа к веб-интерфейсу.
•
IP-адрес по умолчанию: 192.168.0.60
•
Имя пользователя/пароль administrator/password (значения по умолчанию)
Примечание: VM6404HB поддерживает только имена пользователей в
нижнем регистре.
Последовательный интерфейс RS-232
Встроенный последовательный интерфейс RS-232 позволяет настраивать
VM6404HB с помощью контроллера (например, компьютера).
Support and Documentation Notice
All information, documentation, fi rmware, software
utilities, and specifi cations contained in this package
are subject to change without prior notifi cation by the
manufacturer.
To reduce the environmental impact of our products,
ATEN documentation and software can be found
online at http://www.aten.com/download/
Technical Support
www.aten.com/support
이 기기는 업무용(A급) 전자파적합기기로서 판매자 또는 사용자는 이 점을
주의하시기 바라며, 가정외의 지역에서 사용하는 것을 목적으로 합니다.
EMC Information
FEDERAL COMMUNICATIONS COMMISSION INTERFERENCE
STATEMENT:
This equipment has been tested and found to comply with the limits
for a Class A digital device, pursuant to Part 15 of the FCC Rules.
These limits are designed to provide reasonable protection against
harmful interference when the equipment is operated in a commercial
environment. This equipment generates, uses, and can radiate radio
frequency energy and, if not installed and used in accordance with
the instruction manual, may cause harmful interference to radio
communications. Operation of this equipment in a residential area
is likely to cause harmful interference in which case the user will be
required to correct the interference at his own expense.
FCC Caution: Any changes or modifi cations not expressly approved by
the party responsible for compliance could void the user's authority to
operate this equipment.
Warning: Operation of this equipment in a residential environment
could cause radio interference.
This device complies with Part 15 of the FCC Rules. Operation is subject
to the following two conditions:(1) this device mat not cause harmful
interference, and(2) this device must accept any interference received,
including interference that may cause undesired operation.
Important. Before proceeding, download the Installation and
Operation Manual by visiting the website, www.aten.com and
navigating to the product page. The manual includes important
warnings, loading specifi cations and grounding instructions.
Scan for more information
ATEN Website
A
Hardware Review
Front View
1
LCD Display
2
Input Pushbuttons
3
Output Pushbuttons
4
Prev/Next Pushbuttons
5
Function Pushbuttons
Rear View
1
Power Socket
2
Power Switch
3
Grounding Terminal
4
HDMI Output Ports
5
HDMI Input Ports
6
Stereo Audio Output
7
External IR Receiver Port
8
Ethernet Port
9
RS-232 Serial Port
IR Remote Control
1
Power On/Off
2
Output Pushbuttons
3
Input Pushbuttons
B
Hardware Installation
Follow the following steps to safely install the VM6404HB.
1
Use a grounding wire to ground the unit by connecting one end to the
grounding terminal, and the other end to a suitable grounded object.
Note: Do not omit this step. Proper grounding helps prevent damage to the unit
from power surges or static electricity.
2
Connect the unit to up to four HDMI-enabled video sources.
3
Connect the unit to up to four HDMI-enabled displays.
4
To access system settings via the web GUI, use an Ethernet cable to connect the
Ethernet Port of the unit to a network switch.
5
(Optional) To extract HDMI audio, connect a speaker to the Stereo Audio Out port.
6
(Optional) To use IR remote control, connect the supplied IR receiver to the IR
Receiver Port.
7
(Optional) To confi gure the unit’s settings via an RS-232 interface, connect a
hardware or software controller to the RS-232 Serial Port.
8
Plug the power cord to the Power Socket
9
Put the Power Switch to ON.
10
Power on all the connected devices.
Operation
You can operate the VM6404HB locally using the front panel or IR remote control;
remotely via the web interface or an RS-232 serial controller.
Front-panel Pushbuttons/IR Remote Control Unit
•
The access to the front panel is protected by password. To unlock the front panel,
press 1234 using the Input Pushbuttons.
•
Menu Pushbutton: Press this pushbutton to confi gure basic system settings.
•
Profi le Pushbutton: Use this pushbutton to cycle through and apply a profi le of
preconfi gured input assignments.
•
Prev/Next Pushbuttons: Use these pushbuttons to navigate the LCM menu.
•
Enter Pushbutton: Use this pushbutton to go into the next level of settings or
confi rm operations.
•
To confi gure the assignment for an input:
1.
Press the Input Pushbutton of the input you wish to confi gure. The Output
Pushbuttons of the outputs that have been assigned with this input light on.
2.
To assign the input to an output, press the Output Pushbutton of the
corresponding output. The Output Pushbutton lights on to indicate that
confi guration is successful.
3.
To remove assignment to an output, press the Output Pushbutton of the
corresponding output. The Output Pushbutton dims to indicate that it is not
assigned with the input.
VM6404HB 4 x 4 True 4K HDMI Matrix Switch with Scaler
www.aten.com
•
To extract and play an HDMI audio on the connected speaker:
1.
Press the Menu Pushbutton.
2.
Navigate to Operation Mode > Output Status > Audio Extract.
3.
Press the Input Pushbutton of the target input.
Web Interface
The web interface allows you to access advanced system settings, such as profi le
schedules and user accounts. The VM6404HB supports up to 16 concurrent logins.
Use the following information to access the web interface for the fi rst time.
•
Default IP address: 192.168.0.60
•
Default Username/Password: administrator/password
Note: The VM6404HB supports usernames in lower-case only.
RS-232 Serial Interface
The built-in RS-232 serial interface allows you to confi gure the VM6404HB through
a high-end controller, such as a computer.
La pagina sta caricando ...
-
 1
1
-
 2
2


in altre lingue
- English: ATEN VM6404HB Quick start guide
- français: ATEN VM6404HB Guide de démarrage rapide
- español: ATEN VM6404HB Guía de inicio rápido
- Deutsch: ATEN VM6404HB Schnellstartanleitung
- русский: ATEN VM6404HB Инструкция по началу работы
- português: ATEN VM6404HB Guia rápido
- polski: ATEN VM6404HB Skrócona instrukcja obsługi
- 日本語: ATEN VM6404HB クイックスタートガイド
- Türkçe: ATEN VM6404HB Hızlı başlangıç Kılavuzu