

2
EN INSTALLATION MANUAL ................................................................................................................................................ 6
DE MONTAGEANLEITUNG ................................................................................................................................................. 6
ES MANUAL DE MONTAJE ................................................................................................................................................. 6
FR NOTICE DE MONTAGE .................................................................................................................................................. 6
IT ISTRUZIONI DI MONTAGGIO ......................................................................................................................................... 6
PL INSTRUKCJA MONTAŻU ................................................................................................................................................ 6
RU ИНСТРУКЦИЯ ПО МОНТАЖУ ....................................................................................................................................... 6
EN INSTRUCTION MANUAL .............................................................................................................................................. 14
DE BEDIENUNGSANLEITUNG .......................................................................................................................................... 15
ES MANUAL DE USUARIO ................................................................................................................................................ 17
FR NOTICE D’UTILISATION .............................................................................................................................................. 18
IT MANUALE D’USO .......................................................................................................................................................... 20
PL INSTRUKCJA OBSŁUGI ............................................................................................................................................... 21
RU ИНСТРУКЦИЯ ПО ЭКСПЛУАТАЦИИ .......................................................................................................................... 23
EN
DE
ES
FR
IT
PL
RU
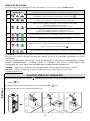
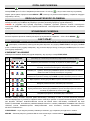
Quantity
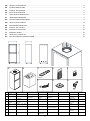
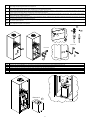
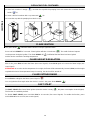
A.
Frame with
burner
Rahmen mit Brenner
Marco con quemador
Cadre avec brûleur
Telaio con bruciatore
Rama z paleniskiem
Рама с горелкой
1
B.
Fuel container
Kraftstoffbehälter
Contenedor de
combustible
Conteneur de
carburant
Contenitore del
carburante
Pojemnik na paliwo
Топливный
контейнер
1
C.
Ceramic logs
Keramische
Holzscheite
Troncos de cerámica
Bûches en
céramique
Ceppi di ceramica
Polana ceramiczne
Керамические
поленья
2
D.
Bag with
granules
Tasche mit dem
Granulat
Bolsa de gránulos
sachet de granulés
Sacchetto per granuli
Torba z granulatem
Мешок с
гранулами
1
E.
Bag with
granules
Tasche mit dem
Granulat
Bolsa de gránulos
sachet de granulés
Sacchetto per granuli
Torba z granulatem
Мешок с
гранулами
1
F.
Service cable
Service -Kabel
Cable USB de servicio
Câble de service
Cavetto per
l'assistenza technica
Kabel serwisowy
кабель сервиса
1
G.
Remote control
Fernbedienung
Control remoto
Télécommande
Telecomando
Pilot
пульт
дистанционногоу
правления
1
H.
Power cable
Stromkabel
Cable de alimentación
Câble
d'alimentation
Cavo di alimentazione
Przewód zasilający
Кабель питания
1
400
1015
322
BCD
F
E
G
A
H
Optional

3
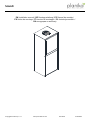
The product is a decorative device creating real fire.
Read the included documentation prior to installing and operating the device.
Consult the local regulations for fireplaces.
1. For indoor use only. Do not use in temperatures below 10°C.
2. Do not use the device in the area smaller than 35 m3.
3. Natural air exchange rate in room – min. 1/h.
4. Do not use the device in humid and drafty conditions.
5. Do not cover top ventilation openings of the device.
6. No heat-sensitive and flammable objects can be placed within a 1 meter radius from the device.
7. We recommend placing a CO2 or dry powder fire extinguisher nearby the device
8. Keep children, animals and any unauthorized persons away from the device.
9. Keep the packaging and manuals for future use.
10. Do not turn on the device in case of fuel spill.
11. Do not interfere in the fuel tank when the device is operating.
12. Do not interfere in the device construction.
13. Do not touch the filament and other hot elements.
14. Do not transport the device if fueled.
15. Do not leave an operating device unattended.
16. For the first few hours of use, there may be a distinct scent of paint
Es ist ein Dekorationsprodukt und es brennt mit echtem Feuer.
Vor der Montage und vor der Inbetriebnahme des Kamins lesen Sie bitte die beigelegte Dokumentation.
Machen Sie sich mit den lokalen Vorschriften bezüglich der Kamine vertraut.
1. Der Kamin nur für den Einbau im Innenraum bestimmt. Erforderliche Raumtemperatur min. 10°C
2. Die Mindestkubatur für einen Kamin - min. 35 m3.
3. Natürliche Luftwechselrate - min. 1/h.
4. Nicht in Bereichen verwenden, in denen Feuchtigkeit und Zugluft vorkommen können.
5. Die Lüftungsschlitze nicht zudecken.
6. Es muss zu brennbaren und hitzeempfindlichen Materialien ein Mindestabstand von 1 Meter eingehalten werden.
7. Wir empfehlen, einen CO2- oder Trockenpulver-Feuerlöscher in der Nähe des Geräts aufzustellen
8. Den Kamin an einem für Kinder, Unbefugte und Tiere unzugänglichen Ort installieren.
9. Verpackung und Gebrauchsanweisung aufbewahren.
10. Im Falle des Brennstoffauslaufs, das Gerät nicht einschalten
11. Den Kraftstofftank nicht stören, wenn das Gerät in Betrieb ist.
12. In die Konstruktion des Gerätes nicht eingreifen
13. Das Glühelement und andere warmen Elemente nicht berühren
14. Den, mit Brennstoff nachgefüllten Kamin nicht transportieren
15. Das Gerät im Betrieb nicht ohne Aufsicht lassen
16. In den ersten Stunden des Brennens kann ein Farbgeruch auftreten.
ENGLISH
DEUTSCH
!
!

4
El producto es un dispositivo decorativo que produce fuego real.
Familiarícese con la documentación adjunta antes de instalar e iniciar el dispositivo.
Familiarícese con las regulaciones locales sobre chimeneas.
1. Producto para uso interno y solamente encajado. Usar a una temperatura min. de 10°C
2. Volumen de la habitación para un producto - mín. 35 m3.
3. Tasa de intercambio de aire natural en la habitación - mín. 1/h.
4. No lo use en lugares con corrientes de aire o humedad.
5. No cubra las ranuras de ventilación.
6. No poner elementos inflamables o sensibles a altas temperaturas dentro de un radio de 1 metro del dispositivo.
7. Se recomienda colocar un extintor de polvo o CO2 cerca del dispositivo.
8. El dispositivo debe estar protegido contra el acceso de niños, animales y personas no autorizadas.
9. Guarde el embalaje y las instrucciones.
10. No encienda el dispositivo si el combustible se derrama fuera del tanque.
11. No interfiera en el tanque de combustible cuando el dispositivo esté funcionando.
12. No modifique la construcción del dispositivo.
13. No toque el filamento o las partes calientes.
14. No transporte el dispositivo con combustible.
15. No deje el dispositivo funcionando sin supervisión.
16. Puede oler pintura durante las primeras horas de quemado.
Le produit est un dispositif décoratif qui produit un feu réel.
Familiarisez-vous avec la documentation ci-jointe avant d'installer et de démarrer l'appareil.
Familiarisez-vous avec les réglementations locales concernant les cheminées.
1. Produit à usage interne et uniquement pour l’encastrement. Utiliser à une température min. de 10°C.
2. Volume de la pièce pour un produit - min. 35 m3.
3. Taux de renouvellement de l'air naturel dans la pièce - min. 1/h.
4. Ne pas utiliser dans des endroits humides ou avec des courants d'air.
5. Ne couvrez pas les fentes de ventilation.
6. Ne pas avoir d'objets inflammables ou sensibles aux températures élevées dans un rayon de 1 mètre de
l'appareil.
7. Il est recommandé de placer un extincteur à poudre ou à CO2 à proximité de l'appareil.
8. L'appareil doit être protégé contre l'accès des enfants, des animaux et des personnes non autorisées.
9. Conservez l'emballage et les instructions.
10. Ne démarrez pas l'appareil en cas de débordement
11. Ne touchez pas le lieu de remplissage de carburant lorsque l'appareil est en marche.
12. Ne modifiez pas la construction de l'appareil.
13. Ne touchez pas le filament ou les parties chaudes.
14. Ne transportez pas l'appareil avec du carburant.
15. Ne laissez pas l'appareil fonctionner sans surveillance.
16. Vous pouvez sentir la peinture pendant les premières heures de combustion
FRANÇAIS
ESPAÑOL
!
!

5
Prodotto è un dispositivo decorativo che produce un vero fuoco.
Familiarizzare con il manuale allegato prima di installare e avviare il dispositivo.
Familiarizzare con le normative locali relative ai camini.
1. Dispositivo solo per uso interno e nella struttura ad incasso. Utilizzare a una temperatura min. di 10°C.
2. Cubatura minima della stanza per il dispositivo – 35 m3.
3. Tasso di ricambio naturale dell'aria nella stanza - min. 1/h.
4. Non usare in luoghi umidi e soggetti a correnti d'aria.
5. Non coprire le fessure di ventilazione.
6. Non posizionare gli oggetti infiammabili o sensibili ad alte temperature entro un raggio di 1 metro dal
dispositivo.
7. Si consiglia di posizionare un estintore a polvere o ad anidride carbonica vicino all'unità.
8. Il dispositivo deve essere protetto dall'accesso di bambini, animali e persone non autorizzate.
9. Conservare la confezione originale e le istruzioni d’uso.
10. Non avviare il dispositivo nel caso di fuoriuscita di carburante dal serbatoio.
11. Non interferire nel serbatoio del carburante quando il dispositivo è in funzione.
12. Non interferire nella costruzione del dispositivo.
13. Non toccare la resistenza o le parti calde del dispositivo.
14. Non trasportare il dispositivo con carburante.
15. Non lasciare incustodito il dispositivo.
16. Nelle prime ore di combustione può apparire il odore di vernice
Produkt jest urządzeniem dekoracyjnym wytwarzającym prawdziwy ogień.
Zapoznaj się z załączoną dokumentacją przed montażem i uruchomieniem urządzenia.
Zapoznaj się z lokalnymi przepisami dotyczącymi kominków.
1. Urządzenie wyłącznie do użytku wewnętrznego i w zabudowie. Używać w temperaturze min. 10C.
2. Kubatura pomieszczenia dla jednego urządzania - min. 35 m3.
3. Naturalna wymiana powietrza w pomieszczeniu - min. 1/h.
4. Nie używać w miejscach występowania wilgoci i przeciągów powietrza.
5. Nie zakrywać otworów wentylacyjnych urządzenia.
6. W promieniu 1 metra od urządzenia nie mogą znajdować się przedmioty łatwopalne i wrażliwe na działanie
wysokich temperatur.
7. Zaleca się umieszczenie w pobliżu urządzenia gaśnicy proszkowej lub CO2.
8. Urządzenie należy zabezpieczyć przed dostępem dzieci, zwierząt oraz osób niepowołanych.
9. Należy zachować opakowanie oraz instrukcje.
10. Nie uruchamiaj urządzenia w przypadku rozlania paliwa poza zbiornik.
11. Nie operuj przy zbiorniku paliwa, gdy urządzenie jest uruchomione.
12. Nie ingeruj w konstrukcję urządzenia.
13. Nie dotykaj żarnika oraz rozgrzanych elementów.
14. Nie transportuj urządzenia z paliwem.
15. Nie pozostawiaj uruchomionego urządzenia bez nadzoru.
16. Przez kilka pierwszych godzin palenia może być wyczuwalny zapach farby
ITALIANO
POLSKI
!
!

6
Продукт является декоративным изделием, производящим настоящий огонь.
Ознакомьтесь с приложенной документацией перед монтажом и запуском устройства.
Ознакомьтесь с местными правилами, касающимися каминов.
1. Устройство предназначено только для использования внутри помещений и после установки. Используйте в
температуре 10°C.
2. Минимальная кубатура помещения для одного устройства составляет 35 м3
3. Естественный воздухообмен в помещении - мин. 1/ч.
4. Не разрешается устанавливать устройство в непосредственной близости к источникам влаги, а также
в помещениях со сквозняком.
5. Не закрывать вентиляционных щелей на устройстве.
6. Любые легковоспламеняющиеся и чувствительные на влияние высокой температуры предметы должны
находиться за пределами изделия в радиусе мин. 1 м.
7. Рядом с устройством рекомендуется размещать порошковый или углекислотный огнетушитель.
8. Устройство должно быть защищено от детей, животных и посторонних лиц.
9. Необходимо сохранить оригинальную упаковку устройства, а также настоящую инструкцию.
10. Не включать устройства в случае утечки топлива из бака.
11. Не заправлять камин топливом, когда устройство работает.
12. Не вмешиваться в конструкцию устройства.
13. Не трогать нити накаливания и горячих элементов.
14. Нельзя перемещать устройство, наполненное топливом.
15. Не оставлять запущенного устройства без присмотр
16. При первом использовании устройства может ощущаться отчетливый запах краски, сохраняющийся в
течение нескольких часов.
РУССКИЙ
!

7
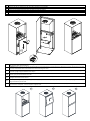
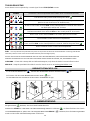
EN
Remove the door by lifting it upwards and then tilting it forwards. Plug the cables into the socket at the bottom of the fireplace. Pull the cable with the
plug through the opening at the back of the appliance.
DE
Entfernen Sie die Tür, indem Sie sie nach oben anheben und dann nach vorne kippen. Stecken Sie die Kabel in die Steckdose an der Unterseite des Kamins.
Ziehen Sie das Kabel mit dem Stecker durch die Öffnung auf der Rückseite des Geräts.
ES
Retire la puerta levantándola hacia arriba e inclinándola hacia delante. Enchufe los cables en la toma situada en la parte inferior del hogar. Tire del cable
con el enchufe a través de la abertura situada en la parte posterior del aparato.
FR
Retirez la porte en la soulevant puis en la basculant vers l'avant. Branchez les câbles dans la prise située au bas du foyer. Tirez le câble avec la fiche à
travers l'ouverture à l'arrière de l'appareil.
IT
Rimuovere lo sportello sollevandolo verso l'alto e poi inclinandolo in avanti. Collegare i cavi alla presa sul fondo del caminetto. Far passare il cavo con la
spina attraverso l'apertura sul retro dell'apparecchio.
PL
Zdejmij drzwiczki podnosząc je do góry, a następnie odchylając do przodu. Wepnij kable w gniazdo w dolnej części kominka. Wyciągnij kabel z wtyczką
przez otwór z tyłu urządzenia.
RU
Снимите дверцу, подняв ее вверх, а затем наклонив вперед. Подключите кабели к розетке в нижней части камина. Протяните кабель с вилкой
через отверстие в задней части прибора.
EN
Place the fuel container in place and screw on the cap with the fuel hoses.
DE
Stellen Sie den Kraftstoffbehälter an seinen Platz und schrauben Sie den Deckel mit den Kraftstoffschläuchen auf.
ES
Coloque el recipiente de combustible en su sitio y enrosque el tapón con las mangueras de combustible.
FR
Mettez le réservoir de carburant en place et vissez le bouchon avec les tuyaux de carburant.
IT
Posizionare il contenitore del carburante e avvitare il tappo con i tubi del carburante.
PL
Umieść kontener z paliwem na miejscu i przykręć korek z wężykami paliwowymi.
RU
Установите топливный контейнер на место и закрутите крышку с топливными шлангами.
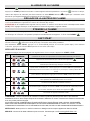
Element H
3
4
Element H
BA
AB
1
2
Element B 1
2

8
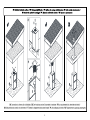
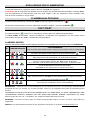
EN
Mount the door. Level the appliance by adjusting the appliance feet.
DE
Montieren Sie die Tür. Nivellieren Sie das Gerät durch Verstellen der Gerätefüße.
ES
Monta la puerta. Nivele el aparato ajustando las patas del mismo.
FR
Montez la porte. Mettez l'appareil à niveau en réglant les pieds de l'appareil.
IT
Montare la porta. Livellare l'apparecchio regolando i piedini.
PL
Zamontuj drzwi. Wypoziomuj urządzenie regulując nóżki urządzenia.
RU
Установите дверь. Выровняйте прибор, отрегулировав ножки прибора.
EN
NOTE! Make sure the device is turned off and the glass shields have cooled down to room temperature. Place the frame with the glass into the prepared
holes and then gently push downwards.
DE
ACHTUNG! Stellen Sie sicher, dass das Gerät ausgeschaltet ist und die Glasscheiben auf Raumtemperatur abgekühlt sind. Setzen Sie den Rahmen mit dem
Glas in die vorbereiteten Löcher und drücken Sie ihn dann vorsichtig nach unten.
ES
¡ATENCIÓN! Asegúrese de que el dispositivo esté apagado y que los vidrios estén a temperatura ambiente. Coloque el marco con el cristal en los agujeros
preparados y luego empuje suavemente hacia abajo.
FR
ATTENTION! Assurez-vous que l'appareil est éteint et que les verres sont à température ambiante. Positionnez Placez le cadre avec le verre dans les trous
préparés, puis poussez doucement vers le bas.
IT
ATTENZIONE! Assicurati che il dispositivo sia spento e che i vetri si siano raffreddate a temperatura ambiente. Inserire il telaio con il vetro nei fori preparati
e spingere delicatamente verso il basso.
PL
UWAGA! Upewnić się, że urządzenie jest wyłączone, a szyby są wystudzone do temperatury pokojowej. Umieść ramkę z szybą w przygotowane otwory a
następnie delikatnie przesuń w dół.
RU
ПРИМЕЧАНИЕ! Убедитесь, что устройство выключено, а стеклянные экраны остыли до комнатной температуры. Вставьте раму со стеклом в
подготовленные отверстия, а затем осторожно надавите вниз.
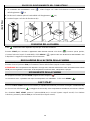
1
2
2
13

9
2
1 1
1
2
2
1 1
1
2
3

10
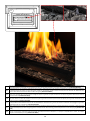
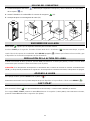
EN
Place the granules (D, E) evenly in the marked area leaving no uncovered area. Use one bag (E) to cover the burner. Distribute the remaining bag (D)
around the ventilation mesh. Make sure the granules are not in contact with the filament. Do not place the granules on the (VENTILATION MESH)
DE
Das Granulat (D, E) an der markierten Stellen gleichmässig verteilen, damit keine freie Lücken entstehen. Ein Beutel (E) ist für die Feuerstelle vorgesehen,
die Restlichen Beutel (D) sollten um das Lüftungsnetz rundherum ausgeschüttet werden. Achten Sie darauf, dass das Granulat den Glühdraht nicht
berührt. Geben Sie das Granulat nicht direkt auf das Lüftungsnetz (VENTILATION MESH)
ES
Distribuya los gránulos (D, E) uniformemente en el lugar marcado, sin dejar espacios. Se debe usar 1 bolsa (E) para el hogar, las bolsas restantes (D) se
deben verter alrededor de la red de ventilación. Asegúrese de que los gránulos no toquen el filamento. No coloque los gránulos directamente sobre la
malla de ventilación (VENTILATION MESH)
FR
Répartir les granulés (D, E) uniformément sur l'endroit marqué, sans laisser d'espace. 1 sac (E) doit être utilisé pour le foyer, les sacs restants (D) doivent
être versés autour du réseau de ventilation. Assurez-vous que les granulés ne touchent pas le filament. Ne placez pas les granulés directement sur la
maille de ventilation (VENTILATION MESH)
IT
Distribuire i granuli (D, E) in modo uniforme nel punto segnato, senza lasciare spazi vuoti. 1 sacco (E) deve essere utilizzato per il fuocolare, i restanti
sacchi (D) devono essere distribuiti attorno alla rete di ventilazione. Assicurarsi che i granuli non tocchino il filamento. Non appoggiare il granulato
direttamente sulla rete di ventilazione (VENTILATION MESH)
PL
Rozłóż równomiernie granulat (D, E) w oznaczonym miejscu nie zostawiając wolnych przestrzeni. 1 worek (E) przeznacz na palenisko, a jeden (D) wysyp
dookoła siatki wentylacyjnej. Zwróć uwagę aby granulat nie dotykał żarnika. Nie umieszczaj granulatu bezpośrednio na siatce wentylacyjnej (VENTILATION
MESH)
RU
Равномерно поместите гранулы (D, E) в отмеченную область, не оставляя незакрытых участков. Используйте один пакет (E), чтобы накрыть
горелку. Распределите оставшиеся пакетов (D) вокруг вентиляционной сетки. Убедитесь, что гранулы не соприкасаются с нитью. Не кладите
гранулы на вентиляционную сетку. (VENTILATION MESH)
VENTILATION MESH
D
E

11
EN
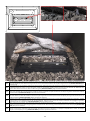
Place the granules (D, E) evenly in the marked area leaving no uncovered area. Use one bag (E) to cover the burner. Distribute the remaining bag (D)
around the ventilation mesh. Make sure the granules are not in contact with the filament. Do not place the granules on the (VENTILATION MESH). put
the ceramic logs
DE
Das Granulat (D, E) an der markierten Stellen gleichmässig verteilen, damit keine freie Lücken entstehen. Ein Beutel (E) ist für die Feuerstelle vorgesehen,
die Restlichen Beutel (D) sollten um das Lüftungsnetz rundherum ausgeschüttet werden. Achten Sie darauf, dass das Granulat den Glühdraht nicht
berührt. Geben Sie das Granulat nicht direkt auf das Lüftungsnetz (VENTILATION MESH). Legen Sie die Keramikklötze
ES
Distribuya los gránulos (D, E) uniformemente en el lugar marcado, sin dejar espacios. Se debe usar 1 bolsa (E) para el hogar, las bolsas restantes (D) se
deben verter alrededor de la red de ventilación. Asegúrese de que los gránulos no toquen el filamento. No coloque los gránulos directamente sobre la
malla de ventilación (VENTILATION MESH). Poner los troncos de cerámica
FR
Répartir les granulés (D, E) uniformément sur l'endroit marqué, sans laisser d'espace. 1 sac (E) doit être utilisé pour le foyer, les sacs restants (D) doivent
être versés autour du réseau de ventilation. Assurez-vous que les granulés ne touchent pas le filament. Ne placez pas les granulés directement sur la
maille de ventilation (VENTILATION MESH). Mettez les bûches en céramique
IT
Distribuire i granuli (D, E) in modo uniforme nel punto segnato, senza lasciare spazi vuoti. 1 sacco (E) deve essere utilizzato per il fuocolare, i restanti
sacchi (D) devono essere distribuiti attorno alla rete di ventilazione. Assicurarsi che i granuli non tocchino il filamento. Non appoggiare il granulato
direttamente sulla rete di ventilazione (VENTILATION MESH). Mettere i ceppi di ceramica
PL
Rozłóż równomiernie granulat (D, E) w oznaczonym miejscu nie zostawiając wolnych przestrzeni. 1 worek (E) przeznacz na palenisko, a jeden (D) wysyp
dookoła siatki wentylacyjnej. Zwróć uwagę aby granulat nie dotykał żarnika. Nie umieszczaj granulatu bezpośrednio na siatce wentylacyjnej (VENTILATION
MESH). Ułóż polana ceramiczne.
RU
Равномерно поместите гранулы (D, E) в отмеченную область, не оставляя незакрытых участков. Используйте один пакет (E), чтобы накрыть
горелку. Распределите оставшиеся пакетов (D) вокруг вентиляционной сетки. Убедитесь, что гранулы не соприкасаются с нитью. Не кладите
гранулы на вентиляционную сетку. (VENTILATION MESH). Положите керамические поленья
VENTILATION MESH
D
E

12
EN
DE
ES
FR
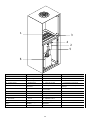
1. Filament
1. Glühelement
1. Filamento
1. Filament
2. Burner
2. Feuerungsleiste
2. Quemador
2. Foyer
3. Device surface
3. Feuerungsrost
3. Tapa de la chimenea
3. Brûleur
4. Control panel
4. Bedienpanel
4. Panel de control
4. Panneau de commande
5. Cap with a pumping hose
5. Schlauch mit
Verschluss
5. Manguera de la bomba
5. Bouchon avec un tuyau de
pompage
6. Fuel container
6. Brennstofftank
6. El depósito de
combustible
6. Conteneur de caburant
IT
PL
RU
1. Resistenza
1. Żarnik
1. нить накаливания
2. Focolare
2. Palenisko
2. горелка
3. Bruciatore
3. Ruszt
3. верхняя плита
4. Pannello di controllo
4. Panel sterowania
4. панель управления
5. Tubo della pompa con il
tappo
5. Wąż pompy z
nakrętką
5. кабель насоса с
крышкой
6. Serbatoio
6. Zbiornik paliwa
6. топливный бак
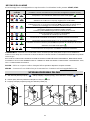
1
2
3
4
5
6

ERROR
ECO START
STOP
HOT FUEL READY
EN Diodes OFF / DE Dioden ausgeschaltet / ES Diodos apagados / FR Diodes éteintes / IT LED spenti /
PL Diody wyłączone / RU Диоды не светятся
EN Diodes ON / DE Dioden eingeschaltet / ES Diodos encendidos / FR Diodes allumées / IT LED accesi /
PL Diody włączone / RU Диоды светятся
EN Blinking diodes / DE Blinkende Dioden / ES Diodos parpadeantes / FR Diodes clignotante / IT LED lampeggianti /
PL Diody migające / RU Диоды мигают
EN
DE
ES
FR
1. ECO mode
2. Flame ignition / flame extinguishing
3. Service socket
4. Control diodes
1. ECO Modus
2. Schaltet den Kamin ein / aus
3. Servicesteckdose
4. Kontroll-Dioden
1. Modo Eco
2. Encendido / extinción de fuego
3. Toma de servicio
4. Diodos de control
1. Mode ECO
2. Allumage / extinction de la flamme
3. Fente de service
4. Diodes de contrôle
IT
PL
RU
1. Modalità ECO
2. Accensione/Spegnimento della fiamma
3. Spina di servizio
4. LED di controllo
1. Tryb ECO
2. Odpalanie / wygaszanie płomienia
3. Gniazdo serwisowe
4. Diody kontrolne
1. Режим ECO
2. Запуск камина / гашение пламени
3. Сервисное гнездо
4. Сигнализационные диоды
3
4
1
2

14
REPLACING FUEL CONTAINER
1. If the fuel container is empty ( ), unscrew the cap with the pumping hose and remove the container from the
holder ( ) (I).
2. Insert a full fuel container with a cap removed ( ) (II).
3. Screw the cap with the pumping hose back on (III).
FLAME IGNITION
The green diode ( ) indicates that the device is ready to ignite the flame.
Press and hold START for 3 seconds. Flame ignition will take 2-10 minutes ( ). The smell of ethanol vapours
can be present during the ignition. The diode READY off ( ) indicates that the flame has been ignited
and the device reached the working temperature.
FLAME HEIGHT REGULATION
After 3 min, press ECO to lower the flame (two sound signals). Press ECO again to increase the flame height (one
sound signal).
ATTENTION! In case the device temperature is too high, the flame will be automatically lowered (ECO) and the height
regulation blocked. If the temperature keeps increasing, the device will be turned off.
FLAME EXTINGUISHING
Press STOP to extinguish the flame (sound signal + ).
You can ignite the flame again when the device is cooled – the green diode READY ( ).
FAST START
The FAST START offers faster flame ignition (when the device is ready ( ), the power consumption is 60 W higher).
The function is enabled by default.
To disable FAST START, press and hold ECO for 10 seconds (four sound signals). To enable the function, press
and hold ECO for 10 seconds (two sound signals).
I IIIII
ENGLISH

15
TROUBLESHOOTING
Some alarms are accompanied by a sound signal. Press START/STOP to mute.
Lp.
DIODES
SOLUTION
(contact the Service Department if the solution does not eliminate the error)
1.
The device is being cooled. Wait for the green diode .
2.
The device run out of fuel while operating. The device is being cooled.
Wait for the red diode to turn off. Refill the tank.
3.
An internal fuel spill occurred. Disconnect the pump. Wipe the visible liquid and wait
for min. 1 hour. Press and hold ECO on the control panel for 10 seconds. If the error is
not eliminated, wait for min. 24 hours.
If the error occurred during flame ignition, it means that the ignition time
has been exceeded. Press and hold ECO on the control panel for 10 seconds.
4.
Device error. Press and hold ECO on the control panel for 10 seconds.
5.
Tank overfilled. Contact the Service Department.
6.
Room temperature too low (<10°C) or device error. Increase the room temperature.
Press and hold ECO on the control panel for 10 seconds. Wait for the green diode .
7.
Device overheat. Please contact service department.
FUEL - Use only ethanol fuel produced from plants in the process of two-time alcohol distillation consisting of 95-96.6%
ethanol by volume. Fanola is the recommended fuel with pharmacological purity.
DO NOT USE SYNTHETIC PETROLEUM BASED FUELS AS THEY ARE CONTAMINATED, EMIT UNPLEASANT ODORS AND CAN
DAMAGE THE FIREPLACE! DO NOT USE FUELS CONTAINING 100% ETHANOL BY VOLUME, GEL, OR AROMATIC FUELS!
CLEANING – Clean with a damp cloth and delicate detergents, only when the device is turned off and cooled.
SERVICE – Keep the provided USB cable for service. Reach out to us at serv[email protected]m.
BRENNSTOFFNACHFÜLLEN
1. Ist der Brennstofftank leer ( ), nehmen Sie den Behälter aus dem Schrank heraus ( ) (I).
2. Ersetzen Sie den leeren Behälter durch einen neuen ( ) (II).
3. Schrauben Sie den Verschluss an dem neuen Tankbehälter zu (III).
FLAMMENZÜNDUNG
Die grüne Diode bedeutet, dass der Kamin betriebsbereit ist.
Drücken Sie START für 3 Sekunden. Die Flammenzündung dauert 2-10 Minuten ( ). In dieser Zeit kann der Geruch
von Kraftstoffdämpfen zu spüren sein. Die ausgeschaltete Diode READY ( ) bedeutet, dass die Flamme gezündet
wurde und der Kamin die Betriebstemperatur erreicht hat.
I IIIII
DEUTSCH

16
REGULIERUNG DER FLAMMENHÖHE
Wenn die Flamme brennt, drücken Sie ECO, um die Flammenhöhe zu verringern (zwei Signaltöne).
Um die Flammenhöhe zu vergrößern, drücken Sie noch mal ECO (ein Signalton).
ACHTUNG! Falls die Temperatur des Gerätes zu hoch ansteigt, wird die Flammenhöhe automatisch verringert (ECO),
und die Regulierung der Flammenhöhe wird nicht mehr möglich. Falls die Temperatur wieder ansteigen wird,
wird der Kamin automatisch ausgeschaltet.
FLAMMENAUSLÖSCHUNG
Um die Flamme auszulöschen, drücken Sie STOP (es wird ein Signalton zu hören sein + ).
Die erneute Inbetriebnahme ist erst nach Abkühlung des Kamins möglich.– grüne Diode READY ( ).
FAST START
Die Funktion FAST START ermöglicht schnelle Flammenzündung (Energieverbrauch im Standby-Modus
für Flammenzündung ( ) und ist um ca. 60 W höher). Diese Funktion ist fabrikmäßig eingeschaltet.
Um FAST START einzuschalten, drücken Sie ECO für 10 Sekunden (vier Signaltöne). Um die Funktion erneut
einzuschalten drücken Sie ECO in 10 Sekunden (zwei Signaltöne).
ALARMMELDUNGEN
Manche Fehler werden zusätzlich mit einem Signalton gemeldet. Um den Signalton leiser zu machen, drücken Sie START/STOP.
Nr
SIGNALMELDUNGEN
FEHLERBEHEBUNG
(Falls der Fehler nicht behoben wurde, setzen Sie sich mit dem Service in Verbindung)
1.
Der Kamin wird abgekühlt. Bitte warten bis die grüne Diode erscheint. .
2.
Der Brennstoffbehälter ist leer (wenn der Kamin im Betrieb ist). Das Gerät wird abgekühlt.
Bitte warten bis die rote Diode erlischt und den Brennstoff nachfüllen.
3.
Brennstoffauslauf. Bitte die Brennstoffpumpe vom Gerät trennen. Die Flüssigkeit wischen
und mind. 1 Stunde warten. Drücken Sie ECO auf dem Bedienpanel
für 10 Sekunden. Falls die Fehlermeldung nicht verschwinden, 24 Stunden warten.
Wenn die Fehlermeldung während Flammenzündung erscheint,
wurde die Wartezeit auf die Flamme überschritten.
Bitte ECO auf dem Bedienpanel für 10 Sekunden drücken.
4.
Gerätefehler. Bitte ECO auf dem Bedienpanel für 10 Sekunden drücken.
5.
Der Brennstofftank wurde überflutet. Bitte sich mit dem Service in Verbindung setzen.
6.
Die Temperatur im Raum ist zu niedrig (<10°C) oder Gerätefehler.
Bitte den Raum beheizen. Bitte ECO auf dem Bedienpanel für 10 Sekunden drücken.
Warten bis die grüne Diode erscheint .
7.
Gerät überhitzt. Kontaktieren Sie die Serviceabteilung
BRENNSTOFF - Verwenden Sie nur Ethanolkraftstoff, der aus Pflanzen im Prozess der zweimaligen Alkoholdestillation
hergestellt wird und aus 95-96,6 Vol.-% Ethanol besteht. Fanola ist der empfohlene Brennstoff mit pharmakologischer
Reinheit.
VERWENDEN SIE KEINE SYNTHETISCHEN BRENNSTOFFE AUF ERDÖLBASIS, DA DIESE VERUNREINIGT SIND,
UNANGENEHME GERÜCHE ABGEBEN UND DEN KAMIN BESCHÄDIGEN KÖNNEN! VERWENDEN SIE KEINE
KRAFTSTOFFE MIT 100 VOL.-% ETHANOL, GEL ODER AROMATISCHE KRAFTSTOFFE!
REINIGUNG – Mit einem feuchten Lappen und milden Reinigungsmittel reinigen, nur wenn der Kamin ausgeschaltet und
abgekühlt ist.
SERVICE – Für Servicezwecke bewahren Sie das mitgelieferte USB-Kabel auf. Kontakt:service@planikafires.com

17
RELLENO DEL COMBUSTIBLE
1. Cuando de depósito está vacío ( ), desenrosque el tapón de la manguera y retire la bombona de combustible
de su soporte ( ) (I).
2. Inserte la bombona de combustible sin conectar la manguera ( ) (II).
3. Arrosque el tapón con la manguera de nuevo (III).
ENCENDIDO DE LA LLAMA
Diodo verde significa que el dispositivo está listo para encender la llama.
Presiona START por 3 segundos. Encender la llama tarda de 2 a 10 minutos ( ).Durante este tiempo, se puede
sentir el olor de los vapores de combustible. Diodo READY apagado ( ) informa que la llama se ha encendido y que
el dispositivo ha alcanzado la temperatura de funcionamiento.
REGULACIÓN DE LA ALTURA DE LLAMA
Cuando se enciende la llama, presione el botón ECO para disminuir su altura (dos pitidos). Presione el botón ECO
nuevamente para aumentar la altura de la llama (solo un pitido).
ATENCIÓN! Si la temperatura del dispositivo es demasiado alta, la altura de la llama se reducirá automáticamente
(ECO) y se bloqueará la posibilidad de su regulación. Si la temperatura continúa aumentando, el dispositivo se apagará.
APAGAR LA LLAMA
Para apagar la llama, presione STOP (solo un pitido + ).
Reactivación de la llama solo es posible después de que el dispositivo se haya enfriado: el diodo verde READY ( ).
FAST START
La función de FAST START permite un encendido más rápido de la llama (consumo de energía en el modo de espera
para encender la llama ( ) es aproximadamente 60 W más alto). La función está habilitada por defecto.
Para apagar FAST START, presione el botón ECO durante 10 segundos (cuatro pitidos). Para reactivar la función,
presione el botón ECO durante 10 segundos (dos pitidos).
I IIIII
ESPAÑOL

18
MENSAJES DE ALARMA
Algunos mensajes van acompañados de una señal audible. Para silenciarlo, presione START / STOP.
Lp.
DIODOS DE PANEL
DE CONTROL
PROCEDIMIENTO
(contacte al servicio si el procedimiento recomendado no elimina el error)
1.
El dispositivo está frío. Espere a que aparezca el diodo verde. .
2.
No hubo combustible durante la operación. El dispositivo está frío.
Espere a que el diodo rojo se apague. Repostar combustible
3.
El combustible se ha derramado en el dispositivo. Desconecte la bomba de combustible.
Limpie el líquido visible y espere min. 1 hora. Presione el botón ECO
en panel de control por 10 segundos.
Si el mensaje no ha desaparecido, espere min. 24 horas.
El mensaje que se muestra durante la activación de la llama significa
que se ha excedido el tiempo de espera de la llama.
Presione el botón ECO en panel de control por 10 segundos.
4.
. Error del dispositivo Presione el botón ECO en panel de control por 10 segundos.
5.
El tanque ha sido derramado. Contacta el servicio
6.
La temperatura ambiente es muy baja (<10 ° C) o el error del dispositivo.
Calienta la habitación. Presione el botón ECO en panel de control por 10 segundos.
Espere a que aparezca el diodo verde .
7.
Sobrecalentamiento del dispositivo. Ponte en contacto con servicio postventa
COMBUSTIBLE - Use solo combustible de etanol producido a partir de plantas en el proceso de destilación de alcohol
dos veces que consta de 95-96,6% de etanol por volumen. Fanola es el combustible recomendado con pureza
farmacológica.
¡NO USE COMBUSTIBLES SINTÉTICOS A BASE DE PETRÓLEO YA QUE ESTÁN CONTAMINADOS, EMITEN
OLORES DESAGRADABLES Y PUEDEN DAÑAR LA CHIMENEA! ¡NO UTILICE COMBUSTIBLES QUE
CONTENGAN 100 % DE ETANOL POR VOLUMEN, GEL O COMBUSTIBLES AROMÁTICOS!
LIMPIEZA - Limpie con un paño húmedo y un detergente suave cuando el aparato esté apagado y enfriado.
SERVICIO - conserve el cable USB incluido para realizar el servicio. Correo electrónico de contacto
RAVITAILLEMENT DU CARBURANT
1. Si le réservoir de carburant est vide ( ), dévisser le bouchon avec le tuyau de pompage et retirer le réservoir du
support. ( ) (I).
2. Insérez le réservoir de carburant plein avec son bouchon enlevé ( ) (II).
3. Revissez le bouchon avec le tuyau de pompage. (III).
I IIIII
FRANÇAIS

19
ALLUMAGE DE LA FLAMME
La diode verte signifie que l'appareil est prêt à démarrer la flamme.
Appuyez sur START pendant 3 secondes. Le démarrage de la flamme prend de 2 à 10 minute ( ).Pendant ce temps,
l'odeur des vapeurs de carburant peut être ressentie. La diode READY éteinte ( ) signifie que la flamme a été
allumée et que l'appareil a atteint la température de fonctionnement.
RÉGLAGE DE LA HAUTEUR DE FLAMME
Lorsque la flamme est allumée, appuyez sur le bouton ECO pour diminuer sa hauteur (deux bips). Appuyez à nouveau
sur le bouton ECO pour augmenter la hauteur de la flamme (bip unique).
ATTENTION! Si la température de l'appareil est trop élevée, la hauteur de la flamme sera automatiquement réduite
(ECO), et son réglage est bloqué. Si la température continue d'augmenter, l'appareil s'éteint.
ÉTEINDRE LA FLAMME
Pour éteindre la flamme, appuyez sur STOP (bip unique + ).
Le rallumage de la flamme n'est possible qu'après le refroidissement de l'appareil - la diode verte READY ( ).
FAST START
La fonction FAST START permet un allumage plus rapide de la flamme (consommation d'énergie en mode veille pour
allumer la flamme ( ) est environ 60 W plus haut). La fonction est activée par défaut.
Pour désactiver FAST START, appuyez sur le bouton ECO pendant 10 secondes (quatre bips). Pour réactiver
la fonction, appuyez sur le bouton ECO pendant 10 secondes (deux bips).
MESSAGES D'ALARME
Certains messages sont accompagnés d'un signal sonore. Pour le couper, appuyez sur START / STOP.
Lp.
DIODES DE PANNEAU
DE COMMANDE
PROCÉDURE
(contactez le service si la procédure recommandée n'élimine pas l'erreur)
1.
L'appareil est refroidi. Attendez que la diode verte apparaisse .
2.
Il n'y avait pas de carburant pendant le fonctionnement. L'appareil est refroidi.
Attendez que la diode rouge s'éteigne. Faire le plein.
3.
Le carburant s'est répandu dans l'appareil. Débrancher la pompe à carburant. Essuyez le
liquide visible et attendez min. 1 heure Appuyez sur le bouton ECO sur le panneau de
commande pendant 10 secondes. Si le message n'a pas disparu, veuillez patienter Min. 24
heures
Le message affiché pendant le démarrage de la flamme signifie que le temps d'attente
pour la flamme a été dépassé. Appuyez sur le bouton ECO pendant 10 secondes.
4.
Erreur du dispositif. Appuyez sur le bouton ECO
sur le panneau de commande pendant 10 secondes.
5.
Le réservoir a été débordé. Contactez le service.
6.
Température ambiante trop basse (<10 ° C) ou erreur de l'appareil.
Réchauffez la pièce. Appuyez sur le bouton ECO sur le panneau de commande pendant
10 secondes. Attendez que la diode verte apparaisse .
7.
Surchauffe de l'appareil Contactez le SAV
CARBURANT - Utilisez uniquement du carburant à l'éthanol produit à partir de plantes dans le processus de
distillation d'alcool en deux temps composé de 95 à 96,6% d'éthanol en volume. Fanola est le carburant recommandé
avec une pureté pharmacologique.
N'UTILISEZ PAS DE COMBUSTIBLES À BASE DE PÉTROLE SYNTHÉTIQUE CAR ILS SONT CONTAMINÉS,
ÉMETTENT DES ODEURS DÉSAGRÉABLES ET PEUVENT ENDOMMAGER LE FOYER ! N'UTILISEZ PAS DE
CARBURANTS CONTENANT 100 % D'ÉTHANOL EN VOLUME, DE GEL OU DE CARBURANTS AROMATIQUES !
NETTOYAGE - Nettoyer avec un chiffon humide et un détergent doux lorsque l'appareil est éteint et refroidi.
SERVICE - Conservez le câble USB fourni pour le service. Contactez par e-mail [email protected]m

20
PROCESSO DI RIFORNIMENTO DEL COMBUSTIBILE
1. Se il serbatoio del combustibile è vuoto ( ), svitare il tappo con il tubo di rifornimento ed estrarre il serbatoio
dall`alloggiamento ( ) (I).
2. Ricollocare il serbatoio pieno di combustibile nell`alloggiamento ( ) (II).
3. Avvitare il tappo con il tubo di rifornimento (III).
CENSIONE DELLA FIAMMA
Il LED verde indica che il dispositivo è pronto per accendere la fiamma.
Premere START per 3 secondi. L’apparizione della fiamma richiede 2-10 minuti ( ). Durante questo periodo,
si avverte l'odore dei vapori di combustibile. Il LED READY ( ) spento indica che la fiamma è stata attivata e che
il dispositivo ha raggiunto la temperatura di funzionamento.
REGOLAZIONE DELL'ALTEZZA DELLA FIAMMA
Quando la fiamma viene attivata, premere il pulsante ECO per diminuirne l'altezza (due segnali acustici).
Premere di nuovo il pulsante ECO per aumentare l'altezza della fiamma (segnale acustico singolo).
ATTENZIONE! Se la temperatura del dispositivo è troppo alta, l'altezza della fiamma viene automaticamente ridotta
(ECO) e la sua regolazione è bloccata. Se la temperatura continua a salire, il dispositivo si spegne.
SPEGNIMENTO DELLA FIAMMA
Per spegnere la fiamma, premere STOP (segnale acustico singolo + ).
Un successivo avvio è possibile solo dopo che il dispositivo si è raffreddato - il LED verde READY ( ).
FAST START
La funzione FAST START consente di accendere più rapidamente la fiamma (il consumo di energia in modalità standby
per l'accensione della fiamma ( ) è maggiore di circa 60 W). Come l’impostazione di fabbrica, la funzione è abilitata.
Per disattivare FAST START, premere il pulsante ECO per 10 secondi (quattro segnali acustici). Per riattivare
la funzione, premere il pulsante ECO per 10 secondi (due segnali acustici).
I IIIII
ITALIANO
La pagina si sta caricando...
La pagina si sta caricando...
La pagina si sta caricando...
La pagina si sta caricando...
-
 1
1
-
 2
2
-
 3
3
-
 4
4
-
 5
5
-
 6
6
-
 7
7
-
 8
8
-
 9
9
-
 10
10
-
 11
11
-
 12
12
-
 13
13
-
 14
14
-
 15
15
-
 16
16
-
 17
17
-
 18
18
-
 19
19
-
 20
20
-
 21
21
-
 22
22
-
 23
23
-
 24
24


in altre lingue
- français: Planika SCANDI Le manuel du propriétaire
- español: Planika SCANDI El manual del propietario
- Deutsch: Planika SCANDI Bedienungsanleitung
- polski: Planika SCANDI Instrukcja obsługi
Documenti correlati
-
 Planika FKE-0890 Manuale utente
-
 Planika Basket Fire Logs Manuale del proprietario
-
 Planika I1495 03 Manuale utente
-
Planika Panorama Manuale utente
-
Planika SENSOF Manuale utente
-
Planika Neo Manuale utente
-
 Planika Porto Laurent Manuale del proprietario
-
 Planika Cabo Laurent Table Manuale del proprietario
-
 Planika Cabo Burner Manuale del proprietario


