
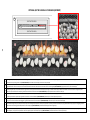
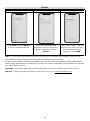
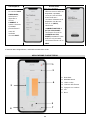
PANORAMA
Copyright Planika Sp. z o.o. www.planika.com I1491#04 22.04.2022
EN Installation manual / DE Montageanleitung / ES Manual de montaje /
FR Notice de montage / IT Istruzioni di montaggio / PL Instrukcja montażu /
RU инструкция по монтажу
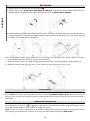
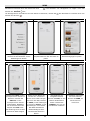
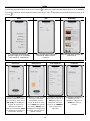
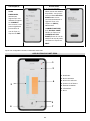
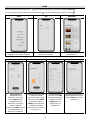
Single Sided
Left Corner
Right Corner
Three-sided
Tunnel
Room Divider
Island
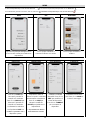
Three-sided Tunnel Room Divider
Island
Three-sided Tunnel Room Divider
Island
Three-sided Tunnel Room Divider
Island

2
EN INSTALLATION MANUAL ....................................................................................................................................... 8
DE MONTAGEANLEITUNG ......................................................................................................................................... 8
ES MANUAL DE MONTAJE ......................................................................................................................................... 8
FR NOTICE DE MONTAGE .......................................................................................................................................... 8
IT ISTRUZIONI DI MONTAGGIO ................................................................................................................................ 8
PL INSTRUKCJA MONTAŻU ........................................................................................................................................ 8
RU ИНСТРУКЦИЯ ПО МОНТАЖУ .............................................................................................................................. 8
EN INSTRUCTION MANUAL .....................................................................................................................................47
DE BEDIENUNGSANLEITUNG ..................................................................................................................................52
ES MANUAL DE USUARIO ........................................................................................................................................ 57
FR NOTICE D’UTILISATION ......................................................................................................................................62
IT MANUALE D’USO .................................................................................................................................................67
PL INSTRUKCJA OBSŁUGI ......................................................................................................................................72
RU ИНСТРУКЦИЯ ПО ЭКСПЛУАТАЦИИ .................................................................................................................77
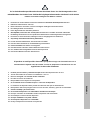
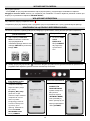
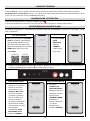
The product is a decorative device with real fire.
Read the included documentation prior to installing and operating the device.
Check the local regulations for fireplaces.
1. For indoor use and in housing only. Min. temperature of use is 10°C.
2. Natural air exchange rate in room – min. 1/h.
3. Do not use the device in humid and drafty spaces.
4. Do not cover top ventilation openings of the device.
5. Do not place any objects on the top of the device.
6. We recommend placing a CO2 or dry powder fire extinguisher nearby the device
7. For service purposes, the surrounding must allow for easy removal of the device.
8. Keep children, animals and unauthorized persons away from the device.
9. Keep the packaging and manuals for future use.
10. Do not turn on the device in case of fuel spill.
11. Do not interfere in the fuel filler when the device is operating.
12. Do not interfere in the device construction.
13. Do not touch the filament and other hot elements.
14. Do not transport the device if fueled.
15. Do not leave an operating device unattended
!
ENGLISH

3
Es ist ein Dekorationsprodukt und es brennt mit echtem Feuer. Vor der Montage und vor der
Inbetriebnahme des Kamins lesen Sie bitte die beigelegte Dokumentation. Machen Sie sich mit den
lokalen Vorschriften bezüglich der Kamine vertraut.
1. Der Kamin nur für den Einbau im Innenraum bestimmt. Erforderliche Raumtemperatur min. 10°C.
2. Natürliche Luftwechselrate - min. 1/h.
3. Nicht in Bereichen verwenden, in denen Feuchtigkeit und Zugluft vorkommen können.
4. Die Lüftungsschlitze nicht zudecken.
5. Keine Gegenstände auf dem Kamin platzieren.
6. Wir empfehlen, einen CO2- oder Trockenpulver-Feuerlöscher in der Nähe des Geräts aufzustellen
7. Die Montage des Kamins muss eine problemlose Herausnahme zu Wartungszwecken ermöglichen.
8. Den Kamin an einem für Kinder, Unbefugte und Tiere unzugänglichen Ort installieren.
9. Verpackung und Gebrauchsanweisung aufbewahren.
10. Im Falle des Brennstoffauslaufs, das Gerät nicht einschalten
11. Falls der Kamin im Betrieb ist, die Einfüllöffnung nicht berühren
12. In die Konstruktion des Gerätes nicht eingreifen
13. Das Glühelement und andere warmen Elemente nicht berühren
14. Den, mit Brennstoff nachgefüllten Kamin nicht transportieren
15. Das Gerät im Betrieb nicht ohne Aufsicht lasse
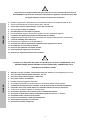
El producto es un dispositivo decorativo que produce fuego real. Familiarícese con la
documentación adjunta antes de instalar e iniciar el dispositivo. Familiarícese con las
regulaciones locales sobre chimeneas.
1. Producto para uso interno y solamente encajado. Usar a una temperatura min. de 10°C
2. Tasa de intercambio de aire natural en la habitación - mín. 1/h.
3. No lo use en lugares con corrientes de aire o humedad.
4. No cubra las ranuras de ventilación.
5. Está prohibido colocar objetos en el dispositivo.
6. Se recomienda colocar un extintor de polvo o CO2 cerca del dispositivo.
7. La instalación del dispositivo debe permitir una extracción fácil para el mantenimiento.
8. El dispositivo debe estar protegido contra el acceso de niños, animales y personas no autorizadas.
9. Guarde el embalaje y las instrucciones.
10. No encienda el dispositivo si el combustible se derrama fuera del tanque.
11. No toque el llenador de combustible cuando el dispositivo esté funcionando.
12. No modifique la construcción del dispositivo.
13. No toque el filamento o las partes calientes.
14. No transporte el dispositivo con combustible.
15. No deje el dispositivo funcionando sin supervisión
ESPAÑOL
DEUTSCH
!
!

4
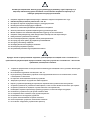
Le produit est un dispositif décoratif qui produit un feu réel. Familiarisez-vous avec la
documentation ci-jointe avant d'installer et de démarrer l'appareil. Familiarisez-vous avec
les réglementations locales concernant les cheminées.
1. Produit à usage interne et uniquement pour l’encastrement. Utiliser à une température min. de 10°C.
2. Taux de renouvellement de l'air naturel dans la pièce - min. 1/h.
3. Ne pas utiliser dans des endroits humides ou avec des courants d'air.
4. Ne couvrez pas les fentes de ventilation.
5. Il est interdit de placer des objets sur l'appareil.
6. Il est recommandé de placer un extincteur à poudre ou à CO2 à proximité de l'appareil.
7. L'installation de l'appareil doit permettre un retrait facile pour l'entretien.
8. L'appareil doit être protégé contre l'accès des enfants, des animaux et des personnes non autorisées.
9. Conservez l'emballage et les instructions.
10. Ne démarrez pas l'appareil en cas de débordement
11. Ne touchez pas le lieu de remplissage de carburant lorsque l'appareil est en marche.
12. Ne modifiez pas la construction de l'appareil.
13. Ne touchez pas le filament ou les parties chaudes.
14. Ne transportez pas l'appareil avec du carburant.
15. Ne laissez pas l'appareil fonctionner sans surveillance
Prodotto è un dispositivo decorativo che produce un vero fuoco. Familiarizzare con il
manuale allegato prima di installare e avviare il dispositivo. Familiarizzare con le
normative locali relative ai camini.
1. Dispositivo solo per uso interno e nella struttura ad incasso. Utilizzare a una temperatura min. di 10°C.
2. Tasso di ricambio naturale dell'aria nella stanza - min. 1/h.
3. Non usare in luoghi umidi e soggetti a correnti d'aria.
4. Non coprire le fessure di ventilazione.
5. È vietato posizionare oggetti sul dispositivo.
6. Si consiglia di posizionare un estintore a polvere o ad anidride carbonica vicino all'unità.
7. L'installazione del dispositivo deve consentire una facile rimozione per un eventuale manutenzione.
8. Il dispositivo deve essere protetto dall'accesso di bambini, animali e persone non autorizzate.
9. Conservare la confezione originale e le istruzioni d’uso.
10. Non avviare il dispositivo nel caso di fuoriuscita di carburante dal serbatoio.
11. Non operare nei pressi di bocchettone di riempimento quando il dispositivo è in funzione.
12. Non interferire nella costruzione del dispositivo.
13. Non toccare la resistenza o le parti calde del dispositivo.
14. Non trasportare il dispositivo con carburante.
15. Non lasciare incustodito il dispositivo.
FRANÇAIS
!
ITALIANO
!

5
Produkt jest urządzeniem dekoracyjnym wytwarzającym prawdziwy ogień. Zapoznaj się z
załączoną dokumentacją przed montażem i uruchomieniem urządzenia. Zapoznaj się z
lokalnymi przepisami dotyczącymi kominków
1. Urządzenie wyłącznie do użytku wewnętrznego i w zabudowie. Używać w temperaturze min. 10C.
2. Naturalna wymiana powietrza w pomieszczeniu - min. 1/h.
3. Nie używać w miejscach występowania wilgoci i przeciągów powietrza.
4. Nie zakrywać otworów wentylacyjnych urządzenia.
5. Zabrania się umieszczania jakichkolwiek przedmiotów na urządzeniu.
6. Zaleca się umieszczenie w pobliżu urządzenia gaśnicy proszkowej lub CO2.
7. Montaż urządzenia musi umożliwiać bezproblemowe wyjęcie go w celu serwisowania.
8. Urządzenie należy zabezpieczyć przed dostępem dzieci, zwierząt oraz osób niepowołanych.
9. Należy zachować opakowanie oraz instrukcje.
10. Nie uruchamiaj urządzenia w przypadku rozlania paliwa poza zbiornik.
11. Nie operuj przy wlewie paliwa, gdy urządzenie jest uruchomione.
12. Nie ingeruj w konstrukcję urządzenia.
13. Nie dotykaj żarnika oraz rozgrzanych elementów.
14. Nie transportuj urządzenia z paliwem.
15. Nie pozostawiaj uruchomionego urządzenia bez nadzoru.
Продукт является декоративным изделием, производящим настоящий огонь. Ознакомьтесь с
приложенной документацией перед монтажом и запуском устройства. Ознакомьтесь с местными
правилами, касающимися каминов
1. Устройство предназначено только для использования внутри помещений и после установки. Используйте
в температуре 10°C.
2. Естественный воздухообмен в помещении - мин. 1/ч.
3. Не разрешается устанавливать устройство в непосредственной близости к источникам влаги, а также
в помещениях со сквозняком.
4. Не закрывать вентиляционных щелей на устройстве.
5. Запрещается размещать на устройстве любые предметы.
6. Рядом с устройством рекомендуется размещать порошковый или углекислотный огнетушитель.
7. Устройство должно быть установлено таким образом, чтобы его легко можно было извлечь для сервиса.
8. Устройство должно быть защищено от детей, животных и посторонних лиц.
9. Необходимо сохранить оригинальную упаковку устройства, а также настоящую инструкцию.
10. Не включать устройства в случае утечки топлива из бака.
11. Не заправлять камин топливом, когда устройство работает.
12. Не вмешиваться в конструкцию устройства.
13. Не трогать нити накаливания и горячих элементов.
14. Нельзя перемещать устройство, наполненное топливом.
15. Не оставлять запущенного устройства без присмотр
POLSKI
РУССКИЙ
!
!

6
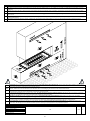
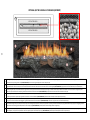
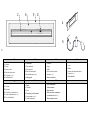
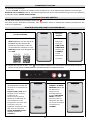
EN
The minimal cubature (70 m3) concerns the room with the ventilation slots (5 and 7 from page 7). Both ends of the outlets have to be in the same room.
DE
Die minimale Kubatur des Raumes (70m3) gilt für den Raum mit dem Lüftungsgitter (5 und 7 ab Seite 7). Der Lufteinlass und -auslass müssen in dem selben Raum sein.
ES
La cubatura mínima (70 m3) se refiere al local al que se dirigen las rejillas de ventilación (5 y 7 de la página 7). La entrada y la salida deben estar dirigidas a la misma
habitación.
FR
Le volume minimum (70 m3) se réfère à la pièce où sont dirigées les grilles de ventilation (5 et 7 à la page 7). L'entrée et la sortie doivent être dirigées vers la même
pièce.
IT
La cubatura minima (70 m3) si riferisce al locale verso il quale sono dirette le griglie di aerazione (5 e 7 a pagina 7). L'ingresso e l'uscita devono essere diretti nella
stessa stanza.
PL
Minimalna kubatura (70m3) odnosi się do pomieszczenia, do którego skierowane są kratki wentylacyjne (5 i 7 na stronie 7). Wlot i wylot musi być skierowany do tego
samego pomieszczenia.
RU
Минимальная кубатура (70 м3) относится к помещению с вентиляционными отверстиями (5 и 7 на стр. 7). Оба отверстия должны находиться в одной
комнате.
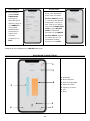
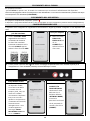
EN
Control panel must be installed on the wall beside the fireplace, at the same level or above the flame line. It has to be at a point where fireplace is visible. Failing
to do so may cause failure of the device and will void the warranty.
DE
Der Steuerungspanel muss neben dem Kamin installiert werden, auf der Flammenhöhe oder oberhalb. Aus Sicherheitsgründen muss er sich im selben Einbau
befinden, wie der Kamin. Das Nichteinhalten an die Richtlinien kann zur Beschädigung des Gerätes und den Garantieverlust führen.
ES
El panel de control debe instalarse al lado la chimenea, al mismo nivel o por encima de la línea de la llama. Debe estar en un lugar donde la chimenea sea visible.
El incumplimiento de las instrucciones puede dañar el dispositivo y anular la garantía.
FR
Le panneau de commande doit être installé à côté du foyer, au même niveau ou au-dessus de la ligne de flamme. Il devrait être dans un endroit où la cheminée
est visible. Le non-respect des instructions peut endommager l'appareil et annuler la garantie.
IT
Il pannello di controllo deve essere installato accanto al camino, allo stesso livello o sopra la linea di fiamma. Deve trovarsi in un punto in cui sia visibile il
camino. Il mancato rispetto delle linee guida può danneggiare il dispositivo e invalidare la garanzia.
PL
Panel sterowania musi być zainstalowany obok kominka, na tym samym poziomie lub powyżej linii płomienia. Panel sterowania musi być w miejscu, w którym
kominek jest widoczny podczas użytkowania. Niezastosowanie się do wytycznych może spowodować uszkodzenie urządzenia i utratę gwarancji.
RU
Пульт управления должен быть установлен на стене рядом с камином, на том же уровне или выше линии пламени. Это должно быть в точке, где
камин виден. Несоблюдение этого требования может привести к выходу из строя устройства и аннулированию гарантии.
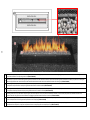
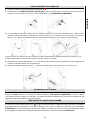
Burner / Feuerungsleiste / Hogar / Foyer / Focolare / Palenisko / Желоб пламени
Min. m3
kW
Panorama Single Sided
990
70 m3
7
Panorama Left Corner / Right Corner
Panorama Three-sided
Panorama See Through
Panorama Room Divider
Panorama Island
!
!

7
EN
DE
ES
FR
IT
PL
RU
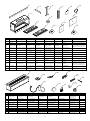
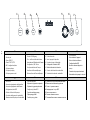
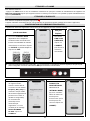
Quantity
1.
Flange extension
panel long
langer Montageleise
Liston de montaje
larga
Bande de montage
longue
Listello di montaggio
lungo
Listwa montażowa
długa
Монтажная панель
длинный
1x See Through, 1x Room Divider,
1x Island
2.
Flange extension
panel short
kurzer Montageleise
Liston de montaje
corta
Bande de montage
courte
Listello di montaggio
corto
Listwa montażowa
krótka
Монтажная панель
короткая
1x Left/Right Corner, 1x Room
Divider,2x Three-Sided, 2x Island
3.
Panorama Casing
Panorama Casing
Panorama Casing
Panorama Casing
Panorama Casing
Panorama Casing
Panorama Casing
1
4.
Stability brackets
Stahl- Stütze
Soporte
Support de
stabilisation
Staffe di supporto
Wspornik
stabilizujący
стабилизатор
1x Single Sided, 2x Left/Right
Corner, 2x See Through, 3x Room
Divider,3x Three-Sided, 4x Island
5.
Ventilation slot
(outlet)
Lüftungsgitter (Auslass)
Barril de ventilación
(salida)
Baril de ventilation
(sortie)
Fessura di ventilazione
(uscita)
Luft wentylacyjny
(wylot)
Вентиляционное
отверстие (выход)
1
6.
Flue collar
Rosette
rosetón de
chimenea
rosace de cheminée
Colletto della canna
fumaria
Rozeta kominowa
Розетка дымохода
3
7.
Ventilation slot
(inlet)
Lüftungsgitter (Einlass)
Barril de ventilación
(entrada)
Baril de ventilation
(entrée)
Fessura di ventilazione
(ingresso)
Luft wentylacyjny
(wlot)
Вентиляционное
отверстие (приток)
1
8.
Bag with screws
Tasche mit Schrauben
Bolsa con tornillos
Sac avec vis
Sachetto con le viti
Worek z wkrętami
samowiercącymi
сумка с винтами
1
9.
Ventilation tube
Lüftungskanal
Ducto de ventilación
conduit d'aération
Tubo di ventilazione
Kanał wentylacyjny
Вентиляционная
трубка
3+2
10.
Installation
manual
Montageanleitung
Manual de montaje
Notice de montage
Istruzioni di
montaggio
Instrukcja montażu
инструкция по
монтажу
1
11.
Glass enclosure
short
kurze Glasscheibe
Panel de vidrio
corto
Panneau de vitre
courte
Pannello di vetro corto
Panel szklany
krótki
Стеклянный корпус
короткий
1x Left/Right Corner, 1x Room
Divider,2x Three-Sided, 2x Island
12.
Glass enclosure
long
lange Glasscheibe
Panel de vidrio largo
Panneau de vitre
longue
Pannello in vetro lungo
Panel szklany długi
Стеклянный корпус
длинный
1x Single Sided, 1x Left/Right
Corner, 2x See Through, 2x Room
Divider, 1x Three-Sided, 2x Island
13.
M4 screws for
flue collar
metrische Schraube M4
für die Rosette
Tornillo métrico M4
para roseta
Vis métrique M4 pour
rosace
Viti M4 per colletto
fumi
Śruba metryczna
M4 do rozety
Винты М4 для
розетки
12
14.
Worm clamp
Schneckenklemme
abrazadera de
gusano
pince à vis sans fin
Morsetto a vite senza
fine
Opaska ślimakowa
Червячный зажим
10
EN
DE
ES
FR
IT
PL
RU
Quantity
15.
Burner
Kamin
Quemador
Cheminée
Camino
Kominek
горелка
1
16.
Remote control
Fernbedienung
Control remoto
Télécommande
Telecomando
Pilot
пульт
дистанционногоу
правления
1
17.
Fuel pump
Brennstoffpumpe
Bomba de combustible
Pompe
Pompa di rifornimento
Pompka paliwa
топливный насос
1
18.
Service cable
Service -Kabel
Cable USB de servicio
Câble de service
Cavetto per l'assistenza
technica
Kabel serwisowy
кабель сервиса
1
19.
Bag for fuel pump
Tasche für
Brennstoffpumpe
Bolso de la bomba de
combustible
Sac pour la pompe
Sacchetto per la pompa di
rifornimento
Torba do pompki paliwa
чехол для топливного
насоса
1
20.
External control
panel
Außensystemsteuerung
Panel de control externo
panneau de
commande externe
Esterno pannello di
controllo
Zewnętrzny panel
sterowania
Внешний пульт
управления
1
21.
Bag with granules
Tasche mit dem
Granulat
Bolsa de gránulos
sachet de granulés
Sacchetto per granuli
Torba z granulatem
Мешок с гранулами
6+1
22.
Ceramic logs
keramische Holzscheiten
Troncos de cerámica
bûches céramiques
Tronchi di ceramica
Polana ceramiczne
Керамические бревна
4
23.
White stones
Weiße Steine
piedras blancas
Pierres blanches
Pietre bianche
Białe kamienie
Белые камни
30
24.
Suction cups
Saugnapfhaken
Ventosas
Ventouses
Ventose
Przyssawki
Присоски
2
25
Screws for control
panel
Schraube für die
Außensystemsteuerung
Tornillo para Panel de
control externo
Vis pour panneau de
commande externe
Viti per Esterno pannello di
controllo
Śruba do panelu
sterowania
Винты для Внешний
пульт управления
2
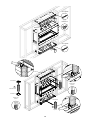
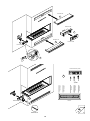
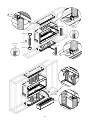
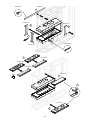
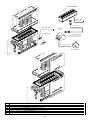
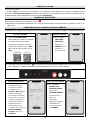
1. 4. 10.
2.
8.
3.
6.
5.
9.
12.
11.
13.
7.
14.
16.
17.
18.
19.
20.
15.
22.
23.
21.
optional
optional 24.
25.

8
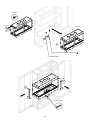
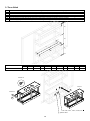
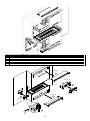
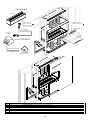
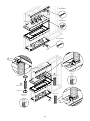
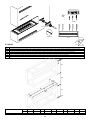
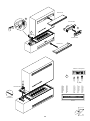
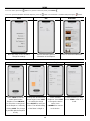
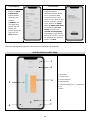
1. Single Sided
EN
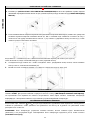
Construction frame has to be made as self-load. Panorama casing cannot be put under the load of the housing weight.
DE
Der Konstruktionsrahmen muss selbsttragend hergestellt werden. Casing Panorama kann nicht mit dem Gewicht des Gehäuses belastet werden.
ES
El marco de construcción debe hacerse como autocargable. El Casing Panorama no se puede cargar con el peso de la construccion.
FR
Le cadre de construction doit être réalisé en tant qu'auto-charge. Le boîtier Panorama ne peut pas être chargé par le poids du boîtier.
IT
Il telaio di costruzione deve essere realizzato come autocaricante. L'involucro panoramico non può essere caricato dal peso dell'alloggiamento.
PL
Rama konstrukcyjna musi być wykonana jako samonośna. Casing Panorama nie może być obciążony ciężarem zabudowy.
RU
Каркас конструкции должен быть самонесущим. Panorama Casing нельзя подвергать нагрузке от веса корпуса.
W
W1 min
W2 max
D
D1 max
H1
H2
H3
H4
H5
H6
mm
mm
mm
mm
mm
mm
mm
mm
mm
mm
mm
Panorama Single Sided
1320
1020
150
450
50
25-50
1140-2440
710
360-385
25-50
50-55
H3
W
D
H4
W1
D1
W2
W2
H5
H2
H1
H6
Min. 3x1,5 mm2
, 230 V, 50 Hz, PE
Optional SHS
Element 3

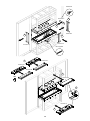
9
3
2
1
Not supplied
Element 7A
Element 5A
Element 5A
Element 7A
Element 7B
Element 5B
1
2
3
180° 3

10
Element 6
Element 13
Not supplied
Not supplied
Element 9 B
2
2
Element 9 A
1-3m
Element 9 A
3 pieces
Element 9 A B
1
Element 14
Element 14
0,1-1m
Element 9 B
2 pieces
2 pieces
3 pieces
3
3
3

11
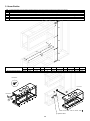
Min. 3x1,5 mm,
230 V, 50 Hz, PE
Optional SHS
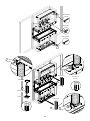
Element 15
1
2
3
RJ45 Ethernet
(not supplied by producer)
Burner
Planika SHS
module
Smart Home System
Input / Output Connection
(not supplied by producer)
Device control signal
(Potential / Potential Free)
(not supplied by producer)
Min. 3x1,5 mm,
230 V, 50 Hz, PE
SHS MODULE

12
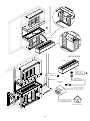
EN
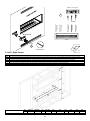
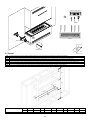
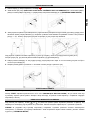
Make sure to finish the VISIBLE EDGE of the cladding material
DE
Stellen Sie sicher, dass die SICHTBARE KANTE des Verkleidungsmaterials abgedeckt ist
ES
Asegúrese de cubrir EL BORDE VISIBLE del material de revestimiento.
FR
Assurez-vous de couvrir LE BORD VISIBLE du matériau de revêtement
IT
Assicurati di coprire il bordo visibile del materiale di rivestimento
PL
Upewnij się, żeby wykończyć WIDOCZNĄ KRAWĘDŹ materiału okładzinowego.
RU
Убедитесь, что ВИДИМЫЙ КРАЙ облицовочного материала закрыт.
Element 5B
Element 7B
2
3
Element 20A
Element 20A
Element 20B
1
1
1

13
41
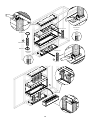
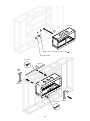
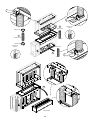
2. Left / Right Corner
EN
Construction frame has to be made as self-load. Panorama casing cannot be put under the load of the housing weight.
DE
Der Konstruktionsrahmen muss selbsttragend hergestellt werden. Casing Panorama kann nicht mit dem Gewicht des Gehäuses belastet werden.
ES
El marco de construcción debe hacerse como autocargable. El Casing Panorama no se puede cargar con el peso de la construccion.
FR
Le cadre de construction doit être réalisé en tant qu'auto-charge. Le boîtier Panorama ne peut pas être chargé par le poids du boîtier.
IT
Il telaio di costruzione deve essere realizzato come autocaricante. L'involucro panoramico non può essere caricato dal peso dell'alloggiamento.
PL
Rama konstrukcyjna musi być wykonana jako samonośna. Casing Panorama nie może być obciążony ciężarem zabudowy.
RU
Каркас конструкции должен быть самонесущим. Panorama Casing нельзя подвергать нагрузке от веса корпуса.
W
W1 min
W2 max
D
D1 max
H1
H2
H3
H4
H5
H6
mm
mm
mm
mm
mm
mm
mm
mm
mm
mm
mm
Panorama Left / Right Corner
1320
1020
150
450
50
25-50
1140-2440
710
360-385
25-50
50-55
Element 20B
2,5m
RJ45 Ethernet
Burner
External control panel
Power Supply
Fuel Hose
SHS Connection
Power Supply
1
2
Element 25
W
D
W1
D1
W2
W2
H3
H4
H5
H2
H1
H6

14
Element 8
1
Element 2
Min. 3x1,5 mm2
, 230 V, 50 Hz, PE
Optional SHS
Element 8
1
Element 4
1
Element 2
2
Element 3
3
2
1
3
Element 4
Element 4
Not supplied

15
Element 7A
Element 5A
Element 5A
Element 7A
Element 7B
Element 5B
1
2
3
180°
3
Element 6
Element 13
Not supplied
Not supplied

16
Element 9 B
Element 9 A
2
2
1-3m
Element 9 A
3 pieces
Element 9 A B
1
Element 14
Element 14
0,1-1m
Element 9 B
2 pieces
2 pieces
3 pieces
3
3
3
Element 15
1
2
3

17
RJ45 Ethernet
(not supplied by producer)
Burner
Planika SHS
module
Smart Home System
Input / Output Connection
(not supplied by producer)
Device control signal
(Potential / Potential Free)
(not supplied by producer)
Min. 3x1,5 mm,
230 V, 50 Hz, PE
SHS MODULE
Min. 3x1,5 mm,
230 V, 50 Hz, PE
Optional SHS
EN
Make sure to finish the VISIBLE EDGE of the cladding material
DE
Stellen Sie sicher, dass die SICHTBARE KANTE des Verkleidungsmaterials abgedeckt ist
ES
Asegúrese de cubrir EL BORDE VISIBLE del material de revestimiento.
FR
Assurez-vous de couvrir LE BORD VISIBLE du matériau de revêtement
IT
Assicurati di coprire il bordo visibile del materiale di rivestimento
PL
Upewnij się, żeby wykończyć WIDOCZNĄ KRAWĘDŹ materiału okładzinowego.
RU
Убедитесь, что ВИДИМЫЙ КРАЙ облицовочного материала закрыт.

18
41
Element 5B
Element 7B
2
Element 20A
Element 20A
Element 20B
1
1
1
3
Element 20B
2
2,5m
RJ45 Ethernet
Burner
External control panel
Power Supply
Fuel Hose
SHS Connection
Power Supply
1
Element 25

19
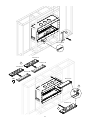
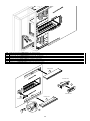
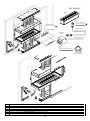
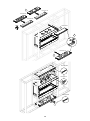
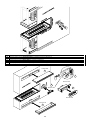
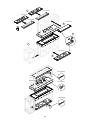
3. Three Sided
EN
Construction frame has to be made as self-load. Panorama casing cannot be put under the load of the housing weight.
DE
Der Konstruktionsrahmen muss selbsttragend hergestellt werden. Casing Panorama kann nicht mit dem Gewicht des Gehäuses belastet werden.
ES
El marco de construcción debe hacerse como autocargable. El Casing Panorama no se puede cargar con el peso de la construccion.
FR
Le cadre de construction doit être réalisé en tant qu'auto-charge. Le boîtier Panorama ne peut pas être chargé par le poids du boîtier.
IT
Il telaio di costruzione deve essere realizzato come autocaricante. L'involucro panoramico non può essere caricato dal peso dell'alloggiamento.
PL
Rama konstrukcyjna musi być wykonana jako samonośna. Casing Panorama nie może być obciążony ciężarem zabudowy.
RU
Каркас конструкции должен быть самонесущим. Panorama Casing нельзя подвергать нагрузке от веса корпуса.
W
W1 min
W2 max
D
D1 max
H1
H2
H3
H4
H5
H6
mm
mm
mm
mm
mm
mm
mm
mm
mm
mm
mm
Panorama Three Sided
1301
1020
150
450
50
25-50
1140-2440
710
360-385
25-50
50-55
W
D
W1
D1
W2
W2
H3
H4
H5
H2
H1
H6
Min. 3x1,5 mm2
, 230 V, 50 Hz, PE
Optional SHS
Element 8
1
Element 4
1
Element 2
2
Element 3
Element 8
1
Element 2

20
2
1
4
3
4
4
Element 4
Element 4
Element 4
Element 2
Not supplied
Element 8
Element 5A
Element 7A
Element 7B
Element 5B
1
180°
Element 7A
Element 5A
2
3
3
La pagina si sta caricando...
La pagina si sta caricando...
La pagina si sta caricando...
La pagina si sta caricando...
La pagina si sta caricando...
La pagina si sta caricando...
La pagina si sta caricando...
La pagina si sta caricando...
La pagina si sta caricando...
La pagina si sta caricando...
La pagina si sta caricando...
La pagina si sta caricando...
La pagina si sta caricando...
La pagina si sta caricando...
La pagina si sta caricando...
La pagina si sta caricando...
La pagina si sta caricando...
La pagina si sta caricando...
La pagina si sta caricando...
La pagina si sta caricando...
La pagina si sta caricando...
La pagina si sta caricando...
La pagina si sta caricando...
La pagina si sta caricando...
La pagina si sta caricando...
La pagina si sta caricando...
La pagina si sta caricando...
La pagina si sta caricando...
La pagina si sta caricando...
La pagina si sta caricando...
La pagina si sta caricando...
La pagina si sta caricando...
La pagina si sta caricando...
La pagina si sta caricando...
La pagina si sta caricando...
La pagina si sta caricando...
La pagina si sta caricando...
La pagina si sta caricando...
La pagina si sta caricando...
La pagina si sta caricando...
La pagina si sta caricando...
La pagina si sta caricando...
La pagina si sta caricando...
La pagina si sta caricando...
La pagina si sta caricando...
La pagina si sta caricando...
La pagina si sta caricando...
La pagina si sta caricando...
La pagina si sta caricando...
La pagina si sta caricando...
La pagina si sta caricando...
La pagina si sta caricando...
La pagina si sta caricando...
La pagina si sta caricando...
La pagina si sta caricando...
La pagina si sta caricando...
La pagina si sta caricando...
La pagina si sta caricando...
La pagina si sta caricando...
La pagina si sta caricando...
La pagina si sta caricando...
-
 1
1
-
 2
2
-
 3
3
-
 4
4
-
 5
5
-
 6
6
-
 7
7
-
 8
8
-
 9
9
-
 10
10
-
 11
11
-
 12
12
-
 13
13
-
 14
14
-
 15
15
-
 16
16
-
 17
17
-
 18
18
-
 19
19
-
 20
20
-
 21
21
-
 22
22
-
 23
23
-
 24
24
-
 25
25
-
 26
26
-
 27
27
-
 28
28
-
 29
29
-
 30
30
-
 31
31
-
 32
32
-
 33
33
-
 34
34
-
 35
35
-
 36
36
-
 37
37
-
 38
38
-
 39
39
-
 40
40
-
 41
41
-
 42
42
-
 43
43
-
 44
44
-
 45
45
-
 46
46
-
 47
47
-
 48
48
-
 49
49
-
 50
50
-
 51
51
-
 52
52
-
 53
53
-
 54
54
-
 55
55
-
 56
56
-
 57
57
-
 58
58
-
 59
59
-
 60
60
-
 61
61
-
 62
62
-
 63
63
-
 64
64
-
 65
65
-
 66
66
-
 67
67
-
 68
68
-
 69
69
-
 70
70
-
 71
71
-
 72
72
-
 73
73
-
 74
74
-
 75
75
-
 76
76
-
 77
77
-
 78
78
-
 79
79
-
 80
80
-
 81
81


in altre lingue
- français: Planika Panorama Manuel utilisateur
- español: Planika Panorama Manual de usuario
- Deutsch: Planika Panorama Benutzerhandbuch
- polski: Planika Panorama Instrukcja obsługi
Documenti correlati
-
 Planika Porto Laurent Manuale del proprietario
-
 Planika Arcticon Manuale del proprietario
-
 Planika Cabo Laurent Table Manuale del proprietario
-
 Planika SCANDI Manuale del proprietario
-
 Planika POLARIS Manuale del proprietario
-
 Planika Cabo Burner Manuale del proprietario
-
 Planika I1495 03 Manuale utente
-
 Planika Lotus Manuale del proprietario
-
Planika SENSOF Manuale utente
-
Planika Neo Manuale utente


