Planika FLA3 Manuale utente

Tipo
Manuale utente
FLA3 / FLA3+
Copyright Planika Sp. z o.o. www.planika.com I1360#31 11.05.2023
EN Installation manual / DE Montageanleitung / ES Manual de montaje /
FR Notice de montage / IT Istruzioni di montaggio / PL Instrukcja montażu /
RU инструкция по монтажу
WARNING / WARNUNG / ADVERTENCIA / AVERTISSEMENT / ATTENZIONE / OSTRZEŻENIE / ВНИМАНИЕ
EN This manual only applies to the installation and operation of FLA3 / FLA3+ burner only. The installation of the fireplace in Forma firebox, Daze / Laurent Box is included in the other manual.
DE Diese Anleitung gilt nur für die Installation und den Betrieb des FLA3 / FLA3+ Brenners. Die Installation des Kamins in Forma Feuerraum, Daze / Laurent Box ist in der anderen Anleitung
enthalten.
ES Este manual sólo se aplica a la instalación y funcionamiento del quemador FLA3 / FLA3+. La instalación de la chimenea en Forma firebox, Daze / Laurent Box se incluye en el otro manual.
FR Ce manuel s'applique uniquement à l'installation et au fonctionnement du brûleur FLA3 / FLA3+. L'installation de la cheminée dans le foyer Forma, Daze / Laurent Box est incluse dans l'autre
manuel.
IT Questo manuale si applica solo all'installazione e al funzionamento del bruciatore FLA3 / FLA3+. L'installazione del caminetto nel focolare Forma, Daze / Laurent Box è inclusa nell'altro manuale.
PL Niniejsza instrukcja dotyczy wyłącznie instalacji i obsługi palnika FLA3 / FLA3+. Instalacja kominka w obudowie Forma, Daze / Laurent Box zawarta jest w innej instrukcji.
RU Данное руководство относится только к установке и эксплуатации только горелки FLA3 / FLA3+. Установка камина в топку Forma, Daze / Laurent Box включена в другое руководство.
2
EN INSTALLATION MANUAL ....................................................................................................................................... 2
DE MONTAGEANLEITUNG ......................................................................................................................................... 3
ES MANUAL DE MONTAJE ......................................................................................................................................... 3
FR NOTICE DE MONTAGE .......................................................................................................................................... 4
IT ISTRUZIONI DI MONTAGGIO ................................................................................................................................ 4
PL INSTRUKCJA MONTAŻU ........................................................................................................................................ 5
RU ИНСТРУКЦИЯ ПО МОНТАЖУ .............................................................................................................................. 5
EN INSTRUCTION MANUAL .....................................................................................................................................14
DE BEDIENUNGSANLEITUNG ..................................................................................................................................19
ES MANUAL DE USUARIO ........................................................................................................................................ 24
FR NOTICE D’UTILISATION ......................................................................................................................................29
IT MANUALE D’USO .................................................................................................................................................34
PL INSTRUKCJA OBSŁUGI ......................................................................................................................................39
RU ИНСТРУКЦИЯ ПО ЭКСПЛУАТАЦИИ .................................................................................................................44
The product is a decorative device creating real fire.
Read the included documentation prior to installing and operating the device.
Consult the local regulations for fireplaces.
1. For indoor use and in housing only. Min. temperature of use is 10°C.
2. Natural air exchange rate in room min. 1/h.
3. Do not use the device in humid and drafty spaces.
4. Do not cover top ventilation openings of the device.
5. No heat-sensitive and flammable objects can be placed within a 1 meter radius from and directly above the device.
6. Do not place any objects on the top of the device.
7. We recommend placing a CO2 or dry powder fire extinguisher nearby the device
8. For service purposes, the surrounding must allow for easy removal of the device.
9. Keep children, animals and unauthorized persons away from the device.
10. Keep the packaging and manuals for future use.
11. Do not turn on the device in case of fuel spill.
12. Do not interfere in the fuel filler when the device is operating.
13. Do not interfere in the device construction.
14. Do not touch the filament and other hot elements.
15. Do not transport the device if fueled.
16. Do not leave an operating device unattended
ENGLISH
!
3
Es ist ein Dekorationsprodukt und es brennt mit echtem Feuer. Vor der Montage und vor der
Inbetriebnahme des Kamins lesen Sie bitte die beigelegte Dokumentation. Machen Sie sich mit den
lokalen Vorschriften bezüglich der Kamine vertraut.
1. Der Kamin nur für den Einbau im Innenraum bestimmt. Erforderliche Raumtemperatur min. 10°C.
2. Natürliche Luftwechselrate - min. 1/h.
3. Nicht in Bereichen verwenden, in denen Feuchtigkeit und Zugluft vorkommen können.
4. Die Lüftungsschlitze nicht zudecken.
5. Im Umkreis von einem Meter und direkt über dem Kamin sollten keine brennbare und hitzeempfindliche
Gegenstände platziert werden.
6. Keine Gegenstände auf dem Kamin platzieren.
7. Wir empfehlen, einen CO2- oder Trockenpulver-Feuerlöscher in der Nähe des Geräts aufzustellen
8. Die Montage des Kamins muss eine problemlose Herausnahme zu Wartungszwecken ermöglichen.
9. Den Kamin an einem für Kinder, Unbefugte und Tiere unzugänglichen Ort installieren.
10. Verpackung und Gebrauchsanweisung aufbewahren.
11. Im Falle des Brennstoffauslaufs, das Gerät nicht einschalten
12. Falls der Kamin im Betrieb ist, die Einfüllöffnung nicht berühren
13. In die Konstruktion des Gerätes nicht eingreifen
14. Das Glühelement und andere warmen Elemente nicht berühren
15. Den, mit Brennstoff nachgefüllten Kamin nicht transportieren
16. Das Gerät im Betrieb nicht ohne Aufsicht lassen
El producto es un dispositivo decorativo que produce fuego real. Familiarícese con la
documentación adjunta antes de instalar e iniciar el dispositivo. Familiarícese con las
regulaciones locales sobre chimeneas.
1. Producto para uso interno y solamente encajado. Usar a una temperatura min. de 10°C
2. Tasa de intercambio de aire natural en la habitación - mín. 1/h.
3. No lo use en lugares con corrientes de aire o humedad.
4. No cubra las ranuras de ventilación.
5. No poner elementos inflamables o sensibles a altas temperaturas dentro de un radio de 1 metro del dispositivo
y directamente sobre el dispositivo.
6. Está prohibido colocar objetos en el dispositivo.
7. Se recomienda colocar un extintor de polvo o CO2 cerca del dispositivo
8. La instalación del dispositivo debe permitir una extracción fácil para el mantenimiento.
9. El dispositivo debe estar protegido contra el acceso de niños, animales y personas no autorizadas.
10. Guarde el embalaje y las instrucciones.
11. No encienda el dispositivo si el combustible se derrama fuera del tanque.
12. No toque el llenador de combustible cuando el dispositivo esté funcionando.
13. No modifique la construcción del dispositivo.
14. No toque el filamento o las partes calientes.
15. No transporte el dispositivo con combustible.
16. No deje el dispositivo funcionando sin supervisión
ESPAÑOL
DEUTSCH
!
!
4
Le produit est un dispositif décoratif qui produit un feu réel. Familiarisez-vous avec la
documentation ci-jointe avant d'installer et de démarrer l'appareil. Familiarisez-vous avec
les réglementations locales concernant les cheminées.
1. Produit à usage interne et uniquement pour l’encastrement. Utiliser à une température min. de 10°C.
2. Taux de renouvellement de l'air naturel dans la pièce - min. 1/h.
3. Ne pas utiliser dans des endroits humides ou avec des courants d'air.
4. Ne couvrez pas les fentes de ventilation.
5. Ne pas avoir d'objets inflammables ou sensibles aux températures élevées dans un rayon de 1 mètre de l'appareil
ou directement sur l’appareil
6. Il est interdit de placer des objets sur l'appareil.
7. Il est recommandé de placer un extincteur à poudre ou à CO2 à proximité de l'appareil.
8. L'installation de l'appareil doit permettre un retrait facile pour l'entretien.
9. L'appareil doit être protégé contre l'accès des enfants, des animaux et des personnes non autorisées.
10. Conservez l'emballage et les instructions.
11. Ne démarrez pas l'appareil en cas de débordement
12. Ne touchez pas le lieu de remplissage de carburant lorsque l'appareil est en marche.
13. Ne modifiez pas la construction de l'appareil.
14. Ne touchez pas le filament ou les parties chaudes.
15. Ne transportez pas l'appareil avec du carburant.
16. Ne laissez pas l'appareil fonctionner sans surveillance
Prodotto è un dispositivo decorativo che produce un vero fuoco. Familiarizzare con il
manuale allegato prima di installare e avviare il dispositivo. Familiarizzare con le
normative locali relative ai camini.
1. Dispositivo solo per uso interno e nella struttura ad incasso. Utilizzare a una temperatura min. di 10°C.
2. Tasso di ricambio naturale dell'aria nella stanza - min. 1/h.
3. Non usare in luoghi umidi e soggetti a correnti d'aria.
4. Non coprire le fessure di ventilazione.
5. Non posizionare gli oggetti infiammabili o sensibili ad alte temperature entro un raggio di 1 metro e direttamente
al di sopra del dispositivo.
6. È vietato posizionare oggetti sul dispositivo.
7. Si consiglia di posizionare un estintore a polvere o ad anidride carbonica vicino all'unità.
8. L'installazione del dispositivo deve consentire una facile rimozione per un eventuale manutenzione.
9. Il dispositivo deve essere protetto dall'accesso di bambini, animali e persone non autorizzate.
10. Conservare la confezione originale e le istruzioni d’uso.
11. Non avviare il dispositivo nel caso di fuoriuscita di carburante dal serbatoio.
12. Non operare nei pressi di bocchettone di riempimento quando il dispositivo è in funzione.
13. Non interferire nella costruzione del dispositivo.
14. Non toccare la resistenza o le parti calde del dispositivo.
15. Non trasportare il dispositivo con carburante.
16. Non lasciare incustodito il dispositivo.
FRANÇAIS
ITALIANO
!
!
5
Produkt jest urządzeniem dekoracyjnym wytwarzającym prawdziwy ogień. Zapoznaj się z
załączoną dokumentacją przed montażem i uruchomieniem urządzenia. Zapoznaj się z
lokalnymi przepisami dotyczącymi kominków
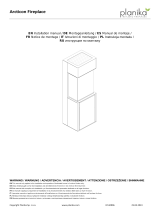
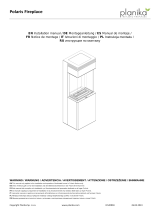
1. Urządzenie wyłącznie do użytku wewnętrznego i w zabudowie. Używać w temperaturze min. 10C.
2. Naturalna wymiana powietrza w pomieszczeniu - min. 1/h.
3. Nie używać w miejscach występowania wilgoci i przeciągów powietrza.
4. Nie zakrywać otworów wentylacyjnych urządzenia.
5. W promieniu 1 metra od oraz bezpośrednio nad urządzeniem nie mogą znajdować się przedmioty łatwopalne
i wrażliwe na działanie wysokich temperatur.
6. Zabrania się umieszczania jakichkolwiek przedmiotów na urządzeniu.
7. Zaleca się umieszczenie w pobliżu urządzenia gaśnicy proszkowej lub CO2.
8. Montaż urządzenia musi umożliwiać bezproblemowe wyjęcie go w celu serwisowania.
9. Urządzenie należy zabezpieczyć przed dostępem dzieci, zwierząt oraz osób niepowołanych.
10. Należy zachować opakowanie oraz instrukcje.
11. Nie uruchamiaj urządzenia w przypadku rozlania paliwa poza zbiornik.
12. Nie operuj przy wlewie paliwa, gdy urządzenie jest uruchomione.
13. Nie ingeruj w konstrukcję urządzenia.
14. Nie dotykaj żarnika oraz rozgrzanych elementów.
15. Nie transportuj urządzenia z paliwem.
16. Nie pozostawiaj uruchomionego urządzenia bez nadzoru.
Продукт является декоративным изделием, производящим настоящий огонь. Ознакомьтесь с
приложенной документацией перед монтажом и запуском устройства. Ознакомьтесь с местными
правилами, касающимися каминов
1. Устройство предназначено только для использования внутри помещений и после установки. Используйте
в температуре 10°C.
2. Естественный воздухообмен в помещении - мин. 1/ч.
3. Не разрешается устанавливать устройство в непосредственной близости к источникам влаги, а также
в помещениях со сквозняком.
4. Не закрывать вентиляционных щелей на устройстве.
5. Любые легковоспламеняющиеся и чувствительные на влияние высокой температуры предметы должны находиться
за пределами изделия в радиусе мин. 1 м. Одновременно их нельзя устанавливать непосредственно над камином.
6. Запрещается размещать на устройстве любые предметы.
7. Рядом с устройством рекомендуется размещать порошковый или углекислотный огнетушитель.
8. Устройство должно быть установлено таким образом, чтобы его легко можно было извлечь для сервиса.
9. Устройство должно быть защищено от детей, животных и посторонних лиц.
10. Необходимо сохранить оригинальную упаковку устройства, а также настоящую инструкцию.
11. Не включать устройства в случае утечки топлива из бака.
12. Не заправлять камин топливом, когда устройство работает.
13. Не вмешиваться в конструкцию устройства.
14. Не трогать нити накаливания и горячих элементов.
15. Нельзя перемещать устройство, наполненное топливом.
16. Не оставлять запущенного устройства без присмотр
POLSKI
РУССКИЙ
!
!
6
Burner
L [mm]
D [mm]
H [mm]
Heat
[kW]
FLA 3 / FLA 3+
FLA 3 / FLA 3+
FLA3
FLA3+
FLA 3 / FLA 3+
590
590
280
220
305
3,1
790
790
4,4
990
990
7,0
1190
1190
9,4
1490
1490
13,0
1990
1990
18,0
2490
2490
22,5
EN
DE
ES
FR
IT
PL
RU
Quantity
A.
Burner
Brenner
Quemador
Brûleur
Bruciatore
Palnik
Горелка
1
B.
Glass shield
Glasschild
Escudo de cristal
Bouclier de verre
Schermo di vetro
Szyba techniczna
Стеклянный экран
1x 590, 790, 990, 1190
2x 1490, 1990, 2490
C.
Small glass
holder
Glashalterung (klein)
Soporte pequeño
Support petit
Piccolo supporto vetri
Mały kamerton
держатели стекла
2x 590, 790, 990
3x 1190
4x 1490,1990,
6x 2490
D.
Glass holder
connector
Schraube fär
Glashalterung
Tornillo para
soporte
Vis de support
Le viti per il supporto
vetri
Śruba do
kamertona
винт для технического
стекла
E.
Remote control
Fernbedienung
Control remoto
Télécommande
Telecomando
Pilot
пульт дистанционногоу
правления
1
F.
Service cable
Service -Kabel
Cable USB de
servicio
Câble de service
Cavetto per
l'assistenza technica
Kabel serwisowy
кабель сервиса
1
G.
Fuel pump
Brennstoffpumpe
Bomba de
combustible
Pompe
Pompa di rifornimento
Pompka paliwa
топливный насос
1
H.
Installation and
user's manual
Montageanleitung
Bedienungsanleitung
Manual de montaje,
de usuario
Notice de montage et
d’utilisation
Istruzioni d’uso e
montaggio
Instrukcja montażu
i obsługi
инструкция по монтажу
и эксплуатации
1
I.
Windscreen
connector type 1
Windschutzscheibenan
schluss Typ 1
Conector parabrisas
tipo 1
Connecteur de pare-
brise type 1
Connettore parabrezza
tipo 1
Łacznik panelu
szklanego typ 1
Разъем ветрового стекла
тип 1
4x 590, 790, 990,1190, 1490,
8x 1990,2490
J.
Windscreen
Glaspanel
Panel de vidrio
Panneau en verre
Panello di vetro
Panel szklany
стеклянная палень
2x 590, 790, 990,1190, 1490,
4x 1990,2490
K.
Tall glass holder
Großer Glashalter
Portavasos alto
Grand porte-verre
Portabicchieri alto
Wysoki uchwyt do
paneli szklanych
Высокий держатель для
стаканов
4x 590, 790, 990,1190, 1490,
8x 1990,2490
L.
Windscreen
connector type 2
Windschutzscheibenan
schluss Typ 2
Conector parabrisas
tipo 2
Connecteur de pare-
brise type 2
Connettore parabrezza
tipo 2
Łacznik panelu
szklanego typ 2
Разъем ветрового стекла
тип 2
M.
Washer
Unterlegscheibe
Arandela del perno
Rondelle de boulon
Rondella per bulloni
Podkładka
Стиральная машина
B
M3x15
ACD
F
GK
M
L
IH
E
J
optionaloptionaloptional
optional
optional
7
`
EN
The fireplace surrounding must be made of non-flammable materials and insulated from any flammable elements of the construction. Use only
fasteners and adhesives that are resistant to high temperature.
DE
Das Gehäuse aus nicht brennbaren Materialien angefertigt, von allen brennbaren Elementen der Konstruktion isoliert.
ES
El encajamiento debe ser de materiales no combustibles, aislado de todos los elementos inflamables de la estructura. Los conexiones y aglutinantes
deben ser resistentes a altas temperaturas.
FR
L’encastrement doit être de matériaux incombustibles, isolé de tous les éléments inflammables de la construction. Les raccordement et liants doivent
être résistants aux hautes températures.
IT
La struttura ad incasso deve essere fatta di materiali non combustibili, isolati da tutti gli elementi infiammabili della struttura. Collegamenti e leganti
devo essere resistenti alle alte temperature.
PL
Zabudowa wykonana z materiałów niepalnych, odizolowana od wszelkich palnych elementów konstrukcji. Łączenia i spoiwa odporne na działanie
wysokich temperatur.
RU
Конструкция, в которой установлен камин должна быть изготовлена из невоспламеняющихся материалов, и она должна быть изолированной
от любых воспламеняющихся элементов. В качестве соединений, адгезивных веществ используйте термостойкие продукты.
8
1.
2.
Min. 3x1,5 mm2
, 230 V, 50 Hz,
PE
Optional SHS connection
1
RJ45 Ethernet
(not supplied by producer)
FLA3 / FLA3+
Planika SHS
module
Smart Home System
Input / Output Connection
(not supplied by producer)
Device control signal
(Potential / Potential Free)
(not supplied by producer)
Min. 3x1,5 mm2
, 230 V, 50 Hz,
PE
Optional SHS connection
EN The space under the device must be closed.
DE Die Konstruktion unter dem Kamin muss geschlossen sein.
ES El espacio debajo del dispositivo debe ser cerrado.
FR L’espace sous le dispositif doit être fermé.
IT Lo spazio al di sotto del camino deve essere chiuso.
PL Przestrzeń pod urządzeniem musi być zamknięta.
RU Конструкция под устройства должна быть закрытой.
9
B
C
D
10
J
K
I/L
M
11
12
AC
TV
13
EN
DE
ES
FR
1. Filament
2. Burner
3. Device surface
4. Control panel
5. Fuel filler
6. Fuel pump (a, b, c)
1. Glühelement
2. Feuerungsleiste
3. Feuerungsrost
4. Bedienpanel
5. Brennstofftanköffnung
6. Brennstoffpumpe (a, b, c)
1. Filamento
2. Hogar
3. Rejilla
4. Panel de control
5. Llenado de combustible
6. Bomba (a, b, c)
1. Filament
2. Foyer
3. Brûleur
4. Panneau de commande
5. Remplissage
6. Pompe (a, b, c)
IT
PL
RU
1. Resistenza
2. Focolare
3. Bruciatore
4. Pannello di controllo
5. Bocchettone di riempimento
6. Pompa di rifornimento (a, b,
c)
1. Żarnik
2. Palenisko
3. Ruszt
4. Panel sterowania
5. Wlew paliwa
6. Pompa paliwa (a, b, c)
1. Нить накаливания
2. Желоб пламени
3. Верхняя плита
4. Панель управления
5. Отверстие для наполнения
топливом
6. топливный насос (a, b, c)
2
3
1
4
5
a
b
c
6
14
EN
DE
ES
FR
1. Service port
2. Power ON/OFF
3. Flame START/STOP
4. Wi-Fi configuration/status
5. Fuel pump release
6. Fuel pump coupling
7. Fuel pump power socket
1. Service-USB-Eingang
2. Ein und Ausschalten des
Kamins
3. Anzünden und Erlöschen der
Flamme
4. Konfiguration / WIFI Status
5. Knopf zum befreien der
Pumpe
6. Anschluss der
Brennstoffpumpe
7. Netzanschluss der
Brennstoffpumpe
1. Puerto de servicio
2. Iniciar / apagar el dispositivo
3. Encender / apagar el
dispositivo
4. Configuración / estado de WIFI
5. Botón de liberación de la
bomba
6. Conector de la bomba de
combustible
7. Suministro de bomba de
combustible
1. Prise de service
2. Allumer/éteindre l'appareil
3. Allumer / éteindre la
flamme
4. Configuration/état WIFI
5. Bouton de déverrouillage
de la pompe
6. Connecteur de pompe à
carburant
7. Alimentation de la pompe
à carburant
IT
PL
RU
1. Presa USB
2. Accensione/spegnimento
del dispositivo
3. Accensione/spegnimento
della fiamma
4. Configurazione/stato WIFI
5. Pulsante di rilascio della
pompa
6. Connettore della pompa di
combustibile
7. Alimentazione della
pompa di combustibile
1. Gniazdo serwisowe
2. Włączenie / wyłączenie
urządzenia
3. Odpalanie / wygaszanie
płomienia
4. Konfiguracja / status WIFI
5. Przycisk zwalniający
pompę
6. Złącze pompy paliwa
7. Zasilanie pompy paliwa
1. Сервисный порт для подключения
кабеля
2. Включение / выключение
устройства
3. Розжиг / тушение пламени
4. Конфигурация / статус
WIFI
5. Кнопка спуска насоса
6. Разъем топливного насоса
7. Разъем кабеля питания
топливного насоса
1
2
3
4
5
6
START
STOP
SERVICE
ONLY
7
15
REFUELLING
1. Open the lid (I) and turn the device on by pressing .
2. If the fuel tank is empty (START/STOP BUTTON BLUE LIGHT ON) or you want to refuel the fireplace, firmly plug in the fuel
pump inleta (you will hear a click sound) and the power cord b (II) (BLUE LIGHT FLASHING).
3. If the fuel bottle is secured with the flame restrictor (cap on the bottles’ neck) (III) please remove it before inserting
the fuel pump inlet (IV) Place the fuel container stably on the floor and insert the pump hose ‘c’ (IV). Press and hold
the button on the pump to start refuelling (V).
When the fuel bottle is empty, replace it with a full one and continue using the pump (see: section 3 above). The pump
will stop refilling when the fuel tank is full (you will hear a beep).
4. Unplug the power cord ‘b’. To unplug the pump, hold the pump inlet ‘a’ and firmly press the release button (VI).
5. Shake the remaining fuel from the hose ‘c’ to the container and place the pump in the bag (VII).
FLAME IGNITION
When the START/STOP button is lit up in green, the device is ready to be launched.
Press START. Firing up of the device takes from 2 to 10 minutes (FLASHING GREEN LIGHT). During the process of
firing up, scent of fumes can be present. When the lights stop flashing, the device is lit up and has reached the working
temperature.
FLAME HEIGHT REGULATION
When the flame is on, press the or button on the remote or scroll the flame level bar in the mobile app to choose
one of the six flame heights. The flame starts on height 4 by default.
NOTE. In case of too high a temperature of the device, the flame height will be automatically decreased and locked
from changing. If the temperature continues to increase, the flame will be extinguished (RED LIGHT)
ENGLISH
16
FLAME EXTINGUISHING
To extinguish the flame:
-press STOP. When the flame is being extinguished, additional fans are turned on to speed up the cooling process.
Flashing red light indicated the device being cooled. Restarting the flame is possible only after complete cooldown of
the device (GREEN LIGHT).
TURNING THE DEVICE OFF
To turn the device OFF, press .
The device will automatically turn off in case of any work related errors. (check the error in the mobile app).
WIRELESS CONTROL CONFIGURATION
To pair the device with the mobile app (simultaneous pairing of more than one device is not possible):
Join the newsletter
Find your fireplace
1. Launch the FLA3
NET-ZERO mobile
app. Join the newsletter
by submitting your e-
mail address and
pressing SIGN UP or
simply press SKIP.
2. On the FIND YOUR
FIREPLACE screen
press CONNECT to
start the network
search.
3. Press and hold the WiFi button on the fireplace. When the button starts flashing, the fireplace is ready to be paired
for 5 minutes.
Setup Network Active
Connect to Home Network
4. Go to mobile device setup,
turn on the WiFi network
and connect with
Fireplace_WiFi_setup(if
the network is not visible,
unplug the device for 10
seconds and retry the
configuration). The
fireplace will be
automatically found by the
mobile app, which will be
confirmed by the app
(SETUP NETWORK
ACTIVE). Press
CONNECT.
5. On the CONNECT
TO HOME
NETWORK screen,
choose the name of
the network which
you plan to use by
default (NETWORK
NAME) and submit its
password. Make sure
the password is
correct and hit
(SUBMIT).
17
Your fireplaces
Access Point
6. On the following
screen (YOUR
FIREPLACES),
choose your device
and press
CONNECT. The
screen also allows
you to change the
name of the
fireplace (EDIT).
7. You can also create a
dedicated network
ACCESS POINT and
connect directly with the
device. To do that, press
(HELP), choose
(CONNECTION TYPE),
and (ACCES POINT), then
confirm by pressing
(CREATE ACCESS
POINT). Submit new name
for the network and the
password. Confirm by
pressing NEXT.
After successful configuration, the WiFi button will light up in green.
FLA3 NET-ZERO MOBILE APP
1. Newsletter
2. Fireplace status
3. Fuel level
4. Flame height
5. Start and stop
6. Info
7. Menu
1
2
3
4
5
7
6
18
MENU
To access menu, press the button. To go back to the main panel, press BACK
To access general information about the fireplace, press the button. The newsletter is available after pressing the button.
Menu
Info
Newsletter
Main app setup. Press the tab to
change the settings.
Press to check the general
information of the fireplace
Press to check the notifications
Panel Lock
Default Level
Your fireplaces
Contact us
Press LOCK to lock the
control panel on the
fireplace. Press UNLOCK
to unlock the control panel
on the fireplace. Confirm by
clicking SAVE. The change
is possible with the fireplace
off only.
Change the default launch
flame height. Press SAVE
to confirm the change.
Press RESET to reset your
choice. The default setting
of the flame is height 4.
Check available
fireplaces. Press EDIT
to change the device
name. Press
CONNECT to connect
to the device.
Contact Planika by e-mail.
Press SEND to send us an
e-mail.
19
ERRORS
Help
Error
File a Report
Press HELP in the main MENU to
access the Troubleshooting tab.
Fix the error with the provided
information. If the error proceeds to
appear, contact us by pressing
REPORT.
If still in need of service, send us a
message with a short description
of the problem and general
information. Press SEND.
INFORMATION SIGNALS
POWER DIODE
START/STOP DIODE
SOUND
ACTION
COMMUNICATION
-
Green light
Device turned off
-
Green light
Device is ready to work
-
Green blinking
Starting procedure
-
Working
-
Blue light
No fuel - Refuel
-
Blue blinking
Refueling
Blue blinking with sound
Full tank
Red light with sound
Extingushing, cooling
Purple light with sound
Error check the app (troubleshooting)
and contact with service
-
Blue, red blinking
Fuel tank is empty
WI-FI DIODE
ACTION
COMMUNICATION
Blue light
Not connected to wi-fi
Blue blinking
Pairing / configuration
Green light
Wi-fi connected
FUEL - Use only ethanol fuel produced from plants in the process of two-time alcohol distillation consisting of 95-
96.6% ethanol by volume. Fanola is the recommended fuel with pharmacological purity.
DO NOT USE SYNTHETIC PETROLEUM BASED FUELS AS THEY ARE CONTAMINATED, EMIT UNPLEASANT
ODORS AND CAN DAMAGE THE FIREPLACE! DO NOT USE FUELS CONTAINING 100% ETHANOL BY VOLUME,
GEL, OR AROMATIC FUELS!
CLEANING Clean with a damp cloth and delicate detergents, only when the device is turned off and cooled.
SERVICE Keep the provided USB cable for service. Reach out to us at service@planikafires.com.
20
BRENNSTOFFNACHFÜLLEN
1. Öffnen Sie die Klappe des Bedienpanels und Einfüllklappe (I) und drücken Sie um den Kamin einzuschalten.
2. Ist der Brennstofftank leer (START/STOP TASTE MIT BLAUER LEUCHTDIODE) oder möchten Sie den Brennstoff
nachfüllen, klemmen Sie mit einer sicheren Bewegung den Pumpenschlauch ‘a(Sie werden einen Klick ren) und den
Netzkabel an ‘b’ (II) (BLAUE LEUCHTDIODE BLINKT).
3. Wenn die Flasche mit Ethanol mit einem zusätzlichen Schutzkorken ausgestattet ist (III), muss man diesen entfernen,
bevor man das Schlauchende von der Pumpe in die Flasche reinsetzt (IV). Stellen Sie den Brennstoffbehälter stabil auf
den Boden und fügen den Schlauch hinein ‘c’ (IV). Drücken Sie den Knopf auf der Pumpe (V), um das
Brennstoffnachfüllen zu beginnen.
Wenn der Brennstoffbehälter leer ist, tauschen Sie ihn auf einen vollen aus und schalten die Pumpe wieder ein (siehe Punkt 3).
Die Pumpe wird automatisch ausgeschaltet, sobald der Brennstoffbehälter voll ist (SIGNALTON).
4. Trennen Sie den Netzkabel vom Gerät ‘b’. Um die Pumpe ‘a‘ abzulösen, halten Sie das Ende des Schlauches ‘a’ und
drücken kräftig die, mit dem Aufkleber gekennzeichnete Taste (VI).
5. Schütten Się den restlichen Kraftstoff vom Pumpenschlauch ‘c’ in den Behälter ein und stecken die Pumpe
in die Pumpeschützhülle (VII).
FLAMMENZÜNDUNG
Die grün beleuchtete Taste START / STOP heisst, dass das Gerät bereit ist um die Flammenzündung zu starten.
Drücken Sie START. Die Flammenzündung dauert 2-10 Minuten (BLINKENDE GRÜNE LEUCHTDIODE). In dieser Zeit kann
der Geruch von Kraftstoffdämpfen zu spüren sein. Das Erlöschen der Leuchtdioden ist eine Information, dass die Flamme
gezündet wurde und der Kamin die Betriebstemperatur erreicht hat.
REGULIERUNG DER FLAMMENHÖHE
Wenn die Flamme brennt, drücken Sie oder auf der Fernbedienung oder den Flammenpegelbalken verschieben in der
Applikation, um die Flammenhöhe auf 6 Niveaus zu vergrössern oder zu verkleinern. Das Gerät schaltet sich standardmäßig
mit einer Flammenhöhe auf dem 4 Niveau.
ACHTUNG! Falls der Kamin zu hohe Temperatur erreicht, wird die Flamme automatisch verringert und die Möglichkeit die
Flammenhöhe zu ändern wird blockiert. Falls die Temperatur weiter ansteigen wird, wird die Flamme ausgelöscht (ROTE
LICHTDIODE).
DEUTSCH
  • Page 1 1
  • Page 2 2
  • Page 3 3
  • Page 4 4
  • Page 5 5
  • Page 6 6
  • Page 7 7
  • Page 8 8
  • Page 9 9
  • Page 10 10
  • Page 11 11
  • Page 12 12
  • Page 13 13
  • Page 14 14
  • Page 15 15
  • Page 16 16
  • Page 17 17
  • Page 18 18
  • Page 19 19
  • Page 20 20
  • Page 21 21
  • Page 22 22
  • Page 23 23
  • Page 24 24
  • Page 25 25
  • Page 26 26
  • Page 27 27
  • Page 28 28
  • Page 29 29
  • Page 30 30
  • Page 31 31
  • Page 32 32
  • Page 33 33
  • Page 34 34
  • Page 35 35
  • Page 36 36
  • Page 37 37
  • Page 38 38
  • Page 39 39
  • Page 40 40
  • Page 41 41
  • Page 42 42
  • Page 43 43
  • Page 44 44
  • Page 45 45
  • Page 46 46
  • Page 47 47
  • Page 48 48
  • Page 49 49

Planika FLA3 Manuale utente

Tipo
Manuale utente