
Manuale Operativo
Operating Manual
Mode d'Emploi
Bedienungsanleitung
Handleiding
viscount
Vivace


viscount Vivace
INDICE
1
1. COMANDI SUL PANNELLO SINISTRO ............................................................................................................... 3
2. COMANDI SUL PANNELLO CENTRALE ............................................................................................................ 3
3. COMANDI SUL PANNELLO DESTRO .................................................................................................................. 4
4. COMANDI SUI MANUALI ..................................................................................................................................... 5
5. I PEDALI D’ESPRESSIONE ................................................................................................................................... 6
6. LE VASCHETTE LATERALI POSTE SOTTO I MANUALI ................................................................................. 6
7. INFORMAZIONI SULL’INTERFACCIA MIDI ...................................................................................................... 7
8. FACTORY RESET .................................................................................................................................................... 8


viscount Vivace
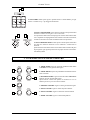
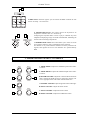
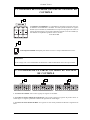
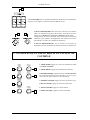
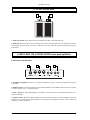
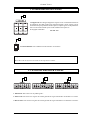
1. COMANDI SUL PANNELLO SINISTRO
1. Sezione COUPLERS (Unioni): questi comandi richiamano le unioni tra i registri
dei vari manuali e della pedaliera. Sarà quindi possibile suonare, ad esempio, i registri
appartenenti al secondo manuale anche sulla pedaliera in aggiunta ai registri selezionati
sulla pedaliera stessa, o quelli del secondo manuale sul primo manuale, ecc.
Le combinazioni possibili sono le seguenti:
• I/P: le voci del primo manuale abilitate alla pedaliera;
• II/P: le voci del secondo manuale abilitate alla pedaliera;
• II/I: le voci del secondo manuale abilitate al primo manuale.
1
2
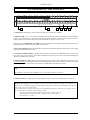
2. Interruttore POWER: interruttore per l’accensione / spegnimento dell’organo.
ATTENZIONE!!
In caso di temporale o di lunghi periodi di inutilizzo si consiglia di disinserire la spina dalla presa di
corrente.
1
2
3
1. Sezione PEDAL: questa sezione contiene gli 8 registri della pedaliera.
2. Sezione MAN.I: questa sezione contiene i 10 registri del primo manuale.
3. Sezione MAN.II: questa sezione contiene gli 11 registri del secondo manuale.
2. COMANDI SUL PANNELLO CENTRALE
3

viscount Vivace
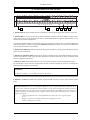
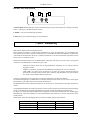
4. Sezione MIDI: tramite questi registri è possibile attivare il canale MIDI A per ogni
sezione. Consultare il cap. 7 per maggiori informazioni.
4
5
6
5. Selettore TRANSPOSER: questo selettore permette la trasposizione della
tastiera di 6 semitoni verso il grave e di 5 verso l’acuto.
La trasposizione della tastiera rende più agevole suonare nelle tonalità “diffi-
cili” e semplifica l’accompagnamento di un cantante o di un altro strumentista,
evitando in tal modo la necessità di effettuare laboriose trasposizioni.
6. Selettore MEMORY BANK: tramite questo controllo potrete selezionare
uno degli otto banchi di memoria con cui richiamare / memorizzare le
memorie.
Questa funzione risulta molto utile in caso di utilizzo dello strumento da parte
di più organisti: ogni organista potrà salvare le proprie memorie in un determi-
nato Memory Bank.
VOLUME
VOLUME
PEDAL
MAN. II
VOLUME
MAN. I
SPEED
DEPTH
VOLUME
VOLUME
REVERB
GENERAL
TREM.
TREM.
1
2
3
4
5
6
7
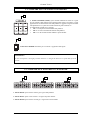
1. TREM. SPEED: regola la velocità di modulazione dell’effetto
di Tremolo sul suono generato dall’organo.
2. TREM. DEPTH: imposta la profondità di modulazione dell’ef-
fetto di Tremolo.
3. REVERB VOLUME: regola il livello dell’effetto di Riverbero
applicato al suono generato dall’organo.
Questo effetto è molto utile qualora lo strumento si trovi in
ambienti piccoli e/o privi di riverbero naturale.
4. GENERAL VOLUME: regola il volume generale dell’organo.
5. MAN.I VOLUME: regola il volume del primo manuale.
6. MAN.II VOLUME: regola il volume del secondo manuale.
7. PEDAL VOLUME: regola il volume della pedaliera.
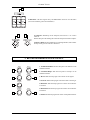
3. COMANDI SUL PANNELLO DESTRO
4

viscount Vivace
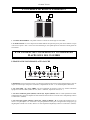
1 2 3 4 5 6
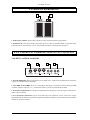
1. Pulsante SET (S): questo pulsante permette di richiamare la funzione di salvataggio delle memorie e/o del Tutti.
2. Memorie (HR; 1 - 2 - 3 - 4 - 5 - 6): tutte le selezioni effettuate sui registri, sulle sezioni MIDI e Couplers possono
venire memorizzate. A tal fine premere il pulsante S e, mantenendolo premuto, il pulsante della memoria in cui si
desidera salvare l’attuale configurazione.
Le memorie includono inoltre un tasto denominato HR: conosciuta anche col nome di zero (0), la memoria HR memo-
rizza automaticamente i comandi e i registri attivi quando il tasto è acceso, evitando così di perdere la configurazione
presente prima del richiamo di una memoria.
3. Pulsante ENC (Enclosed): premendo questo pulsante potrete controllare il volume generale dell’organo tramite il
pedale d’espressione MAN.II.
4. Pulsante A.P (Automatic Pedal): tramite questo pulsante è possibile suonare i registri della pedaliera sui primi 32
tasti del primo manuale. Questi registri diventano monofonici con priorità sulla nota più grave. Utilizzando questa
funzione la pedaliera viene esclusa.
5. Pulsante T (Tutti): questo pulsante attiva il TUTTI con il quale accendere una serie preimpostata di registri.
Per programmare e salvare una nuova configurazione del Tutti, accendere il pulsante T, attivare le voci desiderate e,
tenendo premuto il pulsante S, premere HR.
4. COMANDI SUI MANUALI
NOTA BENE
Il “TUTTI” non attiva le voci oscillanti, i tremoli e la Vox Celeste.
Funzione Set+Cancel: Nel caso di collegamento MIDI con un altro organo VISCOUNT, l’attivazione di un
registro sullo strumento trasmittente causerà (tramite l’invio di un messaggio di sistema esclusivo)
l’abilitazione dello stesso sull’organo ricevente. Qualora si desideri che determinati registri non suonino sul-
l’organo trasmittente, ma alla loro selezione vengano comunque attivati sullo strumento ricevente, eseguite la
seguente procedura:
- Premere il pulsante Set (S) e contemporaneamente il Cancel (C): tutti i registri vengono
accesi.
- Spegnere i registri che si desidera suonino solo sull’organo ricevente.
- Premere nuovamente Set+Cancel.
6. Pulsante C (Cancel): Premendo questo pulsante il pistoncino HR verrà acceso e tutti i registri attivati verranno
spenti.
5

viscount Vivace
5. I PEDALI D’ESPRESSIONE
1. Pedale MAN.I / PEDAL: questo pedale controlla il volume del primo manuale e della pedaliera.
2. Pedale MAN.II: tramite questo pedale sarà possibile gestire il volume del secondo manuale. Se il pulsante ENC,
posizionato sotto il primo manuale, è acceso, sarà possibile controllare il volume generale dell’organo.
1 2
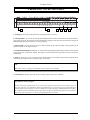
6. LE VASCHETTE LATERALI POSTE SOTTO I MANUALI
VASCHETTA LATERALE SINISTRA
1. Presa HEADPHONES: Presa di collegamento per una cuffia stereo. A cuffia inserita l’amplificazione interna del-
l’organo verrà automaticamente disabilitata.
2. Prese MIDI IN-OUT-THRU: Prese per il collegamento dell’organo con dispositivi dotati di interfaccia MIDI
(expander, computer, sequencer, ecc...). Si rimanda al capitolo 7 per ulteriori informazioni sul MIDI.
3. Prese INPUT L(MONO)-R: Prese di ingresso all’amplificazione dell’organo. In caso di sorgente monofonica uti-
lizzare la presa L-MONO.
4. Prese OUTPUT L(MONO)-R: Prese di uscita dell’organo non amplificate. Queste connessioni vengono
generalmente usate per effettuare registrazioni su apparati di registrazione analogica. In caso di unità ricevente monofonica
utilizzare la sola presa L-MONO.
1 2 3 4
6

viscount Vivace
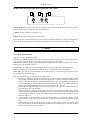
VASCHETTA LATERALE DESTRA
4 5 6
4. GENERAL PITCH: Consente la regolazione fine dell’accordatura di tutto lo strumento. Alla consegna l’organo
viene intonato dal costruttore con LA=440Hz (potenziometro pitch in posizione centrale).
5. PEDAL: Regola l’accordatura fine della pedaliera.
6. MAN. II: Regola l’accordatura fine del secondo manuale.
Lavorando su questi controlli sarà possibile ottenere effetti di ensamble più o meno pronunciati, a seconda del livello
dei battimenti che si verranno a creare scordando lievemente le sezioni tra loro.
7. INFORMAZIONI SULL’INTERFACCIA MIDI
La sigla MIDI è l’acronimo di Musical Instrument Digital Interface (Interfaccia Digitale per Strumenti Musicali).
Tale interfaccia permette agli strumenti elettronici, anche di marca e genere diverso, di colloquiare tra loro o con un
computer per scambiarsi numerose informazioni tramite un ben specifico e dettagliato protocollo di codici.
Sara’ cosi’ possibile ottenere diverse funzioni dalle macchine collegate senza dover necessariamente agire su di loro in
maniera fisica.
Gli strumenti musicali elettronici dotati di interfaccia MIDI sono dotati di uno o più connettori DIN 5 poli che rappre-
sentano, appunto, le prese MIDI. Solitamente dette prese sono tre e sono così nominate:
- MIDI IN: Tramite questa presa l’organo riceve i dati MIDI emessi da altre unità.
- MIDI OUT: Tramite questa presa l’organo trasmette i dati MIDI da essa generati.
- MIDI THRU: Questa presa, utilizzata per il collegamento in serie di più unità riceventi, trasmette i dati
MIDI ricevuti dalla porta MIDI IN.
Nel Vivace queste prese sono posizionate nella vaschetta sinistra sotto il primo manuale. La trasmissione e la ricezione
dei dati MIDI sono suddivise in 16 canali per cui, data una unità trasmittente, di tutte le riceventi collegate risponderà
solo quella che risulterà impostata sul canale della trasmittente.
Selezionando il canale MIDI di trasmissione, infatti, andremo a collegarci solo con quell’unità il cui canale di ricezione
risulta essere lo stesso. Risulta chiaro che se due unità MIDI sono settate con canali diversi, esse non possono scambiar-
si dati.
L’organo Vivace è dotato di una interfaccia MIDI che possiede la caratteristica di essere BIFONICA ossia ogni singolo
manuale può trasmettere e ricevere su 2 canali MIDI indipendenti di cui uno di base (sempre attivo) ed uno ausiliario
(denominato A).
Il canale MIDI A di ciascuna sezione può essere attivato/disattivato tramite i comandi presenti nel pannello centrale,
alla sinistra dei registri per le voci (vedi anche il cap. 2). Di seguito la distribuzione dei canali MIDI per ogni sezione:
7
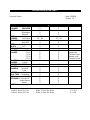
MANUALE Canale MIDI di BASE Canale MIDI A
Pedaliera 14 7
I manuale 12 3
II manuale 11 1

viscount Vivace
8. FACTORY RESET
Con il termine Factory Reset si intende la possibilità di ripristinare le impostazioni originali dello strumento
eliminando tutte le modifiche apportate dall’utente. L’organo Vivace è in grado di eseguire sia la procedura di
inizializzazione generale (tutte le sezioni dello strumento vengono ripristinate ai loro valori originali) sia il singolo
Factory Reset del Tutti.
INIZIALIZZAZIONE GENERALE DELLO STRUMENTO
Per procedere con l’inizializzazione generale accendere l’organo tenendo premuti contemporaneamente i tasti HR, 1 e
2 delle memorie.
INIZIALIZZAZIONE DEL TUTTI
Per riconfigurare il registro del TUTTI con le impostazioni originali accendere l’organo tenendo premuto il pistoncino
HR delle memorie.
8
In aggiunta ai canali di Base e A, l’organo gestisce altri 2 canali GLOBALI utilizzati per lo scambio di informazioni
MIDI generali o di sistema. Detti canali risultano essere il 10 (solo trasmissione) e il 16.
N.B.:
La pedaliera, il I manuale ed il II manuale possono anche ricevere dati MIDI rispettivamente sui canali 8, 4 e 2.

viscount Vivace
CONTENTS
9
1. LEFT-HAND PANEL CONTROLS ......................................................................................................................... 11
2. CENTRAL PANEL CONTROLS ............................................................................................................................. 11
3. RIGHT-HAND PANEL CONTROLS ...................................................................................................................... 12
4. CONTROLS ON THE MANUAL ........................................................................................................................... 13
5. THE EXPRESSION PEDALS ................................................................................................................................. 14
6. CONTROLS AND CONNECTIONS LOCATED UNDER THE KEYBOARDS .................................................... 14
7. INFORMATIONS ABOUT MIDI INTERFACE ....................................................................................................... 15
8. FACTORY RESET ................................................................................................................................................... 16


viscount Vivace
1. LEFT-HAND PANEL CONTROLS
1. Couplers section: these buttons couple the registers of the various manuals and the
Pedalboard together, so that for example it will be possible to play the registers belonging
to the Swell on the Pedalboard, as well as the registers selected for the Pedalboard
itself, or the Swell registers on the Choir, etc. The combinations available are:
• I/P: the voice of the Great in the Pedalboard.
• II/P: the voice of the Swell in the Pedalboard.
• II/I: the voice of the Swell in the Great.
1
2
2. On/off switch: switch to power on / off the instrument.
CAUTION!!
In case of thunder storms you are advised always to disconnect the plug from the power socket.
1
2
3
1. Pedal section: this section contains the 8 Pedalboard stops.
2. Manual I section: this section contains the 10 stops of the Great.
3. Manual II section: this section contains the 11 stops of the Swell.
2. CENTRAL PANEL CONTROLS
11

viscount Vivace
4. MIDI section: with these registers you can activate the MIDI A channel for each
section. See chapt. 7 for more infos.
4
5
6
5. TRANSPOSER selector: this selector allows the keyboard to be
transposed 6 semitones down or 5 semitones up.
Transposing the keyboard makes it easier to play in “difficult” keys and
simplifies accompanying a singer or another instrumentalist, eliminating the
need for time-consuming transpositions.
7. MEMORY BANK selector: this control allows you to select one of the
seven memory banks for recall / memorisation of the memories.
This function is very useful when the instrument is used by more than one
organist; each organist can save his own memories in a specific Memory
Bank.
VOLUME
VOLUME
PEDAL
MAN. II
VOLUME
MAN. I
SPEED
DEPTH
VOLUME
VOLUME
REVERB
GENERAL
TREM.
TREM.
1
2
3
4
5
6
7
1. TREM. SPEED: it adjusts the modulation speed of the Tremo-
lo effects.
2. TREM. DEPTH: it adjusts the modulation depth of the Tremo-
lo effects.
3. 3.
3. 3.
3. REVERB VOLUME: it adjusts the volume of the Reverberation
effect. Through the digital Reverb you enriche the sound of your
Vivace organ placed in a small rooms without natural echo.
4. GENERAL VOLUME: it adjust the general volume of the organ.
5. 5.
5. 5.
5. MAN.I VOLUME: it adjusts the Great volume.
6. MAN.II VOLUME: it adjusts the Swell volume.
7. 7.
7. 7.
7. PEDAL VOLUME: it adjusts the Pedalboard volume.
3. RIGHT-HAND PANEL CONTROLS
12

viscount Vivace
1 2 3 4 5 6
1. S button (Set): this button is used to activate the memories and Tutti save function.
2. Memories (HR; 1 - 2 - 3 - 4 - 5 - 6): all selections made with the tab registers including the sections MIDI and
Couplers can be memorized. To do this press the SET (S) button, and keep it pressed while pressing one of the 6
memory buttons to select the memory where this combination of registers is to be saved.
Memories include a push-button marked HR (it can be also called 0). This memory memorize temporarely the last
configuration present at time when the piston was switched on.
3. ENC button (Enclosed): after this button has been pressed, the MAN.II expression pedal can be used to control
the general volume of the entire organ.
4. A.P button (Automatic Pedal): by pushing the A.P. piston, you will play the pedalboard registers on the first 32
keys of the Great. These registers will become monophonic with priority on the lowest note. When utilizing this
function, the pedalboard will not play.
5. T button (Tutti): the Tutti enables a series of preset registers. To store a new configuration of Tutti, first of all
activate the function by pressing the T button, then modify the configuration of the registers as you prefer. To save the
new setting, keep the S (set) button pressed and press the HR button of the memories section.
4. CONTROLS ON THE MANUALS
N.B.
The Tutti does not activate the modulation voices, the tremolos and the Vox Celeste.
Function Set + Cancel: when the MIDI is connected to another VISCOUNT organ, the activation of a
register on the transmitting organ will (through the sending of an exlusive system message) activate the
same register on the receiving organ.
If you wish that some registers will not play on the transmitting organ but, when selected, will play only on
the receiving organ, you have to follow this procedure:
- Press Set (S) piston and at the same time Cancel (C): all tabs will be on.
- Switch off the tabs you do not wish to sound on the receiving organ.
- Press again Set + Cancel.
6. C button (Cancel): by pushing this piston the HR piston will be on and the activated registers will be off.
13

viscount Vivace
5. THE EXPRESSION PEDALS
1. MAN.I / PEDAL pedal: this pedal controls the Great and Pedalboard volumes.
2. MAN.II pedal: this pedal can be used to control the volume of the Swell. If the ENC button under the Great has
been pressed, this pedal can be used to control the overall volume of the organ.
1 2
6. CONTROLS AND CONNECTIONS LOCATED UNDER
THE KEYBOARDS
LEFT-HAND SIDE PANEL
1. HEADPHONES: connector for a stereo headphone set. With the headphone connected, the organ’s internal
amplification will automatically be disabled.
2. MIDI IN - OUT - THRU: connectors for connecting the organ to devices equipped with MIDI interface (expander,
computer, sequencer, etc.). For more infos about MIDI see also chapt. 7.
3. INPUT L(MONO) - R: organ amplification input connectors. In case of monophonic source, use the L-MONO
connector.
4. OUTPUT L(MONO) - R: unamplified organ output connectors. These connectors are generally used for making
recordings on analogue recording equipment. In case of a monophonic receiver unit, use the L-MONO connector
only.
1 2 3 4
14

viscount Vivace
RIGHT-HAND SIDE PANEL
4 5 6
1. GENERAL PITCH: allows fine adjustment of the tuning of the entire instrument. On delivery, the organ has been
tuned by the manufacturer to A=440Hz (pitch knob in central position).
2. PEDAL: regulates the fine tuning of the Pedalboard
3. MAN. II: regulates the fine tuning of the Swell.
These controls can be adjusted to obtain more or less pronounced ensemble effects, depending on the level of the
pulsation generated when the tuning of the different sections is varied slightly.
7. INFORMATIONS ABOUT MIDI INTERFACE
15
MIDI stands for Musical Instrument Digital Interface. This interface allows electronic instruments, even of different
makes and types, to dialogue with each other or with a computer, in order to exchange a large number of items of
information by means of a clearly defined, detailed protocol of codes. This allows different functions to be obtained
from the connected machines, without necessarily having to touch them at all.
Electronic musical instruments equipped with MIDI interface have one or more DIN 5 pin connectors which are the
MIDI connectors. There are normally three MIDI connectors, as follows:
- MIDI IN: Connector through which the machine receives the MIDI data emitted by other units
- MIDI OUT: Connector through which the machine emits the MIDI data it has generated
- MIDI THRU: Used for series connection of a number of receiver units, this connector emits the MIDI data
exactly as they are received by the MIDI IN port.
In the Vivace organ, these connectors are located in the connection panel on the left under the first manual.
Transmission and reception of MIDI data are subdivided into channels, so that given one transmitter unit, of all the
receiver units connected, only the one tuned to the transmitter channel will respond.
The MIDI protocol includes 16 channels, so given one transmitter instrument, separate control of up to 16 instruments
connected to it is possible. When the MIDI transmission channel is selected, we will connect only to the unit with the
same receiver channel.
Naturally, if two MIDI units are tuned to different channels they are unable to exchange data.
The Vivace organ is equipped with a MIDI interface which can be BIPHONIC, meaning that every single manual is
able to transmit and receive on 2 indipendent MIDI channels, one BASE channel and one auxiliary channel (called
A).
MIDI A channel of each section can be activated or disactivated through the register tabs indicated in the table.
MANUAL BASE channel MIDI A channel
Pedalboard 14 7
Great 12 3
Swell 11 1

viscount Vivace
8. FACTORY RESET
16
The Factory Reset is the function by which the instrument is returned to its original settings pre-set by the manufacturer,
eliminating all the modifications made by the user.
The Vivace organ is able to perform both the general initialization (all sections of the instrument are reset to their
original values) and Tutti initialization procedures.
In view of the characteristics of the initialization process, you are advised to save data considered important on
disk before starting the operations described below.
GENERAL INITIALIZATION OF THE INSTRUMENT
To proceed with the general inizialization switch the organ off and back on, keeping the push-buttons HR 1 and 2
pressed.
INITIALIZING THE TUTTI REGISTER
To initialize the Tutti register switch the instrument off and back on, keeping the HR push-button.
In addition to the BASE and MIDI A channels, the organ also controls 2 OVERALL channels used for exchanging
general MIDI or system information. These channels are numbers 10 (transmission only) and 16.
N.B.:
Pedalboard, Sweel and Great can receive MIDI data also through channels 8, 4 and 2 respectively.

viscount Vivace
SOMMAIRE
17
1. CONTRÔLES DE LA PARTIE GAUCHE DU PANNEAU DE CONTRÔLE ......................................................... 19
2. CONTRÔLES DE LA PARTIE CENTRALE DU PANNEAU DE CONTRÔLE ..................................................... 19
3. CONTRÔLES DE LA PARTIE DROITE DU PANNEAU DE CONTRÔLE ........................................................... 20
4. LES CONTRÔLES PLACÉS SOUS LE PREMIER CLAVIER (GRAND ORGUE) .............................................. 21
5. LA PÉDALE DE BOITE D’EXPRESSION............................................................................................................. 22
6. LE PANNEAU DE CONNEXIONS ET CONTRÔLEURS PLACÉS SOUS LES CLAVIERS ............................... 22
7. REINSEGNEMENTS SUR L’INTERFACE MIDI .................................................................................................. 23
8. FACTORY RESET ................................................................................................................................................... 24

La pagina si sta caricando...
La pagina si sta caricando...
La pagina si sta caricando...
La pagina si sta caricando...
La pagina si sta caricando...
La pagina si sta caricando...
La pagina si sta caricando...
La pagina si sta caricando...
La pagina si sta caricando...
La pagina si sta caricando...
La pagina si sta caricando...
La pagina si sta caricando...
La pagina si sta caricando...
La pagina si sta caricando...
La pagina si sta caricando...
La pagina si sta caricando...
La pagina si sta caricando...
La pagina si sta caricando...
La pagina si sta caricando...
La pagina si sta caricando...
La pagina si sta caricando...
La pagina si sta caricando...
La pagina si sta caricando...
La pagina si sta caricando...
La pagina si sta caricando...
La pagina si sta caricando...
-
 1
1
-
 2
2
-
 3
3
-
 4
4
-
 5
5
-
 6
6
-
 7
7
-
 8
8
-
 9
9
-
 10
10
-
 11
11
-
 12
12
-
 13
13
-
 14
14
-
 15
15
-
 16
16
-
 17
17
-
 18
18
-
 19
19
-
 20
20
-
 21
21
-
 22
22
-
 23
23
-
 24
24
-
 25
25
-
 26
26
-
 27
27
-
 28
28
-
 29
29
-
 30
30
-
 31
31
-
 32
32
-
 33
33
-
 34
34
-
 35
35
-
 36
36
-
 37
37
-
 38
38
-
 39
39
-
 40
40
-
 41
41
-
 42
42
-
 43
43
-
 44
44
-
 45
45
-
 46
46


in altre lingue
- English: Viscount Vivace Operating instructions
- français: Viscount Vivace Mode d'emploi
- Deutsch: Viscount Vivace Bedienungsanleitung
- Nederlands: Viscount Vivace Handleiding
Documenti correlati
-
Viscount Prestige VIII Istruzioni per l'uso
-
Viscount Cantorum Dou Manuale utente
-
-
-
-
-
-
-
-
Viscount Cantorum V Organ Keyboard Manuale del proprietario