TFA Digital Radio-Controlled Alarm Clock with Nap Timer SIESTA Manuale utente
- Categoria
- Orologi da tavolo
- Tipo
- Manuale utente

Bedienungsanleitung
Instruction manual
Mode d’emploi
Istruzioni per l'uso
Gebruiksaanwijzing
Instrucciones de uso
Kat. Nr. 60.2532
TFA_No. 60.2532_anl_11_19 16.11.2019 8:58 Uhr Seite 1

32
Fig. 1
Fig. 2
A 1
A 5
A 4
A 3
A 2
B 3
B 1
B 6
B 2
B 5
B 4
TFA_No. 60.2532_anl_11_19 16.11.2019 8:58 Uhr Seite 2

54
Fig. 3
SIESTA – Funkwecker
Vielen Dank, dass Sie sich für dieses Gerät aus dem Hause TFA entschieden haben.
1. Bevor Sie mit dem Gerät arbeiten
• Lesen Sie sich bitte die Bedienungsanleitung genau durch.
So werden Sie mit Ihrem neuen Gerät vertraut, lernen alle Funktionen und Bestandteile kennen, erfahren wichtige Details
für die Inbetriebnahme und den Umgang mit dem Gerät und erhalten Tipps für den Störungsfall.
• Durch die Beachtung der Bedienungsanleitung vermeiden Sie auch Beschädigungen des Gerätes und die Gefährdung
Ihrer gesetzlichen Mängelrechte durch Fehlgebrauch.
• Ebenso haften wir nicht für inkorrekte Messwerte und Folgen, die sich aus solchen ergeben können.
• Für Schäden, die aus Nichtbeachtung dieser Bedienungsanleitung verursacht werden, übernehmen wir keine Haf-
tung.
• Beachten Sie besonders die Sicherheitshinweise!
• Bewahren Sie diese Bedienungsanleitung gut auf!
2. Lieferumfang
• Funkwecker
• Bedienungsanleitung
C 1
TFA_No. 60.2532_anl_11_19 16.11.2019 8:58 Uhr Seite 3

76
SIESTA – Funkwecker
3. Einsatzbereich und alle Vorteile Ihres neuen Gerätes auf einen Blick
• Funkuhr mit höchster Genauigkeit
• Manuelle Einstellmöglichkeit
• Alarmzeit mit Snooze-Funktion
• Anzeige der Innentemperatur
• Timer für Kurzschlaf-Funktion
• Hintergrundbeleuchtung
4. Zu Ihrer Sicherheit
• Das Produkt ist ausschließlich für den oben beschriebenen Einsatzbereich geeignet. Verwenden Sie das Produkt nicht
anders, als in dieser Anleitung dargestellt wird.
• Das eigenmächtige Reparieren, Umbauen oder Verändern des Gerätes ist nicht gestattet.
Vorsicht!
Verletzungsgefahr:
• Bewahren Sie das Gerät und die Batterien außerhalb der Reichweite von Kindern auf.
SIESTA – Funkwecker
• Batterien enthalten gesundheitsschädliche Säuren und können bei Verschlucken lebensgefährlich sein. Wurde eine Batte-
rie verschluckt, kann dies innerhalb von 2 Stunden zu schweren inneren Verätzungen und zum Tode führen. Wenn Sie
vermuten, eine Batterie könnte verschluckt oder anderweitig in den Körper gelangt sein, nehmen Sie sofort medizinische
Hilfe in Anspruch.
• Batterien nicht ins Feuer werfen, kurzschließen, auseinander nehmen oder aufladen. Explosionsgefahr!
• Um ein Auslaufen der Batterien zu vermeiden, sollten schwache Batterien möglichst schnell ausgetauscht werden.
• Beim Hantieren mit ausgelaufenen Batterien chemikalienbeständige Schutzhandschuhe und Schutzbrille tragen!
Wichtige Hinweise zur Produktsicherheit!
• Setzen Sie das Gerät keinen extremen Temperaturen, Vibrationen und Erschütterungen aus.
• Vor Feuchtigkeit schützen.
5. Bestandteile
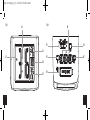
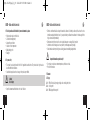
A: Display:
A 1: PM (im 12-Stunden-Format), gegebenenfalls Funk-Symbol, Uhrzeit
A 2: Snooze-Symbol
TFA_No. 60.2532_anl_11_19 16.11.2019 8:58 Uhr Seite 4

98
SIESTA – Funkwecker
A 3: Kurzschlaf-Display mit Timersymbol
A 4: Alarmzeit-Display mit Alarmsymbol
A 5: Temperatur-Display mit Hintergrundbeleuchtungssymbol
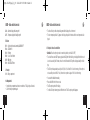
B: Tasten:
B 1: Schiebeschalter Einstellung Uhr- und Alarmzeit, Alarm ON/OFF
B 2: CLEAR Taste
B 3: HR Taste
B 4: 5 und 15 und 30 Taste
B 5: MIN Taste
B 6: SNOOZE/LIGHT Taste
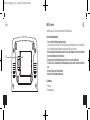
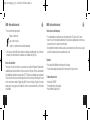
C: Gehäuse:
C 1: Batteriefach
6. Inbetriebnahme
• Öffnen Sie das Batteriefach und legen Sie zwei neue Batterien 1,5 V AA polrichtig ein.
SIESTA – Funkwecker
• Schließen Sie das Batteriefach wieder.
• Ein kurzer Signalton ertönt und es werden alle Segmente kurz angezeigt.
• Die Innentemperatur (Voreinstellung °C) erscheint im Display. Es kann 3-8 Minuten dauern, bis die richtige Temperatur
angezeigt wird.
6.1 Empfang der Funkzeit
• Achtung: Der Funkuhrempfang funktioniert nur im Normalmodus (Schiebeschalter auf Position AL ON/OFF)
• Die Uhr versucht nun, das DCF-Funksignal zu empfangen und das DCF-Empfangszeichen blinkt. Wenn der Zeitcode nach
ca. 7 Minuten empfangen wurde, werden die funkgesteuerte Zeit und das DCF-Empfangszeichen ständig im Display ange-
zeigt.
• Der DCF-Signalempfang findet täglich um 1:00, 2:00, 3:00, 4:00 oder um 5:00 Uhr morgens statt. Ist der Empfang um
5:00 Uhr nicht erfolgreich, so findet der nächste Empfangsversuch wieder um 1:00 Uhr früh statt.
• Sie können die Initialisierung auch manuell starten.
• Halten Sie die HR Taste für drei Sekunden gedrückt.
• Das DCF-Empfangszeichen blinkt.
• Zum Beenden des DCF-Empfangsversuchs drücken Sie kurz die HR Taste. Das DCF-Empfangszeichen verschwindet.
TFA_No. 60.2532_anl_11_19 16.11.2019 8:58 Uhr Seite 5

1110
SIESTA – Funkwecker
• Es gibt drei verschiedene Empfangssymbole:
blinkt - Empfang aktiv
bleibt stehen - Empfang erfolgreich
kein Symbol - kein Empfang/Empfang wurde ausgeschaltet/Uhrzeit wurde manuell eingestellt
• Falls die Funkuhr kein DCF-Signal empfangen kann (z.B. wegen Störungen, Übertragungsdistanz, etc.), kann die Zeit
manuell eingestellt werden. Die Uhr arbeitet dann wie eine normale Quarz-Uhr (siehe: Manuelle Einstellungen der Uhr-
zeit).
Hinweis zum Empfang der Funkzeit
Die Zeitübertragung erfolgt von einer Cäsium Atom-Funkuhr, die von der Physikalisch Technischen Bundesanstalt in Braun-
schweig betrieben wird. Die Abweichung beträgt weniger als 1 Sekunde in einer Million Jahren. Die Zeit ist kodiert und wird
von Mainflingen in der Nähe von Frankfurt am Main durch ein DCF-77 (77.5 kHz) Frequenzsignal übertragen mit einer Reich-
weite von ca. 1.500 km. Ihre Funkuhr empfängt das Signal, wandelt es um und zeigt immer die exakte Zeit an. Auch die
Umstellung von Sommer- und Winterzeit erfolgt automatisch. Während der Sommerzeit erscheint DST im Display. Der Emp-
fang hängt hauptsächlich von der geographischen Lage ab. Im Normalfall sollten innerhalb des Radius von 1.500 km ausge-
hend von Frankfurt bei der Übertragung keine Probleme auftauchen.
SIESTA – Funkwecker
Bitte beachten Sie folgende Hinweise:
• Es wird empfohlen, einen Abstand von mindestens 1,5 – 2 Metern zu eventuell störenden Geräten wie Computerbildschir-
men und Fernsehgeräten einzuhalten.
• In Stahlbetonbauten (Kellern, Aufbauten) ist das empfangene Signal natürlicherweise schwächer. In Extremfällen wird
empfohlen, das Gerät in Fensternähe zu platzieren und/oder durch Drehen das Funksignal besser zu empfangen.
• Nachts sind die atmosphärischen Störungen meist geringer und ein Empfang ist in den meisten Fällen möglich. Ein einzi-
ger Empfang pro Tag genügt, um die Genauigkeit zu gewährleisten und Abweichungen unter 1 Sekunde zu halten.
7. Bedienung
• Halten Sie die HR oder MIN Taste im Einstellmodus gedrückt, gelangen Sie in den Schnelllauf.
• Das Gerät verlässt automatisch den Einstellmodus, wenn längere Zeit keine Taste gedrückt wird.
7.1 Manuelle Einstellung der Uhrzeit
• Stellen Sie den Schalter auf TIME SET.
• Im großen Display blinkt die Uhrzeit.
• Drücken Sie die HR Taste, um die Stunden einzustellen.
TFA_No. 60.2532_anl_11_19 16.11.2019 8:58 Uhr Seite 6

1312
SIESTA – Funkwecker
• Mit dieser Einstellung wählen Sie gleichzeitig aus, ob die Uhrzeit im 12- oder 24 Std.-System angezeigt wird. Zuerst
erscheinen die Stunden im 24-Std.-System, danach im 12-Std.-System (PM erscheint von 12 bis 24 Uhr im Display).
• Drücken Sie die MIN Taste, um die Minuten einzustellen.
• Stellen Sie den Schalter auf AL ON oder AL OFF, um den Einstellungsmodus zu verlassen.
• Auf dem Display erscheint die eingestellte Uhrzeit.
• Bei erfolgreichem Empfang des DCF-Funksignals wird die manuell eingestellte Zeit überschrieben.
7.2 Einstellung der Alarmzeit
• Stellen Sie den Schalter auf AL SET.
• Im mittleren Display blinkt die Alarmzeit (Voreinstellung 7:00).
• Drücken Sie die HR Taste, um die Stunden einzustellen.
• Drücken Sie die MIN Taste, um die Minuten einzustellen.
• Stellen Sie den Schalter auf AL ON, um die Alarmfunktion zu aktivieren.
• Das Alarm-Symbol erscheint im Display.
7.3 Alarmfunktionen
• Wenn die eingestellte Alarmzeit erreicht ist, beginnt der Wecker zu klingeln.
• Das Alarm-Symbol blinkt.
SIESTA – Funkwecker
• Die Hintergrundbeleuchtung schaltet sich kurz an.
• Der ansteigende Alarmton schaltet sich automatisch nach ein paar Minuten aus.
• Drücken Sie auf eine beliebige Taste, um den Alarmton auszuschalten oder drücken Sie die SNOOZE/LIGHT Taste, um die
Snooze-Funktion zu aktivieren.
• Das Snooze und das Alarm-Symbol blinken im Display.
• Der Alarmton wird für fünf Minuten unterbrochen.
• Drücken Sie eine beliebige Taste, um die Snooze-Funktion auszuschalten.
• Das Snooze-Symbol verschwindet.
• Das Alarm-Symbol bleibt im Display stehen und der Alarm aktiviert sich zur gleichen Alarmzeit wieder.
• Stellen Sie den Schalter auf AL OFF, um die Alarmfunktion auszuschalten.
• Das Alarm-Symbol verschwindet.
7.4 Einstellung des Timers für die Kurzschlaf-Funktion
• Im oberen Display (Voreinstellung 00) wird die eingestellte Zeit für die Kurzschlaf-Funktion (NAP) angezeigt.
• Wählen Sie mit den Tasten 5, 15 oder 30 aus, wie viele Minuten Sie schlafen möchten. Mit jedem weiteren Tastendruck
addiert sich die Zeit (bis 360 Minuten).
• Mit Eingabe der Minuten ist die Kurzschlaf-Funktion sofort aktiviert.
TFA_No. 60.2532_anl_11_19 16.11.2019 8:58 Uhr Seite 7

1514
SIESTA – Funkwecker
• Mit der CLEAR-Taste können Sie die eingestellte Zeit löschen und den Timer anhalten.
• Sind die eingestellten Minuten abgelaufen, ertönt ein Alarmton.
• Die Symbole blinken.
• 00 erscheint im Display.
• Die Hintergrundbeleuchtung wird für zehn Sekunden aktiviert.
• Drücken Sie eine beliebige Taste, um den Alarmton auszuschalten.
• Die Kurzzeitschlaf-Funktion ist deaktiviert.
7.5 Hintergrundbeleuchtung
• Drücken Sie die SNOOZE/LIGHT Taste.
• Die Hintergrundbeleuchtung wird für zehn Sekunden aktiviert.
7.6 Einstellung der Temperatureinheit
• Im unteren Display wird die Innentemperatur (Voreinstellung °C) angezeigt.
• Drücken Sie die HR Taste im Normalmodus, um zwischen Celsius (°C) und Fahrenheit (°F) als Temperatureinheit auszu-
wählen.
SIESTA – Funkwecker
8. Pflege und Wartung
• Reinigen Sie das Gerät mit einem weichen, leicht feuchten Tuch. Keine Scheuer- oder Lösungsmittel verwenden!
• Entfernen Sie die Batterien, wenn Sie das Gerät längere Zeit nicht verwenden.
• Bewahren Sie Ihr Gerät an einem trockenen Platz auf.
8.1 Batteriewechsel
• Sobald das Batteriesymbol erscheint, wechseln Sie bitte die Batterien.
• Öffnen Sie das Batteriefach und legen Sie zwei neue Batterien 1,5 V AA polrichtig ein.
• Schließen Sie das Batteriefach wieder.
9. Fehlerbeseitigung
Problem Lösung
Keine Anzeige ➜ Batterien polrichtig einlegen
➜ Batterien wechseln
Kein DCF Empfang ➜ Schiebeschalter auf Position AL ON/OFF stellen
➜ HR Taste für drei Sekunden gedrückt halten, um Empfangsversuch auszulösen
TFA_No. 60.2532_anl_11_19 16.11.2019 8:58 Uhr Seite 8

1716
SIESTA – Funkwecker
➜ Empfangsversuch in der Nacht abwarten
➜ Anderen Aufstellort für das Gerät wählen
➜ Uhrzeit manuell einstellen
➜ Beseitigen der Störquellen
➜ Neuinbetriebnahme des Gerätes gemäß Bedienungsanleitung
Anzeige LL.L/HH.H ➜ Temperatur liegt außerhalb des Messbereichs
Unkorrekte Anzeige ➜ Batterien wechseln
Wenn Ihr Gerät trotz dieser Maßnahmen immer noch nicht funktioniert, wenden Sie sich an den Händler, bei dem Sie das Pro-
dukt gekauft haben.
10. Entsorgung
Dieses Produkt wurde unter Verwendung hochwertiger Materialien und Bestandteile hergestellt, die recycelt und wiederver-
wendet werden können.
Batterien und Akkus dürfen keinesfalls in den Hausmüll!
SIESTA – Funkwecker
Als Verbraucher sind Sie gesetzlich verpflichtet, gebrauchte Batterien und Akkus zur umweltgerechten Entsorgung
beim Handel oder entsprechenden Sammelstellen gemäß nationaler oder lokaler Bestimmungen abzugeben.
Die Bezeichnungen für enthaltene Schwermetalle sind: Cd=Cadmium, Hg=Quecksilber, Pb=Blei
Dieses Gerät ist entsprechend der EU-Richtlinie über die Entsorgung von Elektro- und Elektronik-Altgeräten
(WEEE) gekennzeichnet.
Dieses Produkt darf nicht mit dem Hausmüll entsorgt werden. Der Nutzer ist verpflichtet, das Altgerät zur
umweltgerechten Entsorgung bei einer ausgewiesenen Annahmestelle für die Entsorgung von Elektro- und
Elektronikgeräten abzugeben.
11. Technische Daten
Spannungsversorgung: Batterien 2 x 1,5 V AA (nicht inklusive) – Verwenden Sie Alkaline Batterien
Messbereich Temperatur: -10°C….50°C (14°F…122°F) °C/°F umschaltbar
Gehäusemaße: 138 x 70 x 70mm
Gewicht: 168 g (nur das Gerät)
TFA_No. 60.2532_anl_11_19 16.11.2019 8:58 Uhr Seite 9

1918
SIESTA – Funkwecker
Diese Anleitung oder Auszüge daraus dürfen nur mit Zustimmung von TFA Dostmann veröffentlicht werden. Die technischen Daten entsprechen
dem Stand bei Drucklegung und können ohne vorherige Benachrichtigung geändert werden.
Die neuesten technischen Daten und Informationen zu Ihrem Produkt finden Sie auf unserer Homepage unter Eingabe der Artikel-Nummer in
das Suchfeld.
EU-KONFORMITÄTSERKLÄRUNG
Hiermit erklärt TFA Dostmann, dass der Funkanlagentyp 60.2532 der Richtlinie 2014/53/EU entspricht. Der vollständige Text der EU-Konformi-
tätserklärung ist unter der folgenden Internetadresse verfügbar: www.tfa-dostmann.de/service/downloads/ce
www.tfa-dostmann.de
E-Mail: [email protected]
TFA Dostmann GmbH & Co.KG, Zum Ottersberg 12, D-97877 Wertheim, Deutschland 11/19
SIESTA – Radio-controlled alarm clock
Thank you for choosing this instrument from TFA.
1. Before you use this product
• Please make sure you read the instruction manual carefully.
This information will help you to familiarize yourself with your new device, to learn all of its functions and parts, to find
out important details about its first use and how to operate it and to get advice in the event of a malfunction.
• Following and respecting the instructions in your manual will prevent damage to your instrument and loss of your
statutory rights arising from defects due to incorrect use.
• Likewise, we take no responsibility for any incorrect readings or for any consequences resulting from them.
• We shall not be liable for any damage occurring as a result of non following of these instructions.
• Please take particular note of the safety advice!
• Please keep this instruction manual safe for future reference.
2. Delivery contents
• Radio-controlled alarm clock
• Instruction manual
TFA_No. 60.2532_anl_11_19 16.11.2019 8:58 Uhr Seite 10

2120
SIESTA – Radio-controlled alarm clock
3. Field of operation and all the benefits of your new instrument at a glance
• Highest precision radio-controlled clock
• Count down timer (Nap timer)
• Alarm with snooze function
• Indication of indoor temperature
• Manual setting option
• Backlight
4. For your safety
• This product is exclusively intended for the field of application described above. The product should only be used as
described within these instructions.
• Unauthorized repairs, alterations or changes to the product are prohibited.
Caution!
Risk of injury:
• Keep this instrument and the batteries out of reach of children.
SIESTA – Radio-controlled alarm clock
• Batteries contain harmful acids and may be hazardous if swallowed. If a battery is swallowed, this can lead to serious
internal burns and death within two hours. If you suspect a battery could have been swallowed or otherwise caught in the
body, seek medical help immediately.
• Batteries must not be thrown into a fire, short-circuited, taken apart or recharged. Risk of explosion!
• Low batteries should be changed as soon as possible to prevent damage caused by leaking.
• Wear chemical-resistant protective gloves and safety glasses when handling leaking batteries.
Important information on product safety!
• Do not place your device near extreme temperatures, vibrations or shocks.
• Protect it from moisture.
5. Elements
A: Display:
A 1: PM (in 12-hour dislay format), optionally radio controlled symbol, time
A 2: Snooze symbol
A 3: NAP display with timer symbol
TFA_No. 60.2532_anl_11_19 16.11.2019 8:58 Uhr Seite 11

2322
SIESTA – Radio-controlled alarm clock
A 4: Alarm time display with alarm symbol
A 5: Temperature dispaly with backlight symbol
B: Buttons:
B 1: Switch setting time and alarmtime, ALARM ON/OFF
B 2: CLEAR button
B 3: HR button
B 4: 5 and 15 and 30 button
B 5: MIN button
B 6: SNOOZE/LIGHT button
C: Housing:
C 1: Battery compartment
6. Getting started
• Open the battery compartment and insert two new batteries 1.5 V AA, polarity as illustrated.
• Close the battery compartment again.
SIESTA – Radio-controlled alarm clock
• The device will alert you with a beep and all segments will be displayed for a short moment.
• The indoor temperature (default °C) appears on the display. It may take 3-8 minutes until the correct temperature is dis-
played.
6.1 Reception of the radio controlled time
• Attention: The radio reception only works in normal mode (switch to position AL ON / OFF)
• The clock will now scan the DCF frequency signal and the DCF symbol will be flashing on the display. When the time code
is received successfully after 7 minutes, the radio-controlled time and the DCF symbol are displayed steadily on the dis-
play.
• The DCF reception always takes place daily at 1:00, 2:00, 3:00, 4:00 and 5:00 o'clock in the morning. If the reception is
not successfully received until 5:00 o'clock, the next receive operation is again at 1:00 o'clock in the morning.
• You can start the initialization manually.
• Press and hold HR button for three seconds.
• The DCF reception symbol will be flashing.
• To end the DCF reception attempt, press the HR button short. The DCF reception symbol disappears.
TFA_No. 60.2532_anl_11_19 16.11.2019 8:58 Uhr Seite 12

2524
SIESTA – Radio-controlled alarm clock
• There are three different reception symbols:
flashing - reception is active
stays - reception is very good
no symbol - no reception/reception is shut down/set time manually
• If the clock can not detect the DCF-signal (for example due to disturbances, transmitting distance, etc.), the time can be
set manually. The clock will then work as a normal quartz clock. (see: Manual setting of the clock).
Note for radio-controlled time
The time base for the radio-controlled time is a caesium atomic clock operated by the Physikalisch Technische Bunde-
sanstalt Braunschweig. It has a time deviation of less than one second in one million years. The time is coded and transmit-
ted from Mainflingen near Frankfurt via frequency signal DCF-77 (77.5 kHz) and has a transmitting range of approximately
1,500 km. Your radio-controlled clock receives this signal and converts it to show the precise time. Changeover from sum-
mer time or winter time is automatic. In Daylight Saving Time DST is shown on the display. The quality of the reception
depends mainly on the geographic location. Normally there should be no reception problems within a 1,500 km radius
around Frankfurt.
SIESTA – Radio-controlled alarm clock
Therefore, please note the following steps:
• The recommended distance to any interfering sources like computer monitors or TV sets is at least 1.5 - 2 meters.
• Inside ferro-concrete rooms (basements, superstructures), the received signal is naturally weakened. In extreme cases,
please place the unit close to a window to improve the reception.
• During night-time, the atmospheric interference is usually less severe and reception is possible in most cases. A single
daily reception is adequate to keep the accuracy deviation under 1 second.
7. Operation
• Press and hold the HR or MIN button in the setting mode for fast running.
• The device will automatically quit the setting mode if no button is pressed for a long period of time.
7.1 Manual settings of the clock
• Slide the switch to TIME SET.
• The time will be flashing on the large display.
• Press the HR button to adjust the hours.
TFA_No. 60.2532_anl_11_19 16.11.2019 8:58 Uhr Seite 13

2726
SIESTA – Radio-controlled alarm clock
• With this setting, you also select, if the time will be displayed in the 12 or 24 hour system. First, the hours will appear in
24- hour system then the hours will appears in 12-hour system (PM appears from 12 to 24 o'clock on the display).
• Press the MIN button to adjust the minutes.
• Slide the switch to the position AL ON or AL OFF, to exit the setting mode.
• On the display appears the adjusted time.
• By a successful reception of the DCF signal, the manually set time will be overwritten.
7.2 Setting of the alarm time
• Slide the switch to the position AL SET.
• The alarm time (default 7:00) will be flashing on the middle display.
• Press the HR button to adjust the hours.
• Press the MIN button to adjust the minutes.
• Slide the switch on the position AL ON, to activate the alarm function.
• The alarm symbol appears on the display.
7.3 Alarm functions
• When the adjusted alarm time is reached, the alarm will ring.
• The alarm symbol will be flashing.
SIESTA – Radio-controlled alarm clock
• The backlight turns on for a short time.
• The increasing alarm will automatically turn off a few minutes.
• Press any button to turn off the alarm sound or press the SNOOZE/LIGHT button and the snooze function will be activated.
• The alarm symbol and the snooze symbol disappear on the display.
• The alarm sound will be interrupted for five minutes.
• Press any button to turn off the snooze function.
• The snooze symbol will disappear.
• The alarm symbol stays on the display and the alarm time will be reactivated at the same time.
• Slide the switch to the position AL OFF, to turn off the alarm function.
• The alarm symbol will disappear.
7.4 Setting of the NAP function
• On the upper display (default 00) appears the adjusted time for the NAP function.
• Select with the 5, 15 or 30 button the time how long you want to sleep. With each further button operation the time will be
added (until 360 minutes).
• With the setting of the minutes the NAP function will be activated.
• With the CLEAR button you can delete the set time or stop the timer.
• An alarm sounds when the set time has elapsed.
TFA_No. 60.2532_anl_11_19 16.11.2019 8:58 Uhr Seite 14

2928
SIESTA – Radio-controlled alarm clock
• The symbols will be flashing.
• 00 appears on the display.
• The backlight turns on for ten seconds.
• Press any button to stop the alarm sound.
• The NAP function is deactived.
7.5 Backlight
• Press the SNOOZE/LIGHT button.
• The backlight turns on for ten seconds.
7.6 Setting of the temperature unit
• On the lower display appears the indoor temperature (default °C).
• Press the HR button to toggle between Celsius (°C) or Fahrenheit (°F) as temperature unit.
8. Care and maintenance
• Clean the device with a soft damp cloth. Do not use solvents or scouring agents.
• Remove the batteries if you do not use the device for a long period of time.
• Keep the device in a dry place.
SIESTA – Radio-controlled alarm clock
8.1 Battery replacement
• Change the batteries when the battery symbol appears on the display.
• Open the battery compartment and insert two new batteries 1.5 V AA, polarity as illustrated.
• Close the battery compartment again.
9. Troubleshooting
Problems Solution
No display ➜ Ensure that the batteries polarity are correct
➜ Change the batteries
No DCF reception ➜ Switch on the position AL ON/OFF
➜ Press and hold the HR button for three seconds and start the reception manually
➜ Wait for attempted reception during the night
➜ Choose another place for your product
➜ Set the clock manually
➜ Check if there is any source of interference
➜ Restart the instrument according to the manual
TFA_No. 60.2532_anl_11_19 16.11.2019 8:58 Uhr Seite 15

3130
SIESTA – Radio-controlled alarm clock
Indication: LL.L / HH.H ➜ Temperature is outside measuring range
Incorrect indication ➜ Change the batteries
If your device fails to work despite these measures contact the supplier from whom you purchased it.
10. Waste disposal
This product has been manufactured using high-grade materials and components which can be recycled and reused.
Never dispose of empty batteries and rechargeable batteries in household waste.
As a consumer, you are legally required to take them to your retail store or to an appropriate collection site
depending on national or local regulations in order to protect the environment.
The symbols for the heavy metals contained are: Cd=cadmium, Hg = mercury, Pb=lead
This instrument is labelled in accordance with the EU Waste Electrical and Electronic Equipment Directive (WEEE).
Please do not dispose of this instrument in household waste. The user is obligated to take end-of-life devices
to a designated collection point for the disposal of electrical and electronic equipment, in order to ensure
environmentally-compatible disposal.
SIESTA – Radio-controlled alarm clock
11. Specifications
Power consumption: Batteries 2 x 1,5 V AA (not included) – Use alkaline batteries
Temperature measuring range: -10°C ... 50°C (14°F... 122°F) °C/°F-reversible
Housing dimension: 138 x 70 x 70 mm
Weight: 168 g (instrument only)
No part of this manual may be reproduced without written consent of TFA Dostmann. The technical data are correct at the time of going to print
and may change without prior notice. The latest technical data and information about this product can be found in our homepage by simply
entering the product number in the search box.
EU declaration of conformity
Hereby, TFA Dostmann declares that the radio equipment type 60.2532 is in compliance with Directive 2014/53/EU. The full text of the EU decla-
ration of conformity is available at the following Internet address: www.tfa-dostmann.de/service/downloads/ce
www.tfa-dostmann.de
E-Mail: [email protected]
TFA Dostmann GmbH & Co.KG, Zum Ottersberg 12, D-97877 Wertheim, Germany 11/19
TFA_No. 60.2532_anl_11_19 16.11.2019 8:58 Uhr Seite 16

3332
SIESTA – Réveil radio-piloté
Nous vous remercions d'avoir choisi l'appareil de la Société TFA.
1. Avant d'utiliser votre appareil
• Veuillez lire attentivement le mode d'emploi.
Vous vous familiariserez ainsi avec votre nouvel appareil, vous découvrirez toutes les fonctions et tous les éléments qui le
composent, vous noterez les détails importants relatifs à sa mise en service et vous lirez quelques conseils en cas de dys-
fonctionnement.
• En respectant ce mode d'emploi, vous éviterez d'endommager votre appareil et de perdre vos droits légaux en cas de
défaut si celui-ci résulte d’une utilisation non-conforme.
• De même, nous n’assumons aucune responsabilité pour des relevés incorrects et les conséquences qu’ils pourraient
engendrer.
• Nous n'assumons aucune responsabilité pour des dommages qui auraient été causés par le non-respect du présent
mode d'emploi.
• Suivez bien toutes les consignes de sécurité !
• Conservez soigneusement le mode d'emploi !
2. Contenu de la livraison
• Réveil radio-piloté • Mode d'emploi
SIESTA – Réveil radio-piloté
3. Aperçu du domaine d'utilisation et de tous les avantages de votre nouvel appareil
• Réveil radio-piloté de grande précision
• Option de réglage manuel
• Réveil avec fonction de répétition snooze
• Affichage de la température intérieure
• Minuteur pour sieste
• Éclairage de fond
4. Pour votre sécurité
• Le produit est destiné uniquement à l'utilisation décrite ci-dessus. N'utilisez jamais l’appareil à d'autres fins que celles
décrites dans le présent mode d'emploi.
• Vous ne devez en aucun cas réparer, démonter ou modifier l'appareil par vous-même.
Attention !
Danger de blessure :
• Gardez votre appareil et les piles hors de la portée des enfants.
TFA_No. 60.2532_anl_11_19 16.11.2019 8:58 Uhr Seite 17

3534
SIESTA – Réveil radio-piloté
• Les piles contiennent des acides nocifs pour la santé et peuvent être mortelles dans le cas d’une ingestion. Si une pile a été
avalée, elle peut entraîner des brûlures internes graves ainsi que la mort dans l’espace de 2 heures. Si vous craignez qu’une
pile ait pu être avalée ou ingérée d’une autre manière, quelle qu’elle soit, contactez immédiatement un médecin d’urgence.
• Ne jetez jamais de piles dans le feu, ne les court-circuitez pas, ne les démontez pas et ne les rechargez pas. Risque d'ex-
plosion !
• Une pile faible doit être remplacée le plus rapidement possible afin d'éviter toute fuite.
• Pour manipuler des piles qui ont coulé, utilisez des gants de protection chimique spécialement adaptés et portez des
lunettes de protection !
Conseils importants de sécurité du produit !
• Évitez d’exposer l’appareil à des températures extrêmes, à des vibrations ou à des chocs.
• Protégez-le contre l'humidité.
5. Composants
A : Affichage :
A 1 : PM (en format de 12 heures), éventuellement symbole radio, horloge
SIESTA – Réveil radio-piloté
A 2 : Fonction snooze
A 3 : Écran de minuterie pour sieste avec symbole minuteur
A 4 : Écran d'alarme avec symbole d’alarme
A 5 : Écran de température avec symbole d'éclairage de fond
B : Touches :
B 1 : Interrupteur de réglage de l'heure et de l'heure du réveil, ALARM ON/OFF
B 2 : Touche CLEAR
B 3 : Touche HR
B 4 : Touches 5, 15 et 30
B 5 : Touche MIN
B 6 : Touche SNOOZE/LIGHT
C : Boîtier :
C 1 : Compartiment à piles
6. Mise en service
• Ouvrez le compartiment à piles et insérez deux nouvelles piles de type 1,5 V AA en respectant la polarité +/-.
TFA_No. 60.2532_anl_11_19 16.11.2019 8:58 Uhr Seite 18

3736
SIESTA – Réveil radio-piloté
• Refermez le compartiment à piles.
• Un signal sonore se fait entendre et tous les segments s'allument brièvement.
• La température ambiante (par défaut en °C) est affichée sur l’écran. Cela peut prendre 3-8 minutes jusqu'à ce que la tem-
pérature correcte soit affichée.
6.1 Réception de l'heure radio
• Attention : La réception de l'horloge radio-pilotée fonctionne uniquement en mode normal (interrupteur sur la position
AL ON / OFF)
• L’horloge cherche le signal radio DCF et le symbole de réception DCF clignote. En cas de réception correcte après 7 minu-
tes, l’heure radio-pilotée et le symbole de réception DCF sont affichés en continu sur l'écran.
• La réception du signal DCF a lieu à 1:00, 2:00, 3:00, 4:00 et 5:00-heures du matin. Si la réception a échoué à 5:00 h du
matin, la prochaine réception sera effectuée à 1:00 h le jour suivant.
• Vous pouvez également activer manuellement la réception.
• Maintenez la touche HR appuyée pendant trois secondes.
• Le symbole de réception DCF clignote.
• Appuyez sur la touche HR brièvement pour désactiver la réception DCF. Le symbole de réception DCF disparaît.
SIESTA – Réveil radio-piloté
• Il y a trois symboles de réception différents :
clignote - réception en cours
allumé en continu - la réception a abouti
aucun symbole - réception désactivée/récepteur a été éteint/réglage manuel de l'heure
• Si votre horloge radio-pilotée ne peut pas recevoir le signal DCF (par exemple en cas de perturbations, d'une distance de
transmission excessive etc.), vous pouvez régler l'horaire manuellement. L’horloge fonctionne comme une horloge à
quartz normale (voir Réglage manuel de l'horloge).
Consignes pour la réception de l'heure radio
La transmission de l’heure radio-pilotée s’effectue via une horloge atomique au césium, exploitée par la Physikalisch-Techni-
sche Bundesanstalt de Braunschweig (Institut Fédéral Physico-Technique de Braunschweig). L’écart de précision de cette
horloge est d'1 seconde pour un million d’années. L’heure est diffusée à partir de Mainflingen, près de Francfort-sur-le-Main,
avec un signal DCF-77 (77,5 kHz) d'une portée d’environ 1500 km. L'horloge radio-pilotée reçoit le signal, le convertit et
affiche l'heure précise. Le passage de l'heure d'hiver à l'heure d'été et vice-versa s'effectue également automatiquement.
Pendant l’heure d’été, DST est affiché sur l'écran. La réception dépend de votre position géographique. En règle générale,
dans un rayon de 1500 km autour de Francfort, aucun problème de transmission ne devrait survenir.
TFA_No. 60.2532_anl_11_19 16.11.2019 8:58 Uhr Seite 19

3938
SIESTA – Réveil radio-piloté
Nous vous prions de respecter les consignes suivantes :
• Nous vous recommandons de respecter une distance de 1,5 - 2 m entre l'appareil et d’éventuelles sources de signaux
parasites, comme les écrans d'ordinateurs et les postes de télévision.
• Dans les bâtiments en béton armé (caves, greniers aménagés), le signal reçu est affaibli. Dans les cas extrêmes, nous
vous conseillons de placer l’appareil près d’une fenêtre de manière à améliorer la réception du signal radio.
• La nuit, les perturbations s’affaiblissent en règle générale et la réception DCF est possible dans la plupart des cas. Une
seule réception par jour suffit pour garantir la précision de l’affichage de l’heure et pour maintenir d’éventuels écarts en
dessous d'1 seconde.
7. Utilisation
• Si vous maintenez la touche HR ou MIN appuyée au cours d'un mode de réglage, vous parviendrez à l'affichage rapide.
• L'appareil quitte automatiquement le mode de réglage lorsque-aucune touche n’est pressée pendant un certain temps.
7.1 Réglage manuel de l'heure
• Déplacez l’interrupteur sur TIME SET.
• L'heure clignote sur la partie principale de l'écran.
• Appuyez sur la touche HR pour réglez les heures.
SIESTA – Réveil radio-piloté
• Avec ce réglage, vous choisissez en même temps si l’heure doit être affichée suivant le système de 12 ou de 24 heures.
Tout d'abord, les heures apparaissent suivant le système de 24 heures puis suivant le système de 12 heures (PM est affi-
ché à l’écran entre 12 et 24 heures).
• Appuyez sur la touche MIN pour réglez les minutes.
• Déplacez l'interrupteur sur AN ON ou AL OFF, pour quitter le mode de réglage.
• L'heure réglée est affichée sur l’écran.
• Lorsque la réception du signal DCF a abouti, l'heure ajustée manuellement sera remplacée par l’heure radio.
7.2 Réglage du réveil
• Déplacez l'interrupteur sur AL SET.
• L'heure de réveil est affichée sur l’écran du milieu (par défaut 7:00).
• Appuyez sur la touche HR pour réglez les heures.
• Appuyez sur la touche MIN pour réglez les minutes.
• Déplacez l'interrupteur sur AL ON, pour activer l'alarme.
• Le symbole de réveil apparaît sur l'écran.
7.3 Fonctions de l’alarme
• Lorsque l'heure de réveil fixée est atteinte, le réveil se met à sonner.
TFA_No. 60.2532_anl_11_19 16.11.2019 8:58 Uhr Seite 20
La pagina si sta caricando...
La pagina si sta caricando...
La pagina si sta caricando...
La pagina si sta caricando...
La pagina si sta caricando...
La pagina si sta caricando...
La pagina si sta caricando...
La pagina si sta caricando...
La pagina si sta caricando...
La pagina si sta caricando...
La pagina si sta caricando...
La pagina si sta caricando...
La pagina si sta caricando...
La pagina si sta caricando...
La pagina si sta caricando...
La pagina si sta caricando...
La pagina si sta caricando...
La pagina si sta caricando...
La pagina si sta caricando...
La pagina si sta caricando...
La pagina si sta caricando...
La pagina si sta caricando...
La pagina si sta caricando...
La pagina si sta caricando...
-
 1
1
-
 2
2
-
 3
3
-
 4
4
-
 5
5
-
 6
6
-
 7
7
-
 8
8
-
 9
9
-
 10
10
-
 11
11
-
 12
12
-
 13
13
-
 14
14
-
 15
15
-
 16
16
-
 17
17
-
 18
18
-
 19
19
-
 20
20
-
 21
21
-
 22
22
-
 23
23
-
 24
24
-
 25
25
-
 26
26
-
 27
27
-
 28
28
-
 29
29
-
 30
30
-
 31
31
-
 32
32
-
 33
33
-
 34
34
-
 35
35
-
 36
36
-
 37
37
-
 38
38
-
 39
39
-
 40
40
-
 41
41
-
 42
42
-
 43
43
-
 44
44


TFA Digital Radio-Controlled Alarm Clock with Nap Timer SIESTA Manuale utente
- Categoria
- Orologi da tavolo
- Tipo
- Manuale utente
in altre lingue
- français: TFA Digital Radio-Controlled Alarm Clock with Nap Timer SIESTA Manuel utilisateur
- español: TFA Digital Radio-Controlled Alarm Clock with Nap Timer SIESTA Manual de usuario
- Deutsch: TFA Digital Radio-Controlled Alarm Clock with Nap Timer SIESTA Benutzerhandbuch
- Nederlands: TFA Digital Radio-Controlled Alarm Clock with Nap Timer SIESTA Handleiding
Documenti correlati
-
TFA Dostmann Digital Radio-Controlled Alarm Clock with USB Charging Function CHARGE-IT Manuale utente
-
TFA 60.2550 Manuale utente
-
-
-
-
-
-
-
-