B&W HTM7 Manuale del proprietario
- Categoria
- Altoparlanti
- Tipo
- Manuale del proprietario

Kevlar is a registered trademark of DuPont.
Nautilus is a trademark of B&W Group Ltd.
Copyright © B&W Group Ltd. E&OE
Printed in UK.
B&W Group (UK Sales)
T +44 1903 221 500
E uksales@bwgroup.com
B&W Group North America
T +1 978 664 2870
E marketing@bwgroupusa.com
B&W Group Asia Ltd
T +852 2 869 9916
E info@bwgroup.hk
B&W Group Ltd
Dale Road
Worthing West Sussex
BN11 2BH England
T +44 (0) 1903 221800
F +44 (0) 1903 221801
info@bwgroup.com
www.bowers-wilkins.com
II09235 Issue 3
700 Series
HTM7
Owner’s Manual
Figure 1 Figure 2
Figure 3
La pagina si sta caricando...
La pagina si sta caricando...

1
Русский
Ограниченная
гарантия....................16
Руководство по
эксплуатации............17
"esky
Záruka .......................18
Návod k pouãití..........19
Polski
Gwarancja .................20
Instrukcja
uÃytkownika ...............20
Slovenska navodila
Omejena garancija ....22
Navodila za uporabo .22
Dansk
Begrænset garanti ......23
Brugsanvisning ...........23
Svenska
Begränsad garanti ......24
Bruksanvisning ...........25
.......................26
.....................26
.......................27
....................27
European Declaration
of Conformity
..............
31
Specifications .............32
Contents
English
Limited Warranty...........2
Owner’s Manual............2
Français
Garantie limitée.............3
Manuel d’utilisation.......4
Deutsch
Garantie .......................5
Bedienungsanleitung.....5
Español
Garantía limitada...........7
Manual de
instrucciones ................7
Português
Garantia limitada...........9
Manual do utilizador .....9
Italiano
Garanzia limitata .........11
Manuale di istruzioni ...11
Nederlands
Beperkte garantie .......12
Handleiding ................13
Ελληνικά
Περιïρισµένη
εγγύηση....................14
Ãδηγίες Ìρήσεως ....15
5777 Inside HTM7 update 13/12/06 4:31 pm Page 1

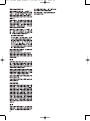
English
Limited Warranty
Dear customer
,
W
elcome to B&W.
This pr
oduct has been designed and
manufactured to the highest quality
standar
ds. However, if something does go
wr
ong with this product, B&W Group Ltd
and its national distributors warrant free of
charge labour (exclusion may apply) and
replacement parts in any country served by
an official B&W distributor.
This limited warranty is valid for a period of
five years fr
om the date of purchase or two
years for electronics including amplified
loudspeakers.
Terms and Conditions
1 The warranty is limited to the repair of
the equipment. Neither transportation,
nor any other costs, nor any risk for
removal, transportation and installation
of products is covered by this warranty.
2 This warranty is only valid for the
original owner
. It is not transferable.
3 This warranty will not be applicable in
cases other than defects in materials
and/or workmanship at the time of
pur
chase and will not be applicable:
a. for damages caused by incorrect
installation, connection or packing,
b.
for damages caused by any use other
than correct use described in the user
manual, negligence, modifications, or
use of parts that ar
e not made or
authorised by B&W,
c. for damages caused by faulty or
unsuitable ancillary equipment,
d. for damages caused by accidents,
lightning, water
, fir
e heat, war
, public
disturbances or any other cause
beyond the reasonable control of B&W
and its appointed distributors,
e.
for pr
oducts whose serial number has
been altered, deleted, removed or
made illegible,
f. if repairs or modifications have been
executed by an unauthorised person.
4 This guarantee complements any
national/regional law obligations of
dealers or national distributors and
does not af
fect your statutory rights as
a customer.
How to claim repairs under
warranty
Should service be required, please follow
the following procedure:
1 If the equipment is being used in the
country of purchase, you should
contact the B&W authorised dealer
from whom the equipment was
pur
chased.
2 If the equipment is being used outside
the country of pur
chase, you should
contact the B&W national distributor in
the country of r
esidence who will
advise where the equipment can be
serviced. You can call B&W in the UK
or visit our web site to get the contact
details of your local distributor.
To validate your warranty, you will need to
produce this warranty booklet completed
and stamped by your dealer on the date of
purchase. Alternatively, you will need the
original sales invoice or other proof of
ownership and date of purchase.
Owner’s manual
Introduction
Thank you for choosing B&W
.
Please r
ead this manual fully before
unpacking and installing the product. It will
help you to optimise its performance.
B&W maintains a network of dedicated
distributors in over 60 countries who will be
able to help you should you have any
pr
oblems your dealer cannot resolve.
Environmental Information
B&W pr
oducts ar
e designed to
comply with international directives
on the Restriction of Hazardous
Substances (RoHS) in electrical
and electr
onic equipment and the disposal
of Waste Electrical and Electronic
Equipment (WEEE). The cr
ossed wheelie
bin symbol indicates compliance and that
the pr
oducts must be appropriately
recycled or processed in accordance with
these directives. Consult your local area
waste disposal organisation for guidance
on how to dispose of this equipment in a
pr
oper manner
.
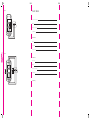
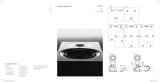
Unpacking (Figure 1)
• Fold the top carton flaps right back and
invert the carton and contents.
• Lift the carton clear of the contents.
•
Remove the inner packing from the
product.
• We suggest you retain the packing for
futur
e use.
Check in the carton for:
• 4 self-adhesive rubber pads
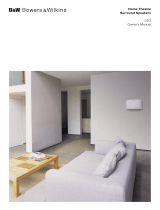
Positioning
If using a projection television with an
acoustically transpar
ent screen, place the
speaker behind the centr
e of the screen.
Otherwise position it directly above or
below the scr
een, whichever is closest to
ear level. Align the front of the speaker
approximately level with the screen.
Fix the 4 self-adhesive pads to the base of
the speaker
. They give a degree of vibration
isolation. The flat area on top of the
television may be smaller than the base of
the speaker, so position the feet
accor
dingly
.
Stray Magnetic Fields
The speaker drive units ar
e magnetically
shielded such that the stray magnetic field
outside the boundaries of the cabinet,
except the front, is too low to cause
distortion of the television picture in the
vast majority of cases.
There are, however, some extremely
sensitive televisions – some that even have
to be adjusted according to their alignment
with the earth’s magnetic field. If you have
a problem, first degauss the television set
with the speaker in place. Some have a
button especially for this purpose. If not,
switch off the set at the mains for
15 minutes and switch on again. Merely
putting the set into standby mode is not
suf
ficient.
If you still have a pr
oblem, try moving the
speaker either forwar
ds or backwar
ds a
little to get a more favourable juxtaposition,
or space the speaker further fr
om the
television until the distortion disappears.
Because of the higher stray magnetic field
in front of the speakers, we recommend
you keep magnetically sensitive articles
(computer discs, audio and video tapes,
swipe cards and the like) at least 0.2m from
the speaker
. LCD and plasma screens are
not affected by magnetic fields.
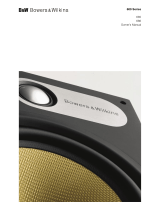
Connections (Figures 2 & 3)
All connections should be made with the
equipment switched off.
There are 2 pairs of terminals at the back of
the speaker which permit bi-wiring if
desired. On delivery, the separate pairs are
connected together with high-quality links
for use with a single 2-cor
e cable. For
single cable connection, leave the links in
place and use either pair of terminals on
the speaker
.
Ensur
e the positive terminal on the speaker
(marked + and coloured red) is connected
to the positive output terminal of the
amplifier and negative (marked – and
coloured black) to negative. Incorrect
connection can result in poor imaging and
loss of bass.
To bi-wire, remove the links by loosening
the terminal caps and use a separate
2-core cable from the amplifier to each pair
of terminals. This can impr
ove the
resolution of low-level detail. Observe the
correct polarity as before. When bi-wiring,
incorr
ect connection can also impair the
frequency response.
The terminals accept 6mm (1/4-in) spades,
bared wire ends or round pins up to 6mm
diameter and 4mm banana plugs. When
using spades, fit them under the sliding
collar.
Important safety notice:
In certain countries, notably those in
Europe, the use of 4mm banana plugs is
considered a potential safety hazard,
because they may be inserted into the
holes of unshuttered mains supply sockets.
In order to comply with European
CENELEC safety regulations, the 4mm
holes in the ends of the terminals are
blocked by plastic pins. Do not remove the
pins if you are using the product where
these conditions apply.
Always scr
ew the terminal caps down
tightly to optimise the connection and
prevent rattles.
2
5777 Inside HTM7 update 13/12/06 4:31 pm Page 2
La pagina si sta caricando...
La pagina si sta caricando...
La pagina si sta caricando...
La pagina si sta caricando...
La pagina si sta caricando...
La pagina si sta caricando...
La pagina si sta caricando...
La pagina si sta caricando...
La pagina si sta caricando...

I terminali accettano terminazioni spades,
cavi spellati o connettori a spina rotonda
del diametro di 6 mm e spine a banana da
4 mm. Quando utilizzate le teminazioni
spades, sistematele sotto il colletto a
guaina.
Importante nota di sicurezza:
In alcuni paesi, in particolare quelli in
Europa, l’utilizzo delle spine a banana viene
considerato un potenziale rischio in quanto
possono venir inserite nei fori di prese di
alimentazione non protette. Per essere
conformi alle regole di sicurezza CENELEC
europee, i fori da 4 mm alle estremità dei
terminali sono bloccati da perni in plastica.
Non toglieteli se state utilizzando il prodotto
in luoghi dove si applicano queste condizioni.
Avvitate sempre saldamente i cappellotti dei
terminali per ottener
e il miglior
collegamento e per impedire le vibrazioni.
Chiedete consiglio al vostro rivenditore sulla
scelta dei cavi. Controllate che l’impedenza
totale sia inferior
e a quella massima
raccomandata nelle caratteristiche e
utilizzate un cavo a bassa induttanza per
evitar
e l’attenuazione delle frequenze più
alte.
Messa a punto
Per un maggior realismo in impianti home
theater è importante bilanciare i diffusori e
regolare l’immagine acustica in modo che
sia proporzionata alle dimensioni dello
schermo. Con schermi più piccoli può
esser
e più r
ealistico aver
e i dif
fusori destr
o
e sinistro più vicini tra essi di quanto non
far
este ascoltando solo la musica.
Regolate il livello dei tre diffusori anteriori
per ottener
e un passaggio uniforme dei
suoni quando attraversano lo schermo.
Regolate il livello dei dif
fusori surr
ound in
modo che, ad eccezione degli ef
fetti
speciali, la vostra attenzione non venga
attratta indebitamente da essi.
Accomodatevi in tutte le possibili posizioni
d‘ascolto quando dovete decidere i livelli
ottimali.
Consultate il manuale del vostro decoder
per maggiori informazioni su come r
egolare
i livelli.
Periodo di rodaggio
La r
esa del dif
fusor
e cambierà leggermente
durante il periodo iniziale di ascolto. Se il
diffusore è stato posto in un ambiente
freddo le resine smorzanti e i materiali di
sospensione delle unità impiegheranno un
po’ di tempo per r
ecuperare le loro
proprietà. Durante le prime ore di utilizzo le
sospensioni delle unità si ammorbidiranno.
Il tempo necessario al diffusore per
raggiungere la resa prevista dipenderà dalle
condizioni di immagazzinamento
precedente e da come viene usato. Come
guida, pr
evedete fino a una settimana
perché si stabilizzino gli effetti della
temperatura e 15 ore di media di utilizzo
per
ché le parti meccaniche raggiungano le
caratteristiche progettuali previste.
Manutenzione
La superficie del cabinet solitamente va
solo spolverata. Se volete utilizzare un
prodotto spray per la pulizia, rimuovete le
griglie dal cabinet, tirandole delicatamente
verso l’esterno. Spruzzate il prodotto sul
panno, non direttamente sul cabinet. Prima
di procedere alla pulizia, provate il prodotto
su una piccola area del diffusore, poiché
alcuni prodotti per la pulizia potrebbero
danneggiare alcune superfici. Evitate
prodotti abrasivi, o contenenti acidi, alkali o
agenti anti-batterici. Non utilizzate prodotti
per la pulizia di nessun tipo sugli
altoparlanti. Per pulire il tessuto delle
griglie, una volta rimosse dal cabinet,
potete utilizzare una normale spazzola per
tessuto. Evitate di toccare gli altoparlanti,
specialmente i tweeter
, che potrebbero
danneggiarsi.
Come tutti i materiali naturali, anche il legno
del cabinet del diffusore subisce l’influenza
degli agenti ester
ni.Tenete il prodotto
lontano da fonti di calore diretto come ad
esempio termosifoni o termoconvettori, per
evitar
e il rischio di fessurazioni sulla
superficie del cabinet. Il legno è trattato
con una laccatura resistente a raggi ultra-
violetti per minimizzar
e le variazioni di
tonalità nel tempo, ma è naturale aspettarsi
una, seppur minima, variazione di tonalità.
La dif
ferenza di tonalità potrebbe essere
maggiormente notata confr
ontando il color
e
del legno del cabinet con quello nella zona
coperta dalla griglia di pr
otezione, o in punti
che rimangono in ombra, che varieranno la
loro tonalità molto più lentamente rispetto
ad altre aree del cabinet esposte alla luce.
Le differenze di colore possono essere
eliminate esponendo la superficie alla luce
del sole fino a che il colore sarà uniforme a
tutto il resto del cabinet. Questo processo
può richiedere diversi giorni o anche
settimane, ma può essere velocizzato,
utilizzando con cautela, una lampada a
raggi ultra-violetti.
Nederlands
Beperkte garantie
Geachte cliënt,
W
elkom bij B&W.
Dit pr
oduct is volgens de hoogste
kwaliteitsnormen ontworpen en
vervaar
digd. Mocht er toch iets defect zijn
aan dit pr
oduct dan kunt u aanspraak
maken op gratis vervanging van onderdelen
via de nationale distributeur van B&W
Group Ltd (er zijn uitzonderingen) in elk
land waar een officiële B&W distributeur
gevestigd is.
Deze beperkte garantie is geldig voor een
periode van vijf jaar vanaf de
aankoopdatum en twee jaar voor de
elektronica, waaronder actieve luidsprekers.
Voorwaarden
1. De garantie is beperkt tot de reparatie
van de apparatuur. Transport- en
andere kosten, eventueel risico voor
het verwijderen, vervoeren en
installeren van producten vallen niet
onder deze garantie.
2. De garantie geldt alleen voor de eerste
eigenaar en is niet overdraagbaar.
3. Deze garantie is niet van toepassing in
ander
e gevallen dan defecten van
materialen en/of fabricage ten tijde van
aankoop en is niet van toepassing:
a. voor schade die veroorzaakt is door
onjuiste installatie, aansluiting of
verpakking;
b.
voor schade die ver
oorzaakt is door
onjuist gebruik, anders dan beschreven
in de handleiding, nalatigheid,
modificatie, of gebruik van onder
delen
die niet door B&W goedgekeurd of
gemaakt zijn;
c.
voor schade ver
oorzaakt door defecte
of ongeschikte aanvullende apparatuur;
d.
voor schade ver
oorzaakt door ongeval,
onweer, water, brand, hitte, oorlog,
openbaar geweld of een ander
e
oorzaak buiten controle van B&W en
haar distributeurs;
e. voor producten waarvan het
serienummer gewijzigd, verwijder
d,
gewist of onleesbaar gemaakt is;
f.
indien r
eparaties of modificaties
uitgevoerd zijn door een onbevoegd
persoon.
4.
Deze garantie vult eventuele nationale/
regionale wettelijke verplichtingen voor
dealers of nationale distributeurs aan
en heeft geen invloed op uw wettelijke
rechten als consument.
Garantieclaims
Wanneer u aanspraak wilt maken op
garantie handel dan als volgt:
1
Indien de apparatuur gebruikt wordt in
het land van aankoop, neem dan
contact op met de erkende B&W
dealer waar de apparatuur gekocht is.
2.
Indien de apparatuur niet het land van
aankoop wordt gebruikt, neem dan
12
5777 Inside HTM7 update 13/12/06 4:31 pm Page 12

contact op met de nationale
distributeur van B&W in het land waar
u verblijft. Deze zal u informeren hoe te
handelen. U kunt contact opnemen
met B&W in Groot-Brittannië of onze
website bezoeken voor het adres van
uw plaatselijke distributeur.
Om uw garantie geldig te maken, dient u
dit ingevulde garantiebewijs, op de datum
van aankoop afgestempeld door uw
leverancier te kunnen tonen. De tweede
mogelijkheid is het tonen van het
oorspronkelijke aankoopbewijs of ander
bewijs van eigendom met aankoopdatum.
Handleiding
Inleiding
V
an harte proficiat met de aanschaf van dit
B&W kwaliteitspr
oduct.
Hoe goed echter de luidspr
eker op zich
ook is, het resultaat wordt sterk beïnvloed
door de ruimte waar hij wor
dt gebruikt. Het
loont daar
om zeker te experimenteren met
de juiste opstelling, om tot een optimaal
resultaat te komen. Lees bovendien deze
handleiding helemaal aandachtig door; de
informatie helpt u de weergavekwaliteit van
uw audiosysteem te optimaliser
en.
B&W luidsprekers worden verkocht in meer
dan 60 landen over de hele wer
eld. B&W
heeft een internationaal netwerk van
zorgvuldig uitgezochte importeurs die u
optimale service zullen geven. Mocht uw
leverancier een probleem niet kunnen
oplossen, dan kan de importeur u altijd
ver
der helpen.
Milieu
De producten van B&W zijn
ontwikkeld conform de
internationale richtlijnen omtrent de
Restriction of Hazardous
Substances (RoHS – Beperking van
Gevaarlijke Stoffen) in elektrische en
elektr
onische apparatuur en de verwerking
van W
aste Electrical and Electronic
Equipment (WEEE – Afgedankte Elektrische
en Elektronische Apparatuur). Het
doorgestr
eepte kliko-symbool geeft aan dat
hieraan wordt voldaan en dat het product
op de juiste manier dient te wor
den
ger
ecycled of bewerkt in over
eenstemming
met deze richtlijnen. Raadpleeg de
richtlijnen ter plaatse voor een corr
ecte
verwerking van afgedankte apparatuur
.
Uitpakken (afb. 1)
• Verwijder eerst de nieten uit de
bovenzijde van de verpakking om bij het
uitpakken de luidspr
ekerkast niet te
beschadigen. Het is het eenvoudigste
eerst de flappen van de doos geheel
terug te vouwen en dan de doos om te
ker
en.
• Trek daarna de doos voorzichtig
omhoog. De luidspreker blijft dan op zijn
plaats staan.
•
V
erwijder het verpakkingsmateriaal van
de luidspreker.
• We adviseren u het verpakkingsmateriaal
te bewaren voor het geval de
luidsprekers in de toekomst vervoerd
zouden moeten worden; dat gaat het
best in de originele verpakking.
In de doos vindt u behalve deze
handleiding:
• 8 Zelfklevende rubber voetjes.
Plaatsing
De ideale positie voor een centrum
luidspreker is precies in het hart van het
beeldscherm, indien dit akoestisch
transparant is. In alle ander
e gevallen, zolas
bij een gewoon tv-toestel, kan de
luidspreker direct onder of boven het
scherm worden geplaatst. Kies altijd een
positie die zoveel mogelijk overeenkomt
met oorhoogte en houd de voorzijde van de
luidspreker in lijn met de voorzijde van het
scherm.
Plak de vier meegeleverde zelfklevende
rubber voetjes op de onderkant van de
luidspreker. Deze geven een zekere
mechanische isolatie zodat trillingen van de
luidspr
eker niet worden doorgegeven. Dit is
vooral belangrijk als de luidspreker bovenop
een r
elatief zwakke TV-behuizing wordt
geplaatst. Houd in dat geval bij het plakken
van die rubber voetjes ook rekening met de
vaak smaller
e bovenrand van de TV!
Vervormen van TV-beelden
De luidsprekereenheden zijn magnetisch
afgeschermd zodat het systeem in de
meeste gevallen dichtbij TV- en
computerbeeldschermen mag staan zonder
beeldvervorming te ver
oorzaken.
Er zijn echter zeer gevoelige TV’
s op de
markt, waarvan sommige zelfs gecorrigeerd
moeten wor
den voor het magnetisch veld
van de aar
de. Heeft u last van vervorming
van het beeld, dan is het verstandig eerst
het beeld te demagnetiseren door het
toestel geheel uit te schakelen (niet standby
maar geheel uit); sommige toestellen
hebber daarvoor een speciale schakelaar
(de-gaussing). Neem de stekker uit het
stopcontact en steek die er na ca.
15
minuten weer in en schakel ook het
apparaat weer in.
Is het pr
obleem niet opgelost, pr
obeer dan
om de luidspreker een beetje naar voren of
achter
en te verplaatsen, dan wel iets ver
der
van de TV vandaan tot het beeld weer
normaal is.
Vanwege het sterkere magneetveld aan de
voorzijde van de luidspr
ekers adviseren we
u om erg gevoelige zaken (zoals floppy
disks, audio- en videobanden, credit cards,
etc.) niet dichter dan 0,2 m van de
luidsprekervoorkant te leggen. LCD- en
plasmaschermen hebben daar geen last
van.
Aansluiten (afb. 2 en 3)
V
oordat u iets aansluit of aan de
verbindingen verandert, eerst alle
apparatuur uitschakelen!
Er bevinden zich twee paar vergulde
aansluitklemmen op het aansluitpaneel: één
paar voor de laag/middeneenheid en één
paar voor de tweeter. De luidspreker is
hierdoor geschikt voor Bi-Wiring of
Bi-Amping. Af fabriek zijn de beide paren
doorverbonden met een verbindingsplaatje
van verguld koper, zodat de luidspreker
met een normale 2-aderige kabel kan
worden gebruikt. De beste verbinding krijgt
u door de blank gemaakte kabeluiteinden
onder de aansluitklemmen te bevestigen.
De positieve (+/rode) klem van de
versterker wordt verbonden met de
positieve (+/rode) klem van de luidspreker;
de negatieve (–/zwart) met de andere
luidsprekerklem. Let er op dat de juiste
polariteit gehandhaafd blijft bij het
aansluiten van een luidspr
ekerpaar
.
Verkeerde fase veroorzaakt een vaag
ster
eobeeld en geeft verlies aan laag.
Bij toepassing van Bi-W
iring, eerst alle
klemmen losdraaien en de koper
en
doorverbinding verwijderen. Verbind één
luidspr
ekeruitgang van de versterker nu met
twee afzonderlijke 2-aderige kabels met de
klemmen van de luidspreker: één kabel
voor het hoog en één voor laag/midden.
Hierbij is de juiste polariteit dubbel
belangrijk: zowel voor een juist
frequentieverloop van elke
luidspr
ekereenheid afzonderlijk, als voor de
juiste balans tussen de linker en r
echter
luidspreker. Door de afzonderlijke kabels
verbetert de detailweergave juist bij lager
volume. De onderlinge beïnvloeding tussen
de verschillende delen van het wisselfilter
wordt hierdoor verminderd en bovendien
kan voor elk frequentiegebied de meest
optimale kabel wor
den gekozen.
De klemmen zijn geschikt voor 6 mm
spades, blanke draadeinden, of ronde
pennen tot 6 mm doorsnede en 4 mm
banaanstekkers. Bij gebruik van spades
deze onder de revet aanbrengen.
Veiligheid
In bepaalde landen, speciaal de Europese,
wordt het gebruik van 4 mm
banaanstekkers als potentieel gevaarlijk
gezien, omdat deze ook in de
onbeschermde openingen van een
stopcontact kunnen worden gestoken. Om
aan de Europese CENELEC
veiligheidsvoorschriften te voldoen, worden
de uiteinden van de aansluitingen
geblokkeerd met plastic pennen. V
erwijder
deze pennen niet wanneer u het product
gebruikt op een plaats waar deze
veiligheidsvoorschriften van kracht zijn.
Draai de kapjes van de klemmen altijd
stevig aan om een goede verbinding te
waarborgen en rammelen te voorkomen.
Gebruik tussen versterker en luidspr
ekers
kabels met een zo laag mogelijke
serieweerstand (het liefst minder dan
0,2 ohm heen en terug). De kabel naar de
tweeter dient bovendien ook een lage
zelfinductie hebben, daar anders het hoog
wordt verzwakt. Uw B&W-leverancier kan u
hierbij adviseren: ook de lengte speelt in de
keuze een r
ol.
Optimaliseren
V
oor een zo r
ealistisch mogelijk klankbeeld
in een Home Cinema systeem is het
belangrijk het geluidsbeeld aan te passen
aan de grootte van het scherm en tevens
de niveaus van de luidsprekers met elkaar
13
5777 Inside HTM7 update 13/12/06 4:31 pm Page 13
La pagina si sta caricando...
La pagina si sta caricando...
La pagina si sta caricando...
La pagina si sta caricando...
La pagina si sta caricando...
La pagina si sta caricando...
La pagina si sta caricando...
La pagina si sta caricando...
La pagina si sta caricando...
La pagina si sta caricando...
La pagina si sta caricando...
La pagina si sta caricando...
La pagina si sta caricando...

27
5777 Inside HTM7 update 13/12/06 4:31 pm Page 27

28
5777 Inside HTM7 update 13/12/06 4:31 pm Page 28

29
5777 Inside HTM7 update 13/12/06 4:31 pm Page 29
La pagina si sta caricando...

31
5777 Inside HTM7 update 13/12/06 4:31 pm Page 31

32
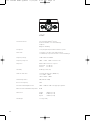
HTM7
Technical Features
Description
Drive Units
Frequency Range
Frequency Response
Dispersion
Sensitivity
Harmonic Distortion
Nominal Impedance
Crossover Frequency
Recommended Amplifier Power
Max. Recommended Cable Impedance
Dimensions
Net Weight
Free-mounted Nautilus
™
tweeter
Kevlar
®
brand fibre cone bass/midrange
Flowport
™
Magnetic Shielding
2-way magnetically shielded vented-box system
1x ø25mm (1 in) alloy dome high-frequency
1x ø165mm (6.5 in) woven Kevlar
®
cone bass/midrange
-6dB at 46Hz and 50kHz
50Hz – 25kHz ±3dB on reference axis
Within 2dB of reference response
Horizontal: over 40˚ arc
Vertical: over 10˚ arc
91dB spl (2.83V, 1m)
2nd and 3rd harmonics (90dB, 1m)
<1% 120Hz – 20kHz
<0.5% 150Hz – 20kHz
8
Ω (minimum 4.6Ω)
4kHz
50W – 120W into 8
Ω on unclipped programme
0.1
Ω
Height: 306mm (12.1in)
Width: 450mm (17.7in)
Depth:
289mm (11.4in)
12.5 kg (28 lb)
5777 Inside HTM7 update 13/12/06 4:31 pm Page 32

Kevlar is a registered trademark of DuPont.
Nautilus is a trademark of B&W Group Ltd.
Copyright © B&W Group Ltd. E&OE
Printed in UK.
B&W Group (UK Sales)
T +44 1903 221 500
E uksales@bwgroup.com
B&W Group North America
T +1 978 664 2870
E marketing@bwgroupusa.com
B&W Group Asia Ltd
T +852 2 869 9916
E info@bwgroup.hk
B&W Group Ltd
Dale Road
Worthing West Sussex
BN11 2BH England
T +44 (0) 1903 221800
F +44 (0) 1903 221801
info@bwgroup.com
www.bowers-wilkins.com
II09235 Issue 3
700 Series
HTM7
Owner’s Manual
Figure 1 Figure 2
Figure 3
-
 1
1
-
 2
2
-
 3
3
-
 4
4
-
 5
5
-
 6
6
-
 7
7
-
 8
8
-
 9
9
-
 10
10
-
 11
11
-
 12
12
-
 13
13
-
 14
14
-
 15
15
-
 16
16
-
 17
17
-
 18
18
-
 19
19
-
 20
20
-
 21
21
-
 22
22
-
 23
23
-
 24
24
-
 25
25
-
 26
26
-
 27
27
-
 28
28
-
 29
29
-
 30
30
-
 31
31
-
 32
32
-
 33
33
-
 34
34
-
 35
35
-
 36
36


B&W HTM7 Manuale del proprietario
- Categoria
- Altoparlanti
- Tipo
- Manuale del proprietario
in altre lingue
- English: B&W HTM7 Owner's manual
- français: B&W HTM7 Le manuel du propriétaire
- español: B&W HTM7 El manual del propietario
- Deutsch: B&W HTM7 Bedienungsanleitung
- русский: B&W HTM7 Инструкция по применению
- Nederlands: B&W HTM7 de handleiding
- português: B&W HTM7 Manual do proprietário
- dansk: B&W HTM7 Brugervejledning
- čeština: B&W HTM7 Návod k obsluze
- polski: B&W HTM7 Instrukcja obsługi
- svenska: B&W HTM7 Bruksanvisning
Documenti correlati


Altri documenti
-
 Bowers & Wilkins HTM7 Manuale del proprietario
-
Bowers & Wilkins CM9 Manuale utente
-
Bowers Wilkins HTM61 Manuale utente
-
Bowers & Wilkins CMC 2 Manuale del proprietario
-
 Bowers & Wilkins DS3 Manuale utente
-
 Bowers & Wilkins 685 Manuale del proprietario
-
Bowers Wilkins 684 Manuale utente
-
 Bowers & Wilkins XT2 Manuale utente
-
 Bowers & Wilkins CM5 Manuale utente
-
Bowers Wilkins 685 Manuale del proprietario


