La pagina si sta caricando...

Outdoor IP Camera
Quick User Manual
EN/DE/IT/ES/FR
Customer Service
Monday - Saturday
9:00-18:00 Beijing Time (UTC +8)
E-Mail: [email protected]
Skype ID: tech.sricam
Website: www.sricam.com
Sricam
R
For Videos of how to setup IP Cameras please visit Website: www.sricam.com/videos

Products Introduction
Before starting setup
Make sure of the following:
- Your router supports the 2.4GHz frequency band (802.11b/g/n).
- Your router DHCP is enabled.
- Your smartphone is connected to the Internet with a WLAN/Wi-Fi that the camera will connect with.
- You know the WLAN/Wi-Fi password.( No special characters in the password and Wi-Fi name such
as @#$%^&*).
- For Videos of how to setup IP Cameras please visit Website: www.sricam.com/videos
-1-
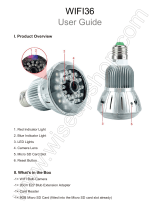
Power Jack
Reset
LAN Port
Lens
IR LED
SP007
SP008
Lens
IR LED
Antenna
MicroSD
Card Slot
MicroSD
Card Slot
Power Jack
Reset
LAN Port
Sricam
R
EnglishEnglish
(Note:Sricam standard model SP015 don't support microSD card, if need can be customized).

3
Start setup
Step1. Product Connection
-2-
Router
1
2
3
Reset
WAN LAN
Sricam App Installation
Step2.
Scan the QR code to download the“Sricam” App.
Search“Sricam”on Google Play or iOS App Store
Power the IP Camera
Reset to the camera.(keep pressing the RESET button for 15 seconds.)
English

-3-
Step3. Register an APP User Account
3-1
Keep password
Keep password
Note: The “Device ID” can
be found on the label which is
attached to the camera.
Add deviceAdd device
IPCam
1069813
Next
Input password(default:888888)
Input the email
Please creat a password
for App accountplease don't
input your email password
0551876
Step4. View the Camera on a Smart Phone (Open the “Sricam”App and follow these steps)
Note: Here take camera
ID:1069813 as an example.
Forgot Password?
Forgot Password?
English

-4-
Note: Touch this button for setting
APP“Authority, Multi-Media,
System,
About us,
Update, Logout. ”
IPCam
Add new device
Note:Touch
for stream, keep
pressing for Setting
Authority: Open “Audio / Pan Tilt /...”
Multi-Media: Check “Video Playback/ Local Pictures
/ Alarm List”
Add device
Wi-Fi Setting
Change Admin Password
Password modify succeed
want to connect to Wi-Fi network?
The device is online.For the security,you’d
better change the password immediately
Change Password
Modify
Input old admin password
Input new admin password
Input new admin password
1069813
Sricamsales
Input Wi-Fi Password
4-8
Note: Password should be
3-9 characters long (A-Z,0-9)
without special characters.
English

-5-
Live video stream on smartphone
9
For configuring and watching live videos on Windows PC, please download SricamPC
software and user manual at website:
www.sricam.com/download
Please visit:
www.sricam.com/faqs
More FAQs:
1. How to restore the camera to factory settings
2. How can I add the camera to my 2nd phone
3. Camera ID, Camera Password, App Account ID and Password
4. Watch live videos from SricamPC App on Windows 7/8/10 PC
5. How to watch live streams with ONVIF clients
-If you fail to setup the Wi-Fi network in step 4-7, please make sure your Sricam is not connecting
to a 5G Wi-Fi signal. You can resolve this issue by 1) reconnecting to a non-5G Wi-Fi signal on
your smart phone or 2) skip this step and setup the Wi-Fi by going through the steps under
“setting”>“Network Setting” on the app.
-If you experience inconsistent signal,it could be due to 1)too many devices sharing the same
internet network.Or 2)the IP camera is too far from the router if using Wi-Fi connection.
Microphone
9.Pan & Tilt
2.Screenshots
English

-6-
IP Camera
More FAQs:
1. How to restore the camera to factory settings
2. How can I add the camera to my 2nd phone
3. Camera ID, Camera Password, App Account ID and Password
4. Watch live videos from SricamPC App on Windows 7/8/10 PC
5. How to watch live streams with ONVIF clients
FAQ1: MicroSD card record and playback setting
1) Insert the microSD card to the camera
2) MicroSD card format and record setting
Log in “Sricam” App and follow the steps:Setting -> Record Setting -> SD card Formatting-> Record Switch
Touch " Playback" for playback the record on MicroSD card,as picture below (Note: each record is 30 minutes)
FAQ1-1 FAQ1-2 FAQ1-3
3) Record Playback(on App)
(Note: If you use 64G or 128G SD card can't recording, you need to format the SD card to FAT32 format on
your PC. If the SD card recording is full,it will automatically loop coverage, you do not need to manually delete
the video file.)
Record Setting
SD Card Free Space:827M
SD Card Formatting
Record Type
Record Switch
SD Card Total Space:3784M
Manual Record
Alarm Record
Timing Record
Devices List
IPCam
Add new device
Modify Settings
DeletePlayback
Settings
IPCam
Device information
Time Setting
Media Setting
Security Setting
Network Setting
Alarm Setting
Record Setting
!
1
2
Playback-63
Devices List
SD card videos
Latest 1 day Latest 3 days
Latest 1
month months
Lastest 3
Phone local videos
disc1/2017-02-02_14:00:00_S.av (1123S)
disc1/2017-02-02_13:30:00_S.av (1800S)
disc1/2017-02-02_13:00:00_S.av (1800S)
IPCam Add new device
Modify Settings DeletePlayback
1
2
FAQ1-4 FAQ1-5
Log in “Sricam” App and follow the steps: Setting_>Playback
.
English

-7-
English
FAQ2: How to Setup Motion Detection Alarm
Step1: Enable motion detection alarm
Step1-1: Tap “Setting” button “Settings” “Alarm setting” be the alarm setting window as pictures FAQ2-1 ,
FAQ2-2 and FAQ2-3.
Step1-2: Enable “Motion Detection Alarm” and “Alarm Switch” as FAQ2-3
Devices List
IPCam
Add new device
Modify Settings
DeletePlayback
Settings
IPCam
Device information
Time Setting
Media Setting
Security Setting
Network Setting
Alarm Setting
!
1
2
Alarm Setting
Email Alerts
Motion Detect Sensitivity(The most sensitive’0’)
Motion Detection Alarm
Push Notifications Account
Receive Notifications
Unbound
Alarm Switch
Buzzer Alarm
Email Alerts
Save
Sender:
Please input sender’s mail address
SMTP server:
Select the email SMTP server...
port:
Please input the port number
Password:
Encryption mode
Receiver
Email: Input the email
Input password
No encrypt SSL encrypt TLS encrypt
Email: Input the email
Step2: Choose motion detection alarm notification mode
There are 3 modes you can choose to get the alarm notification.
•
Phone push alarm
Enable “Receive Notifications” then the camera will push notification to your smart phone when an alarm is activated. Push
notification account is default as the Sricam app login account. If don’t need this function, you can delete the push account.
•
Buzzer alarm
Enable “Buzzer Alarm” then the camera’s buzzer works when an alarm is activated.
•
Email alarm
The alarm notification will send to your designated email address.
Tap " Email Alarm", and fill in the email information as below guide
1. Sender: Please input your email address (e.g., [email protected]).
2. SMTP server: The server address for the Sender's email account.
3. Port: Please select 587 or 465 if the SMTP address is mtp.gmail.com, Smtp.mail.yahoo.com or smtp.live.com(Hotmail.com).
If not, please select 25.
4. Password: The password for the email account. account and to activate your email account).
5. Email: Enter up to three receiving email accounts (e.g., you may have both [email protected] and Marcy@yahoo. com)
as picture FAQ2-4
If failed to setup Email Alert, please activate your Gmail or Yahoo Email account, Please check FAQS 8 in website
www.sricam.com/faqs

Produkt Einführung
Vor der Inbetriebnahme
Stellen Sie Folgendes sicher:
- Ihr Router unterstützt das 2,4 GHz-Frequenzband (802.11b / g / n).
- Ihr Router DHCP ist aktiviert.
- Ihr Smartphone ist über
WLAN / Wi-Fi mit dem Internet verbunden, damit die Kamera darüber verbunden werden kann.
- Denken Sie daran, dass das
WLAN / Wi-Fi-Passwort (keine Sonderzeichen im Passwort und im WLAN-Namen
wie @ # $% ^ & *) beinhalten darf.
- Für Videos von der Einrichtung von IP-Kameras besuchen Sie bitte Website:
www.sricam.com/videos
DC
Spannungsversorgung
DC Spannungsversorgung
Linse
Linse
Netzwerkanschluss
Netzwerkanschluss
8
Reset
IR LED
SP007
SP008
IR LED
Antenna
Reset
Sricam
R
Deutsch
(Hinweis: Sricam Standardmodell SP015 stützt nicht microSD Karte, wenn Notwendigkeit besonders angefertigt werden kann).
Micro SD Karten Slot
Micro SD Karten Slot

Setup starten
Schritt2. Sricam APP Installation
Methode 1: Scannen Sie den QR-Code, um die "Sricam" App herunterzuladen.
Methode 2: Suchen Sie "Sricam" auf Google Play oder im iOS App Store
Schritt 1. Produktanschluss
Schritte 1-1: Schalten Sie die IP-Kamera ein
Schritte 1-2: Schließen Sie die Kamera an das Netzwerk an (schließen Sie die Kamera an einen Router oder Switch
mit einem RJ-45 Ethernet-Kabel an.)
Schritte 1-3: Setzen Sie die Standardeinstellung zurück ( die RESET-Taste für 15 Sekunden gedrückt.)
9
Router
1
2
3
Reset
WAN LAN
Deutsch

10
Schritt3. Registrieren Sie ein APP Benutzerkonto
Schritt4. Anzeigen der Kamera auf einem Smart Phone
Password eingeben
Password eingeben
Password merken
Password merken
Passwort vergessen?
Passwort vergessen?
anmelden
anmelden
registrieren
registrieren
Die E-Mail eingeben
Password eingeben
Passwort eingeben
Erstellen Sie bitte ein Passwort
für den App Account, geben Sie bitte nicht
Ihr E-Mail Passwort ein.
Eingeben der in 3-2 registrierten
Adresse
0551876
-Liste -hinzufügen -hinzufügen
Gerät-ID eingeben
Nächst
Nächst
1069813
IPCam
Passwort eingeben
(Voreinstellung:888888)
E-Mail oder App-Account eingeben
Zurück
Zurück Zurück
Hinweis: Sie können die
Geräte ID auf dem Aufkleber, der
auf der Kamera klebt finden
Deutsch

11
-Liste
-hinzufügen
Nächst
1069813
Übersprigen
Übersprigen
Passwort ändern
Administratior-Password
ändern
altes Administrator-Passwort eingeben
neues Administrator-Passwort eingeben
neues Administrator-Passwort eingeben
modifizieren
Passwort erfolgreich
modifiziert
Das Gerät ist in dem verkabelten
Netzwerk.Wollen Sie das Gerät mit
Wlan-Netzwerk verbinden?
BEST
Ä
TIGENABSAGEN
Sricamsales
Wlan-Passwort eingebn
Wlan-Einstellung
Hinweis: Drücken Sie diese Taste, um
APP „Autorität, Multimedia, Update,
System,Abmelden, Beenden
“ einzustellen”
Autorität
: Öffnen “Audio / Pan Tilt /...”
Multimedia:
Prüfen “
Wiedergabe
/ Lokale Bilder
/ Alarmereignis”
IPCam
Neues Gerät hinzufügen
Hinweis: Berühren
zum Streamen, und
drücken zum Einstellen
Zurück Zurück
Zurück
Hinweis: Erstellen Sie bitte
mit 3-9 Zahlen (A-Z,0-9) Ihr
neues Passwort
Deutsch
Das Gerät ist online.Sicherheitshalber ändern
Sie das Passwort lieber sofort

12
Live Übertragungstasten
9
1.Lokale Aufnahme 2. Aufnehmen 3. Auflösung
4.Lautsprecher 5.Kopfüber (umgedreht) 6. Alarmschalter
7.Einstelltaste 8.Mikrofon
9.Schwenken/ Neigen
Konfigurieren und Anschauen von Live-Videos von PC. Runterladen von Software und
Bedienungsanleitung auf:
www.sricam.com/download
Bitte besuchen Sie:
www.sricam.com/faqs
Weitere Fragen und Antworten:
1Rücksetzen auf die Werkseinstellungen
2Festlegen einer festen IP für IP-Kamera
3. WLAN-Ausgabe
4. Wo finde ich die Kamera ID
5. Wie kann man Live-Streams mit ONVIF-Clients ansehen kann
Fehlerbehebung
- Falls Sie dabei ein unbeständiges Signal registrieren, könnte es daran liegen, dass:
1) zu viele Geräte sich dasselbe Netzwerk teilen, oder
2) die IP Kamera zu weit vom verbundenen Router entfernt ist, falls Sie Wlan verwenden.
- Falls die Wlan Netzwerkeinstellungen aus Schritt 4-7 fehlschlagen, stellen Sie bitte sicher, dass Ihr
Sricam nicht mit dem 5G Wlan Signal verbunden ist. Sie können dieses Problem lösen, indem Sie:
1) die Wiederherstellung der Verbindung zu einem Nicht-5G Wi-Fi-Signal auf Ihrem Smartphone oder.
2) Sie diesen Schritt überspringen und das WLAN einrichten, indem Sie die Schritte unter " setting ">
" Network Setting " auf der App durchgehen.
Deutsch

13
IP-Kamera
FAQ1-2 FAQ1-3FAQ1-1
1) Setzen Sie die MicroSD-Karte in der Kamera ein
3) Aufnahme-Wiedergabe (mit der App)
Loggen Sie sich in die "Sricam" App ein. Halten Sie die Kamera gedrückt, um das Menü "Setting" aufzurufen.
Tippen Sie auf "Wiedergabe", um den Datensatz auf der MicroSD-Karte, wie unten abgebildet, abzuspielen
(Hinweis: jeder Datensatz beträgt 30 Minuten)
2) Einstellung des MicroSD-Speicherkartenformats und der Aufnahme
Starten Sie die"Sricam" App und folgen Sie den Schritten: Setting -> Record Setting -> SD card Formatting
-> Record Switch (Hinweis: Wenn Sie eine 64G oder 128G SD-Karte verwenden, müssen Sie die SD-Karte
im FAT32-Format auf Ihrem PC formatieren. Wenn die SD-Speicherkarte voll ist, werden automatisch die
ältesten Dateien gelöscht, Sie müssen die Videodatei nicht manuell löschen.)
Kapazität der SD-Speicherung:767M
Formatierung der SD-Karte
Aufnahmemodus
Aufnahmeschalter
Kapazität der SD-Karte:3784M
manuelle Aufnahme
Alarmprotokoll
Zeitnehmungsprotokol
Gerät-Liste
IPCam
modifizieren
Einstellung
Löschen
Wiederge
-ben
Einstellung
IPCam
Zeiteinstellung
Medieneinstellung
Sicherheitseinstellung
Netzwerk-Einstellung
Alarmeinstellung
!
1
2
SD-Karte Videos
jüngstens 1
Tag
jüngstens 1
Monat
jüngstens 3
Monat
jüngstens 3
Tage
Lokale Handyvideos
disc1/2017-02-02_14:00:01_S.av (1123S)
disc1/2017-02-02_13:30:20_S.av (1800S)
disc1/2017-02-02_13:30:00_S.av (1800S)
IPCam
Löschen
Neues Gerät hinzufügen
Zurück Zurück
Zurück
Gerät-Liste
Neues Gerät hinzufügen
modifizieren
Einstellung
Wiederge
-ben
Wiedergeben-IPCam
Deutsch
FAQ1: Einstellung der MicroSD-Speicherkarte Aufnahme und Wiedergabe
Aufnahmeeinstellung
Aufnahmeeinstellung
Geräteinformation

14
FAQ2: E-Mail und Smartphone Alarmeinstellung der Benachrichtigung
Drücken Sie auf das "Setting" Menü und gehen dann zum Alarm-Einstellungsschnitt, wie im Bild FAQ2-1 und FAQ2-2
1)
Alarm Einstellung
2) Aktivieren Sie als Zweites die Funktion, die Sie benötigen, wie Bewegungserkennungs-Alarm,
E-Mail-Alarm und Telefonbenachrichtigungsalarm, wie im Bild FAQ2-3.(
Stellen Sie den
Empfindlichkeitsgrad um 0-6 ein (am höchsten: 0 am niedrigsten: 6)
IPCam
1
2
Löschen
Speichern
Sender:
Bitte die E-Mail von Sender eingeben
SMTP Server:
Port:
Passwort:
Alarmeinstellung
Die Verwahrung des Emails
E-Mail-Meldungen
Push-Benachrichtigunge-Account
Benachrichtigen lassen
losgebunden
den SMTP Server der E-Mail ...
Bitte geben die Portnummer ein
Passwort eingeben
Hinweis:
3) Email Alarmeinstellung
A: Aktivieren Sie den Alarm, indem Sie den Kippschalter "Motion Detection Alarm" und "Remote Defence" auf einschalten.
Ein Signalton von der Kamera bedeutet, dass die Alarmfunktion erfolgreich aktiviert wurde.
B: Die Standard-Alarm-Benachrichtigungs-ID ist Ihr App-Konto, wenn Sie es nicht benötigen, können Sie das
Benachrichtigungs-Konto löschen.
Tippen Sie auf "E-Mail-Alarm" und geben Sie die E-Mail-Informationen wie unten Beschreibung ein.
1.Sender: Bitte geben Sie Ihre E-Mail-Adresse ein (z. B. [email protected]).
2.SMTP Server: Die Serveradresse für das E-Mail-Konto des Absenders.
3.Port: Bitte wählen Sie 587 oder 465 aus, wenn die SMTP-Adresse mtp.gmail.com, Smtp.mail.yahoo.com
oder smtp.live.com (Hotmail.com) ist. Wenn nicht, wählen Sie bitte 25 aus.
4.Passwort: Das Passwort für das E-Mail-Konto.(Bevor Sie E-Mail-Alarm auf sricam APP setzen, melden Sie sich bitte in
Ihrem E-Mail-Konto an und aktivieren Sie Ihr E-Mail-Konto).
5.Email: Geben Sie bis zu drei E-Mail-Konten ein (z. B. wie vielleicht diese beiden [email protected] und
[email protected]) wie im Bild FAQ2-4.
Einstellung
IPCam
Zeiteinstellung
Medieneinstellung
Sicherheitseinstellung
Netzwerk-Einstellung
Alarmeinstellung
!
Zurück
Zurück Zurück
Gerät-Liste
Neues Gerät hinzufügen
modifizieren
Einstellung
Wiederge
-ben
Deutsch
Geräteinformation

- Per i video su come impostare le telecamere IP visitare il sito Web: www.sricam.com/videos
IR LED
SP007
SP008
IR LED
Antenna
Reimposta
Reimposta
Sricam
R
Italian
(Nota: il modello standard SP015 di Sricam non supporta la scheda microSD, se necessario, può essere
personalizzata).

Router
1
2
3
Reset
WAN LAN
Passo1-3: Ripristina la telecamera. (dopo la e step 2, tenere premuto il tasto reset per 15 secondi).
Metodo 1: QR code scaricare
Passo2. App installare Sricam
Metodo 2: Cerca "Sricam" su Google Play o iOS App Store
Italian

-17-
1069813
IPCam
3-1 3-2 3-3
Aggiungi Camera
Prossimo
Prossimo
0551876
registro in 3-2
Passo3. Registra il tuo Account su Sricam
Italian

1069813
4-4
4-7 4-8
4-5 4-6
IPCam
“Autorita,System,Multi-Media,
Aggiornamento,Esci...”
3-9 caratteri(A-Z,0-9) per
Italian

Per favore visita :
www.sricam.com/faqs
Configurare e guardare i video live da PC, software e download manuale utente da:
www.sricam.com/download
Più FAQs:
1Ripristino dati di fabbrica
2Come impostare l'IP fisso per la telecamera IP?
3. WIFI Problema
4. Come trovare l'ID della telecamera?
5. Come guardare la diffusione con i clienti ONVIF?
7
Italian
/