TEAC T-H500 Manuale del proprietario
- Categoria
- Radio
- Tipo
- Manuale del proprietario

t-h500
`
AM
/
FM STEREO TUNER
9A06054400
This appliance has a serial number located
on the rear panel. Please record the model
number and serial number and retain them
for your records.
Model number
Serial number
WARNING: TO PREVENT FIRE OR SHOCK
HAZARD, DO NOT EXPOSE THIS
APPLIANCE TO RAIN OR MOISTURE.
The exclamation point within an equilateral triangle is intended to alert the user to the
presence of important operating and maintenance (servicing) instructions in the literature
accompanying the appliance.
The lightning flash with arrowhead symbol, within equilateral triangle, is intended to alert
the user to the presence of uninsulated “dangerous voltage” within the product’s enclosure
that may be of sufficient magnitude to constitute a risk of electric shock to persons.
CAUTION: TO REDUCE THE RISK OF ELECTRIC SHOCK, DO NOT
REMOVE COVER (OR BACK). NO USER-SERVICEABLE PARTS INSIDE.
REFER SERVICING TO QUALIFIED SERVICE PERSONNEL.
Ü
ÿ
Ÿ
Thanks for buying a TEAC. Read this manual carefully to get the
best performance from this unit.
Nous vous remercions pour l’achat d’un appareil TEAC.
Lire ce manuel avec attention pour obtenir les meilleures
performances possibles de cet appareil.
Vielen Dank für den Kauf dieses TEAC-Geräts.
Bitte lesen Sie diese Anleitung sorgfältig durch, um die Leistungs-
fähigkeit dieses Geräts optimal nutzen zu können.
Grazie per aver acquistato un prodotto TEAC.
Leggere attentamente questo manuale per ottenere le migliori
prestazioni da questo apparecchio.
Enhorabuena por la adquisición de un TEAC.
Lea detenidamente este manual a fin de obtener el mejor
rendimiento de esta unidad.
OWNER’S MANUAL .................... 3
MANUEL DU PROPRIETAIRE ...... 12
BEDIENUNGSANLEITUNG........... 21
MANUALE DI ISTRUZIONI .......... 30
MANUAL DEL USUARIO ............. 39
ENGLISH
FRANÇAIS
DEUTSCHITALIANOESPAÑOL

Important Safety Instructions
_
2
_
CAUTION:
••
Read all of these Instructions.
••
Save these Instructions for later use.
••
Follow all Warnings and Instructions marked on the audio
equipment.
1) Read Instructions
— All the safety and operating instructions
should be read before the product is operated.
2) Retain Instructions — The safety and operating instructions
should be retained for future reference.
3) Heed Warnings — All warnings on the product and in the
operating instructions should be adhered to.
4) Follow Instructions — All operating and use instructions should
be followed.
5) Cleaning — Unplug this product from the wall outlet before
cleaning. Do not use liquid cleaners or aerosol cleaners. Use a
damp cloth for cleaning.
6) Attachments — Do not use attachments not recommended by
the product manufacturer as they may cause hazards.
7) Water and Moisture — Do not use this product near water
_
for
example, near a bath tub, wash bowl, kitchen sink, or laundry tub; in
a wet basement; or near a swimming pool; and the like.
8) Accessories — Do not place this product on an unstable cart,
stand, tripod, bracket, or table.The product may fall, causing serious
injury to a child or adult, and serious damage to the product. Use
only with a cart, stand, tripod, bracket, or table recommended by the
manufacturer, or sold with the product. Any mounting of the product
should follow the manufacturer’s instructions, and should use a
mounting accessory recommended by the manufacturer.
9) A product and cart combination should be moved with care.
Quick stops, excessive force, and uneven surfaces may cause the
product and cart combination to overturn.
10) Ventilation — Slots and openings in the cabinet are provided
for ventilation and to ensure reliable operation of the product and to
protect it from overheating, and these openings must not be
blocked or covered. The openings should never be blocked by
placing the product on a bed, sofa, rug, or other similar surface.
This product should not be placed in a built-in installation such as a
bookcase or rack unless proper ventilation is provided or the
manufacturer’s instructions have been adhered to.
11) Power Sources — This product should be operated only from
the type of power source indicated on the marking label. If you are
not sure of the type of power supply to your home, consult your
product dealer or local power company. For products intended to
operate from battery power, or other sources, refer to the operating
instructions.
12) Grounding or Polarization — This product may be equipped
with a polarized alternating-current line plug (a plug having one
blade wider than the other). This plug will fit into the power outlet
only one way. This is a safety feature. If you are unable to insert the
plug fully into the outlet, try reversing the plug. If the plug should still
fail to fit, contact your electrician to replace your obsolete outlet. Do
not defeat the safety purpose of the polarized plug.
13) Power-Cord Protection — Power-supply cords should be
routed so that they are not likely to be walked on or pinched by
items placed upon or against them, paying particular attention to
cords at plugs, convenience receptacles, and the point where they
exit from the product.
14) Outdoor Antenna Grounding — If an outside antenna or
cable system is connected to the product, be sure the antenna or
cable system is grounded so as to provide some protection against
voltage surges and built-up static charges. Article 810 of the
National Electrical Code, ANSI/NFPA 70, provides information with
regard to proper grounding of the mast and supporting structure,
grounding of the lead-in wire to an antenna discharge unit, size of
grounding conductors, location of antenna-discharge unit,
connection to grounding electrodes, and requirements for the
grounding electrode.
"Note to CATV system installer:
This reminder is provided to call the CATV system installer’s
attention to Section 820-40 of the NEC which provides guidelines
for proper grounding and, in particular, specifies that the cable
ground shall be connected to the grounding system of the building,
as close to the point of cable entry as practical.
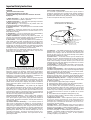
ANTENNA
LEAD IN
WIRE
ANTENNA
DISCHARGE UNIT
(NEC SECTION 810-20)
GROUNDING CONDUCTORS
(NEC SECTION 810-21)
GROUND CLAMPS
POWER SERVICE GROUNDING
ELECTRODE SYSTEM
(NEC ART 250. PART H)
NEC - NATIONAL ELECTRICAL CODE
ELECTRIC
SERVICE
EQUIPMENT
Example of Antenna Grounding as per
National Electrical Code, ANSI/NFPA 70
GROUND
CLAMP
15) Lightning — For added protection for this product during a
lightning storm, or when it is left unattended and unused for long
periods of time, unplug it from the wall outlet and disconnect the
antenna or cable system. This will prevent damage to the product
due to lightning and power-line surges.
16) Power Lines — An outside antenna system should not be
located in the vicinity of overhead power lines or other electric light
or power circuits, or where it can fall into such power lines or
circuits. When installing an outside antenna system, extreme care
should be taken to keep from touching such power lines or circuits
as contact with them might be fatal.
17) Overloading — Do not overload wall outlets, extension cords,
or integral convenience receptacles as this can result in risk of fire
or electric shock.
18) Object and Liquid Entry — Never push objects of any kind into
this product through openings as they may touch dangerous voltage
points or short-out parts that could result in a fire or electric shock.
Never spill liquid of any kind on the product.
19) Servicing — Do not attempt to service this product yourself as
opening or removing covers may expose you to dangerous voltage
or other hazards. Refer all servicing to qualified service personnel.
20) Damage Requiring Service — Unplug this product from the
wall outlet and refer servicing to qualified service personnel under
the following conditions:
a) when the power-supply cord or plug is damaged.
b) if liquid has been spilled, or objects have fallen into the product.
c) if the product has been exposed to rain or water.
d) if the product does not operate normally by following the
operating instructions. Adjust only those controls that are covered
by the operating instructions as an improper adjustment of other
controls may result in damage and will often require extensive work
by a qualified technician to restore the product to its normal
operation.
e) if the product has been dropped or damaged in any way.
f ) when the product exhibits a distinct change in performance
_
this indicates a need for service.
21) Replacement Parts — When replacement parts are required,
be sure the service technician has used replacement parts
specified by the manufacturer or have the same characteristics as
the original part. Unauthorized substitutions may result in fire,
electric shock, or other hazards.
22) Safety Check — Upon completion of any service or repairs to
this product, ask the service technician to perform safety checks to
determine that the product is in proper operating condition.
23) Wall or Ceiling Mounting — The product should be mounted
to a wall or ceiling only as recommended by the manufacturer.
24) Heat — The product should be situated away from heat sources
such as radiators, heat registers, stoves, or other products
(including amplifiers) that produce heat.

ENGLISH
Before Use
_
3
_
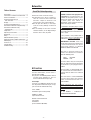
Table of Contents
AI Function..................................................... 3
Connections and Rear Panel Overview .... 4
Antenna Installation..................................... 5
Front Panel Controls and
Their Functions............................................ 6
Display............................................................ 6
Listening to Radio Broadcast...................... 7
How to Preset Broadcasting Manually..... 7
How to Preset Broadcasting
Automatically............................................... 7
Sleep Timer.................................................... 7
Adjusting Current Time ................................ 8
Daily Timer ..................................................... 8
Filing................................................................ 8
RDS (Radio Data System)............................ 9
Major Reception Symbols of RDS Data .... 9
RDS Display ................................................. 10
PTY Search .................................................. 10
Specifications.............................................. 10
Troubleshooting .......................................... 11
Read This Before Operating
For more information, see the owner's
manual of the A-H500.
OIf you press the following buttons with AI
function of the amplifier on, you can
listen to radio broadcasting easily.
For example
If you press the following, without pressing
the stop button while listening to a tape,
you can listen to radio broadcasting.
Tuner: T-H500
band button (preset tuning mode)
Amplifier: A-H500
input selector to tuner
Remote control unit: RC-613
tuner button
band button
preset call button (
˙ or ¥)
AI Function
OPlace the unit on a hard flat surface.
OAvoid placing it in direct sunlight or
close to a source of heat. Also avoid
locations subject to vibrations and
excessive dust, heat, cold or moisture.
ODo not open the cabinet, as this might
result in circuitry damage or electrical
shock.
ODo not attempt to clean the unit with
chemical solvents, as this might damage
the finish. Use a clean, dry cloth.
IMPORTANT (for U.K. Customers)
DO NOT cut off the mains plug from this
equipment.
If the plug fitted is not
suitable for the power points in your
home or the cable is too short to reach
a power point, then obtain an
appropriate safety approved extension
lead or consult your dealer.
If nonetheless the mains plug is cut off,
remove the fuse and dispose of the plug
immediately, to avoid a possible shock
hazard by inadvertent connection to the
mains supply.
If this product is not provided with a
mains plug, or one has to be fitted,
then
follow the instructions given below:
IMPORTANT. DO NOT make any
connection to the larger terminal which
is marked with the letter E or by the
safety earth symbo
ç or coloured
GREEN or GREEN-and-YELLOW.
The wires in the mains lead on this
product are coloured in accordance
with the following code:
BLUE: NEUTRAL
BROWN: LIVE
As these colours may not correspond
with the coloured markings identifying
the terminals in your plug proceed as
follows:
The wire which is coloured BLUE must
be connected to the terminal which is
marked with the letter N or coloured
BLACK.
The wire which is coloured BROWN
must be connected to the terminal
which is marked with the letter L or
coloured RED.
When replacing the fuse only a
correctly rated approved type should
be used and be sure to re-fit the fuse
cover.
IF IN DOUBT — CONSULT A
COMPETENT ELECTRICIAN.

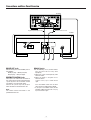
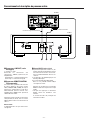
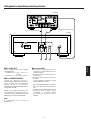
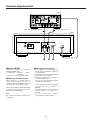
Connections and Rear Panel Overview
_
4
_
1LINE OUT jacks
Connect these jacks to the TUNER jacks on
the amplifier:
White pin-plug
T White jack (left)
Red pin-plug
T Red jack (right)
2REMOTE CONTROL jacks
These jacks are used for the connection of
the system for the purpose of operating the
system by means of the remote control
transmitter or system control signals.
Connect this jack A to jack A (or B) on
other unit either on or beneath this unit.
Note:
The remote control transmitter is not
provided with this unit.
3RESET Switch
OIn the following cases, function buttons
may not often work or may work
improperly.
1) When the system is damaged by some
electrical shock,
2) When the power is irregular or has
electrical noises.
In these cases, try as shown on the
right.
Press the RESET switch once or twice
with a pencil or a ball-point pen lightly.
* If you press this RESET switch, all the
memories will be erased. In this case, try
to preset stations again.
2 31
T-H500
A-H500
Signal Input/Output cord
Remote control cord

ENGLISH
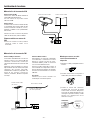
Antenna Installation
_
5
_
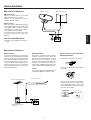
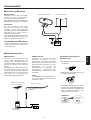
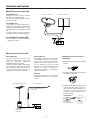
∑Installation of FM antenna
FM indoor antenna
If you live reasonably close to a transmitter
and want to use the provided lead-type FM
antenna, you will have to connect it direct
to the "FM 75Ω" socket. Fit the metal sleeve
of the lead-type antenna over the core
(center) conductor of the "FM 75Ω" socket,
extend the lead and fix it to a window
frame or wall with thumbtacks, or the like,
where reception is best.
∑Installation of AM antenna
AM indoor antenna
Connect an AM antenna to the AM
antenna terminal on the rear panel.
Without an AM antenna, you cannot
receive AM broadcasting.
Outdoor antenna
When you install an AM outdoor antenna,
it is recommended that you should avoid
high-voltage cables, materials of metal,
roadside and so on (mountains or places
near a building) near the antenna.
It is better to install an antenna far away
from high-voltage cables, valleys, or
buildings.
How to assemble AM antenna
OInstall it after assembling an antenna as
shown.
How to connect a coaxial cable to the
matching transformer
1Strip the cable and dress it as shown.
2Press both side tabs outward to remove
the cover.
3Wrap the core conductor around the
central metal fixture as shown. Crimp
the jagged metal fixtures so they hold
the braided portion using pliers, etc. Put
the cover back in place.
FM outdoor antenna
Generally, a 3-element antenna will be
sufficient; if you live in an area where the
FM signals are particularly weak, it may be
necessary to use one with 5 or more
elements. Connect the coaxial cable of the
antenna to the matching transformer as
shown. After completing connection, plug
the transformer into the "FM 75Ω" socket.
Caution
It is recommended that an outdoor antenna
should be installed by an antenna expert.
AM loop antenna AM outdoor antenna
Outdoor FM antenna (75Ω)
FM indoor antenna
Jagged metal
Jagged metal
Insert into slit.
Matching Transformer
(Optional)
Lead-type FM antenna (75Ω)(provided)

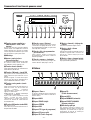
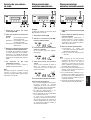
Front Panel Controls and Their Functions
_
6
_
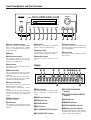
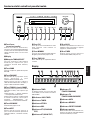
1power standby/on button
Be sure to turn down the amplifier volume
before turning the power on. Sudden
excessive volume level may lead to
hearing impairment.
2Display
3tuning/select control
This control is used for tuning in the
desired broadcasting stations, or adjusting
the time, or manual filing, etc.
4band button
This button is used for selecting the FM or
AM broadcasting.
5FM mode button
This unit automatically switches into the
stereo mode when a stereo broadcast is
received.
Press this button to listen to the radio in
the monaural mode, then the STEREO
indicator on the display will go out.
6tuning mode button
Each time you press this button, tuning
mode will change as follows:
Manual tuning
T Auto tuning T Preset
tuning
After selecting the desired tuning mode by
pressing this button, tune in the desired
broadcast by rotating the tuning/select
control.
7RDS mode button
(See pages 9 and 10.)
8next button
This button is used for advancing to the
next step during time adjustment or manual
filing, etc.
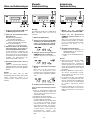
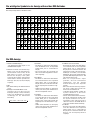
Display
1 Timer indicator
This indicator illuminates while the daily
timer is engaged by pressing the timer
button.
2 DAILY timer indicator
3 TUNED indicator
4 STEREO indicator
5 RDS indicator
6 PTY (PROGRAM TYPE) indicator
7 RT (RADIO TEXT) indicator
9file button
This button is used for filing in manually the
station's name in the preset memory.
0memory button
This button is used for presetting the
broadcast stations. (See pages 7 and 8.)
qtime adjust button
This button is used for adjusting current
time.
wdaily timer button
This button is used for presetting the time
when the system is turned on and off every
day at specified time.
etimer button
This button is used for engaging the daily
timer function.
8 TP (TRAFFIC PROGRAM)
indicator
9 TA (TRAFFIC ANNOUNCEMENT)
indicator
0 AUTO indicator
q MEMORY indicator
w PRESET CHANNEL indicator
e Multiple character indicator
A variety of information is displayed on this
indicator: time, frequency, PS, PTY, RT,
station's name by manual filing, etc.
w
e
1
2345670q98
1 2ewq0987 6543

ENGLISH
_
7
_
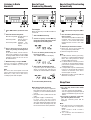
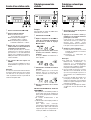
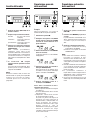
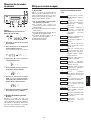
Listening to Radio
Broadcast
1 Select AM or FM as you want to listen
to.
2 Select the desired tuning mode.
Manual tuning mode: No indication on
the display.
Auto tuning mode: "AUTO" appears
on the display.
Preset tuning mode: "PRESET CH."
appears on the
display.
3 Tune in the broadcast you want to
listen to by turning the tuning/select
control.
In the preset mode, numeric buttons
and preset call buttons on the remote
control (provided with the TEAC A-H500
amplifier) allow you to tune to the
desired broadcast.
4 FM broadcasting is set up to STEREO.
If there is any noise in "STEREO", change
the mode to "MONO" by pressing this
button.
Note:
Be sure to turn off the power of the CD
player while listening to broadcasting.
Otherwise, it may cause some noise,
resulting in poor radio reception.
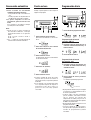
How to Preset
Broadcasting Manually
For example
When you want to preset FM 89.10 MHz to
channel 10.
1 Select the FM broadcasting.
2 Set the frequency to 89.10 MHz by
turning the control either in the manual
tuning mode or auto tuning mode.
3 Press the memory button briefly (for
less than 1 second).
Then "MEMO" will blink in the display.
4 Select CH "10" by turning the control.
If you don't press the memory button
within 8 seconds after selecting the
channel, the selection will be cancelled.
5 Press the memory button briefly.
When all the programs are erased
OIf the power has not been supplied for
long (more than about 15 days), all the
programs you have memorized will be
erased.
1) The power cord is pulled out from the
outlet.
2) The power supply is cut off for long.
In these cases, you must charge
enough electricity (for more than 3
days) after plugging the power cord into
the outlet so that the program may not
be erased even if the cord is pulled out.
How to Preset Broadcasting
Automatically
1 Select the broadcasting band (FM or
AM).
2 Press the memory button long (for more
than 1.5 second).
Then broadcasting will be automatically
received, and as many broadcasting
stations as are received well will be
memorized from channel 1 one after
another.
3 Check the preset broadcast stations.
(1)Select the preset tuning mode by
pressing the tuning mode button.
(2)Turn the tuning/select control.
Notes:
O In FM automatic memory presetting,
frequency is automatically memorized
twice. The setting which has better
reception will be preset first.
O If a new broadcast channel is preset to
a channel, the channel which had been
preset to that position earlier will be
automatically erased.
O It is impossible to preset automatically
in areas far away from the broadcast
station or in mountain areas where
received signals are weak.
O 30 broadcast stations each for AM and
FM bands can be preset.
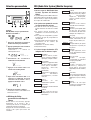
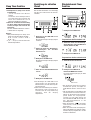
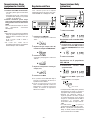
Sleep Timer
1. Press the sleep button on the remote
control unit.
- "SL: 10" is shown in the clock display.
- You can engage the sleep timer from 10
minutes to 90 minutes by pressing this
button.
2. If you want to check the sleep time,
press the sleep button once more.
Then the remaining time will be
displayed.
Notes:
O Each time you press the sleep button,
the sleep preset time is changed as
follows:
SL:10
T SL:20 T SL:30 T SL:60 T
SL:90 T SL:--
O "SL:--" indicates the cancellation of
sleep presetting.

_
8
_
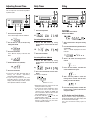
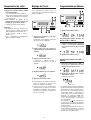
1 Press the daily button.
Presetting ON time: AM 7:15
2 Preset the ON timer by using
tuning/select control and the next
button.
3 Press the next button.
Presetting OFF time: AM 9:30
4 Preset the OFF timer by using
tuning/select control and the next
button.
5 Press the next button and the timer
button.
Presetting is completed.
Current Time
* Daily timer makes the system turn on and
off at preset times every day.
* If you want to record at ON time, select
the desired source with the input
selector on the amplifier (A-H500) and
then set the timer switch on the cassette
deck (R-H500) to the rec position.
* If the timer indicator " " is off, the
daily timer doesn't work.
* While setting the daily timer, if the next
button is held depressed, the timer
function will be cancelled.
1 Press the time adj button.
Then "Hour display" indicator will blink.
2 Set the hour to "10" (o'clock) using
tuning/select knob
3 Press the next button.
Then "Minute display" indicator will
blink.
4 Set the minute to "55" (minutes).
5 Press the next button.
OIf you press the time adj button after or
during the minute adjustment,
adjustment will be completed.
OIf you don't proceed to the next
operation within 8 seconds after "Hour
display" indicator begins to blink, current
time adjustment will be cancelled.
Daily TimerAdjusting Current Time
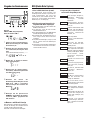
Filing
For example)
FM 98.80 MHz, Preset Ch 01.
Station name : BBC 1
1 Select channel 01 in the preset tuning
mode.
2 Press the file button long (for more than
1.5 seconds).
Then "----" will be displayed in the clock
indicator.
3 Select "B" with the tuning/select
control.
4 Press the next button, and then the
cursor will move one space.
5 After selecting "BBC 1" with the
tuning/select control and the next
button, press the next button.
6 Press the memory button, and then the
broadcasting station name will be
changed to "BBC 1".
O File display and clock display
While the clock is being displayed,press
the file button briefly; the clock display will
be switched to the file display.
Press the file button briefly again to
resume.
You can adjust the current time regardless
of power on/off.

ENGLISH
_
9
_
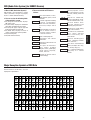
1. What is RDS (Radio Data System)?
RDS provides such information as station
names, local times, the types of program,
RT, etc. as well as FM broadcasting.
2. You can receive the following kinds
of data with this system.
OPS (Program Service Name): displays
FM station name.
OCT (Clock Time): displays the information
about times provided from the station.
OPTY (Program Type): Program type will
be displayed while receiving FM.
ORT (Radio Text): displays the news of
stations composed of up to 64 symbols.
OTP (Traffic Program)
OTA (traffic Announcement)
VARIED
popular programs such as
quiz, entertainment, private
interview, comedy, satire and
so on.
POP M
program on commercial,
practical and popular songs,
and sale volume of discs, etc.
ROCK M
practical modern music
generally composed and
played by young musicians.
M.O.R.M.
popular music usually lasting
for less than 5 minutes.
LIGHT M
classical music, instrumental
music, chorus, and light
music favoured by non-
professionals.
CLASSICS
orchestra including great
operas, symphony, chamber
music and so on.
OTHER M
other music not mentioned
above (example: folk song,
jazz, country song, etc.)
ALARM
this is a program notifying an
emergency or a natural
disaster.
RDS (Radio Data System) (for EUROPE Version)
Major Reception Symbols of RDS Data
Received data of small letters are also
displayed in capital letters.
3. There are 16 kinds of PTY data as
follows:
NEWS
brief annoucements, events,
public opinion, reports, actual
situations.
AFFAIRS
a kind of suggestion including
practical annoucements
other than news, documents,
discussion, analysis and so
on.
INFO
daily information or reference
such as weather forecast,
consumer guide, medical
assistance and so on.
SPORT
sports-related programs.
EDUCATE
educational and cultural
information.
DRAMA
all kinds of radio concert and
serial drama.
CULTURE
all aspects of national or
local culture including
religious events, philosophy,
social science, language,
theatre, and so on.
SCIENCE
programs on natural science
and technology.

_
10
_
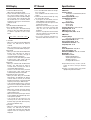
1. Select the FM broadcasting.
RDS can be received only in FM.
2. Select the RDS broadcasting by use of
the tuning mode button and the
tuning/select control. Then RDS will light
up in the upper side of the display. And
the related data, if received, will be
displayed in the type of received data
(PTY, RT, TP, TA).
3. RDS
1) The default of the RDS mode is PS.
2) Press the RDS mode button.
Each time you press the button briefly
(0.5 sec or less), the modes will change
as follows regardless of the current
mode.
T PS T PTY T RT T TA T CTR
3) PS mode
- When you select PS with the RDS mode
button, "PS" will blink for about 4
seconds.
- After 4 seconds, PS or a station name
entered by manual file will be displayed.
4) PTY mode
- When you select PTY with the RDS mode
button, PTY will blink for about 4
seconds. After 4 seconds, the type of
received PTY will be displayed.
- If there is no PTY data among received
broadcastings, RDS mode will be
switched to PS mode automatically.
5) RT mode
- When you select RT with the RDS mode
button, "RT" will blink for about 4
seconds. After 4 seconds, the data of
received RT will be displayed.
- If there is no RT data among received
broadcastings, RDS mode will be
automatically switched to PS mode.
6) TA mode (TP Search Function)
- When you select TA by use of the RDS
mode button, "TA" will blink for about 4
seconds. After 4 seconds, TP received
broadcasting will be searched with FM
frequency increasing in 100 kHz steps.
- If TP received broadcasting is searched,
the increase in frequency will stop and it
is asked whether TA will be received or
not.
- When TA is received, the input selector
of the amplifier will be automatically
switched to the tuner.
- When TA has finished, the input selector
of the amplifier will automatically return
to the previous position.
- If TP and TA turn off while you are
receiving TA, the tuner will search TA
broadcasting again with FM frequency
increasing in 100 kHz steps.
7)CT mode
- When you select CT with the RDS mode
button, "CT" will blink for about 4
seconds. After 4 seconds, the clock time
together with the frequency will be
displayed.
1. Press the RDS mode button for longer
than 1.5 seconds.
Then "SEARCH" will be shown in the
display.
2. Select the desired PTY mode by using
the tuning/select control.
3. - If you press the next button, the PTY
mode will blink in the clock display.
- Searching will start when you turn the
tuning/select control.
- When the PTY mode that you have
selected is searched, searching will
stop and the PTY mode will be
displayed.
- If there is no program in the PTY mode
you have selected, searching will stop
at the frequency started.
* CT can be received regardless of
whichever RDS mode the tuner is set
to.
RDS Display PTY Search
FM Section
Frequency Range:
87.50 MHz to 108.00 MHz (50 kHz
steps) (Europe)
Sensitivity (S/N 30 dB) : 3.0 µV
Total Harmonic Distortion
Mono: 0.15%
Stereo: 0.3%
Signal-to-Noise Ratio
Mono: 70 dB
Stereo: 65 dB
Frequency Response : 20 Hz to 15 kHz
Image Rejection : 70 dB
AM Suppression : 55 dB
Stereo Separation (1 kHz) : 45 dB
AM Section
Frequency Range :
522 kHz to 1,620 kHz (9 kHz steps)
Sensitivity (S/N 20 dB) : 55 dB
Signal-to-Noise Ratio : 40 dB
Total Harmonic Distortion : 1.5%
Image Rejection : 35 dB
General
Power Requirement :
230V, 50 Hz
Power Consumption : 8W
Dimensions (WxHxD) : 285 x 101 x 310 mm
Weight (Net) : 3 kg
Standard Accessories:
Remote Control Cord x 1
Signal Input/Output Cord x 1
AM loop antenna x 1
Lead-type FM antenna x 1
OImprovements may result in specifi-
cation or feature changes without
notice.
OPhotos and illustrations may differ
slightly from production models.
Specifications

ENGLISH
_
11
_
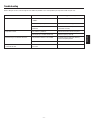
Troubleshooting
Problem Probable cause(s) Suggested remedy
No sound. INPUT SELECTOR of amplifier is not set to Select "TUNER" in INPUT SELECTOR.
"TUNER".
VOLUME of amplifier positioned in "MIN". Adjust VOLUME accordingly.
The terminal for system connection is Connect the terminal for system
pulled out. connection correctly.
Only noise is heard. The antenna is pulled out. Connect the antenna on the rear panel.
The frequency is not detected exactly. Set the frequency correctly.
Broadcasting is received but with noise. The position of antenna is not suitable. Install the antenna again after locating
the best reception position.
The power of CD is turned on. Turn off CD.
The preset call buttons on the remote The remote control is set to a mode other Select tuner on the remote control.
control do not work. than tuner.
Before calling for service, check through the chart below for probable causes of the problems you experience while using this unit.

_
12
_
Avant utilisation
Table des matières
Fonction AI................................................... 12
Raccordements et description du
panneau arrière ....................................... 13
Installation de l'antenne............................ 14
Commandes et fonctions du
panneau avant.......................................... 15
Afficheur....................................................... 15
Ecoute d'une station radio........................ 16
Préréglage manuel des stations .............. 16
Préréglage automatique des
stations...................................................... 16
Temporisation de veille.............................. 17
Réglage de l'heure ..................................... 17
Programmation quotidienne ..................... 17
Sélection personnalisée............................ 18
RDS (Radio Data System)
(Modèle Européen).................................. 18
Principaux symboles de réception
des données RDS..................................... 19
Afficheur RDS.............................................. 19
Recherche PTY............................................ 20
Caractéristiques techniques..................... 20
Dépannage................................................... 20
Pour plus d'informations, se reporter au
manuel d'utilisation de l'Amplificateur A-
H500.
OSi vous appuyez sur les touches
suivantes alors que la fonction AI de
l'Amplificateur est active, vous pourrez
écouter plus facilement les émissions
radio.
Exemple
Si vous appuyez sur les touches suivantes,
sans appuyer sur la touche STOP pendant
que vous écoutez une cassette, vous
pouvez écoutez les émissions radio.
Syntoniseur :T-H500
touche «band» (Mode d'accord préréglé)
Amplificateur :A-H500
sélecteur d'entrée sur «tuner»
Télécommande : RC-613
touche syntoniseur
touche de bande
touche d'appel de présélection
(
˙ ou ¥)
Fonction AI
OPlacer l'appareil sur une surface plate
rigide.
OEviter de le placer directement au soleil
ou près d'une source de chaleur. Eviter
également les endroits sujets aux
vibrations, et à la poussière, la chaleur,
le froid ou l'humidité.
ONe pas ouvrir le coffret, il pourrait en
résulter un dommage de l'électronique
ou des chocs électriques.
ONe pas essayer de nettoyer l'appareil
avec des solvants chimiques, ils
pourraient endommager le fini. Utiliser
un chiffon sec et propre.
Bien lire ceci avant utilisation

FRANÇAIS
_
13
_
Raccordements et description du panneau arrière
1Connecteurs LINE OUT (sortie
analogique)
L = gauche, R = droit
Raccordez ces connecteurs aux
connecteurs TUNER (syntoniseur) de
l'Amplificateur:
Fiche blanche
T connecteur blanche (L)
Fiche rouge
T connecteur rouge (R)
2Connecteur REMOTE CONTROL
(Télécommande)
Ces connecteurs permettent de brancher
les divers éléments de la mini- chaîne
TEAC (T-H500, R-H500, A-H500), de façon à
pouvoir les commander à l'aide de la
télécommande (RC-613 fournie avec
l'amplificateur A-H500) ou des signaux de
commande de la chaîne.
Connectez la fiche A (ou B) au connecteur
correspondant, A (ou B), situé sur l'autre
élément placé au-dessus ou en dessous de
celui-ci.
Avertissement:
La télécommande n'est pas fournie avec
cet appareil.
3Bouton RESET (remise à zéro)
OIl peut arriver que dans certains cas, les
touches fonction ne fonctionnent pas ou
fonctionnent de manière incorrecte.
Ceci se produit notamment dans les cas
suivants:
1) si l'appareil a été endommagé par une
décharge électrique.
2) en cas de variation de l'alimentation.
Dans ces cas, procéder comme indiqué
sur la figure ci-contre.
Appuyez une ou deux fois sur le bouton
RESET à l'aide d'un crayon ou d'un stylo
à bille
* Lorsque vous appuyez sur le bouton
RESET, toutes les mémoires sont
effacées.
Il conviendra alors de prérégler de
nouveau les stations.
2 31
T-H500
A-H500
Cordon de signal Entrée/Sortie
Cordon de télécommande

_
14
_
Installation de l'antenne
∑Installation d'antenne FM
Antenne FM intérieure
Si vous vivez relativement prés d'un
émetteur et voulez utiliser l'antenne FM
fournie de type fil, vous devez la brancher
directement à la prise "FM 75Ω".
Adapter le manchon métallique de
l'antenne type fil sur l'âme (conducteur
central) de la prise "FM 75Ω", étendre le fil
et le fixer sur un cadre de fenêtre ou un
mur avec des punaises, où la réception est
la meilleure.
∑Installation de l'antenne AM
Antenne AM intérieure
Branchez l'antenne AM sur le connecteur
« AM terminal » situé à l'arrière de
l'appareil.
Sans antenne AM, il n'est pas possible de
recevoir les émissions AM.
Antenne extérieure
Eviter d'installer l'antenne AM extérieure à
proximité d'une ligne à haute tension,
d'éléments métalliques, au bord d'une
route, à proximité d'une hauteur ou à côté
d'un bâtiment.
Comment installer une antenne
AM
OInstallez l'antenne après l'avoir montée
comme indiqué sur la figure ci-dessous.
Comment raccorder un câble coaxial
au transformateur d'adaptation
1Dénuder le câble et le préparer comme
montré.
2Ecarter les deux languettes latérales
pour retirer le capot.
3Enrouler l'âme autour de l'ergot
métallique central comme montré.
Replier les griffes métalliques pour
qu'elles tiennent la partie du blindage
en utilisant des pinces, etc. Remettre le
capot en place.
Antenne FM extérieure
Une antenne à 3 éléments est
généralement suffisante; si vous habitez
dans une région où les signaux FM sont
particulièrement faibles, il peut être
nécessaire d'utiliser une antenne à 5
éléments ou plus.
Raccorder le câble coaxial de l'antenne au
transformateur d'adaptation comme
montré. Après avoir terminé le
raccordement, brancher le transformateur
à la prise "FM 75Ω".
Avertissement:
Il est recommandé de confier l'installation
d'une antenne extérieure à un spécialiste.
Antenne-cadre AM (OM/GO)
Antenne AM (OM/GO) extérieure
Antenne FM extérieure
(75 Ω)
Antenne FM intérieure
Griffe métallique
Griffe métallique
Introduire dans
la fente.
Transformateur
d'adaptation(en option)
Antenne Filaire FM (75 Ω)
(fournie)

FRANÇAIS
_
15
_
Commandes et fonctions du panneau avant
1Touche « power standby/on »
(Marche/arrêt - veille / sous
tension)
Assurez-vous que vous avez bien réduit le
volume sonore sur l'amplificateur avant de
mettre l'appareil sous tension. Un volume
sonore trop élevé brutalement peut avoir
des conséquences graves pour l'ouïe.
2Affichage
3bouton « tuning/select »
(Accord/sélection)
Ce bouton de commande permet de régler
les stations radio, l'heure, d'effectuer
manuellement certains réglages, etc.
4Touche « band » (bande)
Cette commande permet de sélectionner la
bande FM ou la bande AM.
5Touche « FM mode » (mode FM)
Cet appareil se met automatiquement en
mode stéréo lorsque l'émission est en
stéréo.
Quand on appuie sur cette touche pour
écouter une émission en monophonie, le
voyant STEREO de l'Afficheur s'éteint.
6Touche « tuning mode » (mode
accord)
Cette touche permet de sélectionner le
mode d'accord. Les deux modes de
réglage suivants s'affichent
alternativement chaque fois que l'on
appuie sur cette touche:
Réglage manuel T Réglage automatique
T Sélection par préréglage
Après avoir choisi le mode d'accord
désiré, à l'aide de cette touche,
sélectionnez la station souhaitée en
tournant le bouton de commande de
Accord/sélection.
7Touche «RDS mode» (mode RDS)
(voir pages 18 à 19).
Cette touche permet de déclencher la
temporisation de Veille.
Afficheur
1 Voyant « Timer »
Ce voyant s'allume lorsque la fonction de
temporisation a été activée à l'aide de la
touche « timer ».
2 Voyant DAILY
3 Voyant TUNED (réglé)
4 Voyant STEREO
5 Voyant RDS
6 Voyant PTY (type de programme)
7 Voyant RT (texte radio)
8 Voyant TP (Traffic Program)
8Touche « next » (Suivant)
Cette touche permet de passer à l'étape
suivante lors du réglage de l'heure, en cas
de programmation manuelle, ou pour toute
autre opération analogue.
9Touche « file » (programmation
personnalisée)
Cette touche permet d'enregistrer
manuellement le nom d'une station en
mémoire préréglée.
0Touche « memory » (mémoire)
Cette touche permet de prérégler les
stations désirées. (Voir pages 16 et 18.)
qTouche « time adj » (réglage de
l'heure)
Cette touche permet de régler l'heure.
wTouche « daily » (heure
programmée)
Cette touche permet de prérégler l'heure à
laquelle l'appareil doit se mettre en
marche et s'arrêter chaque jour à une
heure donnée.
eTouche « timer » (temporisation)
Cette touche permet d'activer la fonction
de programmation quotidienne.
9 Voyant TA
(Traffic Announcement)
0 Voyant AUTO
q Voyant MEMORY (mémoire)
w Voyant PRESET CHANNEL
(Canaux préréglés)
e Afficheur graphique
Cet afficheur permet d'afficher des
informations diverses telles que l'heure, la
fréquence, la présélection, le type de
programme, le nom de la station par
programmation manuelle, etc.
1 2ewq0987 6543
w
e
1
2345670q98

_
16
_
Ecoute d'une station radio
1 Choisir la bande désirée (AM ou FM)
2 Choisir le mode de sélection.
Mode de sélection manuel:
aucune indication sur l'afficheur.
Mode de sélection automatique:
la mention « AUTO » s'affiche.
Mode de sélection par présélection:
la mention « RESET CH. » s'affiche.
3 Réglez-vous sur la station que vous
voulez écouter à l'aide du bouton de
commande d'accord/ sélection.
En mode présélection, les touches
numériques ou la touche d'appel de
présélection sur la télécommande
(fournie avec l'amplificateur TEAC A-
H500) permettent de sélectionner la
station souhaitée.
4 Les stations FM sont réglées sur
STEREO.
S'il y a du bruit en STEREO, passez en
mode MONO en appuyant sur cette
touche.
Remarque:
Assurez-vous d'avoir bien arrêté le lecteur
de disque compact lorsque vous écoutez
une émission sur le syntoniseur. Il peut
sinon se produire du bruit, ce qui réduit le
niveau de réception radio.
Préréglage manuel des
stations
Exemple:
Pour prérégler la station 89,10 MHz de la
bande FM sur le canal 10.
1 Sélectionnez la bande FM.
2 Réglez la fréquence sur 89,10 MHz à
l'aide de la commande permettant de
sélectionner le mode de réglage
Manuel ou Auto.
3 Appuyez brièvement (moins d'une
seconde) sur la touche « memory »
(mémoire).
Le voyant « MEMO » de l'Afficheur se
met à clignoter.
4 Sélectionnez le canal CH 10 à l'aide de
ce bouton.
Si vous n'appuyez pas sur la touche
mémoire dans les 8 secondes qui
suivent la sélection du canal, celle-ci
sera annulée.
5 Appuyez brièvement sur la touche
« memory ».
EN CAS D'EFFACEMENT DE TOUS LES
PROGRAMMES
OSi l'appareil est resté éteint pendant un
certain temps (plus d'une quinzaine de
jours), tous les programmes en mémoire
seront effacés.
1) Le cordon d'alimentation a été
débranché.
2) L'alimentation a été coupée pendant un
certain temps.
Vous devez alors recharger
suffisamment l'appareil (pendant plus
de trois jours) après avoir rebranché
l'appareil pour que le programme ne
s'efface pas même s'il est débranché.
Préréglage automatique
des stations
1 Sélectionnez la bande de fréquence
désirée (FM ou AM).
2 Appuyez sur la touche « memory »
(mémoire) et la maintenir enfoncée
pendant plus 1,5 seconde.
Cette bande est automatiquement
sélectionnée. Toutes les stations qui
peuvent être captées seront
automatiquement mises en mémoire
l'une après l'autre à partir du Canal 1.
3 Vérifiez les stations préréglées.
(1) Sélectionnez le mode d'accord
préréglé en appuyant sur la touche
« tuning mode ».
(2) Actionnez la commande de
accord/sélection.
Remarques:
O En mode de Préréglage FM par
Mémorisation Automatique, la
fréquence est automatiquement
mémorisée deux fois. Le réglage qui
permet d'avoir la meilleure qualité de
réception est mémorisé en premier.
O Si on prérègle un nouveau canal de
diffusion sur un canal donné, le canal
qui aura été préréglé auparavant à
cette position sera automatiquement
effacé.
O Il n'est pas possible de procéder à un
préréglage automatique dans les
régions où l'émetteur est très éloigné
ou dans les régions montagneuses où la
réception est affaiblie.
O Il est possible de prérégler 30 stations
au total dans chacune des bandes FM
et AM.

FRANÇAIS
_
17
_
1 Appuyez sur la touche « daily ».
Préréglage de l'heure de mise en
marche (« ON ») : AM 7:15
2 Préréglez l'heure de mise en marche
(« ON » ) à l'aide de la commande
d'accord/sélection et de la touche
« next ».
3 Appuyez sur la touche « next ».
Préréglage de l'heure d'arrêt (« OFF ») :
AM 9:30
4 Préréglez l'heure d'arrêt « OFF » à
l'aide de la commande d'accord/
sélection et de la touche « next ».
5 Appuyez sur la touche « next » et puis
sur la touche « timer ».
Le réglage est terminé.
Heure
* La fonction Programmation quotidienne
permet de mettre en marche et d'arrêter
l'appareil tous les jours à la même heure.
* Pour lancer un enregistrement à l'heure
programmée (« ON »), sélectionnez la
source souhaitée à l'aide du sélecteur
d'entrée sur l'Ampli A-H500 puis
positionnez le commutateur « timer » sur
« rec » (enregistrement) sur la Platine
Cassette R-H500.
* Si la mention «» du voyant Timer
n'apparaît pas, c'est que la fonction
Programmation Quotidienne (Daily Timer)
ne fonctionne pas.
* Si, Pendant le réglage de la fonction
Programmation Quotidienne, la touche
« next » est maintenue enfoncée, la
fonction Timer sera désactivée.
1 Appuyez sur la touche « time adj »
(réglage de l'heure).
L'indicateur « Hour display » (affichage
de l'heure) se met à clignoter.
2 Régler l'heure sur « 10 » (heures) à
l'aide du bouton de commande Accord/
sélection.
3 Appuyez sur la touche « next ».
L'indicateur « Minute display »
(affichage des minutes) se met à
clignoter.
4 Régler les minutes sur « 55 » (minutes).
5 Appuyez sur la touche « next ».
OSi vous appuyez sur la touche «time adj»
après ou pendant le réglage des
minutes, le réglage sera terminé.
OSi vous ne passez pas à l'opération
suivante dans les 8 secondes qui suivent
le moment où l'indicateur «Hour display»
commence à clignoter, le réglage de
l'heure sera annulé.
Programmation quotidienne
Réglage de l'heure
Il est possible de régler l'heure sur
l'afficheur que l'appareil soit allumé ou
éteint (« ON/OFF »).
Temporisation de veille
1. Appuyez sur la touche « Sleep » (Veille)
de la télécommande.
- SL : l'affichage de l'heure indique 10.
- Vous pouvez régler la temporisation de
veille de 10 à 90 minutes en appuyant
sur cette touche.
2. Pour vérifier la durée de la
temporisation de veille, appuyez une
nouvelle fois sur la touche « Sleep ».
La durée qui reste à courir s'affiche.
Remarques:
O A chaque fois que vous appuyez sur la
touche « Sleep » (veille), la durée de
veille préréglée change comme suit:
SL:10
T SL:20 T SL:30 T SL:60 T
SL:90 T SL:--
O « SL: -- » signifie que le préréglage de la
durée de veille est annulé.

_
18
_
1. Qu'est-ce que le RDS (Radio Data
System) (Système de Données
Radio)?
Le système RDS permet d'obtenir diverses
informations telles que le nom des stations,
l'heure locale, les types de programmes,
etc. en plus des stations FM.
2. Ce système vous permet de recevoir
les types de données suivants.
OPS (nom du Service du Programme):
permet d'afficher le nom de la station
FM
OCT (heure): permet d'afficher les
informations sur l'heure fournie par la
station
OPTY (Type de Programme): permet
d'afficher le type de programme en
réception FM
ORT (texte radio): permet d'afficher des
informations sur les stations, (64
caractères maxi)
OTP (Données sur le trafic routier):
OTA (Annonce trafic):
3. Il existe 16 types de données PTY,
indiquées dans le tableau ci-après:
NEWS
(nouvelles)
annonces brèves, événe-
ments, enquêtes publiques,
reportages, comptes-rendus.
AFFAIRS
(vie pratique)
Conseils et suggestions telles
que des annonces pratiques
autres que les nouvelles :
documents, discussion,
analyses, etc.
INFO
(information)
informations quotidiennes,
météo, informations
consommateurs, conseils
santé, etc.
SPORT
(sports)
émissions sur des
manifestations sportives.
EDUCATE
(éducation)
Informations d'ordre éducatif
et culturel.
DRAMA
(théâtre)
Toutes sortes de concerts
radiophoniques et de séries
dramatiques.
CULTURE
(culture)
Tous les aspects de la culture
nationale ou locale y compris
les manifestations
religieuses, philosophie,
sciences sociales, langues,
théâtre, etc.
SCIENCE
(sciences)
émissions sur les sciences
naturelles et les techniques.
VARIED
(variétés)
émissions grand public telles
que des jeux, des variétés,
des interviews, des émissions
comiques ou satiriques, etc.
POP M
(mus. pop)
émissions de musique de
variété, informations sur les
disques les plus vendus, etc.
ROCK M
(rock)
musique moderne, de jeunes
compositeurs et jouée par
des jeunes.
M.O.R.M.
(Variétés)
musique populaire, titres
durant généralement moins
de 5 minutes.
LIGHT M
(mus. classique)
musique classique,
instrumentale ou chorale et
musique grand public.
CLASSICS
(classique)
musique classique pour
orchestre, y compris les
grands opéras, la musique
symphonique ou de chambre,
etc.
OTHER M
(autre mus.)
Autres types de musique (tels
que par exemple la musique
folklorique, le jazz, la country,
etc.)
ALARM
(alarme)
émissions de messages
d'urgence ou concernant des
catastrophe naturelle.
RDS (Radio Data System) (Modèle Européen)
Sélection personnalisée
Exemple:
MF 104,3 MHz, canal par preséléction 01
Nom de la station RTL 1.
1 Choisissez Channel 01 (canal 01) en
mode de sélection par présélection.
2 Appuyez pendant plus d'une seconde et
demi sur la touche « file ».
L'indication « --- » s'affiche sur
l'affichage de l'heure.
3 Sélectionner « R » à l'aide de la
commande d'accord/sélection.
4 Appuyez sur la touche « Next ». Le
curseur avance d'une position.
5 Après avoir sélectionné « RTL 1 » à
l'aide de la commande d'accord/
sélection et de la touche « next »,
appuyez sur la touche « next ».
6 Appuyez sur la touche « memory ».
Le nom de la station a été modifié et est
désormais « RTL 1 ».
O Affichage du fichier
personnalisé et affichage de
l'heure
Quand l'heure est affichée, appuyez
brièvement sur la touche « file »;
l'affichage de l'heure est remplacé par
l'affichage du ficher personnalisé.
Appuyez de nouveau brièvement sur la
touche « file » pour que l'heure soit
réaffichée.

FRANÇAIS
_
19
_
1. Sélectionnez le mode de réception FM.
- Le système RDS ne peut être capté que
sur la bande FM.
2. Sélectionnez l'émission RDS à l'aide de
la touche « mode de réglage » et de la
commande Accord/sélection. La
mention RDS s'allume dans la partie
supérieure de l'Afficheur. Les données
correspondantes, si elles sont captées,
s'afficheront en fonction du type de
données reçues (PTY, RT, TP, TA).
3. RDS
1) L'état par défaut du mode RDS est PS.
2) Appuyez sur la touche « mode RDS ».
A chaque pression brève sur cette
touche (0,5 seconde maxi), les différents
modes apparaissent dans l'ordre suivant
et ce quel que soit le mode en cours.
T PS T PTY T RT T TA TCTR
3)Mode PS
- Lorsque vous sélectionnez le mode PS à
l'aide de la touche de mode RDS,
l'indication « PS » clignote pendant
environ 4 secondes.
- Au bout de 4 secondes, l'indication PS
ou un nom de station entré par
programmation manuelle s'affiche.
4)Mode PTY
- lorsque vous sélectionnez l'option PTY à
l'aide de la touche de mode RDS,
l'indication PTY clignote pendant environ
4 secondes. Au bout de 4 secondes, le
type de PTY reçu s'affiche.
- S'il n'y a pas de données PTY dans les
programmes captés, le mode RDS passe
automatiquement en mode PS.
5)Mode RT
- lorsque vous sélectionnez l'option RT à
l'aide de la touche « mode RDS »,
l'indication « RT » clignote pendant
environ 4 secondes. Au bout de 4
secondes, les données RT reçues
s'affichent.
- S'il n'y a pas de données RT dans les
émissions captées, le mode RDS passe
automatiquement en mode PS.
6) Mode TA (Fonction de Recherche TP)
- lorsque vous sélectionnez l'option TA à
l'aide de la touche « mode RDS »,
l'indication « TA » clignote pendant
environ 4 secondes. Au bout de ces 4
secondes, une recherche des émissions
TP reçues s'effectue, par pas de
fréquence FM de 100 kHz.
- Lorsque les émissions TP captées sont
trouvées, la fréquence se stabilise et on
vous demande si vous voulez recevoir
les infos TA.
- Quand on reçoit les infos TA, le sélecteur
d'entrée de l'Amplificateur bascule
automatiquement sur le syntoniseur.
- Une fois les infos TA terminées, le
sélecteur d'entrée de l'Amplificateur
revient automatiquement à sa position
précédente.
- En cas de désactivation de TP et de TA
en cours de réception d'une TA, le
syntoniseur effectue de nouveau une
recherche des émissions TA par pas de
fréquence de 100 kHz.
7)Mode CT
- Lorsque vous sélectionnez le mode CT à
l'aide de la touche RDS, l'indication CT
clignote pendant environ 4 secondes. Au
bout de 4 secondes, l'heure aussi bien
que la fréquence sont affichées.
Afficheur RDS
Principaux symboles de réception des données RDS
Les données reçues en minuscules sont
également affichées en majuscules.

_
20
_
Dépannage
Symptôme Cause(s) probable(s) Remède proposé
Pas de son. Le Sélecteur Entrée (INPUT SELECTOR) de Sélectionnez « TUNER » sur le sélecteur
l'Amplificateur n'est pas réglé sur «TUNER». d'entrée (INPUT SELECTOR).
La commande VOLUME de l'Amplificateur Réglez la commande VOLUME en
est positionnée sur MIN. conséquence.
La prise de l'Appareil est débranchée. Branchez correctement la prise de l'appareil.
On n'entend que des parasites. L'antenne est débranchée. Branchez l'antenne à l'arrière de l'appareil.
La fréquence n'est pas bien réglée. Réglez correctement la fréquence.
On reçoit l'émission mais avec des L'antenne est mal placée. Installez de nouveau l'antenne après avoir
parasites. repéré la meilleure position de réception.
Le lecteur de disque compact est sous Arrêtez le lecteur de disque compact.
tension.
Les touches d'appel de présélection de la La télécommande est réglée sur un mode Sélectionnez « tuner » sur la télécommande.
télécommande ne fonctionnent pas. autre que « tuner » (syntoniseur).
Avant de demander l'intervention d'un technicien, vérifiez à l'aide du tableau ci-dessous si le problème n'est pas dû à l'une des causes suivantes.
Partie FM
Gamme de fréquences :
de 87,50 MHz à 108,00 MHz
(par pas de 50 kHz)
Sensibilité (S/B 30 dB) : 3,0 µV
Distorsion harmonique totale
Mono : 0,15%
Stéréo : 0,3%
Rapport Signal / Bruit
Mono : 70 dB
Stéréo : 65 dB
Réponse en fréquence : de 20 Hz à 15 kHz
Rapport de réjection d'image : 70 dB
Suppression AM : 55 dB
Séparation stéréo (1 kHz) : 45 dB
Partie AM
Gamme de fréquences :
de 522 à 1.620 kHz
(par pas de 9 kHz)
Sensibilité (S/B 20 dB) : 55 dB
Rapport Signal / Bruit : 40 dB
Distorsion harmonique totale : 1,5%
Rapport de réjection d'image : 35 dB
Caractéristiques générales
Alimentation :
230 V, 50 Hz ~
Consommation : 8 W
Dimensions (L x H x P) : 285 x 101 x 310 mm
Poids (net) : 3 kg
Accessoires standard
Cordon de télécommande x 1
Cordon de signal Entrée/Sortie x 1
Antenne FM intérieure x 1
Antenne-cadre AM x 1
ODes améliorations peuvent apporter des
changements dans les caractéristiques
techniques et générales sans avis
préalable.
OLes fotos et illustrations peuvent
légèrement différer du produit fini.
Caractéristiques techniques
1. Appuyez sur la touche mode RDS et la
maintenir enfoncée pendant au moins 1
seconde et demi.
L'indication « SEARCH » apparaît sur
l'Afficheur.
2. Sélectionnez le mode PTY désiré à l'aide
de la commande Accord/sélection.
3. - Si vous appuyez sur la touche « next »,
le mode PTY clignote sur l'Affichage de
l'heure.
- La recherche commence dès que vous
commencez à tourner le bouton de
commande d'Accord/ sélection.
-Dès que le mode PTY sélectionné a été
trouvé, la recherche s'arrête et le
mode PTY s'affiche.
- Si le mode PTY que vous avez
sélectionné n'existe pas, la recherche
s'arrête à la fréquence à laquelle elle a
commencé la recherche.
* Le CT peut être capté quel que soit le
mode RDS.
Recherche PTY
La pagina si sta caricando...
La pagina si sta caricando...
La pagina si sta caricando...
La pagina si sta caricando...
La pagina si sta caricando...
La pagina si sta caricando...
La pagina si sta caricando...
La pagina si sta caricando...
La pagina si sta caricando...
La pagina si sta caricando...
La pagina si sta caricando...
La pagina si sta caricando...
La pagina si sta caricando...
La pagina si sta caricando...
La pagina si sta caricando...
La pagina si sta caricando...
La pagina si sta caricando...
La pagina si sta caricando...
La pagina si sta caricando...
La pagina si sta caricando...
La pagina si sta caricando...
La pagina si sta caricando...
La pagina si sta caricando...
La pagina si sta caricando...
La pagina si sta caricando...
La pagina si sta caricando...
La pagina si sta caricando...
La pagina si sta caricando...
-
 1
1
-
 2
2
-
 3
3
-
 4
4
-
 5
5
-
 6
6
-
 7
7
-
 8
8
-
 9
9
-
 10
10
-
 11
11
-
 12
12
-
 13
13
-
 14
14
-
 15
15
-
 16
16
-
 17
17
-
 18
18
-
 19
19
-
 20
20
-
 21
21
-
 22
22
-
 23
23
-
 24
24
-
 25
25
-
 26
26
-
 27
27
-
 28
28
-
 29
29
-
 30
30
-
 31
31
-
 32
32
-
 33
33
-
 34
34
-
 35
35
-
 36
36
-
 37
37
-
 38
38
-
 39
39
-
 40
40
-
 41
41
-
 42
42
-
 43
43
-
 44
44
-
 45
45
-
 46
46
-
 47
47
-
 48
48


TEAC T-H500 Manuale del proprietario
- Categoria
- Radio
- Tipo
- Manuale del proprietario
in altre lingue
- English: TEAC T-H500 Owner's manual
- français: TEAC T-H500 Le manuel du propriétaire
- español: TEAC T-H500 El manual del propietario
- Deutsch: TEAC T-H500 Bedienungsanleitung