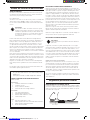
Masport OLYMPIC 400 Manuale del proprietario
- Categoria
- Tosa erba
- Tipo
- Manuale del proprietario
Questo manuale è adatto anche per

031992 - Masport European Reel Mower Owner’s Manual - July ‘10
www.masport.com
Olympic Reel Mowers.
400, 500, 660
Part N
o
: 031992
OWNER’S MANUAL.
GBR
Please read these instructions carefully before assembly.
Keep these and the engine instructions in a safe place for
future use.
This manual covers a range of different Masport Reel Mowers.
Some features mentioned may not apply to your mower.
HANDLEIDING.
NLD
Lees deze handleiding aandachtig door voordat u de
kooimaaier monteert. Bewaar deze instructies en het
motorinstructieboekje op een veilige plaats om ze in de
toekomst te kunnen raadplegen.
Deze handleiding omvat een reeks verschillende Masport
kooimaaiers. Wellicht zijn sommige functies niet van toepassing
voor uw maaier.
MANUEL D’UTILISATION.
FRA
Veuillez lire attentivement ces instructions avant de monter
votre tondeuse. Conserver ce manuel et celui du moteur
dans un endroit sûr pour future référence.
Ce manuel couvre toute une gamme de tondeuses hélicoïdales
Masport de types différents. Certaines fonctions ne s’appliquent
peut-être pas à votre tondeuse.
BETRIEBSANLEITUNG.
DEU
Bitte lesen Sie diese Gebrauchsanweisung vor dem Zusam-
menbau des Gerätes sorgfältig durch. Bewahren Sie diese
Hinweise und die Anleitungen für den Motor gut auf, damit
Sie sie immer zur Hand haben, wenn Sie sie brauchen.
Diese Betriebsanleitung bezieht sich auf eine Reihe verschiedener
Masport Spindelmäher. Nicht alle der beschriebenen Details treffen
notwendigerweise auf Ihren Mäher zu.
MANUALE MASPORT.
ITA
Leggere attentamente le presenti istruzioni prima del mon-
taggio. Conservare questo manuale e il manuale del motore
in un luogo sicuro per l’utilizzo futuro.
Il presente manuale accompagna diversi tosaerba ad asse oriz-
zontale Masport. Alcune caratteristiche indicate qui possono non
riguardare il tosaerba acquistato.
MANUAL DEL PROPIETARIO.
ESP
Lea las presentes instrucciones con atención antes de
proceder al montaje. Guarde estas instrucciones y las del
motor en un sitio seguro para utilizarlas en el futuro.
Este manual abarca una gama de diferentes modelos de
cortacésped de rodillo Masport. Algunas de las características
mencionadas pueden no corresponder al suyo.
Downloaded from www.Manualslib.com manuals search engine


3
031992 - Masport European Reel Mower Owner’s Manual - July ‘10
ESPAÑOL ITALIANO DEUTSCH FRANÇIS NEDERLANDS ENGLISH
Do not operate this machine before it has been
assembled correctly and you have read and
understood these instructions.
These instructions are intended as a general
guide and do not supersede national or local
codes in any way. Contact local Authorities for
clarity of laws relating to operation of this
appliance.
Contents
Symbols in this Owner’s Manual 3
Symbols used on the machine 3
Proper Use 4
Safety Precautions 4
Reel Mower General Arrangement 5
Contents of the Shipping Container 5
Assembly Instructions 5
Before you Start 7
Using your Reel Mower 7
Adjustments for best performance 8
General Maintenance 10
Cleaning and storage 10
Specifications 10
Troubleshooting 11
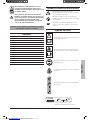
Symbols in this Owner’s Manual
Threatened hazard or hazardous situation.
Not observing this instruction can lead to injuries or
cause damage to property.
Important information on proper handling.
Not observing this instruction can lead to faults in the
machine.
User information. This information helps you to use all
the functions correctly.
Symbols used on the Machine
Read and understand this Owner’s Manual before
operating the machine.
Keep bystanders clear. Danger of flying objects.
Always wear ear and eye protection when using the
machine.
Warning! Keep hands and feet clear of rotating
blade.
OPC Bail. Some models only, see page 7.
Above. Roller clutch engagement. On or Off.
Keep the instructions in a safe place for future use.
KEEP HANDS
AND FEET
CLEAR
ON
EIN
OFF
AUS
POWER DRIVE
FAHRANTRIEB
ON
EIN
OFF
AUS
Downloaded from www.Manualslib.com manuals search engine

4
031992 - Masport European Reel Mower Owner’s Manual - July ‘10
Proper Use
For safety reasons, the Reel Mower is not to be used by children,
young people, or any other persons who are not acquainted with
these directions for use.
Specific safety information. Please read this safety
information and the directions for use carefully and be
sure to follow the instructions to the letter.
Warning
Even though this machine has been designed to be safe in use, it
is essential to follow the Safe Working instructions carefully to avoid
accidents to persons or property.
Safety Precautions
UNDERSTAND YOUR REEL MOWER
Read and understand the owner’s manual and labels affixed to
the Reel Mower. Learn its application and limitations as well as the
specific potential hazards peculiar to it.
DRUGS, ALCOHOL AND MEDICATION
Do not operate the Reel Mower while under the influence of drugs,
alcohol, or any medication that could affect your ability to use it
properly.
1. Your Reel Mower is a piece of power equipment, not a toy, and
should be operated with extreme caution at all times.
2. Children should never be allowed to operate the Reel Mower.
Only persons acquainted with the rules of safe operation set
forth in this manual should be allowed to operate the machine.
3. Read the complete manual to fully understand
the function of all the accessories and controls.
4. Keep other people, children and pets well away
from the area of operation as there is a risk of
objects being thrown out during operation.
5. Do not stand in front of the machine when
starting the engine or when the machine is
running.
6. Wear hearing and eye protection.
7. Do not operate the machine barefoot or with
open sandals. Quality footwear is recommended.
8. Do not wear loose fitting clothing that could become caught in
the moving parts of the machine.
9. Do not place feet or hands on or near the blades while the
engine is running.
10. Do not attempt to adjust the blades when the engine is
running.
11. Do not leave the machine unattended when the engine is
running.
12. Check the fuel supply before starting the
engine. Do not fill the fuel tank with the
machine indoors, while the engine is running
or while the engine is hot. Replace the fuel
cap securely, and wipe off any spilled petrol
before starting the engine.
Warning
Petrol is extremely flammable; spilled fuel can cause a fire or
explosion.
13. Do not run the machine indoors. Engine exhaust gases are
deadly poisonous.
14. Do not touch the engine muffler during or after operation of the
machine. It is extremely hot and can cause severe burns.
15. Do not change the engine governor speed setting. Over-revving
of engine can damage the machine and endanger the operator.
16. Before doing maintenance on the machine, remove the spark
plug wire and ground it to the engine block for added safety.
17. Do not attempt to remove debris from the blades without stop-
ping the engine and removing the spark plug wire for added
safety. Make sure the blades have stopped completely before
attempting to clear the debris.
18. Keep all bolts and fasteners on the machine tight and check
them at regular intervals.
19. Do not leave the machine exposed to the weather. Use the
grass catcher to cover the motor— even when stored indoors.
20. Do not store the machine inside a building with petrol in the
tank where fumes can reach an open flame or spark. Allow the
engine to cool completely before storing inside any enclosure.
Important!
The engine is shipped WITHOUT FUEL or OIL. After
assembly, service engine with petrol and oil as instructed in
the separate engine manual packed with your unit.
Note!
Reference to right or left side of your Reel Mower is viewed
from the operating position.
FLAMMABLE
FUEL
Downloaded from www.Manualslib.com manuals search engine

5
031992 - Masport European Reel Mower Owner’s Manual - July ‘10
ESPAÑOL ITALIANO DEUTSCH FRANÇIS NEDERLANDS ENGLISH
Contents of the shipping container
In the carton you will find…
• One reel mower— assembled.
• One grass catcher.
• Upper and lower handle assembly.
• Owner’s Manual— this publication.
• Engine Owner’s Manual.
• The Masport Express Warranty card.
• 4 Plastic cable ties.
• 6mm Nut and bolt for Roller clutch cable adjuster.
Assembly Instructions
LOWER HANDLE.
To facilitate shipping the handle is not attached to the mower. It has
two parts, an upper and a lower one. Fit the lower handle (the one
without a hand grip) first. It does not matter which way around it is
fitted. Bolt it loosely to the lugs at the rear of the mower using the
four bolts provided. Note that the lower bolts pass through slots to
provide adjustment for the handle height. After fitting the upper
handle, adjust it to the desired height and tighten all four bolts firmly
UPPER HANDLE.
Keeping the upturned handle grip on top, fit the lower ends of the
top handle over the bottom handle and align the holes for the cam
locks.
Remove the nut and washer from the cam lock bolt but leave the
rectangular wear plate in position as you pass the bolt through the
holes from the outside. The flattened part of the bolt fits the slot in
the upper handle. While the cam locks will work with the bolt fitted
either way in the slot, we suggest fitting the bolt so that the cam
lock handle will point to the top of the handle when locked. Fit the
washer and nut on the inside of the bolt and adjust the nut to give
the desired clamping action. Fit the second cam lock in the same
way.
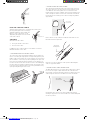
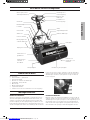
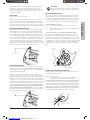
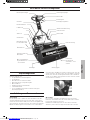
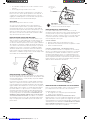
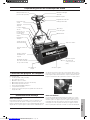
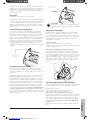
Reel Mower General Arrangement
Choke control
lever
Throttle lever
Fuel cap
Ignition switch
Engine oil filler plug
Catcher handle
Grass catcher
Grass deflector
adjuster bolts
Cutting reel/bottom
blade adjuster—
not visible
Air cleaner
assembly
Pull start cord
Upper handle
Roller clutch cable
adjuster
Roller clutch bail
Lower handle
Lower handle
fastening bolts
Chain cover
Cutting height
adjustment hand-
wheel—
not visible
Cam lock lever
Shaft cover
OPC (Operator Presence
Control) bail
Downloaded from www.Manualslib.com manuals search engine

6
031992 - Masport European Reel Mower Owner’s Manual - July ‘10
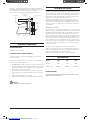
USING THE ‘CAM LOCK’ HANDLE.
Swing the upper handle to the operating position and lock it in
place by pushing the Cam Lock Lever(s)
upwards towards the upper handle. The
firmness of the locking action can be
adjusted by turning the nut on the inside
of the cam lock bolt.
THE CABLES
All models have two cables:
1. The engine throttle control cable.
2. The roller clutch cable.
In addition to these cables models in some markets need to be
fitted with the OPC control cable.
1. THE ENGINE THROTTLE CONTROL CABLE.
The control lever and housing must be fitted to the top handle. The
lever is enclosed by two large plastic housings held together by four
phillips head screws. Remove the screws and place the top housing
(the one with the control lever) in position by fitting its two posts into
the holes in the handle tube. When doing this, ensure that the con-
trol cable runs above the lower handle cross bar to avoid damaging
the cable when the handle is folded for storage. The bottom control
housing can then be fitted under the top housing and held there by
replacing and tightening the four screws.
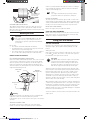
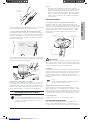
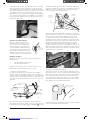
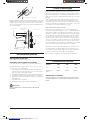
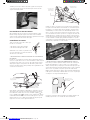
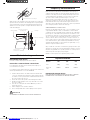
2. FITTING THE ROLLER CLUTCH CABLE.
This cable will be already attached to the mower at the lower end.
The clutch cable is the one that enters the mower under the shaft
cover. With the cable running above the cross bar of the lower
handle, feed the end of the ‘z’ fitting—at the top of the flexible inner
cable—through the small hole in the roller clutch bail, found below
the handle. Turn the ‘z’ fitting so the cable is running alongside the
upper handle.
Clutch ‘z’ fitting is
below the handle
Fit the cable anchor up under the handle tube and attach it to the
tube with the fastener provided.
Clutch adjuster
mounting fastener
It may be necessary to adjust the cable operation after fitting the
cable, see page 9 for details.
3. FITTING THE OPC CABLE, WHERE FITTED.
The OPC (Operator Presence Control) cable is attached to a switch
box close to the engine output shaft. Route the cable above the
lower handle crossbar and feed the end of the ‘z’ fitting on the inner
cable though the small hole in the OPC bail—above the handle.
OPC ‘z’ fitting is
above the handle
Clip the OPC cable anchor to the upper handle from above by
inserting it’s peg into the hole in the handle. Press it down firmly until
it locks into position.
Swing upward to lock
Downloaded from www.Manualslib.com manuals search engine

7
031992 - Masport European Reel Mower Owner’s Manual - July ‘10
ESPAÑOL ITALIANO DEUTSCH FRANÇIS NEDERLANDS ENGLISH
OPC cable anchor clips
into hole on the upper
side of the handle
FINISHING CABLE INSTALLATION.
Try folding the upper handle to ensure the cables are not being
strained. If necessary re-route cables that are unduly stressed..
When the cables are satisfactorily routed secure them in place using
the cable ties provided.
Before you start
Important!
The engine is shipped WITHOUT FUEL or OIL. After
assembly, service the engine with petrol and oil as
instructed in the separate engine manual packed with
your machine.
Be sure that…
• The operator reads and understands this manual,
• The daily maintenance checks have been properly carried out
and the mower is in good working order.
• The operator wears safe clothing and eye protection. Failure to
do so could result in damage and risk to health and safety
IDENTIFICATION OF CONTROLS
OPC (OPERATOR PRESENCE CONTROL) BAIL
Only some models are fitted with this feature. This control is located
on the top of the handle bar. It is used to stop the engine quickly
when the operator releases the OPC bail. To start the engine, you
must move the bail back and hold it against the handle bar. This
allows the engine to be started. When you release the OPC bail the
engine will automatically shut off.
Roller Clutch
Bail
Throttle control
lever
OPC Bail
Some models only
Warning
If the OPC mechanism is not adjusted correctly or is damaged the
engine will continue to run after the OPC bail is released.
In this situation, do not use the mower. Contact your local servicing
specialist.
THROTTLE CONTROL LEVER
The throttle control lever is located in the centre of the upper
handle. It controls the engine speed which governs how fast the
machine is propelled forward. As engine speed rises a centrifugal
clutch automatically engages to drive the cutting reel. At idle the
cutting reel automatically stops.
Note!
The engine speed dictates the speed the mower is
propelled as well as the speed of the cutting reel.
ROLLER CLUTCH BAIL
The roller clutch lever is behind the upper handle cross bar and is
spring loaded to the disengaged position. When engaged the mow-
er moves forward. Move the bail towards the handlebar to engage
the drive to the rear roller. Release the lever to stop the mower.
RECOIL PULL START HANDLE
Refer to the engine owner’s handbook for details.
CLEAR THE AREA TO BE MOWN
Before commencing mowing, ensure the lawn is free from obstruc-
tions, such as stones, etc. Contact with objects of this type may
damage the cutting reel and bottom blade.
Using your reel mower
STARTING THE ENGINE
Ensure the roller clutch bail is in the disengaged position before
starting the engine. Turn the ignition switch (if fitted) to the ‘ON’
position.
Starting Procedure
If the engine has not been running recently move the choke control
to the ‘ON’/ position. The choke is on the side of the engine by
the carburettor, refer engine owner’s manual.
Important!
OPC Models Only. To start the engine on these models,
you must move the bail back and hold it against the
handle bar, then follow the starting procedures below.
This allows the engine to be started. If you release the
OPC bail the engine will automatically shut off again.
Stand to the right of the mower, grasp the starter grip, pull slowly
until a resistance is felt and then pull forcefully to prevent kick-back.
Repeat until the engine starts. Do not pull the cord with a jerk or
release it until fully rewound.—When the engine starts and has
warmed up for a short time, move the choke to the ‘OFF’ position
and throttle control to the desired speed. Should the engine not
start due to ‘flooding’, move the Choke control to ‘OFF’ and pull the
starter six times to clear the flooding.
After allowing the engine a few moments to warm up, mowing may
commence by setting the throttle lever so the engine is running suf-
ficiently fast to engage the automatic clutch. Then engage the roller
clutch by moving the Roller clutch bail forward to the handlebar.
Adjust the throttle to achieve a comfortable walking pace and guide
the machine in the desired direction.
To stop the machine, release the Roller clutch bail. Then reduce the
engine speed.
Downloaded from www.Manualslib.com manuals search engine

8
031992 - Masport European Reel Mower Owner’s Manual - July ‘10
HINTS FOR EASY STARTING.
1. Start a warm engine with the control in the SLOW position.
2. Keep the mower clean and the reel clear of debris.
HARD STARTING CHECK LIST
Look for these faults:-
FUEL.
1. Insufficient fuel in tank.
2. Stale fuel.
3. Water or dirt in fuel.
4. Blocked air vent in fuel tank cap.
IGNITION.
1. Loose spark plug wire.
2. Dirty spark plug electrodes.
3. Incorrect spark plug gap.
4. Incorrect spark plug type.
OTHER.
1. Choked air filter (Dirt or oil).
2. Engine throttle control cable incorrectly adjusted.
3. Lower cutting blade incorrectly adjusted.
4. Faulty OPC system.
MOWING FLAT OPEN AREAS
When mowing flat open areas it is best to first cut a margin approxi-
mately three mower widths at each end where you wish to turn the
mower and then mow at right angles to the margins with parallel
cuts until the area is completed. This leaves your lawn with a very
pleasing appearance. When turning at the end of each cut, disen-
gage the clutch and press down on the handles, turning the mower
on its rear roller. Once the throttle has been set to suit your pace,
there is no need for further adjustment unless you should encounter
very heavy grass growth. The mower can be controlled entirely by
means of the Roller clutch bail.
When making tight turns, release the Roller clutch bail to its open
position and re-engage the clutch when you want to resume cut-
ting.
When mowing around verges, the cutting reel and rear roller should
slightly overhang the edge.
MOWING SLOPING AREAS
Important!
Mowing on slopes requires extra care.
Generally speaking, your mower will mow lawns on which you can
reasonably walk. When mowing a sloping area, mow across the
slope wherever possible, with your machine pointing slightly uphill.
This way you will find it will do a satisfactory job without sliding. If
you find it necessary to mow up and down the slope and the rear
roller shows a tendency to slip on the upward run, then press down
on the handle to increase traction.
PAUSING BETWEEN MOWING
Whenever the mower is left with the engine running e.g. when emp-
tying the catcher close the throttle to allow the engine to idle. Idling
the engine automatically uncouples the drive to the cutting reel, re-
ducing wear. If your mower is fitted with an OPC system, the engine
will stop automatically when you release your grip on the OPC bail.
If the mower is to be left unattended for a longer period, it is advis-
able to stop the engine to prevent possible overheating.
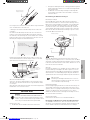
Adjustments for best performance
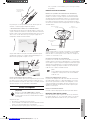
CUTTING HEIGHT ADJUSTMENT
The height of cut ‘C’ can be altered to suit grass and/or ground
conditions by simple rotation of the handwheel situated immediately
forward of the chain cover, see photo page 5.
‘C’ Cut height
• For a shorter cut turn the hand wheel counterclockwise.
• For a longer cut turn the handwheel clockwise.
Never set the cutting height so low that the baseplate touches the
ground. For a healthy attractive lawn we do not recommend cutting
at heights below 7mm. Very long grass is best tackled with the roll-
ers set to give the highest possible cut.
GOLF SERIES
Golf Series low cut height is 3mm.
If it becomes apparent that one side of the machine is cutting at
a lower height than the other, this can be simply adjusted after
slackening the bolt located on the inside of the front right hand roller
bracket (as viewed from the operating position) and tapping that
end of the roller up or down as required. Retighten bolt when the
correct position has been achieved.
GRASS DEFLECTOR ADJUSTMENTS
When cutting grass at various lengths, it may be found that the
cuttings tend to be thrown either too high or low in the catcher. in
which case poor loading will result. To eliminate this the deflector
should be adjusted. This can be done quite simply by slackening
off the two bolts ‘A’ on the front edge of the main frame and mov-
ing the deflector in or out until the desired effect is obtained, then
re-tighten the bolts. If set too far back, grass will be thrown too low
in the catcher, or if too close to the cutting reel, grass will be thrown
over the top of the catcher.
‘A’ Deflector
adjustment bolt.
Downloaded from www.Manualslib.com manuals search engine

9
031992 - Masport European Reel Mower Owner’s Manual - July ‘10
ESPAÑOL ITALIANO DEUTSCH FRANÇIS NEDERLANDS ENGLISH
CUTTING REEL ADJUSTMENTS
To obtain clean cutting, it is necessary to maintain the setting of the
cutting reel relative to the baseplate. When shipped, the setting is
correct, but after a period of use, adjustment will be required.
It will normally be necessary to move the cutting reel closer to the
baseplate to accommodate wear. To do this the adjusting screws
‘B’ on both sides of the machine should be turned clockwise mak-
ing small alterations to each screw alternately until the cutting reel
just makes contact with the baseplate blade. This can be deter-
mined by placing a sheet of copy paper between the reel and the
blade. Rotate the reel by hand, and the paper should be cut. Once
this adjustment has been established THE REEL SHOULD NOT
TOUCH THE BOTTOM BLADE BUT STILL CUT THE PAPER.
Provided the reel and baseplate are in good condition this setting
will give clean cutting without undue reel-to-baseplate pressures.
‘B’ Cutting reel
adjustment bolt.
Important!
Harsh settings increase the load on the mower and accel-
erate the wear of the cutting reel.
TRANSMISSION ADJUSTMENT
Normal stretch and wear makes periodic chain adjustments neces-
sary. When adjusted correctly all chains should be slightly slack in
all directions. To check or adjust chains it is necessary to remove
the chain cover by removing it’s retaining screws and freeing it from
machine. Adjust as follows:
PRIMARY CHAIN
1. Slacken nut which secures nylon adjuster ‘C’.
2. Re-position adjuster to give correct chain adjustment.
3. Re-tighten nut
DRIVE CHAINS—SECONDARY AND FINAL
The final drive chain is not adjustable, and the secondary drive
chain normally requires adjustment only when the cutting unit is re-
ground. If, however, adjustment is required before this it is recom-
mended you contact your nearest Masport Service Agent. If at any
time a chain is removed, take care when replacing the connecting
link that the gap in the spring clip, points away from the direction of
rotation.
Oil
‘C’ Chain tension
adjuster
REAR ROLLER CLUTCH ADJUSTMENTS
After a period of use, adjustment will be required to compensate for
cable stretch etc.
There are two adjusting points.
1. The cable anchor at the top of the handle.
2. The draw bolt through the centre of the clutch.
ADJUSTING THE ROLLER CLUTCH CABLE
Do not adjust the draw bolt unless the upper cable anchor has
reached the end of its travel. To adjust the cable anchor rotate the
thumb wheel anti-clockwise (viewed from behind the handle) to
increase the clutch pressure.
ADJUSTING THE ROLLER CLUTCH DRAW BOLT
If the draw bolt requires adjustment remove the chain and shaft
covers.
To increase the clutch pressure
Adjust the nut ‘A’ on the inner end of the draw bolt until the clutch
operating lever ‘B’ is parallel to the mower side plate when the
clutch drive is just engaging. It should not be necessary to adjust
the ferrule at the lower end of the clutch cable.
Clutch
assembly
‘A’ Draw bolt
adjuster nut
‘B’ Clutch
operating
lever
Clutch
draw bolt
Clutch cable
Downloaded from www.Manualslib.com manuals search engine

10
031992 - Masport European Reel Mower Owner’s Manual - July ‘10
General Maintenance
SERVICING THE ENGINE
See separate engine Owner’s Manual.
INSPECTING AND LUBRICATING THE MOWER
The reel bearings are sealed for life and do not require lubrication.
The following lubrication points should be oiled approximately every
25 hours of operation with SAE30-40 oil.
1. Driving Chains. Keep moistened with oil. This lubrication re-
quires the removal of the chain cover, which can be lifted clear
after unscrewing the two retaining screws.
2. Roller clutch bail pivot points.
3. Front rollers. Apply oil to roller shaft at each end of the rollers.
4. Height Adjustment screw thread. Hand wheel and all pivot
points.
5. Cables. Apply oil to each end.
6. Self Adjusting Chain Adjuster. Apply oil to pivot.
Warning!
NEVER LUBRICATE WHILE MOTOR IS RUNNING.
Cleaning and storage
There is a direct relationship between the mower’s life and the care
and attention given to the mower both during and after operation.
It is important that the mower is thoroughly cleaned down after use
and inspected so that it will be in good working order the next time
it is required.
Thoroughly clean the engine, under the chassis, the rollers and the
grass catcher. Use of a high pressure water jet, especially around
the engine, may force water into places where it may drive out lubri-
cants or cause hard starting from ignition damage.
LONG TERM STORAGE:
After each mowing season or if the mower is not going to be used
for 30 days or more, it is recommended that the fuel shut off valve
be closed off (where fitted) and the fuel tank be drained as mod-
ern fuels have a short shelf life. The mower should then be started
up and run until all of the fuel left in the system is used. While the
engine is warm, drain the engine oil and refill with the correct grade
to the required level. Remove the spark plug and pour 5ml of engine
oil into the engine cylinder, crank slowly to distribute the oil and
replace the spark plug. Store the mower in a clean dry area away
from direct sunlight.
Adjust the cutting reel away from the bottom blade and apply a thin
layer of grease to the cutting edges to prevent corrosion through
the storage period. If possible, spray the mower with a thin film of
light oil to protect it.
Always store the mower on a flat, level surface.
Specifications
Model 400 500 660
Weight 69kg 73kg 79kg
Cut Width 400mm 500mm 660mm
ENGINE INFORMATION
FOR DETAILED SPECIFICATIONS REFER SEPARATE
ENGINE OWNER’S MANUAL.
Downloaded from www.Manualslib.com manuals search engine

11
031992 - Masport European Reel Mower Owner’s Manual - July ‘10
ESPAÑOL ITALIANO DEUTSCH FRANÇIS NEDERLANDS ENGLISH
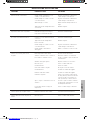
Troubleshooting
Fault Possible Cause Remedy
Some uncut or poorly cut strands of
grass.
Cutting reel is partially out of contact
with the bottom blade.
Cutting reel is in heavy contact with
bottom blade.
Height of cut is too high.
Cutting edges of cutting reel/bottom
blade are rounded.
Re-adjust cutting reel to bottom blade.
Re-adjust cutting reel to bottom blade.
Lower height of cut setting.
Regrind cutting edges.
Scalping. Undulations too severe for height of cut
setting.
Raise height of cut.
Excessive bottom blade wear. Bottom blade in heavy ground contact.
Cutting edges of cutting reel/bottom
blade are rounded.
Cutting reel is in heavy contact with the
bottom blade.
Damaged cutting reel or bottom blade.
Raise height of cut.
Regrind cutting edges.
Re-adjust cutting reel to bottom blade.
Regrind or replace as necessary.
Engine does not start, runs erratically. Choke incorrectly set.
Fuel tank empty or fuel shut off valve
closed.
Faulty recoil starter.
Air cleaner element is dirty.
Spark plug loose.
Spark plug cable disconnected.
Defective spark plug.
Spark plug gap incorrect.
Carburettor is flooded with fuel.
Dirt water or stale fuel in the tank.
Vent hole in the filler cap is blocked.
Move choke lever.
Fill tank with recommended fuel grade
and open fuel shut-off valve.
Return unit to dealer.
Service or replace air cleaner.
Tighten spark plug.
Refit cable to spark plug.
Replace damaged spark plug.
Replace damaged spark plug
Move throttle to ‘Stop’, position pull the
starter cord 5-6 times, move throttle to
‘Run’ and start engine.
Drain and clean fuel tank. Refill with
clean fresh fuel before starting.
Clean or replace fuel cap.
Engine misfires at high speed. Spark plug gap too small. Refer to Engine Manual.
Engine idles poorly. Air cleaner element is dirty. Service or replace air filter.
Downloaded from www.Manualslib.com manuals search engine

12
031992 - Masport European Reel Mower Owner’s Manual - July ‘10
Troubleshooting (continued)
Fault Possible Cause Remedy
Engine overheats. Blocked engine cooling fins and air
passages.
Cooling air flow restricted.
Incorrect spark plug fitted.
Low engine oil level.
Remove debris from around engine.
Remove debris from around engine.
Refer to Engine Manual.
Check oil level and top up if needed.
Engine vibrates and/or is noisy Worn or damaged bearing(s).
Worn or damaged drive chains and/or
sprockets.
Remove and inspect suspect bearings,
replace if necessary.
Remove and inspect suspect chains
and sprocket, replace if necessary.
Oil Leaks from muffler or air cleaner. Engine oil sump over filled.
Mower tipped or handled incorrectly.
Check oil level and drain excess oil.
Check oil level, air cleaner and spark
plug and correct as necessary.
Should faults persist, consult your Authorised Masport Service Agent.
Downloaded from www.Manualslib.com manuals search engine

13
031992 - Masport European Reel Mower Owner’s Manual - July ‘10
ESPAÑOL ITALIANO DEUTSCH FRANÇIS NEDERLANDS ENGLISH
Stel de machine pas in werking nadat deze op
de juiste wijze is gemonteerd en u deze han-
dleiding volledig hebt gelezen en begrepen.
Deze handleiding is bedoeld als algemene
richtlijn en komt op geen enkele wijze in de
plaats van landelijke of plaatselijke regelgev-
ing. Neem bij evt. onduidelijkheid omtrent de
wetgeving met betrekking tot de bediening van
dit apparaat contact op met de plaatselijke
autoriteiten.
Inhoudsopgave
Verklaring van de symbolen in de handleiding 13
Symbolen op de machine 13
Correct gebruik 14
Veiligheidsvoorschriften 14
Onderdelen van de kooimaaier 15
Inhoud van de doos 15
Montageinstructies 15
Voorafgaand aan het starten 17
Gebruik van de kooimaaier 17
Instellingen voor de beste prestatie 18
Algemeen onderhoud 20
Reiniging en opslag 20
Specificaties 20
Storingstabel 21
Verklaring van de symbolen in de
handleiding
Een situatie die gevaarlijk is of gevaar kan opleveren.
Het negeren van deze aanwijzing kan letsel of schade
veroorzaken.
Belangrijke informatie over de juiste omgang met
de maaier. Het negeren van deze aanwijzing kan
defecten van de machine veroorzaken.
Informatie voor de gebruiker. Deze informatie is een
hulpmiddel bij het correcte gebruik van alle functies.
Symbols used on the Machine
Lees deze handleiding aandachtig door voordat u
met de machine aan het werk gaat.
Zorg dat omstanders op afstand blijven. Gevaar
voor rondvliegende voorwerpen.
Draag altijd gehoor- en oogbescherming bij het
gebruik van de maaier.
Waarschuwing! Houd handen en voeten uit de
buurt van het roterende mes.
OPC-beugel. Alleen op bepaalde modellen, zie pag.
17.
Boven. Koppeling kooirol Aan of Uit.
Bewaar deze instructies op een veilige plaats om ze in de
toekomst te kunnen raadplegen.
KEEP HANDS
AND FEET
CLEAR
ON
EIN
OFF
AUS
POWER DRIVE
FAHRANTRIEB
ON
EIN
OFF
AUS
Downloaded from www.Manualslib.com manuals search engine

14
031992 - Masport European Reel Mower Owner’s Manual - July ‘10
Correct gebruik
Vanwege veiligheidsredenen mag de kooimaaier niet worden ge-
bruikt door kinderen, jongeren of anderen die niet bekend zijn met
deze aanwijzingen voor het gebruik.
Specifieke veiligheidsinformatie. Lees deze veilighe-
idsinformatie en de aanwijzingen voor het gebruik
aandachtig door en houd u er exact aan.
Waarschuwing
De machine is zo ontworpen dat deze veilig kan worden gebruikt.
Toch is het van belang de aanwijzingen voor veilig werken zorgvul-
dig op te volgen om persoonlijk letsel en schade te voorkomen.
Veiligheidsvoorschriften
DE WERKING VAN DE KOOIMAAIER BEGRIJPEN
Lees de handleiding aandachtig door en zorg dat u weet wat de
labels op de kooimaaier betekenen. Zorg ook dat u weet wat de
toepassingsmogelijkheden en de beperkingen van de maaier zijn,
evenals de specifieke potentiële gevaren.
DRUGS, ALCOHOL EN MEDICIJNEN
Werk niet met de kooimaaier als u onder invloed bent van drugs,
alcohol of medicijnen die van invloed kunnen zijn op uw vermogen
om de machine op de juiste manier te bedienen.
1. Uw kooimaaier is een aangedreven apparaat en geen speel-
goed, en moet te allen tijde uiterst voorzichtig worden bediend.
2. Laat de kooimaaier nooit bedienen door kinderen. Alleen per-
sonen die bekend zijn met de regels voor een veilige bediening
in deze handleiding mogen de machine bedienen.
3. Lees de complete handleiding door, zodat u
volledig bekend bent met de functie van alle
accessoires en bedieningsfuncties.
4. Houd omstanders, kinderen en huisdieren uit
het werkgebied, omdat er gevaar voor rondv-
liegende voorwerpen bestaat.
5. Ga tijdens het starten van de motor of als de
maaier in bedrijf is, niet aan de voorzijde van de
maaier staan.
6. Draag gehoor- en oogbescherming.
7. Gebruik de machine nooit wanneer u blootsvoets
bent of open sandalen draagt. Draag altijd stevig
schoeisel.
8. Draag geen loszittende kledingstukken, want deze kunnen
worden gegrepen door de bewegende delen van de machine.
9. Blijf met uw handen en voeten uit de buurt van de messen als
de maaier aan staat.
10. Probeer de messen niet in te stellen als de motor loopt.
11. Laat de maaier niet onbewaakt als de motor
draait.
12. Controleer de brandstof alvorens de motor te
starten. Vul de tank niet binnenshuis en voeg
geen brandstof toe terwijl de motor loopt
of als deze heet is. Draai de tankdop stevig vast en verwijder
eventuele gemorste brandstof voordat u de motor start
Waarschuwing
Benzine is uiterst ontvlambaar; door gemorste brandstof kan brand
of een ontploffing ontstaan.
13. Laat de motor niet binnenshuis draaien. Er kunnen dodelijke
uitlaatgassen worden geproduceerd.
14. Raak de uitlaat van de motor niet aan als de maaier in werking
is of daarna. Deze is zeer heet en kan ernstige brandwonden
veroorzaken.
15. Verander de instelling van de snelheidsregeling van de motor
niet. Door de motor te hoge toerentallen te laten draaien kan
de maaier beschadigd raken, wat gevaar voor de bediener kan
opleveren.
16. Verwijder alvorens onderhoudswerkzaamheden aan de maaier
te verrichten de bougiedraad en aard deze voor extra veiligheid
aan het motorblok.
17. Vuil mag uitsluitend van de messen worden verwijderd als de
motor is uitgeschakeld en de bougiedraad is verwijderd voor
extra veiligheid. Zorg dat de messen volledig tot stilstand zijn
gekomen alvorens het vuil te verwijderen.
18. Zorg dat alle bouten en bevestigingen van de maaier goed
vastzitten en controleer dit regelmatig.
19. Zorg dat de maaier niet wordt blootgesteld aan weersinv-
loeden. Gebruik de grasopvangbak om de motor af te dekken
- zelfs bij opslag binnenshuis.
20. Berg de maaier nooit op terwijl zich nog brandstof in de tank
bevindt in een gebouw waar de gasdampen een open vuur of
vonk kunnen bereiken. Laat de motor volledig afkoelen alvorens
deze in een afgesloten ruimte op te slaan.
Belangrijk!
De motor wordt ZONDER BRANDSTOF of OLIE verzon-
den. Na de montage moet de motor met benzine en olie
worden gevuld volgens de aanwijzingen in het motorboekje
bij uw maaier.
Let op!
Verwijzingen naar links en rechts worden gezien vanuit de
bedieningspositie.
FLAMMABLE
FUEL
Downloaded from www.Manualslib.com manuals search engine

15
031992 - Masport European Reel Mower Owner’s Manual - July ‘10
ESPAÑOL ITALIANO DEUTSCH FRANÇIS NEDERLANDS ENGLISH
Inhoud van de doos
De doos bevat:
• Eén kooimaaier — gemonteerd
• Eén grasopvangbak
• Bovenste en onderste deel duwbeugel
• Handleiding - deze publicatie
• Motorboekje
• Masport garantiebewijs
• 4 plastic kabelbinders
• 6 mm moer en bout t.b.v. instelkabel voor kooirol-koppeling
Montageinstructies
ONDERSTE DUWBEUGEL.
Vanuit het oogpunt van verzendgemak is de duwbeugel niet aan
de maaier bevestigd. De duwbeugel bestaat uit twee delen, het
onderste en het bovenste deel. Bevestig eerst het onderste deel
(zonder handgreep). De bevestigingsrichting is bij dit deel niet van
belang. Bevestig dit onderdeel m.b.v. de bijgeleverde bouten losjes
aan de achterzijde van de maaier. Let er daarbij op dat de onderste
bouten door de sleuven steken, zodat de hoogte van de duwbeu-
gel kan worden ingesteld. Bevestig daarna het bovenste deel van
de duwbeugel, stel deze in op de gewenste hoogte en draai alle
bouten stevig vast.
BOVENSTE DUWBEUGEL.
Bevestig, terwijl u de omgekeerde handgreep bovenaan houdt, de
onderste uiteinden van het bovenste deel op het onderste deel van
de duwbeugel en breng de openingen voor de vergrendeling op één
lijn. Verwijder de moer en de sluitring van de vergrendelingsbout,
maar laat de rechthoekige slijtplaat op zijn plaats terwijl u de bout
van buitenaf door de openingen schuift. Het afgeplatte deel van
Reel Mower General Arrangement
Chokehendel
Gashendel
Brandstofdop
Contactschakelaar
Vulplug voor motorolie
Handvat van grasopvangbak
Grasopvangbak
Instelbouten voor
grasdeflector
Instelling kooirol/
ondermes - n
iet zichtbaar
Luchtfilter
Startkoord
Bovenste deel
duwbeugel
Instelkabel voor
kooirol-koppeling
Instelbeugel voor
kooirol-koppeling
Onderste duwbeugel
Bevestigingsbouten
onderste duwbeugel
Kettingkast
Instelwiel voor
maaihoogte - niet
zichtbaar
Vergrendelingshendel
Askap
OPC-beugel (controle
aanwezigheid bediener)
Downloaded from www.Manualslib.com manuals search engine

16
031992 - Masport European Reel Mower Owner’s Manual - July ‘10
de bout past in de sleuf van het bovenste deel van de duwbeugel.
De vergrendeling functioneert met beide bevestigingswijzen van de
bout in de sleuf, maar wij raden aan de bout zodanig te bevesti-
gen dat de vergrendelingshendel in vergrendelde toestand naar de
bovenzijde van de duwbeugel is gericht. Bevestig de sluitring en de
moer aan de binnenzijde van de bout en draai de bout zodanig vast
dat deze goed klemt. Bevestig de tweede vergrendelingshendel op
dezelfde wijze.
HET GEBRUIK VAN DE VERGRENDELINGSHENDEL.
Draai het bovenste deel van de duwbeugel
naar de bedieningspositie en vergrendel dit
door de vergrendelingshendel(s) omhoog te
duwen, in de richting van het bovenste deel
van de duwbeugel. De stevigheid van de
vergrendelingsactie kan worden ingesteld
door de moer op de binnenzijde van de
vergrendelingsbout te draaien.
DE KABELS BEVESTIGEN.
Alle modellen zijn voorzien van twee kabels, die moeten worden
bevestigd.
1. De gaskabel
2. De instelkabel voor de kooirol-koppeling
Afgezien van deze kabels moeten sommige modellen in bepaalde
markten worden voorzien van de OPC-bedieningskabel.
1. DE GASKABEL MONTEREN
De kabel wordt bevestigd aan de bovenkant van de duwbeugel of
aan de onderzijde van de motor. Bij bevestiging aan de duwbeugel
moet de kabel worden gemonteerd en ingesteld op de motor. Voer
de binnenkabel ‘Z’ door de kleine opening in de carburateurhen-
del en klem de buitenmantel van de kabel lichtjes vast onder de
zadelklem, zoals hieronder aangegeven.
Gaskabel op Briggs and
Stratton motor met ‘Z’
bevestiging.
Controleer voordat u de zadelklem volledig vastzet, de actie van
de gashendel door deze naar voren en naar achteren te bewegen.
Draai de zadelklem stevig vast als u tevreden bent over de posi-
ties ‘FAST’ (snel) / en ‘SLOW’ (langzaam)/ . Bij Honda motoren
moet de basisprocedure worden gevolgd, maar het luchtfilter moet
worden verwijderd zodat de ‘Z’ bevestiging toegankelijk is, zie de
onderstaande illustratie.
Zadelklem voor
gaskabel op Honda
motor
Gaskabel op
Honda motor met
‘Z’ bevestiging.
Als de gaskabel al op de motor is gemonteerd, moeten de bedien-
ingshendel en de behuizing op het bovenste deel van de duwbeugel
worden bevestigd. De hendel wordt omsloten door twee kunststof
behuizingsdelen, die worden samengeklemd d.m.v. vier kruiskop-
schroeven. Verwijder de schroeven en plaats het bovenste behuiz-
ingsdeel (het deel met de bedieningshendel) door de twee pootjes
in de openingen van de duwbeugelbuis te schuiven. Let er daarbij
op dat de bedieningskabel over de dwarsstang van de onderste du-
wbeugel loopt, om te voorkomen dat de kabel beschadigd raakt bij
inklappen of tijdens opslag. Het onderste behuizingsdeel kan onder
het bovenste behuizingsdeel worden bevestigd en wordt vastgezet
door de vier schroeven los te draaien en weer vast te zetten.
2. DE INSTELKABEL VOOR DE KOOIROL-KOPPELING
MONTEREN.
Het onderste uiteinde van de kabel is al aan de maaier bevestigd.
De koppelingskabel is de kabel die de maaier binnenkomt onder
de askap. Let erop dat de bedieningskabel over de dwarsstang
van de onderste duwbeugel loopt en voer het uiteinde van de ‘Z’
bevestiging (bovenaan de flexibele binnenkabel) door het gaatje in
de instelbeugel voor de kooirol-koppeling, dat zich vlak onder de
hendel bevindt. Draai de ‘Z’ bevestiging zo, dat de kabel langs de
bovenste duwbeugel loopt.
De ‘Z’ bevestiging van de
koppeling bevindt zich
onder de duwbeugel
Monteer de kabelklem onder de duwbeugelbuis en bevestig deze
met de bijbehorende bevestigingsvoorziening aan de buis.
Swing upward to lock
Naar boven
draaien om te
vergrendelen.
Zadelklem voor
gaskabel op Briggs
and Stratton motor
Downloaded from www.Manualslib.com manuals search engine

17
031992 - Masport European Reel Mower Owner’s Manual - July ‘10
ESPAÑOL ITALIANO DEUTSCH FRANÇIS NEDERLANDS ENGLISH
Bevestiging
koppelingsinstelling
Het kan nodig zijn om de kabelbediening in te stellen nadat de kabel
is bevestigd. Raadpleeg pag. 19 voor bijzonderheden.
3. DE OPC-KABEL MONTEREN - INDIEN VAN TOEPASSING
De OPC-kabel wordt bevestigd aan een schakelkastje dichtbij de
uitgaande as van de motor. Leid de kabel over de dwarsstang van
de onderste duwbeugel en voer het uiteinde van de ‘Z’ bevestig-
ing op de binnenkabel door het gaatje in de OPC-beugel, dat zich
boven de beugel bevindt.
‘Z’ bevestiging
OPC-beugel boven de
duwbeugel
Klem de OPC-kabelklem van bovenaf op de bovenste duwbeugel
door het pootje in de opening in de beugel te steken. Duw de klem
stevig op zijn plaats totdat deze vastklikt.
OPC-kabelklem klikt in
opening in bovenzijde van
de duwbeugel.
DE MONTAGE VAN DE KABELS AFRONDEN.
Probeer de bovenste duwbeugel in te klappen en controleer of de
kabels daarbij niet bekneld raken. Als dat het geval is moeten de
kabels waarop teveel spanning staat opnieuw worden geleid. Als
de kabels naar tevredenheid zijn gemonteerd moeten deze op hun
plaats worden gehouden m.b.v. de bijgeleverde kabelbinders.
Voorafgaand aan het starten
Belangrijk!
De motor wordt ZONDER BRANDSTOF of OLIE verzon-
den. Na de montage moet de motor worden gevuld met
benzine en olie volgens de aanwijzingen in het motor-
boekje bij uw maaier.
Zorg dat…
• De bediener deze handleiding heeft gelezen en begrepen
• De dagelijkse onderhoudscontroles op de juiste wijze zijn uitge-
voerd en de maaier in goed functionerende staat verkeert.
• De kleding van de bediener geen gevaar oplevert en dat hij/zij
gehoor- en oogbescherming draagt. Als dat wordt nagelaten
kan dit schade veroorzaken en de gezondheid en veiligheid in
gevaar brengen
BEDIENINGSELEMENTEN
OPC-BEUGEL (CONTROLE AANWEZIGHEID BEDIENER)
Bepaalde modellen zijn voorzien van deze functie. Deze hendel
bevindt zich aan de bovenzijde van de duwbeugel. Met deze beugel
wordt de motor snel uitgeschakeld als de bediener de OPC-beugel
loslaat. Om de motor te starten moet de beugel in de richting van
de duwbeugel worden bewogen. Hierdoor kan de motor worden
gestart. Wanneer u de OPC-beugel loslaat, schakelt de motor
automatisch uit.
Instelbeugel voor
kooirol-koppeling
Gashendel
OPC-beugel
Alleen op bepaalde modellen
Waarschuwing
Als het OPC-mechanisme niet goed is ingesteld of als dit beschad-
igd is, schakelt de motor niet uit als de OPC-beugel wordt losgelat-
en. Als dat het geval is, mag de maaier niet worden gebruikt. Neem
contact op met uw plaatselijke onderhoudsspecialist.
GASHENDEL
De gashendel bevindt zich in het midden van de bovenste duwbeu-
gel. Deze hendel regelt de motorsnelheid, en daarmee de snelheid
waarmee de maaier wordt voortbewogen. Als de motorsnelheid
wordt verhoogd, schakelt de centrifugale koppeling in, die de
kooirol in beweging zet. Op een stationair toerental stopt de kooirol
automatisch.
Let op!
De motorsnelheid bepaalt de aandrijfsnelheid van de
maaier en de snelheid van de kooirol.
INSTELBEUGEL VOOR KOOIROL-KOPPELING
De instelbeugel voor de kooirol-koppeling bevindt zich achter de
dwarsstang van de bovenste duwbeugel en is veerbelast in ontkop-
pelde toestand. Als de hendel wordt ontkoppeld, zet de maaier zich
in beweging. Trek de beugel naar de duwbeugel om de achterrol in
beweging te zetten. Laat de hendel los om de maaier stil te zetten.
REPETEERSTARTER
Raadpleeg het motorboekje voor uitgebreide gegevens.
HET TE MAAIEN GEBIED REINIGEN
Controleer voordat u gaat maaien of zich geen obstakels, bijv.
stenen, in het maaigebied bevinden. Door contact met dit soort
voorwerpen kunnen de kooirol en het ondermes beschadigd raken.
Downloaded from www.Manualslib.com manuals search engine

18
031992 - Masport European Reel Mower Owner’s Manual - July ‘10
Gebruik van de kooimaaier
DE MOTOR STARTEN
Controleer voordat u de motor start of de instelbeugel
voor kooirol-koppeling is ontkoppeld. Draai de con-
tactschakelaar (indien gemonteerd) naar ‘ON’ (aan).
Startprocedure
Als de motor onlangs niet heeft gelopen, zet de choke dan naar
‘ON’ (aan). De choke bevindt zich aan de zijkant van de motor, vlak
bij de carburateur. Raadpleeg het motorboekje.
Belangrijk!
Alleen modellen met OPC. Om bij deze modellen de motor te
starten moet de beugel naar achteren worden bewogen en tegen
de duwbeugel worden gehouden. Volg daarna de onderstaande
startprocedures. Hierdoor kan de motor worden gestart. Als u de
OPC-beugel loslaat, schakelt de motor weer automatisch uit.
Ga aan de rechterkant van de maaier staan, pak de startgreep vast
en trek deze langzaam aan totdat u weerstand voelt, en trek dan
krachtig aan om terugslag te voorkomen. Herhaal dit totdat de mo-
tor start. Trek het koord niet met een ruk aan en laat het niet los tot-
dat het volledig is opgerold. Nadat de motor is gestart en enige tijd
is opgewarmd de choke op ‘OFF’ (uit) zetten en de gashendel naar
de gewenste stand zetten. Als de motor niet start doordat deze is
‘verzopen’, de chokehendel op ‘OFF’ (uit) zetten en zes keer aan
het startkoord trekken om de overtollige brandstof te verwijderen.
Nadat de motor even is opgewarmd kan worden begonnen met
maaien door de gashendel zo in te stellen dat de motorsnelheid vol-
doende is om de automatische koppeling in te schakelen. Schakel
daarna de kooirol-koppeling in door de betreffende hendel naar
voren, in de richting van de duwbeugel, te bewegen. Kies een gas-
stand die past bij een prettige loopsnelheid en stuur de maaier in de
gewenste richting.
Om de maaier te stoppen de instelbeugel voor de kooirol-koppeling
loslaten. Verminder daarna de motorsnelheid.
TIPS VOOR GEMAKKELIJK STARTEN.
1. Start een warme motor in de stand SLOW (langzaam).
2. Houd de maaier schoon en houd de kooirol vrij van vuil.
CONTROLELIJST VOOR STARTPROBLEMEN.
Controleer de volgende punten:-
BRANDSTOF.
1. Er zit onvoldoende brandstof in de tank.
2. De brandstof is verschaald.
3. Er zit water of vuil in de brandstof.
4. De luchtopening in de tankdop is verstopt.
ONTSTEKING.
1. De bougiekabel zit los.
2. De bougie-elektroden zijn vuil.
3. De afstand tussen de bougie-elektroden is niet correct.
4. Het bougietype is onjuist.
OVERIGE.
1. Het luchtfilter is verstopt (vuil of olie).
2. De gaskabel is onjuist afgesteld.
3. Het onderste mes is onjuist afgesteld.
4. Defect OPC-systeem.
HET MAAIEN VAN VLAKKE EN OPEN GEBIEDEN
Bij het maaien van vlakke en open gebieden is het verstandig
om eerst een strook van ca. drie maaibreedtes te maaien aan elk
uiteinde waar u de maaier wilt keren, en om daarna loodrecht op de
stroken met evenwijdige banen te maaien, totdat het hele gebied
is gemaaid. Dit geeft uw gazon een bijzonder fraai aanzien. Bij
het keren aan het eind van elke baan de koppeling loslaten en de
hendels indrukken en de maaier op de achterste rollen keren. Als
de gashendel eenmaal is ingesteld op uw loopsnelheid, is het niet
nodig deze nogmaals in te stellen, tenzij er sprake is van gebieden
waarvoor meer inzet van de maaier nodig is. De maaier kan volledig
worden bediend door middel van de instelbeugel voor de kooirol-
koppeling.
Bij scherpe bochten de instelbeugel voor de kooirol-koppeling los-
laten naar de ‘open’ stand en de koppeling weer instellen als u wilt
doorgaan met maaien.
Bij het maaien langs randen dienen de kooirol en de achterste rol
enigszins over de rand te hangen.
HELLENDE OPPERVLAKKEN MAAIEN
Belangrijk!
Bij het maaien van hellende oppervlakken moet extra
voorzichtig te werk worden gegaan.
In het algemeen geldt dat uw maaier gazons maait waarop op re-
delijkerwijs kan worden gelopen. Bij het maaien van een hellend op-
pervlak moet waar mogelijk dwars op de helling worden gemaaid,
waarbij de maaier enigszins omhoog wordt bijgestuurd. Op deze
manier wordt een bevredigend resultaat bereikt en loopt u minder
kans om weg te glijden. Als het naar uw mening nodig is om het
hellende oppervlak omhoog en omlaag te maaien en de achterste
rol de neiging tot slippen vertoont bij het omhoog lopen, duw dan
de hendel omlaag voor meer trekkracht.
PAUZEREN TIJDENS HET MAAIEN
Als de maaier stilstaat terwijl de motor loopt, zoals bij het legen
van de grasopvangbak, laat dan de gashandel los zodat de motor
stationair loopt. Als de motor stationair loopt, wordt de aandrijv-
ing van de kooirol automatisch stopgezet, om nodeloze slijtage te
voorkomen. Als uw maaier is uitgerust met een OPC-systeem, stopt
de motor automatisch als de OPC-beugel wordt losgelaten.
Als u de maaier gedurende langere tijd onbewaakt laat staan, is
het verstandig de motor af te zetten om mogelijke oververhitting te
voorkomen.
Instellingen voor de beste prestatie
DE MAAIHOOGTE INSTELLEN
De maaihoogte ‘C’ kan worden ingesteld op de gras- en/of bod-
emomstandigheden door eenvoudig het handwiel te draaien dat
zich vlak voor de kettingkast bevindt, zie foto op pag. 15.
Maaihoogte ‘C’
• Door het wiel naar links te draaien, vermindert u de maaihoogte.
• Door het wiel naar rechts te draaien, vergroot u de maaihoogte.
Downloaded from www.Manualslib.com manuals search engine

19
031992 - Masport European Reel Mower Owner’s Manual - July ‘10
ESPAÑOL ITALIANO DEUTSCH FRANÇIS NEDERLANDS ENGLISH
Stel de maaihoogte nooit zo laag in dat de onderplaat de grond
raakt. Voor een gezond en aantrekkelijk gazon raden wij een
maaihoogte van minimaal 7 mm aan. Zeer lang gras kan het best
worden gemaaid terwijl de rollers zijn ingesteld op een zo hoog
mogelijke maaihoogte.
GOLF-SERIE
Golf-serie lage maaihoogte is 3mm.
Als blijkt dat de maaihoogte aan een kant van de maaier lager is dan
aan de andere kant, kan dit eenvoudig worden bijgesteld door de
bout aan de binnenkant van de rollerbevestiging rechtsvoor (gezien
vanuit de positie van de bediener) naar wens omhoog of omlaag bij
te stellen. Draai de bout weer vast als de gewenste positie is bereikt
INSTELLINGEN GRASDEFLECTOR
Bij het maaien op diverse maaihoogtes kan het voorkomen dat het
gemaaide gras te hoog of te laag in de opvangbak wordt gewor-
pen, waardoor een slechte belading van de bak ontstaat. Om dit
te voorkomen dient de deflector te worden gemonteerd. Dit kan
vrij eenvoudig worden uitgevoerd door de twee bouten ‘A’ aan de
voorste rand van het hoofdframe los te draaien en de deflector naar
binnen of naar buiten te bewegen totdat het gewenste resultaat is
bereikt. Draai daarna de bouten weer vast. Als de deflector te ver
naar achteren wordt ingesteld, wordt het gras te laag in de opvang-
bak geworpen, en als de deflector te dicht bij de kooirol staat, wordt
het gras over de bovenkant van de opvangbak geworpen.
‘A’ instelbout deflector.
INSTELLINGEN KOOIROL
Voor een goed maairesultaat moet de instelling van de kooirol ten
opzichte van de onderplaat worden gehandhaafd. Bij verzending is
de instelling correct, maar nadat de maaier een tijd is gebruikt, moet
de instelling worden bijgesteld.
Normaal is het nodig de kooirol dichter naar de onderplaat in te
stellen om slijtage te voorkomen. Daartoe moeten de stelschroeven
‘B’ aan beide zijden van de maaier naar rechts worden gedraaid,
waarbij de schroeven afwisselend enigszins worden bijgesteld tot-
dat de kooirol net contact maakt met het ondermes. Dit kan worden
bepaald door een vel papier tussen de kooirol en het mes te houd-
en. Draai de kooirol met de hand, daarbij dient het papier te worden
gesneden. Nadat de instelling is bereikt, MOET DEZE ENIGSZINS
WORDEN TERUGGESTELD ZODAT HET PAPIER ALLEEN MAAR
WORDT GEVOUWEN, NIET GESNEDEN. Mits kooirol en onderplaat
in goede toestand zijn geeft deze instelling een goed maairesultaat
zonder onnodige druk van de kooirol op de plaat.
‘B’ instelbout kooirol
Belangrijk!
Krappe instellingen geven een zwaardere belasting van
de maaier en veroorzaken een versnelde slijtage van de
kooirol.
DE TRANSMISSIE INSTELLEN
Bij normale spanning en slijtage moet de ketting af en toe worden
bijgesteld. Bij een correcte instelling heeft de ketting in alle richtin-
gen enigszins speling. Om de kettingen te controleren of bij te stel-
len moet de kettingkast worden gedemonteerd door de bevestig-
ingsschroeven te verwijderen. De instelling vindt als volgt plaats:
PRIMAIRE AANDRIJFKETTING
1. Draai de bevestigingsmoer van de nylon stelschroef ‘C’
los.
2. Bepaal m.b.v. de stelschroef de correcte kettingspanning.
3. Zet de moer weer vast.
AANDRIJFKETTINGEN - SECUNDAIR EN ASAANDRIJVING
De ketting voor de asaandrijving kan niet worden ingesteld, en
de secundaire aandrijfketting hoeft gewoonlijk alleen te worden
ingesteld als de maaieenheid opnieuw wordt geslepen. Als voor die
tijd echter instelling nodig is, is het raadzaam contact op te nemen
met uw Masport onderhoudsagent. Als op enig moment een ketting
is verwijderd, let er dan bij het terugplaatsen van de verbindingss-
chakel op dat de opening in de veerklem van de draairichting af
wijst.
Olie
‘C’ instelling
kettingspanning
INSTELLINGEN KOPPELING ACHTERROL
Nadat de maaier een bepaalde periode is gebruikt, moet de ket-
tingspanning worden bijgesteld.
Er zijn twee instelpunten.
1. De kabelklem aan de bovenzijde van de duwbeugel.
2. De trekbout door het midden van de koppeling.
DE INSTELKABEL VOOR DE KOOIROL-KOPPELING INSTELLEN
Stel de trekbout alleen in als de bovenste kabelklem het eind van
zijn slag heeft bereikt. Om de kabelklem in te stellen het instelwiel
naar links draaien (gezien vanuit de positie van de bediener) om de
koppelingsdruk te verhogen. DE TREKBOUT VOOR DE KOOIROL-
KOPPELING INSTELLEN Als de trekbout moet worden ingesteld,
moeten de kappen van ketting en as worden verwijderd.
De koppelingsdruk verhogen
Downloaded from www.Manualslib.com manuals search engine

20
031992 - Masport European Reel Mower Owner’s Manual - July ‘10
Draai moer ‘A’ op het binneneinde van de trekbout totdat de kop-
peling die hendel ‘B’ bedient parallel is aan de zijplaat van de maaier
als de koppeling net inschakelt. Het dient niet nodig te
zijn om de punt onderaan de koppelingskabel in te stellen.
Koppelingconstructie
‘A’ instelmoer
trekbout
‘B’ bedieningshendel
koppeling
Trekbout
koppeling
Koppelingskabel
Algemeen onderhoud
MOTORONDERHOUD
Raadpleeg het motorboekje.
DE MAAIER INSPECTEREN EN SMEREN.
De lagers van de kooirol zijn niet toegankelijk en hoeven niet te
worden gesmeerd.
De volgende smeerpunten moeten steeds na ca. 25 bedrijfsuren
worden gesmeerd met SAE-40 olie.
1. Aandrijfkettingen. Ingevet houden met olie. Voor deze smering
moet de kettingkast worden gedemonteerd. Deze kan worden
verwijderd door de twee bevestigingsschroeven uit te draaien.
2. Instelbeugel voor kooirol-koppeling.
3. Voorste rollen. Olie aanbrengen op elk uiteinde van de rolas.
4. Schroefdraad hoogteinstelling. Handwiel en alle scharnierpun-
ten.
5. Kabels. Olie aanbrengen op elk uiteinde.
6. Zelfinstellende kettingspanner. Olie aanbrengen op draaipunt.
Warning!
NOOIT SMEREN ALS DE MOTOR LOOPT.
Reiniging en opslag
Er bestaat een rechtstreeks verband tussen de levensduur van de
maaier en de zorg en aandacht die zowel tijdens als na het gebruik
aan de maaier wordt besteed. Het is van belang dat de maaier na
afloop van het maaien grondig wordt gereinigd en geïnspecteerd,
zodat deze de volgende keer goed functioneert.
Reinig de motor grondig, en reinig onder het chassis, de rollers
en de grasopvangbak. Gebruik geen hogedrukspuit, want vooral
rondom de motor kunnen daardoor smeermiddelen worden weg-
gespoten of kunnen er startproblemen ontstaan door schade aan
de ontsteking.
LANGDURIGE OPSLAG:
Na elk maaiseizoen of als de maaier gedurende een periode van 30
dagen of langer niet wordt gebruikt wordt aanbevolen de brandsto-
fafsluitklep (indien aanwezig) te sluiten en de brandstof af te tappen,
omdat de kwaliteit van moderne brandstoffen snel verslechtert.
Daarna de maaier starten en laten lopen totdat alle brandstof die
zich nog in het systeem bevindt, is gebruikt. De olie aftappen terwijl
de motor nog warm is en daarna vullen met het juiste type olie tot
aan het aangegeven niveau. Verwijder de bougie en giet 45 ml mo-
torolie in de motorcilinder, verdeel de olie door langzaam te pompen
en vervang de bougie. Sla de maaier koel en droog op, en niet in
rechtstreeks zonlicht.
Stel de kooirol zo in dat deze niet in contact komt met het on-
dermes en breng een laagje vet op de snijvlakken aan om corrosie
tijdens de opslagperiode te voorkomen. Spuit indien mogelijk een
dun beschermend laagje lichte olie op de maaier.
Plaats de maaier altijd op een vlakke en egale ondergrond.
Specificaties
Model 400 500 660
Gewicht 69kg 73kg 79kg
Maaibreedte 400mm 500mm 660mm
MOTORGEGEVENS
RAADPLEEG VOOR GEDETAILLEERDE SPECIFICATIES HET BI-
JBEHORENDE MOTORBOEKJE
Downloaded from www.Manualslib.com manuals search engine
La pagina si sta caricando...
La pagina si sta caricando...
La pagina si sta caricando...
La pagina si sta caricando...
La pagina si sta caricando...
La pagina si sta caricando...
La pagina si sta caricando...
La pagina si sta caricando...
La pagina si sta caricando...
La pagina si sta caricando...
La pagina si sta caricando...
La pagina si sta caricando...
La pagina si sta caricando...
La pagina si sta caricando...
La pagina si sta caricando...
La pagina si sta caricando...
La pagina si sta caricando...
La pagina si sta caricando...
La pagina si sta caricando...
La pagina si sta caricando...
La pagina si sta caricando...
La pagina si sta caricando...
La pagina si sta caricando...
La pagina si sta caricando...
La pagina si sta caricando...
La pagina si sta caricando...
La pagina si sta caricando...
La pagina si sta caricando...
La pagina si sta caricando...
La pagina si sta caricando...
La pagina si sta caricando...
La pagina si sta caricando...
La pagina si sta caricando...
La pagina si sta caricando...
La pagina si sta caricando...
La pagina si sta caricando...
La pagina si sta caricando...
La pagina si sta caricando...
La pagina si sta caricando...
La pagina si sta caricando...
La pagina si sta caricando...
La pagina si sta caricando...
La pagina si sta caricando...
La pagina si sta caricando...
-
 1
1
-
 2
2
-
 3
3
-
 4
4
-
 5
5
-
 6
6
-
 7
7
-
 8
8
-
 9
9
-
 10
10
-
 11
11
-
 12
12
-
 13
13
-
 14
14
-
 15
15
-
 16
16
-
 17
17
-
 18
18
-
 19
19
-
 20
20
-
 21
21
-
 22
22
-
 23
23
-
 24
24
-
 25
25
-
 26
26
-
 27
27
-
 28
28
-
 29
29
-
 30
30
-
 31
31
-
 32
32
-
 33
33
-
 34
34
-
 35
35
-
 36
36
-
 37
37
-
 38
38
-
 39
39
-
 40
40
-
 41
41
-
 42
42
-
 43
43
-
 44
44
-
 45
45
-
 46
46
-
 47
47
-
 48
48
-
 49
49
-
 50
50
-
 51
51
-
 52
52
-
 53
53
-
 54
54
-
 55
55
-
 56
56
-
 57
57
-
 58
58
-
 59
59
-
 60
60
-
 61
61
-
 62
62
-
 63
63
-
 64
64


Masport OLYMPIC 400 Manuale del proprietario
- Categoria
- Tosa erba
- Tipo
- Manuale del proprietario
- Questo manuale è adatto anche per
in altre lingue
- English: Masport OLYMPIC 400 Owner's manual
- français: Masport OLYMPIC 400 Le manuel du propriétaire
- español: Masport OLYMPIC 400 El manual del propietario
- Deutsch: Masport OLYMPIC 400 Bedienungsanleitung
- Nederlands: Masport OLYMPIC 400 de handleiding
Altri documenti
-
hillvert HT-STM-200 Manuale del proprietario
-
Ransomes 62281, 62282, 62283, 62284, 62285 Manuale del proprietario
-
 Jacobsen 62280 Manuale del proprietario
-
Toro 18" Sportlawn Lawnmower Manuale utente
-
Efco DR 52 VBR6 Manuale utente
-
Wolf Garten TC 32 ME Manuale utente
-
Mountfield HP46R Istruzioni per l'uso
-
-
-
