
5.1CH Blu-ray™
Home Entertainment System
user manual
imagine the possibilities
Thank you for purchasing this Samsung product.
To receive more complete service,
please register your product at
www.samsung.com/register
HT-D5500
HT-D5530
HT-D5550
HT-D5500_ELS_0314.indd 1HT-D5500_ELS_0314.indd 1 2011-03-14 7:40:412011-03-14 7:40:41
La pagina si sta caricando...
La pagina si sta caricando...
La pagina si sta caricando...
La pagina si sta caricando...
La pagina si sta caricando...
La pagina si sta caricando...
La pagina si sta caricando...
La pagina si sta caricando...
La pagina si sta caricando...

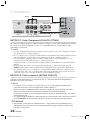
English 11
01 Getting Started
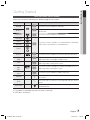
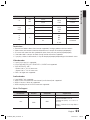
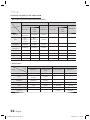
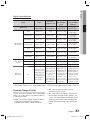
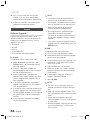
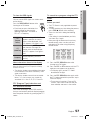
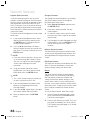
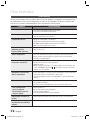
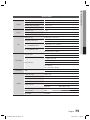
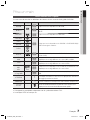
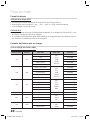
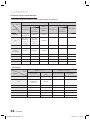
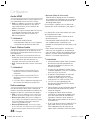
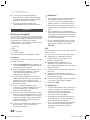
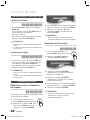
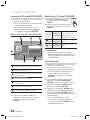
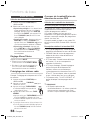
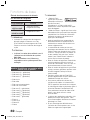
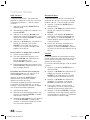
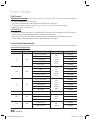
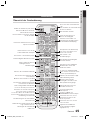
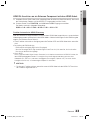
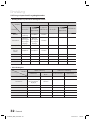
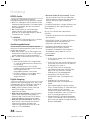
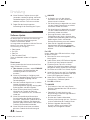
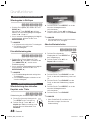
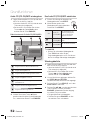
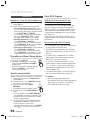
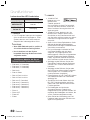
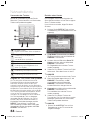
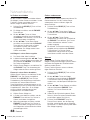
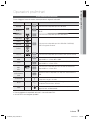
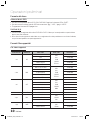
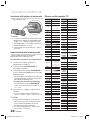
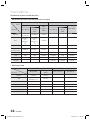
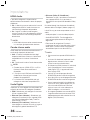
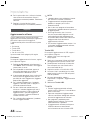
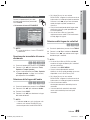
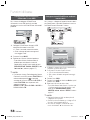
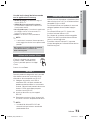
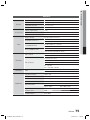
File Extension Container Video Codec Audio Codec Resolution
*.vro
VRO
VOB
MPEG2
AC3
MPEG
LPCM
1920x1080
MPEG1
352x288
*.mpg
*.mpeg
PS
MPEG1
AC3
MPEG
LPCM
AAC
352x288
MPEG2
1920x1080
H.264
1920x1080
*.ts
*.tp
*.trp
TS
MPEG2
AC3
AAC
MP3
DD+
HE-AAC
1920x1080
H.264
1920x1080
VC1
1920x1080
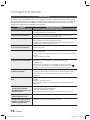
Restrictions
Some of the Codecs above listed are not supported if having a problem with the contents.
Video source with incorrect container information or if corrupt will not be played properly.
AV source with more than the standard bit rate or frame rate may not be played properly.
If the index table is corrupt, the Seek (Jump) function will not be supported.
If you play a video via the network, it may not be played properly depending on the network status.
Video decoder
Up to H.264 Level 4.1 supported.
H.264 FMO/ASO/RS, VC1 SP/MP/AP L4, AVCHD not supported.
XVID, MPEG4 SP, ASP :
- Below 1280 x 720: 60 frame max
- Above 1280 x 720: 30 frame max
GMC 2 or higher not supported.
Audio decoder
Up to WMA 7,8,9 supported.
WMA 9 PRO with more than two channels (multi-channel) not supported.
WMA 9 Lossless, Voice not supported.
WMA sampling rate at 22050Hz mono not supported.
Music File Support
File Extension Container Audio Codec Support Range
*.mp3
MP3
MP3 -
*.wma
WMA
WMA
Compliant with WMA version 10
* Sampling rates (in kHz) - 8, 11, 16, 22, 32,
44.1, 48
* Bit rates - All bit-rates in the range 5kbps to
384kbps
•
•
•
•
•
•
•
•
•
•
•
•
•
HT-D5500_ELS_0314.indd 11HT-D5500_ELS_0314.indd 11 2011-03-14 7:40:512011-03-14 7:40:51

12 English
Getting Started
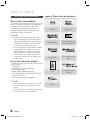
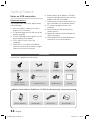
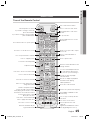
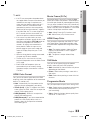
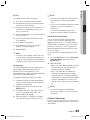
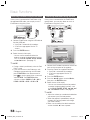
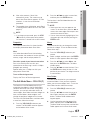
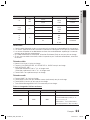
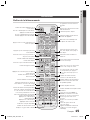
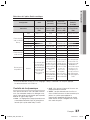
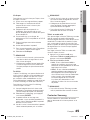
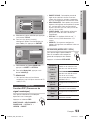
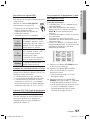
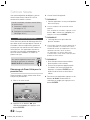
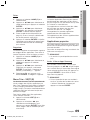
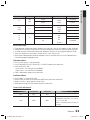
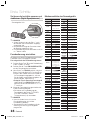
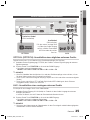
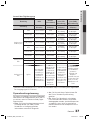
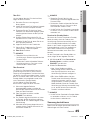
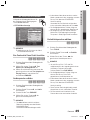
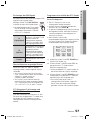
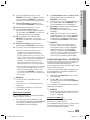
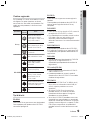
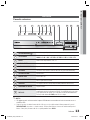
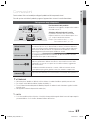
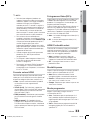
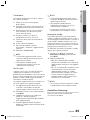
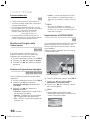
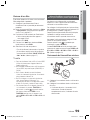
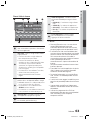
Accessories
Check for the supplied accessories below.
Video Cable FM Antenna iPod Dock User's Manual
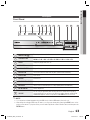
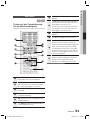
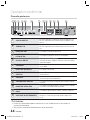
FUNCTION
TV SOURCE
POWER
DISC MENU MENU TITLE MENU
MUTE
SFE MODE
VOL
TUNING
/CH
TOOLS
RETURN
EXIT
INFO
AB
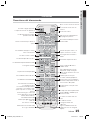
HUB
CD
TUNER
MEMORY
S/W LEVEL
DĺD
MO/ST
D SOUND
DSP
PL
vTuner
SMART SEARCH
REPEATFULL SCREEN
123
456
78
0
9
POPUP
TV
BD
RECEIVER SLEEP
TARDS DISPLAY
PTY- PTY SEARCH PTY+
iPod SYNC
(For Power cord)
Remote Control/
Batteries (AAA size)
Toroidal Ferrite Core ASC Microphone Soft Cloth
Notes on USB connection
Supported devices:
USB storage media, MP3 player, digital camera,
USB card reader
Does not support if a folder or fi le name is
longer than 125 characters.
A subtitle fi le bigger than 300 KB may not be
properly displayed.
A certain USB/digital camera device may not
be compatible with the product.
FAT16 and FAT32 fi le systems are
supported.
Photo (JPEG), music (MP3) and video fi le
should have their names in Korean or English.
Otherwise, the fi le may not played.
1)
2)
3)
4)
5)
Connect directly to the product's USB port.
Connecting through another cable may raise
problems with USB compatibility.
Inserting more than one memory device to a
multi-card reader may not operate properly.
PTP protocol for digital camera is not
supported.
Do not disconnect USB device during a
"loading" process.
Bigger the image resolution, the longer the
delay to displaying.
DRM applied MP3 fi les downloaded from a
commercial site are not played back.
6)
7)
8)
9)
10)
11)
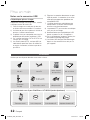
Wireless Dock Cradle for iPod/iPhone : HT-WDC10 (sold separately)
STANDB
Y
L
IN
K
CHARGE
Wireless Transmitter Charging Cradle DC Power Cord DC Power Adapter
HT-D5500_ELS_0314.indd 12HT-D5500_ELS_0314.indd 12 2011-03-14 7:40:512011-03-14 7:40:51
La pagina si sta caricando...
La pagina si sta caricando...
La pagina si sta caricando...
La pagina si sta caricando...

English 17
02 Connections
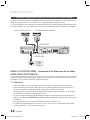
Connections
This section involves various methods of connecting the product to other external components.
Before moving or installing the product, be sure to turn off the power and disconnect the power cord.
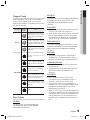
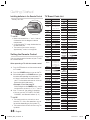
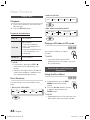
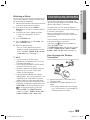
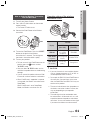
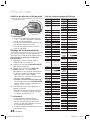
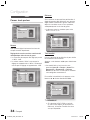
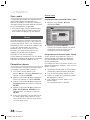
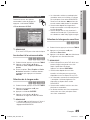
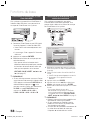
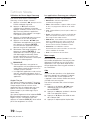
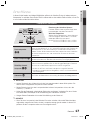
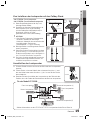
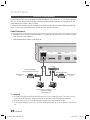
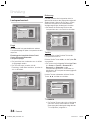
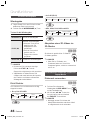
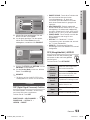
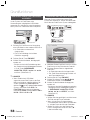
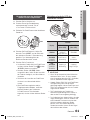
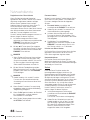
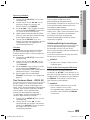
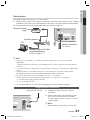
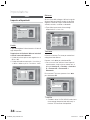
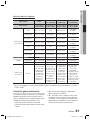
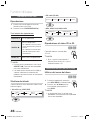
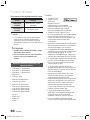
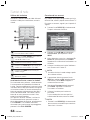
Connecting the Speakers
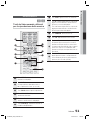
Front Speakers
ei
Place these speakers in front of your listening position, facing inwards (about 45°)
toward you. Place the speakers so that their tweeters will be at the same height
as your ear. Align the front face of the front speakers with the front face of the
centre speaker or place them slightly in front of the centre speakers.
Centre Speaker
f
It is best to install it at the same height as the front speakers. You can also install it
directly over or under the TV.
Surround Speakershj
Place these speakers to the side of your listening position.
If there isn't enough
room, place these speakers so they face each other. Place them about 60 to
90cm above your ear, facing slightly downward.
*
Unlike the front and centre speakers, the surround speakers are used to
handle mainly sound effects and sound will not come from them all the time.
Subwoofer
g
The position of the subwoofer is not so critical. Place it anywhere you like.
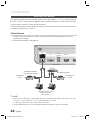
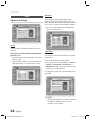
Position of the product
Place it on a stand or cabinet shelf, or under the TV
stand.
Selecting the Listening Position
The listening position should be located about 2.5 to 3
times the distance of the TV's screen size away from
the TV.
Example : For 32" TV's 2~2.4m
For 55" TV's 3.5~4m
SW
NOTE
If you place a speaker near your TV set, screen colour may be distorted because of the magnetic fi eld generated by the
speaker. If this occurs, place the speaker away from your TV set.
✎
CAUTION
Do not let children play with or near the speakers. They could get hurt if a speaker falls.
When connecting the speaker wires to the speakers, make sure that the polarity (+/ –) is correct.
Keep the subwoofer speaker out of reach of children so as to prevent children from inserting their hands or alien substances
into the duct (hole) of the subwoofer speaker.
Do not hang the subwoofer on the wall through the duct (hole).
!
HT-D5500_ELS_0314.indd 17HT-D5500_ELS_0314.indd 17 2011-03-14 7:40:552011-03-14 7:40:55
La pagina si sta caricando...

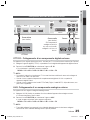
English 19
02 Connections
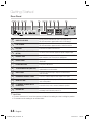
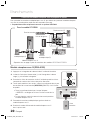
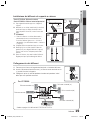
FRONT
SPEAKERS OUT
SPEAKER IMPEDANCE : 3
VIDEO OUT
SURROUND
SUBWOOFER
CENTER FRONT SURROUND
ONENT OUT
VIDEO OUT
NT OUT
FRONT
SPEAKERS OUT
SPEAKER IMPEDANCE : 3
SURROUND
SUBWOOFER
CENTER FRONT
SURROUND
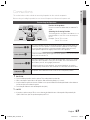
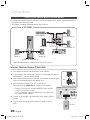
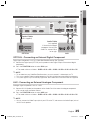
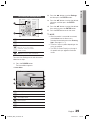
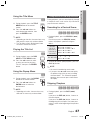
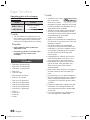
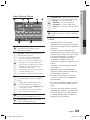
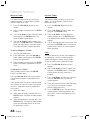
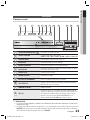
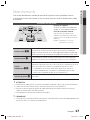
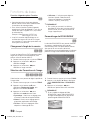
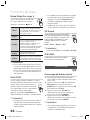
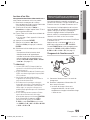
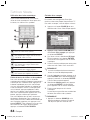
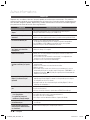
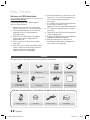
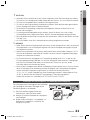
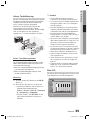
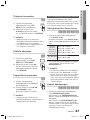
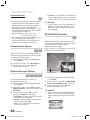
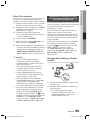
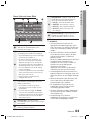
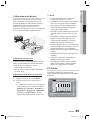
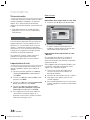
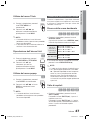
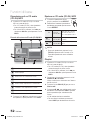
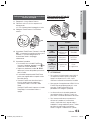
Centre Speaker
Front Speaker (R)
Subwoofer
Surround Speaker (R)
Front Speaker (L)
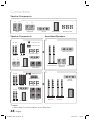
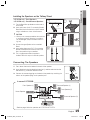
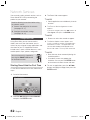
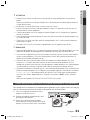
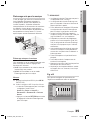
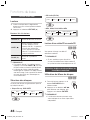
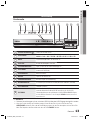
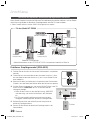
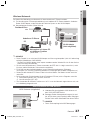
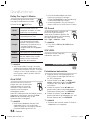
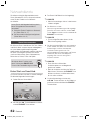
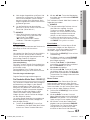
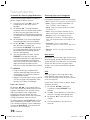
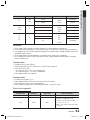
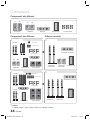
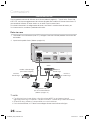
Installing the Speakers on the Tallboy Stand
* HT-D5530 only - Front Speakers
* HT-D5550 only - Front/Surround Speakers
Turn the Stand Base upside-down and connect it
to the Stand.
Insert small screws (4x20, For connecting Stand &
Stand Base) clockwise into the four holes marked
using a screwdriver as shown in the illustration.
CAUTION
When you use a torque screwdriver, be careful not
to put excessive force. Otherwise, it runs idle or
can be damaged. (torque screwdriver- below 15
kg.f.cm)
Connect the upper Speaker to the assembled
Stand.
Insert another large screw (5x15, For connecting
Speaker & Stand) clockwise into the hole on the
rear of the speaker using a screwdriver.
This is the appearance after the speaker is
installed. Follow this steps to install other speaker.
1.
2.
!
3.
4.
5.
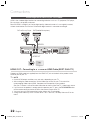
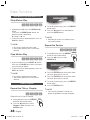
Connecting The Speakers
Press down the terminal tab on the back of the speaker.
Insert the black wire into the black terminal (–) and the red wire into the
red terminal (+), and then release the tab.
Connect the connecting plugs to the back of the product by matching the
colours of the speaker plugs to the speaker jacks.
1.
2.
3.
Black
Red
In case of HT-D5500
* Refer to page 18 for the speakers of HT-D5530/HT-D5550.
Surround Speaker (L)
4
2
Stand
Stand
Base
1
3
Stand
Speaker
5
or
HT-D5500_ELS_0314.indd 19HT-D5500_ELS_0314.indd 19 2011-03-14 7:41:142011-03-14 7:41:14
La pagina si sta caricando...
La pagina si sta caricando...
La pagina si sta caricando...
La pagina si sta caricando...
La pagina si sta caricando...
La pagina si sta caricando...
La pagina si sta caricando...
La pagina si sta caricando...
La pagina si sta caricando...
La pagina si sta caricando...
La pagina si sta caricando...
La pagina si sta caricando...
La pagina si sta caricando...

English 33
03 Setup
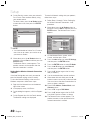
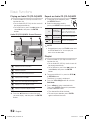
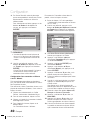
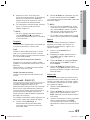
NOTE
If the TV you connected to the product does
not support Movie Frame or the resolution you
selected, the message “If no pictures are
shown after the selection, please wait for 15
seconds. And then, the resolution will be
reverted to the previous value automatically.
Would you like to make a selection?” appears.
If you select Yes, the TV’s screen will go blank
for 15 seconds, and then the resolution will
revert to the previous resolution automatically.
If the screen stays blank after you have
changed the resolution, remove all discs, and
then press and hold the STOP () button on
the front of the product for more than 5
seconds. All settings are restored to the
factory default. Follow the steps on the
previous page to access each mode and
select the Display Setup that your TV will
support.
When the factory default settings are restored,
all stored user BD data is deleted.
The Blu-ray Disc must have the 24 frame
feature for the product to use the Movie Frame
(24Fs) mode.
If both HDMI and Component jacks are
connected and you are currently viewing
Component output, the resolution is fi xed to
576i/480i.
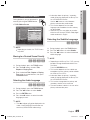
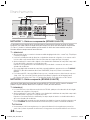
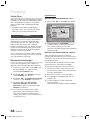
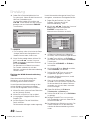
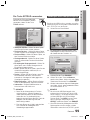
HDMI Color Format
Lets you set the colour space format for HDMI
output to match the capabilities of the connected
device (TV, monitor, etc).
Auto : Automatically sets the product to the
optimum format supported by your device.
YCbCr (4:4:4) : If your TV supports the YCbCr
colour space via HDMI, select this to output the
normal YCbCr colour gamut.
RGB (Standard) : Select this to output the
normal RGB colour gamut.
RGB (Enhanced) : If you have connected the
product to a DVI display device such as a
monitor, select this to output the enhanced
RGB colour gamut.
✎
•
•
•
•
Movie Frame (24 Fs)
Setting the Movie Frame (24Fs) feature to Auto
allows you to adjust the product’s HDMI output to
24 frames per second for improved picture quality.
You can enjoy the Movie Frame (24Fs) feature only
on a TV supporting this frame rate. You can select
Movie Frame only when the product is in the HDMI
1080i or 1080p output resolution modes.
Auto : Movie Frame (24Fs) functions work.
Off :
Movie Frame (24Fs) functions are off.
HDMI Deep Color
Lets you output video from the HDMI OUT jack
with Deep Colour. Deep Colour provides more
accurate colour reproduction with greater colour
depth.
Auto: The product outputs video with Deep
Colour to a connected TV which supports
HDMI Deep Colour.
Off : The picture is output without Deep
Colour.
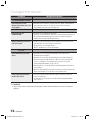
Still Mode
Lets you set the type of picture the product
displays when you pause DVD playback.
Auto: Automatically shows the best still picture
depending on the content.
Frame : Select when pausing a scene with a
little action.
Field : Select when pausing a scene with a lot
of action.
Progressive Mode
Lets you improve picture quality when viewing DVDs.
Auto : Select to have the product automatically
select the best picture quality for the DVD
you’re watching.
Video : Select for the best picture quality from
concert or TV show DVDs.
•
•
•
•
•
•
•
•
•
HT-D5500_ELS_0314.indd 33HT-D5500_ELS_0314.indd 33 2011-03-14 7:41:342011-03-14 7:41:34
La pagina si sta caricando...

English 35
03 Setup
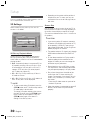
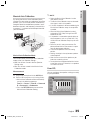
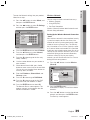
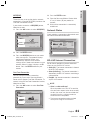
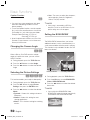
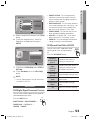
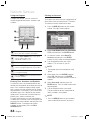
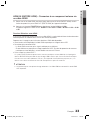
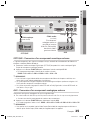
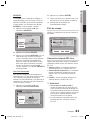
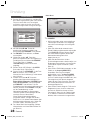
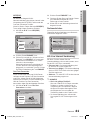
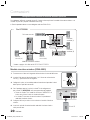
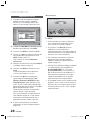
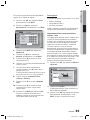
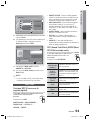
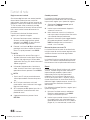
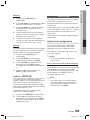
Musical Auto Calibration
By setting the Musical Auto Calibration (MAC)
function just once when you relocate or install the
product, you can have the product automatically
recognize the distance between speakers, levels
between channels, and frequency characteristics
to create a 5.1-channel sound fi eld optimized for
your environment.
ASC IN
ASC IN
50
5
00
m
A
ASC
microphone
Musical Auto Calibration Mode
You will hear either the Musical Auto Calibration
mode or the User Speaker Settings.
Off: You will hear sound in the the Speaker
Setting value.
On: You will hear sound in the Musical Auto
Calibration mode.
Measurement
Plug the ASC microphone into the ASC IN jack.
Place the ASC microphone at the listening position.
Musical Auto Calibration will be automatically
set up in the following sequence:
Front L
Center
Front R
Surround
R
Surround L
Subwoofer
Press the RETURN button to cancel the
Musical Auto Calibration Setting.
•
•
1.
2.
•
•
NOTE
Setting the Musical Auto Calibration function
takes about 3 minutes.
The Musical Auto Calibration setup can be made
when there is no disc in the product.
If the ASC microphone is disconnected during the
Musical Auto Calibration setup, the setup will be
cancelled.
When the Musical Auto Calibration function is
activated, the DSP, Dolby Pro Logic ll and SFE
Mode will not work.
If the product is connected to external devices or
other components (such as an iPod, AUX, D.IN),
the Musical Auto Calibration Setup may not work
properly.
Noise may result in wrong measurement. So
please proceed with the measurement in a quiet
room to obtain proper calibration.
Place the microphone on the main listening
position.
Nothing should get in the way between speakers
and microphone.
Note that the test tone of the speaker may be
loud when conducting the test.
Do not place the microphone behind the furniture
or too close to the wall. Otherwise, it can produce
an incorrect test result.
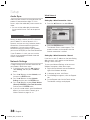
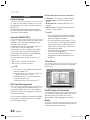
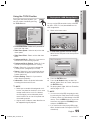
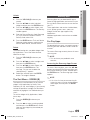
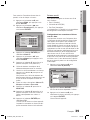
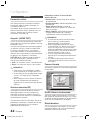
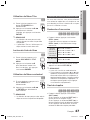
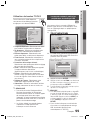
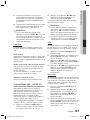
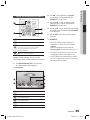
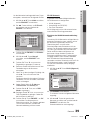
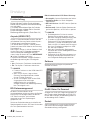
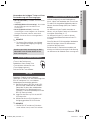
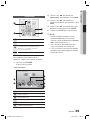
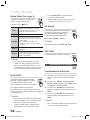
User EQ
You can confi gure the equalizer settings manually
to your preference.
Settings
Display
Audio
Network
System
Language
Security
General
Support
User EQ
Reset
>
Adjust
<
Move
'
Return
6
·
·
·
·
·
0
·
·
·
·
·
-6
0
250Hz
0
600Hz
0
1kHz
0
3kHz
0
6kHz
0
10kHz
0
15kHz
A
✎
HT-D5500_ELS_0314.indd 35HT-D5500_ELS_0314.indd 35 2011-03-14 7:41:372011-03-14 7:41:37
La pagina si sta caricando...
La pagina si sta caricando...
La pagina si sta caricando...
La pagina si sta caricando...
La pagina si sta caricando...
La pagina si sta caricando...
La pagina si sta caricando...
La pagina si sta caricando...
La pagina si sta caricando...
La pagina si sta caricando...
La pagina si sta caricando...
La pagina si sta caricando...
La pagina si sta caricando...
La pagina si sta caricando...
La pagina si sta caricando...
La pagina si sta caricando...
La pagina si sta caricando...
La pagina si sta caricando...

54 English
Basic Functions
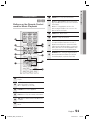
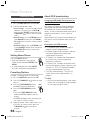
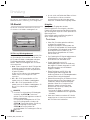
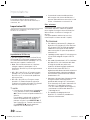
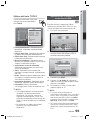
Dolby Pro Logic II Mode
You can select the desired Dolby Pro
Logic II audio mode.
Press the
PL II button.
Music
When listening to music, you can
experience sound effects as if you
are listening to the actual
performance.
Movie
Adds realism to the movie
soundtrack.
Prologic
You can listen to a 2CH sound source
in 5.1CH surround sound with all
speakers active.
- A specifi c speaker(s) may not be
output depending on the input
signal.
Matrix
You will hear multi channel surround
sound.
Stereo
Select this to listen to sound from
the front left and right speakers and
the subwoofer only.
NOTE
When selecting Dolby Pro Logic II mode,
connect your external device to the AUDIO
INPUT jacks (L and R) on the product. If you
connect to only one of the inputs (L or R), you
cannot listen to surround sound.
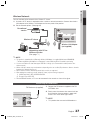
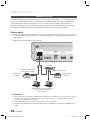
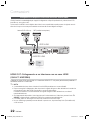
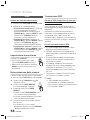
iPod SYNC
If you insert your iPod player in the iPod
Dock that has already been connected
to the system, the video fi les in your
iPod player can be played through the
connected TV.
If the video signal does not synchronize properly
with the audio signal, press iPod SYNC on the
remote control to correct the synchronization.
NOTE
Before you can play the video fi les in iPod player,
the Audio/Video terminals of the TV should be
connected using the Composite cable.
✎
✎
Models below support lip sync settings.
Press iPod SYNC on the remote control to
change audio delay.
Supported Models : classic/3G nano/4G
nano/120GB classic/160GB Classic/5G nano
3D Sound
You can enjoy much natural and vivid
surround sound with enriched tones of
sound. You can adjust the depth of
sound using the level options.
Off High Medium Low.
NOTE
It is not available in FM or W. IPOD mode.
S/W LEVEL
You can adjust the subwoofer's level.
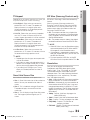
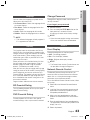
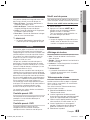
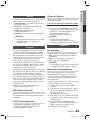
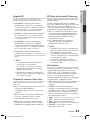
Playing back a Picture
G
Viewing Photo Files
Connect a USB memory that contains JPEG
fi les or insert a disc that contains JPEG fi les.
Press the ◄► buttons to select the My
Contents, and then press the ENTER button
after press the ▲▼ buttons to select the
Photos.
Press the ▲▼◄► buttons to select the
folder you want to play, and then press the
ENTER button.
Press the ▲▼◄► buttons to select the
photo you want to play, and then press the
ENTER button.
NOTE
You can't enlarge the subtitle and PG graphic
in the full screen mode.
✎
1.
2.
3.
4.
✎
B
S/W LEVEL
HT-D5500_ELS_0314.indd 54HT-D5500_ELS_0314.indd 54 2011-03-14 7:42:022011-03-14 7:42:02
La pagina si sta caricando...
La pagina si sta caricando...
La pagina si sta caricando...
La pagina si sta caricando...
La pagina si sta caricando...
La pagina si sta caricando...
La pagina si sta caricando...
La pagina si sta caricando...
La pagina si sta caricando...
La pagina si sta caricando...

English 65
05 Network Services
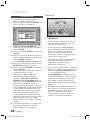
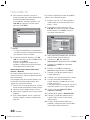
When done, press the ENTER button to
select OK, and then press the ENTER
button again. The Create Account screen re-
appears.
Select Confi rm password, and then press
the ENTER button.
Repeat Steps 7 and 8.
When the Create Account screen re-
appears, select Create Account, and then
press the ENTER button. The Confi rmation
window appears.
Select OK, and then press the ENTER
button. The Continue to Register Service
window appears.
Select Connect Service, and then press the
ENTER button.
The Register Service Account Window
appears.
If you have existing accounts with any of
the listed providers, you can associate the
provider account and the provider account
password with your Smart TV Account.
Registration makes it easier to access
the providers web site. For registration
instructions, go to Step 2 in Account
Management under the Settings Menu.
If you don’t have existing provider accounts
or do not want to register existing accounts
at this time, select OK, and then press the
ENTER button. You can also let the window
close on its own in about a minute.
NOTE
You must use an e-mail address as an ID.
You can register up to 10 User Accounts.
You do not need an account to use Smart
Hub.
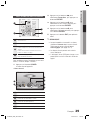
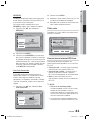
Account Log In
To log in to your Smart TV Account, follow these
steps:
With the Smart Hub main screen displayed
on your TV, press the RED (A) button on
your remote. The Login screen appears.
8.
9.
10.
11.
12.
13.
14.
•
•
✎
1.
Select the Down Arrow next to the Smart
TV ID fi eld, and then press the ENTER
button.
Select your ID from the list that appears, and
then press the ENTER button. The Login
screen re-appears.
Select Password, and then press the
ENTER button. The Password window and
a keypad appears.
Using the keypad and your remote, enter
your password. When done, press the
ENTER button, select OK, and then press
the ENTER button again.
NOTE
If you want Smart Hub to enter your password
automatically, select Remember my Smart TV
ID and password after you have entered your
password, and then press the ENTER button.
A check appears. Smart Hub will now enter
your password automatically when you select
or enter your ID.
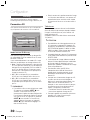
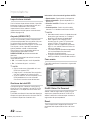
The Settings Menu - BLUE (D)
The Settings Menu Screen gives you access to
account management, account reset, and
account properties functions.
To access the Settings Menu, and then select a
menu item, follow these steps:
Press the BLUE (D) button on your remote.
Press the ▲▼ to select a menu item, and
then press the ENTER button.
The functions on the Settings Menu screen are
described below.
NOTE
The Service Manager item listed in the Settings
Menu is not available for Blu-ray Home
Theaters.
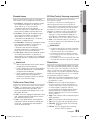
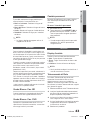
Account Management
The Account Management Menu contains
functions that let you register your service
provider accounts, change your Smart Hub
password, and delete or deactivate your Smart
TV Account.
2.
3.
4.
5.
✎
1.
2.
✎
HT-D5500_ELS_0314.indd 65HT-D5500_ELS_0314.indd 65 2011-03-14 7:42:232011-03-14 7:42:23
La pagina si sta caricando...
La pagina si sta caricando...
La pagina si sta caricando...
La pagina si sta caricando...
La pagina si sta caricando...
La pagina si sta caricando...
La pagina si sta caricando...
La pagina si sta caricando...
La pagina si sta caricando...
La pagina si sta caricando...

76 English
Other information
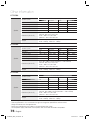
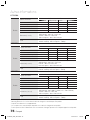
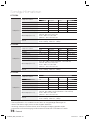
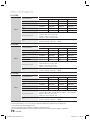
HT-D5500
Speaker
Speaker system
5.1ch speaker system
Front Surround Centre Subwoofer
Impedance 3 Ω 3 Ω 3 Ω 3 Ω
Frequency range 140Hz~20kHz 140Hz~20kHz 140Hz~20kHz 40Hz ~ 160Hz
Output sound pressure level 86dB/W/M 86dB/W/M 86dB/W/M 88dB/W/M
Rated input 165W 165W 170W 170W
Maximum input 330W 330W 340W 340W
Dimensions (W x H x D)
Front : 90 x 207.5 x 68.5 mm
Surround : 90 x 141.5 x 68.5 mm
Centre : 360 x 74.5 x 68.5 mm
Subwoofer : 168 x 350 x 285 mm
Weights
Front : 0.69 kg, Surround : 0.58 kg
Centre : 0.98 kg, Subwoofer : 3.60 kg
HT-D5530
Speaker
Speaker system
5.1ch speaker system
Front Surround Centre Subwoofer
Impedance 3 Ω 3 Ω 3 Ω 3 Ω
Frequency range 140Hz~20kHz 140Hz~20kHz 140Hz~20kHz 40Hz ~ 160Hz
Output sound pressure level 86dB/W/M 86dB/W/M 86dB/W/M 88dB/W/M
Rated input 165W 165W 170W 170W
Maximum input 330W 330W 340W 340W
Dimensions (W x H x D)
Front : 90 x 1300 x 119 mm (Stand base : 250 x 250 mm)
Surround : 90 x 141.5 x 68.5 mm
Centre : 360 x 74.5 x 68.5 mm
Subwoofer : 168 x 350 x 285 mm
Weights
Front : 4.19 kg, Surround : 0.58 kg
Centre : 0.98 kg, Subwoofer : 3.60 kg
HT-D5550
Speaker
Speaker system
5.1ch speaker system
Front Surround Centre Subwoofer
Impedance 3 Ω 3 Ω 3 Ω 3 Ω
Frequency range 140Hz~20kHz 140Hz~20kHz 140Hz~20kHz 40Hz ~ 160Hz
Output sound pressure level 86dB/W/M 86dB/W/M 86dB/W/M 88dB/W/M
Rated input 165W 165W 170W 170W
Maximum input 330W 330W 340W 340W
Dimensions (W x H x D)
Front : 90 x 1300 x 119 mm (Stand base : 250 x 250 mm)
Surround : 90 x 1300 x 119 mm (Stand base : 250 x 250 mm)
Centre : 360 x 74.5 x 68.5 mm
Subwoofer : 168 x 350 x 285 mm
Weights
Front : 4.19 kg, Surround : 3.80 kg
Centre : 0.98 kg, Subwoofer : 3.60 kg
*: Nominal specifi cation
- Samsung Electronics Co., Ltd reserves the right to change the specifi cations without notice.
- Weight and dimensions are approximate.
- Design and specifi cations are subject to change without prior notice.
- For the power supply and Power Consumption, refer to the label attached to the product.
HT-D5500_ELS_0314.indd 76HT-D5500_ELS_0314.indd 76 2011-03-14 7:42:262011-03-14 7:42:26
La pagina si sta caricando...

Correct Disposal of This Product (Waste Electrical & Electronic
Equipment)
(Applicable in the European Union and other European countries with separate collection systems)
This marking on the product, accessories or literature indicates that the product and its electronic accessories (e.g.
charger, headset, USB cable) should not be disposed of with other household waste at the end of their working life. To
prevent possible harm to the environment or human health from uncontrolled waste disposal, please separate these
items from other types of waste and recycle them responsibly to promote the sustainable reuse of material resources.
Household users should contact either the retailer where they purchased this product, or their local government office,
for details of where and how they can take these items for environmentally safe recycling.
Business users should contact their supplier and check the terms and conditions of the purchase contract.
This product and its electronic accessories should not be mixed with other commercial wastes for disposal.
Correct disposal of batteries in this product
(Applicable in the European Union and other European countries with separate battery return systems.)
This marking on the battery, manual or packaging indicates that the batteries in this product should not
be disposed of with other household waste at the end of their working life. Where marked, the chemical
symbols Hg, Cd or Pb indicate that the battery contains mercury, cadmium or lead above the reference
levels in EC Directive 2006/66. If batteries are not properly disposed of, these substances can cause harm
to human health or the environment.
To protect natural resources and to promote material reuse, please separate batteries from other types of
waste and recycle them through your local, free battery return system.
HT-D5500_ELS_0314.indd 78HT-D5500_ELS_0314.indd 78 2011-03-14 7:42:262011-03-14 7:42:26
La pagina si sta caricando...
La pagina si sta caricando...
La pagina si sta caricando...
La pagina si sta caricando...
La pagina si sta caricando...
La pagina si sta caricando...
La pagina si sta caricando...
La pagina si sta caricando...
La pagina si sta caricando...
La pagina si sta caricando...

Français 11
01 Prise en main
Extension de fichier
Conteneur Codec vidéo Codec audio Résolution
*.vro
VRO
VOB
MPEG2
AC3
MPEG
LPCM
1920x1080
MPEG1
352x288
*.mpg
*.mpeg
PS
MPEG1
AC3
MPEG
LPCM
AAC
352x288
MPEG2
1920x1080
H.264
1920x1080
*.ts
*.tp
*.trp
TS
MPEG2
AC3
AAC
MP3
DD+
HE-AAC
1920x1080
H.264
1920x1080
VC1
1920x1080
Restrictions
Certains codecs répertoriés ci-dessus ne sont pas pris en charge en cas de problème liés aux contenus.
Les sources vidéo contenant des informations incorrectes ou corrompues ne sont pas lues correctement.
Les sources AV dotées d’un débit binaire ou d’une vitesse de défi lement supérieur(e) à la normale
peuvent ne pas être lues correctement.
Si la table d’indexation est corrompue, la fonction Positionner (Saut) ne sera pas prise en charge.
Si vous lisez une vidéo via le réseau, celle-ci risque de ne pas s’exécuter correctement, selon l’état
du réseau.
Décodeur vidéo
Norme H.264 Level 4.1 prise en charge.
Formats H.264 FMO/ASO/RS, VC1 SP/MP/AP L4, AVCHD non pris en charge.
XVID, MPEG4 SP, ASP :
- Résolution inférieure à 1280 x 720 : 60 images maxi
- Résolution supérieure à 1280 x 720 : 30 images maxi
Format GMC 2 ou supérieur non pris en charge.
Décodeur audio
Formats WMA 7, 8, 9 pris en charge.
Format WMA 9 PRO avec plus de deux canaux (multicanaux) non pris en charge.
Format WMA 9 Lossless et voix non pris en charge.
Taux d’échantillonnage WMA 22050 Hz mono non pris en charge.
Prise en charge des fi chiers musicaux
Extension de fichier Conteneur Codec audio Plage de prise en charge
*.mp3
MP3
MP3 -
*.wma
WMA
WMA
Compatibilité avec le format WMA version 10
* Taux d'échantillonnage (en kHz) - 8, 11,
16, 22, 32, 44,1, 48
* Débits binaires - Tous les débits binaires
dans la plage allant de 5 kbps à 384 kbps
•
•
•
•
•
•
•
•
•
•
•
•
•
HT-D5500_FRA_0314.indd 11HT-D5500_FRA_0314.indd 11 2011-03-14 7:42:562011-03-14 7:42:56
La pagina si sta caricando...
La pagina si sta caricando...
La pagina si sta caricando...
La pagina si sta caricando...
La pagina si sta caricando...

Français 17
02 Branchements
Cette section décrit différentes méthodes de connexion de l’appareil aux autres périphériques externes.
Avant de déplacer ou d'installer l'appareil, assurez-vous de le mettre hors tension et de débrancher le cordon
d'alimentation.
Connexion des enceintes
Branchements
Position de l’appareil
Placez-le sur un pied, sur la tablette d'un
meuble, ou sous le support du téléviseur.
Choix de la position d'écoute
La position d'écoute (distance entre
l'utilisateur et le téléviseur) doit être située
à environ 2,5 à 3 fois la taille de l'écran du
téléviseur.
Exemple : Téléviseurs 32" : 2 à 2,4 m
Téléviseurs 55" : 3,5 à 4 m
SW
2,5 à 3 fois la taille de l’écran du téléviseur
Enceintes avant
ei
Disposez ces enceintes face à votre position d’écoute, orientées vers vous selon
un angle de 45° environ. Placez les enceintes de sorte que les haut-parleurs
d’aigus se trouvent à hauteur de vos oreilles. Alignez la face avant des enceintes avant
sur la face avant de l'enceinte centrale ou placez-les légèrement à l'avant de l’enceinte centrale.
Enceinte centrale
f
Il est préférable de l'installer à la même hauteur que les enceintes avant/avant
supérieure. Vous pouvez aussi l'installer directement sur ou sous le téléviseur.
Enceintes
ambiophoniques
hj
Placez ces enceintes de part et d’autre de votre position d'écoute. Si vous
manquez d’espace, placez-les face à face. Placez-les à environ 60 à 90 cm au
dessus de la hauteur des oreilles, face légèrement orientée vers le bas.
*
* Contrairement aux enceintes avant/avant supérieure et centrale, les
enceintes ambiophoniques sont utilisées essentiellement pour les effets
sonores; elles ne reproduisent pas de son en permanence.
Caisson de graves
g
Son emplacement n’est pas d’une importance cruciale. Vous pouvez le placer où
vous voulez.
REMARQUE
Si vous placez une enceinte près du téléviseur, la couleur de l’écran pourrait s’altérer en raison du champ magnétique généré
par l’enceinte. Dans ce cas, éloignez l’enceinte du téléviseur.
✎
ATTENTION
Ne laissez pas les enfants jouer avec les enceintes ou à proximité. Ils pourraient se blesser si une enceinte venait à tomber.
Lorsque vous connectez les fi ls aux enceintes, assurez-vous de respecter le sens de la polarité (+/-).
Conservez le caisson de graves hors de portée des enfants afi n d'éviter qu'ils ne mettent les mains ou n’insèrent des
substances étrangères dans l’évent (orifi ce) du caisson.
Ne suspendez pas le caisson de basses au mur par l’évent (orifi ce).
!
HT-D5500_FRA_0314.indd 17HT-D5500_FRA_0314.indd 17 2011-03-14 7:43:012011-03-14 7:43:01
La pagina si sta caricando...

Français 19
02 Branchements
FRONT
SPEAKERS OUT
SPEAKER IMPEDANCE : 3
VIDEO OUT
SURROUND
SUBWOOFER
CENTER FRONT SURROUND
ONENT OUT
VIDEO OUT
NT OUT
FRONT
SPEAKERS OUT
SPEAKER IMPEDANCE : 3
SURROUND
SUBWOOFER
CENTER FRONT
SURROUND
Installations des enceintes sur le socle Tallboy
* HT-D5530 uniquement – Enceintes avant
* HT-D5550 uniquement – Enceintes avant/arrière
Retournez la base du socle et fi xez-la au socle.
Servez-vous d'un tournevis et insérez de petites vis
(4x20, pour la connexion du pied et de la base du
pied) dans le sens des aiguilles d'une montre dans les
quatre trous marqués, tel qu'indiqué dans l'illustration.
ATTENTION
Lorsque vous utilisez un tournevis dynamométrique,
veillez à ne pas appliquer de force excessive. Vous
risqueriez de le faire tourner à vide et de
l'endommager. (tournevis dynamométrique - sous
les 15 kgp/cm)
Installez l’enceinte supérieure sur le support
assemblé.
À l’aide d’un tournevis, insérez une autre grosse vis
(5*15, pour le raccordement de l'enceinte et du pied)
dans le trou situé à l’arrière de l’enceinte et vissez-la
dans le sens des aiguilles d’une montre.
Voici comment se présente le dispositif après
l’installation de l'enceinte. Suivez ces étapes pour
installer d'autres enceintes.
1.
2.
!
3.
4.
5.
In case of HT-D5500
* Reportez-vous en page 18 pour les enceintes des modèles HT-D5530/HT-D5550.
4
2
Socle
Base du
socle
1
3
Socle
Enceinte
5
ou
Connexion des enceintes
Appuyez sur la languette de la borne située à l’arrière de l'enceinte.
Insérez le fi l noir dans la borne noire (–) et le fi l rouge dans la borne rouge
(+), puis relâchez la languette.
Branchez les fi ches de connexion situées à l’arrière du produit en faisant
concorder les couleurs des fi ches et des prises d’enceinte.
1.
2.
3.
Noir
Rouge
Enceinte avant (D)
Caisson de graves
Enceinte ambiophonique (D)
Enceinte ambiophonique (G)
Enceinte avant (G)
Enceinte centrale
HT-D5500_FRA_0314.indd 19HT-D5500_FRA_0314.indd 19 2011-03-14 7:43:202011-03-14 7:43:20
La pagina si sta caricando...
La pagina si sta caricando...
La pagina si sta caricando...
La pagina si sta caricando...
La pagina si sta caricando...
La pagina si sta caricando...
La pagina si sta caricando...
La pagina si sta caricando...
La pagina si sta caricando...
La pagina si sta caricando...
La pagina si sta caricando...
La pagina si sta caricando...
La pagina si sta caricando...

Français 33
03 Confi guration
REMARQUE
Si le téléviseur connecté au produit ne prend
pas en charge la fonction Fréquence cinéma ou
la résolution sélectionnée, le message suivant
apparaîtra : « Si aucune image ne s'affi che après
la sélection, veuillez patienter 15 secondes. La
résolution reprend ensuite automatiquement la
valeur précédente. Souhaitez-vous faire une
sélection ? ». Si vous sélectionnez Oui, l’écran
du téléviseur s'affi chera en blanc pendant 15
secondes, puis la résolution sera ramenée
automatiquement à la valeur précédente.
Si l'écran est toujours blanc après que la
résolution ait été changée, éjectez le disque
inséré, puis appuyez sur le bouton ARRÊT ()
situé à l'avant du produit et maintenez-le
enfoncé pendant plus de 5 secondes. Tous les
réglages d'usine seront alors rétablis. Suivez les
étapes de la page précédente pour accéder aux
différents modes et sélectionner la Confi guration
de l'affi chage prise en charge par votre
téléviseur.
Lorsque les réglages d'usine par défaut sont
rétablis, toutes les données Blu-ray de
l'utilisateur sont supprimées.
Pour que l'utilisateur puisse utiliser le mode
Fréquence cinéma (24 ips), le disque Blu-ray
doit être doté d'une fonction 24 images.
Si les prises HDMI et Composante sont
connectйes et que vous кtes en train de
visionner la sortie Composante, la rйsolution
sera fi xйe sur 576i/480i.
Format couleurs HDMI
Permet de régler le format de l'espace colorimétrique
applicable à la sortie HDMI en réponse aux capacités
de l'appareil connecté (téléviseur, moniteur, etc.)
Auto. : Permet de régler automatiquement le
produit sur le format optimal pris en charge par
votre appareil.
YCbCr (4:4:4) : Si votre téléviseur prend en charge
l'espace colorimétrique YCbCr via HDMI,
sélectionnez cette option pour émettre en sortie la
gamme normale des couleurs YCbCr.
RGB (Standard) : Sélectionnez cette option pour
émettre en sortie la gamme de couleurs RVB
normale.
RGB (avancé) : Si vous avez connecté le produit à
un dispositif d'affi chage DVI tel qu'un moniteur,
sélectionnez cette option pour émettre en sortie la
gamme de couleurs RVB améliorée.
✎
•
•
•
•
Trame vidéo (24Fs)
Le réglage de la fonction Fréquence cinéma (24 ips) sur
Auto. vous permet de spécifi er la sortie HDMI du
produit sur 24 images par seconde pour une qualité
d’image améliorée. Vous ne pouvez bénéfi cier de la
fonction Fréquence cinéma (24 ips) que sur un
téléviseur prenant en charge cette vitesse de
défi lement. Vous ne pouvez sélectionner l’option
Fréquence cinéma (24 ips) que lorsque le produit est
en mode de résolution de sortie HDMI 1080i ou 1080p.
Auto. : Fréquence cinéma (24 ips) est activée.
Arrêt :
La fonction Fréquence cinéma (24 ips) est
désactivée.
HDMI Deep Color
Cette option vous permet d'émettre des données
vidéo en sortie avec la fonctionnalité Couleurs
profondes via la prise SORTIE HDMI. La
fonctionnalité Couleurs profondes permet une
reproduction plus fi dèle des couleurs, notamment
en termes de profondeur.
Auto. : Le produit émet la vidéo en sortie avec
la fonctionnalité Couleurs profondes sur un
téléviseur connecté prenant en charge l’option
Couleurs profondes HDMI.
Arrêt : L'image est émise sans activation de
l'option Couleurs profondes.
Mode image fi xe
Cette option permet de défi nir le type d'image
affi chée par le produit lors de la mise en pause
de la lecture du DVD.
Auto. : Permet d'affi cher automatiquement la
meilleure image fi xe en fonction du contenu.
Image :
Sélectionnez cette option lors de la mise
en pause d'une scène comportant peu d'action.
Champ :
Sélectionnez cette option lors de la
mise en pause d'une scène comportant
beaucoup d'action.
Mode progressif
Cette option permet d'améliorer la qualité de l'image
lors de la lecture d'un DVD.
Auto. :
Sélectionnez ce réglage afi n que le produit
choisisse automatiquement la meilleure qualité d’image
pour la diffusion du DVD en cours de lecture.
Vidéo :
Sélectionnez ce réglage pour obtenir la
meilleure qualité d'image disponible pour le visionnage
de concerts ou de programmes télévisés en DVD.
•
•
•
•
•
•
•
•
•
HT-D5500_FRA_0314.indd 33HT-D5500_FRA_0314.indd 33 2011-03-14 7:43:402011-03-14 7:43:40
La pagina si sta caricando...
La pagina si sta caricando...
La pagina si sta caricando...
La pagina si sta caricando...
La pagina si sta caricando...
La pagina si sta caricando...
La pagina si sta caricando...
La pagina si sta caricando...
La pagina si sta caricando...
La pagina si sta caricando...
La pagina si sta caricando...
La pagina si sta caricando...
La pagina si sta caricando...
La pagina si sta caricando...
La pagina si sta caricando...
La pagina si sta caricando...
La pagina si sta caricando...
La pagina si sta caricando...
La pagina si sta caricando...
La pagina si sta caricando...
La pagina si sta caricando...
La pagina si sta caricando...
La pagina si sta caricando...
La pagina si sta caricando...
La pagina si sta caricando...
La pagina si sta caricando...
La pagina si sta caricando...
La pagina si sta caricando...
La pagina si sta caricando...
La pagina si sta caricando...
La pagina si sta caricando...
La pagina si sta caricando...
La pagina si sta caricando...
La pagina si sta caricando...
La pagina si sta caricando...
La pagina si sta caricando...
La pagina si sta caricando...
La pagina si sta caricando...
La pagina si sta caricando...
La pagina si sta caricando...
La pagina si sta caricando...
La pagina si sta caricando...
La pagina si sta caricando...
La pagina si sta caricando...

Les bons gestes de mise au rebut de ce produit (Déchets
d’équipements électriques et électroniques)
(Applicable dans les pays de l’Union Européenne et dans d’autres pays européens pratiquant le tri sélectif)
Ce symbole sur le produit, ses accessoires ou sa documentation indique que ni le produit, ni ses accessoires
électroniques usagés (chargeur, casque audio, câble USB, etc.) ne peuvent être jetés avec les autres déchets
ménagers. La mise au rebut incontrôlée des déchets présentant des risques environnementaux et de santé publique,
veuillez séparer vos produits et accessoires usagés des autres déchets. Vous favoriserez ainsi le recyclage de la
matière qui les compose dans le cadre d’un développement durable.
Les particuliers sont invités à contacter le magasin leur ayant vendu le produit ou à se renseigner auprès des autorités
locales pour connaître les procédures et les points de collecte de ces produits en vue de leur recyclage.
Les entreprises et professionnels sont invités à contacter leurs fournisseurs et à consulter les conditions de leur contrat
de vente. Ce produit et ses accessoires ne peuvent être jetés avec les autres déchets professionnels et commerciaux.
Elimination des batteries de ce produit
(Applicable aux pays de l’Union européenne et aux autres pays européens dans lesquels des systèmes de
collecte sélective sont mis en place.)
Le symbole sur la batterie, le manuel ou l'emballage indique que les batteries de ce produit ne doivent pas être
éliminées en fin de vie avec les autres déchets ménagers. L'indication éventuelle des symboles chimiques Hg,
Cd ou Pb signifie que la batterie contient des quantités de mercure, de cadmium ou de plomb supérieures aux
niveaux de référence stipulés dans la directive CE 2006/66. Si les batteries ne sont pas correctement éliminées,
ces substances peuvent porter préjudice à la santé humaine ou à l'environnement.
Afin de protéger les ressources naturelles et d'encourager la réutilisation du matériel, veillez à séparer les batteries
des autres types de déchets et à les recycler via votre système local de collecte gratuite des batteries.
HT-D5500_FRA_0314.indd 78HT-D5500_FRA_0314.indd 78 2011-03-14 7:44:302011-03-14 7:44:30
La pagina si sta caricando...
La pagina si sta caricando...
La pagina si sta caricando...
La pagina si sta caricando...
La pagina si sta caricando...
La pagina si sta caricando...
La pagina si sta caricando...
La pagina si sta caricando...
La pagina si sta caricando...
La pagina si sta caricando...

Deutsch 11
01 Erste Schritte
Dateierweiterung
Ballastbehälter
Video Codec Audio Codec Auflösung
*.vro
VRO
VOB
MPEG2
AC3
MPEG
LPCM
1920x1080
MPEG1
352x288
*.mpg
*.mpeg
PS
MPEG1
AC3
MPEG
LPCM
AAC
352x288
MPEG2
1920x1080
H.264
1920x1080
*.ts
*.tp
*.trp
TS
MPEG2
AC3
AAC
MP3
DD+
HE-AAC
1920x1080
H.264
1920x1080
VC1
1920x1080
Beschränkungen
Einige der oben aufgelisteten Codecs werden nicht unterstützt, wenn es ein Problem mit dem Inhalt gibt.
Videoquellen mit unkorrekter Inhaltsbezeichnung oder Beschädigungen werden nicht ordnungsgemäß abgespielt.
AV-Quellen mit mehr als der Standard-Bitrate oder -Bildfrequenz können nicht ordnungsgemäß abgespielt werden.
Wenn das Indexverzeichnis beschädigt ist, arbeitet die Such- (Jump-)Funktion nicht.
Wenn Sie ein Video über das Netzwerk abspielen, kann es passieren, dass es je nach Netzwerkstatus
nicht ordnungsgemäß abgespielt wird.
Videodecodierer
Bis zu H.264 Level 4.1 wird unterstützt.
H.264 FMO/ASO/RS, VC1 SP/MP/AP L4, AVCHD werden nicht unterstützt.
XVID, MPEG4 SP, ASP :
- Unter 1280 x 720: maximal 60 Einzelbilder
- Über 1280 x 720: maximal 30 Einzelbilder
GMC 2 oder höher werden nicht unterstützt.
Audiodecodierer
Bis zu WMA 7,8,9 wird unterstützt.
WMA 9 PRO mit mehr als zwei Kanälen (Multi-Kanal) wird nicht unterstützt.
WMA 9 Lossless, Voice wird nicht unterstützt.
WMA Abtastrate bei 22050Hz Mono wird nicht unterstützt.
Unterstützte Musikdatei
Dateierweiterung Ballastbehälter Audio Codec Frequenzbereich
*.mp3
MP3
MP3 -
*.wma
WMA
WMA
Kompatibel WMA Version 10
* Samplingraten sind (in kHz) - 8, 11, 16, 22,
32, 44.1, 48 (im kHz)
* Bitraten - alle Bitraten im Bereich 5 kbps zu
384 kbps
•
•
•
•
•
•
•
•
•
•
•
•
•
HT-D5500_GER_0314.indd 11HT-D5500_GER_0314.indd 11 2011-03-14 7:38:402011-03-14 7:38:40
La pagina si sta caricando...
La pagina si sta caricando...
La pagina si sta caricando...
La pagina si sta caricando...
La pagina si sta caricando...

Deutsch 17
02 Anschlüsse
Front-Lautsprecher
ei
Platzieren Sie diese Lautsprecher vor Ihrer Hörposition, so dass sie nach innen
zeigen (in einem Winkel von ca. 45°) und auf Sie ausgerichtet sind. Platzieren Sie
die Lautsprecher so, dass die Hochtöner sich auf einer Höhe mit Ihren Ohren
befi nden. Richten Sie die Vorderseite der Front-Lautsprecher an der Vorderseite
des Center-Lautsprechers aus, oder versetzen Sie sie etwas vor die Center-
Lautsprecher.
Center-Lautsprecher
f
Dieser wird am besten auf gleicher Höhe wie die Front-Lautsprecher installiert.
Sie können ihn aber auch direkt über oder unter dem Fernsehgerät platzieren.
Rückwärtige Surround-
Lautsprecher
hj
Platzieren Sie diese Lautsprecher seitlich von Ihrer Sitzposition. Falls dafür der
Platz nicht ausreicht, platzieren Sie sie einander gegenüberliegend. Platzieren
Sie sie 60-90 cm über Ihrem Kopf, leicht nach unten ausgerichtet.
*
Anders als die Front- und Center-Lautsprecher sorgen die Surround-
Lautsprecher hauptsächlich für Klangeffekte, so dass sie nicht fortwährend
Töne wiedergeben.
Subwoofer
g
Die Position des Subwoofers ist nicht wichtig. Sie können ihn beliebig platzieren.
ACHTUNG
Achten Sie darauf, dass Kinder nicht mit den Lautsprechern oder in deren Nähe spielen. Sie
können durch umkippende Lautsprecher verletzt werden.
Stellen Sie beim Anschluss der Lautsprecherkabel mit den Lautsprechern sicher, dass die
Polarität (+/ -) korrekt ist.
Halten Sie den Subwoofer außerhalb der Reichweite von Kindern. Verhindern Sie, dass Kinder
ihre Hände oder Fremdkörper in die Schallöffnung des Subwoofers einführen.
Hängen Sie den Subwoofer nicht an der Schallöffnung an der Wand auf.
HINWEIS
Wenn Sie einen Lautsprecher in der Nähe des Fernsehers aufstellen, können die Bildschirmfarben
aufgrund des magnetischen Feldes, das der Lautsprecher erzeugt, gestört werden. In diesem Fall
platzieren Sie den Lautsprecher weiter vom Fernsehgerät entfernt.
!
✎
Platzierung des Heimkino-Systems.
Platzieren Sie das Gerät auf einem Regal, einer
Kommode oder unter dem Fernsehtisch.
Wahl der Sitzposition
Wählen Sie Ihre Sitzposition in einem Abstand
zum Fernsehgerät, welcher der 2,5-3-fachen
Größe des Bildschirms entspricht.
Beispiel: Bei einem 32-Zoll-Monitor etwa 2-2,4 Meter
Bei einem 55-Zoll-Monitor etwa 3,5-4 Meter
In diesem Kapitel werden verschiedene Möglichkeiten erläutert, das Heimkino-System mit anderen externen
Komponenten zu verbinden. Bevor Sie das Gerät installieren oder an einer anderen Stelle aufstellen, müssen Sie
es ausschalten und den Netzstecker ziehen.
Lautsprecher anschließen
Anschlüsse
SW
2,5-3x Größe des Bildschirms
HT-D5500_GER_0314.indd 17HT-D5500_GER_0314.indd 17 2011-03-14 7:38:432011-03-14 7:38:43
La pagina si sta caricando...

Deutsch 19
02 Anschlüsse
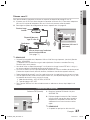
Anschließen der Lautsprecher
Drücken Sie die Anschlusslasche an der Rückseite des Lautsprechers
herunter.
Führen Sie das schwarze Kabel in den schwarzen Anschluss (-) und
das rote Kabel in den roten Anschluss (+) ein. Lassen Sie die Lasche
dann wieder los.
Beachten Sie beim Anschließen der Lautsprecher an der Rückseite des
Produkts, dass die Farben der Stecker denen der Buchsen entsprechen.
1.
2.
3.
Schwarz
Rot
Zum Installieren der Lautsprecher auf dem Tallboy-Stand.
* Nur HT-D5530 – Front-Lautsprecher
* Nur HT-D5550 – Front-/Surround-Lautsprecher
Stellen Sie die Bodenplatte auf den Kopf, und
befestigen Sie den Ständer.
Drehen Sie mit Hilfe eines Schraubendrehers vier
kleine Schrauben (4x20, für die Verbindung
zwischen Bodenplatte und Ständerpfosten) im
Uhrzeigersinn in die vier mit Pfeilen
gekennzeichneten Löcher (siehe Abbildung).
ACHTUNG
Wenn Sie einen Drehmoment-Schraubendreher
verwenden, vermeiden Sie übermäßigen
Krafteinsatz. Anderenfalls kann er leer laufen oder
beschädigt werden. (Drehmoment-
Schraubendreher – 15 Kg.pro Zentimeter)
Befestigen Sie den zusammengesetzten Stand am
oberen Lautsprecher.
Drehen Sie mit einem Schraubendreher eine weitere
große Schraube (5*15, für die Verbindung zwischen
Bodenplatte und Ständerpfosten) im Uhrzeigersinn in
das Loch auf der Rückseite des Lautsprechers.
Dies ist das Aussehen nachdem die Lautsprecher
installiert wurde Folgen Sie diesen Schritten, um
zusätzliche Lautsprecher zu montieren.
1.
2.
!
3.
4.
5.
4
2
Stand
Stand
Base
1
3
Stand
Speaker
5
or
FRONT
SPEAKERS OUT
SPEAKER IMPEDANCE : 3
VIDEO OUT
SURROUND
SUBWOOFER
CENTER FRONT SURROUND
ONENT OUT
VIDEO OUT
NT OUT
FRONT
SPEAKERS OUT
SPEAKER IMPEDANCE : 3
SURROUND
SUBWOOFER
CENTER FRONT
SURROUND
Für das Modell HT-D5500
* Weitere Informationen zu den HT-D5530/HT-D5550-Lautsprechern fi nden Sie auf Seite 18.
Center-Lautsprecher
Front-Lautsprecher
(R)
Subwoofer
Surround-Lautsprecher (R)
Front-Lautsprecher
(L)
Surround-Lautsprecher (L)
HT-D5500_GER_0314.indd 19HT-D5500_GER_0314.indd 19 2011-03-14 7:39:032011-03-14 7:39:03
La pagina si sta caricando...
La pagina si sta caricando...
La pagina si sta caricando...
La pagina si sta caricando...
La pagina si sta caricando...
La pagina si sta caricando...
La pagina si sta caricando...
La pagina si sta caricando...
La pagina si sta caricando...
La pagina si sta caricando...
La pagina si sta caricando...
La pagina si sta caricando...
La pagina si sta caricando...

Deutsch 33
03 Einstellung
HINWEIS
Falls das von Ihnen an das Produkt
angeschlossene Fernsehgerät den Videorahmen
oder die von Ihnen gewählte Aufl ösung nicht
unterstützt, wird folgende Meldung angezeigt:
,,Wenn keine Bilder nach der Auswahl angezeigt
werden, warten Sie 15 Sekunden. Und dann wird
die Aufl ösung automatisch auf den vorherigen
Wert zurückgesetzt. „Möchten Sie eine Auswahl
treffen?“ erscheint Wenn Sie Ja auswählen, bleibt
der Bildschirm für 15 Sekunden leer, und dann
setzt sich die Aufl ösung automatisch auf die
vorherige Aufl ösung zurück.
Wenn der Bildschirm nach dem Ändern der
Aufl ösung leer bleibt, entnehmen Sie alle Disks
und halten Sie dann die Taste STOPP () auf der
Vorderseite des Produkts mindestens 5
Sekunden lang gedrückt. Alle Einstellungen
werden auf die werksseitigen
Standardeinstellungen zurückgesetzt. Folgen Sie
den Anweisungen auf der vorherigen Seite, um
auf die einzelnen Modi zuzugreifen, und wählen
Sie die Anzeigeeinstellungen, die von Ihrem
Fernsehgerät unterstützt werden.
Wenn die Werkseinstellungen wieder hergestellt
werden, werden alle gespeicherten BD-Daten
gelöscht.
Der Blu-ray Disk muss die 24-Bilder-Funktion für
das Produkt unterstützen, um den Filmrahmen
(24 B/Sek.)-Modus zu verwenden.
Wenn sowohl HDMI- als auch Component-
Anschlüsse verbunden sind und Sie sehen mit
Hilfe des Komponent-Ausgangs, wird die
Aufl ösung auf 576i/480i fi xiert.
HDMI-Farbformat
Hier kann das Farbraumformat für die HDMI-
Wiedergabe an die Möglichkeiten des
angeschlossenen Geräts (Fernsehgerät,
Bildschirm, usw.) angepasst werden.
Auto : Stellt Ihr Produkt automatisch auf das
optimale Format ein, das Ihr Gerät unterstützt.
YCbCr (4:4:4) : Wenn Ihr Fernsehgerät den
YCbCr Farbraum über HDMI unterstützt, stellen
Sie diese Option ein, um die normale YCbCr
Farbskala wiederzugeben.
RGB (Standard) : Wählen Sie diese Option,
um die normale RGB Farbskala
wiederzugeben.
RGB (Erweitert) :
Wenn Sie das Produkt an ein
DVI-Anzeigegerät wie beispielsweise einen
Monitor angeschlossen haben, wählen Sie dieses
aus, um die erhöhte RGB-Farbskala auszugeben.
✎
•
•
•
•
Film-Bildfrequenz (24 fps)
Das Einstellen des Videorahmens (24 B/Sek.) auf
Auto, erlaubt Ihnen, die HDMI-Ausgabe des
Produkts für eine verbesserte Bildqualität auf 24
Bilder pro Sekunde einzustellen.
Voraussetzung für die Nutzung der Funktion
Videorahmen (24 B/Sek.) ist ein Fernsehgerät, das
diese Bildfrequenz unterstützt. Sie können
Videorahmen nur auswählen, wenn sich das
Produkt im HDMI 1080i- oder 1080p-
Ausgabemodus befi ndet.
Auto : Videorahmen (24 B/Sek.) -Funktionen
sind aktiviert.
Aus :
Videorahmen (24 B/Sek.) -Funktionen sind
deaktiviert.
HDMI-Deep Color
Erlaubt es Ihnen, Videos aus dem HDMI-
AUSGANG mit Tiefer Farbe abzuspielen. Tiefe
Farbe bietet genauere Farbwiedergabe mit
größerer Farbtiefe.
Auto : Das Produkt gibt Videos mit Tiefe Farbe
an das angeschlossene Fernsehgerät aus, das
HDMI- Deep Color unterstützt.
Aus : Die Bildausgabe erfolgt ohne Tiefe Farbe.
Standbild-Modus
Erlaubt Ihnen, den Bildtyp, der während der
Pausierung der DVD-Wiedergabe angezeigt
werden soll, einzustellen.
Auto : Zeigt je nach Inhalt automatisch das
beste Standbild an.
Frame : Wählt bei der Unterbrechung der
Wiedergabe eine bewegungsarme Szene aus.
Feld : Wählt bei der Unterbrechung der
Wiedergabe eine aktionsreiche Szene aus.
Progressiver Modus
Erlaubt es Ihnen, die Bildqualität während des
Ansehens von DVDs zu verbessern.
Auto : Wählen Sie diese Option aus, damit das
Produkt für die DVD, die Sie gerade ansehen,
automatisch die beste Bildqualität festlegt.
Video : Wählen Sie diese Option für die beste
Bildqualität bei DVDs mit Konzerten oder TV-
Shows aus.
•
•
•
•
•
•
•
•
•
HT-D5500_GER_0314.indd 33HT-D5500_GER_0314.indd 33 2011-03-14 7:39:232011-03-14 7:39:23
La pagina si sta caricando...
La pagina si sta caricando...
La pagina si sta caricando...
La pagina si sta caricando...
La pagina si sta caricando...
La pagina si sta caricando...
La pagina si sta caricando...
La pagina si sta caricando...
La pagina si sta caricando...
La pagina si sta caricando...
La pagina si sta caricando...
La pagina si sta caricando...
La pagina si sta caricando...
La pagina si sta caricando...
La pagina si sta caricando...
La pagina si sta caricando...
La pagina si sta caricando...
La pagina si sta caricando...
La pagina si sta caricando...
La pagina si sta caricando...
La pagina si sta caricando...
La pagina si sta caricando...
La pagina si sta caricando...
La pagina si sta caricando...
La pagina si sta caricando...
La pagina si sta caricando...
La pagina si sta caricando...
La pagina si sta caricando...
La pagina si sta caricando...
La pagina si sta caricando...
La pagina si sta caricando...
La pagina si sta caricando...
La pagina si sta caricando...
La pagina si sta caricando...
La pagina si sta caricando...
La pagina si sta caricando...
La pagina si sta caricando...
La pagina si sta caricando...
La pagina si sta caricando...
La pagina si sta caricando...
La pagina si sta caricando...
La pagina si sta caricando...
La pagina si sta caricando...
La pagina si sta caricando...
La pagina si sta caricando...
La pagina si sta caricando...
La pagina si sta caricando...
La pagina si sta caricando...
La pagina si sta caricando...
La pagina si sta caricando...
La pagina si sta caricando...
La pagina si sta caricando...
La pagina si sta caricando...
La pagina si sta caricando...
La pagina si sta caricando...
La pagina si sta caricando...
La pagina si sta caricando...
La pagina si sta caricando...
La pagina si sta caricando...
La pagina si sta caricando...
La pagina si sta caricando...
La pagina si sta caricando...
La pagina si sta caricando...
La pagina si sta caricando...
La pagina si sta caricando...
La pagina si sta caricando...
La pagina si sta caricando...
La pagina si sta caricando...
La pagina si sta caricando...
La pagina si sta caricando...
La pagina si sta caricando...
La pagina si sta caricando...
La pagina si sta caricando...
La pagina si sta caricando...
La pagina si sta caricando...
La pagina si sta caricando...
La pagina si sta caricando...
La pagina si sta caricando...
La pagina si sta caricando...
La pagina si sta caricando...
La pagina si sta caricando...
La pagina si sta caricando...
La pagina si sta caricando...
La pagina si sta caricando...
La pagina si sta caricando...
La pagina si sta caricando...
La pagina si sta caricando...
La pagina si sta caricando...
La pagina si sta caricando...
La pagina si sta caricando...
La pagina si sta caricando...
La pagina si sta caricando...
La pagina si sta caricando...
La pagina si sta caricando...
La pagina si sta caricando...
La pagina si sta caricando...
La pagina si sta caricando...
La pagina si sta caricando...
La pagina si sta caricando...
La pagina si sta caricando...
La pagina si sta caricando...
La pagina si sta caricando...
La pagina si sta caricando...
La pagina si sta caricando...
La pagina si sta caricando...
La pagina si sta caricando...
La pagina si sta caricando...
La pagina si sta caricando...
La pagina si sta caricando...
La pagina si sta caricando...
La pagina si sta caricando...
La pagina si sta caricando...
La pagina si sta caricando...
La pagina si sta caricando...
La pagina si sta caricando...
La pagina si sta caricando...
La pagina si sta caricando...
La pagina si sta caricando...
La pagina si sta caricando...
La pagina si sta caricando...
La pagina si sta caricando...
La pagina si sta caricando...
La pagina si sta caricando...
-
 1
1
-
 2
2
-
 3
3
-
 4
4
-
 5
5
-
 6
6
-
 7
7
-
 8
8
-
 9
9
-
 10
10
-
 11
11
-
 12
12
-
 13
13
-
 14
14
-
 15
15
-
 16
16
-
 17
17
-
 18
18
-
 19
19
-
 20
20
-
 21
21
-
 22
22
-
 23
23
-
 24
24
-
 25
25
-
 26
26
-
 27
27
-
 28
28
-
 29
29
-
 30
30
-
 31
31
-
 32
32
-
 33
33
-
 34
34
-
 35
35
-
 36
36
-
 37
37
-
 38
38
-
 39
39
-
 40
40
-
 41
41
-
 42
42
-
 43
43
-
 44
44
-
 45
45
-
 46
46
-
 47
47
-
 48
48
-
 49
49
-
 50
50
-
 51
51
-
 52
52
-
 53
53
-
 54
54
-
 55
55
-
 56
56
-
 57
57
-
 58
58
-
 59
59
-
 60
60
-
 61
61
-
 62
62
-
 63
63
-
 64
64
-
 65
65
-
 66
66
-
 67
67
-
 68
68
-
 69
69
-
 70
70
-
 71
71
-
 72
72
-
 73
73
-
 74
74
-
 75
75
-
 76
76
-
 77
77
-
 78
78
-
 79
79
-
 80
80
-
 81
81
-
 82
82
-
 83
83
-
 84
84
-
 85
85
-
 86
86
-
 87
87
-
 88
88
-
 89
89
-
 90
90
-
 91
91
-
 92
92
-
 93
93
-
 94
94
-
 95
95
-
 96
96
-
 97
97
-
 98
98
-
 99
99
-
 100
100
-
 101
101
-
 102
102
-
 103
103
-
 104
104
-
 105
105
-
 106
106
-
 107
107
-
 108
108
-
 109
109
-
 110
110
-
 111
111
-
 112
112
-
 113
113
-
 114
114
-
 115
115
-
 116
116
-
 117
117
-
 118
118
-
 119
119
-
 120
120
-
 121
121
-
 122
122
-
 123
123
-
 124
124
-
 125
125
-
 126
126
-
 127
127
-
 128
128
-
 129
129
-
 130
130
-
 131
131
-
 132
132
-
 133
133
-
 134
134
-
 135
135
-
 136
136
-
 137
137
-
 138
138
-
 139
139
-
 140
140
-
 141
141
-
 142
142
-
 143
143
-
 144
144
-
 145
145
-
 146
146
-
 147
147
-
 148
148
-
 149
149
-
 150
150
-
 151
151
-
 152
152
-
 153
153
-
 154
154
-
 155
155
-
 156
156
-
 157
157
-
 158
158
-
 159
159
-
 160
160
-
 161
161
-
 162
162
-
 163
163
-
 164
164
-
 165
165
-
 166
166
-
 167
167
-
 168
168
-
 169
169
-
 170
170
-
 171
171
-
 172
172
-
 173
173
-
 174
174
-
 175
175
-
 176
176
-
 177
177
-
 178
178
-
 179
179
-
 180
180
-
 181
181
-
 182
182
-
 183
183
-
 184
184
-
 185
185
-
 186
186
-
 187
187
-
 188
188
-
 189
189
-
 190
190
-
 191
191
-
 192
192
-
 193
193
-
 194
194
-
 195
195
-
 196
196
-
 197
197
-
 198
198
-
 199
199
-
 200
200
-
 201
201
-
 202
202
-
 203
203
-
 204
204
-
 205
205
-
 206
206
-
 207
207
-
 208
208
-
 209
209
-
 210
210
-
 211
211
-
 212
212
-
 213
213
-
 214
214
-
 215
215
-
 216
216
-
 217
217
-
 218
218
-
 219
219
-
 220
220
-
 221
221
-
 222
222
-
 223
223
-
 224
224
-
 225
225
-
 226
226
-
 227
227
-
 228
228
-
 229
229
-
 230
230
-
 231
231
-
 232
232
-
 233
233
-
 234
234
-
 235
235
-
 236
236
-
 237
237
-
 238
238
-
 239
239
-
 240
240
-
 241
241
-
 242
242
-
 243
243
-
 244
244
-
 245
245
-
 246
246
-
 247
247
-
 248
248
-
 249
249
-
 250
250
-
 251
251
-
 252
252
-
 253
253
-
 254
254
-
 255
255
-
 256
256
-
 257
257
-
 258
258
-
 259
259
-
 260
260
-
 261
261
-
 262
262
-
 263
263
-
 264
264
-
 265
265
-
 266
266
-
 267
267
-
 268
268
-
 269
269
-
 270
270
-
 271
271
-
 272
272
-
 273
273
-
 274
274
-
 275
275
-
 276
276
-
 277
277
-
 278
278
-
 279
279
-
 280
280
-
 281
281
-
 282
282
-
 283
283
-
 284
284
-
 285
285
-
 286
286
-
 287
287
-
 288
288
-
 289
289
-
 290
290
-
 291
291
-
 292
292
-
 293
293
-
 294
294
-
 295
295
-
 296
296
-
 297
297
-
 298
298
-
 299
299
-
 300
300
-
 301
301
-
 302
302
-
 303
303
-
 304
304
-
 305
305
-
 306
306
-
 307
307
-
 308
308
-
 309
309
-
 310
310
-
 311
311
-
 312
312


Samsung HT-D5500 Manuale utente
- Categoria
- Lettori Blu-Ray
- Tipo
- Manuale utente
in altre lingue
- English: Samsung HT-D5500 User manual
- français: Samsung HT-D5500 Manuel utilisateur
- Deutsch: Samsung HT-D5500 Benutzerhandbuch
Documenti correlati
-
Samsung HT-D4500 Manuale del proprietario
-
-
-
-
-
-
-
-
-
Altri documenti
-
LG HT906TAW Guida utente
-
Sony SRS-GU10iP Manuale del proprietario
-
Apple Universal Dock Manuale utente
-
-
-
Logic3 MIP199K Guida utente
-
MAC Audio 410 Manuale utente
-
Saitek A-250 WIRELESS 2.1 SPEAKER SYSTEM Manuale utente
-
Celexon Expert HDMI radiografische set WHD30M Manuale del proprietario
-
Sony PSP-2004 Quickstart Manuale utente