Moulinex BL962B Ultrablend Cook Manuale del proprietario
- Categoria
- Frullatori
- Tipo
- Manuale del proprietario

Ref. 8080017258/03
EN
FR
ES
PT
IT
EL
NL
DE
UK
RU
KK
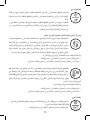
AR
FA
EN
FR
ES
PT
IT
EL
NL
DE
UK
RU
KK
AR
FA
p. 1 - 6
p. 7 - 12
p. 13 - 18
p. 19 - 24
p. 25 - 30
p. 31 - 36
p. 37 - 42
p. 43 - 48
p. 49 - 54
p. 55 - 60
p. 61 - 66
p. 67 - 73
p. 74 - 80
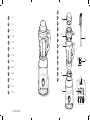
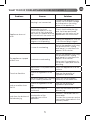
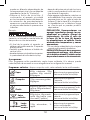
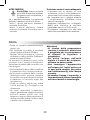
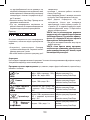
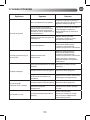
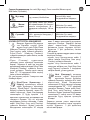
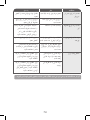
A
F
M
B
C
D
E
I
G
KJ L H

2
1
1
2
2
1
1
2
1

1
A.
Lid cap
B.
Lid
C.
Jug
D.
Removable silicone gasket
E.
Motor unit
F.
Brush
G.
Screen
H.
Start/Stop button
I.
Program selector
J.
Pulse/Clean button
K.
Blend/Pause button
L.
Heat button
M.
Measuring cap
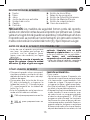
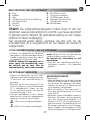
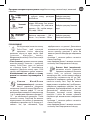
DESCRIPTION OF THE APPLIANCE
BEFORE USING YOUR APPLIANCE FOR THE FIRST TIME
EN
• Before using your appliance for the
first time, rinse the parts that come
into contact with food (jug, lid and
measuring cap) with soapy water
CAUTION : Do not immerse the
appliance in water (neither the
motor unit nor the jug base). Never
put the motor unit (E) under running
water.
Clean with a damp cloth and dry
it carefully.
The blades are extremely sharp and
not removable.
• Make sure all the packaging has
been removed before operating the
appliance.
CAUTION: The safety precautions are part of the appliance.
Read them carefully before using your new appliance for
the first time. Keep them in a place where you can find and
refer to them later on.
The appliance will only start if the jug is correctly positioned
on the motor unit (E) and the lid locked on the jug.
USING YOUR APPLIANCE
• Put the appliance on a flat, stable,
heat-resistant surface away from
sources of heat or water splashes.
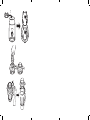
• Make sure the silicone gasket (D) is in
place on the motor unit (E). Position the
jug (C) correctly on the motor unit Fig.
1 and 2.
• Add the ingredients into the assembled
jug without exceeding the maximum
level indicated:
-
1750 ml max for cold preparation
-
1400 ml max for hot preparation
AUTOMATIC FUNCTION:
How to use :
• Lock the lid on the jug and place the
lid cap in position on the lid and lock it
by rotating it. The appliance only starts
up once the jug and lid are correctly
in place.
• Plug in the blender. The product makes
a beep and the screen lights up.
• The product will be immediatly in
standby mode. At this stage you
can select a program by turning the
program selector (l). The led will turn on
on the selected program. The recipe
time information will be displayed.
For hot programs, please note that
the time indicated does not take into

2
account the pre-heating time needed
which may vary according to the
initial temperature and quantity of
your ingredients (between 5 and 15
minutes).
• Press the start/stop button. Then the
appliance starts to work automatically.
• The pre-heat animation appears on the
display during pre-heating time for hot
recipes
Example:
Once the pre-heating phase is
completed, the recipe cooking time
countdown will start.
• At the end of the recipe, the blender
stops automatically. The appliance
bips 5 times.
• You can also stop the blending during
the cycle:
- within 1 minute of working, press the
start/stop button
- more than 1 minute of working, press
and hold the start/stop button for 3
seconds
• To add ingredients while blending for
cold preparation only, remove the lid
cap (A) from the lid (B) and add the
ingredients through the feeder hole.
Beware of the risk of spatter.
CAUTION : We recommend not to
add ingredients while blending hot
preparations. (risk of splashing).
Do not remove the lid cap (A) from
the lid (B) during hot preparations.
It can reach high temperature and
cause burns.
• Do not shake the motor unit or the jug
when the blender is in use.
CAUTION: After running one
program, especially long recipe,
let the blender rest for minimum 5
minutes before operating it again.
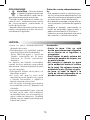
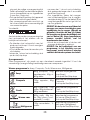
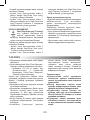
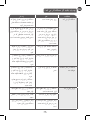
8 programs :
These programs are predifined on a standard basis. You can freely add extra heating/
blending thanks to the manual settings at your convenience.
Hot programs :
Soup, Compote, Coulis, Hot sauce, Mutligrain milk.
Soup
600g pumpkin, 120g
potato, 80g onion, 600g
water.
Select Soup program
Press Start/Stop button
Compote
700g golden apple, 50g
water.
Select Compote
program
Press Start/Stop button
Coulis
60g lemon juice, 100g
sugar, 250g blueberry,
250g strawberry.
Select Coulis program
Press Start/Stop button
Hot sauce
500g milk, 45g butter,
45g flour, nugmeg (1
pinch)
Select Hot soup
program
Press Start/Stop button
Multigrain
milk
100g almond, 1L water.
Select
Select Multigrain milk
program
Press Start/Stop button

2
3
Cold programs :
Ice crush, Green smoothie, Milk shake,
MANUAL FUNCTIONS:
•
Pulse:
Press the pulse/clean
button to let the appliance run
for only a few seconds at a
time. To stop it, release the button. Press
the pulse/clean button as often as it is
necessary.
•
Clean
: allows to pulse/clean your
appliance with soapy water. Press and
hold the pulse/clean button until the
letter H (maximum speed) appear on
the screen. Release the button to stop
after 15 to 30 seconds to complete the
cleaning sequence.
The longest working time can not be
more than 3 minutes.
•
Blend/Pause
: allows to freely
control the way you want to
blend. Press the blend/pause
button, the screen indicates « 5 » but you
can choose the blending speed from 1
up to 9 by turning program selector (I). «
H » is the maximum speed. Then press
start/stop button. You can set up the
working time by turning program
selector, between 10secondes and 3
minutes. The remaining time appears on
the screen. Wait for the blender to stop
automatically. The appliance bips 5
times.
You can also stop the blending during
the cycle :
- within 1 minute of working, press the
start/stop button
- more than 1 minute of working, press
and hold the start/stop button for 3
seconds
•
Heat
: allows to freely control
the way you want to heat.
Press the heat button, the
screen indicates « 60 » but you can
choose the heating temperature from
40° up to 100° by turning program
selector (I). Then press start/stop button.
You can set up the working time by
turning program selector, beetween 5
minutes and 90 minutes.
The remaining time appears on the
screen. Wait for the blender to stop
automatically. The appliance beeps 5
times.
You can also stop the blending during
the cycle :
- within 1 minute of working, press the
start/stop button
- more than 1 minute of working, press
and hold the start/stop button for 3
seconds
EN
Ice crush
8x Ice cube 30x30x40 mm
Select Ice crush program
Press Start/Stop button
Green
smoothie
200g cucumber, 2 kiwi, 150g
pineapple, 60g cabbage,
50g fresh spinach leaves, 50g
celery stalks, 100ml water
Select Green smoothie
program
Press Start/Stop button
Milk shake
100g vanilla ice cream, 1
banana, 25cl milk
Select Milk shake program
Press Start/Stop button

4
OTHER FUNCTIONS
•
Start/Stop
: allows to stop any
blending or heating program
before the end by pressing this
button.
You can also stop the blending during
the cycle :
- within 1 minute of working, press the
start/stop button
- more than 1 minute of working, press
and hold the start/stop button for 3
seconds
Overload protection
• The appliance is equipped with
overload protection. This prevents
the motor from being damaged by
overloading.
If the appliance switches off during
operation, proceed as follows :
- Switch the appliance off using the
power button, unplug and leave it to
cool down for approximately 15-20
minutes.
- Reconnect the appliance to the power
supply and resume blending.
•
Clean the jug immediately after use.
•
For easy cleaning, you can use the
Pulse/Clean button :
- Put 150ml of water and 1 drop of
washing up liquid in the jug. Press
the Pulse/Clean button.
An excess of washing up liquid creates
more foam and consequently can
lead to overflowing. Finish cleaning
the jug with the aid of a sponge.
•
Rinse the inside of the jug and the lid
under running water.
•
In the event of the heated part of
the jug getting extremely dirty, fill
in the jar with a mix of water and
washing up liquid and let it soaked
for a few hours to help get it clean.
•
Use a damp cloth to clean the motor
unit (E). Dry it carefully.
•
The detachable parts (lid, lid cap,
carrier seal, seal, measuring cap)
can be cleaned with a sponge and
hot soapy water. You can also use
the brush to clean the inside of the
jug.
Caution:
•
Empty the preparation, the jug is
not meant for storing food in the
refrigerator or freezer.
•
To clean the outside of the motor
unit and the walls of the jug, use a
damp cloth.
•
Do not immerse the appliance in
water (neither the motor unit nor
the jug base). Never put the motor
unit (E) under running water.
•
The jug, lid cap and removable
silicone gasket must not go in the
dishwasher.
CLEANING

4
5
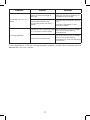
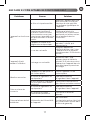
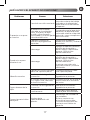
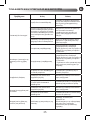
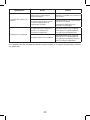
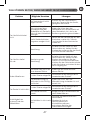
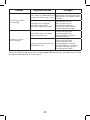
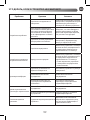
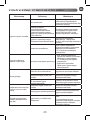
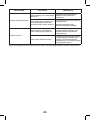
WHAT TO DO IF YOUR APPLIANCE DOES NOT WORK ?
Problems Causes Solutions
Appliance does not
work
The plug is not connected.
Connect the appliance to a
socket with the same voltage
as indicated on the rating
plate of the appliance.
The blender jug is not
positioned correctly on the
motor unit or the jug and lid
are correctly in place and are
not locked onto the motor unit.
Check that the blender jug
and the lid are positioned
properly on the motor unit as
explained in the instructions.
Appliance, keypboard or
program not responding
Unplug the appliance, wait for
1 minute and plug in again.
In case of overheating
Switch the appliance off using
the power button, unplug
and leave it to cool down for
approx.15-20 minutes.
The appliance stopped
while in use
Overload or overheating
Switch the appliance off using
the power button, unplug
and leave it to cool down for
approx.15-20 minutes.
Reconnect the appliance to
the power supply and resume
blending.
Excessive vibrations
The product is not placed on a
flat surface.
Place the appliance on a flat
surface.
Volume of ingredients is too
high.
Reduce the quantity of
ingredients processed.
The silicon gasket (D) is missing
or not correctly positioned.
Place the silicone gasket
correctly on the motor unit.
Leak or overflow from
the lid
Volume of ingredients is too
high.
Reduce the quantity of
ingredients processed.
The lid is not correctly
positioned.
Place the lid correctly on the
blender jug.
Leak from the bottom of
the blender jug
Deterioration of the
watertightness of the
appliance.
Caution : the blades are not
removable.
Contact the consumer service,
see contact information in the
warranty leaflet.
EN

6
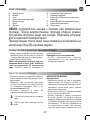
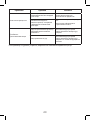
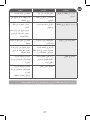
Problems Causes Solutions
The blades do not turn
easily
Pieces of food too large or
too hard.
Reduce the size or quantity of
ingredients processed.
The blended liquid is too
hot and distorted the silicon
gasket.
Contact the consumer service,
see
contact information in the
warranty leaflet.
Cooking problem
The food is not cooked enough
or / The food is overcooked
use manual function to adapt
time of use and heating
temperature
Food sticks to the bottom
use manual function to adapt
time of use and heating
temperature. And see cleaning
instructions
If your appliance is still not running properly, please contact the customer service
department for your country.

6
7
FR
A.
Bouchon
B.
Couvercle
C.
Bol
D.
Joint silicone amovible
E.
Bloc moteur
F.
Brosse
G.
Écran
H.
Bouton start / stop
I.
Sélecteur de programme
J.
Bouton Pulse/Nettoyer
K.
Bouton Mixer/Pause
L.
Bouton Chauffer
M.
Verre doseur
DESCRIPTION DE L’APPAREIL
AVANT LA PREMIÈRE UTILISATION DE VOTRE APPAREIL
• Avant d’utiliser votre appareil pour la
première fois, lavez à la main les pièces
entrant en contact avec les aliments
(bol, couvercle et verre doseur) à l’eau
chaude savonneuse.
ATTENTION : N’immergez pas l’appareil
dans de l’eau (ni le bloc moteur ou la
base du bol). Ne placez jamais le bloc
moteur (E) sous de l’eau courante.
Nettoyez l’appareil avec un chiffon
humide et séchez-le soigneusement.
Les lames sont extrêmement
coupantes et ne sont pas amovibles.
• Vérifiez que tous les éléments
d’emballage ont été retirés avant
d’utiliser l’appareil.
ATTENTION: Les consignes de sécurité font partie de l’appareil.
Lisez cette notice d’utilisation attentivement avant d’utiliser votre
nouvel appareil pour la première fois. Conservez-la dans un
endroit accessible pour pouvoir la consulter ultérieurement.
L’appareil ne peut fonctionner que si le bol est correctement
positionné sur le bloc moteur (E).
UTILISER VOTRE APPAREIL
• Placez l’appareil sur un plan de travail
stable, résistant à la chaleur, propre et
sec.
• Vérifiez que le joint silicone (D) est en
place sur le bloc moteur (E). Positionnez
le bol (C) correctement sur le bloc
moteur Images 1 et 2.
• Mettez les ingrédients dans le bol
assemblé sans dépasser le niveau
maximal indiqué :
-
1750 ml max pour une préparation
froide
-
1400 ml pour une préparation
chaude
FONCTION AUTOMATIQUE :
Instructions d’utilisation :
• Verrouillez le couvercle sur le bol, pla-
cez le bouchon sur le couvercle et
verrouillez-le en le faisant tourner. L’ap-
pareil ne se met en marche que si le
bol et le couvercle sont correctement
assemblés.
• Branchez le blender. L’appareil bipe et
l’écran s’allume.
• L’appareil est immédiatement en
mode veille. Sélectionnez le pro-
gramme en tournant le sélecteur de
programme (I). La LED s‘allume sur le
programme sélectionné. Pour les pro-
grammes chauds, veuillez noter que
le temps indiqué ne prend pas en
compte le temps de préchauffage

8
nécessaire qui peut varier selon la
température initiale et la quantité d’in-
grédients (entre 5 et 15 minutes).
• Appuyez sur le bouton start / stop.
L’appareil se met en marche automa-
tiquement.
• L’animation de préchauffage apparaît
à l’écran pendant le temps de pré-
chauffage pour les recettes chaudes.
Exemple:
Une fois la phase de préchauffage
terminée, l’appareil commence à
décompter le temps de la recette.
• À la fin de la recette, le blender s’arrête
automatiquement. L’appareil bipe 5
fois.
• Vous pouvez également arrêter le
mixage pendant le cycle :
- Pendant la première minute de
fonctionnement : en appuyant sur le
bouton start / stop.
- Après 1 minute de fonctionnement : en
appuyant 3 secondes sur le bouton start
/ stop.
• Pour ajouter des ingrédients pendant
le mixage, retirez le bouchon (A) du
couvercle (B) et ajoutez les ingrédients
par l’orifice d’insertion. Prenez garde au
risque d’éclaboussures.
ATTENTION : Nous recommandons de
ne pas ajouter d’ingrédients pendant
le mixage de préparations chaudes
(risques d’éclaboussures). N’enlevez
pas le bouchon (A) pendant les
préparations chaudes. Cela peut
provoquer des brûlures.
• Ne secouez pas le bloc moteur ou le bol
pendant l’utilisation du blender.
ATTENTION : Après avoir utilisé le
blender pour un cycle, notamment un
cycle long, laissez-le reposer 5 minutes
minimum avant de le réutiliser.
8 programmes :
Ces programmes sont prédéfinis sur une base standard. Vous pouvez modifier la
vitesse de mixage ou la température grâce aux réglages manuels selon vos besoins.
Recettes chaudes :
soupes, compote, coulis, sauces chaudes, lait multicéréale.
Soupe
600 g de potiron, 120 g
de pommes de terre, 80
g d’oignons, 600 g d’eau.
Selectionnez le programme
Soupe
Appuyez sur le bouton Start/Stop
Compote
700 g de pommes gol-
den, 50 g d’eau.
Selectionnez le programme
Compote
Appuyez sur le bouton Start/Stop
Coulis
60 g de jus de citron,
100 g de sucre, 250 g de
myrtilles, 250 g de fraises.
Selectionnez le programme
Coulis
Appuyez sur le bouton Start/Stop
Sauce
500 g de lait, 45 g de
beurre, 45 g de farine, noix
de muscade (1 pincée)
Selectionnez le programme
Hot sauce
Appuyez sur le bouton Start/Stop
Lait
végétal
100 g d’amandes, 1 L
d’eau.
Selectionnez le programme
Multigrain milk
Appuyez sur le bouton Start/Stop

8
9
FR
Recettes froides :
Glace pilée, Smoothies verts, Milkshake
Glace pilée
8 x cubes de glace 30x30x40
mm
Selectionnez le programme
Ice crush
Appuyez sur le bouton Start/
Stop
Smoothie
vert
200 g de concombre, 2 kiwis,
150 g d’ananas, 60 g de choux,
50 g de feuilles d’épinard
fraiches, 50 g de branche de
célery, 100 ml d’eau
Selectionnez le
programme Green
smoothie
Appuyez sur le bouton Start/
Stop
Milkshake
100 g de glace à la vanille, 1
banane, 25 cl de lait
Selectionnez le
programme Milk shake
Appuyez sur le bouton Start/
Stop
FONCTIONS MANUELLES:
•
Pulse:
Appuyez sur le bouton
Pulse/Nettoyer pour faire fonc-
tionner l’appareil pendant
quelques secondes. Pour l’arrê-
ter, relâchez le bouton. Appuyez sur le
bouton Pulse/Nettoyer aussi souvent que
nécessaire.
•
Nettoyer
: Permet de nettoyer votre
appareil avec de l’eau savonneuse.
Appuyez longuement sur le bouton pul-
se/nettoyer jusqu’à ce que la lettre « H »
(vitesse maximale) s’affiche sur l’écran.
Relâchez le bouton pour arrêter après 15
à 30 secondes pour terminer la séquence
de nettoyage.
La durée de fonctionnement ne doit
pas dépasser 3 minutes.
•
Mixer/Pause
: Permet de
régler le mixage. Appuyez sur
le bouton Mixer/Pause, l’écran
affiche « 5 », mais vous pouvez régler la
vitesse de mixage entre 1 et 9 en
tournant le sélecteur de programme (I).
« H » est la vitesse maximale. Puis
appuyez sur le bouton start / stop. Vous
pouvez régler la durée de
fonctionnement entre 10 secondes et 3
minutes en tournant le sélecteur de
programme. La durée restante s’affiche
à l’écran. Attendez que le blender
s’arrête automatiquement. L’appareil
bipe 5 fois.
- Pendant la première minute de
fonctionnement : en appuyant sur le
bouton start / stop.
- Après 1 minute de fonctionnement :
en appuyant 3 secondes sur le bouton
start / stop.
•
Chauffer
: Permet de régler la
fonction chauffe. Appuyez sur
le bouton Chauffer, « 60 »
s’affiche à l’écran. Puis réglez la
température de chauffe entre 40 et 100
°C en tournant le sélecteur de
programme (I). Appuyez sur le bouton
start / stop. Vous pouvez également
régler la durée de fonctionnement entre
5 et 90 minutes en tournant le sélecteur
de programme.
Le temps restant s’affiche à l’écran.
Attendez que le blender s’arrête
automatiquement. L’appareil bipe 5 fois.
- Pendant la première minute de
fonctionnement : en appuyant sur le
bouton start / stop.
- Après 1 minute de fonctionnement :
en appuyant 3 secondes sur le bouton
start / stop.

10
AUTRE FONCTION
•
start / stop
: Permet d’arrêter
un programme de mixage ou
de chauffe avant la fin. Vous
pouvez également arrêter le mixage
pendant le programme :
- Pendant la première minute de
fonctionnement : en appuyant sur le
bouton start / stop.
- Après 1 minute de fonctionnement :
en appuyant 3 secondes sur le bouton
start / stop.
Protection contre la surcharge
• L’appareil intègre une protection
contre la surcharge. Cela permet
d’éviter que le moteur ne soit
endommagé par une trop grande
quantité d’ingrédients.
• Si l’appareil s’éteint pendant
l’utilisation, procédez comme suit :
- Éteignez l’appareil avec le bouton
start / stop, débranchez-le et laissez-le
refroidir pendant 15-20 minutes environ.
- Rebranchez l’appareil et poursuivez le
mixage.
•
Nettoyez le bol immédiatement
après utilisation.
•
Pour faciliter le nettoyage, vous
pouvez utiliser le bouton Pulse/
Nettoyer :
- Mettez 150 ml d’eau et 1 goutte
de liquide vaisselle dans le bol,
puis appuyez sur le bouton Pulse/
Nettoyer.
Si vous mettez trop de liquide vaisselle,
cela créera plus de mousse qui risque
alors de déborder. Terminez de
nettoyer le bol avec une éponge.
•
Rincez l’intérieur du bol et le
couvercle à l’eau courante.
•
Si la partie chauffée du bol devient
extrêmement sale, remplissez-le
avec une solution d’eau et de
liquide vaisselle, puis laissez tremper
plusieurs heures afin de faciliter le
nettoyage.
•
Nettoyez le bloc moteur (E) avec
un chiffon humide. Séchez-le
soigneusement.
•
Les pièces amovibles (couvercle,
bouchon, support de joint, joint,
verre doseur) peuvent être
nettoyées avec une éponge et de
l’eau chaude savonneuse. Vous
pouvez aussi utiliser une brosse pour
nettoyer l’intérieur du bol.
Attention:
•
Videz la préparation, le bol n’est
pas destiné à stocker des aliments
au réfrigérateur ou au congélateur.
•
Pour nettoyer l’extérieur du bloc
moteur et les parois du bol, utilisez
un chiffon humide.
•
Ne plongez pas l’appareil dans
l’eau (ni le bloc moteur ou la base
du bol). Ne mettez jamais le bloc
moteur (E) sous l’eau du robinet.
•
Le bol, le bouchon, le couvercle,
et le joint silicone amovible ne
doivent pas être nettoyés au lave-
vaisselle.
NETTOYAGE

10
11
FR
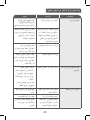
QUE FAIRE SI VOTRE APPAREIL NE FONCTIONNE PAS ?
Problèmes Causes Solutions
L’appareil ne fonctionne
pas
La fiche n’est pas branchée.
Branchez l’appareil dans une
prise fournissant une tension
identique à celle spécifiée
sur la plaque signalétique de
l’appareil.
Le bol du blender n’est pas
correctement positionné
sur le bloc moteur ou le bol
et le couvercle ne sont pas
correctement assemblés et ne
sont pas verrouillés sur le bloc
moteur.
Vérifiez que le bol et le
couvercle sont correctement
positionnés sur le bloc moteur
tel qu’expliqué dans les
instructions.
L’appareil, le clavier ou le
programme ne répond pas
Débranchez l’appareil
pendant 1 minute, puis
rebranchez-le.
En cas de surchauffe
Éteignez l’appareil en
utilisant le bouton start / stop
, débranchez-le et laissez-le
refroidir pendant 15-20 minutes
environ.
L’appareil s’éteint
pendant l’utilisation
Surcharge ou surchauffe
Éteignez l’appareil à l’aide
du bouton start / stop,
débranchez-le et laissez-le
refroidir 15-20 minutes environ.
Rebranchez l’appareil dans la
prise électrique et poursuivez
le mixage.
Vibrations excessives
L’appareil n’est pas posé sur
une surface plane.
Placez l’appareil sur une
surface plane.
Le volume d’ingrédients est
trop important.
Réduisez la quantité
d’ingrédients dans l’appareil.
Le joint silicone est manquant
ou il n’est pas correctement
positionné.
Positionnez correctement le
joint silicone sur le bloc moteur.
Fuites au niveau du
couvercle
Le volume d’ingrédients est
trop important.
Réduisez la quantité
d’ingrédients dans l’appareil.
Le couvercle n’est pas
correctement positionné.
Placez correctement le
couvercle sur le bol du
blender.
Fuites par la base du bol
du blender.
Détérioration de l’étanchéité
de l’appareil.
Attention : Les lames ne sont
pas amovibles.
Contactez le service client (voir
les coordonnées fournies dans
la fiche de garantie).

12
Problèmes Causes Solutions
Les lames tournent mal
Les morceaux d’aliment sont
trop gros ou trop durs.
Réduisez la quantité ou la taille
des ingrédients mixés.
Le liquide mixé est trop chaud
ou le joint silicone est déformé.
Contactez le service client (voir
les coordonnées fournies dans
la fiche de garantie).
Problème de cuisson
Les aliments ne sont pas
suffisamment cuits ou ils sont
trop cuits.
Réglez manuellement la durée
de fonctionnement et la
température de chauffe.
Les aliments ont collé au fond.
Réglez manuellement la
durée de fonctionnement et
la température de chauffe.
Consultez les instructions de
nettoyage.
Si votre appareil ne fonctionne toujours pas correctement, contactez le service client
dans votre pays.

12
13
ES
A.
Tapón
B.
Tapa
C.
Jarra
D.
Junta de silicona extraíble
E.
Unidad del motor
F.
Cepillo
G.
Pantalla
H.
Botón de Inicio/Stop
I.
Selector de programa
J.
Botón de Pulsación/Limpieza
K.
Botón de Mezclar/Pausar
L.
Botón de calentamiento
M.
Vaso de medición
DESCRIPCIÓN DEL APARATO
ANTES DE USAR EL APARATO POR PRIMERA VEZ
• Antes de usar el aparato por primera
vez, lave las piezas que entran en
contacto con los alimentos (jarra,
tapa y vaso de medición) en agua
jabonosa.
ATENCIÓN: No sumerja el aparato en
agua. No coloque nunca la unidad
del motor (E) bajo el grifo con agua
caliente. Límpielos con un paño
húmedo y séquelos bien. Las cuchillas
están muy afiladas y no son extraíbles.
Les lames sont extrêmement
coupantes et ne sont pas amovibles.
• Antes de utilizar el aparato, asegúrese
de haber retirado todo el embalaje.
PRECAUCIÓN: Las medidas de seguridad forman parte del aparato.
Léalas con atención antes de usar el aparato por primera vez. Consér-
velas en un lugar donde pueda recuperarlas y consultarlas en el futuro.
El aparato solo se pondrá en funcionamiento si la jarra está correcta-
mente colocada en la unidad del motor (E) y fije la tapa en su lugar.
CÓMO USAR SU APARATO
• Coloque el aparato sobre una superfi-
cie plana, estable y resistente al calor,
alejado de fuentes de calor o de salpi-
caduras de agua.
• Compruebe que la junta de silicona
(D) está colocada en su lugar en la
unidad del motor (E). Coloque la jarra
(C) correctamente en la unidad del
motor Fig. 1 y 2.
• Eche los ingredientes en la jarra sin ex-
ceder el nivel máximo indicado:
-
1750 ml para preparaciones en frío
-
1400 ml para preparaciones en
caliente
FUNCIÓN AUTOMÁTICA :
Cómo usarla :
• Fije la tapa en la jarra. El aparato solo
se pone en marcha una vez que la jarra
y la tapa están correctamente colo-
cadas en su lugar. Coloque el vaso en
su lugar en la tapa y gírelo para fijarlo.
• Enchufe la batidora. El aparato emite
un pitido y la pantalla se ilumina.
• El aparato entrará inmediatamente en
modo standby. En ese momento, pue-
de seleccionar un programa girando
el selector de programa (I). El LED del
programa seleccionado se iluminará.
La información sobre el tiempo de la re-
ceta aparecerá en pantalla. Para pro-
gramas calientes, tenga en cuenta que
el tiempo indicado no incluye el tiempo
de precalentamiento necesario, el cual

14
puede ser diferente dependiendo de
la temperatura inicial y la cantidad de
ingredientes (entre 5 y 15 minutos).
• Presione el botón de inicio/stop. A
continuación, el aparato se pondrá
en funcionamiento automáticamente.
• La animación de precalentamiento
aparece en pantalla durante el tiem-
po de precalentamiento para recetas
calientes.
Ejemplo:
Una vez completada la fase de precalen-
tamiento, se iniciará la cuenta atrás del
tiempo de cocción de la receta.
• Al final de la receta, el aparato se
detiene automáticamente. El aparato
emite 5 pitidos.
• También puede detener el batido du-
rante el ciclo:
- durante el primer minuto de funcionamien-
to, presionando el botón de inicio/stop.
- después del primer minuto de funciona-
miento, presionando el botón de inicio/
stop durante 3 segundos.
• Para agregar ingredientes mientras se
está realizando una mezcla, solo para
preparaciones en frío, retire el vaso de
la tapa (A) de la tapa (B) e introduzca
los ingredientes por su abertura. Tenga
en cuenta que se pueden producir
salpicaduras.
PRECAUCIÓN: Recomendamos no
agregar ingredientes durante las pre-
paraciones en caliente. (Riesgo de
salpicaduras). No retire el vaso de
la tapa (A) de la tapa (B) durante
las preparaciones en caliente. Puede
alcanzar altas temperaturas y causar
quemaduras.
• No sacuda la unidad del motor o la jarra
cuando esté usando la batidora.
PRECAUCIÓN: Después de un programa,
especialmente uno largo, deje descan-
sar la batidora durante 5 minutos antes
de ponerla de nuevo en funcionamiento.
8 programas :
Estos programas están predefinidos según bases estándar. Si lo desea, puede
calentar/batir de acuerdo a su receta gracias a la configuración manual.
Programas calientes :
Sopa, compota, coulis, salsa caliente, leche multicereales
Sopa
600g calabaza, 120g
patatas, 80g cebolla,
600g agua.
Seleccione el programa Sopa
Presione el botón Inicio/Stop
Compota
700g manzana golden,
50g agua.
Seleccione el programa
Compota
Presione el botón Inicio/Stop
Coulis
60g zumo de limón, 100g
azúcar, 250g arándanos,
250g fresas.
Seleccione el programa Coulis
Presione el botón Inicio/Stop
Salsa
caliente
500g leche, 45g mante-
quilla, 45g harina, nuez
moscada (1 pellizco)
Seleccione el programa Sopa
caliente
Presione el botón Inicio/Stop
Leche
multic
ereales
100g almendras, 1L
agua.
Seleccione el programa
Leche multicereales
Presione el botón Inicio/Stop

14
15
ES
Programas fríos:
Hielo picado, Batido verde, Batido de leche,
Hielo
picado
8 cubos de hielo de 30x30x40
mm
Seleccione el programa
Hielo picado
Presione el botón Inicio/
Stop
Batido
verde
200g pepino, 2 kiwi, 150g piña,
60g col, 50g hojas frescas de
espinacas, 50g amas de apio,
100ml agua
Seleccione el programa
Batido verde
Presione el botón Inicio/
Stop
Batido de
leche
100g helado de vainilla, 1
plátano, 25cl leche
Seleccione el programa
Batido de leche
Presione el botón Inicio/
Stop
FUNCIONAMIENTO MANUAL:
• Pulsación: Presione el botón
pulsación/limpieza para hacer
funcionar el aparato unos se-
gundos cada vez. Para detenerlo, suelte
el botón. Presione el botón pulsación/lim-
pieza tantas veces como sea necesario.
• Limpieza : Permite usar el botón de
pulsación/limpieza con agua jabonosa.
Mantenga presionado el botón de pul-
sación/limpieza hasta que la letra H apa-
rezca en pantalla (velocidad máxima).
Suelte el botón al cabo de 15 o 30 se-
gundos para completar la secuencia de
limpieza.
El tiempo máximo de funcionamiento
no debe exceder los 3 minutos.
• Mezclar/Pausar: Permite
controlar libremente cómo
desea realizar la mezcla. Pre-
sione el botón mezclar/pausar, la pan-
talla mostrará « 5 » pero puede seleccio-
nar la velocidad de forma independiente
de 1 a 9 girando el selector de velocidad
(I). « H » es la velocidad máxima. Luego,
presione el botón inicio/stop. Puede pro-
gramar el tiempo de funcionamiento gi-
rando el selector de programa, entre 10
segundos y 3 minutos. El tiempo restante
aparece en pantalla. Espere a que la ba-
tidora se detenga automáticamente. El
aparato emite 5 pitidos.
- durante el primer minuto de funciona-
miento, presionando el botón de inicio/
stop.
- después del primer minuto de funciona-
miento, presionando el botón de inicio/
stop durante 3 segundos.
• Calentamiento: Permite
controlar libremente lo que
desea calentar, Presione el
botón de calentamiento y en la pantalla
aparecerá “60”pero puede seleccionar
la temperatura desde 40º hasta 100º gi-
rando el selector de programa (I). A conti-
nuación, presione el botón de inicio/stop.
Puede programar el tiempo de funciona-
miento girando el selector de programa,
entre 5 minutos y 90 minutos. El tiempo
restante aparece en pantalla. Espere a
que la batidora se detenga automática-
mente. La batidora emitirá 5 pitidos.
También puede detener el batido du-
rante el ciclo:
- durante el primer minuto de funciona-
miento, presionando el botón de inicio/
stop.
- después del primer minuto de funciona-
miento, presionando el botón de inicio/
stop durante 3 segundos.

16
OTRAS FUNCIONES
• Inicio/Stop : Permite detener
cualquier programa de mezcla
o calentamiento antes de lle-
gar al final presionando este botón.
También puede detener el batido du-
rante el ciclo: - durante el primer minuto
de funcionamiento, presionando el
botón de inicio/stop.
- después del primer minuto de funciona-
miento, presionando el botón de inicio/
stop durante 3 segundos.
Protección contra sobrecalentamien-
tos
• Este aparato posee un dispositivo pro-
tector contra sobrecalentamientos. Este
dispositivo evita que el aparato se dañe
a causa de un sobrecalentamiento.
• Si el aparato se apaga cuando está en
funcionamiento, proceda del siguiente
modo:
- Apague el aparato presionando el
botón de encendido, desenchúfelo y
déjelo enfriar durante 15-20 minutos.
- Vuelva a conectar el aparato a la toma
de corriente y continúe mezclando.
•
Lave la jarra inmediatamente
después de usarla.
•
Para limpiarla con facilidad, puede
usar el botón pulsación/limpieza:
- Eche 150ml de agua y 1 gota de
líquido lavavajillas en la jarra.
Presione el botón pulsación/
limpieza.
Un exceso de líquido lavavajillas
creará mucha espuma que puede
derramarse. Termine limpiando la jarra
con una esponja.
•
Enjuague el interior de la jarra y su
tapa bajo el grifo.
•
En caso de que la jarra esté
demasiado sucia, llénela con agua
y líquido lavavajillas y déjela a
remojo durante unas horas.
•
Use un paño húmedo para limpiar
la unidad del motor (E). Séquela con
cuidado.
•
Las partes separables (tapa, vaso de
la tapa, junta, sello, vaso medidos)
se pueden lavar con una esponja y
agua caliente jabonosa. También
puede usar un cepillo para limpiar el
interior de la jarra.
Precaución:
•
Vacíe la jarra. Esta no está
hecha para almacenar alimentos
en su interior en el frigorífico o
congelador.
•
Para limpiar la parte externa del
motor y las paredes de la jarra, use
un paño húmedo.
•
No sumerja el aparato en agua
(ni la unidad del motor ni la base
de la jarra). No coloque nunca la
unidad del motor (E) bajo el grifo..
•
La jarra, la tapa, la tapón y la
junta de silicona separable no se
pueden lavar en el lavaplatos.
LIMPIEZA

16
17
ES
¿QUÉ HACER SI EL APARATO NO FUNCIONA?
Problemas Causas Soluciones
El aparato no se pone
en marcha
El enchufe no está conectado.
Conecte el enchufe a una
toma de corriente del voltaje
indicado en la etiqueta de
especificaciones ubicada en
el aparato.
La batidora no está bien
colocada en la unidad del
motor, o la jarra y la tapa
no están correctamente
posicionadas y no están fijadas
a la unidad del motor.
Compruebe que la jarra de la
batidora y la tapa están bien
colocadas sobre la unidad del
motor tal y como se explica en
las instrucciones.
El aparato, el panel de
botones o el programa no
responden
Desenchufe el aparato,
espere unos minutos y vuelva a
enchufarlo.
Sobrecarga
Apague el aparato mediante
el botón de encendido y
desenchúfelo. Déjelo enfriar
durante 15-20 minutos
aproximadamente.
El producto se para
durante el uso.
Sobrecarga
Apague el aparato mediante
el botón de encendido y
desenchúfelo. Déjelo enfriar
durante 15-20 minutos
aproximadamente.
Vuelva a conectarlo a la
toma de corriente y continúe
utilizándolo.
Vibración excesiva
El producto no está colocado
sobre una superficie plana.
Coloque el producto sobre
una superficie plana.
El volumen de los ingredientes
es excesivo.
Reduzca la cantidad de
ingredientes a procesar.
La junta de silicona (D) no está
en su lugar o está colocada
de forma incorrecta.
Coloque la junta de silicona de
forma correcta en la unidad
del motor.
Fuga o derrame de la
tapa.
El volumen de los ingredientes
es excesivo.
Reduzca la cantidad de
ingredientes a procesar.
La tapa no está colocada
correctamente.
Fije la tapa correctamente
sobre la jarra de la batidora.
Fuga en la parte inferior
de la jarra.
Deterioro de la
impermeabilización del
aparato.
Precaución: Las cuchillas no
son extraíbles.
Entre en contacto con
el servicio al consumidor.
Consulte la información de
contacto en el folleto de
garantía.

18
Problemas Causas Soluciones
Las cuchillas no giran
con facilidad.
Los trozos de alimento son
demasiado grandes o
demasiado duros.
Reduzca el tamaño o la
cantidad de ingredientes a
procesar.
El líquido de la batidora está
demasiado caliente y ha
deformado la junta de silicona.
Entre en contacto con el
servicio al consumidor. La
información se encuentra en la
garantía.
Problema de cocción
La comida no está
suficientemente cocinada o
está demasiado cocinada:
Use la función manual
para adaptar el tiempo de
uso y la temperatura de
calentamiento.
Los alimentos se pegan al
fondo
Use la función manual
para adaptar el tiempo de
uso y la temperatura de
calentamiento. Consulte las
instrucciones de limpieza.
Si aún así el aparato no funciona correctamente, entre en contacto con el
departamento de servicio al consumidor de su país.
La pagina si sta caricando...
La pagina si sta caricando...
La pagina si sta caricando...
La pagina si sta caricando...
La pagina si sta caricando...
La pagina si sta caricando...
La pagina si sta caricando...
La pagina si sta caricando...
La pagina si sta caricando...
La pagina si sta caricando...
La pagina si sta caricando...
La pagina si sta caricando...
La pagina si sta caricando...
La pagina si sta caricando...
La pagina si sta caricando...
La pagina si sta caricando...
La pagina si sta caricando...
La pagina si sta caricando...
La pagina si sta caricando...
La pagina si sta caricando...
La pagina si sta caricando...
La pagina si sta caricando...
La pagina si sta caricando...
La pagina si sta caricando...
La pagina si sta caricando...
La pagina si sta caricando...
La pagina si sta caricando...
La pagina si sta caricando...
La pagina si sta caricando...
La pagina si sta caricando...
La pagina si sta caricando...
La pagina si sta caricando...
La pagina si sta caricando...
La pagina si sta caricando...
La pagina si sta caricando...
La pagina si sta caricando...
La pagina si sta caricando...
La pagina si sta caricando...
La pagina si sta caricando...
La pagina si sta caricando...
La pagina si sta caricando...
La pagina si sta caricando...
La pagina si sta caricando...
La pagina si sta caricando...
La pagina si sta caricando...
La pagina si sta caricando...
La pagina si sta caricando...
La pagina si sta caricando...
La pagina si sta caricando...
La pagina si sta caricando...
La pagina si sta caricando...
La pagina si sta caricando...
La pagina si sta caricando...
La pagina si sta caricando...
La pagina si sta caricando...
La pagina si sta caricando...
La pagina si sta caricando...
La pagina si sta caricando...
La pagina si sta caricando...
La pagina si sta caricando...
La pagina si sta caricando...
La pagina si sta caricando...
-
 1
1
-
 2
2
-
 3
3
-
 4
4
-
 5
5
-
 6
6
-
 7
7
-
 8
8
-
 9
9
-
 10
10
-
 11
11
-
 12
12
-
 13
13
-
 14
14
-
 15
15
-
 16
16
-
 17
17
-
 18
18
-
 19
19
-
 20
20
-
 21
21
-
 22
22
-
 23
23
-
 24
24
-
 25
25
-
 26
26
-
 27
27
-
 28
28
-
 29
29
-
 30
30
-
 31
31
-
 32
32
-
 33
33
-
 34
34
-
 35
35
-
 36
36
-
 37
37
-
 38
38
-
 39
39
-
 40
40
-
 41
41
-
 42
42
-
 43
43
-
 44
44
-
 45
45
-
 46
46
-
 47
47
-
 48
48
-
 49
49
-
 50
50
-
 51
51
-
 52
52
-
 53
53
-
 54
54
-
 55
55
-
 56
56
-
 57
57
-
 58
58
-
 59
59
-
 60
60
-
 61
61
-
 62
62
-
 63
63
-
 64
64
-
 65
65
-
 66
66
-
 67
67
-
 68
68
-
 69
69
-
 70
70
-
 71
71
-
 72
72
-
 73
73
-
 74
74
-
 75
75
-
 76
76
-
 77
77
-
 78
78
-
 79
79
-
 80
80
-
 81
81
-
 82
82


Moulinex BL962B Ultrablend Cook Manuale del proprietario
- Categoria
- Frullatori
- Tipo
- Manuale del proprietario
Documenti correlati
Altri documenti
-
Tefal BL841140 Manuale utente
-
 Russell Hobbs 22260-56 Manuale utente
-
AEG SB93 Series Manuale utente
-
Beko TBV 8104 BX Manuale del proprietario
-
-
OK OMX 102 Manuale utente
-
Rotel U451CH1 Istruzioni per l'uso
-
Duronic BL89 Instructions Manual
-
Philips HR2204/80 Manuale utente
-
Panasonic MX-ZX1800 Manuale del proprietario
