
4
3
1
2
6
5
11
1
12
2
7
2
2
8
9
1
2
2
10
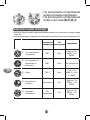
FR
EN
DE
NL
ES
EL
IT
PT
RU
UK
KK
AR
FA
E
P
I
J
F
P5
P1
P2
P4
P3
A
K
P6
B
D
C
G
H
P7
NOTICE EASY SOUP
le 7/03/2014
NOT 5
4
3
1
2
6
5
11
1
12
2
7
2
2
8
9
1
2
2
10
FR
EN
DE
NL
ES
EL
IT
PT
RU
UK
KK
AR
FA
E
P
I
J
F
P5
P1
P2
P4
P3
A
K
P6
B
D
C
G
H
P7
NOTICE EASY SOUP
le 7/03/2014
NOT 5
FR p 5 – 14
EN p 15 – 24
DE p 25 – 34
NL p 35 – 44
ES p 45 – 54
EL p 55 – 64
IT p 65 – 74
PT p 75 – 84
RU p 85 – 94
UK p 95 – 104
KK p 105 – 114
AR p 124 – 115
FA p 134 – 125
8080014382

4
3
1
2
6
5
11
1
12
2
7
2
2
8
9
1
2
2
10
FR
EN
DE
NL
ES
EL
IT
PT
RU
UK
KK
AR
FA
E
P
I
J
F
P5
P1
P2
P4
P3
A
K
P6
B
D
C
G
H
P7
NOTICE EASY SOUP
le 7/03/2014
NOT 5
4
3
1
2
6
5
11
1
12
2
7
2
2
8
9
1
2
2
10
FR
EN
DE
NL
ES
EL
IT
PT
RU
UK
KK
AR
FA
E
P
I
J
F
P5
P1
P2
P4
P3
A
K
P6
B
D
C
G
H
P7
NOTICE EASY SOUP
le 7/03/2014
NOT 5
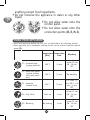
INTERNATIONAL GUARANTEE
Date of purchase: . . . . . . . . . . . . . . . . . . . . . . . . . / Date d'achat / Fecha de compra / Data da
compra / Data d'acquisto / Kaufdatum / Aankoopdatum / Købsdato / Inköpsdatum / Kjøpsdato /
Ostopäivä / Data zakupu / Data vânzării / Įsigijimo data/ Ostukuupäev / Datum nakupa /
Sorozatszám / Dátum nákupu / Pirkuma datums / Datum Kupovine / Datum kupnje / Data
cumpărării / Datum nákupu / Tarikh pembelian / Tanggal pembelian / Ngày mua hàng / Satın alma
tarihi / Дата продажи / Дата на закупуване / Датум на купување / Сатылған мерзімі /
Ημερομηνία αγοράς /Վաճառքի օրը / / 購買日期 /購入日/구입일자/ءﺍﺮﺸﻟﺍ ﺦﻳﺭﺎﺗ / ﻱﺮﺧ ﺦﻳﺭﺎﺗr
Product reference: . . . . . . . . . . . . . . . . . . . . . . . . . . . . . . . . . / Référence du produit / Referencia
del producto / Nome do produto / Tipo de prodotto / Typnummer des Gerätes / Artikelnummer van
het apparaat / Referencenummer / Produktreferens / Artikkelnummer / Tuotenumero / referencja
produktu / Model / Gaminio numeris / Toote viitenumber / Tip aparata / Vásárlás kelte / Typ
výrobku / Produkta atsauces numurs / Model proizvoda / Oznaka proizvoda / Cod produs / Produk
rujukan / Referensi produk / Mã sản phẩm/ Ürün kodu / Модель / Модель / Модел на уреда /
Моделi / Κωδικός προιόντος / Մոդել / /產品模型 /製品番号/제품명/ ﻞﻣﺎﻜﻟﺍ ﺞﺘﻨﻤﻟﺍ ﻊﺟﺮﻣ /
ﻝﻮﺼﺤﻣ ﻞﻣﺎﻛ ﻊﺟﺮﻣ
Retailer name & address: . . . . . . . . . . . . . . . . . . . . . . . . . . . . . . . . . . . . . . . . . / Nom et adresse du
vendeur / Nombre y dirección del minorista / Nome e endereço do revendedor / Nome e indirizzo
del negozzio / Name und Anschrift des Händlers / Naam en adres van de dealer / Forhandler navn &
adresse / Återförsäljarens namn och adress / Forhandler navn og adresse / Jälleenmyyjän nimi ja
osoite / nazwa i adres sprzedawcy / Numele şi adresa vânzătorului / Parduotuvės pavadinimas ir
adresas / Müüja kauplus ja aadress / Naziv in naslov trgovine / Tipusszám / Názov a adresa predajcu
/ Veikala nosaukums un adrese / Naziv i adresa maloprodaje / Naziv i adresa prodavca / Naziv i
adresa prodajnog mjesta / Nume şi adresă vânzător / Název a adresa prodejce / Nama dan alamat
peruncit / Nama Toko Penjual dan alamat / Tên và địa chỉ cửa hàng bán/ Satıcı firmanın adı ve
adresi / Название и адрес продавца / Назва і адреса продавця / Търговки обект / Назив и
адреса на продавницата / Сатушының аты және мекен-жайы / Επωνυμία και διεύθυνση
καταστήματος / Վաճառողի անվանումը և հասցեն /
/ /零售商的店名和地
址/販売店名、住所/소매점 이름과 주소/ ﻪﻧﺍﻮﻨﻋ ﻭ ﺔﺋﺰﺠﺘﻟﺍ ﻊﺋﺎﺑ ﻢﺳﺍ / ﺵﻭﺮﻓ ﻩﺩﺮﺧ ﺱﺭﺩ ﻡﺎﻧ
Distributor stamp . . . . . . . . . . . . . . . . . . . . . . . . . . . . ./ Cachet distributeur /Sello del distribuidor /
Carimbo do revendedor / Timbro del negozzio / Händlerstempel / Stempel van de dealer /
Forhandler stempel / Återförsäljarens stämpel / Forhandler stempel / Jälleenmyyjän leima / pieczęć
sprzedawcy / Ştampila vânzătorului / Antspaudas / Tempe
l / Žig trgovine / Eladó neve, címe/
Razítko predajcu / Zīmogs / Pečat maloprodaje/ Pečat prodavca / Pečat prodajnog mjesta / Ştampila
vânzătorului/ Razítko prodejce/ Cap peruncit / Cap dari Toko Penjual / Cửa hàng bán đóng dấu/
Satıcı Firmanın Kaşesi / Печать продавца / Печатка продавця / Печат на търговския обект /
Печат на продавницата / Сатушының мөрі / Σφραγίδα καταστήματος / Վաճառողի կնիքը /
/ / 零售商的蓋印 /販売店印/販売店印/소매점 직인/ ﺔﺋﺰﺠﺘﻟﺍ ﻊﺋﺎﺑ ﻢﺘﺧ / ﻩﺩﺮﺧ ﺮﻬﻣ
ﻭﺮﻓ

5
FR
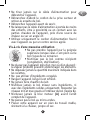
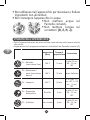
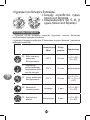
DESCRIPTION DE L’APPAREIL (FIG 1)
A Poignée supérieure
B Bloc moteur
C Capteur de trop plein
D Connecteur du bloc moteur
E Connecteur du bol
F Poignée latérale
G Indication niveau MAX – MIN à l’intérieur du bol
H Fiche du cordon d’alimentation
I Bol
J Cordon d’alimentation
K Couteau 4 lames
P Tableau de commande
P1 Programme soupe veloutée
P2 Programme soupe avec morceaux
P3 Programme compote
P4 Programme auto nettoyage
P5 Programme mixage
P6 Voyant de maintien au chaud
P7 Lancement ou arrêt des programmes
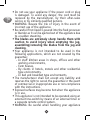
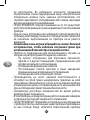
CONSIGNES DE SECURITE
• Lire attentivement le mode d’emploi avant la première
utilisation de votre appareil et le conserver: une
utilisation non conforme au mode d’emploi dégagerait
le fabricant de toute responsabilité.
• Cet appareil n’est pas prévu pour être utilisé par des
personnes (y compris les enfants) dont les capacités
physiques, sensorielles ou mentales sont réduites ou des
personnes dénuées d’expérience ou de connaissance,
sauf si elles ont pu bénéficier, par l’intermédiaire
d’une personne responsable de leur sécurité, d’une
surveillance ou d’instructions préalables concernant
l’utilisation de l’appareil.
• Il convient de surveiller les enfants pour s’assurer qu’ils
ne jouent pas avec l’appareil.
• Votre machine a été conçue pour un usage domestique

6
FR
seulement à l’interieur de la maison et à une altitude
inférieure à 2000 m.
• Si le cordon d’alimentation est endommagé, n’utilisez
pas l’appareil. Faites obligatoirement remplacer le
cordon d’alimentation par le fabricant, son service
après-vente ou des personnes de qualification similaire
afin d’éviter tout danger.
• AVERTISSEMENT : Attention aux risques de blessure en
cas de mauvaise utilisation de l’appareil.
• Être vigilant si un liquide chaud est versé dans le
préparateur culinaire ou le mélangeur dans la mesure
où il peut être éjecté de l’appareil en raison d’une
ébullition soudaine.
• Les lames sont très coupantes : manipulez-les
avec précaution pour ne pas vous blesser, lors des
manipulations du bloc moteur et lors du nettoyage.
• Votre appareil n’a pas été conçu pour être utilisé dans
les cas suivants qui ne sont pas couverts par la garantie:
- Des coins cuisines réservés au personnel dans
des magasins, bureaux et autres environnements
professionnels,
- Dans des fermes,
- Par les clients des hôtels, motels et autres
environnements à caractère résidentiel,
- Dans des environnements de type chambres d’hôtes.
• Le fabricant décline toute responsabilité et se réserve
le droit de résilier la garantie en cas d’utilisation
commerciale ou inadaptée, ou de non-respect des
consignes.
• La température des surfaces accessibles peut être élevée
lorsque l’appareil est en fonctionnement.
• L’appareil n’est pas destiné à être mis en fonctionnement
au moyen d’une minuterie extérieure ou par un système

7
FR
de commande à distance séparé.
• AVERTISSEMENT: Soyez prudent lors de la manipulation
de votre appareil (nettoyage, remplissage et versage):
évitez tout débordement de liquide sur les connecteurs
(D, E, H, J).
• Toujours suivre les instructions de nettoyage pour
nettoyer votre appareil :
- Débrancher l’appareil.
- Ne pas nettoyer l’appareil chaud.
- Nettoyer avec un chiffon ou une éponge humide.
- Ne jamais mettre l’appareil dans l’eau ou sous l’eau
courante
• Votre appareil émet de la vapeur qui peut occasionner
des brûlures.
• Lors de l’utilisation de l’appareil, certaines
pièces atteignent des températures
élevées (paroi inox du bol et du bloc
moteur). Elles peuvent occasionner des
brûlures. Manipulez l’appareil par les
pièces plastiques froides (poignée).
• AVERTISSEMENT: la surface du bol présente une chaleur
résiduelle après utilisation. Assurez vous de ne toucher
que la poignée de votre produit pendant la chauffe et
jusqu’au refroidissement complet.
• Reportez-vous au mode d’emploi pour le choix et le
temps de fonctionnement de chaque programme.
• Reportez-vous au mode d’emploi pour l’assemblage de
l’appareil.
• Reportez-vous au mode d’emploi pour le nettoyage
et l’entretien de votre appareil en particulier pour les
parties en contact avec les aliments.
• Cet appareil peut être utilisé par des enfants âgés
d’au moins 8 ans, à condition qu’ils bénéficient d’une

8
FR
surveillance ou qu’ils aient reçu des instructions quant
à l’utilisation de l’appareil en toute sécurité et qu’ils
comprennent bien les dangers encourus. Le nettoyage et
l’entretien par l’utilisateur ne doivent pas être effectués
par des enfants, à moins qu’ils ne soient âgés de plus
de 8 ans et qu’ils soient sous la surveillance d’un adulte.
• Conserver l’appareil et son câble hors de portée des
enfants âgés de moins de 8 ans.
MARCHÉS EUROPÉENS SEULEMENT :
• Cet appareil peut être utilisé par des personnes dont
les capacités physiques, sensorielles ou mentales sont
réduites ou dont l’expérience ou les connaissances ne
sont pas suffisantes, à condition qu’ils bénéficient
d’une surveillance ou qu’ils aient reçu des instructions
quant à l’utilisation de l’appareil en toute sécurité et en
comprennent bien les dangers potentiels.
• Toujours déconnecter l’appareil de l’alimentation si on
le laisse sans surveillance et avant montage, démontage
ou nettoyage.
• Cet appareil ne doit pas être utilisé par les enfants.
Conserver l’appareil et son câble hors de portée des
enfants.
• Les enfants ne doivent pas utiliser l’appareil comme
un jouet.
Vis-à-vis du raccordement électrique
• L’appareil doit être branché sur une prise de courant
électrique reliée à la terre.
• L’appareil est conçu pour fonctionner uniquement en
courant alternatif. Vérifiez que la tension d’alimentation
indiquée sur la plaque signalétique de l’appareil
corresponde bien à celle de votre installation électrique.
Toute erreur de branchement annule la garantie.

9
FR
• Ne tirez jamais sur le câble d’alimentation pour
débrancher l’appareil.
• Débranchez d’abord le cordon de la prise secteur et
retirez-le ensuite du bol.
• Débranchez l’appareil avant de servir.
• Ne laissez pas le câble d’alimentation à portée de mains
des enfants, être à proximité ou en contact avec les
parties chaudes de l’appareil, près d’une source de
chaleur ou sur un angle vif.
• Utilisez uniquement le cordon d’alimentation fourni
avec l’appareil ou par un centre service agréé.
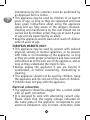
Vis-à-vis d’une mauvaise utilisation
• Ne pas prendre l’appareil par la poignée
supérieure lorsque celui-ci est plein car le
bol risque de se renverser.
• N’utilisez pas le bol comme récipient
(congélation, stérilisation).
• Ne placez pas l’appareil près d’un mur ou d’un placard :
la vapeur produite pouvant endommager les éléments.
• Ne dépassez jamais la quantité maximum indiquée dans
les recettes.
• Ne pas utiliser d’ingrédients congelés
• Rangez l’appareil lorsqu’il est refroidi.
• Ne jamais faire chauffer du lait.
• N’utilisez jamais le bol mixeur sans ingrédients, ni
avec des ingrédients solides uniquement. Respecter les
niveaux min et max gravés à l’intérieur du bol (repère G).
• N’enlevez jamais le bloc moteur (A) avant l’arrêt
complet de l’appareil.
• Ne passez pas le bol au micro-ondes.
• Placez votre appareil sur un plan de travail stable,
résistant à la chaleur, propre et sec.
!!

10
FR
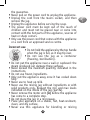
• N’utilisez jamais cet appareil pour mélanger ou mixer
d’autres éléments que des ingrédients alimentaires.
• L’appareil ne doit pas être immergé.
• Ne pas mettre de l’eau sur le
tableau de commande.
• Ne pas mettre de l’eau sur les
connecteurs (D, E, H, J).
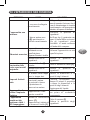
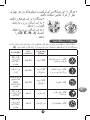
UTILISATION DE L’APPAREIL
• Nettoyez l’appareil avant la première utilisation comme indiqué dans le
paragraphe nettoyage.
• Votre appareil possède 5 programmes automatiques pilotés depuis le tableau de
commande (P).
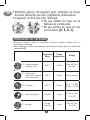
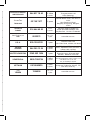
Température
(Max)
Temps
préparation
Mixage
P1 – Soupe Veloutée
(texture fine)
100°C 23 min
5 fois 20s ON –
10s OFF
P2 – Soupe avec
morceaux (texture
avec morceaux)
100°C 25 min Pas de mixage
P3 –Compote 100° C 20 min
2x 3s / 5s OFF
2x 10s / 5s OFF
P4 – Auto nettoyage Chauffe 3 min
6 Fois 15s ON
-15s OFF
P5 – Mixage
Pas de
chauffe
4 min
5 fois 25s ON –
15s OFF

11
FR
MISE EN SERVICE
• Maintenez le bol par la poignée latérale avec une main et retirez le bloc moteur
à l’aide de la poignée supérieure avec l’autre main (fig 1).
• Mettez les ingrédients dans le bol (fig 2).
Conseils :
- Mettre toujours en premier les légumes et ensuite les autres ingrédients
(riz, viande).
- Couper les ingrédients en cubes de 2 cm.
- Décongeler les ingrédients avant de les mettre dans le bol.
• Ajoutez ensuite de l’eau en respectant impérativement les niveaux MAX et MIN
du bol (fig 3) pour les programmes P1 et P2. Pour le programme P3 vous pouvez
mettre jusqu’à 800 gr de fruits maximum avec 150 ml de liquide minimum.
• Remuez le liquide et les ingrédients (fig 4).
• Repositionnez le bloc moteur sur le bol en vous assurant que les deux connecteurs
(repères D et E) soient bien alignés (fig 5).
• Insérez la fiche du cordon sur la poignée du bol et branchez le cordon sur
l’alimentation (fig 6).
• L’ensemble des fonctions clignotent.
MISE EN ROUTE DES PROGRAMMES
• Sélectionnez le programme souhaité en appuyant sur la touche correspondante
(fig 7). Seul le programme choisi clignote.
• Appuyez sur la touche start pour lancer le programme. L’appareil émet un signal
sonore, la touche start et celle du programme choisi restent éclairées jusqu’à la
fin du programme (fig 8).
• Une fois le programme terminé, l’appareil émet un signal sonore. Après les
programmes P1, P2 et P3, l’appareil passe automatiquement en mode maintien
au chaud pendant 40 min et son voyant s’allume (fig 9).
Remarques : vous pouvez arrêter le programme à tout moment en appuyant de
nouveau sur la touche start/stop.
En cas d’interruption du cycle d’une recette en appuyant sur le bouton
start/stop ou par l’ouverture du bloc moteur, il faudra recommencer la
préparation et attendre 20 min de refroidissement de l’appareil pour
relancer le cycle de programmation.
• Débranchez le cordon de la prise secteur et retirez-le ensuite du bol.
• Maintenez le bol à l’aide de la poignée latérale avec une main et retirez le bloc
moteur à l’aide de la poignée supérieure avec l’autre main (fig 1).
• Vous pouvez maintenant verser la soupe, le smoothie ou la compote dans un
récipient.
Conseil: Si vous voulez une soupe encore plus lisse, vous pouvez sélectionner
ensuite le programme mixage (P5) pour affiner votre préparation.
Pour faire connaissance avec votre machine nous vous suggérons d’essayer les
recettes du livret recettes.

12
FR
NETTOYAGE DE L’APPAREIL
• Avant la première utilisation, faire un cycle de lavage pour nettoyer l’appareil
comme indiqué ci-dessous :
- Ouvrez l’appareil (fig 1) et remplissez le bol avec 1.2 l. d’eau chaude du
robinet (jusqu’au niveau MAX) (fig 3).
-
Refermez l’appareil (fig 5) et branchez-le (fig 6).
- Sélectionnez le programme auto nettoyage (P4) puis lancez-le en appuyant
sur la touche start/stop (fig 10).
- Au signal sonore vous indiquant la fin du programme, ouvrez l’appareil
(fig 1), videz l’eau et rincez l’intérieur du bol (fig 11).
• L’appareil ne doit pas être immergé. Ne passez pas le bloc moteur (B) et le bol
(I) sous l’eau courante.
• Si nécessaire, une fois l’appareil refroidi, passez les lames sous le robinet (fig
12) et finissez de nettoyer l’intérieur du bol et du bloc moteur avec une éponge
humide.
• Si des salissures persistent, dans le bol, laissez tremper pendant plusieurs heures
avec de l’eau additionnée de liquide vaisselle et enlevez ensuite les résidus avec
une éponge abrasive.
• Rincez ensuite le bol.
• Prenez des précautions lorsque vous retirez le bloc moteur (B) et lors du
nettoyage des lames qui sont coupantes.
• Pour nettoyer l’extérieur du bloc moteur (B) et les parois du bol (I), utilisez un
chiffon humide. Séchez-le soigneusement.
• Ne pas mettre de liquide vaisselle dans le bol pendant le programme easy cleaning
(risque de débordement durant le cycle de nettoyage).
• L’appareil n’est pas prévu pour être nettoyé dans un lave vaiselle.
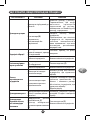
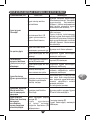
SI VOTRE APPAREIL NE FONCTIONNE PAS, QUE FAIRE ?
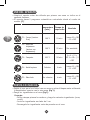
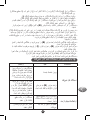
PROBLEMES CAUSES SOLUTIONS
L’appareil ne
fonctionne pas
La prise n’est pas
branchée
Branchez l’appareil sur une
prise. Assurez-vous que le
cordon d’alimentation est
correctement inséré dans la
poignée latérale et prise réseau.
Le bloc moteur (B)
n’est pas correctement
positionné ou verrouillé
Retirez une partie des
ingrédients.
Vérifiez que le contenu ne
dépasse pas le niveau MAX et
assurez-vous que les ingrédients
sont répartis uniformément au
fond du bol.

13
FR
PROBLEMES CAUSES SOLUTIONS
Vibrations
excessives
L’appareil n’est pas posé
sur une surface plane,
l’appareil n’est pas stable
Placez l’appareil sur une
surface plane
Volume d’ingrédients
trop important
Réduisez la quantité
d’ingrédients traités
Fuite par le haut
du bol
Capteur de trop plein (C)
encrassé
Nettoyer le capteur (C)
Volume d’ingrédients
trop important
Réduisez la quantité
d’ingrédients traités
Préparations mal
mixées
Morceaux d’aliments trop
gros ou trop durs
Réduisez la taille ou la
quantité d’ingrédients traités
Arrêt du moteur par la
protection surcharge
moteur
Laissez refroidir au minimum
20 minutes votre produit
et réduisez la taille ou la
quantité d’ingrédients traités.
Ajoutez du liquide
L’appareil fait
disjoncter
l’installation
électrique
Appareil ayant pris
l’humidité
Laisser sécher l’appareil
pendant 24H avant de le
rebrancher .
Votre appareil
bipe en continu
et toutes les LED
clignotent
Capteur de trop plein
encrassé (C)
Votre appareil est équipé
d’un détecteur de niveau (C)
Nettoyer le capteur (C)
Réduisez la quantité
d’ingrédients
Cuisson mal
réalisée ou prise au
fond du bol
Volume d’ingrédients trop
important
Ne dépassez pas le niveau maxi
(fig 3) pour les ingrédients
Vous n’avez pas
sélectionné le bon
programme
Recommencer la recette
avec la bonne sélection du
programme
Pas assez ou trop de
liquide
Vérifiez bien que le liquide se
trouve entre le niveau MIN et
MAX pour P1 et P2 (fig 3).
Pour P3 prévoir du liquide
entre 150 ml et 300ml.
Mauvaise homogénéisation
des ingrédients
Remuez le liquide et les
ingrédients (fig 4)
Vous avez fait chauffer
du lait
L’appareil à soupe n’est pas
approprié pour faire chauffer
du lait.

14
FR
Votre appareil ne fonctionne toujours pas ?
Adressez-vous à un centre service agréé (voir la liste dans le livret service).
RECYCLAGE
• Elimination des matériaux d’emballage et de l’appareil
L’emballage comprend exclusivement des matériaux sans danger pour
l’environnement, pouvant être jetés conformément aux dispositions de
recyclage en vigueur.
Pour la mise au rebut de l’appareil, se renseigner auprès du service
approprié de votre commune.
• Produits électroniques ou produits électriques en fin de vie :
Participons à la protection de l’environnement !
Votre appareil contient de nombreux matériaux valorisables ou
recyclables.
Confiez celui-ci dans un point de collecte pour que son traitement soit
effectué.
La directive Européenne 2012/19/UE sur les Déchets des Equipements Electriques
et Electroniques (DEEE), exige que les appareils ménagers usagés ne soient pas
jetés dans le flux normal des déchets municipaux. Les appareils usagés doivent
êtres collectés séparément afin d’optimiser le taux de récupération et le recyclage
des matériaux qui les composent et réduire l’impact sur la santé humaine et
l’environnement.

15
EN
DESCRIPTION OF THE APPLIANCE (FIG 1)
A Top handle
B Motor unit
C Overflow sensor
D Motor unit connector
E Jug connector
F Side handle
G MAX level – MIN level on the inside of the jug
H Socket for power cord
I Jug
J Power cord
K Four-point blade
P Control panel
P1 Creamed soup
P2 Soup with pieces
P3 Compote
P4 Easy Clean
P5 Blending
P6 Keep warm
P7 Start/stop
SAFETY INSTRUCTIONS
• Read the instructions carefully before using your
appliance for the first time: This product has been
designed for domestic use only. Any commercial
use, inappropriate use or failure to comply with the
instructions, the manufacturer accepts no responsibility
and the guarantee will not apply.
• This appliance is not designed to be used by people
(including children) with reduced physical, sensory
or mental capabilities, or by people with no prior
knowledge or experience, unless they have been given
supervision or instructions concerning use of the
appliance, by a person responsible for their safety.
• Children should be supervised to ensure that they do
not play with the appliance.
• This appliance is designed for indoor household use
only and at an altitude below 2000 m.

16
EN
• Do not use your appliance if the power cord or plug
is damaged. To avoid any danger, the cord must be
replaced by the manufacturer, by their after-sales
service or by similarly qualified persons.
• WARNING: Beware the risk of injury in the event of
incorrect use of the appliance.
• Be careful if hot liquid is poured into the food processor
or blender as it can be ejected out of the appliance due
to a sudden steaming.
• The blades are extremely sharp: handle them with
caution to avoid injury when emptying the jug,
assembling/removing the blades from the jug and
cleaning.
• Your appliance is not intended to be used in the
following applications, which are not covered by the
guarantee:
- In staff kitchen areas in shops, offices and other
working environments,
- Farm houses,
- By clients in hotels, motels and other residential
type environments,
- In bed and breakfast type environments.
• The manufacturer shall not accept any liability and
reserves the right to cancel the guarantee in the event
of commercial or inappropriate use or non-compliance
with the instructions.
• Exposed surfaces may become hot when the appliance
is in use.
• This appliance is not intended to be operated using an
external time-switch by means of an external timer or
a separate remote control system.
• WARNING: Be careful when handling your appliance

17
EN
(cleaning, filling OR emptying it): avoid spilling liquid
on the connecting points (D,E,H,J).
• Always follow the cleaning instructions when cleaning
the appliance:
- Unplug the appliance.
- Do not clean when hot.
- Clean with a damp cloth or sponge.
- Never immerse the appliance in water, under running
water or in any other liquid.
• Your appliance gives off steam which can cause burns.
• When using the appliance, some parts
become very hot (stainless steel interior
of the jug and motor unit). They can
cause burns. Handle the appliance using
the cold plastic parts (handle).
• WARNING: the surface of the jug will still
be hot after you have finished using the
appliance. Make sure you touch only the
product’s handle while heating and until
it has cooled down completely.
• Refer to the instructions to see the operating times and
speed settings for each accessory.
• Refer to the instructions when assembling the
accessories, and when mounting to the appliance.
• Refer to the instructions to clean your appliance and
keep it in a good condition, particularly for the parts
that come into contact with food.
• Do not use your appliance if it does not operate
correctly, if it has been damaged or if the power cord
or plug is damaged. To maintain safety, these parts
must be replaced by an Approved Service Centre.
• Any intervention other than normal cleaning and

18
EN
maintenance by the customer must be performed by
an Approved Service Centre.
• This appliance may be used by children of at least 8
years of age, as long as they are supervised and have
been given instructions about using the appliance
safely and are fully aware of the dangers involved.
Cleaning and maintenance by the user should not be
carried out by children unless they are at least 8 years
of age and are supervised by an adult.
• Keep the appliance and its lead out of reach of children
under 8 years of age.
EUROPEAN MARKETS ONLY:
• This appliance may be used by persons with reduced
physical, sensory or mental capacities, or by persons
with little or no knowledge of the appliance, as long
as they are under proper surveillance and have received
instructions as to the safe use of the appliance, and as
long as they understand the implicit risks.
• Always unplug the appliance if you are leaving it
unattended, or before assembling, dismantling or
cleaning.
• This appliance should not be used by children. Keep
the appliance and its cord out of the reach of children.
• Children shall not play with the appliance.
Electrical connection
• The appliance should be plugged into a socket outlet
with an earth connection.
• It is designed to work with alternating current only.
Please check that the supply voltage indicated on
the name plate of the appliance corresponds to your
electrical installation. Any incorrect connection voids

19
EN
the guarantee.
• Never pull on the power cord to unplug the appliance.
• Unplug the cord from the mains socket, and then
remove the jug.
• Unplug the appliance before serving the soup.
• The power cord must be kept out of the reach of
children and must not be placed near or come into
contact with the hot parts of the appliance, sources of
heat or sharp corners.
• Only use the power cord that comes with the appliance
or a cord from an approved service centre.
Incorrect use
• Do not hold the appliance by the top handle
when the jug is full, as it may tip over.
• Do not use the jug as a container
(freezing, sterilisation).
• Do not put the appliance near a wall or cupboard: the
steam produced can damage these surfaces.
• Never exceed the maximum quantity indicated in the
instructions.
• Do not use frozen ingredients.
• Only put the appliance away once it has cooled down
fully.
• Never use to heat up milk.
• Never use the mixing jug without ingredients or with
solid products only. Respect the min and max levels
indicated on the inside of the jug (part G).
• Never remove the motor unit (A) before the appliance
has come to a complete stop.
• Do not place the jug in a microwave.
• Place your appliance on a stable, flat, heat-resistant,
clean, and dry surface.
• Never use this appliance for blending or mixing
!!

20
EN
anything except food ingredients.
• Do not immerse the appliance in water or any other
liquid.
• Do not allow water onto the
control panel.
• Do not allow water onto the
connection points (D, E, H, J).
USING YOUR APPLIANCE
• Clean the appliance before the first use, as indicated in the cleaning section.
• Your appliance has 5 automatic settings which can be chosen from the control
panel (P).
Temperature
(Max)
Preparation
time
Blending
P1 – Creamed soup
(creamy texture)
100°C 23 min
5 times 20 secs
ON - 10 secs
OFF
P2 – Soup with pieces
(coarser texture
with some small
bits)
100°C 25 min No blending
P3 – Compote
(stewed fruit)
100° C 20 min
2 x 3 secs / 5
secs OFF 2 x 10
secs / 5 secs
OFF
P4 – Easy Clean Heat up 3 min
6 times 15 secs
ON - 15 secs
OFF
P5 – Blending No heating 4 min
5 times 25 secs
ON - 15 secs
OFF

21
EN
USE
• Hold the side handle of the jug with one hand and remove the motor unit by
pulling up the top handle with the other hand (fig 1).
• Put the ingredients into the jug (fig 2).
Tips:
- Defrost the the ingredients before putting them in the jug.
- Cut the ingredients into 2cm pieces.
- Always put the vegetables in first, followed by the other ingredients (rice,
meat).
• Then add the water, ensuring that you respect the MIN and MAX levels marked
on the jug (fig 3) for settings P1 and P2. For the P3 setting, you can add up to
800g of fruit as a maximum, using a minimum of 150ml liquid.
• Stir the liquid and ingredients together manually (fig 4).
• Place the motor unit back on the top of the jug, ensuring that the two connection
points (parts D and E) fit together properly (fig 5).
• Plug one end of the power cord into the side handle and connect the other end
to the mains socket (fig 6).
• All the settings on the control panel will flash.
USING THE SETTINGS
• Choose your preferred setting by pressing the corresponding button (fig 7). Only
the chosen setting will flash.
• Press the start button to start the programme. The appliance will beep, and the start
button and chosen setting will stay lit up until the programme has finished (fig 8).
• Once the programme has finished, the appliance will beep again. After settings
P1, P2 and P3, the appliance will automatically switch to keep-warm mode for
40 minutes and the button will light up (fig 9).
Note: You can stop the programme at any time by pressing the start/stop button
again.
If a soup-making cycle is interrupted by pressing the start/stop button or by
opening the motor unit, preparation should be restarted and you should wait
20 mins for the appliance to cool down, before restarting the programme.
• Unplug the cord from the mains socket, and then remove the jug.
• Hold the side handle of the jug with one hand and remove the motor unit by
pulling up the top handle with the other hand (fig 1).
• You can now pour the soup, smoothie or compote into a container.
Tip: For a smoother soup, you can then press the blend setting (P5) to give it
a creamy texture.
To familiarise yourself with the appliance, we suggest you try out one of the
recipes from the recipe booklet.

22
EN
CLEANING YOUR APPLIANCE
• Before first use or to clean the appliance as indicated below:
- Open the appliance (fig 1) and fill the jug with 1.2 L of hot water from the
tap (up to the MAX level) (fig 3). Do not add washing-up liquid to the jug.
- Put the top back on (fig 5) and plug it in (fig 6).
- Press the P4 Easy cleaning button (fig 10).
- When you hear the beep indicating the programme has finished, open the
appliance (fig 1), empty the water and rinse inside the jug (fig 11).
• Do not immerse the appliance in water. Do not place the motor unit (B) or the
jug (I) under running water.
• If necessary, once the appliance has cooled down, wash the blade under the tap
(fig 12) and finish by cleaning the inside of the jug and the motor unit with a
damp sponge.
• If there are still stains on the inside of the jug, leave it to soak for a few hours
in hot soapy water, then remove the residue with a plastic scourer.
• Rinse the bowl.
• Be careful when you remove the motor unit (B) and when cleaning the blade,
which is extremely sharp.
• To clean the outside of the motor unit (B) and the walls of the jug (I), use a
damp cloth. Dry carefully.
• Do not put washing-up liquid in the jug while the easy-cleaning programme is
running (risk of overflowing during the cleaning cycle).
• The appliance is not designed to be cleaned in a dishwasher.
WHAT TO DO IF YOUR APPLIANCE DOESN’T WORK
PROBLEMS CAUSES SOLUTIONS
The appliance does
not work.
The plug is not
connected or switched
on at the mains power
socket.
Plug your appliance into a
power socket. Ensure that the
power cord is correctly inserted
into the socket on the side
handle and mains socket.
The motor unit (B) is
not correctly positioned
or locked in.
Remove some of the
ingredients.
Check that the contents to not
exceed the MAX level and ensure
that the ingredients are spread
evenly over the base of the jug.
La pagina si sta caricando...
La pagina si sta caricando...
La pagina si sta caricando...
La pagina si sta caricando...
La pagina si sta caricando...
La pagina si sta caricando...
La pagina si sta caricando...
La pagina si sta caricando...
La pagina si sta caricando...
La pagina si sta caricando...
La pagina si sta caricando...
La pagina si sta caricando...
La pagina si sta caricando...
La pagina si sta caricando...
La pagina si sta caricando...
La pagina si sta caricando...
La pagina si sta caricando...
La pagina si sta caricando...
La pagina si sta caricando...
La pagina si sta caricando...
La pagina si sta caricando...
La pagina si sta caricando...
La pagina si sta caricando...
La pagina si sta caricando...
La pagina si sta caricando...
La pagina si sta caricando...
La pagina si sta caricando...
La pagina si sta caricando...
La pagina si sta caricando...
La pagina si sta caricando...
La pagina si sta caricando...
La pagina si sta caricando...
La pagina si sta caricando...
La pagina si sta caricando...
La pagina si sta caricando...
La pagina si sta caricando...
La pagina si sta caricando...
La pagina si sta caricando...
La pagina si sta caricando...
La pagina si sta caricando...
La pagina si sta caricando...
La pagina si sta caricando...
La pagina si sta caricando...
La pagina si sta caricando...
La pagina si sta caricando...
La pagina si sta caricando...
La pagina si sta caricando...
La pagina si sta caricando...
La pagina si sta caricando...
La pagina si sta caricando...
La pagina si sta caricando...
La pagina si sta caricando...
La pagina si sta caricando...
La pagina si sta caricando...
La pagina si sta caricando...
La pagina si sta caricando...
La pagina si sta caricando...
La pagina si sta caricando...
La pagina si sta caricando...
La pagina si sta caricando...
La pagina si sta caricando...
La pagina si sta caricando...
La pagina si sta caricando...
La pagina si sta caricando...
La pagina si sta caricando...
La pagina si sta caricando...
La pagina si sta caricando...
La pagina si sta caricando...
La pagina si sta caricando...
La pagina si sta caricando...
La pagina si sta caricando...
La pagina si sta caricando...
La pagina si sta caricando...
La pagina si sta caricando...
La pagina si sta caricando...
La pagina si sta caricando...
La pagina si sta caricando...
La pagina si sta caricando...
La pagina si sta caricando...
La pagina si sta caricando...
La pagina si sta caricando...
La pagina si sta caricando...
La pagina si sta caricando...
La pagina si sta caricando...
La pagina si sta caricando...
La pagina si sta caricando...
La pagina si sta caricando...
La pagina si sta caricando...
La pagina si sta caricando...
La pagina si sta caricando...
La pagina si sta caricando...
La pagina si sta caricando...
La pagina si sta caricando...
La pagina si sta caricando...
La pagina si sta caricando...
La pagina si sta caricando...
La pagina si sta caricando...
La pagina si sta caricando...
La pagina si sta caricando...
La pagina si sta caricando...
La pagina si sta caricando...
La pagina si sta caricando...
La pagina si sta caricando...
La pagina si sta caricando...
La pagina si sta caricando...
La pagina si sta caricando...
La pagina si sta caricando...
La pagina si sta caricando...
La pagina si sta caricando...
La pagina si sta caricando...
La pagina si sta caricando...
La pagina si sta caricando...
La pagina si sta caricando...
La pagina si sta caricando...
La pagina si sta caricando...
La pagina si sta caricando...
La pagina si sta caricando...
-
 1
1
-
 2
2
-
 3
3
-
 4
4
-
 5
5
-
 6
6
-
 7
7
-
 8
8
-
 9
9
-
 10
10
-
 11
11
-
 12
12
-
 13
13
-
 14
14
-
 15
15
-
 16
16
-
 17
17
-
 18
18
-
 19
19
-
 20
20
-
 21
21
-
 22
22
-
 23
23
-
 24
24
-
 25
25
-
 26
26
-
 27
27
-
 28
28
-
 29
29
-
 30
30
-
 31
31
-
 32
32
-
 33
33
-
 34
34
-
 35
35
-
 36
36
-
 37
37
-
 38
38
-
 39
39
-
 40
40
-
 41
41
-
 42
42
-
 43
43
-
 44
44
-
 45
45
-
 46
46
-
 47
47
-
 48
48
-
 49
49
-
 50
50
-
 51
51
-
 52
52
-
 53
53
-
 54
54
-
 55
55
-
 56
56
-
 57
57
-
 58
58
-
 59
59
-
 60
60
-
 61
61
-
 62
62
-
 63
63
-
 64
64
-
 65
65
-
 66
66
-
 67
67
-
 68
68
-
 69
69
-
 70
70
-
 71
71
-
 72
72
-
 73
73
-
 74
74
-
 75
75
-
 76
76
-
 77
77
-
 78
78
-
 79
79
-
 80
80
-
 81
81
-
 82
82
-
 83
83
-
 84
84
-
 85
85
-
 86
86
-
 87
87
-
 88
88
-
 89
89
-
 90
90
-
 91
91
-
 92
92
-
 93
93
-
 94
94
-
 95
95
-
 96
96
-
 97
97
-
 98
98
-
 99
99
-
 100
100
-
 101
101
-
 102
102
-
 103
103
-
 104
104
-
 105
105
-
 106
106
-
 107
107
-
 108
108
-
 109
109
-
 110
110
-
 111
111
-
 112
112
-
 113
113
-
 114
114
-
 115
115
-
 116
116
-
 117
117
-
 118
118
-
 119
119
-
 120
120
-
 121
121
-
 122
122
-
 123
123
-
 124
124
-
 125
125
-
 126
126
-
 127
127
-
 128
128
-
 129
129
-
 130
130
-
 131
131
-
 132
132
-
 133
133
-
 134
134
-
 135
135
-
 136
136
-
 137
137


