Marathon CL030075 Manuale utente
- Categoria
- Sveglie
- Tipo
- Manuale utente

USER MANUAL / MANUEL UTILISATEUR /
MANUALE UTENTE / INSTRUCCIONES DE USO /
BENUTZERHANDBUCH
See disclaimer on page 2 before use.
Voir l’avertissement à la page 12 avant utilisation.
Vedi liberatoria a pagina 22 prima dell’uso.
Consulte la renuncia en la pagina 32 antes de usar.
Vor verwendung bitte haftungsausschluss auf seite 42 lesen.

2
DISCLAIMER:
This medication reminder alarm clock (CL030075WH) is to
serve and be used as a reminder aid only. It should be used
in accordance with instructions and only as a supplement to
other means of reminding yourself to take medications and to
perform medical tests and tasks. You maintain full responsibility
to take medications or perform medical tests and tasks at
the appropriate times. Marathon watch company assumes
no responsibility for any direct, incidental or consequential
damages, including but without limitation, damages or injuries
resulting from misuse of the product, malfunction of the
product, mathematical inaccuracy, alarm inaccuracy or loss of
stored data. No warranty, express or implied, including any
implied warranty of merchantability or of tness for a particular
purpose, shall extend beyond the medication reminder alarm
clock’s two year warranty period.

3
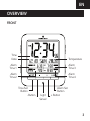
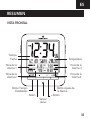
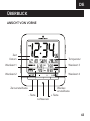
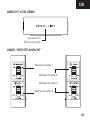
OVERVIEW
FRONT
EN
Time
Date Temperature
Alarm
Time 1
Alarm
Time 3
Alarm
Time 2
Alarm
Time 4
Time Set
Button
Alarm Set
Button
- Button + ButtonLight
Sensor

4
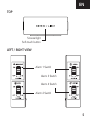
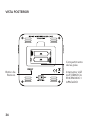
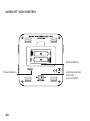
BACK
Reset
Button
Auto Light
ON/OFF
Switch
Battery
Compartment

5
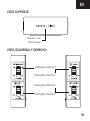
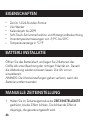
Alarm 1 Switch
Alarm 2 Switch
Alarm 3 Switch
Alarm 4 Switch
TOP
LEFT / RIGHT VIEW
EN
Snooze/light
Soft-touch button

6
FEATURES
•
Time in 12/24 hour formats
•
Four alarms
•
Calendar year up to 2099
•
Soft-touch snooze and backlight functions
•
Indoor temperature readings from -9.9 °C to 50 °C
•
Temperature displayed in °C/°F
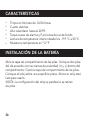
BATTERY INSTALLATION
Open the battery compartment and insert 2 AA size batteries
following the correct polarity. Once done, snap the cover back
in. The clock is now ready for use.
NOTE: The clock settings will be lost if the batteries are
removed.
MANUAL TIME SETTING
1. In time display mode, press and hold the TIME SET button
until the digits ash. The ashing digit is the one currently
being set.

7
EN
2. Setting order: Hour, Minute, Second, Year, Month,
Day, °C/°F.
3. For each setting, press the [-] and [+] buttons to adjust the
values. Press and hold the [-] and [+] buttons to advance
through the values rapidly.
4. Press the TIME SET button to conrm the value and go to
the next setting. Pressing the TIME SET button after setting
°C/°F will exit time setting mode.
5. If no buttons are pressed for 15 seconds, the values will be
saved and the clock will automatically return to time
display mode.
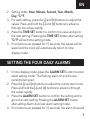
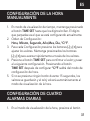
SETTING THE FOUR DAILY ALARMS
1. In time display mode, press the ALARM SET button to enter
alarm setting mode. The ashing alarm time is the one
currently being set.
2. Press the [-] and [+] buttons to adjust the current alarm time.
Press and hold the [-] and [+] buttons to advance through
the values rapidly.
3. Press the ALARM SET button to conrm the setting and to
go to the next setting. Pressing the ALARM SET button
after setting Alarm 4 will exit alarm setting mode.
4. If no buttons are pressed for 15 seconds, the alarm times will

8
be saved and the clock will automatically return to time
display mode.
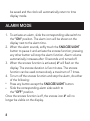
ALARM MODE
1. To activate an alarm, slide the corresponding side switch to
the “ON” position. The alarm icon will be shown on the
display next to the alarm time.
2. When the alarm sounds, softly touch the SNOOZE/LIGHT
button to pause it and activate the snooze function; pressing
any other button will stop the alarm function. Alarm volume
automatically increases after 10 seconds until turned off.
3. When the snooze function is activated,
Z
Z
will ash on the
display. The snooze duration is ve minutes. The snooze
function can be used consecutively a maximum of 7 times.
4. To turn off the snooze function and stop the alarm, do either
of the following:
•
Press any button except the SNOOZE/LIGHT button.
•
Slide the corresponding alarm side switch to
the “OFF” position.
Once the snooze function is off, the snooze icon
Z
Z
will no
longer be visible on the display.

9
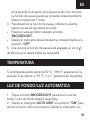
TEMPERATURE
If the temperature is over 50 °C, “HH.H” will appear on the
display. If it is lower than -9.9 °C, “LL.L” will appear on
the display.
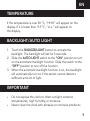
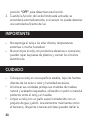
BACKLIGHT/AUTO LIGHT
1. Touch the SNOOZE/LIGHT button to activate the
backlight. The backlight will last for 5 seconds.
2. Slide the AUTO LIGHT switch to the “ON” position to turn
on the automatic backlight function. Slide the switch to the
“OFF” position to turn off the function.
3. When the automatic backlight function is on, the backlight
will automatically turn on if the sensor cannot detect a
sufcient amount of light.
IMPORTANT
•
Do not expose the clock to direct sunlight, extreme
temperatures, high humidity, or moisture.
•
Never clean the clock with abrasive or corrosive products;
EN

10
they may scratch the plastic parts and corrode the
electronic circuits.
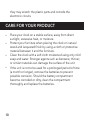
CARE FOR YOUR PRODUCT
•
Place your clock on a stable surface, away from direct
sunlight, excessive heat, or moisture.
•
Protect your furniture when placing the clock on natural
wood and lacquered nish by using a cloth or protective
material between it and the furniture.
•
Clean the clock with a soft cloth moistened using only mild
soap and water. Stronger agents such as benzene, thinner,
or similar materials can damage the surface of the unit
•
If the unit is not to be used for a prolonged period of time
(a month or longer), remove the batteries to prevent
possible corrosion. Should the battery compartment
become corroded or dirty, clean the compartment
thoroughly and replace the batteries.

11
Our Products contain high quality components and are designed to facilitate
recycling. Our products or product packaging are marked with the symbol
below. The symbol indicates that the product must not be treated as municipal
waste. It must be disposed of separately via the appropriate return and
collection systems available. By following these instructions you ensure that
this product is treated correctly and help to reduce potential impacts on the
environment and human health, which could otherwise result from inappropriate
handling. Recycling of products helps to conserve natural resources and protect
the environment. For more detailed information on collection and recycling
systems for this product, please contact the shop where you purchased it, your
local dealer or sales/service representatives.
EN

12
AVERTISSEMENT :
Ce réveil alarme de médicaments (CL030075WH) ne doit
servir et être utilisé qu’à titre d’aide-mémoire. Il doit être
utilisé conformément aux instructions et uniquement en
complément d’autres moyens de se rappeler de prendre ses
médicaments et d’effectuer des tests et des tâches médicales.
Vous conservez l’entière responsabilité de prendre vos
médicaments ou d’effectuer des tests et des tâches médicales
au moment opportun. Marathon Watch Company n’assume
aucune responsabilité pour tout dommage direct, accessoire
ou consécutif, y compris, mais sans s’y limiter, les dommages
ou blessures résultant d’une mauvaise utilisation du produit,
d’un mauvais fonctionnement du produit, d’une inexactitude
mathématique, d’une imprécision d’alarme ou de la perte des
données stockées. Aucune garantie, expresse ou implicite,
y compris toute garantie implicite de qualité marchande ou
d’adaptation à un usage particulier, ne peut s’étendre au-delà
de la période de garantie de deux ans du réveil-mémoire.

13
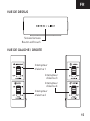
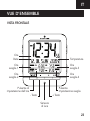
VUE D’ENSEMBLE
VUE DE DEVANT
Heure
Date Température
Temps
d’alarme 1
Temps
d’alarme 3
Temps
d’alarme 2
Temps
d’alarme 4
Bouton de
réglage de l’heure
Bouton de réglage
de l’alarme
- Bouton + Bouton
Capteur de
lumière
FR

14
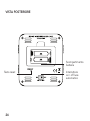
VUE DE DERRIÈRE
Bouton
réinitialiser
Interrupteur
marche/arrêt
de l’éclairage
automatique
Compartiment
des piles

15
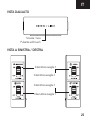
Snooze/lumiere
Bouton soft-touch
Interrupteur
d’alarme 1
Interrupteur
d’alarme 2
Interrupteur
d’alarme 3
Interrupteur
d’alarme 4
VUE DE DESSUS
VUE DE GAUCHE / DROITE
FR

16
CARACTÉRISTIQUES
•
Heure en format 12/24 heures
•
Quatre alarmes
•
Année civile jusqu’en 2099
•
Fonctions de répétition de réveil et de rétro-éclairage
soft-touch
•
Températures intérieures de -9,9 °C à 50 °C
•
Afchage de la température en °C/°F
INSTALLATION DE BATTERIE
Ouvrez le compartiment des piles et insérez 2 piles AA en
respectant la polarité. Une fois l’opération terminée, remettez le
couvercle en place. L’horloge est maintenant prête à l’emploi.
REMARQUE : Les réglages de l’horloge seront perdus si les
piles sont retirées.
RÉGLAGE MANUEL DE L’HEURE
1. En mode afchage de l’heure, appuyez sur la touche
TIME SET et maintenez-la enfoncée jusqu’à ce que les

17
chiffres clignotent. Le chiffre clignotant est celui en cours
de réglage.
2. Réglage de l’ordre :
Heure, minute, seconde, année, mois, jour, °C/°F.
3. Pour chaque réglage, appuyez sur les boutons[-] et[+]
pour régler les valeurs. Appuyez sur les boutons [-] et [+]
et maintenez-les enfoncés pour faire avancer rapidement
les valeurs.
4. Appuyez sur la touche TIME SET pour conrmer la valeur
et passer au réglage suivant. Appuyez sur le bouton TIME
SET après avoir réglé °C/°F pour quitter le mode de réglage
de l’heure.
5. Si vous n’appuyez sur aucun bouton pendant 15
secondes, les valeurs sont sauvegardées et l’horloge revient
automatiquement au mode d’afchage de l’heure.
RÉGLAGE DES QUATRE ALARMES
QUOTIDIENNES
1. En mode d’afchage de l’heure, appuyez sur la touche
ALARM SET pour passer en mode de réglage de l’alarme.
L’heure d’alarme clignotante est celle en cours de réglage.
2. Appuyez sur les boutons [-] et [+] pour régler l’heure
de l’alarme actuelle. Appuyez sur les boutons [-] et [+] et
FR

18
maintenez-les enfoncés pour faire avancer rapidement
les valeurs.
3. Appuyez sur la touche ALARM SET pour conrmer le
réglage et passer au réglage suivant. Appuyer sur le bouton
ALARM SET après le réglage de l’alarme 4 permet de
quitter le mode de réglage de l’alarme.
4. Si vous n’appuyez sur aucun bouton pendant 15 secondes,
les heures d’alarme sont enregistrées et l’horloge revient
automatiquement au mode d’afchage de l’heure.
MODE ALARME
1. Pour activer une alarme, faites glisser l’interrupteur latéral
correspondant sur la position “ON”. L’icône de l’alarme
s’afche sur l’écran à côté de l’icône heure de l’alarme.
2. Lorsque l’alarme retentit, appuyez doucement sur le
bouton SNOOZE/LUMIERE pour la mettre en pause et
activer la fonction de répétition de réveil ; appuyez sur
n’importe quel autre bouton pour arrêter la fonction alarme.
Le volume de l’alarme augmente automatiquement après
10 secondes jusqu’à ce qu’il s’éteigne.
3. Lorsque la fonction de répétition de réveil est activée,
Z
Z
clignote sur l’écran. La durée de la répétition de réveil est
de cinq minutes. La fonction de répétition de réveil peut

19
être utilisée au maximum 7 fois de suite.
4. Pour désactiver la fonction de répétition de réveil et arrêter
l’alarme, procédez comme suit :
•
Appuyez sur n’importe quelle touche sauf la touche
SNOOZE/LUMIERE.
•
Faites glisser l’interrupteur correspondant du côté de
l’alarme sur la position “OFF”.
Une fois la fonction de répétition de réveil désactivée, l’icône de
répétition de réveil
Z
Z
ne sera plus visible sur l’écran.
TEMPÉRATURE
Si la température est supérieure à 50 °C, “HH.H” s’afchera
sur l’écran. Si elle est inférieure à -9,9 °C, “LL.L” s’afchera sur
l’écran.
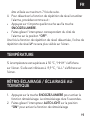
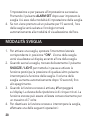
RÉTRO-ÉCLAIRAGE / ÉCLAIRAGE AU-
TOMATIQUE
1. Appuyez sur la touche SNOOZE/LUMIERE pour activer la
fonction rétroéclairage. Le rétroéclairage dure 5 secondes.
2. Faites glisser l’interrupteur AUTO LIGHT sur la position
“ON” pour activer la fonction de rétroéclairage
FR

20
automatique. Faites glisser l’interrupteur sur la position
“OFF” pour désactiver la fonction.
3. Lorsque la fonction de rétroéclairage automatique est
activée, le rétroéclairage s’allume automatiquement si le
capteur ne peut pas détecter une quantité sufsante
de lumière.
IMPORTANT
•
N’exposez pas l’horloge à la lumière directe du soleil, à
des températures extrêmes, à une humidité élevée ou à
la moisissure.
•
Ne nettoyez jamais l’horloge avec des produits abrasifs ou
corrosifs ; ils pourraient rayer les pièces en plastique et
corroder les circuits électroniques.
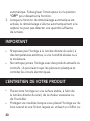
L’ENTRETIEN DE VOTRE PRODUIT
•
Placez votre horloge sur une surface stable, à l’abri de
la lumière directe du soleil, de la chaleur excessive ou
de l’humidité.
•
Protégez vos meubles lorsque vous placez l’horloge sur du
bois naturel et une nition laquée en utilisant un chiffon ou
La pagina si sta caricando...
La pagina si sta caricando...
La pagina si sta caricando...
La pagina si sta caricando...
La pagina si sta caricando...
La pagina si sta caricando...
La pagina si sta caricando...
La pagina si sta caricando...
La pagina si sta caricando...
La pagina si sta caricando...
La pagina si sta caricando...
La pagina si sta caricando...
La pagina si sta caricando...
La pagina si sta caricando...
La pagina si sta caricando...
La pagina si sta caricando...
La pagina si sta caricando...
La pagina si sta caricando...
La pagina si sta caricando...
La pagina si sta caricando...
La pagina si sta caricando...
La pagina si sta caricando...
La pagina si sta caricando...
La pagina si sta caricando...
La pagina si sta caricando...
La pagina si sta caricando...
La pagina si sta caricando...
La pagina si sta caricando...
La pagina si sta caricando...
La pagina si sta caricando...
La pagina si sta caricando...
La pagina si sta caricando...
-
 1
1
-
 2
2
-
 3
3
-
 4
4
-
 5
5
-
 6
6
-
 7
7
-
 8
8
-
 9
9
-
 10
10
-
 11
11
-
 12
12
-
 13
13
-
 14
14
-
 15
15
-
 16
16
-
 17
17
-
 18
18
-
 19
19
-
 20
20
-
 21
21
-
 22
22
-
 23
23
-
 24
24
-
 25
25
-
 26
26
-
 27
27
-
 28
28
-
 29
29
-
 30
30
-
 31
31
-
 32
32
-
 33
33
-
 34
34
-
 35
35
-
 36
36
-
 37
37
-
 38
38
-
 39
39
-
 40
40
-
 41
41
-
 42
42
-
 43
43
-
 44
44
-
 45
45
-
 46
46
-
 47
47
-
 48
48
-
 49
49
-
 50
50
-
 51
51
-
 52
52


Marathon CL030075 Manuale utente
- Categoria
- Sveglie
- Tipo
- Manuale utente
in altre lingue
- English: Marathon CL030075 User manual
- français: Marathon CL030075 Manuel utilisateur
- español: Marathon CL030075 Manual de usuario
- Deutsch: Marathon CL030075 Benutzerhandbuch
Documenti correlati
Altri documenti
-
Explore Scientific Projection Radio-controlled Alarm Clock Manuale del proprietario
-
Celestron Elements Trek Lite Guida utente
-
 Explore Scientific Mini Radio-controlled Alarm clock Manuale del proprietario
-
 Explore Scientific Radio-controlled Projection Alarm Clock Manuale del proprietario
-
Explore Scientific WSH0002 Manuale del proprietario
-
Explore Scientific Radio-controlled alarm clock Manuale del proprietario
-
 Explore Scientific RPW3009000000 Manuale del proprietario
-
-
-
Braun BC10 Istruzioni per l'uso


