KTM 60303965044 Manuale del proprietario
- Tipo
- Manuale del proprietario

3.213.349
60303965044
CARBON SIDE FAIRING
12.2014
INFORMATION
KTM Motorrad AG
5230 Mattighofen, Austria
www.ktm.com
*3213349*

2
Le agradecemos que se haya decidido por este producto.
Este producto de alta calidad está probado para la competición y se ha desarrollado específi camente para las exigencias de este deporte. Para poder garantizar
los máximos niveles de seguridad y funcionalidad, es imprescindible que el producto se monte correctamente. Por este motivo, es muy importante que siga las
instrucciones del manual de montaje o que se ponga en contacto con su concesionario autorizado.
El (cuasi) fabricante y el proveedor de este producto no se harán responsables del montaje y el uso incorrectos.
¡Muchas gracias!
Wir freuen uns, dass Sie sich für dieses Produkt entschieden haben.
Unser hochwertiges Qualitätsprodukt ist rennerprobt und wurde speziell für sportliche Herausforderungen entwickelt. Eine korrekte Montage des Produktes
ist unerlässlich, um ein Maximum an Sicherheit und Funktionalität gewährleisten zu können. Bitte befolgen Sie daher die Montageanleitung oder wenden Sie
sich an Ihren autorisierten Fachhändler.
Für falsche Montage oder Verwendung dieses Produktes kann der (Quasi-)Hersteller bzw. Lieferant nicht zur Verantwortung gezogen werden.
Vielen Dank.
Thank you for choosing this product.
Our high quality product has been tested under racing conditions and was developed specifi cally for use in sports activities. Correct installation of the product
is essential to ensure that a maximum degree of safety and functionality is achieved. Therefore, please follow the installation instructions or contact your
authorized dealer.
The (quasi) manufacturer or supplier cannot be held responsible for products that are incorrectly mounted or inappropriately used.
Thank you.
Grazie per aver scelto questo prodotto.
Questo nostro prodotto di pregiata qualità è collaudato nelle competizioni ed è stato sviluppato specifi camente per gare sportive. Il montaggio corretto del prodotto
è fondamentale per garantirne la massima sicurezza e funzionalità. Rispetti quindi le istruzioni di montaggio o rivolgersi al proprio concessionario autorizzato.
Il produttore (detentore del marchio)/fornitore non può essere considerato responsabile per un montaggio o impiego errato del presente prodotto.
Vi ringraziamo per l’attenzione!
Merci d‘avoir porté votre choix sur ce produit.
Notre produit de haute qualité est éprouvé pour les compétitions et a été conçu spécialement pour un usage sportif. Un montage approprié du produit est
indispensable pour garantir une sécurité et une fonctionnalité maximales du véhicule. C‘est pourquoi nous vous invitons à suivre scrupuleusement le manuel
de montage ou à vous adresser à votre revendeur agréé.
En cas de montage ou d‘utilisation non conformes de ce produit, le (quasi) constructeur ou le fournisseur déclinent toute responsabilité.
Merci !
7 ITALIANO
9 FRANCAIS
11 ESPANOL
3 DEUTSCH
5 ENGLISH

3
DEUTSCH
Lieferumfang
1x Seitenverkleidung rechts und links 60303965000
1x Hitzeschutzfolie rechts und links 60303967000
1x Halteblech links 60303964050
1x Halteblech rechts 60303966050
2x Sechskantmutter M8 0985080003
2x Schraube M6x18 69014017000
2x Bundschraube M8x40 0025080456
2x Distanzgummi 60006001021
2x Gummistreifen selbstklebend 60303965010
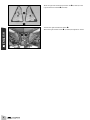
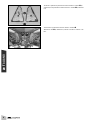
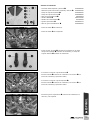
- Schraube rechts entfernen.
- Schraube links entfernen.
- Gummistreifen (Lieferumfang) auf Halteblech links (Lieferum-
fang) und Halteblech rechts (Lieferumfang) kleben.
- Halteblech rechts positionieren.
- Schraube (Lieferumfang) mit Mutter (Lieferumfang) montie-
ren und mit 25 Nm festziehen.
- Halteblech links positionieren.
- Schraube (Lieferumfang) mit Mutter (Lieferumfang) montie-
ren und mit 25 Nm festziehen.
- Distanzgummi (Lieferumfang) rechts und links montieren.

4
DEUTSCH
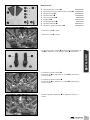
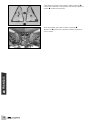
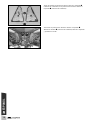
- Hitzeschutzfolie rechts und links (Lieferumfang) auf Hitzeschutz
rechts und links (Lieferumfang) kleben.
- Hitzeschutz rechts und links positionieren.
- Schraube (Lieferumfang) rechts und links montieren und mit 10
Nm festziehen.

5
ENGLISH
Scope of supply
1x side trim, right and left 60303965000
1x thermal protection foil, right and left 60303967000
1x retaining plate, left 60303964050
1x retaining plate, right 60303966050
2x hex nuts M8 0985080003
2x screws M6x18 69014017000
2x collar screws M8x40 0025080456
2x rubber spacers 60006001021
2x rubber strips, self-adhesive 60303965010
- Remove screw on the right.
- Remove screw on the left.
- Bond rubber strips (included) on the left retaining plate (in-
cluded) and right retaining plate (included).
- Position the right retaining plate .
- Mount screw (included) with nut (included) and tighten to
25 Nm.
- Position the left retaining plate .
- Mount screw (included) with nut (included) and tighten to
25 Nm.
- Mount rubber spacers (included) on the right and left.

6
ENGLISH
- Bond the right and left thermal protection foil (included) on the
right and left heat shields (included).
- Position the right and left heat shields .
- Mount the right and left screws (included) and tighten to 10 Nm.

7
ITALIANO
Materiale fornito
N. 1 fi ancatina destra e sinistra 60303965000
N. 1 pellicola di protezione termica destra e sinistra 60303967000
N. 1 piastrina sinistra 60303964050
N. 1 piastrina destra 60303966050
N. 2 dadi esagonali M8 0985080003
N. 2 viti M6x18 69014017000
N. 2 viti fl angiate M8x40 0025080456
N. 2 gommini distanziali 60006001021
N. 2 fascette in gomma autoadesive 60303965010
- Rimuovere la vite a destra.
- Rimuovere la vite a sinistra.
- Incollare le fascette in gomma (in dotazione) sulla piastrina sini-
stra (in dotazione) e sulla piastrina destra (in dotazione).
- Posizionare la piastrina destra .
- Montare la vite (in dotazione) con il dado (in dotazione) e
serrare a 25 Nm.
- Posizionare la piastrina sinistra .
- Montare la vite (in dotazione) con il dado (in dotazione) e
serrare a 25 Nm.
- Montare il gommino distanziale (in dotazione) a destra e a
sinistra.

8
ITALIANO
- Incollare la pellicola di protezione termica destra e sinistra (in
dotazione) sulla protezione termica destra e sinistra (in dotazio-
ne).
- Posizionare la protezione termica destra e sinistra .
- Montare la vite (in dotazione) a destra e sinistra e serrare a 10
Nm.

9
FRANCAIS
Contenu de la livraison
1x Habillage latéral à droite et à gauche 60303965000
1x Film de protection anti-chaleur à droite et à gauche 60303967000
1x Tôle de fi xation à gauche 60303964050
1x Tôle de fi xation à droite 60303966050
2x Écrou hexagonal M8 0985080003
2x Vis M6x18 69014017000
2x Vis à épaulement M8x40 0025080456
2x Caoutchouc d’écartement 60006001021
2x Bandes caoutchouc autocollantes 60303965010
- Enlever la vis à droite.
- Enlever la vis à gauche.
- Coller les bandes de caoutchouc (contenu de la livraison) sur la
tôle de fi xation de gauche (contenu de la livraison) et sur la tôle
de fi xation de droite (contenu de la livraison).
- Placer la tôle de fi xation à droite .
- Monter la vis (contenu de la livraison) avec l’écrou (contenu
de la livraison) et serrer à 25 Nm.
- Placer la tôle de fi xation à gauche .
- Monter la vis (contenu de la livraison) avec l’écrou (contenu
de la livraison) et serrer à 25 Nm.
- Monter le caoutchouc d’écartement (contenu de la livraison) à
droite et à gauche.

10
FRANCAIS
- Coller le fi lm de protection anti-chaleur à droite et à gauche
(contenu de la livraison) sur la protection anti-chaleur à droite et à
gauche (contenu de la livraison).
- Placer la protection anti-chaleur à droite et à gauche .
- Monter la vis (contenu de la livraison) à droite et à gauche et
serrer à 10 Nm.

11
ESPANOL
Volumen de suministro
1 carenado lateral izquierdo y derecho 60303965000
1 lámina de protección térmica izquierda y derecha 60303967000
1 chapa de sujeción izquierda 60303964050
1 chapa de sujeción derecha 60303966050
2 tuercas hexagonales M8 0985080003
2 tornillos M6x18 69014017000
2 tornillos de collarín M8x40 0025080456
2 gomas separadoras 60006001021
2 tiras de goma autoadhesivas 60303965010
- Retirar el tornillo de la derecha.
- Retirar el tornillo de la izquierda.
- Pegar las tiras de goma (volumen de suministro) en la chapa
de sujeción izquierda (volumen de suministro) y la chapa de
sujeción derecha (volumen de suministro).
- Posicionar la chapa de sujeción derecha .
- Montar el tornillo (volumen de suministro) con la tuerca (vo-
lumen de suministro) y apretarlo a 25 Nm.
- Posicionar la chapa de sujeción izquierda .
- Montar el tornillo (volumen de suministro) con la tuerca (vo-
lumen de suministro) y apretarlo a 25 Nm.
- Montar las gomas separadoras (volumen de suministro) a la
derecha y a la izquierda.

12
ESPANOL
- Pegar las láminas de protección térmica derecha e izquierda
(volumen de suministro) en las protecciones térmicas derecha e
izquierda (volumen de suministro).
- Posicionar las protecciones térmicas derecha e izquierda .
- Montar los tornillos (volumen de suministro) derecho e izquierdo
y apretarlos a 10 Nm.
-
 1
1
-
 2
2
-
 3
3
-
 4
4
-
 5
5
-
 6
6
-
 7
7
-
 8
8
-
 9
9
-
 10
10
-
 11
11
-
 12
12


KTM 60303965044 Manuale del proprietario
- Tipo
- Manuale del proprietario
in altre lingue
- English: KTM 60303965044 Owner's manual
- français: KTM 60303965044 Le manuel du propriétaire
- español: KTM 60303965044 El manual del propietario
- Deutsch: KTM 60303965044 Bedienungsanleitung
Documenti correlati
Altri documenti
-
Volkswagen 510 092 101 Mounting instructions
-
Husqvarna 28508915044 Information
-
 Elektra Beckum TKHS 315 E/P Manuale utente
-
Abus HomeTec Pro CFA3000 Manuale utente
-
Dolmar PT-4000 Manuale del proprietario
-
-
