Moni Car seat Dragon Istruzioni per l'uso
- Categoria
- Sedili dell'auto
- Tipo
- Istruzioni per l'uso

BG: ВАЖНО! ПРОЧЕТЕТЕ ВНИМАТЕЛНО И ЗАПАЗЕТЕ ЗА БЪДЕЩИ СПРАВКИ
EN: IMPORTANT! READ CAREFULLY AND KEEP FOR FUTURE REFERENCE
DE: WICHTIG! LESEN SIE DIE ANWEISUNGEN SORGFӒLTIG DURCH, BEVOR SIE DAS PRODUKT VERWENDEN, UND BEWAHREN
SIE DIESE ZUM SPӒTEREN NACHSCHLAGEN AUF
EL: ΣΠΟΥΔΑΙΟΣ! ΔΙΑΒΑΣΤΕ ΠΡΟΣΕΚΤΙΚΑ ΑΥΤΕΣ ΤΙΣ ΟΔΗΓΙΕΣ ΠΡΙΝ ΤΗΝ ΧΡΗΣΗ ΤΟΥ ΠΡΟΙΟΝΤΟΣ ΚΑΙ ΚΡΑΤΗΣΤΕ ΓΙΑ
ΜΕΛΛΟΝΤΙΚΟ ΕΛΕΓΧΟ ΣΕ ΕΥΚΟΛΑ ΠΡΟΣΒΑΣΙΜΟ ΚΑΙ ΑΣΦΑΛΕΣ ΣΗΜΕΙΟ
ES: ¡IMPORTANTE! ¡ANTES DE USAR EL PRODUCTO LEA LAS INSTRUCCIONES CUIDADOSAMENTE Y GUÁRDELAS PARA
FUTURAS CONSULTAS EN UN LUGAR ACCECIBLE Y SEGURO
RO: IMPORTANT! CITIȚI CU ATENȚIE ȘI PĂSTRAȚI PENTRU REFERINȚE VITORIALE
RU: ВАЖНО! ПРОЧИТАЙТЕ ВНИМАТЕЛЬНО И ХРАНИТЕ ДЛЯ ДАЛЬНЕЙШЕГО ИСПОЛЬЗОВАНИЯ
IT: IMPORTANTE! SI PREGA DI LEGGERE ATTENTAMENTE QUESTE ISTRUZIONI PRIMA DI USARE IL PRODOTTO E DI
CONSERVARLE PER UN RIFERIMENTO FUTURO IN UN POSTO FACILMENTE ACCESSIBILE E SICURO
FR: IMPORTANT! LISEZ ATTENTIVEMENT LES INSTRUCTIONS ET CONSERVEZ-LES EN LIEU SÛR POUR DES CONSULTATIONS
ULTÉRIEURЕS
SR: VAŽNO! PAŽLJIVO ČITAJTE I SAČUVAJTE ZA BUDUĆE REFERENCE
NL: BELANGRIJK! ZORGVULDIG LEZEN EN OPSLAAN VOOR TOEKOMSTIGE REFERENTIES
BG: ИНСТРУКЦИЯ ЗА УПОТРЕБА НА СТОЛ ЗА КОЛА “DRAGON” АРТИКУЛЕН № G401
EN: INSTRUCTION MANUAL FOR CAR SEAT “DRAGON” ITEM NO G401
DE: BEDIENUNGSANLEITUNG FÜR DEN AUTOKINDERSITZ “DRAGON”ARTIKEL NR. G401
EL: ΟΔΗΓΙΕΣ ΧΡΗΣΗΣ ΤΟΥ ΚΑΘΙΣΜΑΤΟΣ ΑΥΤΟΚΙΝΗΤΟΥ “DRAGON” ΑΡΙΘΜΌΣ ΠΡΟΪΌΝΤΟΣ G401
ES: INSTRUCCIONES DE USO DE SILLA DE COCHE ''DRAGON'' NÚMERO DE ARTÍCULO G401
RO: INSTRUCTIUNI DE UTILIZARE SCAUN AUTO „DRAGON” NR. ARTICOL G401
RU: ИНСТРУКЦИЯ ПО ЭКСПЛУАТАЦИИ АВТОКРЕСЛА “DRAGON” НОМЕР АРТИКУЛА G401
IT: ISTRUZIONI D’USO DEL SEGGIOLINO AUTO “DRAGON” NUMERO DI ARTICOLO G401
FR: INSTRUCTIONS POUR L'UTILISATION DE SIÈGE DE VOITURE„DRAGON” NUMÉRO D’ARTICLE G401
SR: UPUTSTVA ZA UPOTREBU AUTO SEDIŠTA “DRAGON” ARTIKL G401
NL: GEBRUIKSAANWIJZING VAN DE AUTOSTOELLETJE "DRAGON"ARTIKEL № G401
Група 0+, 1, 2, 3
Подходящ за деца с тегло от 0 до 36 кг
Group 0+, 1, 2, 3
Suitable for children weighing from 0 to 36 kg
Gruppe 0+, 1, 2, 3
Geeignet für Kinder mit einem Gewicht von 0 bis 36 kg.
Ομάδα 0+, 1, 2, 3
Κατάλληλο για παιδιά με βάρος από 0 έως 36 κιλά.
Grupo 0+,1, 2, 3
Аpto para niños de 0 a 36 kg.
Grupa 0+, 1, 2, 3
Destinat pentru copii cu greutatea de la 0 el 36 kg.
Grupa 0+, 1, 2, 3
Pogodan za decu težine od 0 do 36 kg
Группа 0+, 1, 2, 3
Подходит для детей весом от 0 до 36 кг.
Gruppo 0+, 1, 2, 3
Adatto per bambini da 0 a 36 kg.
Groupe 0+, 1, 2, 3
Convient aux enfants pesant de 0 à 36 kg.
Grupa 0+, 1, 2, 3
Pogodno za decu sa težinom od 0 do 36 kg.
Groep 0+,1, 2, 3
Geschikt voor kinderen met een gewicht van 0 tot 36 kg

2
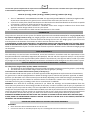
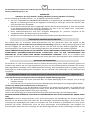
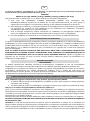
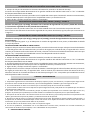
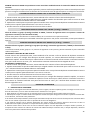
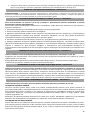
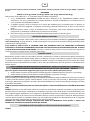
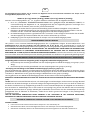
BG EN
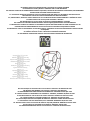
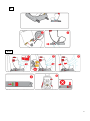
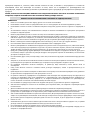
Правилно
Неправилно
Обез. колан
–
диагонален
колан
Обез. колан –
подвижен колан
Възможно.
А
PD

3
B
B.1

4
B.2
B.3

5
C
C.1

6
D
E

7
BG: ИНСТРУКЦИЯ ЗА УПОТРЕБА НА СТОЛ ЗА КОЛА “DRAGON” ............................................................................8
EN: INSTRUCTION MANUAL FOR CAR SEAT “DRAGON” ..........................................................................................13
DE: BEDIENUNGSANLEITUNG FÜR DEN AUTOKINDERSITZ "DRAGON" ......................................................................17
EL: ΟΔΗΓΙΕΣ ΧΡΗΣΗΣ ΤΟΥ ΚΑΘΙΣΜΑΤΟΣ ΑΥΤΟΚΙΝΗΤΟΥ “DRAGON”.......................................................................22
ES: INSTRUCCIONES DE USO DE SILLA DE COCHE ''DRAGON'...................................................................................27
RO: INSTRUCTIUNI DE UTILIZARE SCAUN AUTO „DRAGON”....................................................................................32
RU: ИНСТРУКЦИЯ ПО ЭКСПЛУАТАЦИИ АВТОКРЕСЛА “DRAGON”…………………………………..………………………...…….…37
FR: INSTRUCTIONS POUR L'UTILISATION DE SIÈGE DE VOITURE “DRAGON” ……………………………………….……...………..42
SR: UPUTSTVA ZA UPOTREBU AUTO SEDIŠTA “DRAGON” ……………………………………………………………………..…..…………47
NL: GEBRUIKSAANWIJZING VAN DE AUTOSTOELLETJE "DRAGON"………………....………………………………….…….………….51
IT: ISTRUZIONI D’USO DEL SEGGIOLINO AUTO “DRAGON” ……………………………….........................…………………..……..56

8
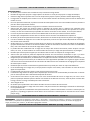
Обезопасяващата система съответства на изискванията на Правило 44 на Икономическата комисия за Европа на
Организацията на Обединените нации (UN/ECE Регулация No.16).
ЗАБЕЛЕЖКА
ГРУПА 0+ (0-13 kg), ГРУПА I (9-18 kg), ГРУПА II (15-25 kg), ГРУПА III (22-36 kg)
Когато използвате столчето (0+, 1, 2, 3) обърнете внимание на следната информация:
1. Това е „УНИВЕРСАЛНА“ СИСТЕМА ЗА ОБЕЗОПАСЯВАНЕ НА ДЕЦА. Тя е одобрена (No
E8*44R04/15*11283*0) съгласно Правило № 44, серия от изменения 04, за общо използване в превозни
средства и е пригодима към повечето, но не всички, седалки за леки автомобили.
2. Може да се очаква, че по отношение на монтирането, системата ще съответства, ако производителят е
заявил в инструкцията за експлоатация на превозното средство, че то е пригодено за монтиране на
„универсална“ система за обезопасяване на деца от тези възрастови групи.
3. Тази обезопасителна система за деца е класифицирана като „универсална“ при по-строги условия от
тези, прилагни за предишни модели, които не съдържат тази информация.
4. При съмнения, консултирайте се с производителя на обезопасителното устройство за деца или с
търговеца на дребно.
Продуктът представлява универсална обезопасяваща система за деца, одобрена съгласно стандарт ECE R44/04
за тегловни групи 0+ 1, 2, 3 за деца с тегло от 0 до 36 кг. За тегловна група 0+ столчето се поставя в посока
обратна на посоката на движение на автомобила и детето е с лице към задната седалка. За тегловни групи 1,2,3
столчето се поставя по посока на движението на автомобила и детето е с лице към движението.
ТАЗИ СИСТЕМА ЗА ОБЕЗОПАСЯВАНЕ НА ДЕЦАТА Е ПОДХОДЯЩА ЗА ИНСТАЛИРАНЕ САМО В АВТОМОБИЛИ,
ОБОРУДВАНИ С ОДОБРЕНИ НАДБЕДРЕНИ/ ТРИТОЧКОВИ/ СТАТИЧНИ/ ПРИБИРАЩИ СЕ ОБЕЗОПАСИТЕЛНИ
КОЛАНИ, СЪОТВЕТСТВАЩИ НА ИЗИСКАВНИЯТА НА РЕГЛАМЕНТ UN/ECE ИЛИ ДРУГИ ЕКВИВАЛЕНТНИ
СТАНДАРТИ. Проверете в инструкциите на вашия автомобил дали може да се постави в нея тази универсална
предпазна система за деца от упоменатите тегловни групи.
Детското предпазно столче за кола е изработено, тествано и сертифицирано според изискванията на
Европейския Стандарт за Детско Безопасно Оборудване (ECE R 44/ 04). Печатът с Е одобрението (в кръг) и
номерът на одобрението се намират на етикета за одобрение (стикер, поставен на детската предпазна
седалка).Това одобрение ще бъде невалидно ако направите някакви промени по детското предпазно столче.
Само на производителят е позволено да прави промени по детската предпазна седалка.
Обезопасителни колани на автомобила: диагонален колан; надбедрен колан; ISOFOX прикрепващи точки.
• Детската седалка може да бъде инсталирана с помощта на триточков колан и ISОFIX закрепване за групи
1,2,3 (9–36 кг).
• Детската седалка може да бъде инсталирана с помощта на триточков колан за група 0+ (0-13 кг).
Указание относно детската предпазна система ISOFIX (в група 0+,1):
Този тип детски стол за кола е подходящ за закрепване към седалките на автомобилите, оборудвани със система
ISOFIX, които са монтирани в съответствие с ЕСЕ R14. Масовата група и размерът на ISOFIX, за които е
предназначено това устройство, е: ISOFIX клас Е за група 0 (0-10 кг) и ISOFIX клас D за група 1 (9-18кг).
При използване на система за обезопасяване на деца ISOFIX, прочетете инструкцията на производителя на
автомобила.
ВНИМАНИЕ! ИЗКЛЮЧИТЕЛНО ОПАСНО! НЕ ПОСТАВЯЙТЕ СТОЛА ЗА КОЛА В ПРЕВОЗНОТО СРЕДСТВО НА
СЕДАЛКИ С ВЪЗДУШНИ ВЪЗГЛАВНИЦИ (SRS).
ВНИМАНИЕ! Вашето дете ще бъде максимално защитено при условие, че спазвате указанията и препоръките
от инструкцията! Обърнете внимание на предупрежденията и осигурете всички необходими предпазни мерки,
за да предотвратите риска от нараняване или увреждане на детето и да осигурите неговата безопасност! Вие
носите отговорност за безопасността на детето, ако не спазвате и не се съобразявате с тези указания и
BG
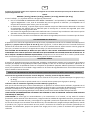
ВИД НА УТВЪРДЕНИТЕ КОЛАНИ ЗА ОБЕЗОПАСЯВАНЕ НА ДЕТСКО СТОЛЧЕ В АВТОМОБИЛ – ФИГУРА А
ПРЕДВИДЕНА УПОТРЕБА НА ПРОДУКТА
ЗАКОНОВИ ИЗИСКВАНИЯ

9
препоръки! Уверете се, че всеки, който ползва столчето за кола, е запознат с инструкцията и я спазва. Не
използвайте части или аксесоари за столчето за кола, които не са одобрени от производителя или
дистрибутора, защото това може да изложи на риск Вашето дете и да доведе до анулиране на гаранцията на
продукта.
МОЛЯ, ПРОЧЕТЕТЕ ИНСТРУКЦИИТЕ ВНИМАТЕЛНО ПРЕДИ МОНТИРАНЕТО НА СТОЛА ЗА КОЛА В ПРЕВОЗНОТО
СРЕДСТВО, ЗАЩОТО НЕПРАВИЛНОТО МУ ПОСТАВЯНЕ МОЖЕ ДА БЪДЕ ОПАСНО.
ВНИМАНИЕ!
• Никога не оставяйте детето без надзор, докато е в столчето за автомобил.
• Използвайте столчето само по предназначение! То не е конструирано за ползване в домашни условия.
• Използвайте столчето за кола в положение обърнато назад само, докато теглото на детето не надхвърли 9
кг.
• За максимална защита, като най-безопасна позиция в повечето автомобили се препоръчва централната
позиция на задната седалка.
• Винаги предпазвайте детето в столчето за кола, като използвате предпазния колан.
• Уверете се, че всички колани, прикрепящи обезопасителната система в превозното средство са възможно
най-силно пристегнати. Уверете се, че коланите, които обезопасяват детето са регулирани спрямо тялото на
детето, затегнати колкото е възможно по-здраво, без да се причини дискомфорт на детето и не са усукани.
• Много е важно да използвате надбедрения колан ниско долу, така че тазът да е здраво захванат.
• Не използвайте обезопасителната система в автомобил само с надбедрен колан.
• Винаги проверявайте за необезопасени предмети зад столчето или на седалката до него, обекти или багаж,
които могат да доведат до нараняване на детето в случай на внезапно спиране, сблъсък или катастрофа. Те
трябва да бъдат отстранени или сигурно закрепени, но на безопасно разстояние от столчето и детето.
• Продуктът трябва да бъде здраво фиксиран към автомобилната седалка посредством коланите, дори да не
се използва, защото в противен случай при инцидент или при рязко спиране на автомобила, столчето може
да нарани пътниците в него.
• Не използвайте други точки, носещи товар, освен тези, описани в инструкциите и отбелязани върху детското
столче.
• Уверете се, че всички части на обезопасителната система са застопорени правилно на място и няма опасност,
при ежедневната употреба на автомобила, да се прещипят в регулируемите седалки и врати.
• Не оставяйте катарамата частично затворена, тя трябва да бъде заключена, когато всички части са
ангажирани.
• След силен сблъсък столчето и коланите може да бъдат повредени, затова е препоръчително да ги
подмените.
• Производителят не поема отговорност за безопасността в случай, че са използвани резервни части, различни
от оригиналните за одобрения тип или препоръчани от него.
• Не правете изменения, подобрения и не добавяйте нови аксесоари или подложки върху конструкцията на
столчето за автомобил освен тези предвидени от производителя и без предварителното одобрение на
оторизирана организация. Моля, уверете се, че следвате внимателно инструкциите на производителя,
когато поставяте и нагласяте тази обезопасяваща система за деца.
• Не поставяйте на продукта допълнително шнурове или връзки, за да избегнете риска от задушаване.
• Ако възникне повреда по столчето не се опитвайте да я отстраните сами, а се свържете с оторизиран сервиз
или вносителя.
• Детската обезопасителна система не трябва да бъде ползвана без покривало(тапицерия).
• Покривалото (тапицерията) на детското столче не трябва да се подменя с покривало (тапицерия), което не е
препоръчано от производителя. То играе важна роля за ефективността на обезопасителната система.
• Ако оставите Вашия автомобил на пряка слънчева светлина, Ви препоръчваме да покриете столчето за кола,
защото то и прилежащите пластмасови части може да се нагреят много и да се деформират. Също така преди
да поставите детето в седалката, проверете дали столчето се е нагряло, за да го предпазите от изгаряне.
• Пазете от огън.
• Автомобилното детско столче не замества детско кошче или легло. Ако детето Ви се нуждае от сън, то трябва
да бъде сложено в подходяща бебешка количка, детско кошче или легло.
• Не съхранявайте продукта на влажни места и под пряка слънчева светлина.
• Не се опитвайте сами да поправяте столчето за кола. Това може да доведе до последващи повреди, ако се
извърши от непрофесионалист.
ВАЖНО! ПРОЧЕТЕТЕ ВНИМАТЕЛНО И ЗАПАЗЕТЕ ЗА БЪДЕЩИ СПРАВКИ

10
• Столчето за кола може да се инсталира в две основни положения: изправено положение по посока на
движението за група 1,2,3 (9-36 кг) и наклонено положение по посока, обратна на движението, за
новородени и деца до 13 кг.
ВАЖНО! Схемите и фигурите в тази инструкция са само илюстративни и насочващи.
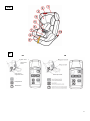
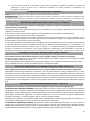
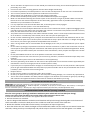
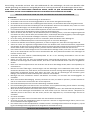
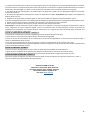
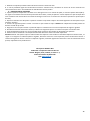
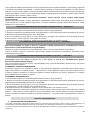
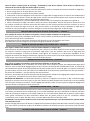
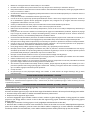
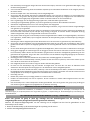
СЪСТАВНИ ЧАСТИ: 1. Дръжка за регулиране на облегалката за глава; 2. Облегалка за глава; 3. Прорез за раменен колан;
4.Подложка; 5.Възглавнички за раменните колани; 6.Триточкова система за коланите и катарамата; 7. Възглавничка за
катарамата; 8. Бутон за регулиране на ъгъла;9.Бутон за завъртане; 10. Лента за регулиране на коланите.
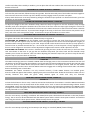
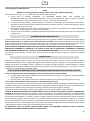
Клас за използване като група 0+ (0-13 кг): инсталиране с триточков колан на автомобила и обезопасителния
колан на стола (с лице назад).
Използвайте триточковия обезопасителен колан на автомобила, за да осигурите безопасността на детето и да
закрепите столчето за кола.
1.Поставете столчето за кола върху седалката на автомобила по посока обратна на движението.
2. Издърпайте изцяло предпазния колан на автомобила.
3. Прекарайте диагоналния колан между облегалката за гърба и облегалката за глава на детския стол и
коремния колан през водачите за колана на дъното на детската седалка. Уверете се, че и двете части на колана
на автомобила са под колана на детския седалка.
4. Закопчайте раменния и коремния колан в катарамата ( вижте последователността на стъпките на Фигура B.1).
5. Поставете детето в столчето. Проверете височината на раменните колани. Уверете се, че коланите не са
усукани. Закопчайте коланите на детето, като се уверите, че са добре поставени и издърпайте каишката в
центъра на седалката и я затегнете. За по-голямо удобство и безопасност при използване на столчето от
новородено може да поставите на дъното на седалката допълнителна подложка, която е част от стола за кола.
За поставяне на петточковия обезопасителен колан следвайте стъпките, посочени на фигура B.1.
Съединете двете метални части на катарамата. Вкарайте двата конектора в горната част на катарамата, докато
се захванат добре и щракнат на място.
Винаги проверявайте дали предпазния колан е добре закрепен, като издърпате раменните ремъци нагоре.
За да освободите колана, натиснете червения бутон на катарамата надолу.
За регулиране на височината на раменните колани на стола следвайте стъпките, посочени на фигура B.2.
Прекарайте коланите през раменните подложки, след това през раменния отвор в предната част на стола.
Прекарайте коланите през седалката навън от задната страна на стола. Издърпайте коланите надолу към
долната част на стола до металните съединители в задната част на бустера. Плъзнете коланите върху металния
съединител. Ако има нужда от по-голяма дължина на колана, натиснете лоста в долната предна част на стола и
едновременно с това издърпайте коланите. За да свалите коланите, направете описаните действия в обратен
ред.
За пристягане и отпускане на раменните колани следвайте стъпките, посочени на фигура В.3.
ПРИСТЯГАНЕ НА РАМЕННИТЕ КОЛАНИ: Издърпайте раменните колани нагоре, за да отстраните разхлабените
надбедрени части на колана. Издърпайте регулиращата лента, докато предпазният колан се затегне напълно.
Предпазният колан трябва да се регулира възможно най-плътно към телцето на детето, без да му причиняват
дискомфорт. Коланите не трябва да са усукани. Уверете се, че частта на колана за кръста е разположена
възможно най-ниско – не около корема – така че тазът да е здраво захванат.
Внимание! Разхлабеният колан може да бъде опасен. Проверявайте правилното регулиране на коланите и ги
затягайте при необходимост, всеки път когато поставяте детето в столчето.
ОТПУСКАНЕ НА РАМЕННИТЕ КОЛАНИ: Предпазният колан се разхлабва чрез натискане на лоста в долната
предна част на седалката. Натиснете надолу лоста, докато с другата ръка хваните двете раменни ремъка.
Издърпайте раменните колани към себе си, за да разхлабите коланите. При регулиране на раменните колани,
внимавайте да не захванете ремъка за регулиране на колана, докато натискате лоста надолу.
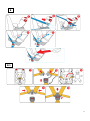
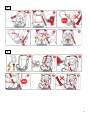
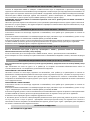
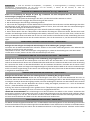
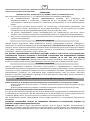
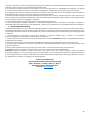
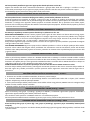
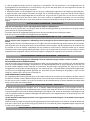
ИНСТАЛИРАНЕ НА ДЕТСКОТО СТОЛЧЕ: ГРУПА 0+ (0-13 кг) – ФИГУРА B
ПОСТАВЯНЕ НА ПЕТТОЧКОВ ОБЕЗОПАСИТЕЛЕН КОЛАН– ФИГУРА B.1
РЕГУЛИРАНЕ НА ВИСОЧИНАТА НА РАМЕННИТЕ КОЛАНИ НА СТОЛА– ФИГУРА B.2
ПРИСТЯГАНЕ И ОТПУСКАНЕ НА РАМЕННИТЕ КОЛАНИ – ФИГУРА B.3
ОСНОВНИ ЧАСТИ НА ДЕТСКИ СТОЛ – ФИГУРА PD

11
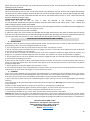
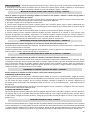
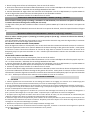
Точките за закрепавне ISOFIX се намират 2 ISOFIX метални кути за закрепване в пресечната точка между
седалката и облегалката на автомобила под тапицерията и мателна кука кука зад седалката на автомобила. От
двете страни на седалката натиснете бутона ISOFIX и издърпайте конекторите ISOFIX на най-дългата позиция.
Плъзнете двата ISOFIX конектора здраво във вложките, докато конекторите на ISOFIX се задействат със
звук от кликване от двете страни. Бутонът ISOFIX трябва да е зелен от двете страни.
ВНИМАНИЕ! Конекторите ISOFIX са поставени правилно само ако и двата бутона на ISOFIX системата са
обозначени в зелено.
Натиснете детската седалка към облегалката, като приложите равномерен натиск от двете страни. Разклатете
детския стол, за да се уверите, че е здраво закрепен и проверете отново зелените бутони за безопасност, за да
се уверите, че са закрепени.
1.Поставете столчето за кола върху седалката на автомобила, като трябва да е ориентирано по посока на
движението.
2.Натиснете ISOFIX механизмите за захващане директно върху металните куки на автомобила, докато се чуе
“щрак”. Индикаторът за заключване на ISOFIX трябва да показва ЗЕЛЕНО.
3.Натиснете здраво детското столче съм облегалката на автомобилната седалка. По време на това преместване
системата ISOFIX ще затегне детската седалка до облегалката на седалката и ще чуете звук от щракване.
4.Хванете стола и проверете дали е закрепен здраво или се клати.
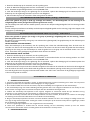
Клас за използване като група 1 (9-18 кг): инсталиране с ISOFIX / триточков колан на автомобила и
обезопасителния колан на стола (с лице напред).
Стола за кола може да се инсталира както с ISOFIX система, така и с триточков колан на автомобила.
За инсталиране на стола с помощта на триточков колан на автомобила следвайте стъпките, посочени на фигура
D.
Клас за използване като група II (15–25 кг) и като група III (22-36 кг): предпазен колан на колата/ ISOFIX (с лице
напред).
При използване на стола за група 2 и 3 трябва да се отстрани петточковия обезопасителен колан на
столчето,омекотителя на катарамата и допълнителната подложка.
ИНСТАЛИРАНЕ С ПЕТТОЧКОВ КОЛАН:
Поставете столчето за кола върху седалката на автомобила, като трябва да е ориентирано по посока на
движението. Позиционирайте раменния колан през куката над рамото на детето, а колана за скута над стола и
скута на детето. Прекарайте колана през долния отвор на седалката на столчето и закопчайте колана в
катарамата на автомобилната седалка, докато чуете “щрак”. Проверете дали катарамата на колана е заключена
като издърпате колана.
ИНСТАЛИРАНЕ С ISOFIX СИСТЕМА:
1.Поставете столчето за кола върху седалката на автомобила, като трябва да е ориентирано по посока на
движението.
2.Натиснете ISOFIX механизмите за захващане директно върху металните куки на автомобила, докато се чуе
“щрак”. Индикаторът за заключване на ISOFIX трябва да показва ЗЕЛЕНО.
3.Натиснете здраво детското столче съм облегалката на автомобилната седалка. По време на това преместване
системата ISOFIX ще затегне детската седалка до облегалката на седалката и ще чуете зв от щракване.
4.Хванете стола и проверете дали е закрепен здраво или се клати.
5. Поставете детето в столчето. Позиционирайте раменния колан през куката над рамото на детето, а колана
за скута над стола и скута на детето. Прекарайте колана през долния отвор на седалката на столчето и
закопчайте колана в катарамата на автомобилната седалка, докато чуете “щрак”. Проверете дали катарамата
на колана е заключена като издърпате колана.
❖ ИНСТРУКЦИИ ЗА ПОДДРЪЖКА
ПОЧИСТВАНЕ И ПОДДРЪЖКА
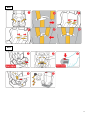
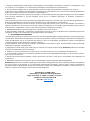
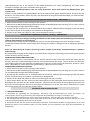
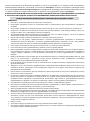
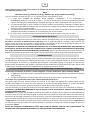
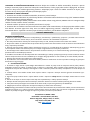
ИНСТАЛИРАНЕ НА ISOFIX СИСТЕМА – ФИГУРА С
ПОЛЗВАНЕ НА ДЕТСКО СТОЛЧЕ С ISOFIX СИСТЕМА – ФИГУРА С.1
ИНСТАЛИРАНЕ НА ДЕТСКОТО СТОЛЧЕ: ГРУПА I (9-18 кг) – ФИГУРА D
ИНСТАЛИРАНЕ НА ДЕТСКОТО СТОЛЧЕ: ГРУПА II;III (15-36 кг) – ФИГУРА Е

12
1. Редовно проверявайте заключващите, фиксиращите и регулиращите механизми, коланите и тапицерията, за да
сте сигурни, че са изправни, не са износени или повредени и използването им е безопасно.
2. Ако установите повреда или че някоя функция не работи, веднага преустановете ползването на столчето.
3. Детският стол не трябва да се използва без тапицерията! Тя е неразделна част от столчето и може да бъде заменяна
единствено с идентична на тази, доставяна от производителя.
4. Не използвайте повторно столчето след инцидент, тъй като може да има структурни повреди, които да го направят
много опасно. Възможно е да има повреди, които да не са видими. Прегледът от сервизен специалист е
задължителен.
5. Не излагайте столчето за кола на вредното въздействие на преките слънчеви лъчи, тъй като това ще доведе до по-
бързото и ненавременно стареене на пластмасовите части и избледняване на тапицерията.
6. Съхранявайте столчето за кола на място, до което малки деца нямат достъп. Не го съхранявайте във влажно и
прашно помещение с много ниски или високи стайни температури. Не поставяйте други предмети върху стола за
кола, докато го съхранявате, тъй като това може да доведе до повреда на продукта.
7. Извършвайте редовен преглед преди всяко ползване на столчето за кола.
8. При проблеми, свързани с нормалната експлоатация на стола за кола, се обърнете към оторизиран сервиз или
търговеца, от който сте го закупили или дистрибутора на този продукт.
❖ ИНСТРУКЦИИ ЗА ПОЧИСТВАНЕ
1.Тапицерията може да се сваля и да се почиства с мек почистващ препарат в перална машина на цикъл за деликатни
тъкани (30°C). Моля, вижте инструкциите на етикета за почистване, зашит за тапицерията. Цветовете на тапицерията
може да избледнеят ако тя се почиства при повече от 30°C. Не използвайте центрофуга и сушене в електрическа
сушилня за дрехи (платът може да се отдели от ватата).
2. Пластмасовите части могат да се почистват, използвайки топла вода със сапун. Не използвайте силни почистващи
препарати (например, разтворители).
3. Предпазният колан може да се сваля и да се почиства със хладка сапунена вода. Внимание! Никога не сваляйте
езичестите заключващи части от ремъците.
4. Уверете се, че при почистването не влиза сапун в токата или която и да е регулираща и насочваща част.
5. Не използвайте химически почистващи препарати, белина или разграждащи препарати, за да почистите която и
да е част от стола за кола.
6. Винаги след почистване оставяйте столчето да изсъхне напълно и след това го използвайте или приберете за
съхранение.
7. Избягвайте мокренето на етикетите. Не ги отстранявайте, защото съдържат важна информация.
Внимание! Детския стол за кола не трябва да се използва без тапицерията. Ако ви се наложи да смените тапицерията
на стола за кола, моля, уверете се, че използвате оригиналната тапицерия, тъй като това е важно за правилното
функциониране на предпазната система. За да замените с оригинална тапицерия се свържете с търговския агент, от
който сте закупили този продукт, вносителя или производителя.
Произведено за MONI в КНР
Производител и Вносител: Мони Трейд ООД
Адрес: България, гр. София, кв. Требич, ул. Доло 1,
Телефонен номер: 02/ 936 07 90
Уеб сайт: www.moni.bg

13
The restraint system complies with the requirement of Ordinance 44 of the Economic committee of Europe of the Organization
of United Nations (UN/ECE Regulation No.16).
NOTICE
ГРУПА 0+ (0-13 kg), ГРУПА I (9-18 kg), ГРУПА II (15-25 kg), ГРУПА III (22-36 kg)
1. This is a “UNIVERSAL” CHILD RESTRAINT SYSTEM. It is approved (No E8*44R04/15*11283*0) to Regulation No.
44, 04 series amendments, for general use in vehicles and it will fit most, but not all car seats.
2. A correct fir is likely if the vehicle manufacturer has declared in the vehicle handbook that the vehicle is capable
of accepting a “Universal” child restraint for this age group.
3. This child restraint has been classified as “Universal” under more stringent conditions than those which
applied to earlier designs which do not carry this notice.
4. If in doubt, consult either the child restraint manufacturer or the retailer.
This product is a universal restraint system for children approved under standard ECE R44/04 for weight group 0+,1,2,3
for children weighing from 0 to 36 kg. For weight group 0+ the car seat must be placed in the direction opposite to
the direction of movement of the car and the child must be facing the rear seat. For weight groups 1,2,3 the car seat
must be places in the direction of movement of vehicle and the child faces the traffic.
THIS RESTRAINT SYSTEM IS SUITABLE ONLY IF THE APPROVED VEHICLES ARE EQUIPPED WITH LAP/3-POINT/ STATIC
WITH RETRACTING SAFETY BELTS, APPROVED TO UN/ECE REGULATION NO. 16 OR OTHER EQUIVALENT STANDARDS.
Check in the instructions of your car if this universal restraint system for children from the mentioned weight groups
can be placed.
The child safety car seat has been manufactured, tested and certified in accordance with the requirements of the
European Standard for Child Safety Equipment (ECE R 44/04). The seal with the E approval mark (in a circle) and the
approval number are on the approval label (sticker affixed to the child seat). This approval will be invalid if you make
any changes to the child safety seat. Only the manufacturer is allowed to make changes to the child restraint system.
Car safety belts: diagonal belt; lap belt; ISOFIX attachements.
• The child seat can be installed using a three-point belt and ISOFIX anchorage system for groups 1,2,3 (9-36 kg).
• The child seat can be installed using a three-point belt for group 0+ (0-13 kg).
Instruction on the ISOFIX child restraint system (in Group 0+,1):
This is the ISOFIX child restraint system. It has been approved under Regulation No 44, the 04 series of amendments,
for general use in vehicles equipped with an ISOFIX anchorage system. Vehicles with positions approved as ISOFIX
positions (as described in the vehicle manual) must be fitted, depending on the child seat category and the device.
The mass group and size class ISOFIX for which this device is intended are: ISOFIX size E class for group (0-10 kg)
and ISOFIX size D for group 1 (9-18kg). Check the car manufacturer’s handbook.
WARNING! Your child will be maximally protected if you follow the warnings and recommendations from the
instructions! Pay attention to the warnings provide all necessary in order to avoid the risk of injury or impairment of
the child if you do not provide its safety! You are responsible for the safety of the child if you do not follow and do not
comply with these warnings and recommendations! Make sure that anyone who uses the car seat is familiar with the
instruction and follows it. Do not use parts or accessories for the car seat, which are not approved by the manufacturer
or the distributer, because this may put your child at risk and to lead to voiding of the warranty of the product.
WARNING! EXTREME HAZARD! DO NOT PLACE THE CAR SEAT IN A VEHICLE ON CAR SEATS WITH AIR BAGS (SRS).
PLEASE, READ THE INSTRUCTIONS CAREFULLY BEFORE YOU INSTALL THE CAR SEAT IN THE VEHICLE, BECAUSE ITS
INCORRECT USE CAN BE DANGEROUS.
WARNING!
• Never leave the child unattended while is in the car seat.
• Use the car seat for its intended purpose only! It is not designed to be used in domestic conditions.
EN
IMPORTANT! READ CAREFULLY AND KEEP FOR FUTURE REFERENCE
INTENDED USE
TYPES OF APPROVAL BELTS TO HAVE IN THE VEHICLE – FIGURE A
LEGAL REQUIREMENTS

14
• The car seat does not replace a cot or a bed. Should your child need to sleep, then it should be placed in a suitable
pram body, cot, or bed.
• Use the car seat in the rear-facing position until the child's weight exceeds 9 kg.
• For maximum protection, the safest position in most cars the central position on the rear seat is recommended.
• This car seat is placed in direction opposite to the direction of movement!
• Always protect your child when it is in the car seat using the safety belt.
• Do not leave the buckle partially closed, it should be locked when all parts are engaged.
• Make sure that all belts attaching the restraint system to the vehicle are as tight as possible. Make sure that the
belts that secure the child are adjusted to fit the child’s body, tightened as much as possible without causing
discomfort to your child and are not twisted.
• It is very important to use the waist belt down low, so that the pelvis is firmly engaged.
• Do not use the restraint system in a car with waist belt only.
• Always check for unsecured objects behind the car seat or on the vehicle seat next to it, objects and luggage, which
can lead to injuries of the child in case of a sudden stop, collision or an accident. They must be removed or securely
fixed, at a safe distance from the car seat and the child.
• The product must be fixed safely to the vehicle seat with the belts, even if it is not used, because otherwise in case
of an accident or a sudden stop of the vehicle, the car seat can injure the passengers in it.
• Do not use other load bearing points, except for those described in the instructions and indicated on the car seat.
• Make sure that all parts of the restraint system are fastened correctly in place and there is no danger during daily
use of the car, for them to get pinched in the adjustable seats and doors.
• After a strong collision the car seat and belts can be damaged, that is why it is recommended for you to replace
them.
• Do not make any changes, improvements and do not add new accessories or pads on the construction of the car
seat except for those approved by the manufacturer and without prior proof of an authorized organization. Please,
make sure that you follow carefully the instructions of the manufacturer, when you place and adjust this restraint
system.
• Do not place additional cords or ties on the product to avoid the risk of suffocation.
• If a damage of the car seat occurs do not try to remove it by yourselves, contact an authorized repair shop or the
importer.
• The child restraint system must not be used without a cover (upholstery).
• The cover (upholstery) of the child’s car seat must not be replaced with a cover that has not been approved by the
manufacturer. The cover is integral part of the restraint system’s safety.
• If you leave your car exposed to direct sunlight, we recommend you to cover the car seat, because it and its plastic
parts can get overheated and deformed. Also, before you place the child in the car seat, check whether the car seat
is heated, in order to prevent it from burning itself.
• Keep out of fire !
• Dо not store the product in humid places and in direct sunlight.
• Do not try to repair the car seat by yourselves. this may led to resulting damage, if it is not done by a professional.
• The car seat can be installed in two basic positions: upright in the direction of movement for group 1,2,3 (9-36 kg)
and reclined in the opposite direction of movement for newborns and children up to 13 kg.
IMPORTANT! The diagrams and figures in this instruction are illustrative and indicative only.
MAIN PARTS OF THE CAR SEAT: 1. Headrest adjuster; 2. Headrest; 3. Hip pad; 4. Crotch strap; 5. Seat cushion; 6. Three-point
harness and buckle system; 7. Buckle pad; 8. Angle adjustment button;9.Pivot button; 10. Belt adjustment strap.
Class for use as group 0+ (0-13 kg): installation with three-point vehicle belt and seat belt (rear-facing).
Use the car's three-point seat belt to ensure the child's safety and secure the car seat.
1.Place the child seat on the car seat in the opposite direction of traffic.
2. Pull out the entire car seat belt.
3. Pass the diagonal belt between the backrest and headrest and lap belt through the belt guides on the bottom of
child’s seat. Make sure that the both parts of the car belt are under the harness of the child seat.
4. Buckle the shoulder and lap belt into the buckle ( see sequence of steps in Figure B.1).
5. Place the child in the seat. Check the height of the shoulder belts. Make sure the straps are not twisted. Fasten the
seat belts, making sure they are well placed, and pull the strap in the center of the seat and tighten it. For added
CHILD SEAT INSTALLATION: GROUP 0+ (0-13 kg) - FIGURE B
MAIN PARTS OF THE CAR SEAT - PD

15
comfort and safety when used by a newborn, you can place the soft seat cushion that comes with the car seat on the
bottom of the seat.
To fit the five-point seat belt, follow the steps in Figure B.1. Slot the two metal parts of the buckle connectors together.
Insert the two connectors into the top of the buckle until they engage securely and click into place.
Always check the harness is correctly locked by pulling the shoulder straps upwards. To release the harness, press the
red button on the buckle downwards.
To adjust the height of the seat’s shoulder straps, follow the steps in Figure B.2. Pass the shoulder straps through
shoulder pads, then through the shoulder slot at the front of the seat. Push the straps right through the seat out at
the back.Pull the straps down to the bottom of the seat to the metal connectors at the back of the booster. Slide the
straps onto the metal connecter. If you need more length of the strap, at the front of the booster seat push the strap
lever, and at the same time pull the straps. To remove the straps do the above in reverse order.
To tighten and slacken the shoulder belts, follow the steps in Figure B.3.
TIGHTENNING THE HARNESS: Pull the shoulder straps upwards to remove the slack from the lap sections of the
harness. Now pull the adjuster strap until the harness is fully tightened. The harness should be adjusted as tightly as
possible without causing discomfort to your child. Straps should not be twisted. Ensure that the lap strap portion is
located as low as possible towards the lap – not around the stomach, so that the pelvis is firmly engaged. A loose
harness can be dangerous. Check the harness adjustment & tighten each time the child is placed in the seat
SLACKENING THE HARNESS: The harness is slackened by pressing the lever (under the seat cover) on the front of the
seat. Press down on the lever as you grip the two shoulder straps with your other hand. Pull the shoulder straps
towards you to loosen the harness. Take care when adjusting the shoulder straps that you do not trap the harness
adjuster strap as you press down on the lever
The ISOFIX anchorage points are located 2 ISOFIX metal anchorage points at the intersection between the seat and
the backrest of the vehicle under the upholstery and a hook and loop matt hook behind the vehicle seat. On both sides
of the seat, press the ISOFIX button and pull the ISOFIX connectors to the longest position. Slide the two ISOFIX
connectors firmly into the inserts until the ISOFIX connectors engage with a clicking sound on both sides. The ISOFIX
button should be green on both sides.
WARNING! The ISOFIX connectors are only inserted correctly if both ISOFIX buttons are marked green.
Press the child seat against the backrest, applying even pressure on both sides. Shake the child seat to make sure it is
securely fastened and check the green safety buttons again to make sure they are fastened.
1.Place the child seat on the car seat, it must be oriented in the direction of movement. 2.Push the ISOFIX attachment
mechanisms directly onto the metal hooks of the vehicle until a "click" is heard. The ISOFIX locking indicator should
show GREEN. 3.Press the child seat firmly into the backrest of the car seat. During this movement, the ISOFIX system
will tighten the child seat against the seat back and you will hear a clicking sound.4.Grasp the chair and check that it is
securely fastened or is not stable.
Class for use as Group 1 (9-18 kg): installation with ISOFIX/three-point vehicle belt and seat belt on the seat (forward
facing). The car seat can be installed with both the ISOFIX system and the vehicle's three-point seat belt. To install the
chair using the vehicle's three-point harness, follow the steps shown in Figure D.
Class for use as Group II (15-25 kg) and as Group III (22-36 kg): car seat belt/ ISOFIX (forward facing).
FASTENING THE 5-POINT SEAT BELT- FIGURE B.1
FITTING THE SHOULDER STRAPS HEIGHT - FIGURE B.2
- FIGURE B.1
TIGHTENING AND SLACKENING THE HARNESS- FIGURE B.3
- FIGURE B.1
INSTALLING THE ISOFIX SYSTEM - FIGURE C
- FIGURE B.3
- FIGURE B.1
CHILD SEAT USE WITH ISOFIX SYSTEM - FIGURE C.1
- FIGURE B.3
- FIGURE B.1
CHILD SEAT INSTALLATION: GROUP I (9-18 kg) - FIGURE D
CHILD SEAT INSTALLATION: GROUP II; III (15-36 kg) - FIGURE E

16
When using the seat for Group 2 and 3, the five-point seat belt on the seat, the buckle cushion and the additional
padding must be removed.
INSTALLATION WITH FIVE-POINT BELT
Place the child seat on the car seat, it must be oriented in the direction of travel. Position the shoulder belt through
the hook over the child's shoulder and the lap belt over the chair and the child's lap. Pass the belt through the lower
seat opening of the car seat and buckle the belt into the car seat buckle until you hear a "click". Check that the belt
buckle is locked by pulling the belt.
INSTALLATION WITH ISOFIX SYSTEM
1.Place the car seat on the car seat, it must be oriented in the direction of movement.
2.Push the ISOFIX attachment mechanisms directly onto the metal hooks of the vehicle until a "click" is heard. The
ISOFIX locking indicator should show GREEN.
3.Press the child seat firmly into the backrest of the car seat. During this movement, the ISOFIX system will tighten the
child seat against the seat back and you will hear a click.
4.Check if the seat is firmly secured or wobbles.
5. Place the child in the seat. Position the shoulder belt through the hook over the child's shoulder and the lap belt
over thes eat and the child's lap. Pass the belt through the lower seat opening of the car seat and buckle the belt into
the car seat buckle until you hear a "click". Check that the belt buckle is locked by pulling the belt.
❖ MAINTENANCE
1. Regularly check the locking, fixing and adjusting mechanisms, the belts and cover, in order to make sure that they are in
good working order, not worn or damaged and their use is safe.
2. If you find any fault or that any of the functions does not work, stop using he car seat.
3. The car seat must not be used without cover! It is integral part of the car seat and can be replaced only with an identical
one to the one provided by the manufacturer.
4. Do not use the car seat after an accident because it can have undergone structural changes which can make it very
dangerous. It is possible to have damage which are not visible. The inspection of a repair shop specialist is obligatory.
5. Do not expose the car seat to the harmful effect of direct sunlight, because this will lead to faster and untimely aging of
the plastic parts and fading of the cover.
6. Store the car seat at a place to which small children do not have access. Do not store it at a wet and dusty room with very
low or very high room temperature. Do not place other objects on the car seat while you store it, because this may lead to
damage of the product.
7. Check regularly the main parts before each use of the car seat.
8. If any technical problem occurs related with the normal use of the car seat, do not try to repair the product by yourselves.
Contact the shop, from which you bought It or authorized service center.
❖ CLEANING
1.The cover can be removed and cleaned with soft cleaning agent in a washing machine at delicate fabrics cycle (30°C).
Please, see the instructions of the washing label, sewn to the cover. The colours of the cover can fade if it is cleaned at more
than 30°C. Do not use spin dryer and tumble dryer (the fabric can get separated from the wadding).
2. Part of the chair is plastic and can be cleaned using warm water and soap. Do not use strong detergents (for example
solvents).
3.The safety belt can be removed and be cleaned with lukewarm soapy water. Warning! Never remove the locking tongues
of the harnesses.
4.Make sure that during cleaning no soap enters the buckle or any adjusting or guiding part.
5.Do not use chemical cleaning agents, bleach or abrasive agents, in order to clean any part of the car seat.
6.Always after cleaning let the car seat dry completely and afterwards use it or store it.
7.Avoid wetting the labels. Do not remove them, because they contain important information.
Warning! The child’s car seat must not be used without the cover. If you have to replace the cover of the car seat, please,
make sue that you use the original cover, because this is important for the correct operation of the restraint system. In order
to replace with an original cover, contact the commercial agent you bought this product from the importer or manufacturer.
Manufactured for MONI in PRC
Manufacturer and Importer: Moni Trade Ltd.
Address: Bulgaria, Sofia, Trebich, 1 Dolo Str.,
Phone number: 003592/936 07 90
Website: www.monib.bg
INSTRUCTIONS FOR MAINTENANCE AND CLEANING

17
Das Rückhaltesystem entspricht den Anforderungen der Regelung 44 der Wirtschaftskommission für Europa der Vereinten
Nationen (UN/ECE-Regelung Nr. 16).
BEMERKUNG
GRUPPE 0+ (0-13 kg), GRUPPE I (9-18 kg), GRUPPE II (15-25 kg), GRUPPE III (22-36 kg)
Bei der Verwendung des Kindersitzes (0+, 1, 2, 3) folgende Information beachten:
1. Das ist ein „UNIVERSELLES“ KINDERRÜCKHALTESZSTEM. Es ist zugelassen (Nr. E8*44R04/15*11283*0) gemäß
Regel Nr. 44, Änderungsserie 04, für die allgemeine Verwendung in Fahrzeugen und mit den meisten, aber
nicht allen Pkw-Sitzen kompatibel.
2. Hinsichtlich des Einbaus kann davon ausgegangen werden, dass das System konform ist, wenn der Hersteller
in der Bedienungsanleitung des Fahrzeugs angegeben hat, dass es für den Einbau eines „universellen“
Kinderrückhaltesystems für diese Altersgruppen geeignet ist.
3. Dieses Kinderrückhaltesystem wird unter strengeren Bedingungen als „universal“ eingestuft als bei
Vorgängermodellen, die diesen Hinweis nicht enthalten.
4. Wenden Sie sich im Zweifelsfall an den Hersteller oder Händler des Kinderrückhaltesystems.
Das Produkt stellt ein universelles Kinderrückhaltesystem dar, das gemäß der Norm ECE R44/04 für die
Gewichtsgruppe 0+,1,2,3 für Kinder mit einem Gewicht von 0 bis 36 kg zugelassen ist. Bei der Gewichtsgruppe 0+ wird
der Sitz entgegen der Fahrtrichtung des Autos platziert und das Kind sitzt dem Rücksitz gegenüber. Bei den
Gewichtsgruppen 1,2,3 wird der Sitz in Fahrtrichtung angebracht und das Kind ist dem Verkehr zugewandt.
DIESES KINDERRÜCKHALTESYSTEM IST NUR GEEIGNET, WENN ZUGELASSENE FAHRZEUGE MIT STATISCHEN ODER
AUFROLLBAREN DREIPUNKT-SICHERHEITSGURTEN AUSGESTATTET SIND, DIE DEN ANFORDERUNGEN DER
REGELUNG NR. 16 DER UN/ECE ODER ANDERE GLEICHWERTIGE STANDARDS. Prüfen Sie im Handbuch Ihres
Fahrzeuges, ob dieses universelle Kinderrückhaltesystem für die genannten Gewichtsgruppen darin installiert werden
kann.
Der Kindersitz ist nach der Europäischen Norm für Kinderschutzausrüstung (ECE R 44/04) entwickelt, geprüft und
zertifiziert.Der Stempel mit der Zulassungsnummer (im Kreis) und die Zulassungsnummer befinden sich auf dem
Zulassungsaufkleber (Aufkleber an der Kinderrückhaltevorrichtung). Diese Zustimmung wird sein ungültig, wenn Sie
Änderungen am Knderrückhaltesystem vornehmen. Nur der Hersteller darf Änderungen an der Kindersicherung
vornehmen.
Fahrzeugsicherheitsgurte: diagonaler Gürtel; Taillengürtel; ISOFOX-Befestigungspunkte.
• Der Kindersitz kann mit einem Drei-Punkt-Gurt und ISОFIX Befestigung für die Gruppen 1,2,3 (9–36 kg)
eingebaut werden
• Der Kindersitz kann mit einem Drei-Punkt-Gurt Befestigung für die Gruppen 0+ (0-13 kg) eingebaut werden.
Hinweis zum ISOFIX-Kinderrückhaltesystem (in Gruppe 0+,1):
Dieser Kinderautositztyp ist für die Befestigung auf Autositzen mit ISOFIX-System geeignet, die gemäß ECE R14
eingebaut sind. Die ISOFIX-Gewichtsgruppe und -Größe, für die dieses Gerät bestimmt ist, ist: ISOFIX Klasse E für
Gruppe 0 (0-10 kg) und ISOFIX Klasse D für Gruppe 1 (9-18 kg).
Lesen Sie bei Verwendung eines ISOFIX-Kinderrückhaltesystems die Anweisungen des Fahrzeugherstellers.
ACHTUNG! EXTREM GEFÄHRLICH! STELLEN SIE DEN AUTOKINDERSITZ NICHT IN EIN FAHRZEUG MIT AIRBAG-SITZEN
(SRS).
ACHTUNG! Ihr Kind ist maximal geschützt, wenn Sie die Anweisungen und Empfehlungen der Anleitung befolgen!
Beachten Sie die Warnhinweise und treffen Sie alle notwendigen Sicherheitsvorkehrungen, um das Risiko einer
Verletzung oder Beschädigung des Kindes zu vermeiden und seine Sicherheit zu gewährleisten! Sie sind für die
Sicherheit des Kindes verantwortlich, wenn Sie diese Anweisungen und Empfehlungen nicht befolgen und
berücksichtigen! Stellen Sie sicher, dass jeder, der den Kinderwagen benutzt, mit den Anweisungen vertraut ist und
DE
VORGESEHENE VERWENDUNG DES PRODUKTS
RECHTLICHE ANFORDERUNGEN
ART DER ZUGELASSENEN AUTO-SICHERHEITSGURTE FÜR DEN KINDERSITZ IM FAHRZEUG – ABBILDUNG A

18
diese befolgt. Verwenden Sie keine Teile oder Zubehörteile für den Kinderwagen, die nicht vom Hersteller oder
Händler genehmigt sind, da dies Ihr Kind gefährden und zur Löschung der Garantie des Kinderwagens führen kann.
BITTE LESEN SIE DIE ANLEITUNGEN SORGFÄLTIG DURCH, BEVOR SIE DEN AUTOKINDERSITZ IM FAHRZEUG
MONTIEREN, DA EINE FALSCHE ANBRINGUNG DES AUTOKINDERSITZES GEFÄHRLICH SEIN KANN.
WARNUNG!
• Lassen Sie ein Kind niemals unbeaufsichtigt im Autokindersitz.
• Verwenden Sie den Sitz nur bestimmungsgemäß! Es ist nicht für den Hausgebrauch konzipiert.
• Verwenden Sie den Autositz in der rückwärtsgerichteten Position, bis das Gewicht des Kindes 9 kg überschreitet.
• Der Autokindersitz ersetzt keine Kinderkrippe oder ein Kinderbett. Wenn Ihr Kind schlafen muss, sollte es in einen
geeigneten Kinderwagen, eine Kinderkrippe oder ein Bett gelegt werden.
• Für maximalen Schutz wird die mittlere Rücksitzposition als die sicherste Position in den meisten Autos empfohlen.
• Sichern Sie das Kind im Autokindersitz immer mittels des Sicherheitsgurtes.
• Achten Sie darauf, dass alle Gurte, die das Rückhaltesystem im Fahrzeug sichern, so fest wie möglich angeschnallt
sind. Stellen Sie sicher, dass die Gurte, die das Kind sichern, an den Körper des Kindes angepasst, so fest wie möglich
angezogen sind, ohne Ihrem Kind Unbehagen zu bereiten, und nicht verdreht sind.
• Es ist sehr wichtig, den Beckengurt tief unten zu verwenden, damit das Becken sicher befestigt ist.
• Verwenden Sie das Rückhaltesystem in einem Fahrzeug nicht nur mit einem Beckengurt.
• Lassen Sie die Schnalle nicht teilweise geschlossen, sie sollte verriegelt sein, wenn alle Teile eingerastet sind.
• Achten Sie immer auf ungesicherte Gegenstände hinter dem Kindesitz oder auf dem Sitz daneben, Gegenstände
oder Gepäck, die das Kind bei einem plötzlichen Stopp, Zusammenstoß oder Verkehrsunfall verletzen könnten. Sie
sollten entfernt oder sicher befestigt werden, jedoch in sicherem Abstand zum Kindersitz und zum Kind.
• Das Produkt muss mit Sicherheitsgurten fest am Autokindersitz befestigt werden, auch wenn es nicht verwendet
wird, da der Autokindersitz sonst bei einem Verkehrsunfall oder beim plötzlichen Anhalten des Fahrzeuges die
Insassen verletzen kann.
• Verwenden Sie keine anderen Lastaufnahmepunkte als die in der Anleitung beschriebenen und auf dem
Autokindersitz gekennzeichneten.
• Stellen Sie sicher, dass alle Teile des Rückhaltesystems ordnungsgemäß eingerastet sind und beim täglichen
Gebrauch des Fahrzeuges keine Gefahr besteht, dass diese in den verstellbaren Sitzen und Türen eingeklemmt
werden.
• Nach einem starken Aufprall können der Kindersitz und die Gurte beschädigt werden, daher wird empfohlen, sie
auszutauschen.
• Nehmen Sie keine Änderungen, Verbesserungen oder das Hinzufügen neuer Zubehörteile oder Polster an der
Struktur des Autositzes vor, außer denen, die vom Hersteller und ohne vorherige Genehmigung einer autorisierten
Organisation bereitgestellt wurden. Bitte stellen Sie sicher, dass Sie die Anweisungen des Herstellers genau
befolgen, wenn Sie dieses Kinderrückhaltesystem montieren und einstellen.
• Befestigen Sie keine zusätzlichen Schnüre oder Bänder am Produkt, um das Risiko auf Erstickungsgefahr zu
vermeiden.
• Wenn dem Kindersitz Beschädigung entsteht, versuchen Sie nicht, ihn selbst zu reparieren, sondern wenden Sie
sich an ein autorisiertes Servicecenter oder an den Importeur.
• Das Kinderrückhaltesystem darf nicht ohne Abdeckung verwendet werden.
• Der Kindersitzbezug darf nicht durch einen vom Hersteller nicht empfohlenen Bezug ersetzt werden. Der Bezug
spielt eine wichtige Rolle für die Wirksamkeit des Sicherheitssystems.
• Wenn Sie Ihr Auto in direktem Sonnenlicht stehen lassen, empfehlen wir Ihnen, den Autokindersitz abzudecken, da
er und die daran befestigten Kunststoffteile sehr heiß werden und sich verformen können. Überprüfen Sie
außerdem, bevor Sie das Kind in den Sitz setzen, dass der Sitz aufgewärmt ist, um Verbrennungen am Kind zu
vermeiden.
• Von Feuer fernhalten.
• Lagern Sie das Produkt nicht an feuchten Orten und unter direktem Sonnenlicht.
• Versuchen sie nicht, den autokindersitz selbst zu reparieren. dies kann zu folgeverletzungen führen, wenn es von
einem nichtfachmann durchgeführt wird.
• Der Autositz kann in zwei Grundpositionen installiert werden: vorwärtsgerichtete Position für Gruppe 1,2,3 (9-36
kg) und vorwärtsgerichtete Liegeposition für Neugeborene und Kinder bis 13 kg.
WICHTIG! SORGFÄLTIG LESEN UND ZUM SPÄTEREN NACHSCHLAGEN AUFBEWAHREN
HAUPTTEILE DES KINDERSITZES - ABBILDUNG PD

19
BESTANDTEILE: 1. Griff zum Einstellen der Kopfstütze; 2. Kopfstütze; 3. Schultergurtschlitz; 4. Unterlage; 5.Polster für
Schultergurte; 6.Dreipunktsystem für die Gurte und die Schnalle; 7. Polster für die Schnalle; 8. Taste zur
Winkeleinstellung;9.Drehknopf; 10. Gurteinstellband.
Klasse zur Verwendung als Gruppe 0+ (0-13 kg): Installation mit dem Dreipunkt-Gurt des Autos und dem
Sicherheitsgurt (entgegen der Fahrtrichtung).
Verwenden Sie den Dreipunkt-Sicherheitsgurt des Autos, um das Kind und den Autositz zu sichern.
1. Stellen Sie den Autositz entgegen der Fahrtrichtung auf den Autositz.
2. Den Sicherheitsgurt des Fahrzeugs vollständig aufrollen.
3. Führen Sie den Diagonalgurt zwischen Rückenlehne und Kopfstütze des Kindersitzes und den Beckengurt durch die
Gurtführungen an der Unterseite des Kindersitzes. Stellen Sie sicher, dass sich beide Teile des Autosicherheitsgurts
unter dem Sicherheitsgurt des Kindersitzes befinden.
4. Befestigen Sie die Schulter- und Beckengurte in der Schnalle (siehe Schrittfolge in Abbildung B.1).
5. Setzen Sie das Kind in den Sitz. Überprüfen Sie die Höhe der Schultergurte. Achten Sie darauf, dass die Gurte nicht
verdreht sind. Befestigen Sie die Sicherheitsgurte des Kindes, stellen Sie sicher, dass sie sicher sitzen, ziehen Sie den
Gurt in die Mitte des Sitzes und ziehen Sie ihn fest. Für mehr Komfort und Sicherheit bei der Verwendung des Sitzes
von einem Neugeborenen können Sie das weiche Sitzkissen, das Teil des Autositzes ist, auf die Unterseite des Sitzes
legen.
Befolgen Sie zum Anlegen des Fünfpunkt-Sicherheitsgurts die in Abbildung B.1 gezeigten Schritte.
Verbinden Sie die beiden Metallteile der Schnalle. Stecken Sie die beiden Verbindungsstücke in die Oberseite der
Schnalle, bis sie fest sitzen und einrasten.
Überprüfen Sie immer, ob der Sicherheitsgurt richtig angelegt ist, indem Sie die Schultergurte nach oben ziehen.
Um den Gurt zu lösen, drücken Sie den roten Schnallenknopf nach unten.
Befolgen Sie zur Einstellung der Schultergurte die in Abbildung B.2 gezeigten Schritte.
Führen Sie die Gurte durch die Schulterpolster und dann durch den Schulterschlitz an der Vorderseite des Stuhls.
Führen Sie die Gurte durch den Sitz aus der Rückenlehne des Stuhls heraus. Ziehen Sie die Gurte nach unten in Richtung
der Unterseite des Stuhls zu den Metallverbindern auf der Rückseite des Boosters. Schieben Sie die Gurte auf die
Metallverbindung. Wenn eine längere Gurtlänge benötigt wird, drücken Sie den Hebel an der unteren Vorderseite des
Stuhls und ziehen Sie gleichzeitig an den Gurten. Zur Demontage der Gurte, führen Sie die beschriebenen Handlungen
in umgekehrter Reihenfolge durch.
Befolgen Sie zum Straffen und Lösen der Schultergurte die in Abbildung В.3 gezeigten Schritte.
STRAFFEN DER SCHULTERGURTE: Ziehen Sie die Schultergurte nach oben, um alle losen Beckenteile des Gurts zu
entfernen. Ziehen Sie am Einstellband, bis der Sicherheitsgurt vollständig gestrafft ist. Der Sicherheitsgurt muss so eng
wie möglich am Körper des Kindes angelegt werden, ohne ihm Unbehagen zu bereiten. Die Gurte dürfen nicht verdreht
sein. Stellen Sie sicher, dass der Beckenteil des Gurts so niedrig wie möglich positioniert ist – nicht um den Bauch
herum –, damit das Becken sicher gehalten wird.
Achtung! Ein lockerer Sicherheitsgurt kann gefährlich sein. Überprüfen Sie jedes Mal, wenn Sie das Kind in den Sitz
setzen, die korrekte Einstellung der Gurte und ziehen Sie sie gegebenenfalls fest.
LÖSEN DER SCHULTERGURTE: Der Sicherheitsgurt wird durch Drücken des Hebels an der unteren Vorderseite des
Sitzes gelöst. Drücken Sie den Hebel nach unten, bis Sie beide Schultergurte mit der anderen Hand umfassen. Ziehen
Sie die Schultergurte zu sich hin, um die Gurte zu lockern. Achten Sie beim Einstellen der Schultergurte darauf, dass
Sie beim Herunterdrücken des Hebels nicht den Gurteinstellriemen einklemmen.
Die ISOFIX-Verankerungspunkte befinden sich in 2 ISOFIX-Metall-Verankerungsboxen an der Verbindung zwischen Sitz
und Autorückenlehne unter der Polsterung und einem Metallhaken hinter dem Autositz. Drücken Sie auf beiden Seiten
des Sitzes den ISOFIX-Knopf und ziehen Sie die ISOFIX-Konnektoren in die längste Position. Schieben Sie die beiden
MONTAGE DES KINDERSITZES: GRUPPE 0+ (0-13 kg) – ABBILDUNG B
EINBAU EINES FÜNFPUNKT-SICHERHEITSGURTS – ABBILDUNG B.1
HÖHENVERSTELLUNG DER SCHULTERGURTE DES STUHLS – ABBILDUNG B.2
STRAFFEN UND LÖSEN DER SCHULTERGURTE - ABBILDUNG B.3
INSTALLIEREN DES ISOFIX-SYSTEMS – ABBILDUNG C

20
ISOFIX-Konnektoren fest in die Einsätze, bis die ISOFIX-Konnektoren mit einem Klickgeräusch auf beiden Seiten
einrasten. Die ISOFIX-Taste muss auf beiden Seiten grün sein.
ACHTUNG! Die ISOFIX-Konnektoren sind nur richtig positioniert, wenn beide Tasten des ISOFIX-Systems grün
markiert sind.
Drücken Sie den Kindersitz mit gleichmäßigem Druck auf beiden Seiten gegen die Rückenlehne. Schütteln Sie den
Kindersitz, um sicherzustellen, dass er fest sitzt, und überprüfen Sie die grünen Sicherheitsknöpfe, um sicherzustellen,
dass sie richtig sitzen.
1. Stellen Sie den Autositz in Fahrtrichtung auf den Autositz.
2. Schieben Sie die ISOFIX-Befestigungsmechanismen direkt auf die Metallhaken des Fahrzeugs, bis ein „Klick“ zu hören
ist. Die ISOFIX-Sperranzeige sollte GRÜN anzeigen.
3. Drücken Sie den Kindersitz fest in die Rückenlehne des Autositzes. Während dieser Bewegung strafft das ISOFIX-
System den Kindersitz an der Sitzlehne und Sie hören ein Klickgeräusch.
4. Greifen Sie den Stuhl und prüfen Sie, ob er sicher befestigt ist oder ob er wackelt.
Klasse zur Verwendung als Gruppe 1 (9-18 kg): Installation mit dem ISOFIX-/Dreipunkt-Sicherheitsgurt des Fahrzeugs
und dem Sicherheitsgurt (in Fahrtrichtung).
Der Autositz kann sowohl mit dem ISOFIX-System als auch mit dem Dreipunktgurt des Autos installiert werden.
Um den Sitz mit dem Dreipunkt-Sicherheitsgurt des Fahrzeugs zu installieren, befolgen Sie die in Abbildung D gezeigten
Schritte.
Klasse zur Verwendung als Gruppe II (15–25 kg) und als Gruppe III (22–36 kg): Autosicherheitsgurt / ISOFIX (in
Fahrtrichtung).
Bei Verwendung des Stuhls für die Gruppen 2 und 3 müssen der Fünfpunkt-Sicherheitsgurt, die Polsterung der Schnalle
und das Sitzkissen entfernt werden.
MONTAGE MIT EINEM FÜNFPUNKT-GURT:
Stellen Sie den Autositz in Fahrtrichtung auf den Autositz. Führen Sie den Schultergurt durch den Haken über die
Schulter des Kindes und den Beckengurt über den Stuhl und den Schoß des Kindes. Führen Sie den Gurt durch die
untere Öffnung des Sitzes des Autositzes und befestigen Sie den Gurt im Gurtschloss des Autositzes, bis Sie ein „Klick“
hören. Überprüfen Sie, ob das Gurtschloss geschlossen ist, indem Sie am Gurt ziehen.
MONTAGE MIT EINEM ISOFIX-SYSTEM:
1. Stellen Sie den Autositz in Fahrtrichtung auf den Autositz.
2. Schieben Sie die ISOFIX-Befestigungsmechanismen direkt auf die Metallhaken des Fahrzeugs, bis ein „Klick“ zu hören
ist. Die ISOFIX-Sperranzeige sollte GRÜN anzeigen.
3. Drücken Sie den Kindersitz fest in die Rückenlehne des Autositzes. Während dieser Bewegung strafft das ISOFIX-
System den Kindersitz an der Sitzlehne und Sie hören ein Klickgeräusch.
4. Greifen Sie den Stuhl und prüfen Sie, ob er sicher befestigt ist oder ob er wackelt.
5. Setzen Sie das Kind in den Sitz. Führen Sie den Schultergurt durch den Haken über die Schulter des Kindes und den
Beckengurt über den Stuhl und den Schoß des Kindes. Führen Sie den Gurt durch die untere Öffnung des Sitzes des
Autositzes und befestigen Sie den Gurt im Gurtschloss des Autositzes, bis Sie ein „Klick“ hören. Überprüfen Sie, ob das
Gurtschloss geschlossen ist, indem Sie am Gurt ziehen.
❖ WARTUNGSANLEITUNG
1. Überprüfen Sie regelmäßig die Verriegelungs-, Sicherungs- und Einstellmechanismen, Gurte und Polster, um
sicherzustellen, dass sie in gutem Zustand, nicht abgenutzt oder beschädigt und sicher zu verwenden sind.
2. Wenn Sie Schäden entdecken oder eine Funktion nicht funktioniert, hören Sie sofort auf, den Sitz zu benutzen.
3. Der Autokindersitz darf nicht ohne Polster verwendet werden! Sie ist fester Bestandteil des Sitzes und kann nur durch
eine vom Hersteller gelieferte identische ersetzt werden.
4. Verwenden Sie den Sitz nach einem Verkehrsunfall nicht wieder, da strukturelle Schäden vorliegen können, die ihn sehr
gefährlich machen. Es kann Schäden geben, die nicht sichtbar sind. Die Inspektion durch einen Servicespezialisten ist
obligatorisch.
REINIGUNG UND INSTANDHALTUNG
VERWENDUNG EINES KINDERSITZES MIT ISOFIX-SYSTEM – ABBILDUNG C.1
MONTAGE DES KINDERSITZES: GRUPPE I (9-18 kg) – ABBILDUNG D
La pagina si sta caricando...
La pagina si sta caricando...
La pagina si sta caricando...
La pagina si sta caricando...
La pagina si sta caricando...
La pagina si sta caricando...
La pagina si sta caricando...
La pagina si sta caricando...
La pagina si sta caricando...
La pagina si sta caricando...
La pagina si sta caricando...
La pagina si sta caricando...
La pagina si sta caricando...
La pagina si sta caricando...
La pagina si sta caricando...
La pagina si sta caricando...
La pagina si sta caricando...
La pagina si sta caricando...
La pagina si sta caricando...
La pagina si sta caricando...
La pagina si sta caricando...
La pagina si sta caricando...
La pagina si sta caricando...
La pagina si sta caricando...
La pagina si sta caricando...
La pagina si sta caricando...
La pagina si sta caricando...
La pagina si sta caricando...
La pagina si sta caricando...
La pagina si sta caricando...
La pagina si sta caricando...
La pagina si sta caricando...
La pagina si sta caricando...
La pagina si sta caricando...
La pagina si sta caricando...
La pagina si sta caricando...
La pagina si sta caricando...
La pagina si sta caricando...
La pagina si sta caricando...
La pagina si sta caricando...
-
 1
1
-
 2
2
-
 3
3
-
 4
4
-
 5
5
-
 6
6
-
 7
7
-
 8
8
-
 9
9
-
 10
10
-
 11
11
-
 12
12
-
 13
13
-
 14
14
-
 15
15
-
 16
16
-
 17
17
-
 18
18
-
 19
19
-
 20
20
-
 21
21
-
 22
22
-
 23
23
-
 24
24
-
 25
25
-
 26
26
-
 27
27
-
 28
28
-
 29
29
-
 30
30
-
 31
31
-
 32
32
-
 33
33
-
 34
34
-
 35
35
-
 36
36
-
 37
37
-
 38
38
-
 39
39
-
 40
40
-
 41
41
-
 42
42
-
 43
43
-
 44
44
-
 45
45
-
 46
46
-
 47
47
-
 48
48
-
 49
49
-
 50
50
-
 51
51
-
 52
52
-
 53
53
-
 54
54
-
 55
55
-
 56
56
-
 57
57
-
 58
58
-
 59
59
-
 60
60


Moni Car seat Dragon Istruzioni per l'uso
- Categoria
- Sedili dell'auto
- Tipo
- Istruzioni per l'uso
in altre lingue
Documenti correlati
Altri documenti
-
 KIKKA BOO Stark ISOFIX Istruzioni per l'uso
-
 KIKKA BOO JAZZY Manuale utente
-
 KIKKA BOO 31002070030 Manuale utente
-
 KikkaBoo Ronda ISOFIX Manuale utente
-
 KikkaBoo Cruz ISOFIX Manuale utente
-
 KikkaBoo O’Right SPS Manuale utente
-
 KikkaBoo Multistage ISOFIX Manuale utente
-
 ickle bubba Mercury i-Size Car Seat Guida utente
-
Brevi KIMI 533 Manuale del proprietario
-


