
© Copyright 2019 ATEN
®
International Co., Ltd.
ATEN and the ATEN logo are trademarks of ATEN International Co., Ltd. All rights reserved. All
other trademarks are the property of their respective owners.
Part No. PAPE-1223-Q20G Printing Date: 01/2019
True 4K HDMI HDBaseT-Lite Extender
Quick Start Guide
VE1830
Support and Documentation Notice
All information, documentation, fi rmware, software utilities, and
specifi cations contained in this package are subject to change without
prior notifi cation bythe manufacturer.
To reduce the environmental impact of our products, ATEN
documentation and software can be found online at
http://www.aten.com/download/
Technical Support
www.aten.com/support
이 기기는 업무용(A급) 전자파적합기기로서 판매자 또는 사용자는 이 점을 주의하시기 바라며,
가정외의 지역에서 사용하는 것을 목적으로 합니다.
EMC Information
FEDERAL COMMUNICATIONS COMMISSION INTERFERENCE
STATEMENT:
This equipment has been tested and found to comply with
the limits for a Class A digital device, pursuant to Part 15
of the FCC Rules. These limits are designed to provide
reasonable protection against harmful interference when
the equipment is operated in a commercial environment.
This equipment generates, uses, and can radiate radio frequency energy and, if not installed
and used in accordance with the instruction manual, may cause harmful interference to radio
communications. Operation of this equipment in a residential area is likely to cause harmful
interference in which case the user will be required to correct the interference at his own expense.
FCC Caution: Any changes or modifi cations not expressly approved by the party responsible for
compliance could void the user's authority to operate this equipment.
Warning: Operation of this equipment in a residential environment could cause radio interference.
This device complies with Part 15 of the FCC Rules. Operation is subject to the following two
conditions:(1) this device mat not cause harmful interference, and(2) this device must accept any
interference received, including interference that may cause undesired operation.
Scan for
more information
A
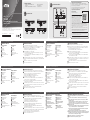
Hardware Review
B
Hardware Installation
Package Contents
1 VE1830T True 4K HDMI HDBaseT-Lite
Transmitter
1 VE1830R True 4K HDMI HDBaseT-Lite Receiver
ATEN VanCryst
™
2 RS-232 Terminal Blocks
1 Power Adapter
1 User Instructions
VE1830T
VE1830R
2a
2b
4
1
3
HDMI Source
Serial Device
Monitor
3
Serial Device
VE1830T
VE1830R
2a
2b
4
1
3
HDMI Source
Serial Device
Monitor
3
Serial Device
1
4 5 6 7 8
4 5 6 7
3
2
1 3
2
VE1830T VE1830R
VE1830 True 4K HDMI HDBaseT-Lite Extender
www.aten.com
VS82H 2-Port True 4K HDMI Splitter
VS82H 2-Port True 4K HDMI Splitter
A
Hardware Review
VE1830T Transmitter
1
Power LED
2
Link LED
3
Signal LED
4
Power Jack
5
HDBaseT Out
6
RS-232 Serial Port
7
Firmware Upgrade Switch
8
HDMI In
B
Hardware Installation
Refer to the installation diagram above and do the following:
1
Connect one end of a Cat 6a/ATEN 2L-2910 cable to the HDBaseT Out port on the
VE1830T and the other end to the HDBaseT In port on the VE1830R.
• Extends full HD 1080p, HDMI signals up to 70 m
• Extends 4K/2K, 60 Hz HDMI signals (4:4:4) up to 35 m
2
To extend an HDMI source, do the following:
(a) Connect the HDMI In port on the VE1830T to the HDMI Out port of your video
source device using an HDMI cable.
(b) Connect the HDMI Out port on the VE1830R to the HDMI In port on a monitor
using an HDMI cable.
3
To extend RS-232 serial signals, connect a computer or a serial controller to the RS-232
Serial port on the VE1830T or the VE1830R. The RS-232 pins are Tx, Rx, and GND from left
to right.
4
Plug the power cord into the power jack on the VE1830T.
5
Power on all the connected devices.
VE1830R Receiver
1
Power LED
2
Link LED
3
Signal LED
4
HDBaseT In
5
RS-232 Serial Port
6
Firmware Upgrade Switch
7
HDMI Out
Extensor HDMI real 4k HDBaseT-Lite VE1830
www.aten.com
Extension HDBaseT-Lite HDMI True 4K VE1830 Estensore VE1830 True 4K HDMI HDBaseT-Lite
True-4K-HDMI-HDBaseT-Lite-Extender VE1830
Удлинитель HDMI True 4K HDBaseT-Lite VE1830
www.aten.com
www.aten.com
www.aten.com
www.aten.com
A
Présentation du matériel
Émetteur VE1830T
1
LED Alimentation
2
LED Liaison
3
LED Signal
4
Fiche d'alimentation
5
Sortie HDBaseT
6
Port série RS-232
7
Commutateur de mise à niveau du
fi rmware
8
Entrée HDMI
B
Installation du matériel
Reportez-vous au schéma d’installation ci-dessus et effectuez les étapes suivantes :
1
Raccordez une extrémité d’un câble Cat 6a/ATEN 2L-2910 au port de sortie HDBaseT
du VE1830T et l'autre extrémité au port d’entrée HDBaseT du VE1830R.
• Étend des signaux HDMI full HD 1080p jusqu'à 70 m
• Étend des signaux HDMI 4K/2K, 60 Hz (4:4:4) jusqu'à 35 m
2
Pour étendre une source HDMI, faites ce qui suit :
(a) Raccordez le port d’entrée HDMI du VE1830T au port de sortie HDMI de votre
appareil source vidéo à l’aide d'un câble HDMI.
(b) Raccordez le port de sortie HDMI du VE1830R au port d’entrée HDMI d’un
moniteur à l’aide d'un câble HDMI.
3
Pour étendre des signaux série RS-232, raccordez un ordinateur ou un contrôleur série
au port Série RS-232 sur le VE1830T ou le VE1830R. Les broches RS-232 sont Tx, Rx et
GND de gauche à droite.
4
Branchez le cordon d’alimentation dans la prise d'alimentation du VE1830T.
5
Mettez sous tension tous les appareils connectés.
Récepteur VE1830R
1
LED Alimentation
2
LED Liaison
3
LED Signal
4
Entrée HDBaseT
5
Port série RS-232
6
Commutateur de mise à niveau
du fi rmware
7
Sortie HDMI
A
Hardwareübersicht
VE1830T-Sender
1
Betriebsanzeige-LED
2
Verbindung-LED
3
Signal-LED
4
Netzanschluss
5
HDBaseT-Ausgang
6
Serieller RS-232-Anschluss
7
Firmware-Aktualisierungsschalter
8
HDMI-Eingang
B
Hardwareinstallation
Beachten Sie die obige Installationsabbildung und gehen Sie wie folgt vor:
1
Verbinden Sie ein Ende eines Cat-6a/ATEN-2L-2910-Kabels mit dem HDBaseT-Ausgang
am VE1830T und das andere Ende mit dem HDBaseT-Eingang am VE1830R.
• Verlängert Full-HD-1080p-, HDMI-Signale bis 70 m
• Verlängert 4K/2K-, 60-Hz-HDMI-Signale (4:4:4) bis 35 m
2
Gehen Sie zur Erweiterung einer HDMI-Quelle wie folgt vor:
(a) Verbinden Sie den HDMI-Eingang am VE1830T per HDMI-Kabel mit dem
HDMI-Ausgang an Ihrem Videoeingangsgerät.
(b) Verbinden Sie den HDMI-Ausgang am VE1830R per HDMI-Kabel mit dem
HDMI-Eingang an einem Monitor.
3
Verlängern Sie serielle RS-232-Signale, indem Sie einen Computer oder einen seriellen
Controller mit dem seriellen RS-232-Anschluss am VE1830T oder VE1830R verbinden.
Die RS-232-Kontakte sind von links nach rechts Tx, Rx und GND.
4
Schließen Sie das Netzkabel an den Netzanschluss am VE1830T an.
5
Schalten Sie alle verbundenen Geräte ein.
VE1830R-Empfänger
1
Betriebsanzeige-LED
2
Verbindung-LED
3
Signal-LED
4
HDBaseT-Eingang
5
Serieller RS-232-Anschluss
6
Firmware-Aktualisierungsschalter
7
HDMI-Ausgang
A
Revisión del hardware
Transmisor VE1830T
1
LED de encendido
2
LED de conexión
3
LED de señal
4
Conector de alimentación
5
Salida HDBaseT
6
Puerto en serie RS-232
7
Botón de actualización del fi rmware
8
Entrada HDMI
B
Instalación de hardware
Consulte el diagrama de instalación de arriba y haga lo sigiente:
1
Conecte un extremo del cable Cat 6a/ATEN 2L-2910 al puerto de salida del HDbaseT
en el VE1830T y el otro extremo al puerto de entrada del HDbaseT en el VE1830R.
• Extiende señal HDMI full HD 1080p, hasta 70 m
• Extiende señal HDMI de 4K/2K, 60 Hz (4:4:4) hasta 35 m
2
Para extender una fuente HDMI, haga lo siguiente:
(a) Conecte el puerto de entrada HDMI del VE1830T al peurto de salida HDMI de su
fuente de video empleando un cable HDMI.
(B) Conecte el puerto de salida HDMI del VE1830R al puerto de entrada HDMI de un
monitor utilizando un cable HDMI.
3
Para extender señales en serie RS-232 conecte un ordenador o un controlador en serie
al puerto en serie RS-232 en el VE1830T o en el VE1830R. Las clavijas de RS-232 son
Tx, Rx y GND de izquierda a derecha.
4
Enchufe el cable de alimentación en el conector de alimentación del VE1830T.
5
Encienda todos los dispositivos conectados.
Receptor VE1830R
1
LED de encendido
2
LED de conexión
3
LED de señal
4
Entada HDBaseT
5
Puerto en serie RS-232
6
Botón de actualización del
fi rmware
7
Salida HDMI
A
Descrizione hardware
Trasmettitore VE1830T
1
LED alimentazione
2
LED Collegamento
3
LED segnale
4
Connettore di alimentazione
5
Uscita HDBaseT
6
Porta seriale RS-232
7
Interruttore di aggiornamento
fi rmware
8
Ingresso HDMI
B
Installazione dell'hardware
Fare riferimento allo schema di installazione precedente e agire come segue:
1
Collegare un'estremità di un cavo Cat 6a/ATEN 2L-2910 alla porta di uscita HDBaseT
su VE1830T e l'altra estremità alla porta di ingresso HDBaseT su VE1830R.
• Estende segnali Full HD 1080p, HDMI fi no a 70 m
• Estende segnali 4K/2K, 60 Hz HDMI (4:4:4) fi no a 35 m
2
Per estendere una sorgente HDMI, agire come segue:
(a) Collegare la porta di ingresso HDMI di VE1830T alla porta di uscita HDMI sulla
sorgente video usando un cavo HDMI.
(b) Collegare la porta di uscita HDMI di VE1830R alla porta di ingresso HDMI su un
monitor usando un cavo HDMI.
3
Per estendere i segnali seriali RS-232, collegare un computer o un controller seriale alla
porta seriale RS-232 su VE1830T o su VE1830R. I pin RS-232 sono Tx, Rx e GND da
sinistra a destra.
4
Collegare il cavo di alimentazione al connettore di alimentazione di VE1830T.
5
Accendere tutti i dispositivi collegati.
Ricevitore VE1830R
1
LED alimentazione
2
LED Collegamento
3
LED segnale
4
Ingresso HDBaseT
5
Porta seriale RS-232
6
Interruttore di aggiornamento
fi rmware
7
Uscita HDMI
A
Обзор аппаратного обеспечения
Передатчик VE1830T
1
Индикатор питания
2
Индикатор связи
3
Индикатор сигнала
4
Разъем питания
5
Выходной разъем HDBaseT
6
Последовательный порт RS-232
7
Кнопка обновления
микропрограммы
8
Входной разъем HDMI
B
Установка аппаратного обеспечения
Руководствуясь приведенной выше установочной схемой, выполните следующие
действия.
1
Подключите один конец кабеля кат. 6a/ATEN 2L-2910 к выходному порту
HDBaseT передатчика VE1830T, а другой конец - к входному порту HDBaseT
приемника VE1830R.
• При этом HDMI-сигналы Full HD 1080p передаются на расстояние до 70 м
• HDMI-сигналы 4K/2K, 60 Гц (4:4:4) передаются на расстояние до 35 м
2
Чтобы увеличить расстояние передачи сигнала от источника HDMI, выполните
следующие действия:
(a) Подключите входной HDMI-порт передатчика VE1830T к выходному HDMI-
порту источника видеосигнала с помощью HDMI-кабеля.
(b) Подключите выходной HDMI-порт приемника VE1830R к входному HDMI-
порту монитора с помощью HDMI-кабеля.
3
Для увеличения расстояния передачи сигналов последовательного
интерфейса RS-232 подключите компьютер или последовательный контроллер
к последовательному порту RS-232 на VE1830T или VE1830R. Конфигурация
контактов RS-232: Tx, Rx и GND (слева направо).
4
Подключите сетевой шнур к разъему питания на VE1830T.
5
Включите питание всех подключенных устройств.
Приемник VE1830R
1
Индикатор питания
2
Индикатор связи
3
Индикатор сигнала
4
Входной разъем HDBaseT
5
Последовательный порт
RS-232
6
Кнопка обновления
микропрограммы
7
Выходной разъем HDMI
Important. Before proceeding, download the Installation and Operation Manual by visiting the
website, www.aten.com and navigating to the product page. The manual includes important
warnings, loading specifi cations and grounding instructions.
La pagina si sta caricando...
-
 1
1
-
 2
2


in altre lingue
- English: ATEN VE1830 Quick start guide
- français: ATEN VE1830 Guide de démarrage rapide
- español: ATEN VE1830 Guía de inicio rápido
- Deutsch: ATEN VE1830 Schnellstartanleitung
- русский: ATEN VE1830 Инструкция по началу работы
- português: ATEN VE1830 Guia rápido
- polski: ATEN VE1830 Skrócona instrukcja obsługi
- 日本語: ATEN VE1830 クイックスタートガイド
- Türkçe: ATEN VE1830 Hızlı başlangıç Kılavuzu