La pagina si sta caricando...

Italiano
Contenuti della confezione: Smart Badge,
cavo di ricarica USB, piastra in metallo,
Guida rapida.
Comandi:
1. Micro USB: collegare a questo livello il
cavo micro-USB per caricare lo Smart
Badge.
2.
A
ccensione/spegnimento (on/off):
spostare l'interruttore verso l'alto per
accendere lo Smart Badge. Spostare
l'interruttore verso il basso per spegnere
lo Smart Badge.
3. Piastra in metallo: collocare la piastra in
metallo sotto gli abiti per fissarla al
pannello magnetico.
4. Pannello magnetico: collocare il
pannello accanto alla piastra in metallo
per effettuare il collegamento magnetico.
5. Pin: servirsi dei pin per fissare lo Smart
Badge agli abiti.
6. Luminosità/collegamento Bluetooth:
premere e rilasciare questo tasto per
scorrere tra i 3 livelli di luminosità: 50%,
75%, e 100%. Per entrare in modalità di
collegamento Bluetooth, tenere premuto
questo tasto per 2 secondi. Per
interrompere il collegamento da un
dispositivo Bluetooth, tenere premuto
questo tasto per 3 secondi.
7. Posizionamento dei messaggi: scegliere
uno degli 8 messaggi disponibili. Creare e
salvare messaggi personalizzati in queste
posizioni servendosi dell'app Smart
Badge.
Ricarica dello Smart Badge: servirsi del
cavo micro-USB in dotazione per collegare lo
Smart Badge a un adattatore di alimentazione
USB collegato a una presa elettrica o al
computer (acceso).
Uso dello Smart Badge:
1. Scaricare l'app Smart Badge dall'App
Store o dal Google Play store.
2. Accendere lo Smart Badge.
Nota bene: rimuovere la pellicola
protettiva dallo schermo per una
visualizzazione chiara.
3. Tenere premuto il tasto Bluetooth
Pairing per 2 secondi per entrare in
modalità di collegamento Bluetooth.
4. Aprire l'app Smart Badge sul proprio
dispositivo (smartphone, tablet, ecc.) per
collegare lo Smart Badge al dispositivo
stesso e creare messaggi personalizzati.
Nota bene: non occorre effettuare alcun
collegamento tramite il menu impostazioni del
dispositivo Bluetooth. Se il dispositivo
Bluetooth è acceso, Smart Badge si
occuperà del collegamento.
Modalità orologio: tenere premuto il tasto
Message Select per 3 secondi per mostrare
l'ora. Premere nuovamente e rilasciare il tasto
Message Selectper commutare tra i formati
a 12 e 24 ore. Tenere premuto il tasto
Message Select per 3 secondi per lasciare la
modalità orologio.
Deutsch
Lieferumfang: Smart Badge, USB-Ladekabel,
Metallplatte, Schnellstart-Anleitung.
Bedienelemente:
1. Mikro-USB: Schließen Sie das Mikro-USB-
Kabel hier an, um Smart Badge aufzuladen.
2. Einschalten/Ausschalten: Bringen Sie
diesen Schalter in die obere Position, um
Smart Badge einzuschalten. Bringen Sie den
Schalter in die untere Position, um Smart
Badge auszuschalten.
3. Metallplatte: Bringen Sie die Metallplatte
unter Ihre Kleidung, um sie an der
Magnetplatte zu befestigen.
4. Magnetplatte: Bringen Sie die Magnetplatte
in die Nähe der Metallplatte, um den
Magnetverschluss zu schließen.
5. Pin:
V
erwenden Sie diese Option, um Smart
Badge an Ihrer Kleidung zu befestigen.
6. Helligkeit/Bluetooth-Verbindung: Drücken
Sie kurz auf diese Taste, um zwischen den 3
Helligkeitsstufen zu wählen: 50%, 75%, oder
100%. Um in den Bluetooth-Koppelmodus
zu gelangen, halten Sie diese Taste 2
Sekunden lang gedrückt. Um ein
gekoppeltes Bluetooth-Gerät zu trennen,
halten Sie diese Taste 3 Sekunden lang
gedrückt.
7. Nachrichtenspeicherorte: Wählen Sie eine
aus 8 Nachrichten aus. Erstellen und
speichern Sie benutzerdefinierte Nachrichten
mit der Smart Badge App an diesen Orten.
Smart Badge aufladen:
V
erwenden Sie das
mitgelieferte Mikro-USB-Kabel, um Smart Badge
mit Ihrem (eingeschalteten) Computer oder mit
einem USB-Netzteil zu verbinden, das in einer
Steckdose eingesteckt ist.
Smart Badge verwenden:
1. Laden Sie die Smart Badge App aus dem
App Store oder Google Play Store herunter.
2. Schalten Sie Smart Badge ein.
Hinweis: Entfernen Sie die Schutzfolie vom
Display-Bildschirm.
3. Halten Sie die Taste Bluetooth-Verbindung
2 Sekunden lang gedrückt, um in den
Bluetooth-Koppelmodus zu gelangen.
4. Öffnen Sie die Smart Badge App auf Ihrem
Gerät (Smartphone, Tablet, etc.), um Smart-
Badge mit Ihrem Gerät zu koppeln und
benutzerdefinierte Nachrichten zu erstellen.
Hinweis: Es ist nicht notwendig, eine
Verbindung über das Bluetooth-Einstellungen-
Menü Ihres Geräts herzustellen. Solange
Bluetooth auf Ihrem Gerät aktiviert ist, wird die
Smart Badge App die Verbindung verwalten.
Uhrenmodus: Halten Sie die Taste Nachricht
auswählen 3 Sekunden lang gedrückt, um die
Zeit anzuzeigen. Drücken Sie erneut kurz auf die
Taste Nachricht auswählen, um zwischen dem
12- und 24-Stunden-Format umzuschalten.
Halten Sie die Taste Nachricht auswählen 3
Sekunden lang gedrückt, um den Uhrenmodus
zu verlassen.
Nederlands
Inhoud van de doos: Smart Badge, USB-oplaadkabel, metalen
plaatje, snelstartgids.
Bedieningsknoppen:
1. Micro-USB: Sluit hier de micro-USB-kabel aan om de Smart
Badge op te laden.
2. Voeding Aan/Uit: Zet deze schakelaar in de hoogste stand om
de Smart Badge in te schakelen. Zet de schakelaar in de
onderste stand om de Smart Badge uit te schakelen.
3. Metalen plaatje: Plaats het metalen plaatje onder de kleding om
het magnetische paneel te bevestigen.
4. Magnetisch paneel: Plaats het paneel nabij het metalen plaatje
om magnetische verbinding te maken.
5. Pin: Gebruik dit om de Smart Badge aan uw kleding te
bevestigen.
6. Helderheid/Bluetooth-koppeling: Deze knop indrukken en
loslaten om de 3 helderheidsniveaus te doorlopen: 50%, 75%,
and 100%. Deze knop 2 seconden lang indrukken om Bluetooth-
koppelingsmodus te activeren. Druk deze knop 3 seconden lang
in om de koppeling met een Bluetooth-apparaat te verbreken.
7. Opslaglocaties berichten: Selecteer een van de 8 berichten.
Maak aangepaste berichten en sla deze op in de opslaglocaties
met behulp van de Smart Badge-app.
De Smart Badge opladen: Gebruik de meegeleverde micro-USB-
kabel om de Smart Badge aan te sluiten op een USB-adapter met
aansluiting op het net of uw pc (ingeschakeld).
De Smart Badge gebruiken:
1. De Smart Badge-app downloaden van de App Store of Google
Play.
2. De Smart Badge inschakelen.
Opmerking: Het beschermfolie verwijderen van het scherm voor
een helder beeld.
3. De knop Bluetooth koppelen 2 seconden lang ingedrukt houden
om de Bluetooth koppelingsmodus te activeren.
4. De Smart Badge-app op uw apparaat (smartphone, tablet, enz.)
openen om de Smart Badge te koppelen met uw apparaat en
aangepaste berichten te maken.
Opmerking: Er hoeft geen verbinding te worden gemaakt vanuit het
menu Bluetooth-instellingen van uw apparaat. Als Bluetooth op uw
apparaat is ingeschakeld, dan regelt de Smart Badge-app de
verbinding.
Klokmodus: De knop Bericht selecteren 3 seconden lang ingedrukt
houden om de tijd weer te geven. De knop Bericht selecteren
opnieuw indrukken en loslaten om te wisselen tussen 12- en 24-
uursnotatie. De knop Bericht selecteren 3 seconden lang ingedrukt
houden om klokmodus te verlaten.
Technical Specifications
Dimensions (width x depth x height):
3.7” x .50” x 1.2”; 9.4 cm x 1.2 cm x 3 cm
Weight: .20 lbs.; .09 kg
Display Resolution: 11 x 44 LEDs
Battery: Rechargeable Lithium-ion battery
Battery Life (when fully charged): Up to 24
hours
Charging Time: 2 hours
Bluetooth Specification: Bluetooth 4.0
A
llgemeinhinweis zur Konformitätserklärung: Hiermit erklären wir, daß sich das
Gerät Smart Badge in Übereinstimmung mit den grundlegenden Anforderungen der
europäischen Richtlinie 1999/5/EG befindet. Die vollständige EG Konformitätserklärung
kann unter folgender Adresse angefordert werden:
inMusic GmbH
Harkortstrasse 12–32
40880 Ratingen
GERMANY
WARNING: To reduce the risk of fire or electrical shock, do
not expose this appliance to rain or moisture. Electrical
equipment should NEVER be kept or stored in damp
environments.
NOTICE CONCERNING FCC REGULATIONS: You are
cautioned that changes or modifications not expressly
approved by the part responsible for compliance could void
the user's authority to operate the equipment.
This equipment has been tested and found to comply with
the limits for a Class B digital device, pursuant to part 15 of
the FCC rules. These limits are designed to provide
reasonable protection against harmful interference in a
residential installation. This equipment generates uses and
can radiate radio frequency energy and, if not installed and
used in accordance with the instructions, may cause
harmful interference to radio communications. However,
there is no guarantee that interference will not occur in a
particular installation. If this equipment does cause harmful
interference to radio or television reception, which can be
determined by turning the equipment off and on, the user is
encouraged to try to correct the interference by one or
more of the following measures:
a. Reorient or relocate the receiving antenna.
b. Move this unit.
c. Increase the separation between the equipment
and receiver.
d. Connect the equipment into an outlet on a circuit
different from that to which the receiver is
connected.
e. Be sure that all cables are properly shielded, using
a choke or ferrite where appropriate.
f. Consult the dealer or an experienced
radio/television technician for help.
ESD / EFT Warning: This unit may contain a
microcomputer for signal processing and control
functions. In very rare situations, severe
interference, noise from an external source, or
static electricity may cause it to lock up. In the
unlikely event that this should happen, turn off the
unit, wait at least five seconds, and then turn it
back on again.
THIS DEVICE COMPLIES WITH PART 15 OF THE
FCC RULES. OPERATION IS SUBJECT TO THE
FOLLOWING TWO CONDITIONS: (1) THIS DEVICE
MAY NOT CAUSE HARMFUL INTERFERENCE, AND
(2) THIS DEVICE MUST ACCEPT ANY
INTERFERENCE RECEIVED, INCLUDING
INTERFERENCE THAT MAY CAUSE UNDESIRED
OPERATION.
FCC RF Radiation Exposure Statement: This equipment
complies with FCC radiation exposure limits set forth for
an uncontrolled environment. End users must follow the
specific operating instructions for satisfying RF exposure
compliance. This transmitter must not be co-located or
operating in conjunction with any other antenna or
transmitter.
RSS Statement for Canadian models: This device
complies with Industry Canada licence-exempt RSS
standard(s). Operation is subject to the following two
conditions: (1) this device may not cause interference, and
(2) this device must accept any interference, including
interference that may cause undesired operation of the
device.
In an environment with radio frequency
interference, the unit may malfunction and resume
normal operation after removal of the interference.
For best audio quality, avoid using this device in a
high RF-radiated environment.
Correct Disposal of This Product: This marking
indicates that this product should not be disposed
with other household wastes throughout the EU.
To prevent possible harm to the environment or
human health from uncontrolled waste disposal,
recycle it responsibly to promote the sustainable
reuse of material resources. To return your used
device, please use the return and collection
systems or contact the retailer where the product
was purchased. They can take this product for
environmentally safe recycling.
Smart Badge contains magnets, which may affect
the operation of pacemakers, defibrillators and
other internal or external medical devices.
Individuals who wear these types of electronics
should consult their physician and the
manufacturer of their medical device to determine
its susceptibility to magnets prior to using Smart
Badge. Smart Badge users should also exercise
caution and maintain a safe distance from other
individuals with such medical devices.
ION Audio is a trademark of ION Audio, LLC,
registered in the U.S. and other countries.
The Bluetooth word mark and logos are registered
trademarks owned by Bluetooth SIG, Inc. and any
use of such marks by ION Audio is under license.
All other product names, company names,
trademarks, or trade names are those of their
respective owners.
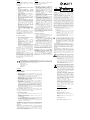
ON OFF
1
2
4
5
6
7
3
-
 1
1
-
 2
2


in altre lingue
- English: iON Smart Badge Quick start guide
- français: iON Smart Badge Guide de démarrage rapide
- español: iON Smart Badge Guía de inicio rápido
- Deutsch: iON Smart Badge Schnellstartanleitung
- Nederlands: iON Smart Badge Snelstartgids
Documenti correlati
Altri documenti
-
Tivoli Audio Music System Home Gen 2 Manuale del proprietario
-
-
Naim Uniti Nova Manuale del proprietario
-
Naim Uniti Star Manuale del proprietario
-
Naim Uniti Atom Manuale del proprietario
-
Samsung SM-T505 Manuale utente
-
Samsung SM-M205FN/DS Manuale utente
-
-
Tivoli Audio Music System Home Generation 2 Manuale del proprietario
-