
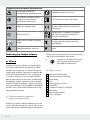
DEKO-SOLARLEUCHTE
/ DECORATIVE SOLAR
LIGHT / LAMPE SOLAIRE DÉCORATIVE
DEK O-SOLARLEUCHTE
Montage-, Bedienungs- und Sicherheitshinweise
DECORATIVE SOLAR LIGHT
Assembly, operating and safety instructions
LAMPE SOLAIRE DÉCORATIVE
Instructions de montage, d‘utilisation et consignes de sécurité
DECORATIEVE SOLARLAMP
Montage-, bedienings- en veiligheidsinstructies
DEKORATIVNÍ SOLÁRNÍ LED SVÍTIDLO
Pokyny k montáži, obsluze a bezpečnostní pokyny
DEKORACYJNA LAMPA SOLARNA
Wskazówki montażu, obsługi i bezpieczeństwa
IAN 383372_2107
DEKORATÍVNE SOLÁRNE SVIETIDLO
Pokyny pre montáž, obsluhu a bezpečnostné pokyny
LÁMPARA SOLAR DECORATIVA
Instrucciones de montaje, de uso y de seguridad
OKRASNA SOLARNA SVETILKA
Navodila za montažo, uporabo in varnostna navodila
NAPELEMES DEKORLÁMPA
Szerelési, használati és biztonsági tudnivalók
SOLCELLELAMPE
Monterings-, betjenings- og sikkerhedshenvisninger
LAMPADA DECORATIVA A ENERGIA SOLARE
Istruzioni di montaggio, d’uso e di sicurezza

Klappen Sie vor dem Lesen die Seite mit den Abbildungen aus und machen Sie sich anschließend mit allen Funktionen des Gerätes
vertraut.
Before reading, unfold the page containing the illustrations and familiarise yourself with all functions of the device.
Avant de lire le mode d‘emploi, ouvrez la page contenant les illustrations et familiarisez-vous ensuite avec toutes les fonctions de l‘appareil.
Vouw vóór het lezen de pagina met de afbeeldingen open en maak u vertrouwd met alle functies van het apparaat.
Przed przeczytaniem proszę rozłożyć stronę z ilustracjami, a następnie proszę zapoznać się z wszystkimi funkcjami urządzenia.
Před čtením si otevřete stranu s obrázky a potom se seznamte se všemi funkcemi přístroje.
Pred čítaním si odklopte stranu s obrázkami a potom sa oboznámte so všetkými funkciami prístroja.
Antes de empezar a leer abra la página que contiene las imágenes y, en seguida, familiarícese con todas las funciones del dispositivo.
Før du læser, vend siden med billeder frem og bliv bekendt med alle apparatets funktioner.
Prima di leggere aprire la pagina con le immagini e prendere confidenza con le diverse funzioni dell’apparecchio.
Olvasás előtt kattintson az ábrát tartalmazó oldalra és végezetül ismerje meg a készülék mindegyik funkcióját.
Pred branjem odprite stran s slikami in se nato seznanite z vsemi funkcijami naprave.
DE / AT / CH Montage-, Bedienungs- und Sicherheitshinweise Seite 5
GB / IE Assembly, operating and safety instructions Page 13
FR / BE Instructions de montage, d‘utilisation et consignes de sécurité Page 19
NL / BE Montage-, bedienings- en veiligheidsinstructies Pagina 27
PL Wskazówki montażu, obsługi i bezpieczeństwa Strona 35
CZ Pokyny k montáži, obsluze a bezpečnostní pokyny Strana 43
SK Pokyny pre montáž, obsluhu a bezpečnostné pokyny Strana 49
ES Instrucciones de montaje, de uso y de seguridad Página 57
DK Monterings-, betjenings- og sikkerhedshenvisninger Side 65
IT Istruzioni di montaggio, d’uso e di sicurezza Pagina 71
HU Szerelési, használati és biztonsági tudnivalók Oldal 79
SI Navodila za montažo, uporabo in varnostna navodila Stran 87

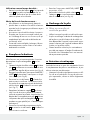
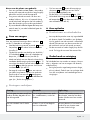
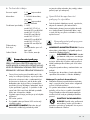
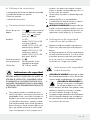
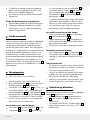
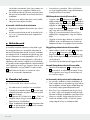
A
5
4
3
1
2
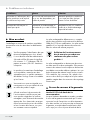
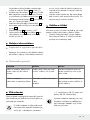
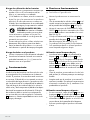
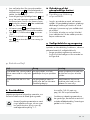
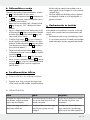
B6
2 7
10
10
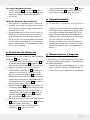
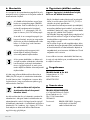
C
2
9
8
10
2


5 DE/AT/CH
Legende der verwendeten Piktogramme ........................................................... Seite 6
Einleitung ......................................................................................................................................... Seite 6
Bestimmungsgemäße Verwendung ....................................................................................................Seite 6
Teilebeschreibung ...............................................................................................................................Seite 6
Lieferumfang ........................................................................................................................................ Seite 6
Technische Daten ................................................................................................................................Seite 7
Sicherheitshinweise ................................................................................................................Seite 7
Produktspezifische Sicherheitshinweise .............................................................................................Seite 7
Sicherheitshinweise für Akkus ............................................................................................................. Seite 7
Funktionsweise ..........................................................................................................................Seite 8
Inbetriebnahme ......................................................................................................................... Seite 8
Produkt montieren ...............................................................................................................................Seite 8
Akku austauschen ...................................................................................................................Seite 9
Akku aufladen ............................................................................................................................ Seite 9
Produkt ein- und ausschalten ..............................................................................................................Seite 9
Wartung und Reinigung .....................................................................................................Seite 9
Fehler beheben ...................................................................................................................................Seite 9
Entsorgung .....................................................................................................................................Seite 10
Abwicklung im Gewährleistungsfall .......................................................................Seite 10
lnverkehrbringer ...................................................................................................................... Seite 10
Serviceadresse ...........................................................................................................................Seite 11
V5.0

6 DE/AT/CH
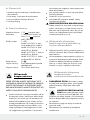
Legende der verwendeten Piktogramme
Warn- und Sicherheitshinweise
beachten!
Schutzhandschuhe tragen!
Dieses Produkt ist nicht zur
Raumbeleuchtung im Haushalt
geeignet. inkl. Ni-MH-Akku (Typ AAA)
Gleichstrom / -spannung Produkt entspricht den produktspezifisch
geltenden europäischen Richtlinien.
Schutzklasse III
b
a
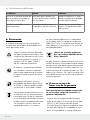
Entsorgen Sie Verpackung und Produkt
umweltgerecht!
IP44 (spritzwassergeschützt) Umweltschäden durch falsche Entsorgung
der Batterien/Akkus!
Vorsicht! Explosionsgefahr! Volt
Deko-Solarleuchte
Einleitung
Wir beglückwünschen Sie zum Kauf Ihres neuen
Produkts. Sie haben sich damit für ein hochwertiges
Produkt entschieden. Die Bedienungsanleitung ist
Teil dieses Produkts. Sie enthält wichtige Hinweise
für Sicherheit, Gebrauch und Entsorgung. Machen
Sie sich vor der Benutzung des Produkts mit allen
Bedien- und Sicherheitshinweisen vertraut. Benutzen
Sie das Produkt nur wie beschrieben und für die
angegebenen Einsatzbereiche. Händigen Sie alle
Unterlagen bei Weitergabe des Produkts an Dritte
mit aus.
Bestimmungsgemäße
Verwendung
Das Produkt dient als Dekoleuchte für den Außen-
bereich. Die eingebaute Solarzelle und der Akku
ermöglichen einen vom Stromnetz unabhängigen
Betrieb. Das Produkt ist nicht für den gewerblichen
Einsatz oder für andere Einsatzbereiche bestimmt.
Dieses Produkt ist nicht zur Raumbe-
leuchtung im Haushalt geeignet.
Teilebeschreibung
1 Aufhänger
2 Solarzellengehäuse
3 Lampenschirm
4 Stab
5 Erdspieß
6 LED
7 EIN- / AUS-Schalter
8 Akku
9 Akkufach
10 Befestigungsschrauben
Lieferumfang
1 Solarzellengehäuse mit eingebautem Akku
1 Lampenschirm mit Aufhänger
1 Stab mit Erdspieß
1 Bedienungsanleitung

7 DE/AT/CH
Technische Daten
Betriebsspannung: 1,2 V (Gleichspannung)
Akku: 1 x Ni-MH-Akku; Typ AAA;
1,2 V (Gleichspannung);
300 mAh
Leuchtmittel: 1 x LED,
Modell 383372-21-A:
rot LED ca. 0,04 W
Modell 383372-21-B:
gelb LED ca. 0,04 W
Modell 383372-21-C:
grün LED ca. 0,06 W
Modell 383372-21-D:
blau LED ca. 0,06 W
Schutzklasse: III /
Schutzart: IP44 (spritzwassergeschützt)
Solarzelle: 30 x 30 mm; amorph
Sicherheitshinweise
VOR GEBRAUCH BITTE DIE BEDIENUNGSAN-
LEITUNG LESEN! BEDIENUNGSANLEITUNG
SORGFÄLTIG AUFBEWAHREN! HÄNDIGEN SIE
ALLE UNTERLAGEN BEI WEITERGABE DES
PRODUKTES AN DRITTE EBENFALLS MIT AUS!
Das Produkt kann von Kindern ab 8 Jahren und
darüber sowie von Personen mit verringerten
physischen, sensorischen oder mentalen Fähig-
keiten oder Mangel an Erfahrung und Wissen
benutzt werden, wenn sie beaufsichtigt oder
bezüglich des sicheren Gebrauchs des Produkts
unterwiesen wurden und die daraus resultierenden
Gefahren verstehen. Kinder dürfen nicht mit dem
Produkt spielen. Reinigung und Benutzerwartung
dürfen nicht von Kindern ohne Beaufsichtigung
durchgeführt werden.
Verwenden Sie das Produkt nicht, wenn Sie
irgendwelche Beschädigungen feststellen.
Die LED ist nicht austauschbar.
Sollte die LED am Ende ihrer Lebensdauer aus-
fallen, muss das ganze Produkt ersetzt werden.
VERLETZUNGSGEFAHR! Stellen Sie sicher,
dass, wenn die Leuchte entfernt wird, auch das
Standrohr und der Erdspieß mit entfernt werden,
damit diese keine Gefahr darstellen (z. B.
Stolpern).
Produktspezifische
Sicherheitshinweise
Schalten Sie das Produkt aus, wenn Sie es in
dunkler Umgebung lagern, um eine Entladung
des Akkus zu vermeiden.
Kalte Temperaturen haben negativen Einfluss
auf die Akku-Betriebsdauer. Wenn Sie das
Produkt längere Zeit nicht benötigen, z. B. im
Winter, so sollte es gereinigt und in einem
trockenen, warmen Raum aufbewahrt werden.
Sicherheitshinweise
für Akkus
LEBENSGEFAHR! Halten Sie Akkus außer
Reichweite von Kindern. Suchen Sie im Falle
eines Verschluckens sofort einen Arzt auf!
EXPLOSIONSGEFAHR! Laden
Sie nicht aufladbare Batterien niemals
wieder auf. Schließen Sie Akkus nicht
kurz und / oder öffnen Sie diese nicht. Überhit-
zung, Brandgefahr oder Platzen können die
Folge sein.
Werfen Sie Akkus niemals in Feuer oder Wasser.
Setzen Sie Akkus keiner mechanischen Belastung
aus.
Benutzen Sie nur Akkus, die in der Spezifikation
den Akkus im Lieferumfang entsprechen.
Risiko des Auslaufens von Akkus
Vermeiden Sie extreme Bedingungen und Tem-
peraturen, die auf Akkus einwirken können z. B.
auf Heizkörpern.
Wenn Akkus ausgelaufen sind, vermeiden Sie
den Kontakt von Haut, Augen und Schleimhäuten
mit den Chemikalien! Spülen Sie die betroffenen
Stellen sofort mit klarem Wasser und suchen
Sie einen Arzt auf!
SCHUTZHANDSCHUHE TRA-
GEN! Ausgelaufene oder beschä-
digte Akkus können bei Berührung

8 DE/AT/CH
mit der Haut Verätzungen verursachen. Tragen
Sie deshalb in diesem Fall geeignete Schutz-
handschuhe.
Im Falle eines Auslaufens der Akkus entfernen
Sie diese sofort aus dem Produkt, um Beschädi-
gungen zu vermeiden.
Entfernen Sie die Akkus, wenn das Produkt
längere Zeit nicht verwendet wird.
Risiko der Beschädigung des Produkts
Verwenden Sie ausschließlich den angegebenen
Akkutyp!
Setzen Sie Akkus gemäß der Polaritätskenn-
zeichnung (+) und (-) an Akku und des Produkts
ein.
Funktionsweise
Die eingebaute Solarzelle des Produkts wandelt
bei Sonneneinstrahlung das Licht in elektrische En-
ergie um und speichert diese in einem Ni-MH-Akku.
Das Produkt wird bei beginnender Dunkelheit ein-
geschaltet. Die eingebaute Leuchtdiode ist ein sehr
langlebiges und energiesparendes Leuchtmittel. Die
Leuchtdauer ist von der Sonneneinstrahlung, dem
Einfallwinkel des Lichts auf die Solarzelle und der
Temperatur (wegen der Temperaturabhängigkeit der
Akkukapazität) abhängig. Ideal ist ein senkrechter
Lichteinfallwinkel bei Temperaturen über dem Gefrier-
punkt. Der Akku 8 erreicht erst nach mehreren
Lade- und Entladezyklen seine maximale Kapazität.
Inbetriebnahme
Produkt montieren
Montieren Sie das Produkt gemäß Abbildung A.
Drehen Sie das Solarzellengehäuse 2 gegen
den Uhrzeigersinn aus dem Lampenschirm 3
(siehe Abb. A).
Bewegen Sie den EIN- / AUS-Schalter 7 in
die mit „ON“ markierte Position, damit sich
das Produkt bei Dunkelheit einschalten kann
(siehe Abb. B).
Setzen Sie das Solarzellengehäuse 2 in den
Lampenschirm 3 ein und drehen Sie es im
Uhrzeigersinn fest (siehe Abb. A).
Ihr Produkt ist nun betriebsbereit. Sie müssen nun
entscheiden, ob Sie das Produkt als Hänge-
leuchte oder als Stehleuchte betreiben möchten.
Verwendung als Stehleuchte:
Stecken Sie den Stab 4 in den Lampenschirm
3 und stecken Sie den Erdspieß 5 auf den
Stab 4 (siehe Abb. A). Beachten Sie, dass
der Erdspieß 5 bei Auslieferung mit der Spitze
in den Stab 4 gesteckt ist. Entfernen Sie ggf.
den Aufhänger 1 vom Lampenschirm 3, in-
dem Sie die Bügel des Aufhängers leicht nach
außen biegen.
Stecken Sie das montierte Produkt so weit in
den Boden (Rasen, Blumenbeet), dass es stabil
steht.
Achten Sie auf einen sicheren Stand. Wenden
Sie bei der Montage bzw. beim Aufstellen keine
Gewalt an, z. B. durch Hammerschläge. Dies
beschädigt das Produkt.
Verwendung als Hängeleuchte:
Ziehen Sie ggf. den Stab 4 mitsamt Erdspieß
5 aus dem Lampenschirm 3.
Befestigen Sie den Aufhänger 1 am Lampen-
schirm, indem Sie die Enden des Aufhängers in
die Aufnahmeöffnungen des Lampenschirms
stecken.
Das Produkt kann nun mithilfe des Bügels auf-
gehängt werden.
Verwendung als Tischleuchte:
Entfernen Sie den Aufhänger 1 und Erdspieß
5 vom Produkt und stellen Sie dieses auf einen
Tisch. Achten Sie dabei darauf, dass die Ober-
fläche des Tisches eben und waagerecht ist.
Auswahl des Betriebsortes:
Um ein optimales Ergebnis zu erzielen, stellen
Sie das Produkt an einem Ort auf, an dem die
Solarzelle möglichst lange direktem Sonnen-
licht ausgesetzt ist.
Stellen Sie sicher, dass die Solarzelle nicht von
einer anderen Lichtquelle, wie z. B. Hof- oder

9 DE/AT/CH
Straßenbeleuchtung, beeinflusst wird, da sich
das Licht sonst in der Dämmerung nicht ein-
schaltet.
Bei niedriger Helligkeit schaltet sich das Licht
automatisch ein, bei normaler Umgebungs-
helligkeit schaltet sich das Licht wieder aus.
Akku austauschen
Um eine optimale Leistung zu erzielen, sollte der
Akku 8 alle 12 Monate ausgetauscht werden.
Trennen Sie das Solarzellengehäuse 2 vom
Lampenschirm 3, indem Sie es gegen den
Uhrzeigersinn drehen (siehe Abb. A).
Schalten Sie das Produkt mit dem EIN- / AUS-
Schalter 7 aus, indem Sie den Schalter auf
die Position „OFF“ schieben (siehe Abb. B).
Lösen Sie mittels eines kleinen Kreuzschlitz-
schraubendrehers die Befestigungsschrauben
10 . Hebeln Sie anschließend den Akkufachde-
ckel des Solarzellengehäuses 2 mittels eines
Schlitzschrauben drehers auf (siehe Abb. C).
Ersetzen Sie den alten Akku 8 durch einen
neuen. Achten Sie beim Einsetzen auf die richtige
Polarität. Diese wird im Akkufach 9 angezeigt.
Verwenden Sie nur Akkus 8 des empfohlenen
Typs (siehe „Technische Daten“).
Schließen Sie das Akkufach 9, ziehen Sie die
Befestigungsschrauben 10 mittels eines kleinen
Kreuzschlitzschraubendrehers an.
Schieben Sie den EIN- / AUS-Schalter 7 auf
die Position „ON“.
Verbinden Sie das Solarzellengehäuse 2 mit
dem Lampenschirm 3, indem Sie es im Uhr-
zeigersinn fest drehen (siehe Abb. A).
Akku aufladen
Produkt ein- und ausschalten
Achten Sie darauf, dass das Produkt eingeschaltet
sein muss, wenn der Akku lädt. Die Ladedauer
der Akkus bei Nutzung der Solarzelle ist abhängig
von der Lichtintensität der Sonnenstrahlung und
dem Einfallwinkel des Lichts auf die Solarzelle.
Stellen Sie die Solarzelle möglichst senkrecht
zum Lichteinfallwinkel auf. So erhalten Sie die
höchste Strahlungsintensität.
Wartung und Reinigung
Die Leuchtdiode ist nicht austauschbar. Das Produkt
ist bis auf einen erforderlichen Akkuwechsel war-
tungsfrei.
Reinigen Sie das Produkt regelmäßig mit einem
trockenen, fusselfreien Tuch. Verwenden Sie bei
stärkeren Verschmutzungen ein leicht ange-
feuchtetes Tuch.
Fehler beheben
Fehler Ursache Lösung
Das Licht schaltet sich nicht ein,
obwohl das Produkt den ganzen
Tag von der Sonne angestrahlt
wurde.
Künstliche Lichtquellen, wie z. B.
Straßenlichter, stören das Produkt. Montieren Sie das Produkt an
einer Stelle, an d
er es nicht von
andere
n Lichtquellen gestört
werden kann.
Das Licht schaltet sich nicht oder
nur kurz ein. Der Akku ist kaputt oder das
Tageslicht hat nicht ausgereicht. Tauschen Sie den Akku aus, oder
montieren Sie das Produkt an
einer Stelle, an der sie mehr
Sonnenlicht erhält.

10 DE/AT/CH
Entsorgung
Die Verpackung besteht aus umweltfreundlichen
Materialien, die Sie über die örtlichen Recycling-
stellen entsorgen können.
b
a
Beachten Sie die Kennzeichnung der
Verpackungsmaterialien bei der Abfall-
trennung, diese sind gekennzeichnet mit
Abkürzungen (a) und Nummern (b) mit
folgender Bedeutung: 1–7: Kunststoffe /
20–22: Papier und Pappe / 80–98:
Verbundstoffe.
Das Produkt und die Verpackungs-
materialien sind recycelbar, entsorgen
Sie diese getrennt für eine bessere Ab-
fallbehandlung. Das Triman-Logo gilt nur
für Frankreich.
Möglichkeiten zur Entsorgung des aus-
gedienten Produkts erfahren Sie bei Ihrer
Gemeinde- oder Stadtverwaltung.
Werfen Sie Ihr Produkt, wenn es ausge-
dient hat, im Interesse des Umweltschutzes
nicht in den Hausmüll, sondern führen
Sie es einer fachgerechten Entsorgung zu.
Über Sammelstellen und deren Öffnungs-
zeiten können Sie sich bei Ihrer zuständi-
gen Verwaltung informieren.
Defekte oder verbrauchte Akkus müssen gemäß
Richtlinie 2006/66/EG und deren Änderungen
recycelt werden. Geben Sie Akkus und / oder das
Produkt über die angebotenen Sammeleinrichtungen
zurück.
Umweltschäden durch falsche
Entsorgung der Akkus!
Akkus dürfen nicht über den Hausmüll entsorgt
werden. Sie können giftige Schwermetalle enthalten
und unterliegen der Sondermüllbehandlung. Die
chemischen Symbole der Schwermetalle sind wie
folgt: Cd = Cadmium, Hg = Quecksilber, Pb = Blei.
Geben Sie deshalb verbrauchte Akkus bei einer
kommunalen Sammelstelle ab.
Abwicklung im
Gewährleistungsfall
Um eine schnelle Bearbeitung Ihres Anlie-
gen zu gewähr leisten, folgen Sie bitte
den folgenden Hinweisen:
- Bitte halten Sie für alle Anfragen den Kassenbon
und die Artikelnummer (IAN 383372_2107) als
Nachweis für den Kauf bereit.
- Die Artikelnummer entnehmen Sie bitte dem Typen-
schild am Produkt, einer Gravur am Produkt, dem
Titelblatt Ihrer Anleitung (unten links) oder dem
Aufkleber auf der Rück- oder Unterseite des
Produktes.
- Sollten Funktionsfehler oder sonstige Mängel auf-
treten, kontaktieren Sie zunächst die nachfolgend
benannte Serviceabteilung telefonisch oder per
E-Mail.
- Ein als defekt erfasstes Produkt können Sie dann
unter Beifügung des Kaufbelegs (Kassenbon) und
der Angabe, worin der Mangel besteht und wann
er aufgetreten ist, für Sie portofrei an die Ihnen
mitgeteilte Service-Anschrift übersenden.
Auf www.lidl-service.com können Sie diese und
viele weitere Handbücher, Produktvideos und
Installationssoftware herunterladen.
lnverkehrbringer
TRADIX GmbH & Co. KG
Schwanheimer Str. 132
64625 Bensheim
DEUTSCHLAND

11 DE/AT/CH
Serviceadresse
TRADIX SERVICE-CENTER
c/o Teknihall Elektronik GmbH
Assar-Gabrielsson-Str. 11-13
DE-63128 Dietzenbach
GERMANY
Hotline: 00800 30012001 (kostenfrei, Mobilfunk
abweichend)
E-Mail: [email protected]
E-Mail: [email protected]
E-Mail: [email protected]
Tradix Art.-Nr.: 383372-21-A / B / C / D
08 / 2021

12

13 GB/IE
List of pictograms used ........................................................................................................ Page 14
Introduction ................................................................................................................................... Page 14
Intended use ........................................................................................................................................ Page 14
Parts description ..................................................................................................................................Page 14
Scope of delivery ................................................................................................................................Page 14
Technical data ..................................................................................................................................... Page 15
Safety notices ..............................................................................................................................Page 15
Product-specific safety instructions .....................................................................................................Page 15
Safety instructions for rechargeable batteries ................................................................................... Page 15
Functioning .....................................................................................................................................Page 16
Start-up .............................................................................................................................................Page 16
Mounting the product .........................................................................................................................Page 16
Replacing the rechargeable battery ........................................................................ Page 16
Charge rechargeable battery ........................................................................................ Page 17
Switching the product on and off .......................................................................................................Page 17
Maintenance and cleaning ............................................................................................... Page 17
Troubleshooting ...................................................................................................................................Page 17
Disposal ............................................................................................................................................Page 17
Processing in the event of a warranty claim ....................................................Page 18
Distributor .......................................................................................................................................Page 18
Service address ..........................................................................................................................Page 18

14 GB/IE
List of pictograms used
Observe the warnings and safety
notes! Wear safety gloves!
This product is not suitable as
residential room lighting. incl. Ni-MH rechargeable battery (type
AAA)
Direct current / voltage Product meets the applicable European
product-specific directives
Protection class III
b
a
Dispose of the packaging and device in
an environmentally friendly manner!
IP44 (splash-proof) Improper disposal of rechargeable batteries
may result in environmental damage!
Danger of explosion! Volt
Decorative solar light
Introduction
We congratulate you on the purchase of your new
product. You have chosen a high quality product.
The instructions for use are part of the product. They
contain important information concerning safety,
use and disposal. Before using the product, please
familiarise yourself with all of the safety information
and instructions for use. Only use the product as
described and for the specified applications. If you
pass the product on to anyone else, please ensure
that you also pass on all the documentation with it.
Intended use
The product is intended as a decoration lamp for
outdoor use. The integrated solar cell and the re-
chargeable battery allow usage independent from
the electricity grid. The product is not intended for
commercial use or for use in other applications.
Not suitable for household room illu-
mination.
Parts description
1 Hanger
2 Solar cell housing
3 Lamp shade
4 Rod
5 Ground stake
6 LED
7 ON / OFF switch
8 Rechargeable battery
9 Battery compartment
10 Fixing screws
Scope of delivery
1 Solar cell housing with integrated rechargeable
battery
1 Lamp shade with hanger
1 Rod with ground spike
1 Set of instructions for use

15 GB/IE
Technical data
Operating voltage: 1.2 V (direct current)
Rechargeable battery: 1 x Ni-MH rechargeable
battery; Type AAA;
1.2 V (direct current);
300 mAh
Illuminant: 1 x LED,
Model 383372-21-A: red
LED about 0.04 W
Model 383372-21-B: yellow
LED about 0.04 W
Model 383372-21-C:
green LED about 0.06 W
Model 383372-21-D: blue
LED about 0.06 W
Protection class: III /
Protection type: IP44 (splash-proof)
Solar cell: 30 x 30 mm; amorph
Safety notices
PLEASE READ THE INSTRUCTIONS FOR USE
PRIOR TO USE! PLEASE KEEP THE INSTRUC-
TIONS IN A SAFE PLACE! IF PASSING THIS
PRODUCT ON TO A THIRD PARTY, INCLUDE
ALL DOCUMENTS!
This product may be used by children age
8 years and above, as well as by persons with
reduced physical, sensory or mental capacities,
or lacking experience and/or knowledge, so
long as they are supervised or instructed in the
safe usage of the product and understand the
associated risks. Children should not be allowed
to play with the product. Cleaning and user
maintenance should not be performed by
children without supervision.
Do not use the product if you detect any kind
of damage.
The LED is not replaceable.
If the LED fails at the end of its life, the entire
product must be replaced.
RISK OF INJURY! Make sure that when the
lamp is removed, the pole and ground spike
are also removed so they cannot pose any risk
(e.g. stumbling over them).
Product-specific
safety instructions
Turn the product off when storing in a dark
environment to prevent discharge of the re-
chargeable battery.
Cold temperatures have a negative influence
on the operating life of the rechargeable batteries.
If the product is not used for an extended period
of time, e.g. during winter, it should be cleaned
and stored in a dry, warm room.
Safety instructions for
rechargeable batteries
DANGER TO LIFE! Keep the rechargeable
batteries out of the reach of children. Seek
immediate medical attention if swallowed!
EXPLOSION HAZARD! Never
recharge disposable batteries. Never
short-circuit and / or open recharge-
able batteries. This could cause batteries to
overheat, catch fire or explode.
Never throw batteries into fire or water.
Do not exert mechanical strain on batteries.
Only use rechargeable batteries that comply
with the specification of the rechargeable
batteries included in the scope of delivery.
Risk of rechargeable battery leakage
Avoid extreme conditions and temperatures
which may impact batteries, e.g. on radiators.
If rechargeable batteries have leaked, avoid
contact between skin, eyes and mucous mem-
branes and the chemicals! Flush the affected
areas immediately with clean water and seek
medical attention!
WEAR SAFETY GLOVES! Re-
chargeable batteries that have leaked
or become damaged can cause burns
upon contact with the skin. Therefore wear suitable
protective gloves in this case.

16 GB/IE
In the event of a battery leak, remove the re-
chargeable batteries from the product immedi-
ately to prevent damage.
Remove the rechargeable batteries if the product
will not be used for an extended period.
Risk of product damage
Only use the battery type specified!
Insert the rechargeable batteries according to
the polarity marking (+) and (-) on the recharge-
able battery and the product.
Functioning
The integrated solar cell of the product converts so-
lar radiation into electrical energy and stores it in the
Ni-MH rechargeable battery. The product switches
on as it begins to get dark. The integrated LED is an
energy-saving illuminant with a very long life. The
light duration depends on the amount of sunlight, the
angle of light on the solar panel and the temperature
(the rechargeable battery capacity is temperature-
dependent). A vertical angle of light at temperatures
above the freezing point is ideal. The rechargeable
battery 8 will only achieve its maximum capacity
after several charging and discharging cycles.
Start-up
Mounting the product
Install the product in accordance with figure A.
Rotate the solar cell housing 2 counter-clock-
wise out of the lamp shade 3 (see fig. A).
To switch on, set the ON / OFF switch 7 to the
“ON“ position, so the product turns on during
darkness (see fig. B).
Insert the solar cell housing 2 into the lamp
shade 3 and tighten by turning clockwise
(see fig. A).
Your product is now ready for use. You must
now decide whether you want to use your
product as a hanging lamp or a floor lamp.
Usage as a floor lamp:
Insert the rod 4 into the lamp shade 3 and
insert the ground stake 5 into the rod 4 (see
fig. A). At delivery, take note of whether the
ground stake 5 is inserted into the rod 4
with the spike. Remove, if necessary, the hanger
1 from the lamp shade 3, by slightly bending
the handle outwards.
Insert the assembled product far enough into
the ground (lawn, flower bed) for it to be stable.
Make sure it is firmly placed. Do not use any
force when assembling or setting up the product,
e.g. hammer blows. This will damage the product.
Usage as a hanging lamp:
Pull, if necessary, the rod 4 including the
ground stake 5 out of the lamp shade 3.
Attach the hanger 1 to the lamp shade by
inserting the endings of the hanger into the
admittance slots of the lamp shade.
The product can now be hung using the handle.
Tabletop use:
Remove the hanger 1 and ground spike 5
from the product and place the product on a
table. When doing so, make sure that the sur-
face of the table is flat and level.
Choice of location:
In order to achieve the best result, set the product
up in a place where the solar cell will get direct
sunlight for as long as possible.
Make sure the solar cell is not impacted by other
light sources, e.g. yard or street lightening, or
the light will not switch on at dawn.
In low light the light will automatically switch on,
and automatically switch off in normal ambient
light.
Replacing the rechargeable
battery
The rechargeable battery 8 should be replaced
every 12 months to ensure optimum performance.
Rotate the solar cell housing 2 anticlockwise
out of the lamp shade 3 (see fig. A).

17 GB/IE
Switch the product off by pushing the ON / OFF
switch 7 to the “OFF“ position (see fig. B).
Remove the fixing screws 10 using a small
cross-tip screwdriver. Subsequently open the
battery compartment cover of the solar cell
housing 2 using a tip screwdriver (see fig. C).
Replace the old rechargeable battery 8 with
a new one. Be sure to insert the rechargeable
battery in the correct direction. This is shown
inside the battery compartment 9. Use only
rechargeable batteries 8 of the recommended
type (see “Technical data“).
Close the battery compartment 9 and pull
tight the fixing screws 10 using a small cross-tip
screwdriver.
Slide the ON / OFF switch 7 into the “ON“
position.
Connect the solar cell housing 2 to the lamp
shade 3 by turning the housing clockwise to
tighten it (see fig. A).
Charge rechargeable battery
Switching the product on and off
Note that the product must be switched on
when the rechargeable battery is charging. The
rechargeable battery charging period using
the solar cell depends on the intensity of the
sunlight and the angle incidence of the light on
the solar cell.
Place the solar cell as perpendicular as possible
to the angle of incidence of the light. In this
way you will receive the highest light levels.
Maintenance and cleaning
The LED cannot be replaced. The product is mainte-
nance-free, except for any necessary change of
battery.
Clean the product regularly with a dry, non-
fluffing cloth. Use a slightly moist cloth to
remove any stubborn dirt.
Troubleshooting
Fault Cause Solution
The light will not switch on even
though the sun shone on the
product all day.
Artificial sources of light, e.g.
street lighting, interfere with the
product.
Mount the product in a place
where it cannot be disturbed by
other sources of light.
T
he light does not c
ome on or
comes on only briefly.
The rechargeable battery is bro-
ken or there was not enough day-
light.
Replace the rechargeable battery
or mount the product in a place
where it can receive more sun-
light.
Disposal
The packaging is made entirely of recyclable mate-
rials, which you may dispose of at local recycling
facilities.
b
a
Observe the marking of the packaging
materials for waste separation, which
are marked with abbreviations (a) and
numbers (b) with following meaning:
1–7: plastics / 20–22: paper and fibre-
board / 80–98: composite materials.

18 GB/IE
The product and packaging materials
are recyclable, dispose of it separately
for better waste treatment. The Triman
logo is valid in France only.
Contact your local refuse disposal author-
ity for more details of how to dispose of
your worn-out product.
To help protect the environment, please
dispose of the product properly when it
has reached the end of its useful life and
not in the household waste. Information
on collection points and their opening
hours can be obtained from your local
authority.
Defective or used rechargeable batteries must be
recycled according to Directive 2006/66/EC and
its amendments. Return rechargeable batteries and /
or the product to the recycling facilities provided.
Improper disposal of rechargeable
batteries may result in environ-
mental damage!
Rechargeable batteries may not be disposed of
with household waste. They may contain toxic heavy
metals and are subject to hazardous waste regula-
tions. The chemical symbols of the heavy metals are:
Cd = cadmium, Hg = mercury, Pb = lead. Therefore
dispose of used rechargeable batteries through a
local collection point.
Processing in the event of a
warranty claim
Please follow the instructions below to
ensure your claim is processed quickly:
- Please have your receipt and the item number
(IAN 383372_2107) ready as your proof of
purchase when enquiring about your product.
- The item number can be found on the type plate
on the product, the cover page of your instructions
(bottom left) or the decal at the back or bottom of
the product.
- In the event of faulty operation or other defects,
please first contact the service department speci-
fied below by phone or e-mail .
- You can send a product, which has first been reg-
istered as defective, postage free to the address
given to you by the service department, enclosing
the purchase slip (receipt) and written details of
the fault and the date it occurred.
Download this and many other manuals, product
videos and installation software from
www.lidl-service.com.
Distributor
TRADIX GmbH & Co. KG
Schwanheimer Str. 132
64625 Bensheim
GERMANY
Service address
TRADIX SERVICE-CENTER
c/o Teknihall Elektronik GmbH
Assar-Gabrielsson-Str. 11-13
DE-63128 Dietzenbach
GERMANY
Hotline: 00800 30012001 (free of charge, mobile
networks vary)
E-Mail: [email protected]
E-Mail: [email protected]
Tradix item no.: 383372-21-A / B / C / D
08 / 2021

19 FR/BE
Légende des pictogrammes utilisés .......................................................................... Page 20
Introduction ................................................................................................................................... Page 20
Utilisation conforme ............................................................................................................................Page 20
Descriptif des pièces ...........................................................................................................................Page 20
Contenu de la livraison .......................................................................................................................Page 21
Caractéristiques techniques ................................................................................................................Page 21
Indications de sécurité .........................................................................................................Page 21
Instructions de sécurité spécifiques au produit .................................................................................. Page 21
Consignes de sécurité pour les piles rechargeables ........................................................................Page 21
Fonctionnement .........................................................................................................................Page 22
Mise en service ...........................................................................................................................Page 22
Montage du produit ...........................................................................................................................Page 22
Remplacer la batterie ...........................................................................................................Page 23
Recharge de la pile .................................................................................................................Page 23
Mise en marche et arrêt du produit ...................................................................................................Page 23
Entretien et nettoyage..........................................................................................................Page 23
Problèmes et solutions .........................................................................................................................Page 24
Mise au rebut ............................................................................................................................... Page 24
En cas de recours à la garantie .....................................................................................Page 24
Responsable de la mise sur le marché ...................................................................Page 26
Adresse du service après-vente ................................................................................... Page 26

20 FR/BE
Légende des pictogrammes utilisés
Respecter les avertissements et les
consignes de sécurité! Porter des gants de protection!
Ce produit ne peut pas servir
d’éclairage de pièce dans un foyer
domestique.
incl. pile rechargeable Ni-MH (type
AAA)
Courant continu / Tension continue Le produit répond aux directives euro-
péennes appliquées spécifiquement pour
ce type de produit
Classe de protection III
b
a
Mettez l’emballage et l’appareil au rebut
dans le respect de l’environnement!
IP44 (protégé contre les projections
d’eau)
Pollution de l‘environnement due à une
mise au rebut non conforme des piles
rechargeables !
Risque d’explosion! Volt
Lampe solaire décorative
Introduction
Nous vous félicitons pour l‘achat de votre nouveau
produit. Vous avez opté pour un produit de grande
qualité. Le mode d‘emploi fait partie intégrante de
ce produit. Il contient des indications importantes
pour la sécurité, l’utilisation et la mise au rebut.
Veuillez lire consciencieusement toutes les indica-
tions d‘utilisation et de sécurité du produit. Ce pro-
duit doit uniquement être utilisé conformément aux
instructions et dans les domaines d‘application spé-
cifiés. Lors d‘une cession à tiers, veuillez également
remettre tous les documents.
Utilisation conforme
Le produit est conçu comme lampe de décoration
pour l‘extérieur. La cellule solaire intégrée et la bat-
terie permettent un fonctionnement indépendant de
l‘alimentation en électricité. Le produit n’est pas
destiné à une utilisation commerciale ou autres do-
maines d’utilisation.
Ce produit ne peut pas servir
d‘éclairage de pièce.
Descriptif des pièces
1 Crochet de fixation
2 Boîtier à cellule solaire
3 Abat-jour
4 Tige
5 Piquet
6 LED
7 Interrupteur MARCHE / ARRÊT
8 Batterie
9 Compartiment à pile
10 Vis de fixation
La pagina si sta caricando...
La pagina si sta caricando...
La pagina si sta caricando...
La pagina si sta caricando...
La pagina si sta caricando...
La pagina si sta caricando...
La pagina si sta caricando...
La pagina si sta caricando...
La pagina si sta caricando...
La pagina si sta caricando...
La pagina si sta caricando...
La pagina si sta caricando...
La pagina si sta caricando...
La pagina si sta caricando...
La pagina si sta caricando...
La pagina si sta caricando...
La pagina si sta caricando...
La pagina si sta caricando...
La pagina si sta caricando...
La pagina si sta caricando...
La pagina si sta caricando...
La pagina si sta caricando...
La pagina si sta caricando...
La pagina si sta caricando...
La pagina si sta caricando...
La pagina si sta caricando...
La pagina si sta caricando...
La pagina si sta caricando...
La pagina si sta caricando...
La pagina si sta caricando...
La pagina si sta caricando...
La pagina si sta caricando...
La pagina si sta caricando...
La pagina si sta caricando...
La pagina si sta caricando...
La pagina si sta caricando...
La pagina si sta caricando...
La pagina si sta caricando...
La pagina si sta caricando...
La pagina si sta caricando...
La pagina si sta caricando...
La pagina si sta caricando...
La pagina si sta caricando...
La pagina si sta caricando...
La pagina si sta caricando...
La pagina si sta caricando...
La pagina si sta caricando...
La pagina si sta caricando...
La pagina si sta caricando...
La pagina si sta caricando...
La pagina si sta caricando...
La pagina si sta caricando...
La pagina si sta caricando...
La pagina si sta caricando...
La pagina si sta caricando...
La pagina si sta caricando...
La pagina si sta caricando...
La pagina si sta caricando...
La pagina si sta caricando...
La pagina si sta caricando...
La pagina si sta caricando...
La pagina si sta caricando...
La pagina si sta caricando...
La pagina si sta caricando...
La pagina si sta caricando...
La pagina si sta caricando...
La pagina si sta caricando...
La pagina si sta caricando...
La pagina si sta caricando...
La pagina si sta caricando...
La pagina si sta caricando...
La pagina si sta caricando...
La pagina si sta caricando...
La pagina si sta caricando...
La pagina si sta caricando...
La pagina si sta caricando...
La pagina si sta caricando...
-
 1
1
-
 2
2
-
 3
3
-
 4
4
-
 5
5
-
 6
6
-
 7
7
-
 8
8
-
 9
9
-
 10
10
-
 11
11
-
 12
12
-
 13
13
-
 14
14
-
 15
15
-
 16
16
-
 17
17
-
 18
18
-
 19
19
-
 20
20
-
 21
21
-
 22
22
-
 23
23
-
 24
24
-
 25
25
-
 26
26
-
 27
27
-
 28
28
-
 29
29
-
 30
30
-
 31
31
-
 32
32
-
 33
33
-
 34
34
-
 35
35
-
 36
36
-
 37
37
-
 38
38
-
 39
39
-
 40
40
-
 41
41
-
 42
42
-
 43
43
-
 44
44
-
 45
45
-
 46
46
-
 47
47
-
 48
48
-
 49
49
-
 50
50
-
 51
51
-
 52
52
-
 53
53
-
 54
54
-
 55
55
-
 56
56
-
 57
57
-
 58
58
-
 59
59
-
 60
60
-
 61
61
-
 62
62
-
 63
63
-
 64
64
-
 65
65
-
 66
66
-
 67
67
-
 68
68
-
 69
69
-
 70
70
-
 71
71
-
 72
72
-
 73
73
-
 74
74
-
 75
75
-
 76
76
-
 77
77
-
 78
78
-
 79
79
-
 80
80
-
 81
81
-
 82
82
-
 83
83
-
 84
84
-
 85
85
-
 86
86
-
 87
87
-
 88
88
-
 89
89
-
 90
90
-
 91
91
-
 92
92
-
 93
93
-
 94
94
-
 95
95
-
 96
96
-
 97
97


in altre lingue
- français: LIVARNO 383372 Le manuel du propriétaire
- español: LIVARNO 383372 El manual del propietario
- Deutsch: LIVARNO 383372 Bedienungsanleitung
- Nederlands: LIVARNO 383372 de handleiding
- slovenčina: LIVARNO 383372 Návod na obsluhu
- polski: LIVARNO 383372 Instrukcja obsługi
Documenti correlati
-
LIVARNO 383372 Manuale del proprietario
-
-
-
-
-
-
-
-
-
