AGPtek A19X Manuale del proprietario
- Categoria
- Lettori MP3 / MP4
- Tipo
- Manuale del proprietario

AGPTEK
User Manual
A19 MUSIC PLAYER
English 01
Deutsch 10
Francais 21
Italiano 32
Español 42
日本語 52

CONTENT
English
Important Notice
......................................................................
1
Product Overview
.....................................................................
2
Main Functions
.........................................................................
2
Help and Troubleshooting
........................................................
8
Specifications
............................................................................
9
Deutsch
Wichtige Hinweise
..................................................................
10
Produktübersicht
....................................................................
11
Hauptfunktionen
.....................................................................
12
Hilfe und Fehlerbehebung
......................................................
18
Spezifikationen
.......................................................................
20
Francais
Avis Important
........................................................................
21
Présentation du Produit
.........................................................
22
Fonctions Principales
..............................................................
23
Aide et Dépannage
.................................................................
29
Spécification
............................................................................
31
Italiano
Avviso IMPORTANTE
...............................................................
32
Panoramica del Prodotto
........................................................
33
Funzioni principali
...................................................................
34
Guida e Risoluzione dei Problemi
...........................................
40

Specificazioni
..........................................................................
41
Español
Nota Importante
.....................................................................
42
Descripción del Producto
........................................................
43
Funciones Principales
.............................................................
44
Ayuda y solución de problemas
..............................................
50
Especificacions
........................................................................
51
日本語
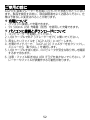
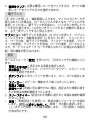
ご使用の前に
....................................................................................
52
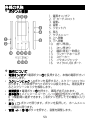
各部の名称
........................................................................................
53
主要な機能
........................................................................................
54
故障かな?と思ったら
....................................................................
60
仕様
....................................................................................................
61
If you have any problems about this product, please feel free
Manufacturer: Shenzhen RuiZu Digital Technology Co., Ltd.
Address: 6/F, Building D, KeShang Mei park, Chongqing Road,
Fuyong, Bao’an District, shenzhen,China.

1
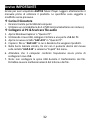
Important Notice
Thank you for purchasing AGPTEK Music Player. Please read the manual
carefully before using the product. Specifications are subject to change
without prior notice.
Charge the Player
• Charge by computer USB port.
•
Use 5V/500mA charger (Charger not included).
Connect to the PC & Download audio files
1. Open the Windows Explorer or "This PC".
2. Using the USB cable, connect the player to a USB port on your PC.
3. Open the new "AGP-A19" folder under "This PC".
4. Copy files to the "AGP-A19" in which you want them to play.
5. In the left sidebar, right-click the "AGP-A19 " folder and select "Eject"
from the menu.
6. Wait until the computer confirms a safe ejection before you unplug the
USB cable.
7. Note: Please do not disconnect the USB plug during file transferring. It
may cause malfunction of the player and the files.

2
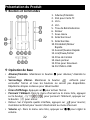
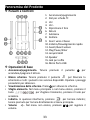
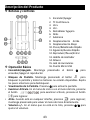
Product Overview
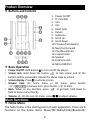
Buttons and Controls
Basic Operation
• Power On/Off. Hold button ➀ to turn on/off the player.
• Screen lock. Hold down the button to lock screen and all the
buttons will be unavailable. Repeat the above steps to unlock.
• Screen display. Press ➀ to activate screen.
• Browse item. On home menu or list menu, press button
/ / / to browse item, press button to enter.
• Back. When on any interface, press to go back; hold down to
back to home menu directly.
• Volume +/-. On the non-list menu, press ➂/➃ to adjust volume.
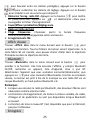
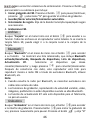
Main Functions
Home Menu
The home menu is the starting point of each application. There are 8
functions on the home menu: Music/FM Radio/Folder/Bluetooth/
1. Power On/Off
2. TF Card Slot
3. Vol +
4. Vol -
5. Reset Hole
6. Return
7. Submenu
8. Scroll Up
9. Scroll Down
10. Previous/Fast Rewind
11. Next/Fast Forward
12. Play/Pause/Enter
13. Lanyard Hold
14. Speaker
15. Earphone Jack
16. Micro USB Port

3
Recorder/Video/E-book/Tools/Settings.
Music
Find “Music” on home menu with button to access to its function. A
related list will show:
• All songs.
• Resume/Now Playing.
• Artists/Albums/Genres.
• Playlists. There are 3 default playlists on the player: Playlist [1]/[2]/[3].
• Update Playlist. Update music files.
• Local Folder/Card Folder. View music file in the local folder or card
folder. Note: These functions only available when memory card
inserted.
Play the music.
While it’s on music playing interface, hold down the button to fast
forward, and press it to skip to next track. Hold down the button to
fast rewind, and press it to play the previous track. Press button to
play/pause.
Back to Home/Play Mode/Sound Settings/Bookmarks/Add to
Playlist/Remove from Playlist/ Delete.
While it’s on music playing interface, tap button to access to the
submenu.
1. Back to Home. Choose to go to home menu.
2. Play Mode.
A. Play music from. Choose to play from All Songs/This
Artist/Album/Genre.
B. Repeat. Choose repeat mode: Repeat Off, Repeat 1, Repeat All.
C. Shuffle. Enable shuffle mode.
D. Repeat Settings.
a. Repeat Mode.
╶ Enter. Press the button to enter.
╶ Set. Press button to confirm the starting time A when A is
flashing. Then press button to set the ending time B when B is
flashing. The passage from time A to B will be repeated automatically.

4
The icon for A-B indication will appear on the screen. Press button
again to back to normal playback.
b. Replay Times. Set the replay times from 1 to 10.
c. Replay Interval. Set the replay gap from 1 to 10 (seconds).
3. Sound Settings. Choose to set Equalizer, Variable Speed Playback and
Volume Limit.
4. Bookmarks. Choose to add bookmark for the song that is playing now,
or go to/delete the bookmark you added.
5. Add to Playlist/Remove from Playlist. Choose to add to or remove from
the 3 existing playlist.
6. Delete. Choose to delete the song that is playing now.
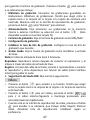
FM Radio
Find “FM Radio” on Home menu with the button to access to its
function. A related list will show:
• Presets. All the saved stations will be listed here.
• Manual tune/Auto tune. When choose “Auto tune”, the searched
stations will be saved in “Presets” automatically.
• FM Recordings. View the radio recording files. You will need to choose
from local folder or card folder if the memory card is inserted. The
radio recordings will also be saved in Recordings> Recordings library.
Start FM Recording/Save/Clear Station/Auto Tune/Tuner Region/FM
Recordings.
While it’s on radio playing interface, press button to switch among
preset stations, press the button / to find tune stations. Press
button to access to its submenu which includes:
1. Start FM Recording. Press button to pause/continue, press
and select “Yes” to save the recording file.
2. Save/Clear station/Auto tune.
3. Tuner Region. Choose from Common/European/Japan Band as needed.
4. FM Recordings.
Folder
Find “Folder” on Home menu with the button to access to its
function. All of the files in the player will be listed. If the Micro SD card is

5
inserted, you can choose to go to Local folder or Card folder.
Bluetooth
Find “Bluetooth” on Home menu with the button to access to its
function. A related list will show, including Bluetooth On/Off, Search for
Devices, Device List, BT Upgrade. Select the device you want to
connect/disconnect, and then press to connect/disconnect. After
successfully connected, this player is ready to play music or FM radio via
Bluetooth headphones, Bluetooth speaker, etc.
Note:
1. When listen to radio by Bluetooth, wired headphones are needed as
radio antenna.
2. Recording,Variable Speed Playback, Video, Pictures, Pedometer
functions are not available when Bluetooth opened.
3. BT Upgrade function is only available for manufacturer, not for user.
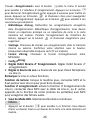
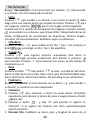
Recorder
Find “Recorder” on home menu with button to access to the
recording interface. Press button to start voice recording, press again
to pause. Press the button and choose “Yes” to save the recording
file. Press button to access to its submenu which includes:
• Recordings Library. Find the saved recordings in
Recordings>Recordings library. You will need to choose from local
folder or card folder if the memory card is inserted. While it’s on
recording playing interface, press button and choose “Delete” to
delete.
• Storage. Choose to store your recordings in internal or external
memory. Confirm your selection with button . (Only available when
TF card inserted)
• Record Format. Choose the record format between MP3/WAV .
• Record Settings.
1. Set rec bitrate. Set the recording bitrate as you need.
2. Record from. Choose the recording source from microphone or Line in.
Note: There are 2 functions after choosing to record from Line in.
Play. Play music after connecting the player and speaker via line in cable.

6
Record. Through the line in cable, connect 2 players or connect the player
and other devices with output function to record the audio.
3. Track AVR mode. Choose normal or track on.
Videos
• Press button to access to its function. You will need to choose
from local folder or card folder if the memory card is inserted.
• Press button to watch videos, press the button / to go to
previous/next video or hold to fast backward/forward.
• When it’s on video playing interface, press button to access to its
submenu, including: Brightness, Repeat, Delete Video, Update Playlist.
Set according to your preference.
Tools
Find “Tools” on Home menu with the button to access to its function.
A related list will show:
• Photos.
Press to access its function. If the TF card is inserted, you need to
choose from a local folder or a card folder. Press to view pictures,
press the / to go to previous/next picture.
When it’s on picture viewing interface, press button to access to its
submenu, including: Brightness, Backlight Timer, Slideshow Settings,
Delete Photos, Update Playlist. Set according to your preference.
• Calendar.
Press the button to switch among year|month|day, press the
button / to choose specific year|month|day.
• Stopwatch
Press to enter, press again to start the timer, then press again to stop
or press to resume. Press to start a new one. The maximum
Stopwatch list is 4.
• Clock.
Press button to enter, a related list will show: Alarm On/off, Alarm
Time, Alarm Cycle (Once/Daily/Work day), Alarm Music, Alarm Volume.
Set according to your preference.
• Pedometer.

7
Find "Pedometer" on Tools with the button to access to its function,
a related list will show:
1. Start.
1) Press to start counting your daily steps. Press it again to stop
counting steps and then press the button to exit it.
2) Press button and choose “Yes” to save the record in “History”. If
the history record is full, it will automatically cover the previous one.
2. Personal Info. Set your height, weight, and step length with button
to confirm.
3. History. All your saved step record will be listed here, and you can save
up to 7 records.
4. Clear history. You can choose to clear the history record you want or
clear all the history record.
E-book
Press to access its function. If the TF card is inserted, you need to
choose from a local folder or a card folder. While it’s on text playing
interface, press button / to turn the pages. Press the button to
play automatically, press again to stop.
Submenu. While it ’s on text playing interface, press button M to enter its
submenu and set your preference, including Autoplay Settings (2s-30s),
Font Size, Page Color, Delete E-book, Select Bookmark, Delete Bookmark,
Add Bookmark, Select Page, Local Folder and Card Folder (Only available
when TF card inserted).
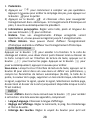
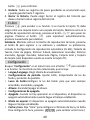
Settings
Find “Settings” on Home menu with the button to access to its
function. A related list will show, including:
• Language/Language. Choose display language.
• Display Settings. Set Brightness, Backlight timer and Screensaver.
• Button Light. Set the button light to be always on, on and off.
• Speaker. Turn On/Off the Speaker.
• Shutdown Settings.
1. Power Off. When there is no operation on the device, the device will
shut off automatically when reaches the set time.

8
2. Sleep Timer. The device will shut down automatically when reaches
the set time.
• Date and Time. Choose “Time” to set time format and date. To set
time, press / to switch among hour | minute; Press button
/ to adjust the value of hour | minute. Set date under “Date
Settings > Set Date” and adjust the date like “Time Settings”.
• Information. Check the information and disk space about your player.
• Format device/Factory settings. Format the device or restore to
factory default settings. Note: Before formatting the device, please
backup the file so as not to lose any files.
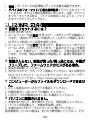
Help and Troubleshooting
How to reset the language?
There are two ways to reset the language as shown below.
1. Find (Settings) in the home menu and confirm it by pressing button
. Select the first (upper) option and press button to confirm.
Scroll down and select the language you want to set.
2. Find (Settings) in the home menu, enter and scroll down to the last
menu. Press button to enter and choose the first (upper) option
which means "Yes" with button to confirm and restore to factory
settings. And then the player will power on automatically and then you
can choose language again.
Can’t turn on the player; the screen of player goes
blank/black; the player is crashed or has a firmware bug.
1. Power off the player and try again.
2. Update the firmware. Please contact our customer service or check our
website at https://www.agptek.com/blog to download the firmware.
Can’t download files from computer.
1. Please confirm whether it’s connected properly;
2. Please check whether the storage space of the internal memory is full;
3. Please check whether the USB cable is damaged.
Can’t recognize the player when connected to the
computer via USB cable.
1. Reconnect it.

9
2. Restart the computer and reconnect it.
3. Connect your player to another USB port.
4. Charge the player for about 10 minutes first.
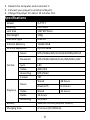
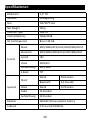
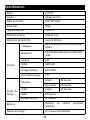
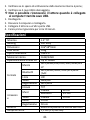
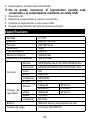
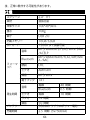
Specifications
Screen
2.4”TFT
Housing
Zinc alloy
Unit Size
106*48*9mm
Net Weight
100g
Interface Type
USB 2.0
Internal Memory
16GB/32GB
SD Card Expansion
Up to 128GB
Format
Music
MP3/WMA/APE/FLAC/WAV/DRM/ACELP
Bluetooth
MP3/WMA/WAVE/FLAC/APE/M4A /AAC
Lyric
LRC
Video
AMV/AVI
Recording
MP3/WAV
E-book
TXT
Playtime
Music
Wired
48 hours
Bluetooth
6.5 hours
Video
Wired
10 hours
Radio
14 hours
Recording
50 hours
Battery
560mAh lithium polymer battery
Charging time
2.5 hours (5V/500mA)

10
Wichtige Hinweise
Vielen Dank, dass Sie sich für den AGPTEK Music Player entschieden
haben. Bitte lesen Sie die Bedienungsanleitung sorgfältig durch, bevor Sie
das Produkt verwenden. Die technischen Daten können ohne vorherige
Ankündigung geändert werden.
Aufladen
• Laden Sie über den USB-Anschluss des Computers auf.
• Verwenden Sie ein 5V/500mA Ladegerät (Ladegerät nicht im
Lieferumfang enthalten).
Verbinden Sie sich mit dem PC und laden Sie
Audiodateien herunter
1. Öffnen Sie den Windows Explorer oder "Dieser PC".
2. Schließen Sie den Player mit dem USB-Kabel an einen USB-Anschluss
Ihres PCs an.
3. Öffnen Sie den neuen Ordner "AGP-A19" unter "Dieser PC".
4. Kopieren Sie die Dateien auf den "AGP-A19", in dem Sie sie abspielen
möchten.
5. Klicken Sie in der linken Seitenleiste mit der rechten Maustaste auf den
Ordner "AGP-A19" und wählen Sie "Auswerfen" aus dem Menü.
6. Warten Sie, bis der Computer einen sicheren Auswurf bestätigt, bevor
Sie das USB-Kabel abziehen.
7. Hinweis: Bitte ziehen Sie den USB-Stecker während der
Dateiübertragung nicht ab. Dies kann zu Fehlfunktionen des Players
und der Dateien führen.

11
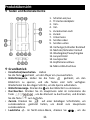
Produktübersicht
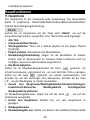
Tasten und Bedienelemente
Grundbetrieb
• Einschalten/Ausschalten. Halten
Sie die Taste ➀ gedrückt , um den Player ein-/auszuschalten.
• Bildschirmsperre. Halten Sie die Taste gedrückt, um den
Bildschirm zu sperren, und alle Tasten sind nicht verfügbar.
Wiederholen Sie die obigen Schritte, um die Sperre aufzuheben.
• Bildschirmanzeige. Drücken Sie ➀ um den Bildschirm zu aktivieren.
• Durchsuchen. Drücken Sie im Hauptmenü oder im Listenmenü die
Taste / / / , um das Element zu durchsuchen, und drücken
Sie die Taste zum Aufrufen.
• Zurück. Drücken Sie auf einer beliebigen Schnittstelle, um
zurückzukehren. gedrückt halten, um direkt zum Hauptmenü
zurückzukehren.
• Lautstärke +/-. Im Nicht-Listen-Menü, drücken Sie ➂/➃ , um die
1. Schalten ein/aus
2. TF-Kartensteckplatz
3. Vol +
4. Vol -
5. Zurücksetzen Loch
6. Zurück
7. Untermenü
8. Scrollen oben
9. Scrollen unten
10. Vorheriger/schneller Rücklauf
11. Nächster/Schneller Vorlauf
12. Wiedergabe/Pause/Eingabe
13. Lanyard Hold
14. Lautsprecher
15. Kopfhöreranschluss
16. Mikro-USB-Anschluss

12
Lautstärke anzupassen.
Hauptfunktionen
Hauptmenü
Das Hauptmenü ist der Startpunkt jeder Anwendung. Das Home-Menü
bietet 8 Funktionen: Musik/UKW-Radio/Ordner/Bluetooth/Aufnahme/
Video/E-Buch/Wergzeug/Einstellung.
Musik
Suchen Sie im Hauptmenü mit der Taste nach "Musik", um auf die
entsprechende Funktion zuzugreifen. Eine Themenliste wird angezeigt:
• Alle Titel.
• Interpreten/Alben/Genres.
• Wiedergabelisten. There are 3 default playlists on the player: Playlist
[1]/[2]/[3].
• Playlist erstellen. Aktualisieren Sie Musikdateien.
• Hauptkatalog/Kartenkatalog. Zeigen Sie die Musikdatei im lokalen
Ordner oder im Kartenordner an. Hinweis: Diese Funktionen sind nur
verfügbar, wenn eine Speicherkarte eingesetzt ist.
Die Musik Abspielen.
Halten Sie im Musikwiedergabemodus die Taste gedrückt, um
schnell vorzuspulen, und drücken Sie , um zum nächsten Titel zu springen.
Halten Sie die Taste gedrückt, um schnell zurückzuspulen, und
drücken Sie, um den vorherigen Titel abzuspielen. Drücken Sie die Taste
, um die Wiedergabe zu starten /anzuhalten.
Zurück zum Hauptmenü/Wiedergabemodus/Soundeinstellungen/
Lesezeichen/Löschen/Zur Wiedergabeliste hinzufügen/Aus
Wiedergabeliste entfernen
Im Musikwiedergabemodus, tippen Sie auf die Taste , um auf das
Untermenü zuzugreifen.
1. Zurück zum Hauptmenü. Wählen Sie, um zum Hauptmenü zu
gelangen.
2. Wiedergabemodus.
A. Musikwiedergebe von. Wähle aus diesem Genre/Album/Interpret/Alle

13
Titel.
B. Wiederholen. Wählen Sie den Wiederholungsmodus: Wiederholen Aus,
Titel Wiederholen, Alles wiederholen.
C. Shuffle. Aktivieren Sie den Shuffle-Modus.
D. Wiederholungseinstellung.
a. Wiederholungsmodus.
╶ Eingeben. Drücken Sie die Taste zum Aufrufen.
╶ Einstellen. Drücken Sie die Taste , um die Startzeit A zu
bestätigen, wenn A blinkt. Drücken Sie dann die Taste , um die
Endzeit B einzustellen, wenn B blinkt. Der Übergang von Zeit A nach B
wird automatisch wiederholt. Das A-B-Anzeigesymbol wird auf dem
Bildschirm angezeigt. Drücken Sie die Taste erneut, um zur
normalen Wiedergabe zurückzukehren.
b. Wiederholungszeit. Stellen Sie die Wiedergabezeiten von 1 bis 10 ein.
c. Wiederholungsintervall. Stellen Sie die Wiederholungslücke zwischen
1 und 10 (Sekunden) ein.
3. Soundeinstellungen. Stellen Sie Equalizer, Variable Schnelligkeit und
Lautstärkebegrenzung ein.
4. Lesezeichen. Wählen Sie, ob Sie ein Lesezeichen für den gerade
wiedergegebenen Titel hinzufügen oder das von Ihnen hinzugefügte
Lesezeichen öffnen/ löschen möchten.
5. Zum Lesezeichen wechseln/Lesezeichen löschen. Wählen Sie, ob Sie
der 3 vorhandenen Wiedergabeliste etwas hinzufügen oder daraus
entfernen möchten.
6. Löschen. Wählen Sie diese Option, um das gerade abgespielte Lied zu
löschen.
UKW Radio
Suchen Sie im Home-Menü mit der Tastenach “UKW-Radio“, um auf seine
Funktion zuzugreifen. Eine Themenliste zeigt:
• Voreinstellung. Alle gespeicherten Sender werden hier aufgelistet.
• Manuelle Einstellung/Autom. Einstellung. Bei Auswahl von
“Automatische Einstellung” werden die gesuchten Sender automatisch
in den “Voreinstellungen” gespeichert.
• UKW-Aufnahme. Zeigen Sie die Radioaufnahmedateien an. Sie müssen

14
einen lokalen Ordner oder einen Kartenordner auswählen, wenn eine
Speicherkarte eingelegt ist. Die Radioaufnahmen werden auch in der
Bibliothek Aufnahmen> Aufnahmen gespeichert.
UKW-Radioaufnahme starten/Speichern/Voreinstellung löschen/
Autom. Einstellung/Bandabstimmung/UKW-Aufnahmen.
Im Radio-Modus, drücken Sie die Taste , um zwischen den
voreingestellten Sendern zu wechseln. Drücken Sie die Taste / um
Sender zu suchen. Drücken Sie die Taste um auf das Untermenü
zuzugreifen, das Folgendes enthält:
1. Starten Sie die UKW-Radioaufnahme. Drücken Sie die Taste , um
die Aufnahme anzuhalten/ fortzusetzen. Drücken Sie und
wählen Sie “Ja”, um die Aufnahmedatei zu speichern.
2. Speichern/Voreinstellung löschen/Autom. Einstellung.
3. Radio Hintergrund.
4. Bandabstimmung. Wählen Sie nach Bedarf aus Common
/European/Japan Band.
5. UKW-Aufnahmen.
Ordner
Suchen Sie im Home-Menü mit der Taste nach “Ordner”, um auf
dessen Funktion zuzugreifen. Alle Dateien im Player werden aufgelistet.
Wenn die Micro-SD-Karte eingelegt ist, können Sie zwischen dem lokalen
Ordner und dem Kartenordner wählen.
Bluetooth
Suchen Sie im Home-Menü mit der Taste nach “Bluetooth”, um auf
dessen Funktion zuzugreifen. Eine Themenliste wird angezeigt,
einschließlich Bluetooth Ein/Aus, Geräte suchen, Geräteliste,
Bluetooth-Upgrade. Wählen Sie das Gerät aus, das Sie verbinden/trennen
möchten, und drücken Sie dann, um die Verbindung herzustellen/zu
trennen. Nach erfolgreicher Verbindung kann dieser Player Musik oder
UKW-Radio über Bluetooth-Kopfhörer, Bluetooth-Lautsprecher usw.
wiedergeben.
Achtung:
1. Wenn Sie über Bluetooth Radio hören, benötigen Sie als Radioantenne

15
einen kabelgebundenen Kopfhörer.
2. Aufnahme, Equalizer, Wiedergabe mit variabler Geschwindigkeit, Video,
Bilder und Schrittzählerfunktionen sind nicht verfügbar, wenn
Bluetooth geöffnet ist.
3.
Bluetooth-Upgrade
-Funktion ist nur für Hersteller verfügbar, nicht
für Benutzer.
Aufnahme
Suchen Sie im Home-Menü nach “Recorder“ mit der Taste , um auf
die Aufnahmeschnittstelle zuzugreifen. Drücken Sie die Taste , um die
Sprachaufnahme zu starten. Drücken Sie erneut, um die Aufnahme
anzuhalten. Drücken Sie die Taste und wählen Sie “Ja”, um die
Aufnahmedatei zu speichern. Drücken Sie die Taste um auf das
Untermenü zuzugreifen, das Folgendes enthält:
• Aufnahmebibliothek. Suchen Sie die gespeicherten Aufzeichnungen
unter Aufzeichnungen> Aufzeichnungsbibliothek. Sie müssen einen
lokalen Ordner oder einen Kartenordner auswählen, wenn eine
Speicherkarte eingelegt ist. Drücken Sie während der Aufnahme die
Taste wählen Sie "Löschen", um die Aufnahme zu löschen.
• Speicher. Wählen Sie diese Option, um Ihre Aufnahmen im internen
oder externen Speicher zu speichern. Bestätigen Sie Ihre Auswahl mit
der Taste . (Nur verfügbar, wenn eine TF-Karte eingelegt ist)
• Aufnahme Format. Wählen Sie das Aufnahmeformat zwischen
MP3/WAV .
• Aufnahme-Einstellungen.
1. Rec-Bitrate einstellen. Stellen Sie die Aufnahme-Bitrate nach Bedarf
ein.
2. Aufnahme von. Wählen Sie die Aufnahmequelle aus dem Mikrofon
oder Line-In.
Hinweis: Das Line-In-Kabel hat zwei Funktionen.
Abspielen. Spielen Sie Musik ab, nachdem Sie den Player und den
Lautsprecher über ein Line-In-Kabel angeschlossen haben.
Aufzeichnung. Schließen Sie über das Line-In-Kabel 2 Player an oder
verbinden Sie den Player und andere Geräte mit Ausgabefunktion (z. B.
Handy), um das Audio aufzunehmen.

16
3. Track-AVR-Modus. Wählen Sie "Normal" oder "Track on".
Video
• Drücken Sie die Taste um auf die Funktion zuzugreifen. Sie
müssen einen lokalen Ordner oder einen Kartenordner auswählen,
wenn eine Speicherkarte eingelegt ist.
• Drücken Sie die Taste um Videos anzusehen, drücken Sie die Taste
/ um zum vorherigen/nächsten Video zu gelangen, oder halten
Sie die Taste gedrückt, um schnell vorwärts/rückwärts zu spulen.
• Im Video-Wiedergabemodus, drücken Sie die Taste um auf das
Untermenü zuzugreifen, das Folgendes umfasst: Helligkeit,
Wiederholen, Video löschen, Wiedergabeliste aktualisieren. Stellen Sie
nach Ihren Wünschen ein.
Werkzeug
Suchen Sie im Home-Menü mit der Taste nach "Werkzeug", um auf
die entsprechenden Funktionen zuzugreifen. Eine Themenliste zeigt:
• Bilder
Drücken Sie die Taste , um auf die Funktion zuzugreifen. Wenn die
TF-Karte eingelegt ist, müssen Sie aus einem lokalen Ordner oder einem
Kartenordner auswählen. Drücken Sie um Bilder anzuzeigen, und
drücken Sie / um zum vorherigen/nächsten Bild zu wechseln.
Auf der Bildbetrachtungsoberfläche -drücken Sie die Taste um auf das
Untermenü zuzugreifen, einschließlich: Helligkeit,
Hintergrundbeleuchtung (Timer), Diashow-Einstellungen, Bild löschen,
Playlist erstellen. Stellen Sie nach Ihren Wünschen ein.
• Kalender.
Drücken Sie die Taste um zwischen Jahr | Monat | Tag umzuschalten,
und drücken Sie die Taste / um ein bestimmtes Jahr | Monat | Tag
auszuwählen.
• Stoppuhr.
Drücken Sie , drücken Sie erneut, um den Timer zu starten, und
drücken Sie dann erneut, um den Vorgang abzubrechen, oder drücken Sie
um fortzufahren. Drücken Sie um einen neuen zu starten. Die
maximale Stoppuhrliste beträgt 4.

17
• Wecker.
Drücken Sie zum Aufrufen. Eine Themenliste zeigt Folgendes an:
Wecker (ein/ausschalten), Zeiteinstellung, Wiederholung (Einmal/Täglich/
Arbeitstag), Weckermusik, Lautstärke. Stellen Sie nach Ihren Wünschen
ein.
• Schrittzähler.
Suchen Sie im Hauptmenü nach "Schrittzähler" mit die Taster um auf
die entsprechende Funktion zuzugreifen. In einer Themenliste wird
Folgendes angezeigt:
1. Beginnen.
1) Drücken Sie um Ihre täglichen Schritte zu zählen. Drücken Sie
erneut, um die Zählung der Schritte zu beenden, und drücken Sie
dann die Taste, um die Schritte zu beenden.
2) Drücken Sie und wählen Sie "Ja", um den Eintrag in "Verlauf" zu
speichern. Wenn der Verlaufsdatensatz voll ist, wird der vorherige
automatisch abgedeckt.
2. Persönliche Informationen. Stellen Sie Ihre Größe, Ihr Gewicht und
Ihre Schrittlänge mit der Taste zur Bestätigung ein.
3. Geschichte. Alle Ihre gespeicherten Schrittdatensätze werden hier
aufgelistet, und Sie können bis zu 7 Datensätze speichern.
4. Geschichte löschen. Sie können den gewünschten Verlaufsdatensatz
oder den gesamten Verlaufsdatensatz löschen.
E-Buch
Drücken Sie die Taste , um auf die Funktion zuzugreifen. Wenn die
TF-Karte eingelegt ist, müssen Sie aus einem lokalen Ordner oder einem
Kartenordner auswählen. Im Text-Wiedergabemodus drücken Sie die Taste
/ um die Seiten umzublättern. Drücken Sie die Taste um die
Wiedergabe automatisch zu starten. Drücken Sie erneut, um die
Wiedergabe zu stoppen.
Untermenü. Im Textwiedergabemodus drücken Sie die Taste M um das
Untermenü aufzurufen und legen Sie Ihre Präferenz fest, einschließlich
Autoplay-Einstellung (2s-30s), Schriftgröße, Seitenfarbe, E-Buch löschen,
Lesezeichen wählen, Lesezeichen löschen, Lesezeichen hinzufügen,
Seitemzahl wählen, Hauptkatalog und Kartenkatalog (nur verfügbar, wenn
La pagina si sta caricando...
La pagina si sta caricando...
La pagina si sta caricando...
La pagina si sta caricando...
La pagina si sta caricando...
La pagina si sta caricando...
La pagina si sta caricando...
La pagina si sta caricando...
La pagina si sta caricando...
La pagina si sta caricando...
La pagina si sta caricando...
La pagina si sta caricando...
La pagina si sta caricando...
La pagina si sta caricando...
La pagina si sta caricando...
La pagina si sta caricando...
La pagina si sta caricando...
La pagina si sta caricando...
La pagina si sta caricando...
La pagina si sta caricando...
La pagina si sta caricando...
La pagina si sta caricando...
La pagina si sta caricando...
La pagina si sta caricando...
La pagina si sta caricando...
La pagina si sta caricando...
La pagina si sta caricando...
La pagina si sta caricando...
La pagina si sta caricando...
La pagina si sta caricando...
La pagina si sta caricando...
La pagina si sta caricando...
La pagina si sta caricando...
La pagina si sta caricando...
La pagina si sta caricando...
La pagina si sta caricando...
La pagina si sta caricando...
La pagina si sta caricando...
La pagina si sta caricando...
La pagina si sta caricando...
La pagina si sta caricando...
La pagina si sta caricando...
La pagina si sta caricando...
La pagina si sta caricando...
-
 1
1
-
 2
2
-
 3
3
-
 4
4
-
 5
5
-
 6
6
-
 7
7
-
 8
8
-
 9
9
-
 10
10
-
 11
11
-
 12
12
-
 13
13
-
 14
14
-
 15
15
-
 16
16
-
 17
17
-
 18
18
-
 19
19
-
 20
20
-
 21
21
-
 22
22
-
 23
23
-
 24
24
-
 25
25
-
 26
26
-
 27
27
-
 28
28
-
 29
29
-
 30
30
-
 31
31
-
 32
32
-
 33
33
-
 34
34
-
 35
35
-
 36
36
-
 37
37
-
 38
38
-
 39
39
-
 40
40
-
 41
41
-
 42
42
-
 43
43
-
 44
44
-
 45
45
-
 46
46
-
 47
47
-
 48
48
-
 49
49
-
 50
50
-
 51
51
-
 52
52
-
 53
53
-
 54
54
-
 55
55
-
 56
56
-
 57
57
-
 58
58
-
 59
59
-
 60
60
-
 61
61
-
 62
62
-
 63
63
-
 64
64


AGPtek A19X Manuale del proprietario
- Categoria
- Lettori MP3 / MP4
- Tipo
- Manuale del proprietario
in altre lingue
- English: AGPtek A19X Owner's manual
- français: AGPtek A19X Le manuel du propriétaire
- español: AGPtek A19X El manual del propietario
- Deutsch: AGPtek A19X Bedienungsanleitung
- 日本語: AGPtek A19X 取扱説明書
Documenti correlati
-
AGPtek A58 Manuale del proprietario
-
AGPtek K2 Manuale utente
-
-
-
AGPtek G05s Manuale del proprietario
-
-
-
-
-
AGPtek Lecteur Mp3 USB 8Go Manuale utente
Altri documenti
-
Intenso Video Rocker 1.5" Manuale del proprietario
-
Polaroid SL4TF24PR001/SEC Manuale utente
-
-
Yoton YM05 Guida utente
-
Intenso Alarmbox Manuale del proprietario
-
Intenso Video Shooter Manuale del proprietario
-
MPMan MP181BT Manuale del proprietario
-
-
-
Crypto MP1500BT Manuale utente